
Installing from a distribution package
uWSGI is available as a package in several OS/distributions.
Installing from source
To build uWSGI you need Python and a C compiler (gcc and clang are
supported). Depending on the languages you wish to support you will need their
development headers. On a Debian/Ubuntu system you can install them (and the
rest of the infrastructure required to build software) with:
apt-get install build-essential python
And if you want to build a binary with python/wsgi support (as an example)
apt-get install python-dev
On a Fedora/Redhat system you can install them with:
yum groupinstall "Development Tools"
yum install python
For python/wsgi support:
If you have a variant of make available in your system you can simply run
make. If you do not have make (or want to have more control) simply run:
python uwsgiconfig.py --build
You can also use pip to install uWSGI (it will build a binary with python support).
# Install the latest stable release:
pip install uwsgi
# ... or if you want to install the latest LTS (long term support) release,
pip install https://projects.unbit.it/downloads/uwsgi-lts.tar.gz
Or you can use ruby gems (it will build a binary with ruby/rack support).
# Install the latest stable release:
gem install uwsgi
At the end of the build, you will get a report of the enabled features. If
something you require is missing, just add the development headers and rerun
the build. For example to build uWSGI with ssl and perl regexp support you
need libssl-dev and pcre headers.
Alternative build profiles
For historical reasons when you run ‘make’, uWSGI is built with Python as the
only supported language. You can build customized uWSGI servers using build
profiles, located in the buildconf/ directory. You can use a specific
profile with:
python uwsgiconfig.py --build <profile>
Or you can pass it via an environment variable:
UWSGI_PROFILE=lua make
# ... or even ...
UWSGI_PROFILE=gevent pip install uwsgi
Modular builds
This is the approach your distribution should follow, and this is the approach
you MUST follow if you want to build a commercial service over uWSGI (see
below). The vast majority of uWSGI features are available as plugins. Plugins
can be loaded using the –plugin option. If you want to give users the maximum
amount of flexibility allowing them to use only the minimal amount of
resources, just create a modular build. A build profile named “core” is
available.
python uwsgiconfig.py --build core
This will build a uWSGi binary without plugins. This is called the “server
core”. Now you can start building all of the plugins you need. Check the
plugins/ directory in the source distribution for a full list.
python uwsgiconfig.py --plugin plugins/psgi core
python uwsgiconfig.py --plugin plugins/rack core
python uwsgiconfig.py --plugin plugins/python core
python uwsgiconfig.py --plugin plugins/lua core
python uwsgiconfig.py --plugin plugins/corerouter core
python uwsgiconfig.py --plugin plugins/http core
...
Remember to always pass the build profile (‘core’ in this case) as the third
argument.
Installing uWSGI on Windows 10
uWSGI is a fast, secure and flexible application server that can be used to deploy various web applications. Although it is primarily designed for Unix systems, it can also be installed on Windows.
In this tutorial, we will be learning how to install uWSGI on Windows 10.
Prerequisites
- A Windows 10 machine
- Python 3.x installed
- A C compiler (Visual Studio 2015 or above)
- Git command line interface installed
Steps
-
Open Command Prompt as Administrator.
-
Install uWSGI using pip:
pip install uwsgi -
Clone uWSGI repository from Github to any directory:
git clone https://github.com/unbit/uwsgi.git -
Change to the directory where the cloned repository is located.
cd uwsgi -
Build uWSGI using the following command. Replace
python3.x.msiwith the name of the Python installer you have downloaded:uwsgi --build-plugin "plugins/python python3.x msi" -
The command above will generate a file named
_python3.x_msi_plugin.soin theuwsgidirectory. -
Finally, copy the generated
_python3.x_msi_plugin.sofile to thesite-packagesdirectory of your Python installation.copy _python3.x_msi_plugin.so C:\Python3x\Lib\site-packages\uwsgi\Replace
Python3xwith the actual version of Python you have installed. -
Now, open a new Command Prompt window and test the uWSGI installation:
uwsgi --versionIf you see a version number displayed, then uWSGI has been successfully installed on your Windows 10 machine.
Congratulations! You have successfully installed uWSGI on Windows 10. You can now use it to deploy and serve web applications.
If you want to self-host in an easy, hands free way, need an external IP address, or simply want your data in your own hands, give IPv6.rs a try!
Alternatively, for the best virtual desktop, try Shells!
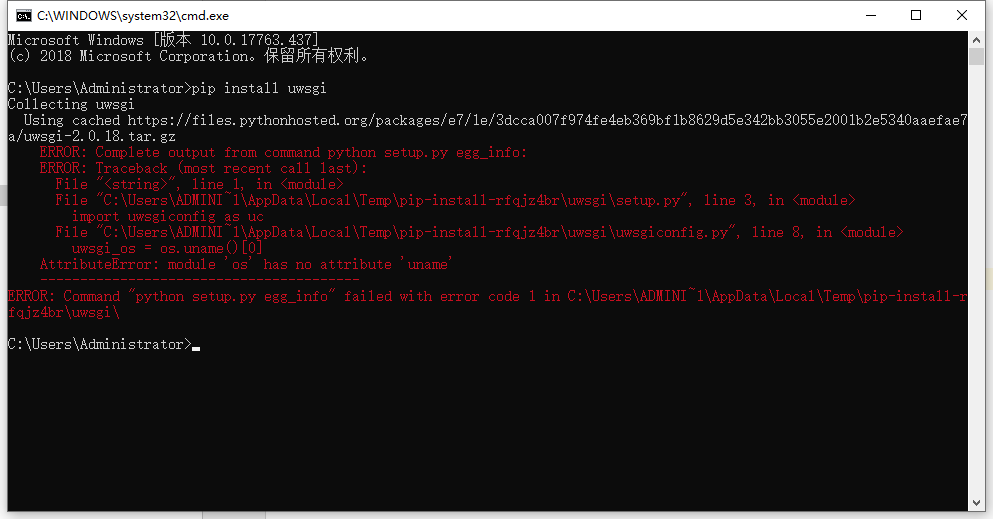
1. Use pip install uwsgi to report an error directly in cmd
Use pip install uwsgi directly in cmd to report an error
AttributeError: module ‘os’ has no attribute ‘uname’
Error description:
is because in uwsgiconfig.py file, os.uname() does not support windows system, platform module supports any system
ERROR: Complete output from command python setup.py egg_info:
ERROR: Traceback (most recent call last):
  File "<string>", line 1, in <module>
  File "C:\Users\ADMINI~1\AppData\Local\Temp\pip-install-9kgm_b8s\uwsgi\setup.py", line 3, in <module>
    import uwsgiconfig as uc
  File "C:\Users\ADMINI~1\AppData\Local\Temp\pip-install-9kgm_b8s\uwsgi\uwsgiconfig.py", line 8, in <module>
    uwsgi_os = os.uname()[0]
AttributeError: module 'os' has no attribute 'uname'
----------------------------------------
ERROR: Command "python setup.py egg_info" failed with error code 1 in C:\Users\ADMINI~1\AppData\Local\Temp\pip-install-9kgm_b8s\uwsgi\
2. Download uwsgi offline package for Anwen
uwsgi offline package:https://pypi.org/project/uWSGI/#files
unzip after downloading,Find the file uwsgiconfig.py
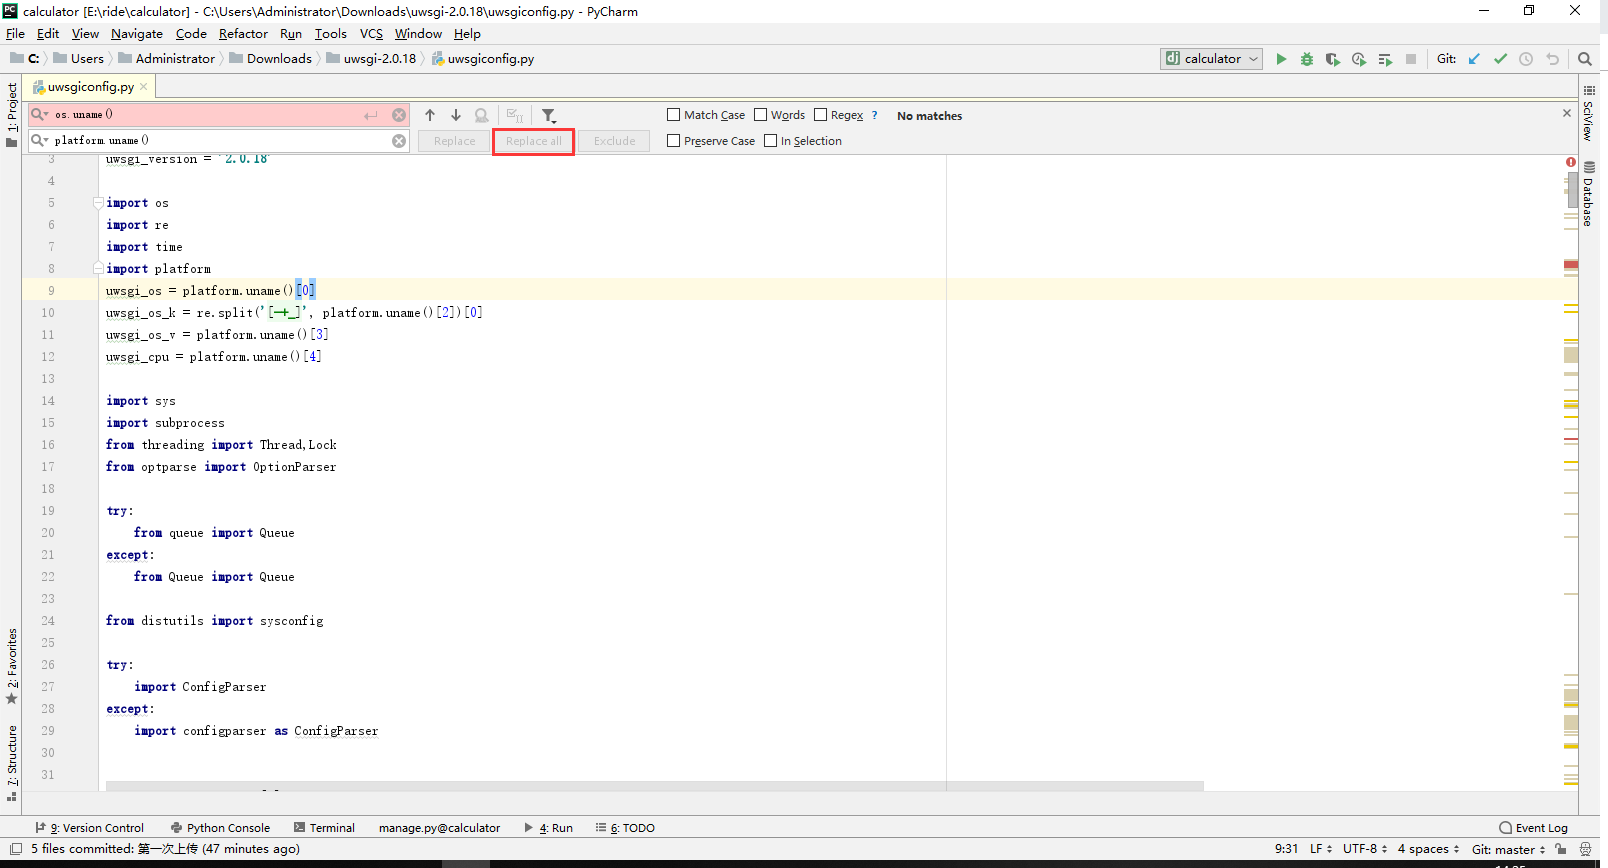
3. Modify uwsgiconfig.py file
Use what tool to modify what you like, but pay attention to all modifications
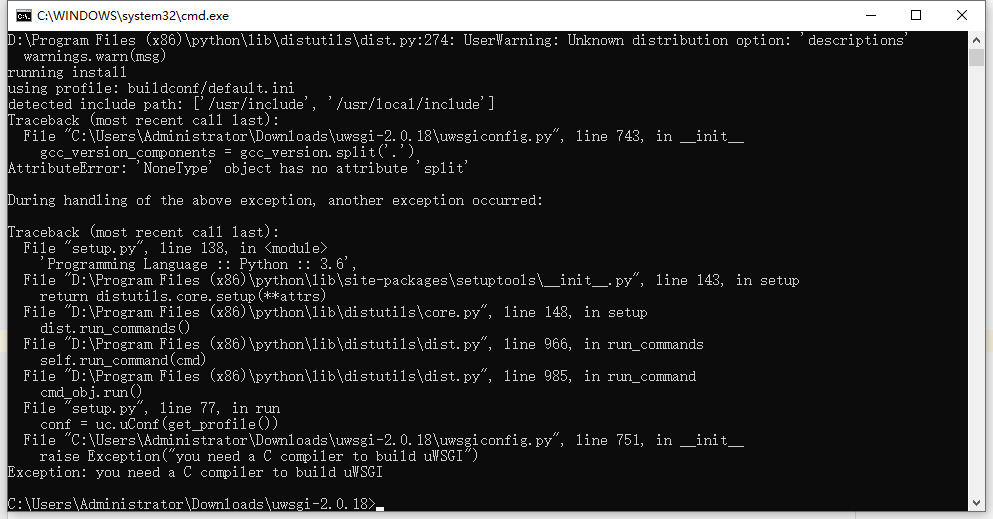
4. Run python after entering the file directorysueup.py install
Found that an error was reported because there was no C language compilation
Exception: you need a C compiler to build uWSGI
5. Download and install MinGW
Check out https://jingyan.baidu.com/article/0320e2c11564ca1b87507b8f.html
6 Run python after entering the file directorysueup.py install
Successful installation
uWSGI is a fast, compiled server suite with extensive configuration
and capabilities beyond a basic server.
-
It can be very performant due to being a compiled program.
-
It is complex to configure beyond the basic application, and has so
many options that it can be difficult for beginners to understand. -
It does not support Windows (but does run on WSL).
-
It requires a compiler to install in some cases.
This page outlines the basics of running uWSGI. Be sure to read its
documentation to understand what features are available.
Installing
uWSGI has multiple ways to install it. The most straightforward is to
install the pyuwsgi package, which provides precompiled wheels for
common platforms. However, it does not provide SSL support, which can be
provided with a reverse proxy instead.
Create a virtualenv, install your application, then install pyuwsgi.
$ cd hello-app
$ python -m venv venv
$ . venv/bin/activate
$ pip install .  # install your application
$ pip install pyuwsgi
If you have a compiler available, you can install the uwsgi package
instead. Or install the pyuwsgi package from sdist instead of wheel.
Either method will include SSL support.
$ pip install uwsgi

# or
$ pip install --no-binary pyuwsgi pyuwsgi
Running
The most basic way to run uWSGI is to tell it to start an HTTP server
and import your application.
$ uwsgi --http 127.0.0.1:8000 --master -p 4 -w hello:app

*** Starting uWSGI 2.0.20 (64bit) on [x] ***
*** Operational MODE: preforking ***
mounting hello:app on /
spawned uWSGI master process (pid: x)
spawned uWSGI worker 1 (pid: x, cores: 1)
spawned uWSGI worker 2 (pid: x, cores: 1)
spawned uWSGI worker 3 (pid: x, cores: 1)
spawned uWSGI worker 4 (pid: x, cores: 1)
spawned uWSGI http 1 (pid: x)
If you’re using the app factory pattern, you’ll need to create a small
Python file to create the app, then point uWSGI at that.
wsgi.py
from hello import create_app

app = create_app()
$ uwsgi --http 127.0.0.1:8000 --master -p 4 -w wsgi:app
The --http option starts an HTTP server at 127.0.0.1 port 8000. The
--master option specifies the standard worker manager. The -p
option starts 4 worker processes; a starting value could be CPU * 2.
The -w option tells uWSGI how to import your application
Binding Externally
uWSGI should not be run as root with the configuration shown in this doc
because it would cause your application code to run as root, which is
not secure. However, this means it will not be possible to bind to port
80 or 443. Instead, a reverse proxy such as nginx or
Apache httpd should be used in front of uWSGI. It is possible to
run uWSGI as root securely, but that is beyond the scope of this doc.
uWSGI has optimized integration with Nginx uWSGI and
Apache mod_proxy_uwsgi, and possibly other servers, instead of using
a standard HTTP proxy. That configuration is beyond the scope of this
doc, see the links for more information.
You can bind to all external IPs on a non-privileged port using the
--http 0.0.0.0:8000 option. Don’t do this when using a reverse proxy
setup, otherwise it will be possible to bypass the proxy.
$ uwsgi --http 0.0.0.0:8000 --master -p 4 -w wsgi:app
0.0.0.0 is not a valid address to navigate to, you’d use a specific
IP address in your browser.
Async with gevent
The default sync worker is appropriate for many use cases. If you need
asynchronous support, uWSGI provides a gevent worker. This is not the
same as Python’s async/await, or the ASGI server spec. You must
actually use gevent in your own code to see any benefit to using the
worker.
When using gevent, greenlet>=1.0 is required, otherwise context locals
such as request will not work as expected. When using PyPy,
PyPy>=7.3.7 is required.
$ uwsgi --http 127.0.0.1:8000 --master --gevent 100 -w wsgi:app

*** Starting uWSGI 2.0.20 (64bit) on [x] ***
*** Operational MODE: async ***
mounting hello:app on /
spawned uWSGI master process (pid: x)
spawned uWSGI worker 1 (pid: x, cores: 100)
spawned uWSGI http 1 (pid: x)
*** running gevent loop engine [addr:x] ***
1. Install using pip
Error: os has no uname()
solve:
Locate the uwsgiconfig.py file, first after import platform, change all os.unam() to platform.uname().
os.uname() does not support windows system. The platform module is to support any system.
2. Download uwsgi offline installation
https://pypi.python.org/pypi/uWSGI/
After decompression, enter the directory
Error: Exception: you need a C compiler to builduWSGI
Solution: Configure the C compilation environment
If there is no C compilation environment on this machine, you need to download a compiler (MinGW/tinycc)
I have codeblocks installed on my computer, so I have installed MinGW, and then configure system variables
path=;MinGW directory/bin
http://jingyan.baidu.com/article/6b97984da0bd8a1ca2b0bf90.html
3. Install again
I thought that the installation was successful, but the result still reported an error. Later, I found out that Windows does not support uwsgi.
reference:
http://lists.unbit.it/pipermail/uwsgi/2011-May/002092.html
http://blog.csdn.net/sunhuaqiang1/article/details/70185022
https://docs.python.org/3/library/os.html?highlight=uname#os.uname
https://stackoverflow.com/questions/32163910/uwsgi-installation-error-in-windows-7