
Last Updated :
27 Nov, 2024
In this article, we will look into the various methods of installing Tkinter on a Windows machine.
Note : For Python 3 tkinter should already be included with your Python installation. However, if it’s not available or you’re encountering issues, you can install or reinstall it using the following steps:
For Windows:
If you don’t have tkinter installed, the easiest way is to reinstall Python from the official website and ensure that the tkinter package is included during installation.
- Download the latest Python version from python.org.
- During installation, ensure the “Tcl/Tk and IDLE” option is selected.
However, if you want to ensure all dependencies are managed via pip (though tkinter is part of the Python standard library in most cases), you can install the tk package using pip.
For PIP Users:
Open up the command prompt and use the below command to install Tkinter:
pip install tk
This installs the Python tk bindings, which is what tkinter depends on. The following message will be displayed once the installation is completed:

To verify the installation use the tk._test() function. Use the below screenshots for reference:
Python
import tkinter
tkinter._test()
Output:
For conda Users:
Conda users can open up the Anaconda Power Shell and use the below command to install Tkinter:
conda install -c anaconda tk
You will get the following message once the installation is completed:

To verify the installation run the below code:
Python
import tkinter
tkinter._test()
Output:
-
Install Tkinter on Windows
-
Install Tkinter on Linux
-
Install Tkinter on Mac Operating System
-
Install Tkinter in Pycharm
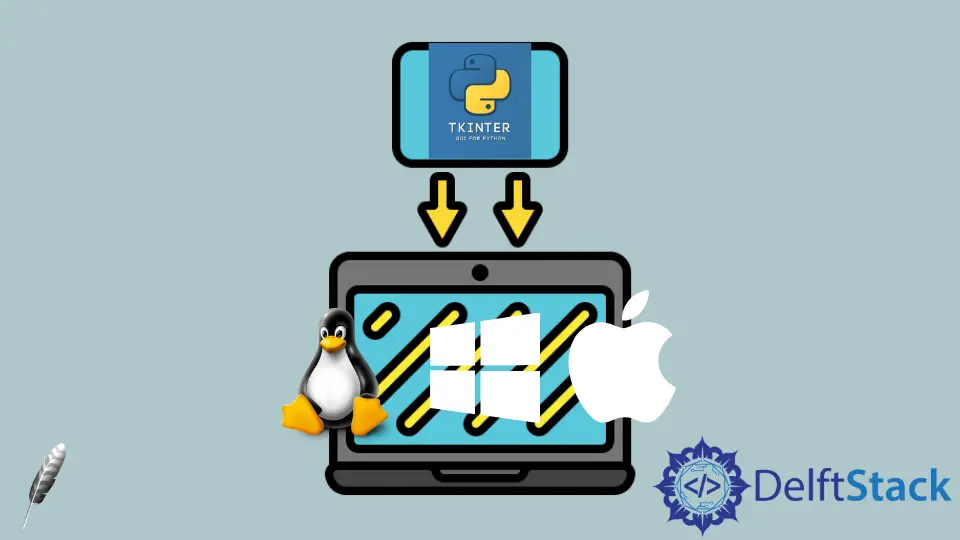
This tutorial will demonstrate how to install Tkinter on multiple platforms. Every platform has individual commands to install Tkinter in Python.
Install Tkinter on Windows
Tkinter offers multiple GUI libraries to develop GUI applications. The Tkinter is one of the popular libraries to build GUI system interfaces.
To install Tkinter, we have to install Python; if it is already installed, we can move on to install Tkinter. When we start the installation of Python, we can check td or tk and IDLE Tkinter during installation.
This way, this Tkinter will come along with Python packages, and we do not need to install it separately. However, if we lose installing Tkinter during the installation of Python, we can do it later using the pip command.
We can confirm the Python version using this command.
python --version
Pip’s version is checked using this command.
pip -V
Now we are ready to install Tkinter.
pip install tk
Now we can use the tkinter library. To confirm the tkinter library is installed, write the code in the shell.
import tkinter
tkinter._test()
If you are an Anaconda user, you can use the following command.
conda install -c anaconda tk
Install Tkinter on Linux
There are different variants of the Linux operating system. This section will learn how to install Tkinter in multiple variants.
Use this command if you’re using a Debian-based Linux operating system.
# python2 user
sudo apt-get install python-tk
# python3 user
sudo apt-get install python3-tk
Use this command if you’re using one of these: RHEL, CentOS, Oracle Linux.
sudo yum install -y tkinter tk-devel
The Fedora-based Linux operating system uses this command.
sudo pacman -S tk
Use this command to confirm the tkinter library is installed successfully.
python -m Tkinter
Install Tkinter on Mac Operating System
There are two ways to install the tkinter library in MacOS. The Mac user will follow these steps.
Run the below command to check that python3 is installed.
python3 --version
Run the below command to check that pip3 is installed.
pip3 --version
If your pip is outdated, please upgrade your pip using the below command.
pip3 install --upgrade pip
We will use pip3 as the first method. Write the following command to install Tkinter.
pip3 install tk
The second method needs a setup.py file to install the Tkinter.
We have to download the latest version of Tkinter in python3 using this command.
curl https://files.pythonhosted.org/packages/a0/81/
742b342fd642e672fbedecde725ba44db44e800dc4c936216c3c6729885a/tk-0.1.0.tar.gz > tk.tar.gz
Write the following command to extract the downloaded package.
tar -xzvf tk.tar.gz
Go to the extracted folder and run this command.
python3 setup.py install
To ensure the tkinter library is installed, run this code in the Python terminal.
import tk
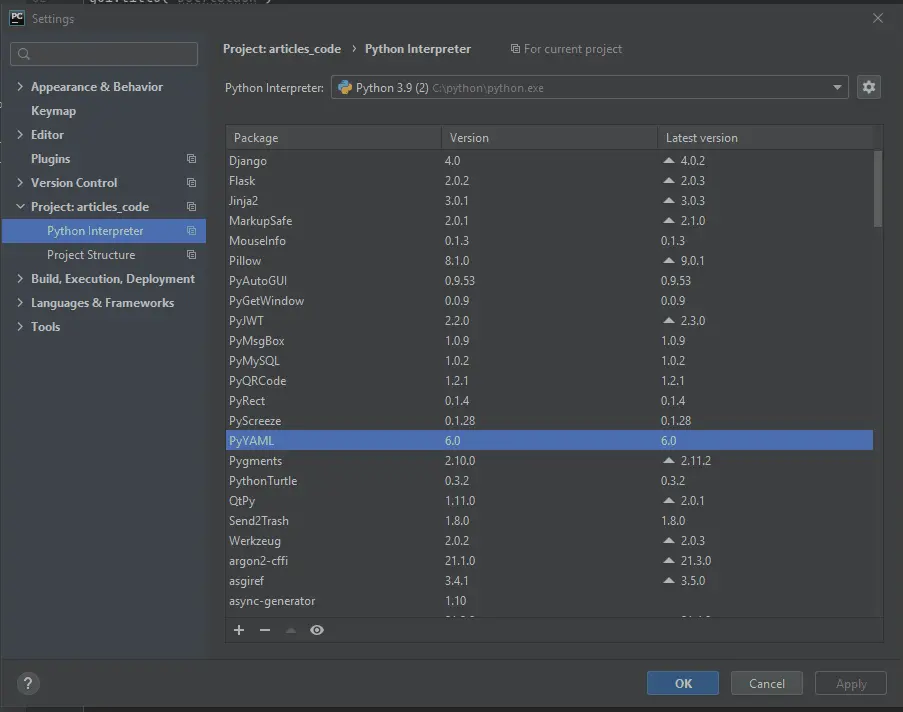
Install Tkinter in Pycharm
The installation process is very simple in Pycharm IDLE. Pycharm IDLE is more convenient for users.
There is an interface to install the tkinter library without running a command.
Go to File>Settings>Project>Python Interpreter and click the + button, search tk, and click the Install Package button. You can select the specific version.
Click here to read more about Tkinter.
Enjoying our tutorials? Subscribe to DelftStack on YouTube to support us in creating more high-quality video guides. Subscribe
Python — один из самых лёгких и популярных языков программирования. С помощью python решается достаточно много проблем — он сможет помочь в почти любой ситуации. Сегодня речь пойдёт о встроенной библиотеке tkinter. С помощью tkinter создаётся уникальный графический интерфейс для приложения на python.
В этой статье:
-
Загрузка
-
Синтаксис
-
Компиляция
Tkinter вы можете скачать на официальном сайте или PyPi.

Загрузка
Для начала работы необходимо загрузить tkinter. Как я уже упоминал выше, он встроенный. Но встроен он начиная с версии Python3.
Загрузка для windows:
pip install tkinter

pip install --update tkinter
либо на всё том же PyPi выбираете tkinter для Windows, macOS или Linux.
Синтаксис
Теперь надо разобраться с синтаксисом tkinter. Сначала импортируем:
from tkinter import *Теперь наша задача — сделать окно приложения. Для этого выберем название приложения (у меня это My App). Запишем
from tkinter import *
#исходный код

if __name__ == '__main__':
  #выполнение кода до загрузки
  root = Tk()
  root.title('My App') #заголовок
  root.mainloop() #отображение окна
пояснение
Сначала мы импортировали tkinter. После него идёт исходный код — виджеты, текст и тд. После if name == ‘main’ в отступах идёт код, который выполняется до загрузки, тоесть первее чем код в начале (не считая импорт). Сам код, который будет дальше, пишите до. .mainloop() отвечает за отображение окна — оно обязательно должно быть в конце кода. Если вы редактируете 2 окна, нужно ставить не в конец, а в начало кода второго окна (да я «очень хорошо» объясняю)
виджеты и текст
Теперь наша задача — ввести текст. Наше окно пока что пустое. Выглядит оно так:
Чтобы добавить и редактировать текст, нужно использовать виджет Label. Давайте попробуем записать
lbl1 = Label(root, text='Привет')
lbl1.grid(column=0, row=0)
Row отвечает за строку, а column за столбец. Правда, у некоторых могут возникнуть проблемы в том, что вторая строка сдвинута. Для этого изменим grid на place
lbl1.place(x=10,y=10)Нужно всего лишь указать место по x и y. Для удобства можете задать отдельный класс для управления переменными
class wid_prm():
  #класс управления переменными
  x     = 10
  y1    = 10
  y2    = 30
  y3    = 50
  x_y_z = 410
  #...

lbl1 = Label(root, text='...')
lbl2 = Label(root, text='...')

#плейсы
lbl1.place(x=x,y=y1)
lbl2.place(x=x,y=y2)
Думаю, тут всё понятно. Местоположение по x нужно использовать одно, если вы хотите использовать один столбец. Думаю, не стоит тратить время, нужно автоматизировать управление переменными x, y
for auto_prm in range(5):
  y1 = 10
  y1 += 20
  y1 -= 10
  y1 -= 10
  if y1 == 30:
    #останавливаем процесс
    y1 = 30
  else:
    y2          = y1 + 20
    y3          = y1 + 40
    y4          = y1 + 60
    y5,y6,y7,y8 = y1 * 2 + (y1 * 4)
    y990 = 4
    if y990 > 1:
      x = 10
    else:
      x = 5
А для чего это? Это для того, чтобы задать переменные автоматически. Просто скопируйте и вставьте эту часть кода в свой код.
Давайте теперь сделаем шрифт жирным в Label
lbl1 = Label(root,text='...',font=("Times New Roman",21,"bold"))Вы, наверное, уже поняли, что за шрифт отвечает функция font. «bold» можете убрать, если вы не хотите жирный шрифт текста. 21 — размер текста в пикселях/мм.
Теперь попробуем использовать виджет Button — добавим кнопку
btn1 = Button(root, text='Не нажимай', command=clicked)
btn1.place(x=x_x,y=y1_y)

def clicked():
  print('Я же сказал...')
При нажатии на кнопку будет писать определённый текст по команде clicked. Вы можете дать любое название и любое содержимое команды.
Получается, что полный код пока-что выглядит так:
from tkinter import * #импорт
#исходный код

class wid_prm():
  #класс управления переменными
  x     = 10
  y1    = 10
  y2    = 30
  y3    = 50
  x_y_z = 410
  for auto_prm in range(5):
    y1 = 10
    y1 += 20
    y1 -= 10
    y1 -= 10
    if y1 == 30:
      #останавливаем процесс
      y1 = 30
    else:
      y2          = y1 + 20
      y3          = y1 + 40
      y4          = y1 + 60
      y5,y6,y7,y8 = y1 * 2 + (y1 * 4)
      y990 = 4
      if y990 > 1:
        x = 10
      else:
        x = 5
class prm_x_y():
  x_x = 10
  y1_y = 50

lbl1 = Label(root, text='...')
btn1 = Label(root, text='Не нажимай', command=clicked)
def clicked():
  print('Я же сказал...')

#плейсы
lbl1.place(x=x,y=y1)
btn1.place(x=x_x,y=y1_y)

if __name__ == '__main__':
  root = Tk()
  root.title('My App')
  root.geometry('400x400')
  root.mainloop()
Отлично получилось.
Виджет messagebox
Виджет messagebox позволяет создать отдельное окно с информацией. Давайте попробуем
from tkinter import *
from tkinter import messagebox

messagebox.showinfo('Заголовок', 'текст')
Это довольно круто для дополнительных виджетов.
Я, наверное, с синтаксисом закончу.
Компиляция
Первым делом нужно установить приложение auto-py-to-exe. Вы его можете установить либо с того же PyPi, либо через командную строку:
pip install auto-py-to-exe

pip install --update auto-py-to-exe
Вы скачаете приложение auto-py-to-exe от python. Вот как оно выглядит:

В script location указываете путь к файлу. Вот небольшой пример:
>Path to file:
>\Users\username\Desktop\file.py
Дальше всё просто. Укажите One File, если не хотите, чтобы файлы приложения засоряли ваш пк. Если хотите скрыть консоль (и оставить только окно tkinter), выберите Window Based.
Загрузите иконку приложения в Icon. И наконец-то нажимаете CONVERT .PY TO .EXE. Думаю, с последующим вы сами справитесь — в консоль будет выводиться всякая всячина, и в итоге вы успешно сконвертируете приложение на tkinter.
В этом посте я рассказал базу синтаксиса tkinter. Да, виджетов в ткинтере в разы больше, я могу их подробно расписать в следующей статье если вы захотите.
Are you scrounging through the web looking for how to install Tkinter on your device? Well, you’re in luck! This simple guide shows step-by-step how to achieve this.
Python has a wide array of frameworks that are used for building GUI (Graphical User Interface) applications. However, the only framework that is included in the Python standard library is Tkinter.
So, since Tkinter is already part of the standard Python library, it typically comes included with installations of Python. However, if you’re yet to install Python or your version of Python doesn’t include Tkinter, don’t worry!
In this guide, we’ll go over how to install Tkinter on Windows, macOS, Linux, and also the visual elements that are included in Tkinter.
So, let’s jump right into it!
Table of Contents
- What is Tkinter and Why Do You Need it?
- Installing Tkinter on Windows
- Installing Tkinter on macOS
- Installing Tkinter on Linux
- Overview of the Widgets Used to Create GUIs
What is Tkinter and Why Do You Need it?
Tkinter is the de-facto Python framework for building GUI applications, and with good reason.
Tkinter is widely used due to the fact that it’s cross-platform, has a native look and feel, and provides a lot of customizability. Additionally, Tkinter has also been praised for being easily understandable thanks to its smaller library size.
While having many advantages, Tkinter also has disadvantages. So, Tkinter has been said to have a UI that isn’t always reliable and it also doesn’t include advanced widgets. However, many people would argue that the advantages outweigh the disadvantages.
Overall, Tkinter is useful for many different people and needs, including those who want to get a working and native-feeling application that runs on multiple operating systems quickly and efficiently.
Now, that we have a basic understanding of what it is, let’s jump right into the steps to install it!
Installing Tkinter on Windows
If you would like to install Tkinter on a Windows machine:
- First, verify if python is installed on your system by opening the Command Prompt and entering python –version.
python --version
If python is installed on your system, the version will be displayed. Else, if you don’t have python installed, you can install it from here.
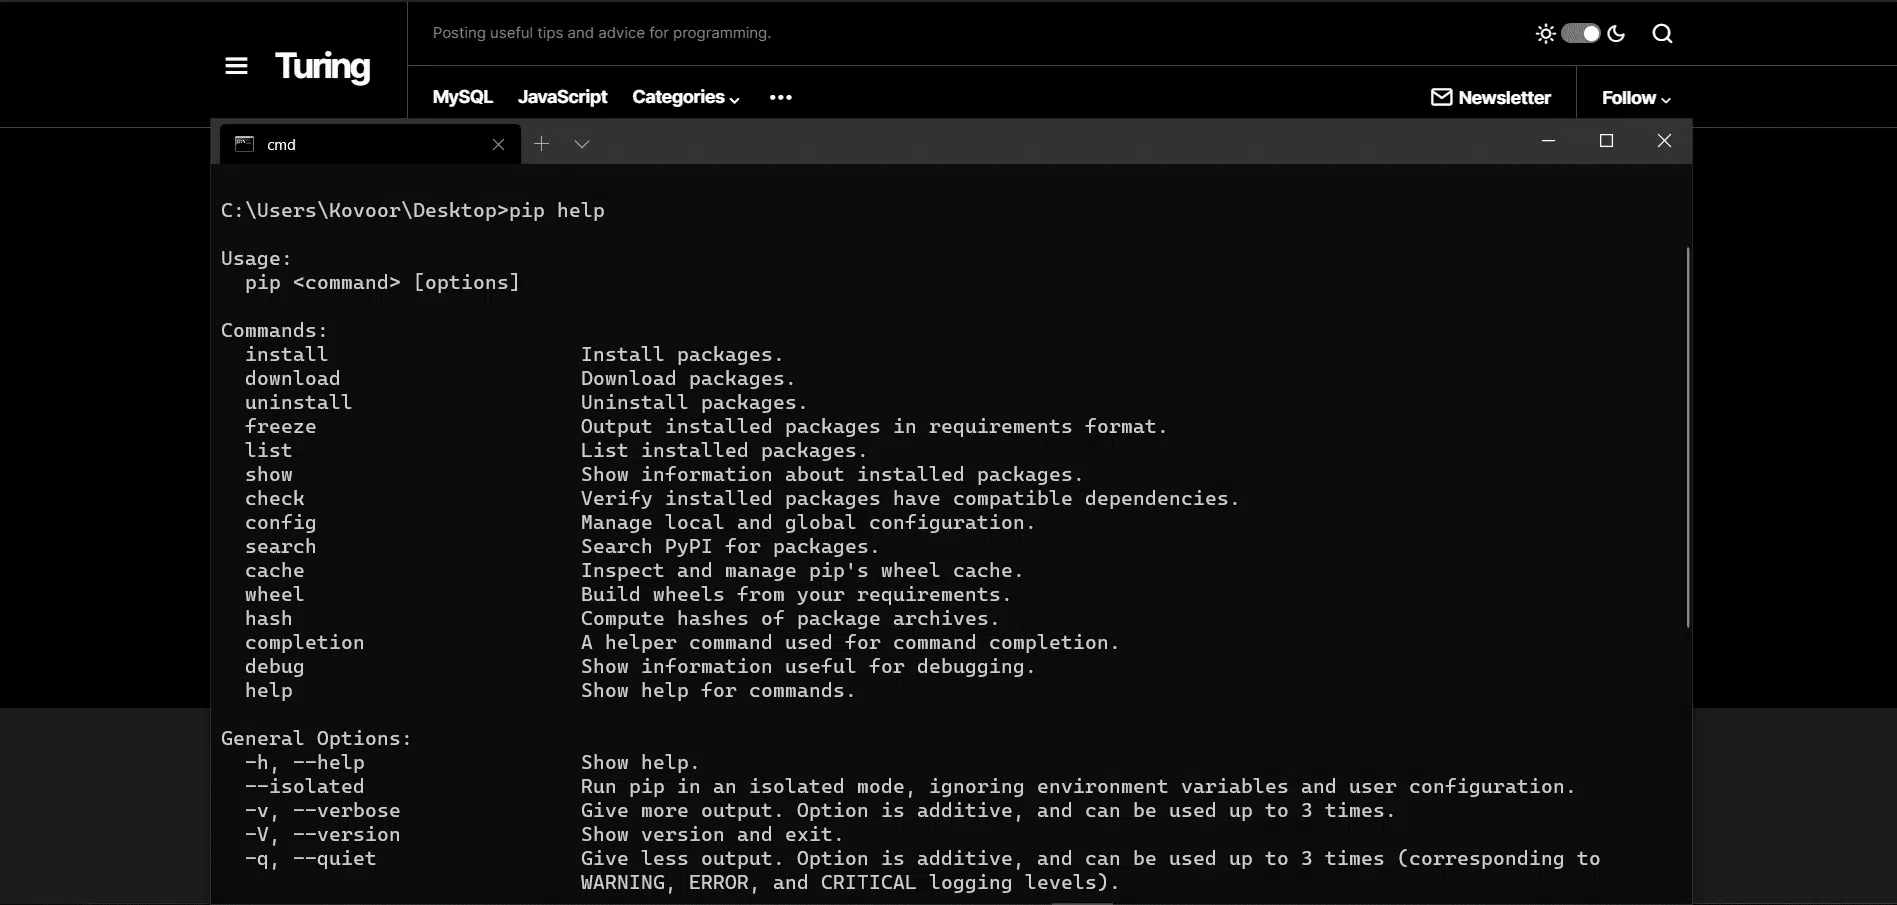
- Next, verify if pip is installed on your system as we will be using pip to install Tkinter. So, enter pip help in the command line.
Again, if pip is installed, the version will be displayed. Else if you don’t have pip installed, you can learn how to install it here.
pip help
- Third, install Tkinter by entering pip install tk in the command line. Once Tkinter has been installed, you will receive a confirmation message that looks like the following:
pip install tk
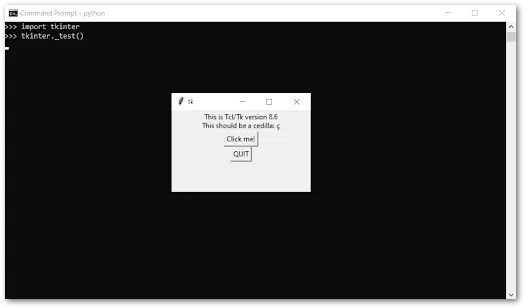
- Lastly, enter import tk in the Python Terminal once Tkinter has been installed to verify if it works. There should be no error message shown once imported. You can also enter tkinter._test() after importing, and a small GUI window should appear that looks like this.
import tk
tkinter._test()
Installing Tkinter on macOS
If you would like to install Tkinter on a macOS machine:
- First, verify if python is installed on your system by opening the Terminal and entering python3 –version.
python3 --version
If python is installed on your system, the version will be displayed. Else, if you don’t have python installed, you can install it from here.
- Second, verify if pip is installed on your system as we will be using pip to install Tkinter. So, enter pip3 –version or pip help in the Terminal.
pip3 --version

pip help
If pip is installed, the version will be displayed. Else, if you don’t have pip installed, learn how to do it here.
- Third, install Tkinter by entering pip install tk in the Terminal. You will receive a confirmation message that looks similar to the one listed in the Windows section once Tkinter has been installed.
pip install tk
- Lastly, enter import tk in the Python Terminal once Tkinter has been installed to verify if it works. There should be no error message shown once imported.
import tk
Installing Tkinter on Linux
- First, verify if python is installed on your system by opening the Linux Terminal and entering python3 –version.
python3 --version
If python is installed on your system, the version will be displayed. Else, if you don’t have python installed, you can install it from here.
- Second, assuming you are using a Debian-based distribution of Linux, install Tkinter by entering sudo apt-get install python-tk in the Linux Terminal.
sudo apt-get install python-tk
- Then, enter your password if prompted and enter “y” to confirm the installation.
- Lastly, enter import tk in the Python Terminal once Tkinter has been installed to verify if it works. There should be no error message shown once imported.
import tk
Widgets are basic elements and they are essential to the creation of GUIs using Tkinter. Without widgets, users wouldn’t be able to interact with and use an application properly.
Therefore, below are a few examples of common widgets used in the Tkinter library:
- Label
-
- A label is a one-line widget used to display text or an image on the screen.
- Frame
-
- A frame is a container widget used to group and organize widgets.
- Button
-
- A button is a widget that may contain text and when clicked, performs an action.
- Entry
-
- An entry is a one-line text field that is used to get input from the user.
- Text
-
- A text is a widget that allows users to input multi-line text.
- Canvas
-
- A canvas widget is used to draw in your GUI. You can create shapes, graphs, and more.
- Checkbutton
-
- A checkbutton widget is a button that is used to execute an on/off choice. A checkbutton is commonly used for customization purposes where users can choose whether they want to turn a setting on or off.
Conclusion
Learning how to develop a GUI application can be a very beneficial skill to add to your skillset.
There are many reasons why someone may want to develop a GUI application. These range from wanting to add on to their programming skills to develop a user-friendly version of their project that previously ran on the command line. The latter can be very helpful when it comes to getting a non-computer savvy person to use an application as navigating through a GUI is far easier than the command line.
That being said, in this article, we looked at how to install Tkinter on Windows, macOS, and Linux machines and verifying that it works. Additionally, we looked at the basic building blocks of GUIs on Tkinter, called widgets.
Having said that, we hope you’ve found this guide helpful when it comes to installing Tkinter and understanding the basics of widgets.
Feel free to share this post with your fellow coders to guide them through installing Tkinter!
Пройдите тест, узнайте какой профессии подходите
Работать самостоятельно и не зависеть от других
Работать в команде и рассчитывать на помощь коллег
Организовывать и контролировать процесс работы
Быстрый ответ
Чтобы приступить к созданию графического интерфейса пользователя (GUI) на Python с применением библиотеки tkinter, выполните следующие действия:
- На Linux/macOS введение в терминале команды:
sudo apt-get install python3-tk - Всем пользователям Windows важно знать, что tkinter уже включен в базовую поставку Python.
Если вспомнить — команды для установки даже не потребовались! Задача решена с усмешкой 😁.
- Если вы используете Virtualenv на любой операционной системе, запомните такую команду:
pip install tk
Воспользуйтесь таким тестовым примером для проверки установки:

Установка tkinter в разных дистрибутивах Linux
Установка tkinter в меру отличается, в зависимости от выбранного вами дистрибутива Linux:
-
Поклонникам Debian и пользователям Ubuntu:
-
Пользователям Fedora:
-
Адептам Arch Linux:
-
Если у вас возникла ошибка no module named _tkinter:
Визуализация
Смело представляйте процесс установки tkinter как процесс сборки конструктора LEGO® для вашего GUI-приложения на Python:
После import tkinter as tk реализуется следующая цепочка: найден недостающий элемент (❓) ➡ он добавляется в арсенал инструментов! 🛠️
И посмотрите на получившийся результат:
Откиньтесь на спинку стула, расслабьтесь и позвольте tkinter творить чудеса GUI! 🪄🐍
Бестормозная установка tkinter: лучшие практики
Чтобы установка tkinter состоялась без проблем, следуйте этому руководству:
- Проверяйте названия пакетов – важно, чтобы вы точно знали, что вводить в командную строку.
- Используйте пакетный менеджер – забудьте о сложностях сборки из исходного кода.
- Следите за соответствием версии Python с версией пакета tkinter.
- После установки выполните тест, чтобы гарантировать работоспособность tkinter.
Использование графического пакетного менеджера Synaptic
Для тех, кто предпочитает графический интуитивно понятный интерфейс, пакетный менеджер Synaptic для систем на базе Debian предлагает удобный способ установки tkinter:
- Используйте функцию поиска для нахождения
python3-tk. - Выберите пакет для установки.
-
Завершите процесс нажатием на кнопку Применить изменения.
Всё просто, безопасно и эффективно.
Распространенные ошибки и методы их решения
Ошибка ModuleNotFoundError
Если вы столкнулись с ошибкой ModuleNotFoundError: No module named '_tkinter', не паникуйте:
- Убедитесь, что версия пакета tkinter соответствует версии Python.
- Попробуйте переустановить пакет, чтобы исправить возможные неполадки.
Ошибка ImportError
Если на экране появляется сообщение ImportError: No module named tkinter, проверьте следующее:
- Убедитесь в правильности написания
import tkinter(только для Python 3). - Внимательно следите за настройкой виртуальных окружений, tk может потребовать установки через
pip install tk.
Отдельная установка: когда это необходимо
Иногда бывает необходимо взяться за установку самостоятельно. Для компиляции и установки tcl/tk из исходных кодов нужно выполнить такие шаги:
- Скачать и использовать исходные коды tcl и tk.
- Следуйте инструкциям в файле README для компиляции.
-
Установите собранные модули с помощью команд:
-
Используйте ключ
--prefix, чтобы задать путь установки.
Множественная установка Tkinter: эффективные методы
При возникновении необходимости установить tkinter на несколько систем пользуйтесь следующими приёмами:
- Автоматизируйте процесс – создавайте скрипты для упрощения задачи.
- Контейнеризация – через Docker упакуйте свою среду, облегчив таким образом развертывание tkinter.
- Используйте системы управления конфигурацией, такие как Ansible, чтобы с легкостью копировать вашу установку tkinter на другие машины.
Полезные материалы
- TkInter – Python Wiki — ваш надежный источник информации о tkinter.
- TkDocs Tutorial — пошаговый путеводитель по созданию GUI в tkinter.
- «Frequent ‘tkinter’ Questions – Stack Overflow — изучайте часто встречающиеся вопросы и набирайтесь опыта.
- Welcome to Python.org — статья Python, посвященная tkinter.
- Программирование GUI на Python с помощью Tkinter – Real Python — подробнеющее руководство с примерами.
- tkinter — Python interface to Tcl/Tk — Python 3.12.2 documentation — официальная документация Python, посвященная tkinter.
- Tkinter GUI Programming by Example | Packt — изучение tkinter через практические примеры и практическое применение.