
Requests is a simple, yet elegant, HTTP library.
>>> import requests
>>> r = requests.get('https://httpbin.org/basic-auth/user/pass', auth=('user', 'pass'))
>>> r.status_code
200
>>> r.headers['content-type']
'application/json; charset=utf8'
>>> r.encoding
'utf-8'
>>> r.text
'{"authenticated": true, ...'
>>> r.json()
{'authenticated': True, ...}
Requests allows you to send HTTP/1.1 requests extremely easily. There’s no need to manually add query strings to your URLs, or to form-encode your PUT & POST data — but nowadays, just use the json method!
Requests is one of the most downloaded Python packages today, pulling in around 30M downloads / week— according to GitHub, Requests is currently depended upon by 1,000,000+ repositories. You may certainly put your trust in this code.
Installing Requests and Supported Versions
Requests is available on PyPI:
$ python -m pip install requests
Requests officially supports Python 3.8+.
Supported Features & Best–Practices
Requests is ready for the demands of building robust and reliable HTTP–speaking applications, for the needs of today.
- Keep-Alive & Connection Pooling
- International Domains and URLs
- Sessions with Cookie Persistence
- Browser-style TLS/SSL Verification
- Basic & Digest Authentication
- Familiar
dict–like Cookies - Automatic Content Decompression and Decoding
- Multi-part File Uploads
- SOCKS Proxy Support
- Connection Timeouts
- Streaming Downloads
- Automatic honoring of
.netrc - Chunked HTTP Requests
API Reference and User Guide available on Read the Docs

Cloning the repository
When cloning the Requests repository, you may need to add the -c fetch.fsck.badTimezone=ignore flag to avoid an error about a bad commit (see
this issue for more background):
git clone -c fetch.fsck.badTimezone=ignore https://github.com/psf/requests.git
You can also apply this setting to your global Git config:
git config --global fetch.fsck.badTimezone ignore
This part of the documentation covers the installation of Requests.
The first step to using any software package is getting it properly installed.
$ python -m pip install requests
To install Requests, simply run this simple command in your terminal of choice:
$ python -m pip install requests
Get the Source Code
Requests is actively developed on GitHub, where the code is
always available.
You can either clone the public repository:
$ git clone https://github.com/psf/requests.git
Or, download the tarball:
$ curl -OL https://github.com/psf/requests/tarball/main
# optionally, zipball is also available (for Windows users).
Once you have a copy of the source, you can embed it in your own Python
package, or install it into your site-packages easily:
$ cd requests
$ python -m pip install .
Last Updated :
09 Dec, 2024
Requests is an elegant and simple HTTP library for Python, built for human beings. One of the most famous libraries for Python is used by developers all over the world. This article revolves around how one can install the requests library of Python in Windows/ Linux/ macOS using pip.
Table of Content
- Install Requests Module in Python in Window
- Install Requests Module in Python in Linux
- Install Requests Module in Python in MacOS
- Alternative Methods
- Troubleshooting Tips
- Install Requests Module in Python – FAQs
Install Requests Module in Python in Window
For installing requests in Windows, you need to Install Python (preferably the latest version) first, follow these simple steps to Install Python on Windows:
Steps to Install Python 3 on Windows
- Download the Installer:
- Visit the official Python website: python.org.
- Go to the Downloads section and click on “Download Python 3.x.x” (the latest version).
- Run the Installer:
- Locate the downloaded installer file (
python-3.x.x.exe) and run it.
- Locate the downloaded installer file (
- Select Installation Options:
- Check the box that says “Add Python to PATH” at the bottom of the installer window.
- Choose “Install Now” for a standard installation or “Customize Installation” to choose specific features and installation location.
- Customize Installation (Optional):
- If you chose “Customize Installation,” select optional features like
pip,tcl/tk, and documentation. - Choose the installation location or accept the default.
- If you chose “Customize Installation,” select optional features like
- Complete the Installation:
- The installer will copy the necessary files and set up Python on your system.
- Once the installation is complete, you can close the installer.
Note: You may also refer to this article to get the in-depth details – How to download and install Python Latest Version on Windows
Now open the command prompt from Windows and run the following command:
python -m pip install requests
Booom..!! Done Now this is how you can install Requests Module using pip.
Install Requests Module in Python in Linux
For installing requests in Linux, you need to Install Python (preferably the latest version) first, follow these simple steps to Install Python on Linux:
Steps to Install Python 3 on Linux
Note: If you want to check if Python is already installed in your system then you may run this command in terminal: python –version (This will display the current running version of Python in your Linux)
- Download the Installer:
- Visit the official Python website: python.org.
- Go to the Downloads section and click on “Download Python 3.x.x” (the latest version).
- Run the Installer:
- Locate the downloaded installer file or use Linux distribution’s package manager.
- Install Python:
- Run the following command to install Python: sudo apt python3
- Verify Python Installation:
- Once the installation is complete, verify it by running this command: python3 –version
Note: Alternatively, you may visit this article to read on Installation Guide:
How to download and install Python Latest Version on Linux
To install pip in linux: How to install PIP in Linux?
Install Requests Module in Python in MacOS
For installing requests in MacOS, you need to Install Python (preferably the latest version) first, follow these simple steps to Install Python on macos:
- Download the Installer:
- Visit the official Python website: python.org.
- Open the downloaded
.pkgfile (e.g.,python-3.x.x-macosx.pkg).
- Run the Installer:
- Locate the downloaded installer file and follow the on-screen instructions.
- Verify Python Installation:
- Once the installation is complete, verify it by running this command: python3 –version
Note: Alternatively, you may visit this article to read on Installation Guide:
Install Python Latest Version on MacOS
To install pip macOS. Run the following command
sudo easy_install pip
sudo pip install --upgrade pip
Now to install requests,
pip install requests
Alternative Methods
The last method for installation of requests on any operating system is to grab the base files and install requests manually and Requests is actively developed on GitHub, where the code is always available. For code –
You can either clone the public repository:
git clone git://github.com/psf/requests.git
Or, download the tarball:
curl -OL https://github.com/psf/requests/tarball/master
# optionally, zipball is also available (for Windows users).
Once you have a copy of the source, you can embed it in your own Python package, or install it into your site-packages easily:
cd requests
pip install .
Troubleshooting Tips
While installing Requests, you might encounter some issues. Here are a few troubleshooting tips for different operating systems:
- pip not recognized (Windows or macOS):
- If you get an error like “
pip: command not found"or “pip is not recognized", make sure Python and pip are added to your PATH environment variable.
- If you get an error like “
- Permission Issues (Linux/macOS):
- If you get a
Permission Deniederror, try running the installation withsudo(Linux/macOS):sudo pip3 install requests
- If you get a
- Outdated pip Version:
- If you’re getting errors about an outdated version of pip, upgrade pip using:
pip install --upgrade pip
- If you’re getting errors about an outdated version of pip, upgrade pip using:
- Version Conflicts (Multiple Python Versions):
- If you have multiple versions of Python, make sure you’re using the correct version of
pip(e.g.,pip3for Python 3).
- If you have multiple versions of Python, make sure you’re using the correct version of
Conclusion
Installing the Requests library in Python is straightforward on Windows, Linux, and macOS. If you’re looking to manage HTTP requests or interact with APIs, the Requests library is an essential tool for your Python projects.
By following the steps outlined in this guide, you can easily set up Requests on any major operating system. Make sure you’re using the latest versions of Python and pip to ensure compatibility with the latest updates to Requests.
Web scraping using Python in Windows was tough. Installing pip in windows and using it to install packages useful for web scraping was the hardest part of all. Fortunately, those days are over. Python 3 now ships with PIP built-in. It can be installed easily in Windows by downloading Python 3 from Python.org. Follow the steps below to setup python 3 on your Windows 10 computer.
Installing Python 3 and PIP on Windows
Here are the steps
-
- Download Python 3 from Python.org. Python 3.6.4 is the latest stable release at the time of writing this article. You can download it here https://www.python.org/downloads/release/python-364/
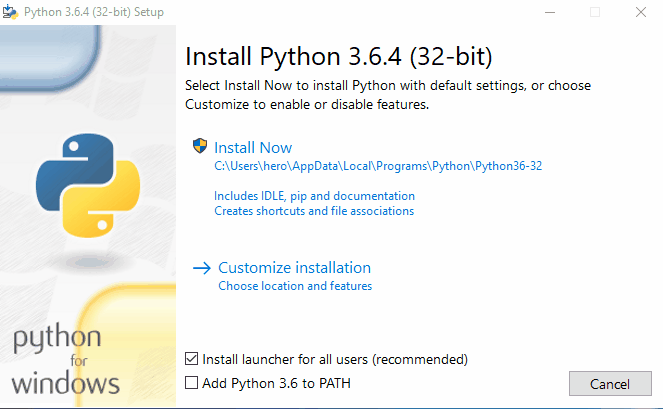
- Start the installer. The installation is straightforward. Its good to just verify if PIP is selected in Optional Features (It must be). pip is a package management system used to install and manage software packages written in Python. Many packages can be found in the Python Package Index (PyPI). Make sure you select Add Python3.6 to PATH to add python environment variables to your PATH making Python and PIP accessible from PowerShell or Command Prompt. We will need this to install packages via pip and run scripts from command line using
python <script>
Below is a GIF of the installation process.
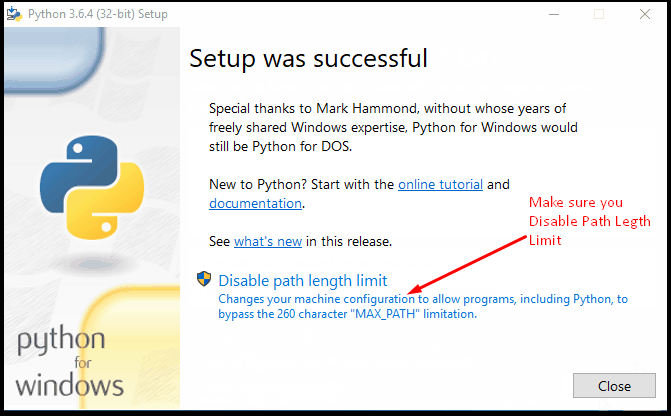
- After setup is successful, Disable path length python limit. If python was installed in a directory with a path length greater than 260 characters, adding it to the path could fail.

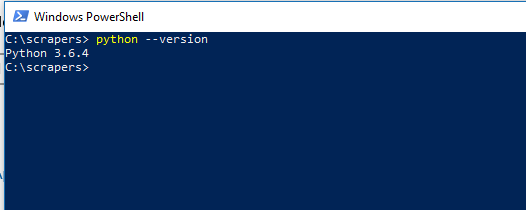
You can close the window now. - Verify Python Installation – Let us verify if it really worked. Open PowerShell (or Command Prompt) and type
python --versionand press enter. You should see a screen similar to the one below with the version of python you installed printed below.
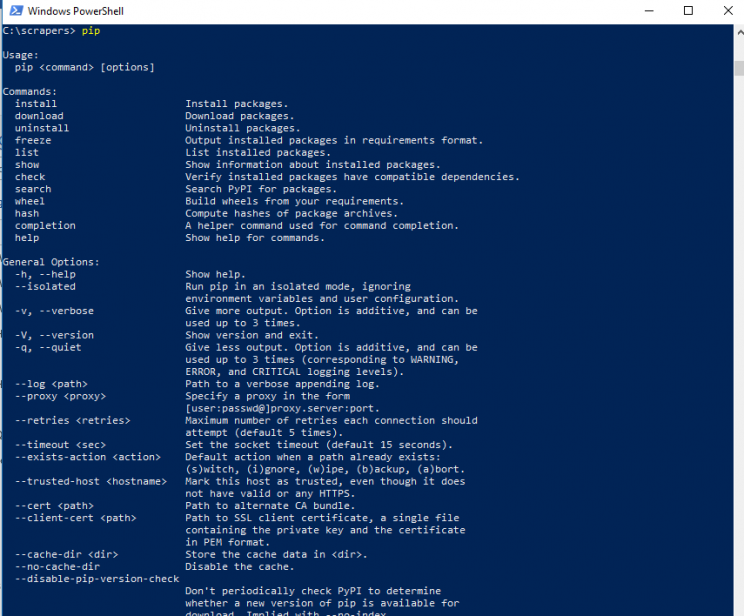
- Verify Pip Installation – Now let’s verify if pip is also installed. In PowerShell (or Command Prompt) type
pip -Vand you should see something like this
That’s it. You’ve set up Python and PIP in windows. Let’s continue to install packages.
Installing Python Packages for Web Scraping
Installing Python Packages is a breeze with PIP. All you have to do is open PowerShell or Command Prompt and type:
pip install <pypi package name>
Here are some of the most common packages we use in our web scraping tutorials
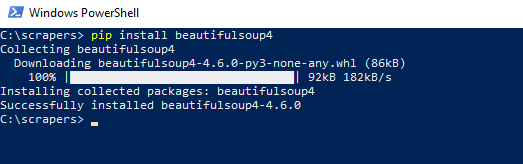
BeautifulSoup
BeautifulSoup is a library for pulling data out of HTML and XML files. It works with your favorite parser to provide idiomatic ways of navigating, searching, and modifying the parse tree. It commonly saves programmers hours or days of work. Install BeautifulSoup in Windows with this command:
pip install BeautifulSoup4
You’ll get a screen similar to this when done.
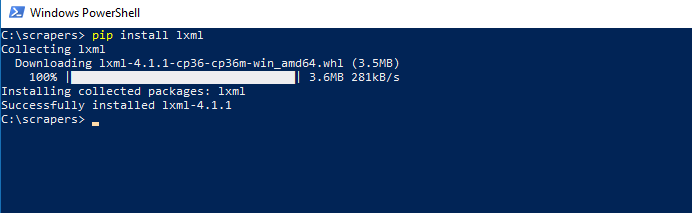
LXML
LXML is the most feature-rich and easy-to-use library for processing XML and HTML in the Python language. We use LXML to parse HTML content downloaded from web pages by converting it into a Tree Like structure that can be navigated programmatically using semi-structured Query Languages like XPaths or CSS Selectors.
Install it using
pip install lxml
You’ll get a screen similar to this when done.
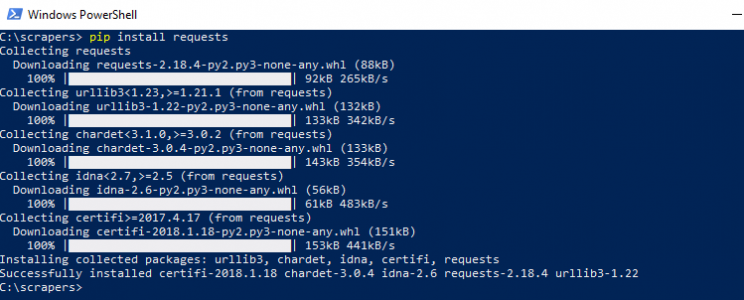
Requests – HTTP for Humans
Although python has its own HTTP Libraries, requests cut down lots of manual labor that comes with urllib. Requests allow you to send organic, grass-fed HTTP/1.1 requests, without the need for manual labor. There’s no need to manually add query strings to your URLs or to form-encode your POST data. Keep-alive and HTTP connection pooling are 100% automatic, thanks to urllib3. Install it using
pip install requests
Once done it would look like this
We can help with your data or automation needs
Turn the Internet into meaningful, structured and usable data
Introduction
As a beginner in Python, installing the ‘requests’ module can seem like a daunting task. However, with the right guidance, you can easily install it using pip in the command prompt. In this article, we will walk you through the step-by-step process of installing the ‘requests’ module in Python on Windows 10.
Prerequisites
Before we begin, make sure you have the following:
- Python installed: You have Python installed on your Windows 10 system. In this case, you have Python version 3.11.4.
- Command Prompt: You have access to the Command Prompt on your Windows 10 system.
- Pip installed: Pip is the package installer for Python. It should be installed along with Python.
Step 1: Open the Command Prompt
To install the ‘requests’ module, you need to open the Command Prompt on your Windows 10 system. You can do this by following these steps:
- Press the Windows key + R to open the Run dialog box.
- Type cmd and press Enter to open the Command Prompt.
Step 2: Verify Python and Pip Installation
Before installing the ‘requests’ module, verify that Python and pip are installed correctly. You can do this by running the following commands in the Command Prompt:
python --version
pip --version
This will display the version of Python and pip installed on your system.
Step 3: Install the ‘requests’ Module
Now that you have verified the installation of Python and pip, you can install the ‘requests’ module using the following command:
pip install requests
This command will download and install the ‘requests’ module along with its dependencies.
Step 4: Verify the Installation
After installing the ‘requests’ module, verify that it has been installed correctly by running the following command:
pip show requests
This command will display information about the ‘requests’ module, including its version and installation location.
Troubleshooting Common Issues
If you encounter any issues during the installation process, here are some common problems and their solutions:
- pip is not recognized as an internal or external command: This error occurs when pip is not installed correctly. Try reinstalling pip using the following command:
python -m ensurepip - requests module not found: This error occurs when the ‘requests’ module is not installed correctly. Try reinstalling the ‘requests’ module using the following command:
pip install requests - Permission denied: This error occurs when you do not have the necessary permissions to install the ‘requests’ module. Try running the Command Prompt as an administrator.
Conclusion
Installing the ‘requests’ module in Python on Windows 10 is a straightforward process. By following the steps outlined in this article, you should be able to install the ‘requests’ module using pip in the Command Prompt. If you encounter any issues during the installation process, refer to the troubleshooting section for common problems and their solutions.
Additional Resources
For more information on installing the ‘requests’ module, refer to the following resources:
- Official Python Documentation: Installing Python Modules
- Pip Documentation: Installing Packages
- Requests Documentation: Installation
Frequently Asked Questions
Q: What is the ‘requests’ module?
A: The ‘requests’ module is a popular Python library for making HTTP requests. It provides a simple and intuitive way to send HTTP requests and interact with web servers.
Q: Why do I need to install the ‘requests’ module?
A: The ‘requests’ module is not included in the standard Python library. You need to install it separately using pip.
Q: How do I uninstall the ‘requests’ module?
A: To uninstall the ‘requests’ module, use the following command: pip uninstall requests
Q: How do I update the ‘requests’ module?
Q: What is the ‘requests’ module?
A: The ‘requests’ module is a popular Python library for making HTTP requests. It provides a simple and intuitive way to send HTTP requests and interact with web servers.
Q: Why do I need to install the ‘requests’ module?
A: The ‘requests’ module is not included in the standard Python library. You need to install it separately using pip. The ‘requests’ module provides a lot of features that make it easier to work with web servers, such as:
- Simplified HTTP requests: The ‘requests’ module provides a simple and intuitive way to send HTTP requests.
- Automatic connection management: The ‘requests’ module automatically manages connections to web servers.
- Support for HTTP/1.1: The ‘requests’ module supports HTTP/1.1, which allows for more efficient communication with web servers.
Q: How do I install the ‘requests’ module?
A: To install the ‘requests’ module, use the following command:
pip install requests
Q: How do I uninstall the ‘requests’ module?
A: To uninstall the ‘requests’ module, use the following command:
pip uninstall requests
Q: How do I update the ‘requests’ module?
A: To update the ‘requests’ module, use the following command:
pip install --upgrade requests
Q: What are the benefits of using the ‘requests’ module?
A: The ‘requests’ module provides several benefits, including:
- Simplified code: The ‘requests’ module provides a simple and intuitive way to send HTTP requests, which makes your code easier to read and maintain.
- Improved performance: The ‘requests’ module automatically manages connections to web servers, which can improve the performance of your code.
- Support for HTTP/1.1: The ‘requests’ module supports HTTP/1.1, which allows for more efficient communication with web servers.
Q: Can I use the ‘requests’ module with other Python libraries?
A: Yes, you can use the ‘requests’ module with other Python libraries. The ‘requests’ module is designed to be flexible and can be used with a variety of other libraries, including:
- BeautifulSoup: The ‘requests’ module can be used with BeautifulSoup to parse HTML and XML documents.
- Scrapy: The ‘requests’ module can be used with Scrapy to build web scrapers.
- Flask: The ‘requests’ module can be used with Flask to build web applications.
Q: How do I troubleshoot issues with the ‘requests’ module?
A: If you encounter issues with the ‘requests’ module, try the following:
- Check the documentation: The ‘requests’ module has extensive documentation that can help you troubleshoot issues.
- Check the error messages: Error messages can provide valuable information about the issue you are experiencing.
- Search online: You can search online for solutions to common issues with the ‘requests’ module.
Q: Can I use the ‘requests’ module with other languages?
A: No, the ‘requests’ module is a Python library and can only be used with Python. However, you can use other libraries in other programming languages to make HTTP requests.
Q: How do I contribute to the ‘requests’ module?
A: If you would like to contribute to the ‘requests’ module, you can:
- Report bugs: You can report bugs and issues with the ‘requests’ module on the project’s issue tracker.
- Submit patches: You can submit patches to the ‘requests’ module to fix bugs or add new features.
- Join the community: You can join the community of developers who contribute to the ‘requests’ module to learn more about the project and get involved.