
Features
- Same class based interface on all supported platforms.
- Access to the port settings through Python properties.
- Support for different byte sizes, stop bits, parity and flow control with
RTS/CTS and/or Xon/Xoff. - Working with or without receive timeout.
- File like API with “read” and “write” (“readline” etc. also supported).
- The files in this package are 100% pure Python.
- The port is set up for binary transmission. No NULL byte stripping, CR-LF
translation etc. (which are many times enabled for POSIX.) This makes this
module universally useful. - Compatible with
iolibrary - RFC 2217 client (experimental), server provided in the examples.
Requirements
- Python 2.7 or Python 3.4 and newer
- If running on Windows: Windows 7 or newer
- If running on Jython: “Java Communications” (JavaComm) or compatible
extension for Java
For older installations (older Python versions or older operating systems), see
older versions below.
Installation
This installs a package that can be used from Python (import serial).
To install for all users on the system, administrator rights (root)
may be required.
From PyPI
pySerial can be installed from PyPI:
python -m pip install pyserial
Using the python/python3 executable of the desired version (2.7/3.x).
Developers also may be interested to get the source archive, because it
contains examples, tests and the this documentation.
From Conda
pySerial can be installed from Conda:
conda install pyserial

or

conda install -c conda-forge pyserial
Currently the default conda channel will provide version 3.4 whereas the
conda-forge channel provides the current 3.x version.
Conda: https://www.continuum.io/downloads
Packages
There are also packaged versions for some Linux distributions:
- Debian/Ubuntu: “python-serial”, “python3-serial”
- Fedora / RHEL / CentOS / EPEL: “pyserial”
- Arch Linux: “python-pyserial”
- Gentoo: “dev-python/pyserial”
Note that some distributions may package an older version of pySerial.
These packages are created and maintained by developers working on
these distributions.
Older Versions
Older versions are still available on the current download page or the old
download page. The last version of pySerial’s 2.x series was 2.7,
compatible with Python 2.3 and newer and partially with early Python 3.x
versions.
pySerial 1.21 is compatible with Python 2.0 on Windows, Linux and several
un*x like systems, MacOSX and Jython.
On Windows, releases older than 2.5 will depend on pywin32 (previously known as
win32all). WinXP is supported up to 3.0.1.
-
Star
(0)
You must be signed in to star a gist -
Fork
(0)
You must be signed in to fork a gist
-
Clone this repository at <script src="https://gist.github.com/Miliox/a52dbf6bc82231104d81.js"></script>
- Save Miliox/a52dbf6bc82231104d81 to your computer and use it in GitHub Desktop.
Clone this repository at <script src="https://gist.github.com/Miliox/a52dbf6bc82231104d81.js"></script>
How install Pyserial of Python for Windows
Pyserial is a Python library for serial communication. It helps you interact with serial ports easily. This guide will show you how to install it.
What Is Pyserial?
Pyserial allows Python to communicate with serial devices. It works on Windows, Linux, and macOS. It’s useful for Arduino, Raspberry Pi, and other hardware projects.
Prerequisites
Before installing Pyserial, ensure you have Python installed. You can check by running:
python --version
If Python is not installed, download it from the official website. Also, ensure pip is installed. Pip is Python’s package manager.
Install Pyserial Using Pip
The easiest way to install Pyserial is using pip. Open your terminal or command prompt and run:
pip install pyserial
This command downloads and installs the latest version of Pyserial. Wait for the installation to complete.
Verify the Installation
After installation, verify it works. Open Python and import the library:
import serial
print(serial.__version__)
If no errors appear, Pyserial is installed correctly. You should see the version number.
Common Installation Issues
Sometimes, you may face issues. One common error is ModuleNotFoundError. This means Python can’t find Pyserial.
If you see this, check if pip installed it in the correct Python version. For more help, read our guide on how to solve ModuleNotFoundError.
Using Pyserial
Once installed, you can start using Pyserial. Here’s a simple example to open a serial port:
import serial

# Open serial port
ser = serial.Serial('COM3', 9600)  # Change COM3 to your port
print("Port opened:", ser.name)
ser.close()
This code opens COM3 at 9600 baud rate. Adjust the port name and baud rate as needed.
Reading Data from Serial Port
You can also read data from the serial port. Here’s an example:
import serial

ser = serial.Serial('COM3', 9600)
while True:
    data = ser.readline().decode('utf-8').strip()
    print("Received:", data)
This code reads data line by line. It decodes the bytes to a string and prints it.
Writing Data to Serial Port
To send data, use the write method. Here’s how:
import serial

ser = serial.Serial('COM3', 9600)
ser.write(b'Hello, Serial!')  # Send bytes
ser.close()
This sends «Hello, Serial!» to the connected device. Note the b prefix for bytes.
Conclusion
Installing Pyserial is simple with pip. It enables powerful serial communication in Python. Now you can interact with hardware devices easily.
If you face issues, check your Python and pip setup. For more help, refer to our guide on ModuleNotFoundError.
Happy coding with Pyserial!
Tutorial on How to connect an Arduino or Microcontroller like AVR ATmega328P,MSP430 ,PIC with a Windows/Linux PC using serial port (ViCP) and talking with it using Python and pySerial library.
This tutorial will concentrate on Python 3.x.x language and will use Pyserial 3.5 Library to communicate with Arduino
-
First section deals with Arduino to PC communication using Python
-
Second section deals with communicating to bare microcontrollers like AVR, Microchip using Python Serial Library
-
and Last section deals with Linux specific details for Python serial port programming.
Check this article if you are Looking to add a tkinter(ttkbootstrap) GUI for your Python Serial Communication program
Contents
- Introduction
- what is pySerial Module
- Sourcecodes
- Hardware used
- Installing PySerial on Windows
- Writing data to Serial Port using Python
- Running the Code on Windows
- pySerial Exceptions
- Reading Data from Serial port using Python
- Setting pySerial Read timeouts
- Interfacing Microcontroller with PC
- Interfacing MSP430 with PC
- Interfacing ATmega328P with PC
- DTR RTS Pin Control using pySerial
- Serial Programming on Linux using Python and pySerial
Introduction
Python is an open source, cross platform ,interpreted language that is easy to learn for beginners. One of the many advantages of Python is the sheer number of contributed modules for performing a wide variety of tasks.
It is widely used for building scripts/program to interact with real world objects like USB relays, USB data acquisition devices, USB data loggers and other embedded systems.
Easiest way to interact with serial port devices is over a Virtual Com Port using a USB to Serial Converter IC like
- FTDI FT232RL
- TUSB3410
- or CP2102
Once the necessary drivers are installed you can interact over VCP by reading and writing into it.
One problem with developing code that uses serial port is portability, you can’t use the same code in both Windows and Linux. For each operating system (Windows/Linux) you have to write custom codes using the native API’s as we have done below
- Win32 Serial Port Programming using Native APi’s
- Linux Serial Port programming using Native API’s.
pySerial Module
Python provides an easy way to do cross platform serial communication using pySerial module.
The modules hides all the OS specific peculiarities and presents a uniform simple interface for programming the serial port.
The code written with pySerial can run unmodified on Windows,Linux systems and Mac Systems.
Source codes
- Browse Python Serial Comm code from our Github Repo
- Download Python Serial Comm code as zip file
Please note that the source codes on the website show only the relevant sections to highlight the process of programming the serial port.
Please use the complete source codes from our github repo when building your own program.
Hardware Used
Here we will be using an Arduino to communicate with the python script running on the PC. You can use both Arduino UNO or Arduino Mega.
If you want to communicate with a bare microcontroller like ATmega32,ATmega32p,ESP32,Raspberry Pi Pico, MSP430 using Python ,You will need a USB to serial converter like USB2SERIAL.
Python on Windows
In Windows, Python is not installed by default, you can find python binary installers from python.org
After completing the installation you can type “python” on your command prompt to enter the python shell. (use CTRL + Z to exit from the shell).
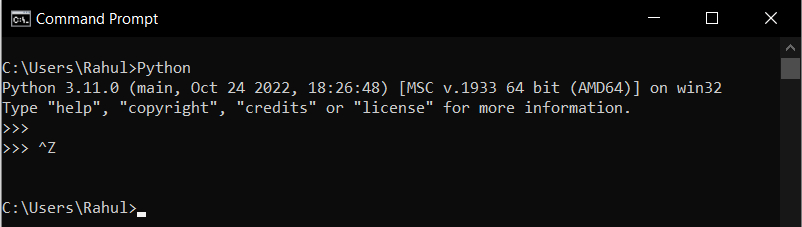
Or you can use the built in GUI shell called IDLE. Press CTR+Q to exit from IDLE.

Installing PySerial on Windows using pip
After you have installed the python interpreter, You can install PySerial using pip installer.
So open up your Windows Command prompt and type in the following command as shown below.
C:\>python -m pip install pyserial
You can also check the installed packages using pip list command.
C:\>python -m pip list 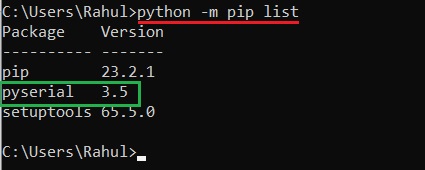
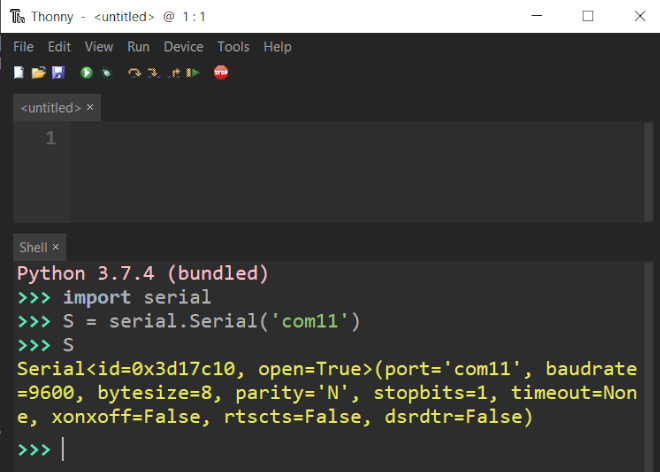
After installing pySerial, open the python shell and type “import serial”. If you are not getting any error messages, pySerial is installed properly.
Some IDE’s like Thonny has built in Python interpreters which work independently from the interpreter installed on your system. They come with pySerial preinstalled.
Writing data to Serial Port using Python and pySerial
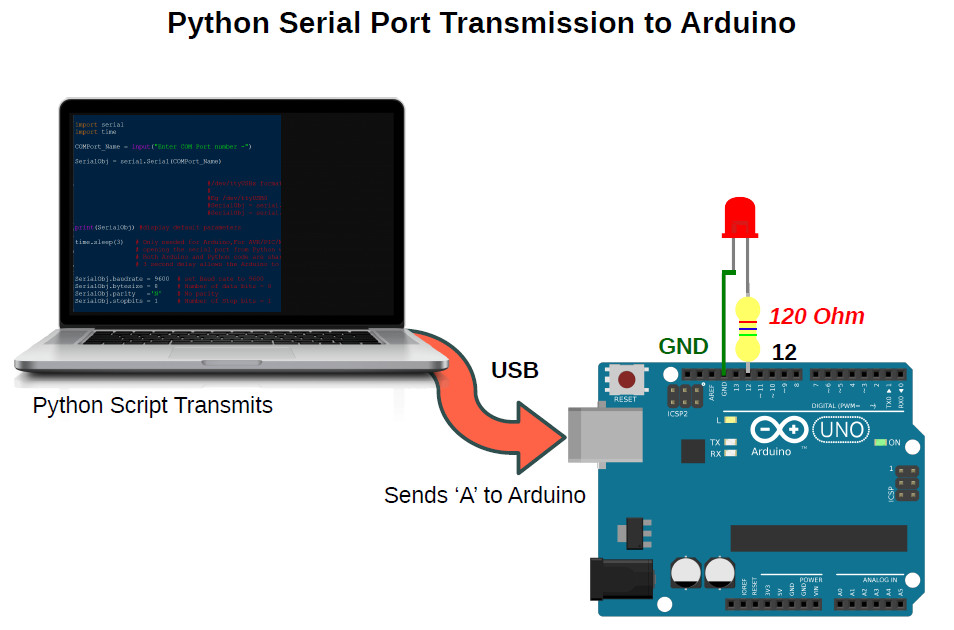
Here we will learn to communicate with an Arduino through Serial Port (Virtual COM Port) from a Windows or Linux PC using Python 3.x.x.
The PC will transmit some data (ASCII Characters) serially over Virtual COM port to the Arduino UNO using a Python Script running on a Windows 10 PC as shown in the above image. The Arduino will blink a LED connected to Pin12 on receiving the character ASCII ‘A’
PC Side Python Code
Now on the PC side
let’s open a serial port and write some values to it. The code in python is quite straight forward, you can just read it like plain English.
Open a text editor and type the following lines of code into it .Save the file with a ” .py” extension.
The Below code writes character ‘A’ to the serial port.
# Python code transmits a byte to Arduino /Microcontroller

import serial
import time

SerialObj = serial.Serial('COM24') # COMxx   format on Windows
                                  # ttyUSBx format on Linux

SerialObj.baudrate = 9600  # set Baud rate to 9600
SerialObj.bytesize = 8     # Number of data bits = 8
SerialObj.parity   ='N'    # No parity
SerialObj.stopbits = 1     # Number of Stop bits = 1
time.sleep(3)

SerialObj.write(b'A')      #transmit 'A' (8bit) to micro/Arduino
SerialObj.close()          # Close the port
Please make sure that you use the correct serial port number.
In the above code it is COM24,
Your serial port number may be different .You can find the correct port number using Device Manager on Windows as shown below .
Code Explanation
The first line import serial imports the pySerial module so that your program can use it.
ComPort = serial.Serial('COM24') opens the serial port named COM24.then we set the various parameters for the serial communication like baudrate, no of stop/start bits,parity etc. Here we will be using the default 9600bps, 8N1 format for communication.
SerialObj.baudrate = 9600  # set Baud rate to 9600
SerialObj.bytesize = 8     # Number of data bits = 8
SerialObj.parity   ='N'    # No parity
SerialObj.stopbits = 1     # Number of Stop bits = 1
Opening the serial port using pySerial will reset the Arduino connected on the port,(here COM24).This is specific to Arduino only .
This is because some of the serial port pins of the USB protocol chip (FT232/ATmega8U/16U) like RTS/DTR are used by the Arduino board to put the ATmega328P in boot mode during programming. When we open the serial port, the signal levels on the RTS/DTR pins of the USB IC may change.
time.sleep(3) # wait for some time ,so the Arduino is readySo you should wait some time (here 3 seconds) before transmitting the data to the Arduino board.
In the above code we are using time.sleep(3) function to create the delay.
Serial communication occurs in bytes (8 bits) while Python3+ handles strings in Unicode format which may consume up to 4 bytes.
So to make the characters suitable to send to a microcontroller we have to convert them to byte based chunks.
In the above Example we are sending a byte ‘A’.
Here A is defined as a byte by using b prefix.You can also use the bytearray() function.
SerialObj.write(b'A') #transmit 'A' (8bit) to micro/ArduinoSerialObj.write(b’A’) function then writes/sends data to your microcontroller /Arduino.
Arduino Side Code
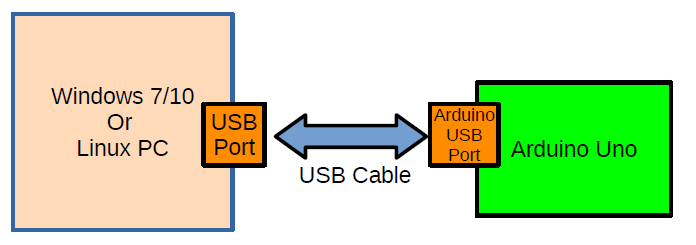
PC and Arduino are connected as shown below using a single USB cable.
On the Arduino side ,
we wait for the Character A and turns the LED connected to Pin12 ON for 2 seconds.
A switch() is used to select the required action.
The partial code is shown below.
if (Serial.available())
   {

     RxedByte = Serial.read();
     switch(RxedByte)
     {
       case 'A':  digitalWrite(12,HIGH);
                  delay(1000);
                  digitalWrite(12,LOW);
                  break;
       case 'B': //your code
                  break;
       default:
                  break;
     }//end of switch()
   }//endof if
Please visit our Github for the full code.
Running the Python Code
In Windows,
You can either run the code from command line,
D:\> python yourSerialTransmitCode.pyor
by using IDLE
From IDLE use “File → Open” to open your code file and from “Run → Run Module”. or press F5
Handling Pyserial Serial Port Exceptions
Some times opening the serial port may fail due to various conditions like port in use ,port not found etc .
pySerial comes with the exception serial.SerialException which can be used to identify the error and fail gracefully.
We also have a Video on How to use and handle pySerial Exceptions during serial port programming
The below partial code shows how to use exceptions
try:
   SerialObj = serial.Serial('COM11',9600) # open the Serial Port


except serial.SerialException as var : # var contains details of issue
   print('An Exception Occured')
   print('Exception Details-> ', var)

else:
   print('Serial Port Opened')
Here is an example of the error message you will get when some other process is using the port you are trying to access.
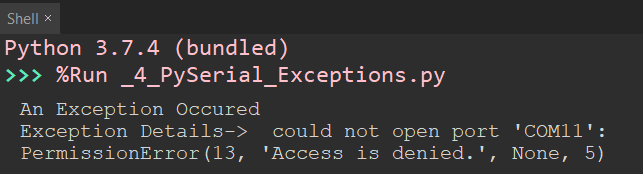
When Port number is wrong.
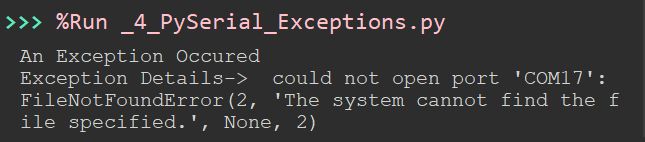
%Run is due to the IDE (here Thonny) running the code on the terminal.
Reading Data from Serial port using Python and Pyserial
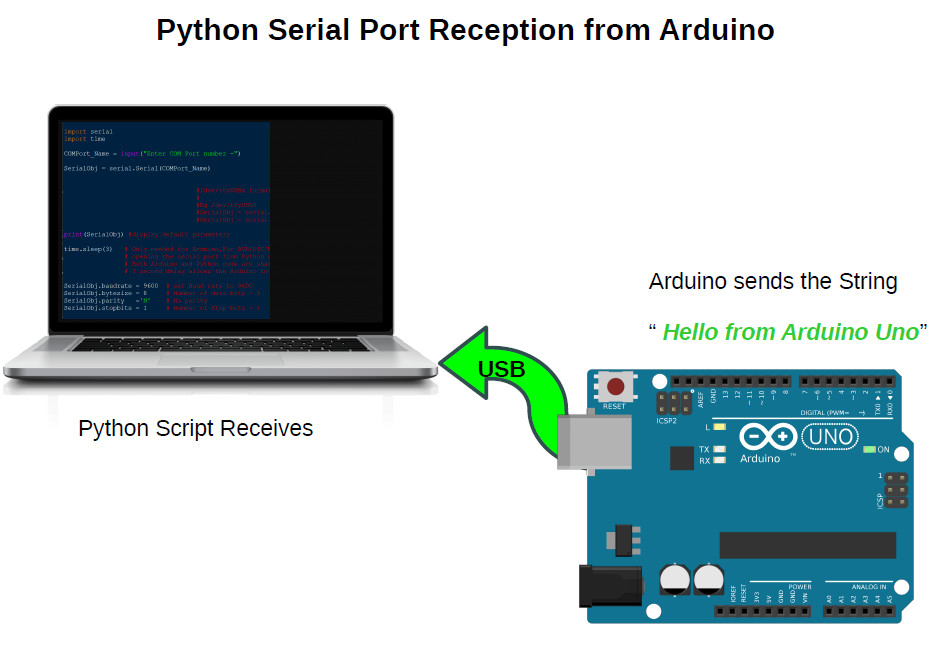
Here we will be sending a text string «Hello from Arduino» from Arduino to a Windows/Linux PC through serial port using Python.
The Python script running on the PC will receive data send by the Arduino using the readline() function of the pyserial library and display the text data on the command line.
PySerial provides two functions to read data from the serialport
- readline()
- read()
readline() reads till it encounters a newline character ‘\n’ and returns the bytes it has read.
If \n character is not encountered it will wait forever or until the read timeout expires.
ReceivedString = SerialObj.readline()
print(ReceivedString)
SerialObj.close()
Setting up pySerial read timeouts
When we are reading something from the serial port using Python and Pyserial library , the sender (Arduino) may fail to respond which will result in the Python script waiting forever.
To mitigate this issue we can set timeouts for the pySerial read() and readline() methods which forces these methods to return after a set time period, irrespective of whether data is received or not.
The code below shows how to set timeouts during a read call.
import serial
import time
SerialObj = serial.Serial('COM3') # COMxx   format on Windows
                                   # ttyUSBx format on Linux

SerialObj.baudrate = 9600  # set Baud rate to 9600
SerialObj.bytesize = 8     # Number of data bits = 8
SerialObj.parity   ='N'    # No parity
SerialObj.stopbits = 1     # Number of Stop bits = 1

SerialObj.timeout  = None  # Setting timeouts here No timeouts,waits forever

time.sleep(3)  #needed only for arduino

ReceivedString = SerialObj.readline()
print(ReceivedString)
SerialObj.close()
there are three values for the timeout parameter
SerialObj.timeout = None ,No timeouts,waits forever- timeout = None means that the code will wait forever
- timeout = 0 non-blocking mode, return immediately in any case
- timeout = seconds Return immediately if data is available else wait for specified seconds till the data arrives
SerialObj.timeout = 3 ,timeout set for 3 seconds,will return after 3secondsArduino Side Code
On the Arduino side ,the text string is stored in a char array as shown below and transmitted to the PC in a loop of about 1 second.
void setup() part not shown below, use the full code from GitHub repo.
void loop()
{
 char TextToSend[] = " Hello From Arduino Uno";
 Serial.println(TextToSend); // sends a \n with text
 delay(1000); //1 second delay
}
Make sure that you use the
Serial.println(TextToSend); // sends a \n with textas println() sends the \n character which helps the python readline() function to return.
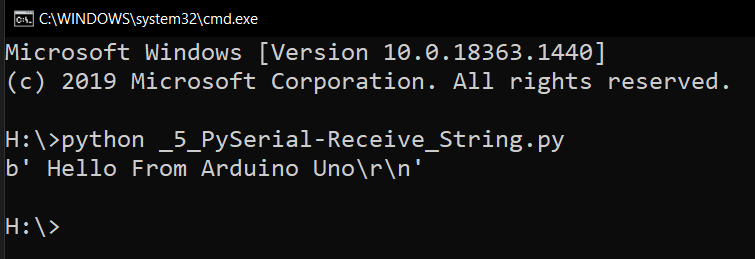
Once the string is received the data is displayed on command line as shown below.
Connecting a Bare Microcontroller to your PC ‘s Serial port
In the above tutorial we learned how to connect an Arduino board with a PC and communicate with it (Receive/Transmit data ) using a standard USB cable.
What if instead of an Arduino we just want to connect a bare microcontroller like ATmega328P,ATmega16,MSP430 or PIC18F4550 to your PC.
In the case of Arduino all the details of how ATmega328P connects with the USB section is abstracted away from the user, when you are building embedded systems you have to know which signals are connected to which.
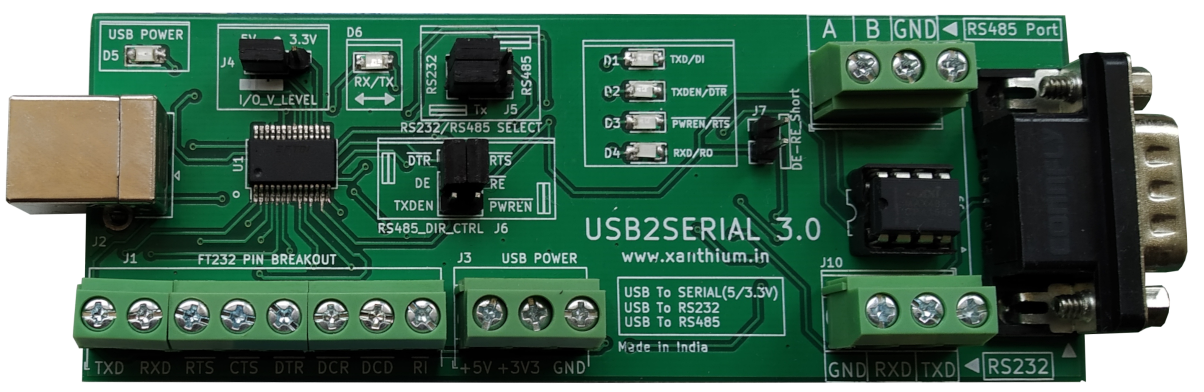
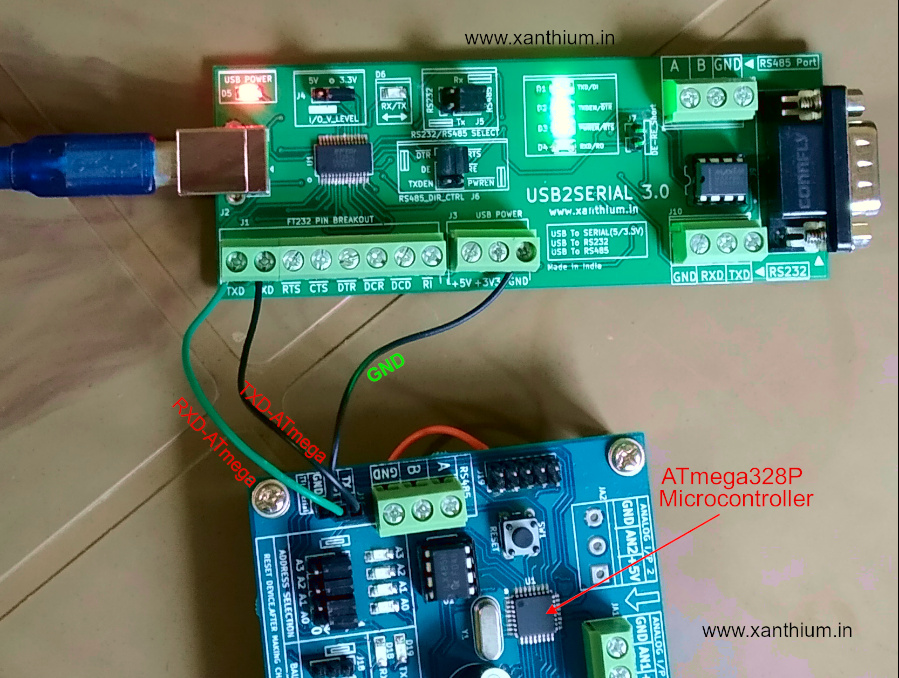
When you are using a microcontroller which do not have any built in USB controller like ATmega16 or MSP430G2553 ,you have to use a USB to Serial Converter chip like FT232RL or buy a standard USB to serial converter board like USB2SERIAL to convert serial signals to the USB ones.

The USB2SERIAL board shown can work as a USB to serial Converter ,USB to RS232 Converter or USB to RS485 converter
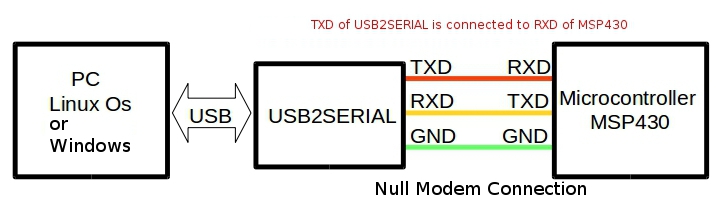
The below block diagram shows how to interface any microcontroller to a PC with a standard USB to serial converter.

Here the TXD of the serial port is connected to the RXD of the microcontroller UART and vice versa. So when microcontroller transmits a byte it goes to the receive buffer of the serial port on the PC side and vice versa.
Ground lines are made common to both PC and microcontroller.
Interfacing MSP430 Microcontroller with PC using Python
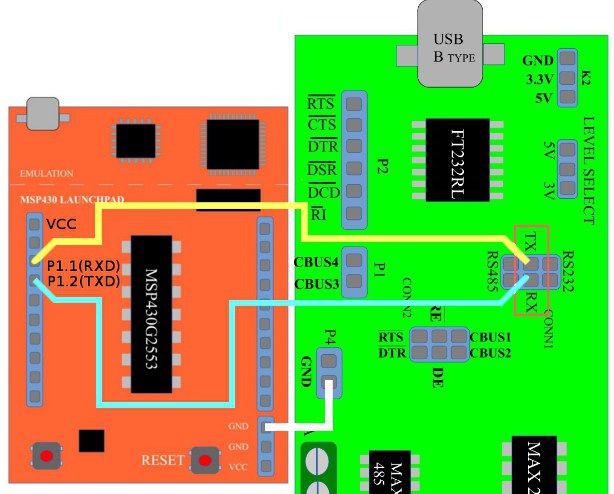
Above image shows how to hook up a launchpad board with PC using USB2SERIAL converter The Controller (MSP430G2553) is connected to the FT232’s Serial port using a null modem cable as shown in the above figure.
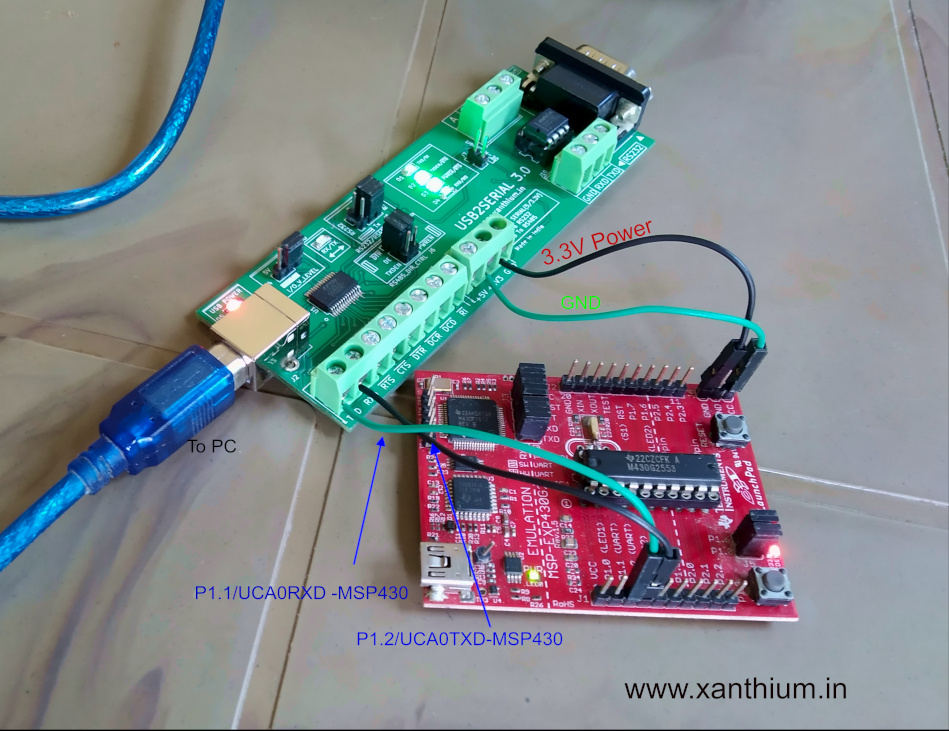
Please note that MSP430’s are 3.3V microcontrollers ,so please select the IO voltage levels of USB2SERIAL board as 3.3V.
In case you want to know more about MSP430’s,
- check this tutorial on How to configure MSP430G2553 UART for serial communication.
Interfacing bare ATmega328P microcontroller with PC using Python.
Yes, Arduino uno is ATmega328P
but here the code is written in AVR embedded C and compiled using AVR studio or Microchip Studio.
- Full tutorial on AVR ATmega to PC communication can be found here
Controlling RTS and DTR Serial Port pins in Python using PySerial
RTS and DTR pins are two extra lines available on most serial ports which are used for signaling purposes.They do not transmit serial data.
Using Pyserial, you can control the logic states of RTS and DTR pins ie make them HIGH or LOW to control a transistor switch or logic circuit.
Earlier, PySerial API used SerialObj.setRTS() and SerialObj.setDTR() which are now deprecated.
The new simplified API is just
- rts
- and dtr
which can be set or cleared by assigning a 1 or 0.
import serial

SerialObj = serial.Serial('COM6',9600)

SerialObj.rts = 1 #RTS HIGH
SerialObj.rts = 0 #RTS LOW
SerialObj.dtr = 1 #DTR HIGH
SerialObj.dtr = 0 #DTR LOW

SerialObj.close()
Please note that you need to add delay between HIGH and LOW to visualize the transition.
In some USB to Serial Converter chips like FT232RL the signals are Active LOW, so setting the pin=1 would make the signal LOW.
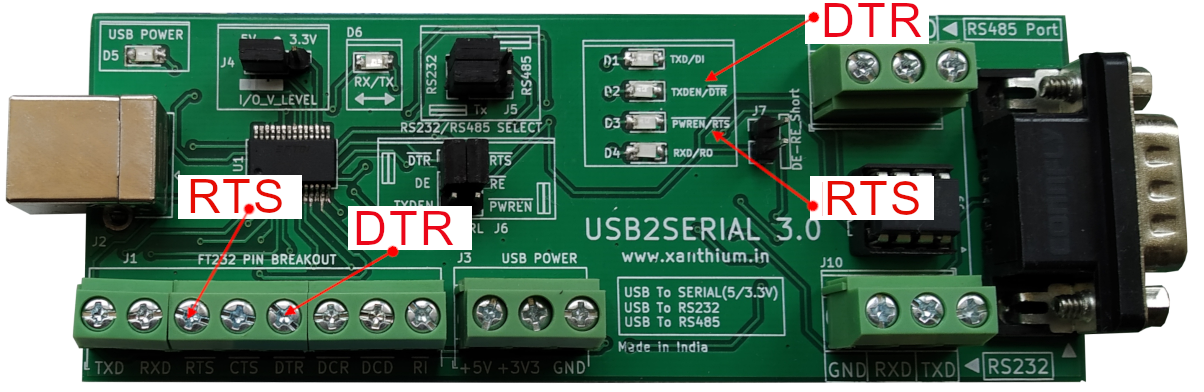
The USB2SERIAL converter shown above have LED’s that indicate the logic levels of the DTR and RTS Pins.The Pins are even brought out to screw terminal head’s as shown above.
Python Serial Port programming on Linux
- Linux specific parts of the Python Serial Port programming can be found here.
The “No module named ‘serial’” Error: A Comprehensive Guide to Troubleshooting
Are you trying to use the serial communication module in your Python code, but keep getting the “No module named ‘serial’” error? Don’t worry, we are here to help.
In this article, we will discuss the reasons why you might be facing this error and provide solutions to rectify the problem.
Reasons for the Error:
Before we dive into the solutions, it is crucial to understand why this error occurs in the first place.
- The most common reason is the absence of the
pyserialpackage in your Python environment. Pyserial is a package for Python that encapsulates the access to the serial ports and provides functions for receiving and transmitting data through serial communication. - Another reason could be an incorrect installation of the
pyserialpackage. It is essential to ensure that you have installed the Pyserial package correctly to avoid any conflicts. - Naming conflicts or variable shadowing can also create errors in your code.
Install Pyserial Package:
To fix the error, first, ensure that you have installed the pyserial package in your Python environment.
You can install the package using the pip command.
Open the command prompt (cmd) or terminal and type the following command:
Make sure you have administrator access to use this command.
This will install the package in your default Python environment. If you are working with virtual environments, you can install pyserial in that specific environment.
In that case, start PowerShell and navigate to the desired directory. Create a virtual environment using the following command
Replace “myenv” with the name you want to give your virtual environment.
Next, activate the environment using
Once your virtual environment is activated, you can install pyserial using the same pip command.
Check Installation and IDE Configuration:
After installing pyserial, you need to ensure that your IDE (Integrated Development Environment) is configured correctly to use the package.
- First, check the version of Python you are using. Pyserial requires Python version 2.7 or 3.0 and higher.
- Next, check if
pyserialhas been installed correctly. You can use thepip showcommand to see if the package is installed in your default Python environment. - If you are using a virtual environment, ensure that you activated the right environment in your IDE.
Reinstall or Upgrade Pyserial Package:
If none of the above solutions work, try reinstalling the package.
First, uninstall pyserial with the following command in your command prompt:
Then, reinstall the package using the following command:
If you have an older version of pyserial installed, you can try upgrading it using:
pip install --upgrade pyserialAfter reinstalling/upgrading, restart your IDE and server and check if the error is gone.
Installing Pyserial on Windows:
If you are using Windows, you might face some additional challenges with installing pyserial packages.
Here are some easy steps that can help you get started.
- First, open the Command Prompt with administrator access.
- Then, use the following command to install
pyserial: - Again, if you are using a virtual environment, you can navigate to the desired directory using PowerShell, create the environment, and use the same
pipcommand to installpyserial. - Finally, to verify if
pyserialhas been installed correctly, use thepip showcommand as we did previously.
Conclusion:
The “No module named ‘serial’” error can be frustrating to deal with, but with our solutions, you should be able to get your code running smoothly again. Remember to check for errors in installation and configuration, and consider reinstalling/upgrading pyserial if necessary.
With these steps, you should be able to fix the error and get back to coding without any issues.
Installing pyserial on macOS or Linux:
On macOS or Linux, you can use the terminal to install pyserial via pip and sudo permissions. The terminal is a built-in shell for the UNIX-based operating systems that can accommodate a wide range of necessary functions.
Here is a step-by-step guide to help you with the installation.
Step 1: Open Terminal:
Press Command+Space or Control+Space and type in terminal.
You can also click on the terminal application located in the Utilities option under Applications.
Step 2: Update pip:
Use the following command to update pip to the latest version:
pip install --upgrade pipStep 3: Install pyserial:
Use the pip command to install pyserial:
sudo pip install pyserialStep 4: Enter Your Password:
You will be prompted to enter your password since pip requires sudo permissions to install the pyserial package.
Step 5: Verify Installation:
After completing the installation process, check if pyserial is installed correctly. Use the following command to display the information about pyserial:
Installing pyserial on Linux or macOS in a Virtual Environment:
Another way to handle installing pyserial is by using a virtual environment.
A virtual environment helps to isolate your Python environment, eliminate version conflicts and keep dependencies clean. Here’s how you can set up and install pyserial in a virtual environment:
Step 1: Create virtual environment:
Open Terminal and navigate to the directory where you want to create your virtual environment.
Use the following venv command to create a virtual environment:
Replace myenv with the name you wish to give your virtual environment.
Step 2: Activate your virtual environment:
source myenv/bin/activateStep 3: Update PIP and Install Pyserial:
pip install --upgrade pipStep 4: Verify Installation:
After completing the installation process, check if pyserial is installed correctly.
Use the following command to display the information about pyserial:
Installing Pyserial in Visual Studio Code:
Visual Studio Code is a popular IDE among developers. To install pyserial properly, you need to ensure that you have the correct Python version and have configured the IDE appropriately.
Here’s how you can install pyserial in Visual Studio Code:
Step 1: Open the Terminal:
In Visual Studio Code, press Ctrl+Shift+` to activate the Terminal.
Step 2: Install Pyserial:
In the Terminal, use the following command to install pyserial:
Step 3: Verify Installation:
Once the installation is complete, use the command:
This command will display all the details about the pyserial package you just installed.
Installing Pyserial in a Virtual Environment in Visual Studio Code:
If you want to create a virtual environment in Visual Studio Code and install pyserial, you need to follow these steps:
Step 1: Create a virtual environment:
In the Terminal, navigate to the directory where you want to create a virtual environment. Use the following venv command to create a virtual environment:
Replace myenv with the name you wish to give your virtual environment.
Step 2: Activate your virtual environment:
source myenv/bin/activateStep 3: Install Pyserial:
Use the following pip command to install pyserial:
Step 4: Verify Installation:
Once the installation is complete, use the command:
This command will display all the details about the pyserial package you just installed.
Conclusion:
Installing pyserial on your system is easy and straightforward.
If you are working on macOS or Linux, you can use the terminal to install pyserial. You can also create a virtual environment to avoid any version conflicts.
The process is similar for Visual Studio Code. Ensure that you have the correct Python version, and you have your IDE configured correctly.
With these steps, you should be able to install pyserial efficiently and integrate it into your projects.
Installing pyserial in PyCharm:
PyCharm is a widely used IDE that is compatible with major Operating Systems.
Here are the steps to install pyserial in PyCharm using the Terminal and within the IDE.
Installing pyserial in the Terminal:
Step 1: Open the Terminal in PyCharm.
You can use the Alt+F12 keyboard shortcut.
Step 2: Use the following command line to install pyserial:
Step 3: Check for installation by typing:
Installing pyserial in the IDE:
Step 1: Go to File > Settings > Project.
Step 2: Select Python Interpreter > Install Packages.
Step 3: In the search bar, type ‘pyserial’.
Step 4: Choose pyserial from the list and click Install Package.
Step 5: Check for installation by typing:
Installing pyserial in Anaconda:
Anaconda is another popular scientific Python distribution that provides a powerful environment for data analytics.
You can install pyserial in Anaconda using Anaconda Navigator, Anaconda Prompt/Terminal, and Jupyter Notebook.
Installing pyserial using Anaconda Navigator:
Step 1: Open the Anaconda Navigator and select the Environments tab.
Step 2: Select the environment in which you want to install pyserial.
Step 3: Click on ‘Not installed’ in the dropdown menu and search for ‘pyserial’.
Step 4: Click on the checkbox next to pyserial and click Apply.
Step 5: Check for installation by opening the Anaconda Prompt and typing:
Installing pyserial using the Anaconda Prompt/Terminal:
Step 1: Open the Anaconda Prompt/Terminal.
Step 2: Use the following command to install pyserial:
Step 3: Check for installation by typing:
Installing pyserial in Jupyter Notebook:
Step 1: Open Jupyter Notebook in your preferred browser.
Step 2: Create a new notebook and select ‘New’ > ‘Python 3 (ipykernel)’.
Step 3: Create a code cell and type the following command to install pyserial in the notebook:
!pip install pyserial --userStep 4: Check for installation by restarting the Jupyter notebook kernel and checking for the presence of the pyserial package.
Conclusion:
pyserial is an essential package for any developer who wants to communicate with external devices using Python.
Installing it in your environment is relatively simple once you know the steps to take. Whether you’re using PyCharm or Anaconda, there are various methods available to you.
Use the installation instructions above, depending on your preference and environment. Remember to verify the installation by using the pip show pyserial command in your terminal/prompt/notebook.
Installing pyserial is crucial for developers working on projects that require serial communication using Python. In this article, we discussed several methods to install pyserial on different platforms.
We covered installation steps using the terminal, IDEs like PyCharm, scientific Python distribution like Anaconda, and Jupyter Notebook. The importance of verifying installation was stressed to ensure that the package is installed correctly.
pyserial is a fundamental package required for several projects, and knowing how to install it should be an essential skill for developers working with Python.