
Время на прочтение5 мин
Количество просмотров7.2K
Освойте сканирование Bluetooth-устройств с помощью Python: Краткое руководство по использованию PyBluez для обнаружения и анализа близлежащих Bluetooth-устройств, необходимое для кибербезопасности и этичного взлома.

В этом уроке мы познакомимся с увлекательным миром обнаружения Bluetooth-устройств с помощью Python. Мы сосредоточимся на написании скрипта, который сканирует близлежащие Bluetooth-устройства и извлекает ценную информацию о них. Этот навык не только полезен для понимания технологии Bluetooth, но и имеет практическое применение в кибербезопасности и этическом взломе.
Bluetooth, будучи широко используемым протоколом беспроводной связи, представляет как возможности, так и проблемы для энтузиастов безопасности. Научившись программно сканировать и собирать информацию о близлежащих устройствах, вы получите фундаментальный набор навыков, который можно применять в различных сценариях, от выявления потенциальных рисков безопасности до проведения этических хакерских экспертиз.
Значение для кибербезопасности и этического взлома
Понимание обнаружения устройств Bluetooth — важнейший аспект сетевого взаимодействия, этического взлома и кибербезопасности в целом. Этот сценарий служит основой для изучения последствий технологии Bluetooth для безопасности.
Этичные хакеры часто используют подобные методы для выявления уязвимых устройств, оценки уровня безопасности и проведения тестирования на проникновение. Сканируя активные Bluetooth-устройства и получая такие сведения, как имена устройств, классы и даже MAC-адреса (Media Access Control), специалисты по безопасности могут определить потенциальные цели для дальнейшего анализа.
Кроме того, эти знания необходимы для распознавания и устранения рисков безопасности, связанных с Bluetooth, таких как несанкционированные подключения устройств и уязвимости, которыми могут воспользоваться злоумышленники.
Научившись сканировать устройства Bluetooth, хакеры могут осуществлять такие вредоносные действия, как выдача себя за другое устройство, атаки типа «человек посередине» и уязвимости профиля Bluetooth. Эти знания могут привести к несанкционированному доступу, перехвату данных или даже атакам типа «отказ в обслуживании», если не принять надлежащих мер безопасности.
Давайте посмотрим, как реализовать это на языке Python. Мы будем использовать модуль PyBluez. PyBluez — это модуль Python, который предоставляет функциональность Bluetooth, позволяя разработчикам реализовывать соединения Bluetooth и управлять устройствами с поддержкой Bluetooth. Мы также будем писать эту программу на Python 3.
Установите PyBluez, выполнив следующую команду в cmd/Terminal:
$ pip install pybluez2Важно отметить, что успешность выполнения предложенного кода может отличаться на виртуальных машинах из-за различий в совместимости с Bluetooth. Для более надежной оценки рекомендуется протестировать код на физической машине с нативной поддержкой Bluetooth.
Теперь перейдем к коду. Создайте файл Python, назовите его осмысленно (например, bluetooth_scanner.py) и следуйте дальше:
# Import bluetooth from the PyBluez module.
import bluetooth

def scan_bluetooth_devices():
    try:
        # Discover Bluetooth devices with names and classes.
        discovered_devices = bluetooth.discover_devices(lookup_names=True, lookup_class=True)
        # Display information about the scanning process.
        print('[!] Scanning for active devices...')
        print(f"[!] Found {len(discovered_devices)} Devices\n")
        # Iterate through discovered devices and print their details.
        for addr, name, device_class in discovered_devices:
            print(f'[+] Name: {name}')
            print(f'[+] Address: {addr}')
            print(f'[+] Device Class: {device_class}\n')
    except Exception as e:
        # Handle and display any exceptions that occur during device discovery
        print(f"[ERROR] An error occurred: {e}")

# Call the Bluetooth device scanning function when the script is run
scan_bluetooth_devices()
Этот Python-скрипт использует модуль bluetooth для сканирования близлежащих Bluetooth-устройств и получения информации о них.
Функция scan_bluetooth_devices() пытается обнаружить Bluetooth-устройства, используя функцию discover_devices() из модуля bluetooth с параметрами lookup_names=True и lookup_class=True для получения имен и классов устройств.
Затем скрипт выводит сообщение о начале процесса сканирования и количестве найденных устройств. Он просматривает список найденных устройств, извлекая и отображая такие сведения, как имя устройства, адрес и класс устройства. Любые исключения, которые могут возникнуть в процессе обнаружения устройств, перехватываются и обрабатываются, а для информирования пользователя выводится сообщение об ошибке. Наконец, при запуске скрипта вызывается функция для выполнения сканирования Bluetooth-устройств.
Результат:

Результат показывает доступные устройства Bluetooth вокруг нас, включая их имена, MAC-адреса и классы устройств.
Получая MAC-адреса из результатов обнаружения Bluetooth-устройств, хакеры могут манипулировать MAC-адресами своих устройств или подменять их, выдавая себя за легитимные устройства. Это может привести к несанкционированному доступу, перехвату данных и нарушению безопасности, что подчеркивает важность применения надежных мер безопасности для предотвращения подмены MAC-адресов.
Из нашего результата следует, что класс устройства Bluetooth 7995916 может быть интерпретирован следующим образом:
-
Двоичное представление: Двоичное представление числа 7995916 — 11110100101101100101100.
Теперь разделим эту бинарную последовательность на основные, второстепенные и служебные классы:
-
Service Class (биты 0-1): Последние два бита двоичного представления равны 00, что означает, что класс обслуживания равен 0 в десятичной системе.
-
Minor Device Class (биты 2-7): Следующие шесть битов — 101100, что в десятичном представлении равно 44.
-
Major Device Class (биты 8-12): Следующие пять битов — 10100, что в десятичном представлении равно 20.
Итак, интерпретация класса устройств 7995916 выглядит следующим образом:
-
Major Device Class: 20
-
Minor Device Class: 44
-
Service Class: 0
Эти числовые значения могут быть интерпретированы с помощью спецификаций Bluetooth. Согласно спецификации Bluetooth Core Specification:
Устройство 1 (Major Device Class: 20, Minor Device Class: 44, Service Class: 0):
-
Major Device Class (20): Компьютер
-
Minor Device Class (44): Рабочая станция
-
Service Class (0): Нет определенного класса обслуживания
Таким образом, DESKTOP-VR0S64Q — это компьютер, а именно рабочая станция.
Устройство 2 (Major Device Class: 26, Minor Device Class: 4, Service Class: 0):
-
Major Device Class (26): Телефон
-
Minor Device Class (4): Смартфон
-
Service Class (0): Нет определенного класса обслуживания
Таким образом, Ghost — это смартфон.
Оба вывода на самом деле верны. Эти интерпретации основаны на документах спецификации ядра Bluetooth, предоставленных Bluetooth Special Interest Group. Не поленитесь ознакомиться с ними здесь. Даже если хакеры не до конца понимают концепцию класса, с помощью имени устройства и MAC-адреса они все равно могут нанести большой ущерб.
Мы в телеграме, подпишись.

Install Pybluez Windows 10 Pybluez can be installed on gnu linux, windows and macos systems and is compatible with python 2.7 and 3. before you install pybluez please install the dependencies required for your system as described in the sections below. installing pybluez using pip. open a terminal (command prompt on windows) and enter. But for windows, there are hoops to jump through. the standard solution for this is to use pybluez. if you’re really lucky, you might be able to install with just pip install pybluez win10. if that fails, however, the way to go is an installation via a pre compiled «wheel».
Install Pybluez Windows 10 To install git in windows go to the git official download page and install it from there. to add it to path go to ‘system properties’ > ‘environment variables’ and edit the ‘path’ in ‘system variables’ > paste the path to your git cmd folder. i hope this will help, good luck!. Pybluez can be installed on gnu linux, windows and macos systems and is compatible with python 2.7 and 3. note: before you install pybluez please install the dependencies required for your system as described in the sections below. or download the latest version using the links below. Pybluez is a cross platform bluetooth python extension module that allows python developers to interact with system bluetooth resources on linux, windows, and macos. pybluez has different dependencies and build requirements for each supported platform. installation can be done either via pip or from source. Bluetooth python extension module to allow python developers to use system bluetooth resources. pybluez works with gnu linux, macos, and windows. download the file for your platform. if you’re not sure which to choose, learn more about installing packages.
Install Pybluez Windows Visitlasopa Pybluez is a cross platform bluetooth python extension module that allows python developers to interact with system bluetooth resources on linux, windows, and macos. pybluez has different dependencies and build requirements for each supported platform. installation can be done either via pip or from source. Bluetooth python extension module to allow python developers to use system bluetooth resources. pybluez works with gnu linux, macos, and windows. download the file for your platform. if you’re not sure which to choose, learn more about installing packages. Please refer to the installation instructions. pybluez is free software; you can redistribute it and or modify it under the terms of the gnu general public license as published by the free software foundation; either version 2 of the license, or (at your option) any later version. Installation: from a command shell: python setup.py install. examples: gnu linux and windows xp: examples simple inquiry.py detecting nearby bluetooth devices; examples simple sdp browse.py browsing sdp services on a bluetooth device; examples simple rfcomm server.py establishing an rfcomm connection. Pybluez can be installed on gnu linux, windows and macos systems and is compatible with python 2 and 3. before you install pybluez please install the dependencies required for your system as described in the sections below. installing pybluez using pip. installing pybluez from source. Pybluez can be installed on gnu linux, windows and mac operating systems and compatible with python 2 and 3. before you install pybluez please install the dependencies required for your system as described in the sections below. installing pybluez using pip. installing pybluez from source.
In today’s connected world, knowing how to interact with Bluetooth devices is a valuable skill. Python is a popular and versatile programming language that can help you scan and connect to Bluetooth devices. Using a library called PyBluez, you can easily discover nearby Bluetooth-enabled devices, making it a perfect choice for beginners and advanced programmers. 📱💻
💡 PyBluez is a popular Python library that allows developers to create Bluetooth applications and interact with nearby devices. With this library, you can scan for nearby devices, establish connections, and send and receive data. The library is compatible with various platforms, including Windows, Linux, and macOS. 🌎

To start scanning for Bluetooth devices with Python and PyBluez, you must install the required packages and import the necessary modules before writing your code. Scanning for devices is simple and intuitive, making it easy for programmers to integrate Bluetooth functionalities into their projects. So, gear up to explore the world of wireless communication with Python! 🐍✨
Prerequisites

Before diving into scanning for Bluetooth devices using Python, let’s make sure you have the necessary setup in place. This section guides you through setting up your Python environment and installing the Pybluez library. 🛠️
Python Environment Setup
To get started, ensure that you have Python installed on your machine. For this tutorial, we recommend using Python version 3.6 or higher. You can check your Python version by running the following command in your terminal:
python --version
If you don’t have Python installed or need to upgrade, visit the official Python website to download the latest version.
Next, you’ll want to set up a virtual environment. This creates an isolated environment to install Python packages, ensuring that your projects don’t interfere with each other or with the system Python installation:
python -m venv venv
source venv/bin/activate  # or "venv\Scripts\activate" on Windows
With your environment set up, you can move on to installing Pybluez. 🚀
Installing Pybluez
Pybluez is a Python library that provides a simple interface for working with Bluetooth devices. To install it, you’ll need to use pip, the Python package manager:
pip install pybluez
💡 If you don’t have pip installed, you can follow our full guide on the Finxter blog.
Great! Now you have a Python environment with the Pybluez library installed, you’re all set to start scanning for Bluetooth devices. In the next sections, you’ll learn how to use Python and Pybluez to detect nearby devices and manipulate Bluetooth services. 💻🔍
Discovering Bluetooth Devices

This section will discuss how to scan for Bluetooth devices using the Python programming language. We’ll explore the Pybluez library, discover devices using the discover_devices function, and fetch device names with the lookup_names function. 🌐🐍
Using Pybluez Library
Pybluez is a popular Python library that simplifies working with Bluetooth devices. You can easily install it using pip, the Python package manager:
pip install pybluez
With Pybluez installed, you can now access various features for Bluetooth devices, such as scanning, connecting, and retrieving information. 📡
Discovering Devices with Discover_Devices
To discover nearby Bluetooth devices, use the discover_devices function of the Pybluez library. This function returns a list of device addresses.
Here is a simple example to get started:
import bluetooth

nearby_devices = bluetooth.discover_devices()
print("Found %d devices" % len(nearby_devices))
This code snippet initiates a Bluetooth scan, and when the scan is complete, prints the number of devices found. 🌟🔍
Fetching Device Names with Lookup_Names
After discovering the available devices, you can retrieve their names using the lookup_names function. Here’s a code snippet that demonstrates how to use lookup_names in combination with discover_devices:
import bluetooth

print("Performing inquiry...")
nearby_devices = bluetooth.discover_devices(lookup_names=True)
print(f"Found {len(nearby_devices)} devices.")

for addr, name in nearby_devices:
    print(f"Address: {addr}, Name: {name}")
This code initiates a Bluetooth scan and returns a list of tuples containing the address and name of each discovered device. The results are printed in a human-readable format, making it easy to identify nearby devices. 📱🖥️
Platform Compatibility

Next, we’ll discuss the platform compatibility of scanning for Bluetooth devices using Python libraries. We’ll cover Linux Support and Windows Support.
Linux Support
For Linux, the recommended library is pybluez2. Pybluez2 provides an easy-to-use interface for scanning and connecting to Bluetooth devices on Linux systems.
To install pybluez2, simply run the following command:
pip install pybluez2
Once installed, you can use it to scan for nearby devices and open Bluetooth sockets 👍.
Windows Support
On the Windows platform, PyBluez is a popular choice for working with Bluetooth devices in Python. It works well with Windows and can be installed by running:
pip install pybluez
Additionally, you can use the pygatt library to communicate with BLE devices on Windows. Install with:
pip install pygatt
Using these libraries, you can effectively scan and communicate with Bluetooth devices on both Linux and Windows platforms 🖥️.
Remember to keep your code updated and use the appropriate library for your specific platform, ensuring a smooth and efficient experience while working with Bluetooth devices in Python.
Bluetooth Low Energy Scanning

This section will focus on how Bluetooth Low Energy (BLE) scanning works using Python libraries. We’ll dive into the details of BLE and its differences from Bluetooth Classic. This will help you understand how to scan for devices using Python more effectively. 🚀
Exploring Bluetooth LE
Bluetooth Low Energy, or BLE, is a low-power wireless technology designed for short-range communication between devices.
One of the key features of BLE is its ability to send and receive advertisements, which are small packets of data broadcasted by devices that contain necessary information such as MAC addresses and service identifiers.
Scanning for BLE devices with Python can be achieved using libraries like gattlib or bleak. These libraries streamline discovering and connecting to BLE devices, giving you the power to interact with and manage Bluetooth LE connections.
Differences from Bluetooth Classic
BLE differs from Bluetooth Classic in several ways, making it a more suitable option for applications that require low power consumption and efficient wireless communication. Some key differences include:
- ⏱️ Power consumption: BLE is designed with power efficiency in mind, making it ideal for battery-operated devices or IoT applications.
- 📶 Range: Bluetooth Classic offers a longer range, but BLE provides shorter range communication, focusing on minimizing power consumption.
- 📘 Protocol: Bluetooth Classic uses a complex protocol stack, while BLE employs a simpler protocol, allowing for quicker and lighter device connections.
- 🏎️ Connection speed: BLE connects much faster than Bluetooth Classic, making it more suitable for applications that need frequent connectivity changes.
By understanding these differences, you’ll be better equipped to choose the appropriate technology and Python library for your specific project needs.
Whether you’re working with BLE or Bluetooth Classic, leveraging Python libraries will simplify scanning for and connecting to other devices. 🌐
Pairing and Connecting Devices

This section will explore how to pair and connect Bluetooth devices using Python libraries. We’ll provide a general understanding of the pairing process and explain how to establish connections using Python sockets.
Understanding the Pairing Process 😃
Pairing is establishing a connection between two Bluetooth devices, ensuring they are authenticated and have the required permissions to interact with each other. This usually involves exchanging a passkey or using an “out-of-band” method, such as Near Field Communication (NFC).
- Device A initiates the process by sending a pairing request to Device B.
- Device B receives the request and either accepts or rejects it.
- If accepted, both devices exchange authentication keys and establish a secure connection.
Connecting using Python Sockets 🚀
Python provides a powerful and flexible way to establish connections between Bluetooth devices using sockets. These are virtual communication channels enabling data exchange between devices.
First, install the PyBluez library to utilize Bluetooth functionality in Python.
pip install PyBluez
Create a socket to establish a connection between two Bluetooth devices:
import bluetooth

server_socket = bluetooth.BluetoothSocket(bluetooth.RFCOMM)
You can bind the server socket to a specific address and port, and start listening for incoming connections:
server_socket.bind(("", bluetooth.PORT_ANY))
server_socket.listen(1)
To accept incoming connections and initiate data exchange, use the following code:
client_socket, client_address = server_socket.accept()
print(f"Accepted connection from {client_address}")
data_received = client_socket.recv(1024)
Close the connection once the data exchange is completed:
client_socket.close()
server_socket.close()
Advanced Topics

In this section, we will explore using a Raspberry Pi for Bluetooth device scanning and the application of Python libraries in Covid-19 contact tracing.
We will discuss the benefits, implementation, and requirements for using these advanced tools in your project.
Using Raspberry Pi for Scanning
Raspberry Pi can be a powerful tool for scanning Bluetooth devices when properly equipped with a Python library. Utilizing the pybluez library, a Raspberry Pi can search for active Bluetooth devices and expand its functionality.
Some benefits of using Raspberry Pi for scanning include:
- Compact and portable design 🌟
- Affordable and easy to use
- Highly customizable with various Python libraries
However, there are a few requirements to set up your Raspberry Pi for scanning:
- A compatible Raspberry Pi model with Bluetooth capabilities
- The Pybluez library installed
- A Python script that uses Pybluez for scanning
After meeting these requirements, you can start exploring Bluetooth scanning capabilities with Raspberry Pi, opening up new possibilities for your projects.
💡 Recommended: Getting Started With Thonny – The Optimal IDE for the Raspberry Pi Pico
Application in Covid-19 Contact Tracing
Python libraries and Bluetooth scanning can play a crucial part in Covid-19 contact tracing efforts.
Using Bluetooth signals to detect nearby devices makes it possible to estimate the proximity between individuals, helping to identify potential exposure risks.
Key concepts in using Python and Bluetooth scanning for contact tracing include:
- Developing an app or software that uses a Python library for Bluetooth scanning 📱
- Collecting anonymous encrypted data from nearby devices
- Analyzing device proximity to determine potential exposure risks
By putting these concepts into practice, Python and Bluetooth scanning can contribute to contact tracing methods, helping in the fight against the spread of infectious diseases. Implementing this technology may keep people safe and provide valuable data for health officials during a pandemic.
Licensing and Limitations

PyBluez is distributed under the GNU General Public License (GPL), which allows you to use, modify, and distribute the library as long as the same license terms are applied to your software. More information about the license can be found on the PyBluez PyPI page. Adhering to the license terms is crucial when using open-source software like PyBluez. 🔐
Regarding limitations, it is essential to be aware of the compatibility of PyBluez with your platform.
While PyBluez supports both Windows and Linux operating systems, you might face some challenges with Mac OS.
Additionally, it is important to keep in mind that PyBluez primarily focuses on classic Bluetooth and not Bluetooth Low Energy (BLE) devices. Thus, in case your project targets BLE devices, you may need to look for alternative libraries like Adafruit’s BLE library. 🌐
Lastly, ensure that your Python version is compatible with the PyBluez library. Regular updates to the library are necessary to maintain compatibility with newer Python versions and to leverage bug fixes from the community. Staying updated ensures you have a smooth development experience with minimal issues. 🔄
Conclusion

Scanning for Bluetooth devices using Python is simple with the help of libraries such as PyBluez and Bleak. Following the provided examples, one can efficiently develop an application to discover nearby Bluetooth devices and even incorporate communication between them. 💡
Working with Python and Bluetooth allows for the creation of various applications, like remote monitoring or automation. It’s essential to have a solid understanding of both Python programming and Bluetooth technology to develop useful solutions. 🖥️
Always test your code thoroughly, ensuring it works with various Bluetooth devices and operating systems. This way, you can create a robust and reliable application. Good luck on your Python and Bluetooth journey! 🚀
If you want to improve your skills in Python, check out our free email academy and download our Python cheat sheets:
Foreword
Reference article:Python Bluetooth Development Base — PYBLUEZ Detailed
System: Windows10 Enterprise Edition
IDE:pycharm2020
Python version:3.6.13 (Note I use the version)
Environment creation: Anaconda3
Computer: desktop external Bluetooth
Pybluez Github Address:https://github.com/pybluez/pybluez
Official documentation:https://pybluez.readthedocs.io/en/latest/api/index.html#classes
Install
According to the reference blog post, the 3.6 and below can be installed normally, and the Windows SDK related errors can be reported. (Note Version, I have measured the 3.8 version installation will report the Windows SDK related errors, the solution is available online, and the relevant parameters are modified after the SDK This is not described herein), so this article uses PY3.6
Reference command:pip install pybluez

test
Some routines are running, there is no listing
Search Bluetooth devices
Reference article:Python Bluetooth Development Base — PYBLUEZ Detailed
#!/usr/bin/env python
# --*--coding=utf-8--*--
# pip install pybluez
import time
from bluetooth import *
# List, used to store searched Bluetooth names
alreadyFound = []
# Search Bluetooth
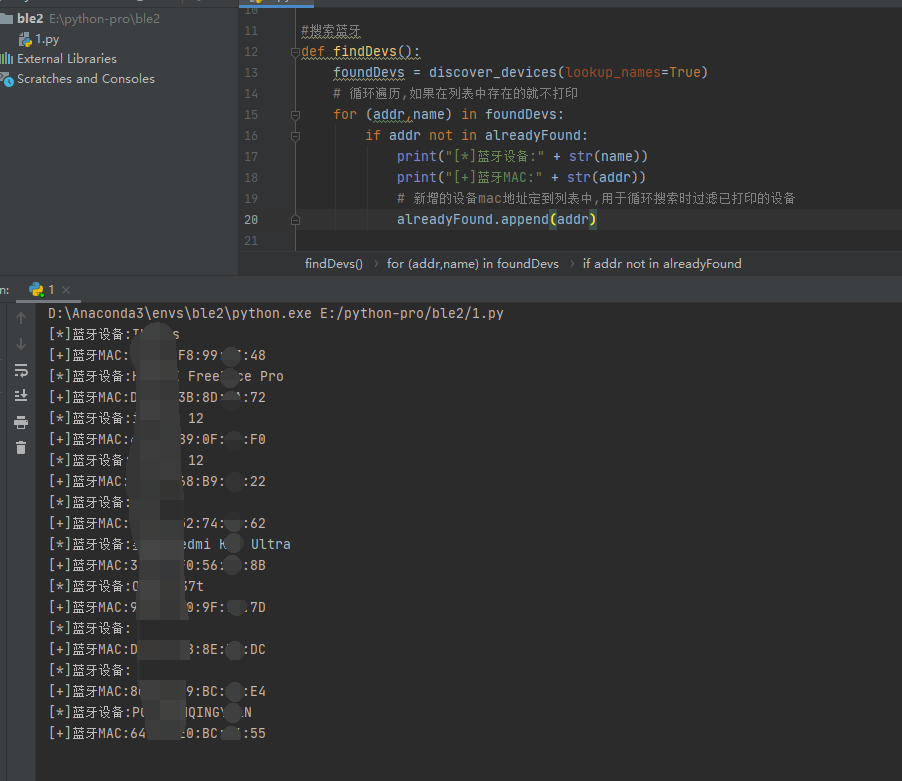
def findDevs():
foundDevs = discover_devices(lookup_names=True)
# Traversal, if you don't print in the list
for (addr,name) in foundDevs:
if addr not in alreadyFound:
print("[*] Bluetooth device:" + str(name))
print("[+] Bluetooth Mac:" + str(addr))
# Added device MAC address to the list, filter the printed device for looping
alreadyFound.append(addr)
# , execute once every 5 seconds
while True:
findDevs()
time.sleep(1)
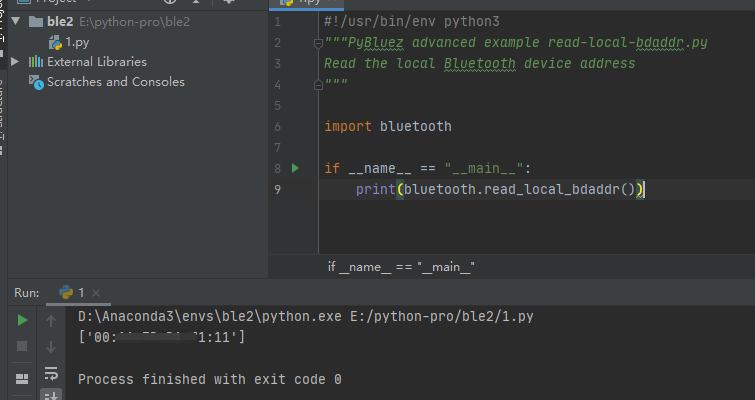
Read the local Bluetooth device address read-local-bdaddr.py
Official routines: pybluez / examples / advanced / read-local-bdaddr.py
#!/usr/bin/env python3
"""PyBluez advanced example read-local-bdaddr.py
Read the local Bluetooth device address
"""

import bluetooth

if __name__ == "__main__":
    print(bluetooth.read_local_bdaddr())
Execute a simple device query, then the device that requests the remote name of each device
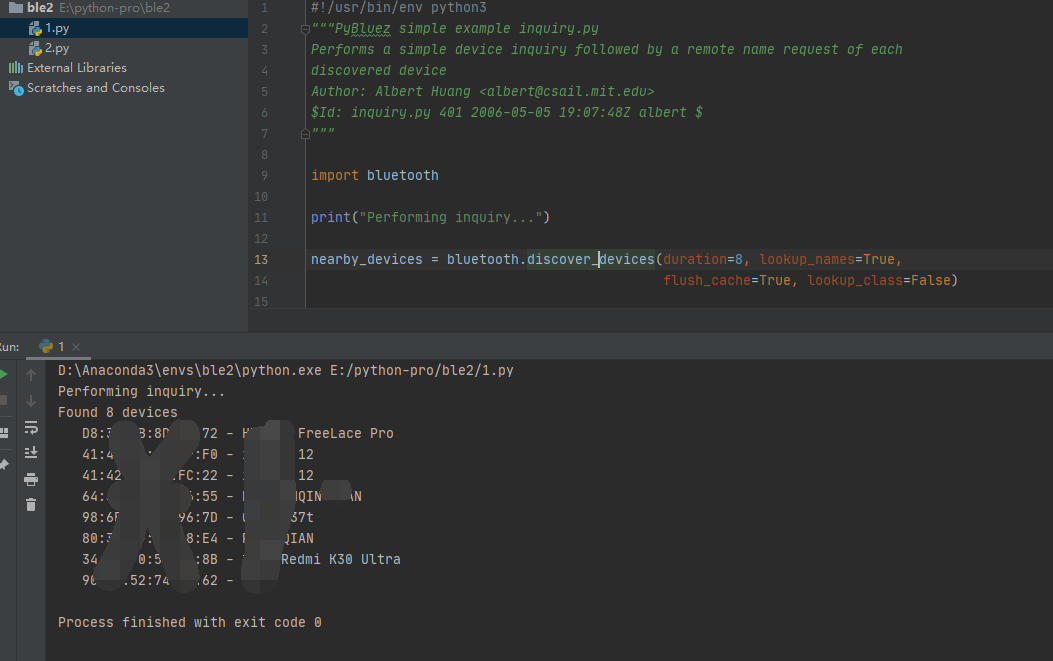
Official routines: pybluez / example / simple / inquiry.py
#!/usr/bin/env python3
"""PyBluez simple example inquiry.py
Performs a simple device inquiry followed by a remote name request of each
discovered device
Author: Albert Huang <[email protected]>
$Id: inquiry.py 401 2006-05-05 19:07:48Z albert $
"""

import bluetooth

print("Performing inquiry...")

nearby_devices = bluetooth.discover_devices(duration=8, lookup_names=True,
                                            flush_cache=True, lookup_class=False)

print("Found {} devices".format(len(nearby_devices)))

for addr, name in nearby_devices:
    try:
        print("   {} - {}".format(addr, name))
    except UnicodeEncodeError:
        print("   {} - {}".format(addr, name.encode("utf-8", "replace")))
Simple demonstration of server applications using RFCMM sockets RFComm-server.py
Official routine: pybluez / example / simple / rfcomm-server.py
#!/usr/bin/env python3
"""PyBluez simple example rfcomm-server.py
Simple demonstration of a server application that uses RFCOMM sockets.
Author: Albert Huang <[email protected]>
$Id: rfcomm-server.py 518 2007-08-10 07:20:07Z albert $
"""

import bluetooth

server_sock = bluetooth.BluetoothSocket(bluetooth.RFCOMM)
server_sock.bind(("", bluetooth.PORT_ANY))
server_sock.listen(1)

port = server_sock.getsockname()[1]

uuid = "94f39d29-7d6d-437d-973b-fba39e49d4ee"

bluetooth.advertise_service(server_sock, "SampleServer", service_id=uuid,
                            service_classes=[uuid, bluetooth.SERIAL_PORT_CLASS],
                            profiles=[bluetooth.SERIAL_PORT_PROFILE],
                            # protocols=[bluetooth.OBEX_UUID]
                            )

print("Waiting for connection on RFCOMM channel", port)

client_sock, client_info = server_sock.accept()
print("Accepted connection from", client_info)

try:
    while True:
        data = client_sock.recv(1024)
        if not data:
            break
        print("Received", data)
except OSError:
    pass

print("Disconnected.")

client_sock.close()
server_sock.close()
print("All done.")
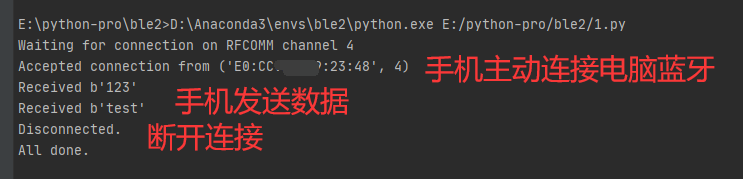
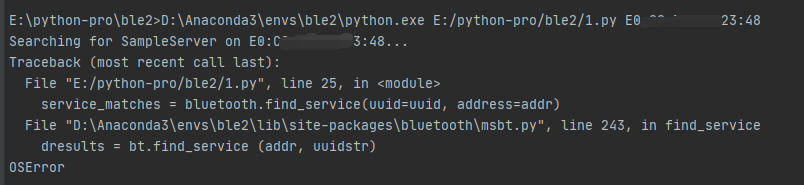
PS: RFComm-Client.py run error. . .
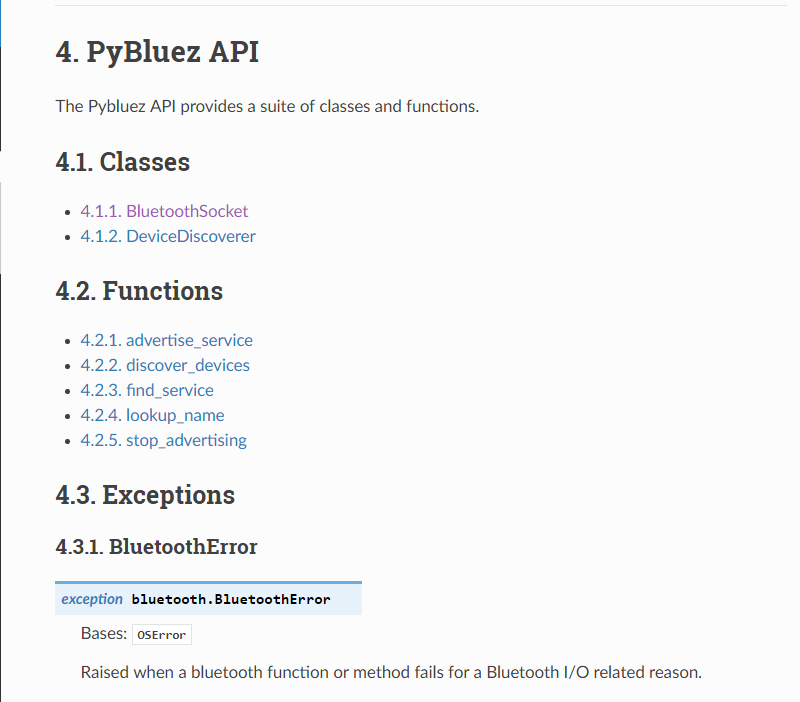
API
Official documentation:https://pybluez.readthedocs.io/en/latest/api/index.html
Introduction: [Wearable Mouse] Bluetooth-based Wearable Mouse Controller for Windows 10 and Linux
I made a Bluetooth-based mouse controller that can be used to control the mouse pointer and perform PC-mouse related operations on the fly, without touching any surfaces. The electronic circuitry, which is embedded on a glove, can be used to track hand gestures through an Accelerometer and that can be translated into the movement of the mouse pointer. This device is also interfaced with a button that replicates the left-button click. The device can be attached serially to the PC (via USB) or wirelessly through a Bluetooth connection. Bluetooth provides a robust and universal wireless communication between the host device and this wearable mouse. As Bluetooth is widely available and comes embedded with almost all personal laptops, the use-case of such a wearable device is broad. Using Raspberry Pi, which is a commonly used development platform for various projects, the interfacing of different sensors, and the development of such a device is easy and scalable. The glove can be replaced with any other wearable to make its application more wide.
As a precaution against the COVID-19, it is advisable to avoid touching surfaces that can be shared among different people, and a touch-screen laptop or a mouse can be among those common surfaces. Using such a wearable device helps in maintaining hygiene and keep the commonly used surfaces sanitized 
Supplies
- Raspberry Pi 3 Model B V1.2
- SparkFun Triple Axis Accelerometer Breakout — MMA8452Q
- Male to Female Jumper Wire
- A glove
- Duct Tape
- Scissors
- Micro-USB cable
- HDMI Cable (for debugging through Raspberry Pi)
Step 1: Interfacing Accelerometer With Raspberry Pi
I used a MMA8542Q Triple-axis accelerometer from Sparkfun which uses the I2C communication protocol to talk to the Raspberry Pi GPIO pins and send the axes data. This sensor provides various modes of operation with the configurable data rate, sleep modes, acceleration range, filter mode, etc. I found the code from Pibits to be very helpful in my initial configuration of the sensor and testing it out with my hand gestures. It is better to first place the sensor on a flat surface and make deterministic tilts while observing the raw sensor values. This is particularly useful in understanding how this sensor reacts with various hand gestures and how we can set up thresholds for our application. Once the accelerometer is succesfully interfaced, you can see the raw axes data coming on the Pi’s terminal screen.
Step 2: Interfacing Push-button With Raspberry Pi
In this wearable device, I interfaced a button that can work as a left-mouse button so that I can click on icons on the screen. The 2 ends of the button are then connected to 2 GPIO pins of the Pi. One of the pins outputs a logical high and the other pin reads that value. When the button is pressed, the circuit becomes closed and the input pin is able to read a logic-high value, which is then processed by the script I wrote to emulate left-mouse clicking. Because of the lack of soldering iron, I used duct tape to connect the jumpers with the button.
Step 3: Developing Python Script to Serially Control Mouse Pointer
I used the Pyautogui Python library to control the mouse pointer. The reason to use this library was that it works on both Linux as well as the Windows platform. In order to control the mouse pointer on my Raspberry Pi, first I connected my Pi to a display. Then, I used the following APIs provided by the library to control my mouse pointer:
-
pyautogui.move(0, 200, 2) # moves mouse down 200 pixels over 2 seconds
-
pyautogui.click() # click the mouse
In order to filter out error data coming from Accelerometer, I used averaging and other filtering methods that can be easily understood through the attached code. The API pyautogui.move(0,y) was used in a way such that the mouse pointer can either go up-down or left-right at a time. This is because the accelerometer reports axes in X, Y, and Z direction, but the API takes only 2 arguments, X and Y axes. Hence, this approach was much suitable for my accelerometer and to map the gestures on the screen.
Step 4: Developing Python Script to Control Mouse Pointer Via Bluetooth
This part is an advanced application wherein any laptop having Bluetooth capabilities can communicate with Raspberry Pi in a server-client communication model and transmit mouse coordinates data wirelessly. In order to set up a Windows 10 64-bit laptop to allow Bluetooth Communication, we need to follow the steps below:
Windows 10:
- Create an incoming Bluetooth COM port.
- Pair the Pi’s Bluetooth with the laptop’s Bluetooth by making Pi discoverable.
- Install Python on Windows.
- Install pip on Windows. Pip is used to install libraries on a Linux or Windows machine.
- Install pyautogui on Windows using: pip install pyautogui
- Once pyautogui is installed on the device, install Pybluez on Windows using the following command on the Windows terminal using: pip install PyBluez-win10. PyBluez enable Bluetooth communication on both Windows and Linux PCs.
- In order to develop an application on a Windows 10 laptop, we need to install Microsoft Visual Studio (15-20 GB of space required) and its build tools. Therefore, along with PyBluez, we need to follow the below instructions,
-
Download and run «Visual Studio Installer»: https://www.visualstudio.com/pl/thank-you-downloa…
-
Install «Visual Studio Build Tools 2017», check «Visual C++ build tools» and «Universal Windows Platform build tools»
-
git clone https://github.com/pybluez/pyblue
- cd pybluez
-
python setup.py install
-
-
If the above instructions are correctly followed, running Python on windows terminal, and importing pyautogui and Bluetooth module should work without errors, as per the image above.
- In the pybluez library installed on the Windows machine, navigate to: pybluez-master\examples\simple\rfcomm-server.py and execute using python rfcomm-server.py. If the terminal goes into a waiting state without errors, go to the below section for setting up Bluetooth on Pi. If there are errors in installing pybluez, refer to GitHub Issues for debugging.
Raspbian on Raspberry Pi:
- Install PyBluez on Pi
- Run the server example on Windows. Then, on Pi, navigate to pybluez-master\examples\simple\rfcomm-client.py and execute. If the two devices have started communicating, Bluetooth is now setup on both the devices. To understand more on how socket communication works with Python, refer to this link from MIT.
There will be some additional data parsing required to send axes data from Pi to PC, as the data is sent in bytes. Refer to the attached code for more info on the client and server data communication.
Step 5: Embedding Accelerometer and Button on the Glove.
Once the accelerometer is well interfaced, the skeleton system looks something the first image on this step.
As the surface of the glove is not flat, I used a dummy credit card that comes to my mailbox every now and then. As per the second image on this step, I attached the dummy credit card on the top surface of my glove with duct tape. Over the card, I attached my accelerometer. This setup was robust enough to keep my accelerometer stable and able to track my gestures accurately.