
HackRF One for Windows
A comprehensive tutorial for setting up and using HackRF One on Windows. This repository provides detailed step-by-step instructions, code samples, and troubleshooting tips—filling the gap left by Linux-focused guides. It also integrates modified code from jamRF_v1.py
Caution
Disclaimer
This repository is provided for educational purposes only. Unauthorized transmission of signals on any frequency band is strictly prohibited. The code is distributed «as is,» without any warranties, including but not limited to warranties of merchantability, fitness for a particular purpose, or noninfringement. The authors and contributors shall not be held liable for any damages or legal issues arising from the use or misuse of this code. Use it at your own risk, and ensure compliance with all applicable laws and regulations. By using or distributing this software, you acknowledge that you have read and understood this disclaimer.
Overview
HackRF One is a popular, low-cost, open-source software-defined radio (SDR) platform. While many setup guides assume a Linux environment, this project is tailored for Windows users. Whether you prefer using Conda, WSL, or Docker, this guide covers various methods to get you started.
Features
- Step-by-step setup guide for HackRF One on Windows
- Windows-specific code samples and scripts
- Integration of selected functions from jamRF_v1.py
- Troubleshooting tips and FAQ
Requirements
- Operating System: Windows 10 or later
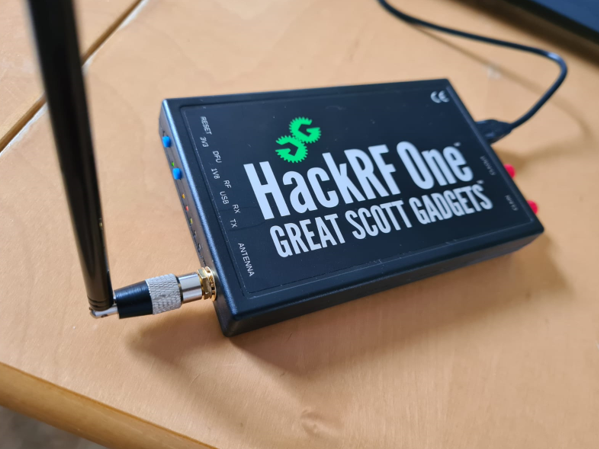
- Device: HackRF One, Micro USB cable (for connecting HackRF to your PC)
- Python: Version 3.6 or higher
Note
There are two popular firmware:
- (Preferred) Stock HackRF One firmware uses a date-based tag in the YYYY.MM.DD format (e.g., 2024.02.1).
To update or verify your firmware, see the official instructions at Updating Firmware - (Most common preloaded) Mayhem (PortaPack) firmware uses semantic versioning in the vX.X.X format (e.g., v2.1.0).
For details on Mayhem updates, see the PortaPack Mayhem repository
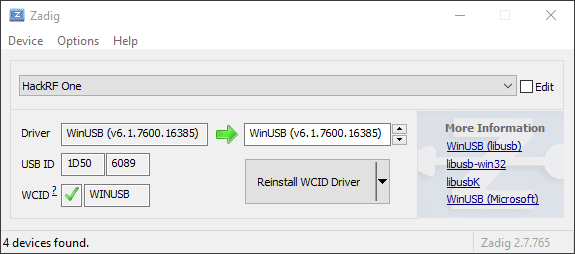
Sometimes Mayhem (PortaPack) firmware might require using Zadig (as shown in the screenshots under the 2nd step in the conda setup section) to resolve “No HackRF boards found.” errors.
Contents
- Conda Setup
- Radioconda Setup
- WSL Setup
- Troubleshooting
Conda Setup
-
Prepare Essentials:
- Download and install Git and Miniconda (or Anaconda).
-
Connect and Verify HackRF One
-
Clone the Repository
Open a Command Prompt and run:git clone https://github.com/whiteSHADOW1234/HackRF-One-for-Windows.gitThis will download the files
jamRF_v1.pyandconfig_v1.yaml. -
Set Up the Python Environment
-
Launch Visual Studio Code (or your preferred editor) and open the cloned repository.
-
If you see unresolved package errors (e.g., as shown below), proceed with the following steps:

-
Open a Command Prompt (by) and run:
conda create -n hackrf_env -c conda-forge gnuradio gnuradio-osmosdr hackrf -y conda activate hackrf_env -
Then, in VSCode, change the Python interpreter to
hackrf_env:- Click on the status bar section that shows the current interpreter and select the one called
hackrf_env.
- Alternatively, open the Command Palette (
Ctrl + Shift + Pon Windows/Linux orCmd + Shift + Pon macOS) and typePython: Select Interpreterto choosehackrf_env.
- Click on the status bar section that shows the current interpreter and select the one called
-
And restart the terminal, the error message (
import XXX could not be found) should now be resolved.
-


Tip
You might need to restart VS Code terminal twice to clear all issues.

- Verify and Run
-
In the terminal, run the following command to ensure HackRF One details are displayed.
> hackrf_info hackrf_info version: 2024.02.1 libhackrf version: 2024.02.1 (0.9) Found HackRF Index: 0 Serial number: 0000000000000000a18c63dc2b3c6813 Board ID Number: 2 (HackRF One) Firmware Version: v2.0.1 (API:1.08) Part ID Number: 0xa000cb3c 0x00614766 Hardware Revision: older than r6 Hardware supported by installed firmware: HackRF One -
Run
python jamRF_v1.pyin the terminal> python jamRF_v1.py 1 100 JAM! The frequency currently jammed is: 2412.0MHz gr-osmosdr 0.2.0.0 (0.2.0) gnuradio 3.10.12.0 built-in sink types: uhd hackrf bladerf soapy redpitaya file Using HackRF One with firmware v2.0.1 Detected Windows OS 100 pagesize :debug: Setting pagesize to 4096 B top_block_impl :debug: Using default scheduler "TPB" UUUUUUUU
-
Radioconda Setup
-
Install Prerequisites:
- Install Git and Miniconda (or Anaconda).
- Install Radioconda. No special installation steps are needed beyond the defaults.
-
Connect and Verify HackRF One
- Plug in your HackRF One with a micro USB cable.
- Open the Device Manager to check if your PC recognizes the device.
- If HackRF One is not recognized, run Zadig, select List All Devices, choose HackRF One, and click Downgrade WCID Driver.
-
Clone the Repository
Open a Command Prompt and run:git clone https://github.com/whiteSHADOW1234/HackRF-One-for-Windows.gitThis will download the project files, including
jamRF_v1.pyandconfig_v1.yaml. -
Verify and Run
-
In the Radioconda prompt, run the following to verify that your HackRF One is correctly recognized:
> hackrf_info hackrf_info version: 2024.02.1 libhackrf version: 2024.02.1 (0.9) Found HackRF Index: 0 Serial number: 0000000000000000a18c63dc2b3c6813 Board ID Number: 2 (HackRF One) Firmware Version: v2.0.1 (API:1.08) Part ID Number: 0xa000cb3c 0x00614766 Hardware Revision: older than r6 Hardware supported by installed firmware: HackRF One -
Then, run the script:
> cd HackRF-One-for-Windows
> python jamRF_v1.py
1 100
JAM!

The frequency currently jammed is: 2412.0MHz
gr-osmosdr 0.2.0.0 (0.2.0) gnuradio 3.10.12.0
built-in sink types: uhd hackrf bladerf soapy redpitaya file
Using HackRF One with firmware v2.0.1
Detected Windows OS
100
pagesize :debug: Setting pagesize to 4096 B
top_block_impl :debug: Using default scheduler "TPB"
UUUUUUUU
-
WSL Setup
-
Install Prerequisites:
- Install Git and WSL with a Linux distrobution (take Ubuntu for example).
- Install usbipd-win (.msi) from its GitHub releases.
-
Connect and Verify HackRF One
- Plug in your HackRF One with a micro USB cable.
- Open the Device Manager to check if your PC recognizes the device.
- If not, run Zadig, select List All Devices, choose HackRF One, and click Downgrade WCID Driver.
-
Clone the Repository
Open a Command Prompt and run:git clone https://github.com/whiteSHADOW1234/HackRF-One-for-Windows.gitThis will download the files
jamRF_v1.pyandconfig_v1.yaml. -
Install Linux Dependencies in WSL:
- Open PowerShell and list your WSL distributions
- Launch your chosen Linux distribution:
wsl -d <YOUR_LINUX_DISTRIBUTION> - Install the necessary packages
sudo apt update sudo apt install gnuradio gr-osmosdr hackrf -y - Verify HackRF detection (It might not detect the device like the following output):
> lsusb
Bus 002 Device 001: ID 1d6b:0003 Linux Foundation 3.0 root hub
Bus 001 Device 001: ID 1d6b:0002 Linux Foundation 2.0 root hub
-
Bind the HackRF USB Port to WSL:
- In a new PowerShell window, list connected USB devices:
> usbipd list Connected: BUSID VID:PID DEVICE STATE 2-1 1d50:6089 HackRF One Not shared 2-3 30c9:000e HP Wide Vision HD Camera Not shared 2-10 8087:0026 Intel(R) Wireless Bluetooth(R) Not shared Persisted: GUID DEVICE - Bind and attach HackRF (replace with your HackRF’s bus ID):
> usbipd bind --busid 2-1 > usbipd list Connected: BUSID VID:PID DEVICE STATE 2-1 1d50:6089 HackRF One Shared 2-3 30c9:000e HP Wide Vision HD Camera Not shared 2-10 8087:0026 Intel(R) Wireless Bluetooth(R) Not shared Persisted: GUID DEVICE > usbipd attach --wsl --busid 2-1 > usbipd list Connected: BUSID VID:PID DEVICE STATE 2-1 1d50:6089 HackRF One Attached 2-3 30c9:000e HP Wide Vision HD Camera Not shared 2-10 8087:0026 Intel(R) Wireless Bluetooth(R) Not shared Persisted: GUID DEVICE - Confirm the attachment by rechecking in the old window with:
> lsusb
Bus 002 Device 001: ID 1d6b:0003 Linux Foundation 3.0 root hub
Bus 001 Device 002: ID 1d50:6089 OpenMoko, Inc. Great Scott Gadgets HackRF One SDR
Bus 001 Device 001: ID 1d6b:0002 Linux Foundation 2.0 root hub
- In a new PowerShell window, list connected USB devices:
-
Test and Run
- In WSL, run the following command to ensure HackRF is recognized.
$ hackrf_info hackrf_info version: unknown libhackrf version: unknown (0.6) Found HackRF Index: 0 Serial number: 0000000000000000a18c63dc2b3c6813 Board ID Number: 2 (HackRF One) Firmware Version: v2.0.1 (API:1.08) Part ID Number: 0xa000cb3c 0x00614766 - Navigate to the cloned repository and execute the script
$ python3 jamRF_v1.py
1 100
JAM!

The frequency currently jammed is: 2412.0MHz
gr-osmosdr 0.2.0.0 (0.2.0) gnuradio 3.10.1.1
built-in sink types: uhd hackrf bladerf soapy redpitaya freesrp file
[INFO] [UHD] linux; GNU C++ version 11.2.0; Boost_107400; UHD_4.1.0.5-3
libusb: warning [libusb_exit] device 2.1 still referenced
libusb: warning [libusb_exit] device 1.2 still referenced
libusb: warning [libusb_exit] device 1.1 still referenced
Using HackRF One with firmware v2.0.1
Detected Linux OS
100
UUUUUUUUUU
- In WSL, run the following command to ensure HackRF is recognized.
Troubleshooting
-
Device Not Found
- Error:
Exception has occurred: RuntimeError Failed to use '0' as HackRF device index: not enough devices File "C:\Users\<USER_NAME>\Desktop\HackRF-One-for-Windows\jamRF_v1.py", line 130, in jam osmosdr_sink = osmosdr.sink("hackrf=0") ^^^^^^^^^^^^^^^^^^^^^^^^ File "C:\Users\<USER_NAME>\Desktop\HackRF-One-for-Windows\jamRF_v1.py", line 271, in <module> jam(freq, waveform, power, t_jamming) RuntimeError: Failed to use '0' as HackRF device index: not enough devices - Solution:
Try switching to a different USB port or update the USB driver.
- Error:
-
Device Misidentification
- Observation
When runningusbipd list, HackRF appears as aUSBIP Shared Device(and similarly in Device Manager) instead ofHackRF One. - Solution
Update the USB driver, unplug and replug the HackRF, or use a different USB port.
- Observation
-
DLL Errors
- Error
python jamRF_v1.py Traceback (most recent call last): File "C:\Users\<USER_NAME>\miniconda3\envs\hackrf_env\Lib\site-packages\gnuradio\blocks\__init__.py", line 18, in <module> from .blocks_python import * ImportError: DLL load failed while importing blocks_python: 找不到指定的模組。 During handling of the above exception, another exception occurred: Traceback (most recent call last): File "C:\Users\<USER_NAME>\Desktop\WiFi-Jamming\jamRF_v1.py", line 19, in <module> from gnuradio import blocks File "C:\Users\<USER_NAME>\miniconda3\envs\hackrf_env\Lib\site-packages\gnuradio\blocks\__init__.py", line 22, in <module> from .blocks_python import * ImportError: DLL load failed while importing blocks_python: 找不到指定的模組。 - Solution
Remove any conflicting conda environments or WSL distrobutions to ensure only one is accessing the HackRF device.
- Error
-
Access Denied error, even when running as Administrator.
- Error
$ hackrf_info hackrf_info version: unknown libhackrf version: unknown (0.6) Found HackRF Index: 0 hackrf_open() failed: Access denied (insufficient permissions) (-1000) - Solution
Remove any conflicting conda environments or WSL distrobutions to ensure only one is accessing the HackRF device.
- Error
-
avahi_service_browser_new()Failed- Error
python3 jamRF_v1.py 1 100 JAM! The frequency currently jammed is: 2412.0MHz gr-osmosdr 0.2.0.0 (0.2.0) gnuradio 3.10.1.1 built-in sink types: uhd hackrf bladerf soapy redpitaya freesrp file [INFO] [UHD] linux; GNU C++ version 11.2.0; Boost_107400; UHD_4.1.0.5-3 [ERROR] avahi_service_browser_new() failed: Bad state libusb: warning [libusb_exit] device 2.1 still referenced libusb: warning [libusb_exit] device 1.2 still referenced libusb: warning [libusb_exit] device 1.1 still referenced Using HackRF One with firmware v2.0.1 100 vmcircbuf_prefs::get :error: /home/<USER_NAME>/.gnuradio/prefs/vmcircbuf_default_factory: No such file or directory gr::vmcircbuf :error: vmcircbuf_createfilemapping: createfilemapping is not available - Solution
Installavahi-daemonby executingsudo apt install avahi-daemon -yin the WSL distrobution will fix.
- Error
HackRF software includes HackRF Tools and libhackrf. HackRF Tools are the commandline utilities that let you interact with your HackRF. libhackrf is a low level library that enables software on your computer to operate with HackRF.
Install Using Package Managers
Unless developing or testing new features for HackRF, we highly recommend that most users use build systems or package managers provided for their operating system. Our suggested operating system for use with HackRF is Ubuntu.
FreeBSD
You can use the binary package: # pkg install hackrf
You can also build and install from ports:
# cd /usr/ports/comms/hackrf
# make install
Linux: Arch
Linux: Fedora / Red Hat
sudo dnf install hackrf -y
Linux: Gentoo
emerge -a net-wireless/hackrf-tools
Linux: Ubuntu / Debian
sudo apt-get install hackrf
OS X (10.5+): Homebrew
brew install hackrf
OS X (10.5+): MacPorts
sudo port install hackrf
Windows: Binaries
Binaries are provided as part of the PothosSDR project, they can be downloaded here.
Installing From Source
Linux / OS X / *BSD: Building HackRF Software From Source
Acquire the source for the HackRF tools from either a release archive or git: git clone https://github.com/greatscottgadgets/hackrf.git
Once you have the source downloaded, the host tools can be built as follows:
cd hackrf/host
mkdir build
cd build
cmake ..
make
sudo make install
sudo ldconfig
If you have HackRF hardware, you may need to update the firmware to match the host tools versions.
Windows: Prerequisites for Cygwin, MinGW, or Visual Studio
cmake-2.8.12.1 or later from http://www.cmake.org/cmake/resources/software.html
libusbx-1.0.18 or later from http://sourceforge.net/projects/libusbx/files/latest/download?source=files
fftw-3.3.5 or later from http://www.fftw.org/install/windows.html
- Install Windows driver for HackRF hardware or use Zadig see http://sourceforge.net/projects/libwdi/files/zadig
If you want to use Zadig select HackRF USB device and just install/replace it with WinUSB driver.
Note for Windows build: You shall always execute hackrf-tools from Windows command shell and not from Cygwin or MinGW shell because on Cygwin/MinGW Ctrl+C is not managed correctly and especially for hackrf_transfer the Ctrl+C (abort) will not stop correctly and will corrupt the file.
Windows: Installing HackRF Software via Cygwin
mkdir host/build
cd host/build
cmake ../ -G "Unix Makefiles" -DCMAKE_LEGACY_CYGWIN_WIN32=1 -DLIBUSB_INCLUDE_DIR=/usr/local/include/libusb-1.0/
make
make install
Windows: Installing HackRF Software via MinGW
mkdir host/build
cd host/build
cmake ../ -G "MSYS Makefiles" -DLIBUSB_INCLUDE_DIR=/usr/local/include/libusb-1.0/
make
make install
Windows: Installing HackRF Software via Visual Studio 2015 x64
Create library definition for MSVC to link to C:\fftw-3.3.5-dll64> lib /machine:x64 /def:libfftw3f-3.def
c:\hackrf\host\build> cmake ../ -G "Visual Studio 14 2015 Win64" \
-DLIBUSB_INCLUDE_DIR=c:\libusb-1.0.21\libusb \
-DLIBUSB_LIBRARIES=c:\libusb-1.0.21\MS64\dll\lib\libusb-1.0.lib \
-DTHREADS_PTHREADS_INCLUDE_DIR=c:\pthreads-w32-2-9-1-release\Pre-built.2\include \
-DTHREADS_PTHREADS_WIN32_LIBRARY=c:\pthreads-w32-2-9-1-release\Pre-built.2\lib\x64\pthreadVC2.lib \
-DFFTW_INCLUDES=C:\fftw-3.3.5-dll64 \
-DFFTW_LIBRARIES=C:\fftw-3.3.5-dll64\libfftw3f-3.lib
CMake will produce a solution file named HackRF.sln and a series of project files which can be built with msbuild as follows: c:\hackrf\host\build> msbuild HackRF.sln
Summary
We want to get started with the HackRF One Software Defined Radio. At the end of the setup, the HackRF One will be ready to use and we will be able to see the first incoming radio signals.
This Setup shows mostly the installation and usage under Linux, this device can also be used under Windows however the software options are limited.
Requirements
- Operating system: Any Linux Distribution but preferably Kali or Pentoo
Description
Installation of Packages
The following commands are for Debian/Ubuntu based Linux Distributions.
First, update your machine:
 sudo apt-get update
 sudo apt upgrade
Then install the hackrf tool and libraries:
sudo apt install hackrf libhackrf-dev libhackrf0
Now install GQRX:
sudo apt install gqrx-sdr
If that does not work use:
sudo aptitude install gqrx-sdr
We also must download the newest firmware from this Git repository:
https://github.com/mossmann/hackrf/releases
Installation under Windows using Zadig
Download the latest release from:
https://zadig.akeo.ie/
Start the program. Under Options select List All Devices. Select HackRF One from the available devices and install the driver. Now you can use HackRF with Windows and for example Universal Radio Hacker.
Check HackRF One
Now, that we have installed the necessary software we can finally connect the HackRF One to our computer. IMPORTANT: Before you connect it to the computer, make sure you have attached the antenna. If you do not do this the HackRF One might get broken.
Now we must activate the USB port in the virtual machine. In Oracle Virtual Box you can do that by right-clicking the VM -> select options -> click USB -> add USB drive -> choose the HackRF One -> Restart the machine.
Now we can check if the HackRF one is recognized by the machine:
hackrf_info
When everything is correct you should see an output like this:
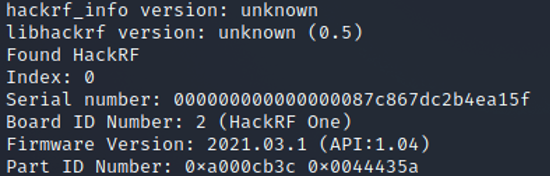
Here you can see the HackRF One was found and some more things. Important now is the firmware version. If it is not the newest, we have to do the following:
Unpack the folder we downloaded before from https://github.com/mossmann/hackrf/releases and navigate into the firmware-bin subdirectory. Then use this command to update the firmware:
hackrf_spiflash -w hackrf_one_usb.bin
Older versions of HackRF firmware (prior to release 2021.03.1) require an additional step to program a bitstream into the CPLD:
hackrf_cpldjtag -x ./cpld/sgpio_if/default.xsvf
Now restart the HackRF One by simply unplugging and plugging back in. You can now check if the version was updated.
Receiving Radio Waves
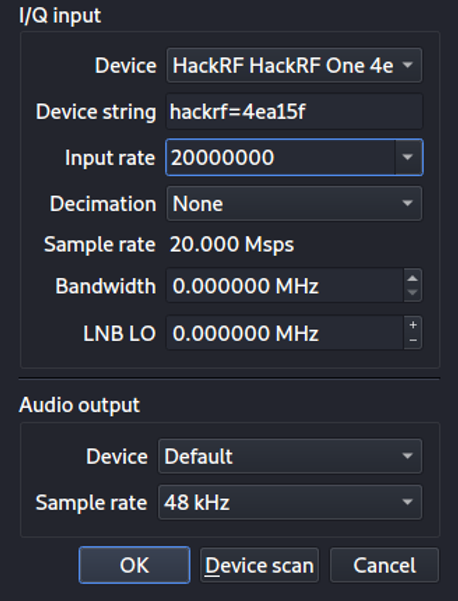
To validate that the HackRF One is properly working we want to test it by simply listening to Radio. To do that, we must start the previous downloaded program GQRX. You will be prompted a configuration window which you should edit like that:
Now the program window will open. We must do some configuration here though:
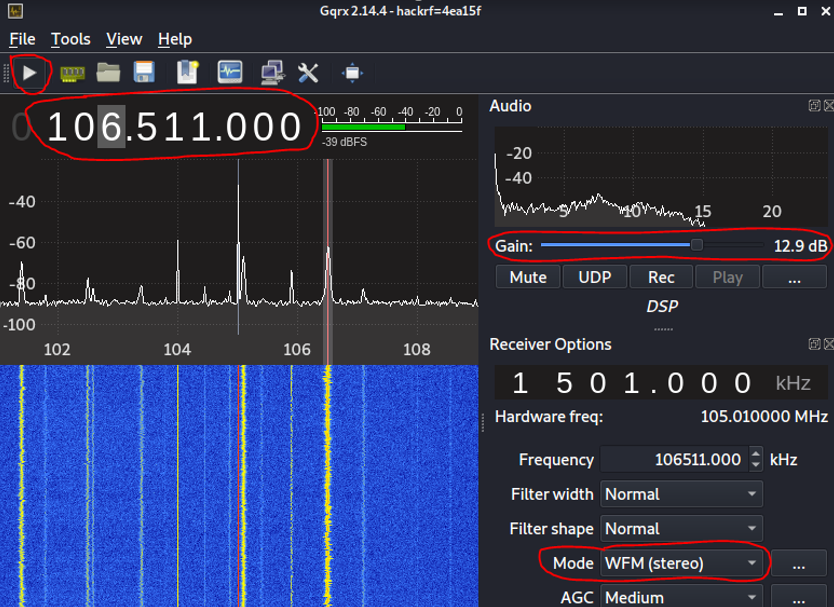
- Change the Mode to ‘WFM(stereo)’
- Increase the Gain (otherwise you will not hear anything)
- Click the ‘Start DSP processing’ button
- Change the Frequency (you can google for radio channel frequencies in your area or try to move the red bar inside one of the white curves)
If you can listen to the radio channel now your HackRF One is set up properly and you can move on to do other, more interesting things with it.
Used Hardware
- HackRF One Software Defined Radio (SDR)
- Antenna (Antratek ANT500)
Courses
- Wahlfach Projekt 1 (2021)
References
- https://miloserdov.org/?p=4370
- https://github.com/mossmann/hackrf/wiki/Getting-Started-with-HackRF-and-GNU-Radio
- https://hackrf.readthedocs.io/en/latest/index.html
Welcome again, my aspiring SDR hackers!
Within the earlier tutorials on this collection, we used the cheap however succesful RTL-SDR for our radio hacking adventures. Though the RTL-SDR may be very able to receiving all kinds of radio indicators, it’s not able to sending radio indicators. As well as, the frequency vary of the RTL-SDR is restricted (see my tutorial on SDR {hardware} comparability right here).

Within the subsequent few tutorials, we can be utilizing the HackRF One transceiver. The HackRF One is able to each sending and receiving radio indicators. Its greatest limitation–compared to the far more costly hardware– is that its is just half-duplex that means it could possibly solely ship or obtain and never each concurrently. Regardless of this limitation, it’s nice for lots of nice hacks comparable to replay assaults the place we seize a transmission after which resend it.

HackRF One was developed by Michael Ossmann as an open supply undertaking. The HackRF One turned infamous for getting used within the car key fob assaults I element right here and has been proven able to interfering with army tactical communication and GPS techniques.

It’s obtainable from Nice Scott Devices, Amazon and different retailers of electronics for about $320.
Step #1: Join Your HackRF One
On this first step, you will have to attach your HackRF to a USB port. Then obtain the HackRF utilities from the Kali repository.
kali > sudo apt set up hackrf
Now, with these utilities put in, let’s examine on the model of our HackRF One.
kali > sudo hackrf_info

This could provide us with some fundamental data on our system, most significantly the firmware model. As you may see, my HackRF One got here with firmware from 2017. There have been a couple of updates since then so let’s replace ours to probably the most present model.
Michael Ossmann, the developer of the HackRF maintains a github repository for all issues HackRF at https://github.com/mossmann/hackrf. From there we navigate to the releases listing and see that there’s model new launch of the firmware for 2021.03.1. Let’s get that firmware and replace our HackRF.

Step #2: Replace the firmware
Obtain and extract the brand new firmware from Ossmann’s repository to your Kali system. It’ll create a listing named appropriately sufficient, hackrf-2021.03.1. Navigate to that listing and you will notice a file named firmware-bin. Change (cd) to that listing.
Now we have to replace the firmware. To replace the firmware, enter the next command;
kali > hackrf_spiflash -w hackrf_one_usb.bin

As soon as the firmware has been up to date, disconnect after which reconnect the HackRF One.
Now, once we ask the HackRF One system for particulars utilizing the hackrf_info command, we will see that it has been up to date to probably the most present firmware.

Step #3: Making ready the HackRF One for Home windows
We can be utilizing Linux for the HackRF hacks in future tutorials (HackRF would not transmit in Home windows), however if you wish to use your HackRF in Home windows, this is tips on how to do it.
First, plug your HackRF One into the USB port. Now, open Zadig and search for the HackRF One beneath gadgets. Choose HackRF One.

Subsequent, click on on the Set up Driver.


When the motive force set up is full, Zadig ought to appear to be this.

Lastly, we have to set up a brand new ExtIO.dll for the HackRF. You could find it at https://github.com/ExtIO_HackRF/releases like under.

Obtain and set up it in the identical listing as your HDSDR.

Now, click on to open HDSDR and you’ll be greeted with a message asking you to pick out which {hardware} you need to use.

Choose the ExtIO_HackRF. When you find yourself carried out, HDSDR will open and use the HackRF One for receiving and processing radio indicators

Abstract
The HackRF One is a strong and cheap radio transceiver wonderful for each sending and receiving radio indicators within the 1Mhz to six GHZ frequency vary. Though it’s only half-duplex and USB2.0, it’s sufficient for most of the hacks we can be doing, comparable to replay assaults the place we seize a sign and replay it. In these circumstances, excessive efficiency is just not required.
Search for extra SDR for Hackers tutorials comparable to sign jamming, GPS spoofing, distant replay assaults and extra.

Getting started with Software Defined Radio (SDR) has never been easier thanks to GNU Radio and the various SDRs available. I have decided to start learning about SDR using the ‘HackRF One’ from Great Scott Gadgets (link).
I am following along with the Great Scott Gadgets website tutorials put on by
Michael Ossmann. I have just completed the first set of code and instruction video. My particular notes are below on getting started with Windows, GNU Radio and my source code.
- Step 1: Setup GNU Radio for Windows
- Go to: http://www.gcndevelopment.com/gnuradio/downloads.htm
- Download the latest and Install
- Step 2: Download and Install Zadig 2.4
- https://zadig.akeo.ie/
- When first plugging in the HackRF One, run Zadig and install the WinUSB driver when selecting the HackRF One
After the installation steps in the list above, it is as easy as opening up GNU Radio Companion and following the steps laid out by Michael to create your first FM Radio.


The only major hiccup that I found was that in the demonstration was that his sample rate was 20M s/sec, this was much too fast for my PC and had issues keeping up. Once I turned down the sampling rate down to 10M s/sec the tuner was crystal clear and worked great.

More to come as I complete future lessons and eventually start listening to the ham radio bands and use this to modify my low cost radar project.