
This is something that has come up multiple times especially when working and dealing with network related tasks. Many times server engineers would contact us and complain about network traffic or VPN related issues or more recently I had to test VPN Connectivity from a server to other remote sites. However this server had 2 Network Cards. Both of them had different IP’s. Here is how the setup was:
- VLAN100 = NIC1 = 192.168.100.10
- VLAN200 = NIC2 = 192.168.200.10
Now I needed to ping the remote sites but I needed the source to be VLAN200 = NIC2 = 192.168.200.10. I opened up wireshark and did a simple ping and that showed traffic going out of VLAN100 = NIC1 = 192.168.100.10. Well that wasn’t going to help me because 192.168.100.10 was not part of the interesting traffic on the Cisco ASA. After a little digging I found out that I found out that there is a utility called NPing, that comes with NMap will allow me to accomplish that. I already had NMap installed on this server so I opened up the command prompt and typed:
nping
I got many options and the two options I was interested in were -e and -S.
- -e lets you specify the network interface you want to source the ICMP packet from
- -S lets you specify the IP Address of that network interface you want to source the ICMP packet from
- In my case I needed to source the ping (ICMP) from the second Network Card using the IP address of 192.168.200.10
- Now an important point to remember over here is that nping will not see the name of your network interface as it is in windows like “local area connection” etc. It uses the Linux way. So now I found out that mapping by utilizing the following command:
- It produced bunch of data towards the top second or third line was *************************INTERFACES************************
- Right under this line it shows all the network interfaces mapped in Linux style with the IP address. So the first interface was eth0, second was eth1
- I picked out the the interface I needed in my case it was eth1 and then ran the following command?
- Now looking at the wireshark capture I was able to see that the ICMP packets were going out of the second network card and on the Cisco ASA Firewall I was able to see the VPN Traffic
- nping offers so many more options to work with for troubleshooting purposes, in general NMAP is a great and must have utility for network and systems engineers

«Для чего в команде ping используются опции Loose, Strict, Record, Timestamp и Verbose?» — такой вопрос мне недавно встретился в вендорном экзамене. Они позволяют влиять на маршрутизацию ICMP пакетов и собирать информацию о транзитных L3-устройствах. Но занимаясь сетевыми технологиями уже достаточно давно, я почти никогда их не использовал.
Мне стало не совсем понятно, почему такой вопрос вообще присутствует в тесте. Вернувшись домой, решил узнать, вдруг я действительно постоянно упускаю из виду что-то важное?
Утилита ping нам всем хорошо знакома. Помимо стандартного «ping 8.8.8.8», можно использовать различные опции, среди которых присутствуют интересующие нас. Их наименование и описание у вендоров примерно одинаковое.
Из наиболее часто используемых я бы отметил следующие.
- Количество отправляемых пакетов
Вместо заданного количества пакетов по умолчанию (например, в Windows — четыре, в оборудовании Cisco — пять), мы можем отправить нужное. Сюда же можно отнести многими любимую опцию «-t» в ОС Windows, которая запускает бесконечную отправку пакетов. - Интерфейс источника
В первую очередь актуально для сетевого оборудования. По умолчанию, при использовании команды ping устройство отправляет пакет с адресом ближайшего интерфейса к точке назначения. В случае тестирования функций NAT или проверки VPN, возникает необходимость отправлять ICMP пакеты с другого интерфейса. Ещё один классический пример: как доказать коллеге, что у него включён файрвол на хосте, а не сеть глючит. Запускаем ping с ядра сети без указания интерфейса – пингуется. С указанием неближайшего интерфейса – не пингуется. - Установка DF-бита
Пакет с установленным DF-битом (=1) не может фрагментироваться. Данную опцию удобно использовать для определения максимально допустимого размера кадра (MTU) между двумя точками. Обычно используется в связке параметрами ниже. - Размер пакета
Можно варьировать размер пакета. Вместе с установкой DF-бита помогает в определении MTU. Шлём большой пакет – 1500 байт. Не проходит. Шлём чуть меньше – 1300. Проходит. Шлём 1400. И так далее. В общем, метод дихотомии и MTU определён.
В Windows мы указываем размер сегмента данных ICMP пакета. На устройствах Cisco – размер пакета IP с учётом заголовков. - Вариация размера пакета в указанном диапазоне
Для тех, кто не любит метод дихотомии, может пригодиться данный режим. Мы указываем начальное значение размера пакета, конечное и шаг. Далее устройство отправляет пакеты, постепенно увеличивая их размер. Главное не забыть выставить DF-бит, а то всё насмарку.
За бортом остался ряд других опций (timeout, ToS и пр.), которыми лично я практически не пользуюсь.
Опции Loose, Strict, Record, Timestamp, Verbose включены в утилиту ping на многих сетевых устройствах. Есть поддержка в Windows.
Record (Record Route)
Пакет ICMP с опцией Record при прохождении через L3-устройства записывает IP-адреса исходящих интерфейсов. Делается это как в сторону пункта назначения, так и обратно. Это удобно, например, при диагностировании проблем, связанных с асинхронной маршрутизацией. Получается вроде traceroute, только лучше.
«Опции»
Слово «опции» я использую в двух контекстах: опции команды ping и опции в пакете ICMP. В случае ICMP, опции – это дополнительные параметры, которые устанавливаются в заголовке IPv4 (далее будем указывать просто IP) в поле Options. Поэтому корректнее, конечно, говорить про опции IP. ICMP просто их использует в своей работе.
Но рано радоваться: максимальное количество записей равно девяти. Причём в них входят данные об IP-адресах устройств в обе стороны. Обусловлено данное ограничением тем, что информация об IP-адресах сохраняется не в теле пакета, а в заголовке. Поле с опциями не может быть слишком большим. Оно ограничено 40 байтами. Нам, в конце концов, по сети нужно гонять полезные данные, а не заголовки. В этот объём помещается всего девять записей (4 байт на каждый IPv4 адрес). Оставшиеся (40-4*9)=4 байта уходят на отметку о типе опции, длине и пр. атрибутах. Напомню, максимальный размер всего заголовка IPv4 – 60 байт.
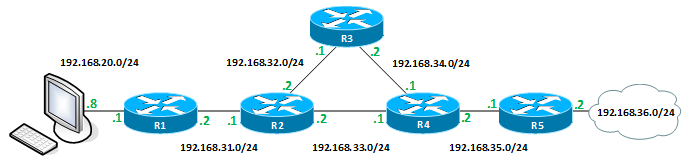
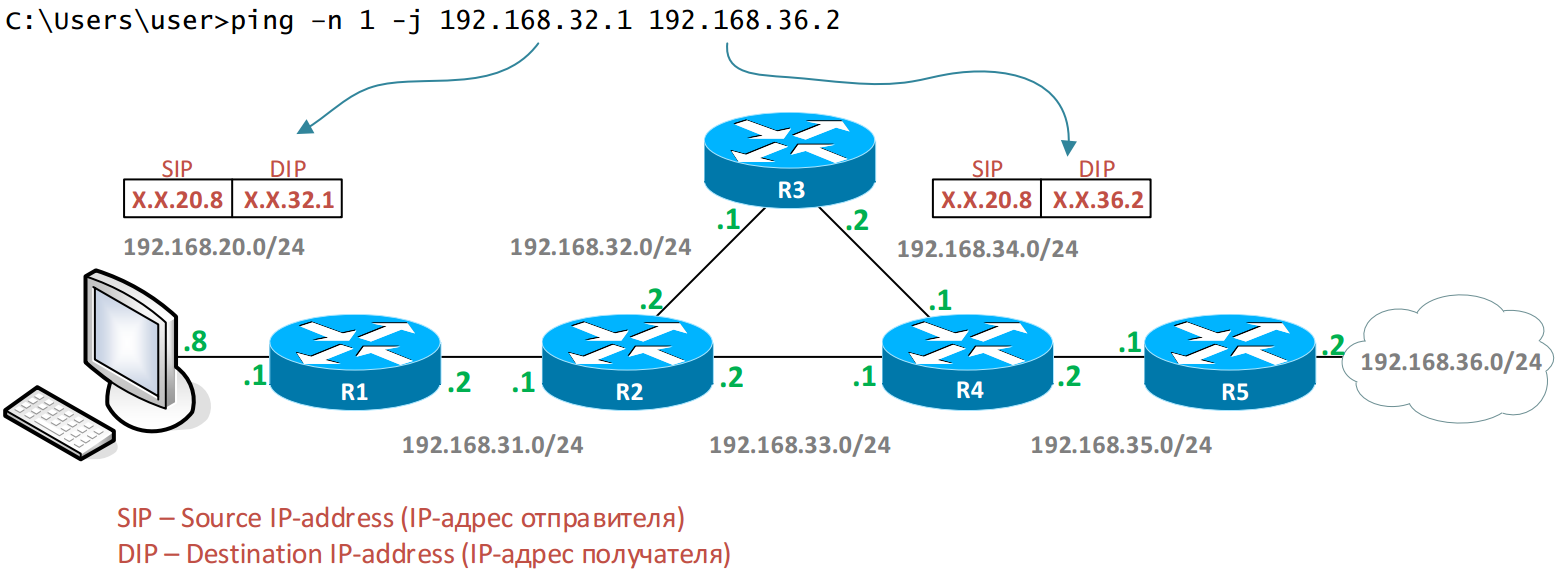
Запускаем с ПК под управлением ОС Windows ping с опцией Record Route (-r) до адреса 192.168.36.2:
C:\Users\user>ping -n 1 -r 9 192.168.36.2
Обмен пакетами с 192.168.36.2 по с 32 байтами данных:
Ответ от 192.168.36.2: число байт=32 время=12мс TTL=252
    Маршрут: 192.168.31.2 ->
           192.168.32.2 ->
           192.168.34.2 ->
           192.168.35.2 ->
           192.168.36.2 ->
           192.168.35.1 ->
           192.168.33.1 ->
           192.168.31.1 ->
           192.168.20.1

Статистика Ping для 192.168.36.2:
    Пакетов: отправлено = 1, получено = 1, потеряно = 0
    (0% потерь)
Приблизительное время приема-передачи в мс:
    Минимальное = 12мсек, Максимальное = 12 мсек, Среднее = 12 мсек
Пакeт ICMP Echo Request c выставленной опцией Record Route (Type = 7) в заголовке IP:
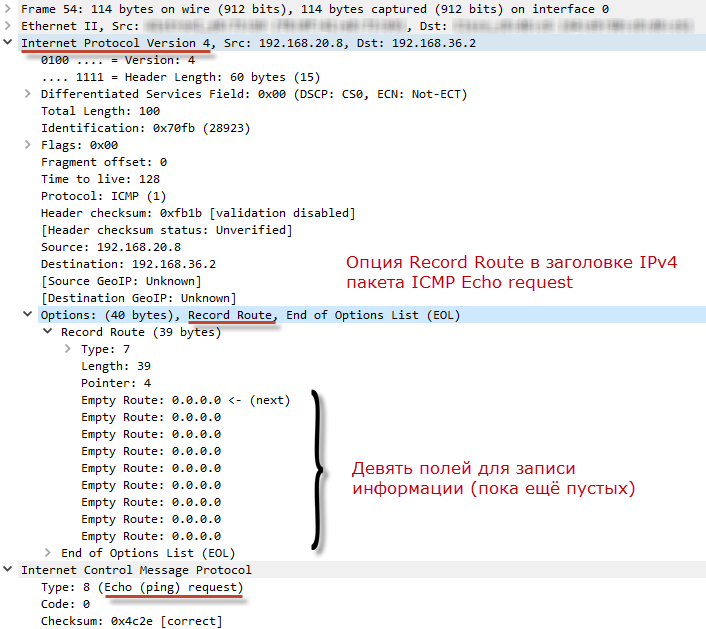
ICMP Echo Request доходит до получателя. По пути в него добавляются адреса транзитных устройств. Получатель берёт заполненные поля опции IP заголовка, копирует их в ICMP Echo Reply и отправляет назад. Пока ICMP Echo reply доберётся до инициатора пинга, он обрастёт записями обратного маршрута.
В ответном пакете ICMP Echo Reply, который получит ПК, опция Record Route будет уже заполнена:
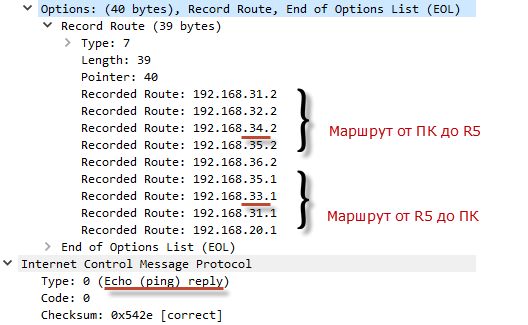
Можно заметить, что в нашей сети имеет место ассиметричная маршрутизация.
Пример ping с опцией Record на сетевом оборудовании Cisco.
R1#ping
Protocol [ip]:
Target IP address: 192.168.36.2
Repeat count [5]: 1
Datagram size [100]:
Timeout in seconds [2]:
Extended commands [n]: y
Source address or interface:
Type of service [0]:
Set DF bit in IP header? [no]:
Validate reply data? [no]:
Data pattern [0xABCD]:
Loose, Strict, Record, Timestamp, Verbose[none]: R
Number of hops [ 9 ]:
Loose, Strict, Record, Timestamp, Verbose[RV]:
Sweep range of sizes [n]:
Type escape sequence to abort.
Sending 1, 100-byte ICMP Echos to 192.168.36.2, timeout is 2 seconds:
Packet sent with a source address of 192.168.20.1
Packet has IP options:  Total option bytes= 39, padded length=40
 Record route: <*>
   (0.0.0.0)
   (0.0.0.0)
   (0.0.0.0)
   (0.0.0.0)
   (0.0.0.0)
   (0.0.0.0)
   (0.0.0.0)
   (0.0.0.0)
   (0.0.0.0)

Reply to request 0 (3 ms).  Received packet has options
 Total option bytes= 40, padded length=40
 Record route:
   (192.168.31.2)
   (192.168.32.2)
   (192.168.34.2)
   (192.168.35.2)
   (192.168.36.2)
   (192.168.35.1)
   (192.168.33.1)
   (192.168.31.1)
   (192.168.31.2) <*>
 End of list

Success rate is 100 percent (1/1), round-trip min/avg/max = 3/3/3 ms
Timestamp
Когда пакет ICMP с опцией Timestamp проходит через L3-устройство, оно записывает в него метку с указанием текущего времени. Схема работы аналогична опции Record, только вместо адреса ставится время. Как и в предыдущем случае пакет может содержать только девять записей о времени (для ОС Windows – четыре, так как кроме временной метки, добавляется IP-адрес устройства).
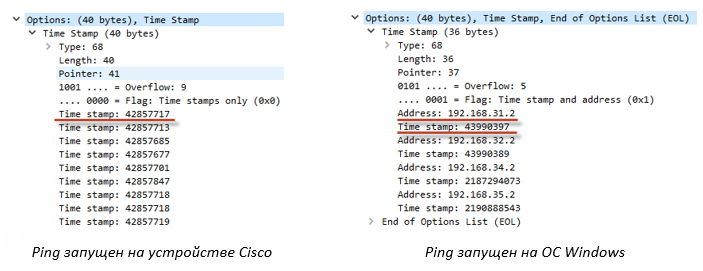
Время в пакете указано в формате UNIX time. Анализ данных имеет хоть какой-то смысл, если все устройства синхронизированы по времени (в нашем примере этого нет).
Пример ping с опцией Timestamp (-s) на ПК под управлением ОС Windows.
C:\Users\user>ping -n 1 -s 4 192.168.36.2

Обмен пакетами с 192.168.36.2 по с 32 байтами данных:
Ответ от 192.168.36.2: число байт=32 время=4мс TTL=252
    Отметка времени: 192.168.31.2 : 43990397 ->
               192.168.32.2 : 43990389 ->
               192.168.34.2 : 2187294073 ->
               192.168.35.2 : 2190888543

Статистика Ping для 192.168.36.2:
    Пакетов: отправлено = 1, получено = 1, потеряно = 0
    (0% потерь)
Приблизительное время приема-передачи в мс:
    Минимальное = 4мсек, Максимальное = 4 мсек, Среднее = 4 мсек
Strict (Strict Source Route)
При использовании данной опции задаётся список IP-адресов L3-устройств, через которые ICMP пакет обязательно должен пройти. Причём именно в той последовательности, которую мы указали. Записей, по традиции, максимум девять.
Работает опция просто: на каждом хопе IP-адрес назначения меняется на тот адрес, который мы указали при запуске утилиты ping.
Все адреса хранятся в заголовке IP нашего ICMP пакета. Поэтому каждое транзитное устройство может их подсмотреть. Такая схема позволяет обходить текущие правила маршрутизации на каждом устройстве, так как фактически имеем пересылку пакета на соседнее устройство.
В нашей схеме R2 имеет маршрут в сеть 192.168.36.0/24 через R3. Но так как у нас жёстко прописаны устройства в опциях ICMP пакета, R2 передаст его напрямую на R4.
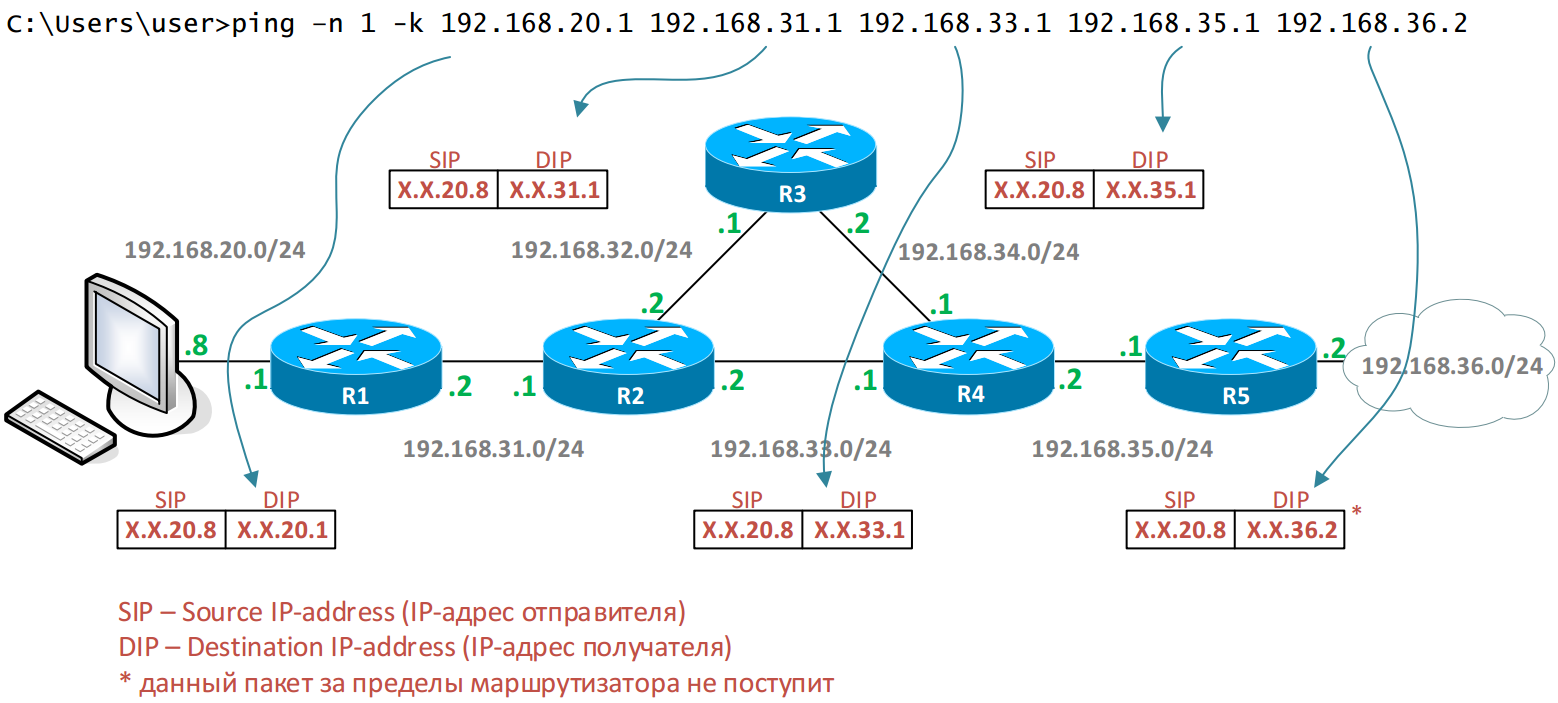
Запускаем утилиту ping с опцией -k (Strict Source Route) в ОС Windows и прописываем адреса устройств.
C:\Users\user>ping –n 1 -k 192.168.20.1 192.168.31.1 192.168.33.1 192.168.35.1 192.168.36.2
Обмен пакетами с 192.168.36.2 по с 32 байтами данных:
Ответ от 192.168.36.2: число байт=32 время=5мс TTL=252
    Маршрут: 192.168.35.1 ->
           192.168.33.1 ->
           192.168.31.1 ->
           192.168.20.1

Статистика Ping для 192.168.36.2:
    Пакетов: отправлено = 1, получено = 1, потеряно = 0
    (0% потерь)
Приблизительное время приема-передачи в мс:
    Минимальное = 5мсек, Максимальное = 5 мсек, Среднее = 5 мсек
Пакeт ICMP Echo Request c выставленной опцией Strict Source Route (Type = 137) в заголовке IP на нашем ПК выглядит следующим образом:
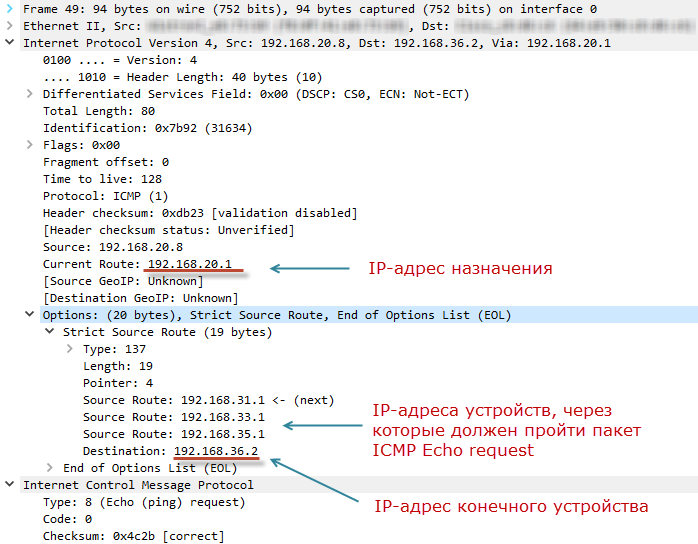
ПК подставил 192.168.20.1 в качестве адреса получателя. Остальные адреса транзитных устройств благополучно запаковал в поля опции IP (записи Source Route). Адрес конечного устройства добавил в запись Destination.
Этот же пакет, после того, как он минует R1:
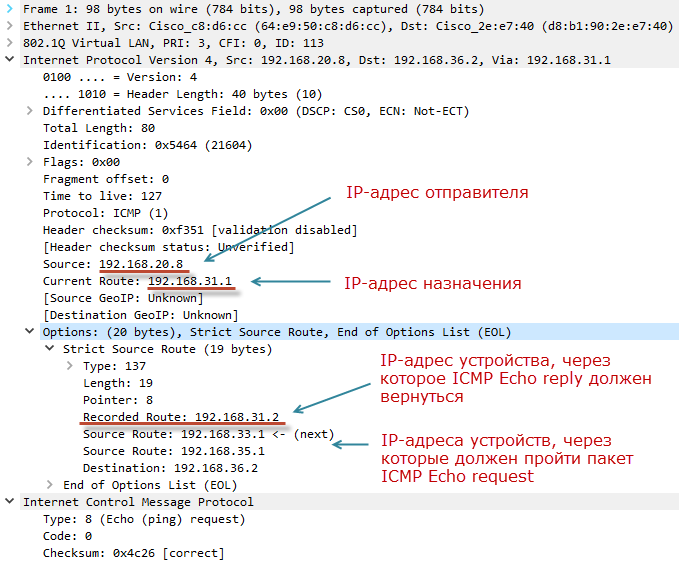
IP-адрес отправителя остался без изменений. IP-адрес получателя поменялся на новый – 192.168.31.1. Это значение взято из поля Source Route, когда пакет ICMP только поступил на R1.
Важно отметить, что R1 занёс в поле опций новую запись — Recorded Route. Туда подставлен IP-адрес интерфейса R1. Данное поле понадобится, чтобы ответный пакет (ICMP Echo reply) вернулся по тому же маршруту, что и ICMP Echo request. Точно также будут поступать и остальные устройства. Поэтому, когда пакет ICMP попадёт на R5, в опции Strict Source Route будет содержаться список IP-адресов интересов, через которые должен пройти ответный пакет.
ICMP Echo reply, полученный ПК:
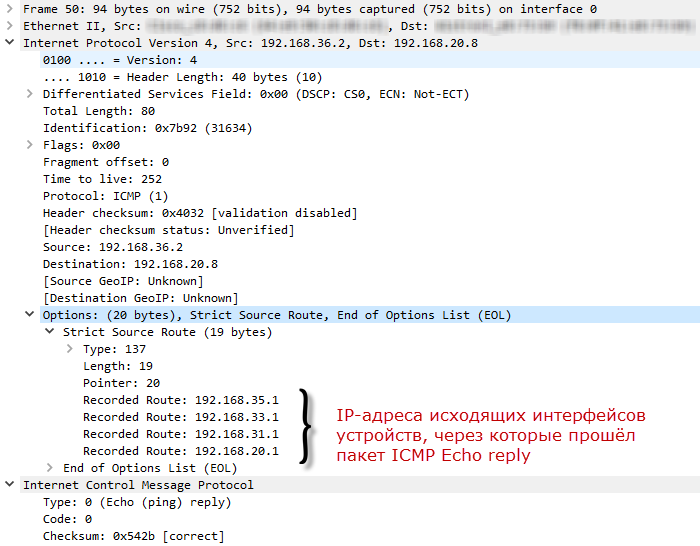
Поле Recorded Route переписывается по мере прохождения пакета ICMP Echo reply, так как там всегда указан адрес исходящего интерфейса для текущего пакета. Поэтому R1, когда получит ICMP Echo reply, заменит 192.168.31.2 на 192.168.20.1.
Если в команде ping мы опустим один из адресов, например, последний (192.168.35.1 – R5), R4 должен будет отправить пакет сразу на устройство с адресом 192.168.36.2. Но так как эта сеть не является для него локальной, R4 отрапортует о том, что заданный узел недостижим. Маршрутизировать пакет по обычным правилам он не будет.
Для обработки опции Record на сетевом оборудовании должен быть включен режим source routing. Например, на оборудовании Cisco он включён по умолчанию.
Loose (Loose Source Route)
Данная опция по сути очень похожа на опцию Strict. Но, в отличии от Strict, в опции Loose задаётся не жёсткий маршрут движения ICMP пакета, а лишь выборочные устройства. Т.е. пакет может маршрутизироваться и другими устройствами. Максимальное количество адресов – девять.
Схема работы аналогична предыдущему случаю. Разница в том, что пакет с опцией Loose может маршрутизироваться транзитными устройствами по обычным правилам.
Запускаем утилиту ping с опцией -j (Loose Source Route) в ОС Windows и прописываем адреса устройств.
C:\Users\user>ping -n 1 -j 192.168.32.1 192.168.36.2
Обмен пакетами с 192.168.36.2 по с 32 байтами данных:
Ответ от 192.168.36.2: число байт=32 время=4мс TTL=250
    Маршрут: 192.168.32.1

Статистика Ping для 192.168.36.2:
    Пакетов: отправлено = 1, получено = 1, потеряно = 0
    (0% потерь)
Приблизительное время приема-передачи в мс:
    Минимальное = 4мсек, Максимальное = 4 мсек, Среднее = 4 мсек
Пакeт ICMP Echo Request c выставленной опцией Loose Source Route (Type = 131) в заголовке IP на нашем ПК выглядит так:

ПК подставил адрес R3 (192.168.32.1) в качестве получателя. При этом адрес конечного устройства R5 (192.168.36.2) указал в опции IP (запись Destination). Далее пакет маршрутизируется в сети по обычным правилам, пока не попадёт на R3. R3 подставит в качестве адреса назначения адрес R5 и в опциях пропишет свой адрес, через который должен будет вернуться ответный пакет (запись Recorded Route). После чего отправит его в сеть.
Ответный пакет ICMP Echo reply особого интереса не представляет, так как аналогичен ранее рассмотренным. В опциях будет указан адрес исходящего интерфейса R3 (запись Recorded Route), через который прошел пакет.
Verbose
Данная опция активируется автоматически при выборе любой из ранее описанных. Предоставляет более детальный вывод информации на экран. На сам пакет ICMP она никак не влияет. В Windows в команде ping такой опции нет.
Чтобы мы могли воспользоваться этими опциями, промежуточное оборудование должно их поддерживать. С этим проблем не будет. К новшествам мира ИТ относить весь этот «rocket science» не приходится. Напрашивается вывод: опции Loose, Strict, Record, Timestamp могут быть полезны, даже с учётом ограничения в «девять». Если бы не следующие нюансы, связанные с безопасностью.
Первое. Опции Record и Timestamp могут благополучно использоваться для проведения разведки в сети. С их помощью можно исследовать топологию сети, получить отпечатки, по которым определить ОС и тип устройства, через которые проходил пакет с данными опциями.
Второе. Опции Loose и Strict позволяют управлять движением пакета, игнорируя стандартные правила маршрутизации. Это предоставляет широкие возможности для попыток проникновения в различные сегменты сети, куда в случае обычной маршрутизации доступа не должно быть. Также возможно проведение разведки для анализа топологии сети. Проведение атак по утилизированию полосы пропускания на определённых сегментах сети. Вариантов много.
Третье. Часть сетевого оборудования обрабатывает пакеты с установленными опциями программным образом на уровне control-plane (без использования различных схем оптимизации маршрутизации трафика), что безусловно нагружает ЦПУ. А значит есть возможность осуществить DoS атаку на такое устройство.
Многие вендоры (есть даже отдельное RFC 7126) рекомендуют пакеты с указанными опциями никак не обрабатывать. Варианты предлагают разные. Вплоть до отбрасывания таких пакетов. Правда у некоторых из производителей бывают диссонансы: с одной стороны рекомендуем отбрасывать такие пакеты, с другой — «Record is a very useful option».
Быстрая попытка проверить соответствие этим рекомендациям у пары интернет-провайдеров показали, что часть опций всё-таки работает. Но source routing отключён везде.
Получается интересный вывод. Опции Loose, Strict, Timestamp, Record могут быть полезны при диагностике проблем в сети. Но вопрос безопасности нивелирует это.
В итоге у меня всё-таки осталось чувство непонимания. Почему озвученный в начале вопрос присутствовал в тесте? Относительно полезна опция Record и то при небольшой глубине сети. Остальные опции под вопросом.
Напоследок небольшой опрос. Всем хорошего дня!
Только зарегистрированные пользователи могут участвовать в опросе. Войдите, пожалуйста.
Пользуетесь ли Вы опциями Loose, Strict, Timestamp, Record?
1.35% Я их просто блокирую6
23.99% Да, жена заставляет107
Проголосовали 446 пользователей. Воздержались 76 пользователей.
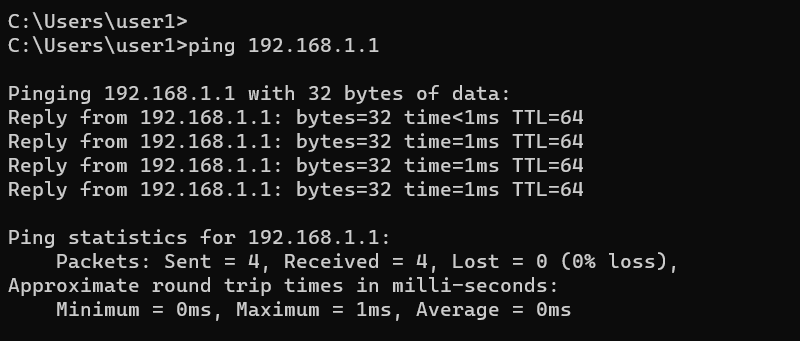
The ping command sends ICMP requests, also known as pings, to a remote device and returns the response. It is the most popular command-line tool for testing connectivity between two network devices.
To do a ping test, execute the command followed by the IP Address or domain name of the remote host you want to test.
ping 192.168.1.1
ping example.com- By default, the CMD
pingcommand sends out 4 ICMP echo-request packets. - With the
-noption, you can specify the number of echo requests to send. - If you use the
-toption, it sends continuous pings until you stop the command by pressing theCtrl+Ckey sequence.
Examples
Ping the IP Address of the remote host:
ping 192.168.1.1Ping the domain name of the remote host:
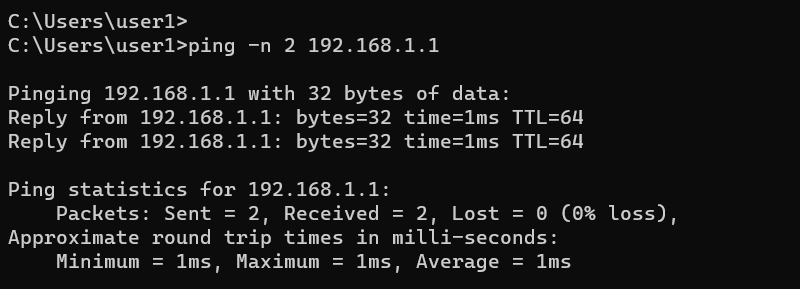
ping example.comWe can specify the ping count with the -n option:
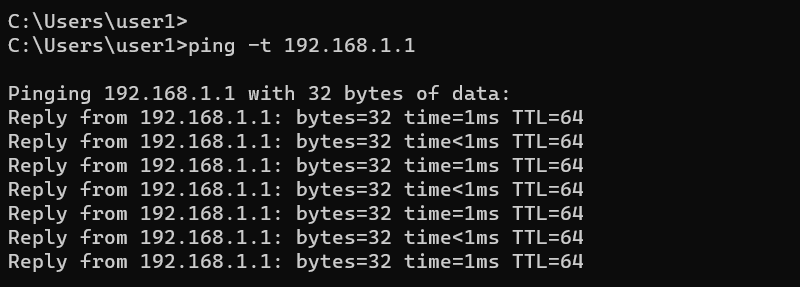
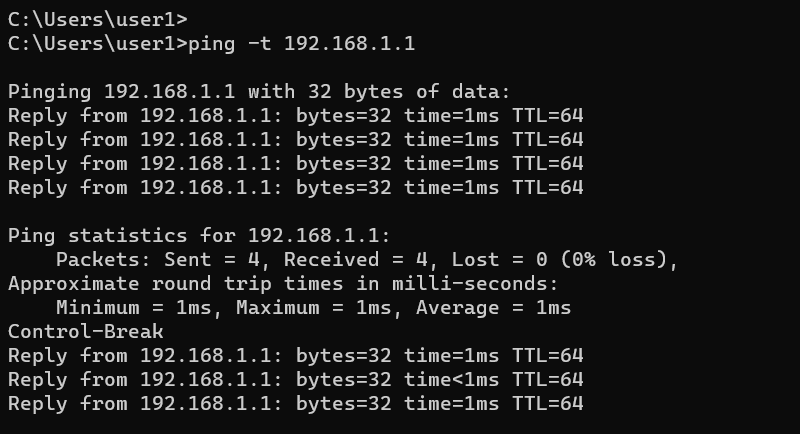
ping -n 10 192.168.1.1In the following example, we use the -t option to send continuous pings to the IP Address 192.168.1.1 (you stop the command by pressing Ctrl+C):
ping -t 192.168.1.1Ping the Google DNS Server:
ping 8.8.8.8Ping the Google DNS Server from the source IP Address 192.168.1.20:
ping -S 192.168.1.20 192.168.1.1Ping a remote computer with a larger packet size:
ping -l 1000 192.168.1.1This command resolves the IP address to the hostname before sending echo requests:
ping -a 8.8.8.8Command Options
| -t | Use this option to send continuous pings. To stop the test, press Control + C. |
| -n | Use this option to specify the number of pings to send. The default is 4. |
| -a | Resolve addresses to hostnames (reverse DNS lookup) if possible. |
| -i | Use this option to specify the TTL (Time to live) value. TTL tells the maximum number of routers each ICMP packet may pass through on its way to a destination. |
| -l | Use this option to modify the packet size of the ICMP Echo Request. The default is 32 bytes. |
| -w | Timeout in milliseconds to wait for each reply. |
| -S | When your computer has more than one IP address, use this option to specify the source IP address from which the pings should be sent. |
| /? | This option displays the help file for the CMD ping command. |
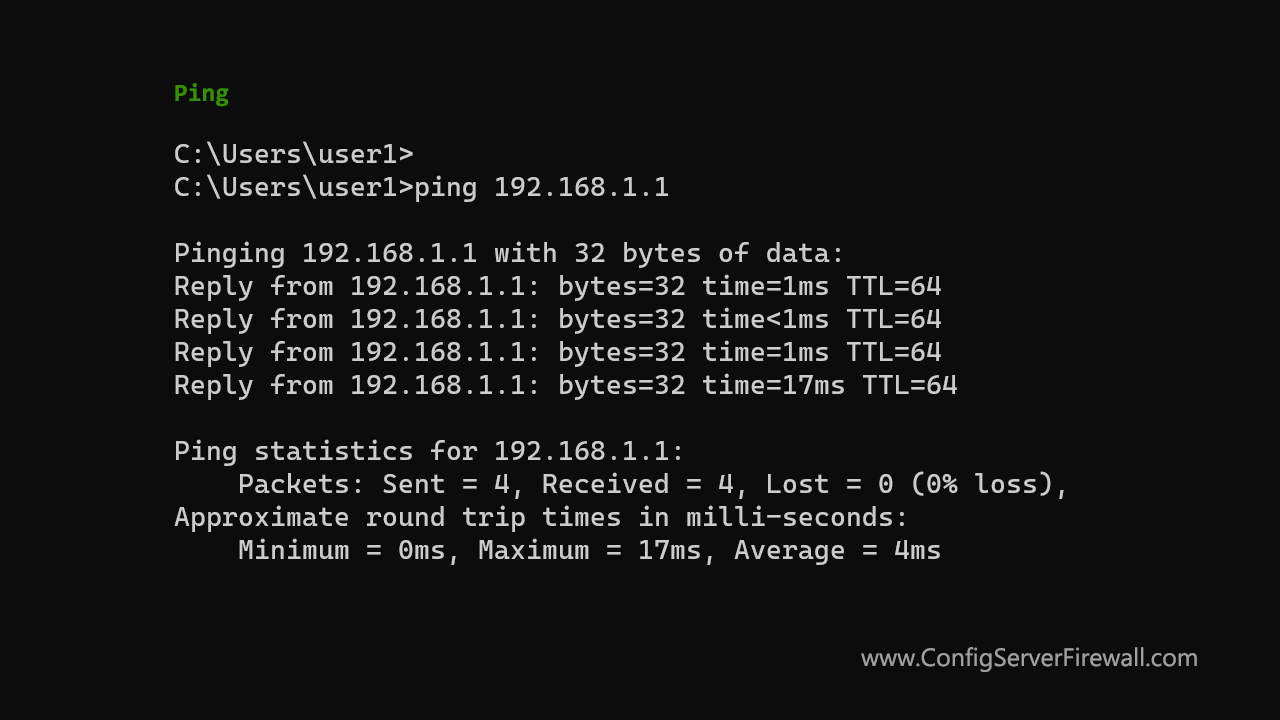
The ping command tests connectivity between two network devices by sending an ICMP Echo Request to the remote device. If the remote device receives the request, it sends an ICMP Echo Reply confirming the connectivity.
If the ping is successful, you will see the ICMP Echo Reply from the remote IP, as shown in the following screenshot.
Under the statistics section, you will see the number of packets that were sent, received, and lost.
When the ping command fails, you will get one of several error messages like Destination host unreachable or Request timed out.
- Destination host unreachable — No routes to the destination. Your router does not know how to reach the remote computer you specified.
- Ping request could not find host — This is a DNS error. Your DNS Server can’t resolve the domain name to the IP address. You probably entered an incorrect domain name.
- Request timed out — Your computer did not receive ICMP Echo Reply from the targeted device. This doesn’t necessarily mean that the host is down. It might be because the remote computer blocks pings.
Continuous Ping Command
The -t is the continuous ping command option. It sends ICMP Echo Requests to the remote computer until you manually stop the command by pressing Ctrl + C.
You can view the statistics while the test is running by pressing Ctrl + Pause key combination.
The -n option allows you to specify the number of pings to send. The Windows default is 4 ICMP requests.
Using ping to Check Internet Connection
Ping is an excellent command-line tool to test your internet connection on Windows. The following steps illustrate the process.
- Ping the loopback address
127.0.0.1to ensure there is nothing wrong with the TCP/IP stack. - Next, ping the IPv4 address of the local network interface. If it is successful, you know that the local network interface is functioning.
- Next, Ping the IP address of the default gateway. Ensure you have connectivity to the gateway.
- Next, Ping an IP Address on the Internet. A good reliable one is
8.8.8.8. The test is successful means you have a connection to the internet. If not, the problem is with your router. - Finally, Ping an Internet domain name like
google.comorexample.com. If this succeeds, everything is working. If not, the problem is with the DNS.
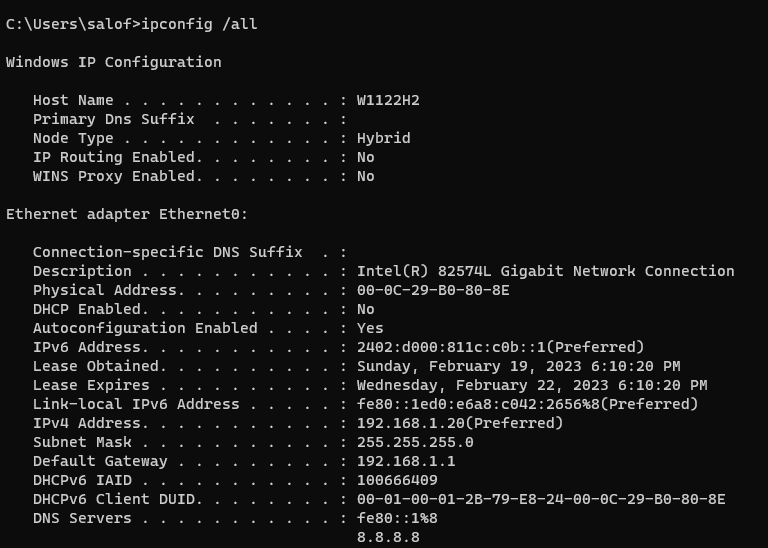
You can view the IP configuration of your local Windows system by running the ipconfig /all command.
Remarks
- A Firewall can block pings. So you may not get a reply from the remote device even if it is up and running.
- The Firewall on Windows 10/11 blocks pings (ICMP) out of the box. You can click on this link to learn how to allow ping through Windows Firewall.
- The PowerShell equivalent to the ping is the
Test-NetConnectioncmdlet; Ping is still available. - While working on the command prompt, type
ping /?to see a list of all command options.
Test connectivity via a specific network interface
Recently while working on a Private cloud implementation, I
came across a scenario where I needed to test connectivity of a node to the
AD/DNS via multiple network adapters.
Many of us would know that having multiple network routes is usually done to take care of redundancy.
So that if a network adapter goes down, one can use the other network interface
to reach out to the node.
In order to make it easy for everyone to follow along, below
is an analogy for the above scenario:
My laptop has multiple network adapters (say Wi-Fi and Ethernet) connected to the same network. Now how do I test connectivity to a Server on the network only over say Wi-Fi network adapter?

So let’s get to it and explore some options at hand.
Below are the network adapters that list out on my laptop:

Now
I want to test connectivity to a Windows Server 2012R2 running in my network
having IP address 10.94.214.9
Using ping.exe
I can specify the source address to ping.exe using –S switch
and verify if the Server (IP 10.94.214.9) is responding to ping/ICMP requests on
a specific network interface.
But there is a gotcha with the above approach, what if the server response to ping is
disabled? Or the network firewall in place drops ICMP requests.
Using Test-NetConnection.
I initially thought of using Test-NetConnection cmdlet
(available on Server 2012 & Windows 8 above with NetTCPIP module) to do a winrm
port check to the server (port 5985), but the cmdlet doesn’t let you specify a
source address for doing a port query. It will automatically select a network
interface to perform the port query (based on the internal windows routing
table). See below the output of the cmdlet, it selects the Ethernet interface
to perform the port check.
See below the syntax of the cmdlet.
PS>gcm test-netconnection -syntax
Test-NetConnection [[-ComputerName] ] [-TraceRoute] [-Hops ] [-InformationLevel ] []
Test-NetConnection [[-ComputerName] ] [-CommonTCPPort]  [-InformationLevel ] []
Test-NetConnection [[-ComputerName] ] -Port  [-InformationLevel ] []
One could play with route.exe and change the network route
to the network where the server lies and then do a Test-NetConnection on the
winrm port, complicated way to handle such a small problem.
Or better as my friend Jaap Brasser told me on IM, disable the network adapter and then do the Test-NetConnection.
Using TCPClient
Now let’s talk about how we can do this in PowerShell.
I can create a TCP Client and connect to the server on winrm port but how do we
make sure that it gets routed via a specific network interface.
The answer is really simple, we create a local endpoint (IP
+ port) and bind our TCP Client to it. All the communications then happen via
the socket.
Below is the code snippet and the explanation of it follows:
|
001 |
$SourceIP = [IPAddress]‘10.94.8.102’; # My WiFi Adapter IP address # get an unused local port, used in local IP endpoint creation # Create the local IP endpoint, this will bind to a specific N/W adapter for making the connection request # Create the TCP client and specify the local IP endpoint to be used. # Connect to the Destination on the required port. # Check the Connected property to see if the TCP connection succeeded. You can see netstat.exe output to verify the connection too |
In the above code after assigning the source IP, destination IP & destination port, there is code which selects a local port to be used.
We have to be careful while selecting a random local port as it
might be already be used in an active TCP connection. There is a clever .NET way of getting a list of already
used ports on a local machine by using the GetActiveTcpListeners() method.
$UsedLocalPorts = ([System.Net.NetworkInformation.IPGlobalProperties]::GetIPGlobalProperties()).GetActiveTcpListeners() |
where -FilterScript {$PSitem.AddressFamily -eq ‘Internetwork’} |
Select -ExpandProperty Port
Once I have a list of all the used local port, I can select
a non-used ephemeral port (range) using the code snippet below:
do {
$localport = $(Get-Random -Minimum 49152 -Maximum 65535 )
} until ( $UsedLocalPorts -notcontains $localport)
Now it is time to create the local endpoint using the source
IP of the network interface and the local unused port.
$LocalIPEndPoint = New-Object -TypeName
System.Net.IPEndPoint -ArgumentList $SourceIP,$localport
Once the Local endpoint is created, construct a TCP client
passing the local endpoint as an argument to it. This will ensure that the TCP connection request flows via that specific N/W adapter.
Once that is done, call the Connect() Method on the TCPclient to connect to the destination. Now the TCP connection uses the SourceIP (on a specific network adapter) to reach out to the destination.
Note – One can try specifying a source address which is not
assigned to the machine, it will let you create the local endpoint but when you
try creating the TCPClient it will throw an error saying that the address is
not valid in the context.
Using the above logic and creating an advanced function should be straight enough, that is an exercise left for the reader.