
-
Visual Studio Code
Как в VS Code настроить форматирование php и html кода в файлах с расширением php?
Поставил php intellisense, но при форматировании пишет модуль для форматирования файлов php не установлен.
-
Вопрос задан
-
7202 просмотра
Комментировать
Подписаться
2
Простой
Комментировать
Пригласить эксперта
Ответы на вопрос 1
-
unlik
@unlik Автор вопроса
Все равно выдает такую же ошибку.
-
В settings.json (найти можно через поиск в параметрах прямо по такому названию)
-
Профессор, ты тупой? Тебя спросили, как починить линтер intellisense, а не как поставить другой, на хер не нужный.
Ваш ответ на вопрос
Войдите, чтобы написать ответ
Похожие вопросы
-
Показать ещё
Загружается…
Минуточку внимания
Войдите на сайт
Чтобы задать вопрос и получить на него квалифицированный ответ.
Реклама
Stunning Framer templates—fully customizable, built to impress, ready for you or your clients • Ad
Recently, I’ve started taking some PHP courses.
In the beginning, I’ve used Brackets, which is simple and beginner-friendly but doesn’t have the extra useful features that Visual Studio Code has.
Also, Brackets is used more for web design and front-end development.
Anyway, I installed VS Code, and the first thing I bumped into is this error:
Cannot validate since no PHP executable is set. Use the setting ‘.php.validate.executablePath’ to configure the PHP executable.
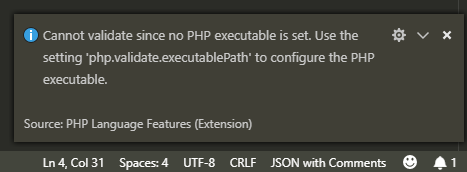
If you don’t set the path to the PHP executable, Visual Studio Code will still work fine, but it won’t validate the PHP code, meaning that you won’t get curly red lines whenever you have an error in your code.
After some digging around, I’ve found the solution, and I’ll share it with you ladies and gentlemen because it’s pretty hard to find comprehensive guidance in their documentation or on forums.
VS Code is not for beginners, so they won’t spoon-feed anyone, unfortunately. 😃
Fix the Validate PHP Error in Visual Studio Code for Windows, macOS or Linux
Note that I’m a Windows (10, to be more specific) user, so I’m not familiar with Linux or macOS. Therefore, I might not be so accurate when it comes to those operating systems.
Here’s what you need to do:
Step 1
You need to find out where your PHP executable (php.exe) is.
That depends on what OS and development environment you use (XAMPP, WAMP, custom installation, and so on).
I’m currently using XAMPP, which is installed on my C: drive on Windows 10, therefore the php.exe file is found in C:/xampp/php/php.exe.
For macOS or Linux users, the usual path is /usr/bin/php.
Step 2
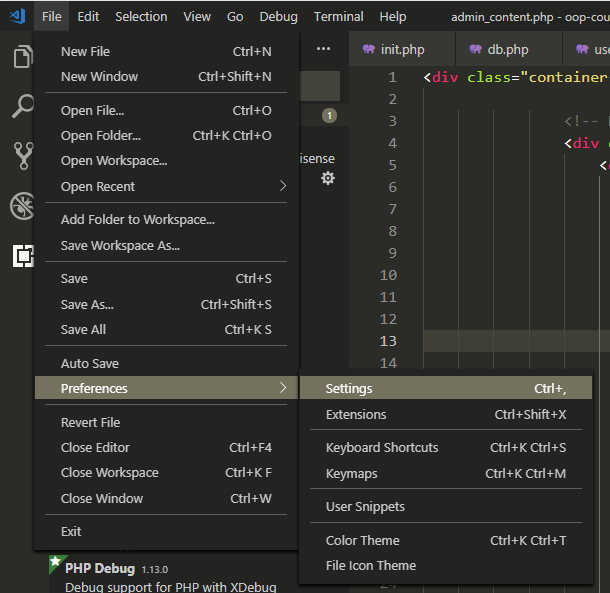
Once you’ve found out where your PHP executable is, open Visual Studio Code and go to File > Preferences > Settings.
Step 3
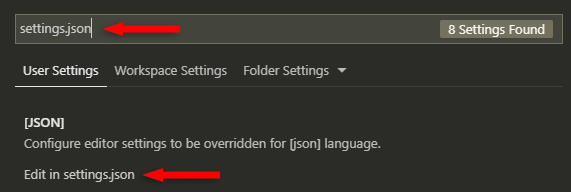
In the Search Settings bar, type settings.json.
Then, click on the Edit in settings.json link.
Step 4
Add a comma after the last line of code, whatever it might be, then add this:
"php.validate.executablePath": "C:/xampp/php/php.exe"
or this for macOS and Linux users:
"php.validate.executablePath": "/usr/bin/php"
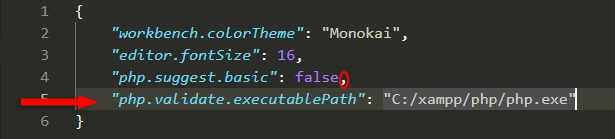
Of course, your path to the php.exe file can be different, as I mentioned at step 1, so make sure you replace C:/xampp/php/php.exe with your correct path.
Don’t add a comma after it if it will be the last line of code!
Step 5
Save the file by going to File > Save or pressing CTRL+S (for Windows).
I think it’s CMD+S for macOS.
Step 6
Close Visual Studio Code and open it again for the warning to go away.
Step 7 — For Windows users
Make sure you have PHP added to your environment’s PATH. I think XAMPP adds it automatically but check anyway.
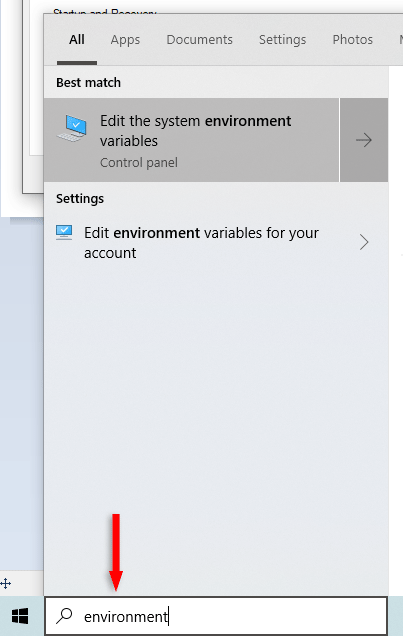
Search for “environment” on Windows.
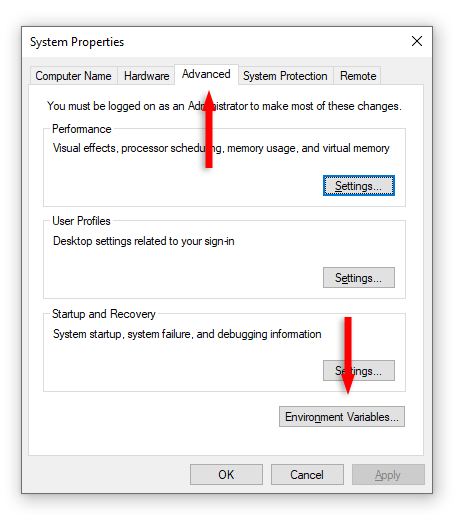
In the Advanced tab, click on Environment Variables…
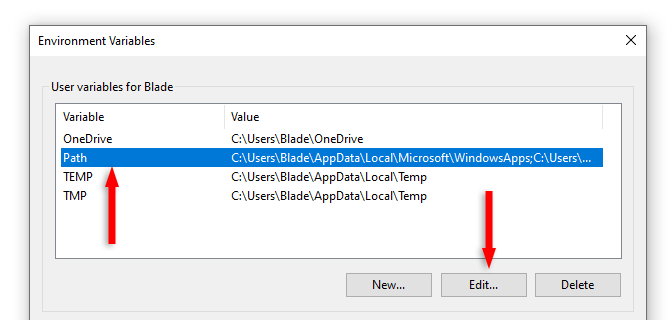
Click on the Path row to select it, then click on Edit…
Edit or add a new PHP path (e.g. C:\\XAMPP\\php).
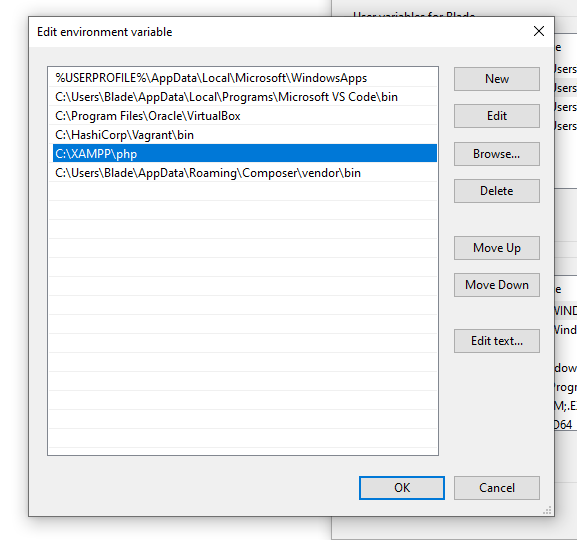
Don’t add the executable file (.exe) as you did in the .json file. Only add the directory.
If using a Virtual Machine on Windows
For example, for Laravel development, I’m using the Homestead environment on Windows 10, which is using Ubuntu as a server. It also comes with prepackaged software, such as PHP.
If I want to found out where PHP is on the server, I use the which php command, which will point out that PHP is found in /usr/bin/php.
Now, if I use that path in VS Code, it won’t work because it’s not on my disk. VS Code can’t look into my server.
So, if you’re running something similar for your dev environment, you’ll need to install PHP locally, on your disk, and then set the path as I showed you above.
I don’t know if there’s a workaround. If you do, let me know in the comments.
Other things to try if it doesn’t work
Some people said that it only worked for them when they added two forward slashes for the path in the settings.json file, like this:
"php.validate.executablePath": "C://xampp//php//php.exe"
For some people, it worked with backslashes (one or two):
"php.validate.executablePath": "C:\xampp\php\php.exe"
Adding this in addition to the php.validate.executablePath line might also fix it:
"php.executablePath": "C:/xampp/php/php.exe"
That’s a Wrap
If this post helped you, please consider following me on Bluesky or Instagram to support me.
Also, don’t hesitate to contact me if you’re interested in my web design services, want to collaborate, or just have something to say.
Одна из частых проблем при форматировании карт памяти SD и MicroSD, а также USB флешки — сообщение об ошибке «Windows не удается завершить форматирование», при этом, как правило ошибка появляется вне зависимости от того, в какой файловой системе выполняется форматирование — FAT32, NTFS, exFAT или другой.
В большинстве случаев проблема возникает после того, как карта памяти или флешка была извлечена из какого-то устройства (фотоаппарат, телефон, планшет и подобного), при использовании программ для работы с разделами дисков, в случаях внезапного отключения накопителя от компьютера во время выполнения операций с ним, при сбоях в питании или же при использовании накопителя какими-либо программами.
В этой инструкции — подробно о различных способах исправить ошибку «не удается завершить форматирование» в Windows 10, 8 и Windows 7 и вернуть возможность очистки и использования флешки или карты памяти.
Полное форматирование флешки или карты памяти в управлении дисками Windows
Прежде всего при возникновении ошибок с форматированием рекомендую попробовать два самых простых и безопасных, но не всегда работающих способа с использованием встроенной утилиты Windows «Управление дисками».
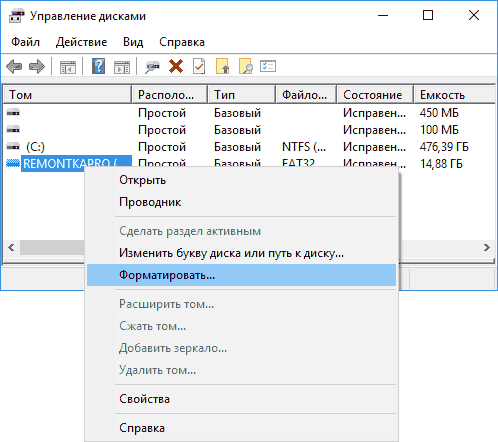
- Запустите «Управление дисками», для этого нажмите Win+R на клавиатуре и введите diskmgmt.msc
- В списке накопителей выберите вашу флешку или карту памяти, нажмите по ней правой кнопкой мыши и выберите «Форматировать».

- Рекомендую выбрать формат FAT32 и обязательно снимите отметку «Быстрое форматирование» (хотя процесс форматирования в данном случае может занять продолжительное время).
Возможно, в этот раз USB накопитель или карта SD будут отформатированы без ошибок (но не исключено, что снова появится сообщение о том, что системе не удается завершить форматирование). См. также: Чем отличается быстрое и полное форматирование.
Примечание: используя Управление дисками обратите внимание на то, как ваша флешка или карта памяти отображается в нижней части окна
Форматирование накопителя в безопасном режиме
Иногда проблема с невозможностью завершить форматирование бывает вызвана тем, что в работающей системе накопитель «занят» антивирусом, службами Windows или какими-либо программами. В этой ситуации помогает форматирование в безопасном режиме.
- Загрузите компьютер в безопасном режиме (Как запустить безопасный режим Windows 10, Безопасный режим Windows 7)
- Отформатируйте флешку или карту памяти с помощью стандартных средств системы или в управлении дисками, как это было описано выше.
Также вы можете загрузить «безопасный режим с поддержкой командной строки» а затем использовать её для форматирования накопителя:
format E: /FS:FAT32 /Q (где E: — буква накопителя который нужно отформатировать).
Очистка и форматирование USB накопителя или карты памяти в DISKPART
Способ с использованием DISKPART для очистки диска может помочь в тех случаях, когда на флешке или карте памяти была испорчена структура разделов или же какое-то устройство, к которому был подключен накопитель создало разделы на нем (в Windows могут быть проблемы, если на съемном накопителе есть несколько разделов).
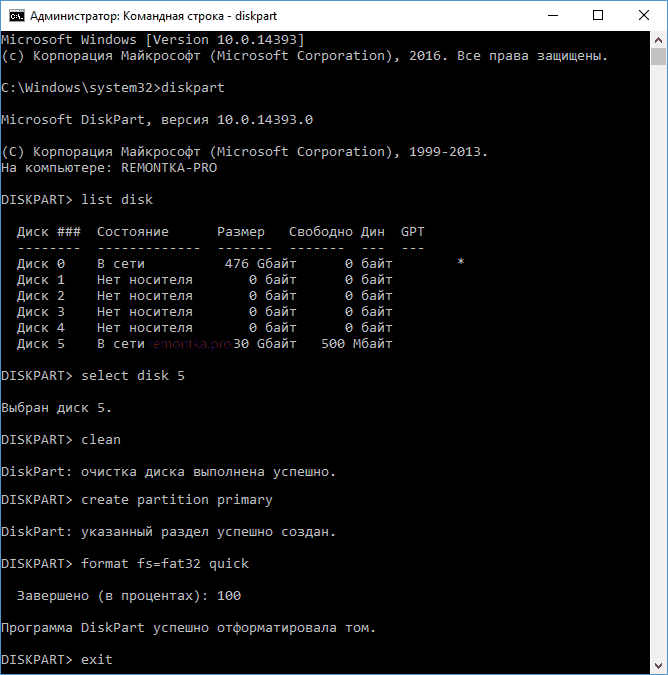
- Запустите командную строку от имени администратора (как это сделать), затем по порядку используйте следующие команды.
- diskpart
- list disk (в результате выполнения этой команды запомните номер накопителя, который нужно отформатировать, далее — N)
- select disk N
- clean
- create partition primary
- format fs=fat32 quick (или fs=ntfs quick)
- Если после выполнения команды под пунктом 7 по завершении форматирования накопитель не появится в проводнике Windows, используйте пункт 9, иначе пропустите его.
- assign letter=Z (где Z — желаемая буква флешки или карты памяти).
- exit
После этого можно закрыть командную строку. Подробнее на тему: Как удалить разделы с флешки.
Если флешка или карта памяти все так же не форматируются
Если ни один из предлагаемых способов не помог, это может говорить о том, что накопитель вышел из строя (но не обязательно). В этом случае можно попробовать следующие инструменты, есть вероятность, что они смогут помочь (но в теории могут и усугубить ситуацию):
- Специальные программы для «ремонта» флешек
- Также могут помочь статьи: Карта памяти или флешка защищена от записи, Как отформатировать флешку, защищенную от записи
- HDDGURU Low Level Format Tool (низкоуровневое форматирование флешки)
На этом завершаю и надеюсь, что проблема связанная с тем, что Windows не удается завершить форматирование была решена.
When calling the php command from the Windows command prompt, you may see a message saying that ‘php’ is not recognized as an internal or external command, operable program or batch file.
Here’s an example of the issue:
This issue appears when Windows has no idea what you mean with the php command.
To solve ‘php’ is not recognized as an internal or external command issue, you need to add the folder containing your PHP program to the Windows environment variable.
You can do so in five steps as shown below:
This tutorial uses Windows 11, but the solution will work on all Windows versions (XP, Vista, 7, 8, and 10).
Step #1: Find your PHP folder location
You first need to find the location of PHP that you installed on your Windows machine.
There are several ways you can get PHP installed: You can download the latest PHP version from windows.php.net, or you can download bundled software like XAMPP, WAMP, or MAMP.
No matter where you got PHP from, you need to find the php/ folder on your machine.
For example, here’s an example of php/ folder from XAMPP:
Step #2: Copy PHP folder path
Once you find the php/ folder, click on the visible URL bar, then click copy:
Next, you need to put this path on Windows environment variable.
Open the Start menu in your machine and type “var” or “variables” in the search bar.
You should see Windows shows Edit the system environment variables menu on the search result as shown below:
Click on that menu and you will be taken into System Properties menu.
Locate the environment variables menu as shown below:
Click on the menu, and you’ll see the Environment Variables for the current User and the System.
Step #4: Add PHP to your Path variable
You need to edit the Path variable in either the User or System variables as shown below:
The User path only applies for the current user, while the System path is active for all users.
If you have only one user who will use PHP, you can put the path in User variables.
Click on the Path variable, then click Edit…
You need to add the php/ folder path to the environment as shown below:
After you add the php/ path, click OK.
Step #5: Restart Command Prompt and run php command again
You need to restart your Command Prompt once before you can use the php command.
Close and then open your Command Prompt again. Run the php -v command, and you should see the PHP version as follows:
This means that Windows recognized the php path you put in the environment variables.
And that’s how you solve the issue ‘php’ is not recognized as an internal or external command, operable program or batch file.
Optional: Use PHP from another source
The same method also works when you have PHP downloaded from windows.php.net.
For example, I’ve downloaded the latest PHP v8.1.10 from windows.php.net and extracted it to my Downloads/ folder.
To make Windows use this version of PHP, I only need to change the Path environment variables as shown below:
Once I clicked OK, I restarted the Command Prompt and ran the php -v command again.
This time, the PHP version is different than the one from XAMPP:
Now you’ve learned how to solve ‘php’ is not recognized as an internal or external command, operable program or batch file issue on your Windows machine. Nice work!
Nobody likes errors, least of all computer programmers!
If you are a PHP developer and recently installed Visual Studio Code (VS Code),
then you are most likely getting a pesky «PHP executable not found» error
message every time you start the program.
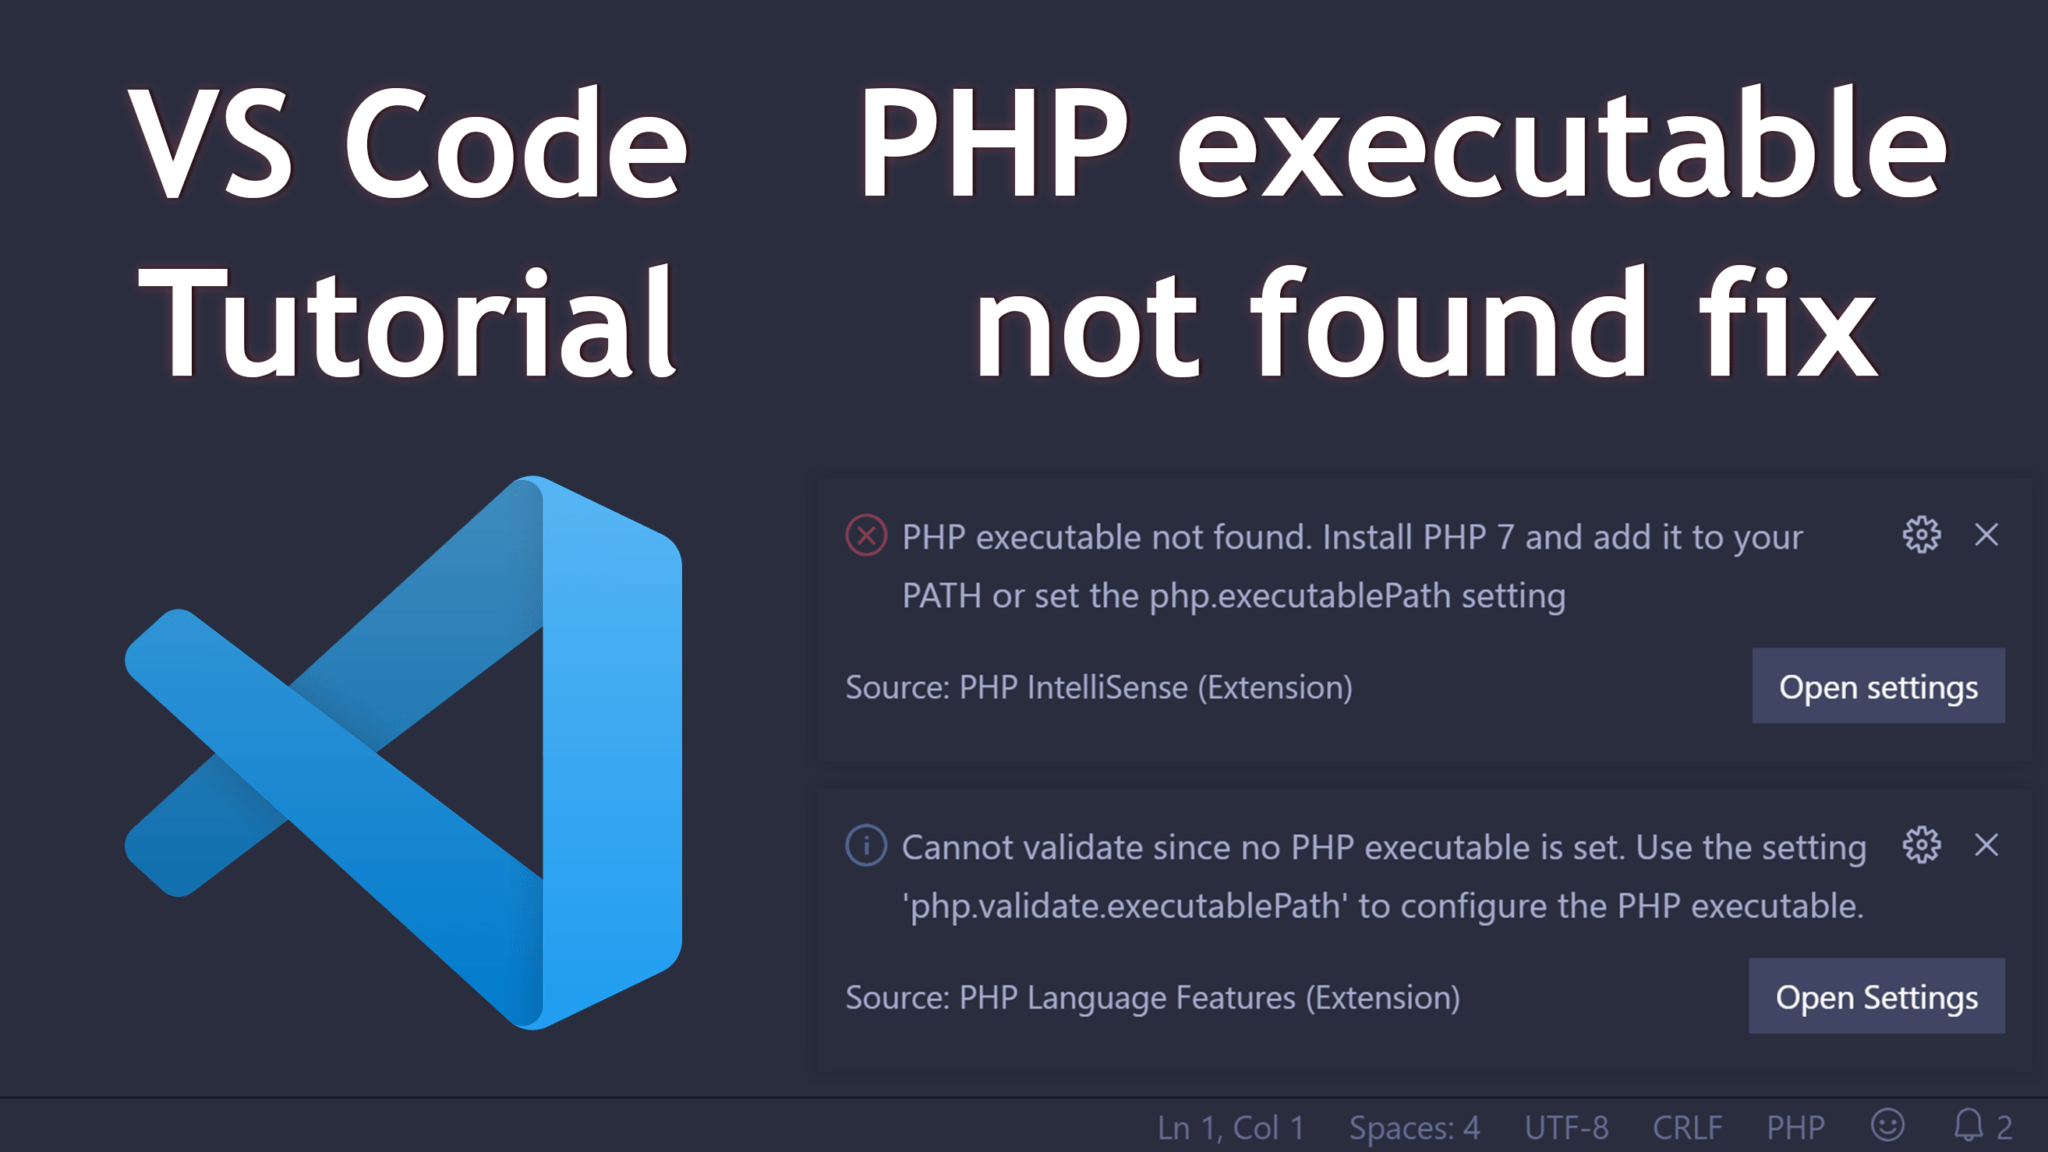
Some other VS Code error message you will see with the PHP executable not found
message includes:
- Install PHP 7 and add to your PATH»
- «set php.executablePath setting»
- «Cannot validate since no PHP executable is set»
- «Use the php.validate.executablePath to configure the PHP executable»
With every single one of these VS Code error messages, you simply need to update
your Windows PATH setting for your PHP executable location. Doing that will
fix all of these PHP executable errors!
How to fix PHP executable not found error in VS Code#
- Install php on your computer (e.g. with XAMPP)
- Locate your php installation directory
- Open Advanced System Settings on Windows
- Update the Windows «PATH» environment variable
- Close VS Code and reopen it
Step 1: Install php on your computer (e.g. with XAMPP)#
The first and very most important step to fix the PHP executable not found error
on Visual Studio Code is to actually have PHP installed on your computer. Now
that might seem like an obvious starting point, but you would be surprised how
many people don’t have PHP installed on their local web dev environment (e.g.
their localhost server).
Personally, I have always been a fan of the XAMPP suite by
ApacheFriends.org. I have been using the XAMPP
suite to install PHP, MySQL, and phpMyAdmin for my localhost web servers for
years. I highly recommend.
Step 2: Locate your php installation directory#
Once you have PHP installed on your local computer (as part of your localhost
server), you need to find the PHP installation directory. As we need the folder
path that holds your php.exe file.

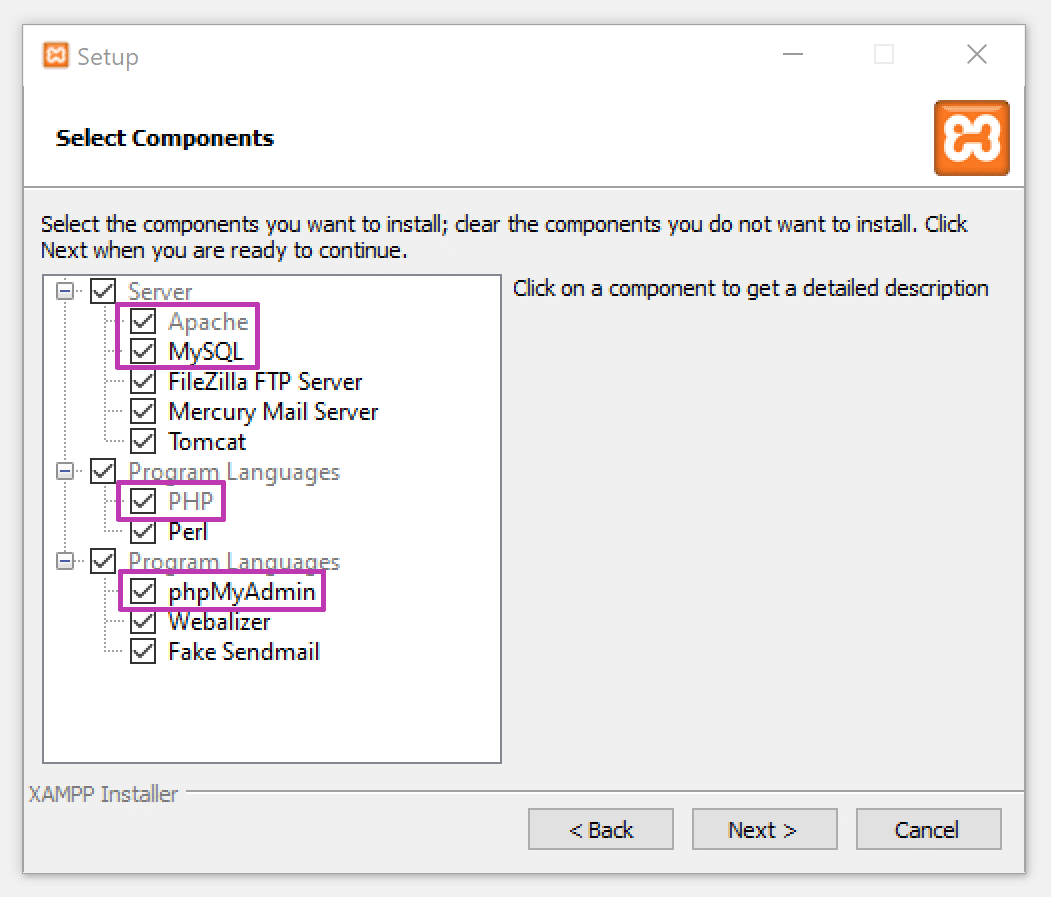
If you installed XAMPP, simply browse to your XAMPP installation directory. The
default location is at C:\xampp. From inside the XAMPP folder, open the PHP
folder and locate the php.exe file. If you can find the php.exe file from in
this folder, then this folder will be your php installation directory.
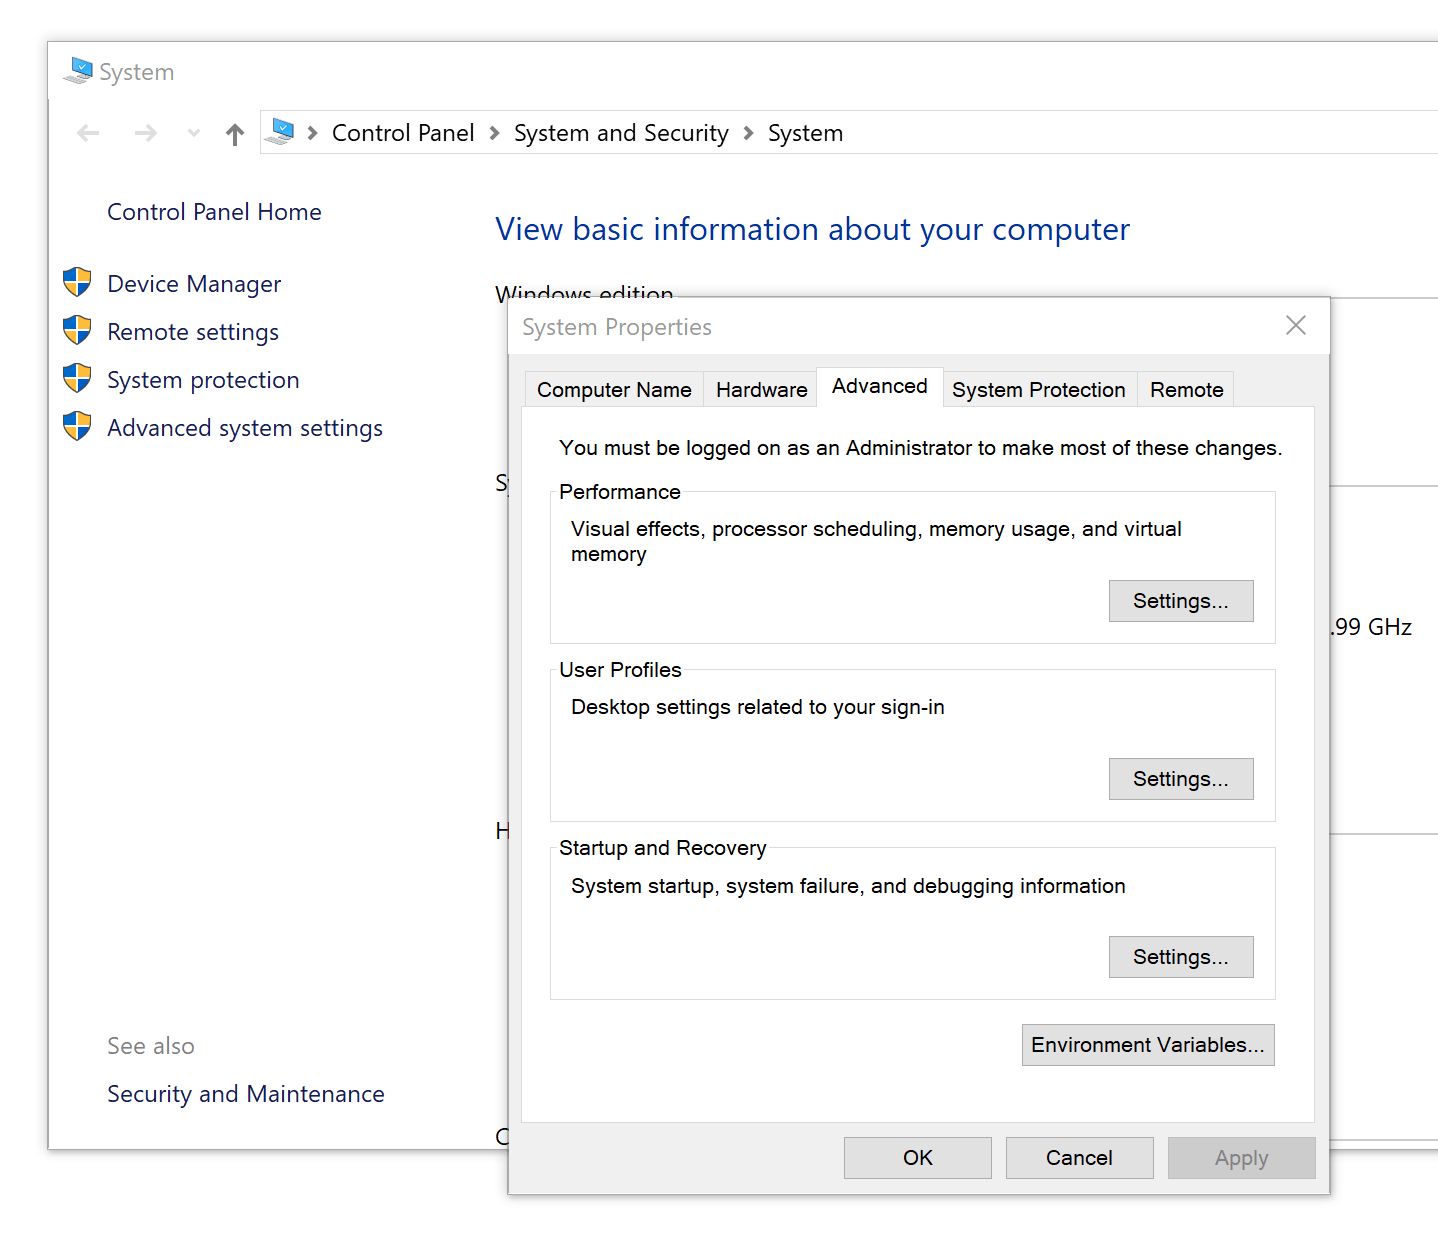
Step 3: Open Advanced System Settings on Windows#
Now that we know your php installation directory, we need to open the actually
add the folder path into the Windows’ PATH. But to get there, you have to open a
few different screens.
From the your file explorer or desktop, right click on «This PC». Then select
«Properties» from the drop down. Doing this will open the Windows control panel
menu for your system settings.
From the system settings menu, you will see all of your computer’s basic
information like RAM, CPU size, and your computer name.
On the left hand side of the program, you will see an option to open «Advanced
System Settings». Go ahead and open the Windows advanced system settings
program.
Please note: this WILL require you to have administrative permissions on
your Windows computer. If you do not, then you will have to contact the person
that does in order to update the Windows PATH variable.
Step 4: Update the Windows «PATH» environment variable#
Once you have successfully found and opened the Windows advanced system settings
popup, you can edit your Windows environment variables. While selected to the
Advanced tab in the popup, click on the «Environment variables…» button at the
bottom. This will open another program.
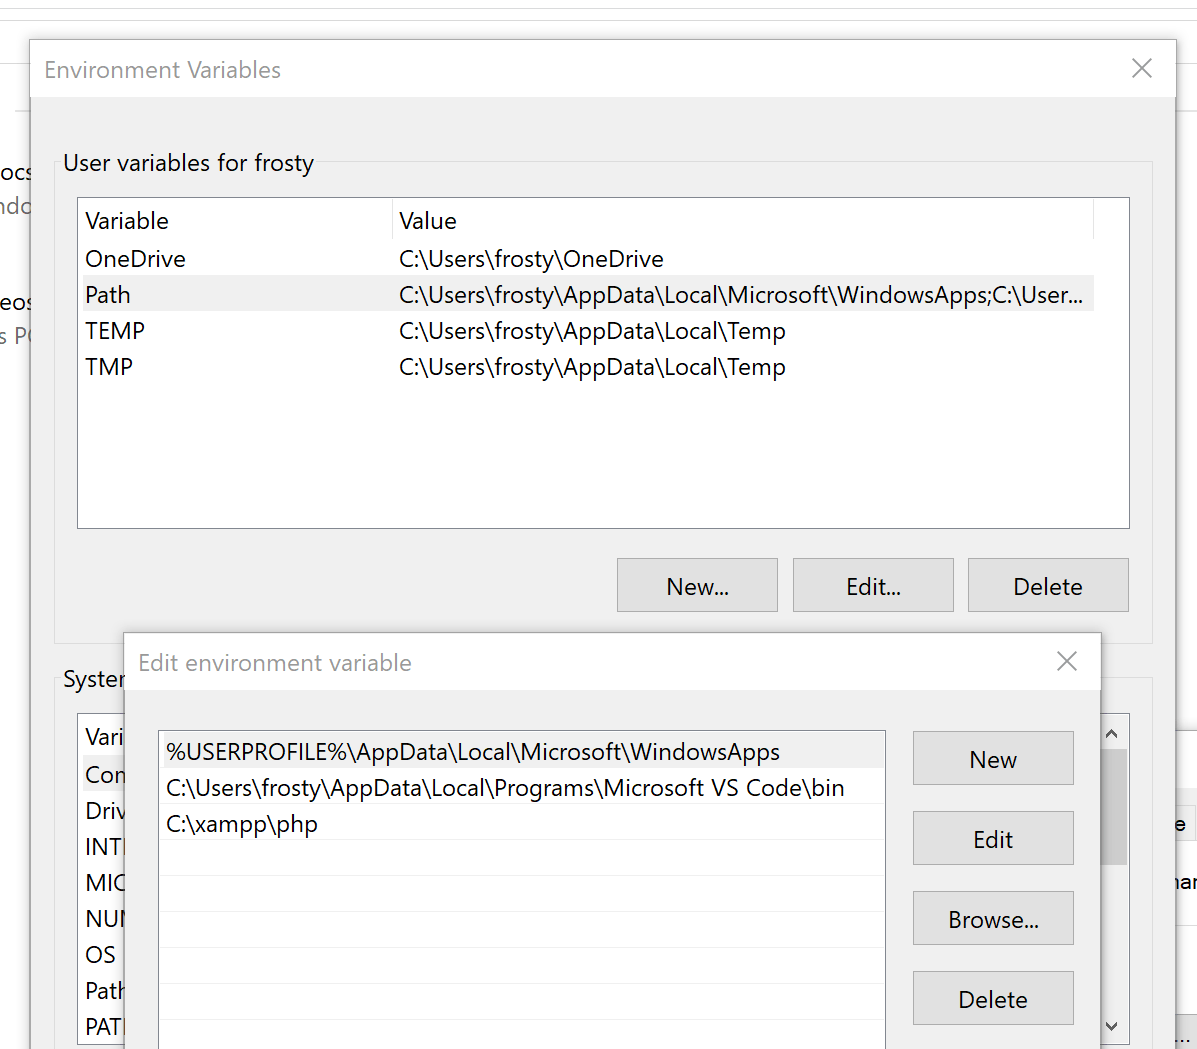
From here you can update all of your Windows environment variables. But in order
to fix the PHP executable not found error message in VS Code, we really only
care about the PATH variable.
So, from the list of User variables, select the «Path» option. Then click the
Edit button. This will open the variable editor window.
Inside of the variable editor window, you can create a new PATH variable quite
easily. Simply click the «New» button on the right hand side. Then enter in your
PHP installation directory that we got from the step above.
Be sure to click away from the new path you created to ensure the updated PHP
path is correctly saved into Windows.
Step 5: Close VS Code and reopen it#
When you have successfully saved your PHP path location into the Windows PATH
variable, you can close out of all of the Windows control panel windows.
You can now close VS code and reopen it. And you will notice that you have
gotten rid of the «PHP executable not found» error message that you get on VS
code start up. Great success!