pgAdmin 4 (Windows)
Maintainer: pgAdmin Development Team
pgAdmin is available for 64 bit Windows™ 7 SP1 (desktop) or 2008R2 (server) and above, up to v4.30.
v5.0 and later are supported on Windows 8 (desktop) or 2012 (server) and above.
v7.0 and later are supported on Windows 10 (desktop) or 2016 (server) and above.
32 bit Windows support is available for versions up to v4.29.
The packages below include both the Desktop Runtime and Web Application:
- pgAdmin 4 v9.3 (released April 30, 2025)
- pgAdmin 4 v9.2 (released April 3, 2025)
- pgAdmin 4 v9.1 (released Feb. 28, 2025)
- pgAdmin 4 v8.14 (released Dec. 12, 2024)
- pgAdmin 4 v7.8 (released Oct. 19, 2023)
- pgAdmin 4 v6.21 (released March 9, 2023)
Info
Nightly snapshot builds generated from the head of the master branch are available here.
To install these packages, simply download and run the installer.
The Windows installers are signed with a Microsoft-issued digital signing key.
Alternative Distributions
pgAdmin is a free software project released under the PostgreSQL licence. The
software is available in source and binary format from the
PostgreSQL mirror network. Because compiling from source
requires technical knowledge, we recommend installing binary packages whenever possible.
The pages in this section give additional details about each binary package available as well as more direct
download links. In addition, you can download source tarballs and pgAgent for your servers to enable additional
functionality.
Only recent downloads are kept on the main download site, along with the last release of each major version.
Older downloads can be found in the Download Archive.
Note that whilst the packages from the APT and YUM repositories are also archived here, the repository metadata
is not maintained so it is not possible to configure the archives as working repositories.
pgAdmin 4
pgAdmin 4 is a complete rewrite of pgAdmin, built using Python, ReactJs, and Javascript. A desktop runtime written in Electron allows it to run standalone for individual users, or the web application code may be deployed directly on a web server for use by one or more users through their web browser. The software has the look and feel of a desktop application whatever the runtime environment is, and vastly improves on pgAdmin III with updated user interface elements, multi-user/web deployment options, dashboards, and a more modern design.
pgAgent
pgAgent is a job scheduler for PostgreSQL which may be managed using pgAdmin. Prior to pgAdmin v1.9, pgAgent shipped as part of pgAdmin. From pgAdmin v1.9 onwards, pgAgent is shipped as a separate application.
pgAdmin 4 Download Guide
Introduction
pgAdmin 4 is a powerful and open-source administration tool for PostgreSQL databases. Whether you are a developer, database administrator, or data analyst, pgAdmin 4 provides an intuitive interface to manage, monitor, and execute SQL queries on PostgreSQL databases.
This guide will walk you through the steps to download and install pgAdmin 4 on different operating systems. If you’re looking for a quick download, use the
Direct Download Link.
System Requirements
Before downloading pgAdmin 4, ensure your system meets the following requirements:
- Windows: Windows 10 or later (64-bit)
- macOS: macOS 11 (Big Sur) or later
- Linux: Ubuntu, Debian, Red Hat, or other major distributions
- Python: Version 3.6 or later (for the Python package)
- PostgreSQL: pgAdmin is compatible with all supported versions of PostgreSQL
How to Download and Install pgAdmin 4
Windows Installation
- Go to the official pgAdmin download page or use the
-
Direct Download Link.
- Select the Windows installer (
.exefile) and download it. - Run the installer and follow the on-screen instructions.
- Once installed, launch pgAdmin 4 from the Start Menu.
- Configure your PostgreSQL database connection and start managing your databases.
macOS Installation
- Download the
.dmgfile from the official website or via the -
Direct Download Link.
- Open the downloaded file and drag the pgAdmin 4 icon to the Applications folder.
- Open pgAdmin 4 from the Applications menu.
- Configure your database settings and start using pgAdmin 4.
Linux Installation (Ubuntu/Debian)
- Open a terminal window and update your package list:
- Install pgAdmin 4 using the following command:
sudo apt install pgadmin4
- Alternatively, download the package from the
-
Direct Download Link.
- Launch pgAdmin 4 using:
- Connect your PostgreSQL database and start managing it through the pgAdmin interface.
Linux Installation (Red Hat/CentOS)
- Update your package list:
- Install pgAdmin 4:
sudo yum install pgadmin4
- Open pgAdmin 4 from your applications menu or terminal.
Features of pgAdmin 4
- User-Friendly Interface: Modern web-based UI for easy database management.
- SQL Query Tool: Run complex queries, analyze performance, and debug SQL commands.
- Database Management: Create, modify, and delete databases, schemas, tables, and functions.
- Backup & Restore: Seamless database backup and restoration.
- Cross-Platform: Available on Windows, macOS, and Linux.
- Server Mode & Desktop Mode: Use as a standalone application or as a web-based tool.
Troubleshooting
Common Issues & Fixes
1. pgAdmin 4 Won’t Launch
- Ensure your system meets the requirements.
- Restart your computer and try again.
- Reinstall pgAdmin if the issue persists.
2. Connection to PostgreSQL Failed
- Verify that your PostgreSQL server is running.
- Check the hostname and port settings.
- Ensure the firewall or antivirus is not blocking the connection.
3. pgAdmin 4 Running Slow
- Clear the browser cache (for web-based mode).
- Optimize PostgreSQL queries and database indexing.
Direct Download Link.
Conclusion
pgAdmin 4 is an essential tool for PostgreSQL database management. Whether you are using Windows, macOS, or Linux, downloading and installing pgAdmin 4 is a straightforward process. Use the Direct Download Link for a hassle-free download experience.
Stay updated with the latest versions and features by visiting the official pgAdmin website. If you encounter issues, refer to the troubleshooting section or seek help from the pgAdmin community.
Happy coding!
Learn the steps to install the popular pgAdmin on Windows 11 or 10 to manage local or remote PostgreSQL Database on your system directly.
Steps to install pgAdmin on Windows 11 or 101. Open Windows Terminal or Powershell2. Install pgAdmin 4 using Winget2. Download pgAdmin3. Run the Setup4. Install pgAdmin on Windows 11 or 105. Launch the pgAdmin6. Connect pgAdmin to Remote PostgreSQL Server
Like popular phpMyAdmin to graphically manage MySQL or MariaDB databases, we have pgAdmin. It is also a free and open source software that provides a graphical interface to develop and administrators PostgreSQL databases. The open-source license of pgAdmin is inherited from the PostgreSQL project. pgAdmin runs on Windows, Linux, macOS, and other Unix derivatives.
However, unlike Linux, pgAdmin on Windows and macOS can easily be installed to manage remote or locally running PostgreSQL.
Well, pgAdmin offers two types of installation: Desktop Deployment and Server Deployment.
Server Deployment: In this installation method, the pgAdmin is installed as a web application with the help of a web server on a command line server, so that single or multiple users can access it simultaneously using a web browser. Of course, credentials are required for security.
Desktop Deployment: This installation is like any other software installed locally on the computer. This means you don’t require any browser to connect and access PostgreSQL but are limited to only one user currently logged on to the operating system. Also, the user needs a GUI running a supported OS.
Installing pgAdmin as a central web application in the local network (server deployment) is helpful if you don’t want to restrict it to only one PC. However, as we are using Windows here, most of this OS users would like to have a Desktop Deployment only. This tutorial will discuss how to install the pgAdmin App and connect it with a remote PostgreSQL Database server.
The steps will be the same for Windows 10 and the latest one, 11. Users can follow this tutorial even with old OS versions not supported by Microsoft, such as Windows 7.
#1st Way is using the Winget command line
1. Open Windows Terminal or Powershell
As our first method involves the command line to install pgAdmin on Windows 11 or 10, we have to open Windows Powershell first. Right-click on your Windows Start button and select PowerShell (Admin) in Windows 10, whereas Windows Terminal (Admin) in Windows 11.
2. Install pgAdmin 4 using Winget
Like Linux, since Windows 10, Microsoft also offers a package manager by default on its operating systems called “Winget.” Although the list of packages to install using it is not as comprehensive as Linux package managers, yet enough to get some popular software quickly. The good thing is the latest version of pgAdmin is available through it. Hence, let’s run a single command to get pgAdmin 4.
To check the pgAdmin version available via Winget
winget search pgAdmin
To install:
winget install pgAdmin

After this, jump to Step 5 of this article.
#2nd method using the official pgAdmin executable setup…
2. Download pgAdmin
The official website of pgAdmin offers an executable file to install this PostgreSQL’s GUI interface app easily. Hence, visit it using the given link and download the same on your Windows 11 or 10 system. You will have the list of the supported versions; select the latest one, and download the same.
3. Run the Setup
Once you have the setup on your system, double-click on it to run the same, and click on Install for me only (recommended); however, if you want to install pgAdmin for all users’ accounts on your system, then you can for the second option.
4. Install pgAdmin on Windows 11 or 10
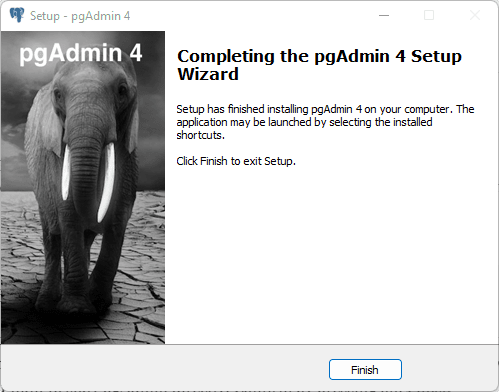
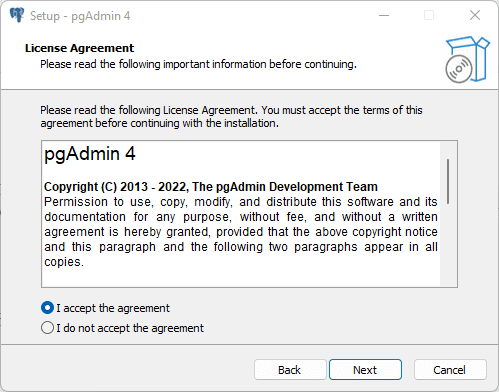
Start the installation by clicking the Next button and then Accepting the license. After that, again click the Next buttons to accept the default setting until the setup starts the installation process. Soon, the installation will be completed; confirm it by pressing “Finish.”

5. Launch the pgAdmin
To start the application or GUI interface app for PostgreSQL Database, go to your Windows search and type pgAdmin; as its icon appears, click to run the same.

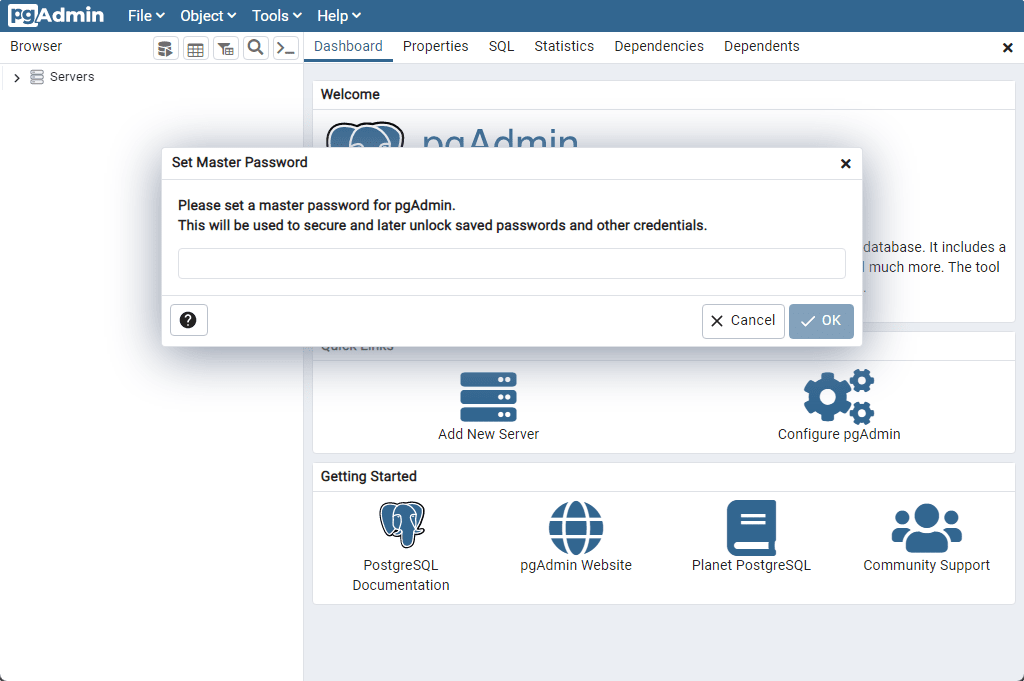
After the start, you will be asked to assign a master password. Remember this is used to store the sensitive connection data to your databases in encrypted form. The master password is not stored anywhere, so you must remember it well.
6. Connect pgAdmin to Remote PostgreSQL Server
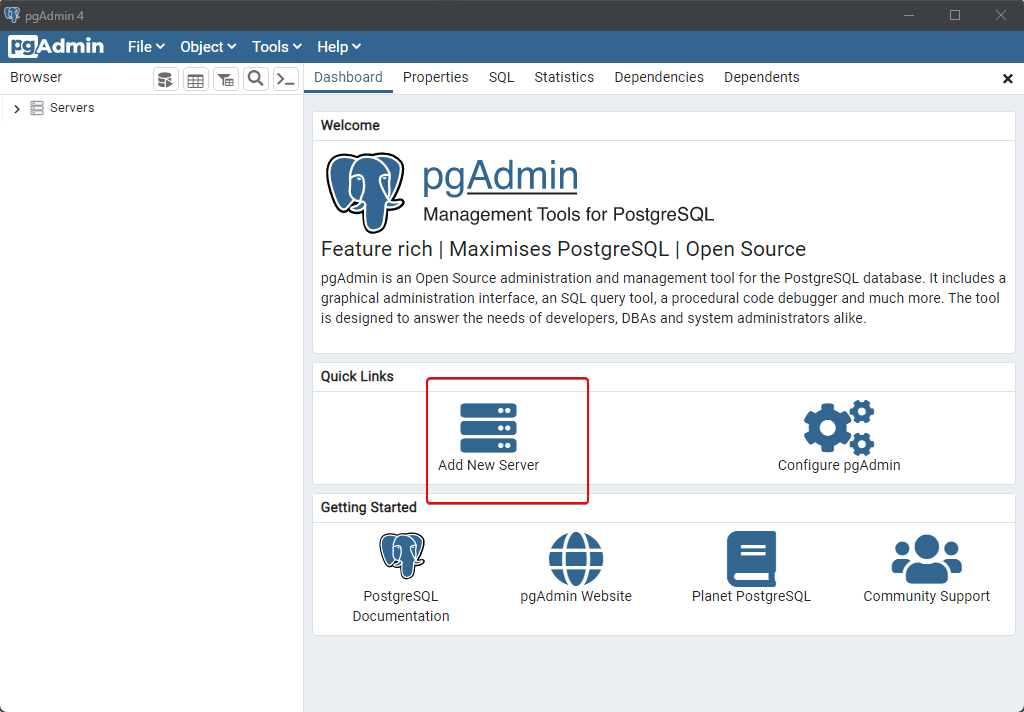
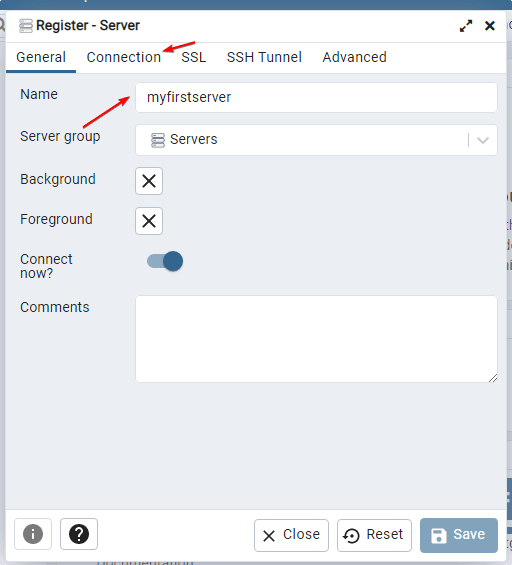
To establish a connection with your remote PostgreSQL Database, click on Add New Server.
In this dialog box, you enter a name for your server to identify it later quickly. It can be the actual name of the remote server or whatever you want to call it on pgAdmin.
Here we are going for a TCP connection, and for that, click on the Connection Tab. After that, you have two options: Configure a direct link to the server via TCP or an indirect reference to the server via SSH tunnel. You can choose the one you want.
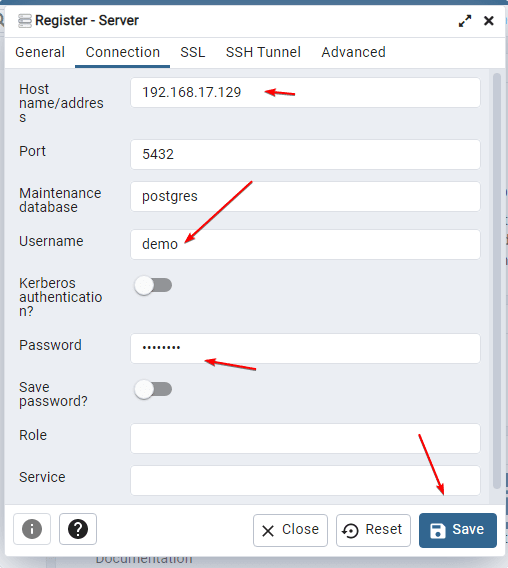
Now, in the Connection tab, enter the Ip-address or domain name of the server on which your PostgreSQL instance is installed.
Leave the Port and Maninatance Database values as they are, and add the PostgreSQL instance Database Username and Password you want to access on pgAdmin.
Next, click on the Save button to let the program establish a connection.
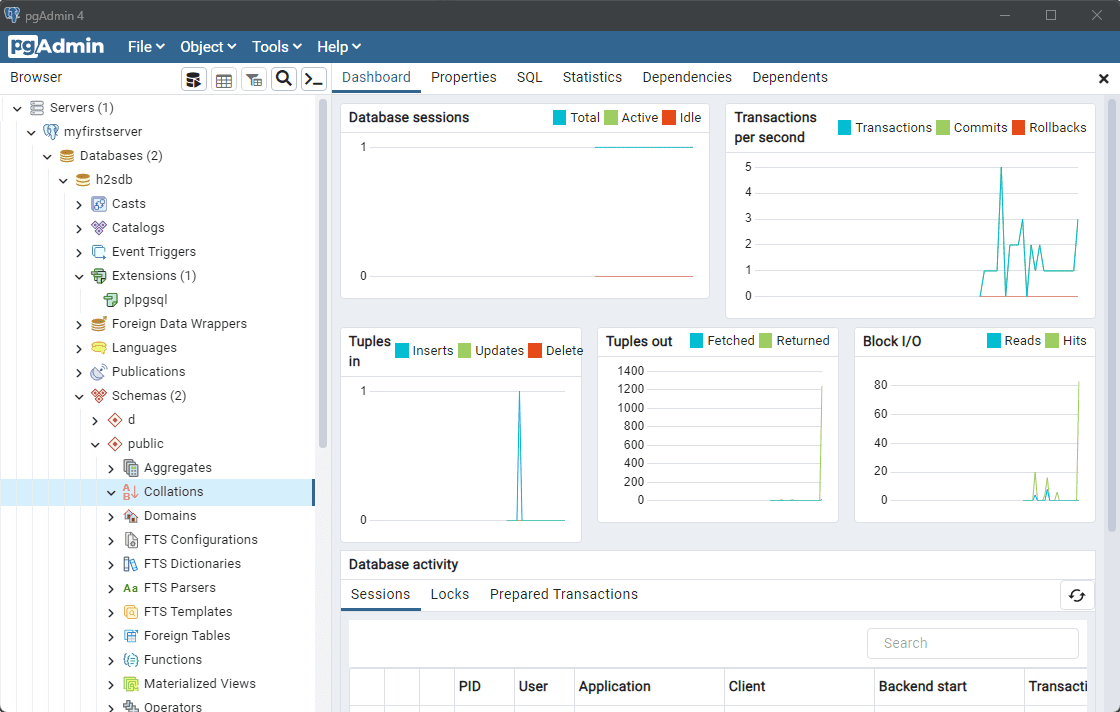
Finally, you will have the graphical user interface with PostgreSQL Database to create, delete and edit tables, including other tasks such as backup and restore.
Other Articles:
⇒ MySQL GUI Tools for Windows and Ubuntu/Linux: Top 8 free
⇒ Install Top 10 essential software on Windows 11 using the command
⇒ How to install XAMPP on Windows 10 using the Command prompt
⇒ How to Install Sensu Go Monitoring on Windows
⇒ How to install Ubuntu 22.04 on Windows 11 WSL…
Страница обновлена :
Дата создания страницы :
Операционная среда
- PostgreSQL (сервер)
-
- PostgreSQL 15
- Windows (сервер)
-
- Windows Server 2019
- pdAdmin (клиент)
-
- pdAdmin 4 версии 7.0
- Windows (клиент)
-
- Windows 11
Необходимые условия
- Виндоус
-
- Windows 10 или более поздней версии
- Windows Server 2016 или более поздней версии
предпосылка
- PostgreSQL уже настроен на другом сервере и может быть подключен извне.
Для установки только с помощью pgAdmin сервер PostgreSQL не требуется, но он необходим в качестве подтверждения места назначения.
О pgAdmin
pgAdmin — это графический интерфейс пользователя для работы с базами данных, официально поддерживаемыми PostgreSQL.
Поскольку состояние базы данных отображается в виде экрана, я думаю, что информация и операции легче для понимания, чем база команд.
Однако поддерживаются не все операции с базой данных, а для некоторых может потребоваться использование команд.
Большинство основных операций можно выполнять с помощью графического интерфейса.
Кстати, pgAdmin — это клиентский инструмент для работы с базами данных.
Вам не нужно устанавливать сервер PostgreSQL в среде, использующей pgAdmin.
Если у вас есть база данных PostgreSQL на другом сервере, вы будете работать с этой базой данных по сети с помощью pgAdmin.
pgAdmin можно установить вместе с PostgreSQL.
Вам не нужно отдельно устанавливать pgAdmin на сервер PostgreSQL.
загружать
В веб-браузере перейдите на следующие страницы:
- pgAdmin 4 (Windows) Скачать
Для каждой версии есть ссылка, поэтому скачайте последнюю версию.
устанавливать
Запустите скачанный установщик.
Выберите Установить только для меня. Не имеет значения, какой из них вы выберете, но в данном случае я выбираю рекомендованный.
Нажмите кнопку «Далее».
Внимательно прочитайте Лицензионное соглашение, поставьте галочку напротив пункта «Я принимаю соглашение» и нажмите кнопку «Далее».
Если место установки не изменилось, нажмите кнопку «Далее».
Если в меню «Пуск» имя папки не изменилось, нажмите кнопку «Далее».
Если проблем с настройками нет, нажмите кнопку «Установить», чтобы начать установку.
Когда установка будет завершена, нажмите кнопку «Готово», чтобы закрыть ее.
Запуск pgAdmin
Выберите «pdAdmin 4 v7» в меню «Пуск». Название может меняться в зависимости от версии.
Установка мастер-пароля
При первом запуске pdAdmin вам будет предложено зарегистрировать мастер-пароль.
Необходимо настроить параметры таким образом, чтобы третья сторона не могла манипулировать базой данных без разрешения.
Проверка соединения
Проверьте, можете ли вы подключиться к базе данных PostgreSQL на другом сервере.
Информация о назначении подключения зависит от среды, поэтому здесь описана только процедура.
После запуска pgAdmin щелкните правой кнопкой мыши по «Серверам» и выберите «Зарегистрировать > сервер…».
На вкладке Общие имя должно быть именем, которое поможет вам идентифицировать сервер.
Выберите вкладку Подключение. Введите «Имя/адрес хоста», «База данных обслуживания», «Имя пользователя» и «Пароль».
Если вы не хотите вводить пароль каждый раз, включите функцию «Сохранить пароль».
Кстати, pdAdmin может не иметь возможности разрешить имя Host, поэтому в таком случае укажите IP-адрес напрямую.
Заполните остальные поля ввода по мере необходимости.
Когда все будет готово, нажмите кнопку «Сохранить».
Если вы можете подключиться к базе данных целевого сервера, проверка завершена.
