
Здравствуйте! Пытаюсь сделать дамп базы данных postgresql. Это trial база на aws, по этому не могу сделать дамп через pgAdmin4, вылетает ошибка. Хочу попробовать сделать через pg_dump из локального ПК. Проблема в том, что pgAdmin установлен, но утилиты pg_dump нет
C:\Users\User>pg_dump --version
'pg_dump' is not recognized as an internal or external command,
operable program or batch file.

C:\Users\User>pg_dump
'pg_dump' is not recognized as an internal or external command,
operable program or batch file.
Искал в интернете как сделать, но там говорится о том, что утилита должна идти в комплекте с PostgreSql, но я не нашёл как установить pg_dump для Windows отдельно от PostgreSql
-
Вопрос задан
-
1528 просмотров
Переустановка PostgreSQL, во время установки выбрать «Command Line Tools» (тогда установится так же pg_dump).
pgAdmin не включает в себя pg_dump.
UPD: проблема была в переменной окружения PATH (не указывала на место расположения на другом диске, куда был установлен PostgreSQL)?
При установке значит PATH не был обновлен.
Надо найти директорию, в которую установлен postgres и попробовать запустить оттуда.
Возможный путь C:\Program Files\PostgreSQL\%version%\bin:
— %version% — подставляешь свою версию
— Все бинари лежат обычно в /bin директории (pg_ctl, pg_dump, initdb и др.)
После рекомендую обновить PATH — добавить этот путь.
Дополнительно: в настройках pgAdmin можно прописать кастомный путь до постгреса:
File (правый верхний угол) -> Preferences -> Paths -> Binary paths
Возможно после этого и pgAdmin заработает
Пригласить эксперта
-
Показать ещё
Загружается…
Минуточку внимания
pg_dump is part of the PostgreSQL client utilities and doesn’t come as a standalone tool. This guide covers how to install PostgreSQL client tools (including pg_dump) on various operating systems.
Mac OS#
Method 1: Using Homebrew (Recommended)#
-
Install Homebrew if you don’t have it:
/bin/bash -c "$(curl -fsSL https://raw.githubusercontent.com/Homebrew/install/HEAD/install.sh)" -
Install PostgreSQL:
brew install postgresql -
Verify installation:
pg_dump --version
Method 2: Using Postgres.app#
- Download Postgres.app
- Move to Applications folder and open
- Add to your PATH:
sudo mkdir -p /etc/paths.d && echo /Applications/Postgres.app/Contents/Versions/latest/bin | sudo tee /etc/paths.d/postgresapp - Restart your terminal
- Verify installation:
pg_dump --version
Ubuntu#
-
Update package lists:
sudo apt update -
Install PostgreSQL client:
sudo apt install postgresql-client -
Verify installation:
pg_dump --versionTo install a specific PostgreSQL version (e.g., PostgreSQL 14):
sudo apt install postgresql-client-14
CentOS/RHEL#
For CentOS/RHEL 7.x#
-
Add PostgreSQL official repository:
sudo yum install -y https://download.postgresql.org/pub/repos/yum/reporpms/EL-7-x86_64/pgdg-redhat-repo-latest.noarch.rpm -
Install PostgreSQL client:
sudo yum install -y postgresql14 -
Verify installation:
pg_dump --version
For CentOS/RHEL 8.x and above#
-
Add PostgreSQL official repository:
sudo dnf install -y https://download.postgresql.org/pub/repos/yum/reporpms/EL-8-x86_64/pgdg-redhat-repo-latest.noarch.rpm -
Disable built-in PostgreSQL module:
sudo dnf -qy module disable postgresql -
Install PostgreSQL client:
sudo dnf install -y postgresql14 -
Verify installation:
pg_dump --version
Windows#
Method 1: Full PostgreSQL Installation#
- Download the PostgreSQL installer from https://www.postgresql.org/download/windows/
- Run the installer and follow the setup wizard
- Deselect components you don’t need (e.g., pgAdmin, StackBuilder)
- Complete the installation
- Add PostgreSQL bin directory to your PATH:
- Go to Control Panel > System and Security > System > Advanced system settings
- Click «Environment Variables»
- Edit PATH variable and add:
C:\Program Files\PostgreSQL\<version>\bin
- Open a new Command Prompt and verify:
pg_dump --version
Method 2: Using the ZIP Version (Client-Only)#
- Download the ZIP archive from https://www.enterprisedb.com/download-postgresql-binaries
- Extract to a location (e.g.,
C:\pgsql) - Add bin directory to PATH:
- Go to Control Panel > System and Security > System > Advanced system settings
- Click «Environment Variables»
- Edit PATH variable and add:
C:\pgsql\bin
- Open a new Command Prompt and verify:
pg_dump --version
Using pg_dump#
Basic usage:
pg_dump -h hostname -p port -U username -d dbname -f output.sqlExamples:
# Dump in plain SQL format
pg_dump -h localhost -U postgres -d mydb -f backup.sql

# Dump in custom format (compressed)
pg_dump -h localhost -U postgres -d mydb -F c -f backup.dump

# Dump schema only
pg_dump -h localhost -U postgres -d mydb --schema-only -f schema.sql

# Dump specific tables
pg_dump -h localhost -U postgres -d mydb -t table1 -t table2 -f tables.sqlTroubleshooting#
Common Issues#
- Command not found: Ensure PostgreSQL bin directory is in your PATH
- Permission denied: Ensure you have proper permissions to run the command
- Connection refused: Check hostname, port, and ensure PostgreSQL server is running
- Authentication failed: Verify username and password
Environment Variables#
Setting up environment variables can make using pg_dump easier:
export PGHOST=localhost
export PGPORT=5432
export PGUSER=postgres
export PGPASSWORD=yourpassword  # Not recommended for security reasons
For Windows:
set PGHOST=localhost
set PGPORT=5432
set PGUSER=postgres
set PGPASSWORD=yourpassword # Not recommended for security reasonsРезервное копирование — одна из важнейших задач системного администратора. Хорошо если копии вам никогда не пригодятся, но они должны быть. Сегодня мы рассмотрим некоторые аспекты резервного копирования популярной СУБД PostgreSQL, в частности при ее применении совместно с 1С:Предприятие. Начнем с самого простого и понятного способа — использования утилиты pg_dump, которая, кстати, может использоваться не только для резервного копирования, но и для переноса баз между различными серверами.
Онлайн-курс по устройству компьютерных сетей
На углубленном курсе «Архитектура современных компьютерных сетей» вы с нуля научитесь работать с Wireshark и «под микроскопом» изучите работу сетевых протоколов. На протяжении курса надо будет выполнить более пятидесяти лабораторных работ в Wireshark.
Как и любой иной способ использование pg_dump для копирования имеет свои плюсы и минусы. К основному минусу можно отнести то, что создаваемый дамп является срезом базы данных на некоторый момент времени и позволяет откатиться только на это состояние. Восстановление на произвольный момент времени невозможно.
Иные способы, позволяющие такое восстановление, работают на уровне инстанса и позволяют восстановить сразу весь кластер, т.е. все базы. Поэтому рекомендации по продуктовому применению PostgreSQL предусматривают основную схему: 1 база — 1 инстанс, что для небольших внедрений может быть избыточно как по ресурсам, так и по накладным расходам на администрирование.
В тоже время pg_dump работает на уровне базы данных и позволяет копировать и откатывать именно определенную базу, не затрагивая соседей по кластеру. Это несомненный плюс.
Также pg_dump может использоваться для переноса баз данных, она кроссплатформенна и кроссверсионна, т.е. позволяет переносить базы между разными платформами и разными версиями PostgreSQL. При этом следует помнить, что версии PostgreSQL совместимы снизу вверх, совместимость сверху вниз не поддерживается, либо поддерживается на ограниченное число версий. Т.е. вы всегда сможете загрузить дамп из PostgreSQL 9.6 в PostgreSQL 15, но не наоборот.
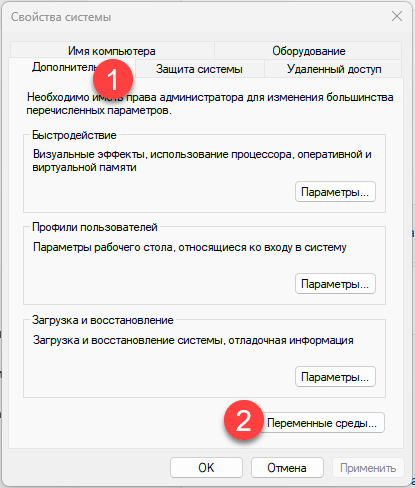
Подготовка сервера
Чтобы удобно работать с утилитами PostgreSQL добавим путь к ним в переменную окружения PATH. Для этого перейдем в Свойства системы — Дополнительно — Переменные окружения.
Затем найдем в списке переменную PATH и изменим ее, добавив новой строкой путь к папке bin вашего экземпляра PostgreSQL, в нашем случае это C:\Program Files\PostgreSQL\15.5-10.1C\bin:
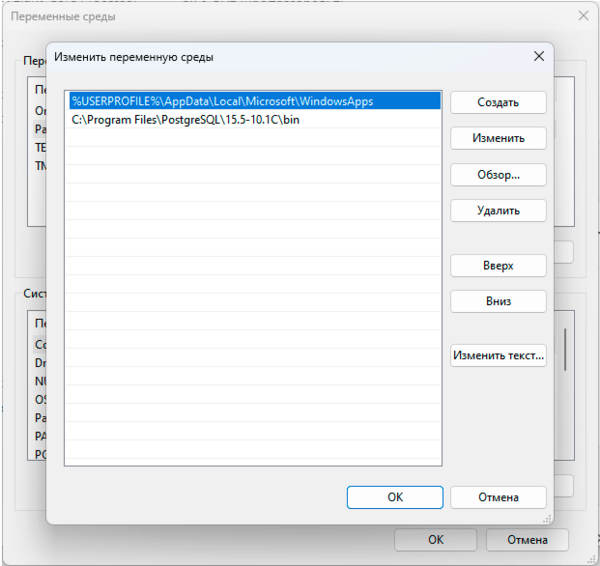
Теперь вы можете обращаться к утилитам PostgreSQL просто по имени. Однако при написании скриптов всегда указывайте полный путь, что позволит избежать ошибок, если у запустившего пользователя скрипт в переменной PATH не окажется указанного выше пути.
Следующий вопрос — пароль суперпользователя СУБД, либо другого пользователя, имеющего нужные права для выгрузки и загрузки базы. В подавляющем большинстве случаев с пользователями никто не заморачивается и все работают от суперпользователя postgres. Для этого можно пойти несколькими путями, один из них создание специального файла паролей, для этого создайте в указанные ниже директорию и файл:
%APPDATA%\postgresql\pgpass.confПосле чего внесите в него следующие строки:
#имя_узла:порт:база_данных:имя_пользователя:парольlocalhost:*:*:postgres:MyPa$$Word_1
Первая строка — это подсказка-комментарий, чтобы вам потом не приходилось вспоминать синтаксис. А ниже мы указали, что при подключении к инстансу расположенному на локальном узле localhost, использующему любой порт, для любой базы данных, при подключении пользователем postgres использовать указанный пароль. Первые четыре поля могут использовать подстановочный знак * указывающий на любое значение. Например, если у вас множество серверов с одинаковым паролем, то можете указать так:
*:*:*:postgres:MyPa$$Word_1Данный способ является рекомендуемым, но у него есть недостаток в виде хранения пароля в открытом виде. Поэтому можно использовать альтернативу, разрешить локальные подключения без пароля. Для этого найдите файл pg_hba.conf который находится в директории кластера data, в нашем случае он расположен по умолчанию в C:\Program Files\PostgreSQL\15.5-10.1C\data. В данный файл добавьте строку:
host all all localhost trustСохраните файл и перезапустите службу PostgreSQL. После чего вы можете без пароля подключаться к базе через localhost, обратите внимание, что в данном случае localhost не равнозначен 127.0.0.1 и если вы укажете адрес, то подключиться не получится.
Создание резервной копии базы данных
Утилита pg_dump умеет создавать копии в разных форматах, каждый из которых имеет свои достоинства и недостатки.
- plain — выгрузка в текстовом SQL формате. Наиболее универсальна, а при необходимости позволяет вручную откорректировать дамп или выполнить частичную загрузку или восстановление, например отдельной таблицы. Не сжимается, имеет большой размер.
- custom — собственный формат pg_dump, предусматривает сжатие данных и возможность многопоточной загрузки, выгружается всегда однопоточно
- directory — выгрузка в виде директории, на каждую таблицу выгружается отдельный сжатый файл, позволяет многопоточную выгрузку и загрузку.
- tar — представляет, по сути, выгрузку в виде директории, но упакованной в tar-архив, сжатие не предусмотрено, поэтому размер выгрузки будет больше, чем у директории, однопоточен.
Таким образом, наиболее удобными с практической точки зрения является формат custom, либо directory — если вам требуется многопоточная выгрузка. При переносе между разными системами предпочтительно использовать plain, так как он представляет набор SQL команд и может быть легко отредактирован вручную.
Итак приступим. Прежде всего следует узнать какие базы данных есть на нашем сервере и как они называются, для этого выполним:
psql -h localhost -U postgres -lВ выводе мы увидим список баз и их параметры:
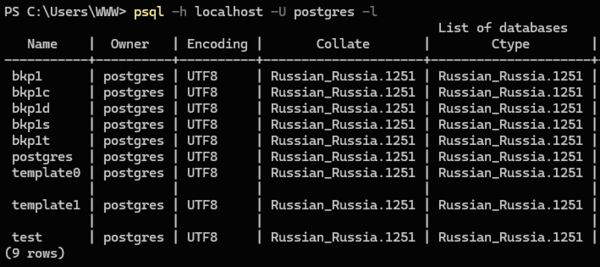
В нашем случае мы будем бекапить базу данных bkp1 и местом хранения резервных копий определим D:\Backup. Начнем с текстового формата, он используется по умолчанию и отдельно указывать его не нужно:
pg_dump -h localhost -U postgres -f D:\Backup\bkp1.sql bkp1Общий синтаксис команды такой: сначала указываем все используемые ключи, первый аргумент без ключа считается именем базы данных, и оно должно быть последним в команде. Указывать ключи после имени базы не следует. В команде мы использовали ключи:
- -h сервер — указывает имя или адрес компьютера, на котором работает сервер СУБД
- -U имя_пользователя — имя пользователя, под которым производится подключение
- -f файл — файл, в который производится выгрузка
Также ниже мы будем использовать ключи:
- -F формат — формат выгрузки
- -j число_заданий — количество потоков
С полным перечнем ключей можно ознакомиться в официальной документации.
В некоторых источниках можно встретить команду в виде:
pg_dump -h localhost -U postgres bkp1 > D:\Backup\bkp1.sqlВажно! В среде Windows не используйте перенаправление для выгрузки и загрузки резервных копий!
Мы неоднократно сталкивались с тем, что выгруженные через перенаправление копии внешне выглядели вполне нормально, в том числе и копии в текстовом формате, но при восстановлении отказывались загружаться. Это происходит не всегда и не везде, но для исключения подобных ситуаций перенаправление в Windows использовать не следует.
Теперь создадим выгрузку в формате custom:
pg_dump -h localhost -U postgres -Fc -f D:\Backup\bkp1.dump bkp1Здесь у нас добавился еще один ключ, указывающий на формат выгрузки, если вы хотите выгрузить в формате tar, просто замените -Fc на -Ft.
И, наконец, в формате директории:
pg_dump -h localhost -U postgres -Fd -f D:\Backup\bkp1_dir -j 4 bkp1Для данного формата у нас появился еще один ключ, указывающий число потоков выгрузки. Число потоков не должно превышать количество ядер процессора, но не все так просто: pg_dump спокойно нагрузит каждый поток, создав 100% загрузку ядер процессора, но сможет ли его принять устройство хранения? Может получиться так, что скорость записи на накопитель окажется бутылочным горлышком и вместо ускорения вы получите замедление как выгрузки дампа, так и всей системы вообще.
Поэтому начните с небольшого количества, двух или четырех потоков, оцените нагрузку на систему и остановитесь на некотором оптимальном значении, это особенно важно, если на сервере в момент выгрузки будут работать пользователи. Нам ведь совершенно ни к чему чтобы они каждый час жаловались на тормоза.
Еще одна тонкость, что будет если указанный файл выгрузки существует? Форматы, custom и tar молча перезапишут его. При выгрузке в формате directory вы получите сообщение, что целевая директория не пуста и выгрузка выполнена не будет. Это следует учитывать при написании скриптов, потому как при ошибке вы либо останетесь без старых копий, либо не будут создаваться новые. Хотя визуально все будет нормально.
Особенно легко ошибиться в случае с directory, если вы используете для выгрузки одну и ту же директорию, потом дополнительно архивируете ее и отправляете на устройство хранения. В этом случае вы будете архивировать одну и ту же старую копию. Поэтому директорию выгрузки надо всегда очищать или удалять.
Восстановление базы данных из резервной копии
Начнем с того, что восстановить базу данных PostgreSQL можно только в новую, пустую базу. Если мы хотим восстановить ее в существующую, то ее придется сначала удалить, а потом создать новую с таким же именем. Исключение — формат plain, это просто набор SQL-команд, которые мы можем выполнить на рабочей базе, выборочно туда что-то подгрузив. Но это требует определенных знаний и квалификации, что выходит за рамки нашей статьи.
Итак, прежде всего удалим старую базу:
dropdb -h localhost -U postgres -i bkp1В приведенной команде мы использовали ключ -i который запросит интерактивное подтверждение действия:
База данных "bkp1" будет удалена навсегда.
Продолжить? (y/n)
Почему мы это сделали и советуем вам поступать также? Как показывает практика, данные команды часто вводятся методом копирования, неважно откуда, из статьи, документации, собственных записей, истории команд. В этом случае интерактивный запрос послужит предохранителем, который позволит остановиться и задуматься что вы делаете.
А теперь создадим новую:
createdb -h localhost -U postgres -T template0 bkp1Ключ -T указывает использовать при создании базы полностью пустой шаблон template0. Если вы хотите выполнить восстановление в отдельную новую базу, то просто создайте ее приведенной выше командой.
Начнем восстановление с формата plain, так как это не дамп, а набор SQL команд, то для их исполнения мы будем использовать утилиту psql:
psql -h localhost -U postgres -d bkp1 D:\Backup\bkp1.sqlФормат команды здесь такой же, сначала ключи, потом файл или директория, из которой идет восстановление. Ключ -d указывает имя базы данных, в которую мы загружаем выгрузку.
Для остальных форматов следует использовать утилиту pg_restore, например восстановим дамп формата custom, в два потока:
pg_restore -h localhost -U postgres -d bkp1 -j 2 D:\Backup\bkp1.dumpСинтаксис тот же самый, просто указываем базу и файл, с форматом утилита разберется самостоятельно. Если же вы попытаетесь подсунуть ей формат plain, то утилита откажется делать загрузку и любезно посоветует вам использовать для этого psql.
Что касается выбора количества потоков, то исходим из тех же соображений: один поток — одно ядро и обязательно тестируем, чтобы производительность диска не стала узким горлышком. Если вы выполняете восстановление в рабочее время, то учтите также влияние на работу пользователей, чтобы не вышло что вы запустили восстановление, а у всех остальных все стало.
При восстановлении из формата directory вместо файла укажите путь к папке:
pg_restore -h localhost -U postgres -d bkp1 -j 2 D:\Backup\bkp1_dirНапоминаем, что формат tar многопоточную загрузку не поддерживает, но вы можете его распаковать и загрузить многопоточно в формате directory.
Также есть способ несколько упростить себе жизнь, чтобы не удалять и не создавать заново базу данных мы можем выполнить:
pg_restore -h localhost -U postgres -d postgres -C -c D:\Backup\bkp1.dumpКлючи -C -c предписывают перед загрузкой удалить и создать заново базу имя которой записано в дампе, в ключе -d при этом потребуется указать любую существующую базу, обычно указывается стандартная postgres. В результате выполнения данной команды вы можете получать некоторые безвредные сообщения об ошибках.
Однако использовать эту команду следует очень осторожно и только на том сервере, откуда был сделан дамп. Также убедитесь, что вы взяли именно тот дамп, что надо. Но мы не рекомендуем так делать, особенно на продуктовых серверах, лучше осознанно удалите базу руками.
Онлайн-курс по устройству компьютерных сетей
На углубленном курсе «Архитектура современных компьютерных сетей» вы с нуля научитесь работать с Wireshark и «под микроскопом» изучите работу сетевых протоколов. На протяжении курса надо будет выполнить более пятидесяти лабораторных работ в Wireshark.
- Can I install PostgreSQL on Windows 10?
- Where is pg_dump installed?
- What is the difference between pg_dump and Pg_dumpall?
- How do I run PostgreSQL client on Windows?
- Is Postgres faster than MySQL?
- Does pg_dump lock database?
- Does pg_dump include data?
Can I install PostgreSQL on Windows 10?
Since version 8.0, PostgreSQL offers an installer for Windows systems that makes the installation process easier and faster. For development purposes, we will install PostgreSQL version 12 on Windows 10. There are three steps to complete the PostgreSQL installation: Download PostgreSQL installer for Windows.
Where is pg_dump installed?
pg_dump, pg_dump_all, pg_restore are all located in the bin folder of the PostgreSQL install and PgAdmin III install.
What is the difference between pg_dump and Pg_dumpall?
Dumping Using pg_dump and pg_dumpall. The pg_dump utility can be used to generate a logical dump of a single database. If you need to include global objects (like uses and tablespaces) or dump multiple databases, use pg_dumpall instead. The output generated by pg_dump is not a traditional “backup”.
How do I run PostgreSQL client on Windows?
Download and run the installer. Insert the PSQL CD into the CD-ROM drive. If the installer does not start automatically, then open the CD root directory and run autorun.exe. 2 In the installer selection list, click Client Only to install the components appropriate for your 32- or 64-bit Windows system.
Is Postgres faster than MySQL?
PostgreSQL is known to be faster while handling massive data sets, complicated queries, and read-write operations. Meanwhile, MySQL is known to be faster with read-only commands.
Does pg_dump lock database?
pg_dump doesn’t lock the entire database, it does get an explicit lock on all the tables it is going to dump, though.
Does pg_dump include data?
The dump file produced by pg_dump does not contain the statistics used by the optimizer to make query planning decisions. Therefore, it is wise to run ANALYZE after restoring from a dump file to ensure optimal performance; see Section 23.1. 3 and Section 23.1. 5 for more information.
Windows Postgres Install using pg_dump and scripts
- Installation Prerequisites
- Postgres
- Memory Requirements
- Postgres User Setup
- Fixing Windows Code page errors
- Postgres
- Installing a production database
- Changing the postgres database administrator password
- Configuration File Examples
- Postgres user password file
- Authentication Setup (hba.conf)
- Proxy User Setup (ident.conf)
Installation Prerequisites
Postgres
- Uses pg_dump and Powershell
- Does NOT need make or Node.js
Postgres is best downloaded from Enterprise DB: (http://www.enterprisedb.com/products-services-training/pgdownload).
This is standard PostGres as packaged by Enterprise DB and not their own Postgres based product EDB Postgres
Enterprise/Standard/Developer. An installation guide is at:
(http://get.enterprisedb.com/docs/PostgreSQL_Installation_Guide_v9.6.pdf)
WARNING: The RIF requires Postgres 9.3 or above to work. 9.1 and 9.2 will not work. It has NOT yet been tested on Postgres 10.
Postgres is usually setup in one of four ways:
- Standalone mode on a Windows firewalled laptop. This uses local database MD5 passwords and no SSL and is not considered secure for network use.
- Secure mode on a Windows server. This uses remote database connections using SSL; with MD5 passwords for psql and Java connectivity.
- Secure mode on a Windows server and Active directory network. This uses remote database connections using SSL; with SSPI (Windows GSS
connectivity) for psql and secure LDAP for Java connectivity. - Secure mode on a Linux server and Active directory network. This uses remote database connections using SSL; with GSSAPI/Kerberos for
psql and secure LDAP for Java connectivity.
The front and and middleware require username and password authentications; so method 4 must not be used.
Postgres also can proxy users (see ident.conf examples are in Configuration File Examples
Typically this is used to allow remote postgres administrator user authentication and to logon as the schema owner (rif40).
The Postgres installer will ask for a password for Postgres; do NOT use internationalised characters, e.g. £ as the
database usually defaults to US ASCII!
The Postgres installer then runs stack builder to download and install the additional packages.
Choose the local port. The following additional packages need to be installed:
- PostGres (database, PG Admin III administration tool, and common extensions)
- PostGIS (Geospatial integration)
- pgODBC (ODBC database connector for PostGres, 32 and 64 bit)
The PostGIS installer will ask to enable the builtin GDAL (Geospatial Data Abstraction Library). This
MUST be chosen.
Once the install is complete:
- Add the Postgres bin directory (e.g. C:\Program Files\PostgreSQL\9.5\bin) to the path
-
The following should normally be set in your environment:
- PGDATABASE — <your database name>
-
Check you can logon as postgres. If you need to reset the password see
Changing the postgres database administrator passwordC:\Program Files\Apache Software Foundation\Tomcat 8.5\bin>psql -U postgres -d postgres psql (9.5.0) Type "help" for help. postgres=#- If you get a code page error on Windows see 1.1.2 below.
Memory Requirements
Approximately:
- Windows 10 seems to need 6-8GB to function in normal use;
- The database needs 1-2 GB (SQL server will automatically; Postgres will run in less);
- R needs 1-2 GB (depends on study size; may need more);
- The Middleware 2-3GB;
- The front end 1-2GB.
16GB recommended. If you process large geographies using the Node.js tilemaker 48-64GB is recommended.
Postgres User Setup
The following users are created by the install script (rif40_database_install.bat):
- postgres — The database administrator. You will have set this password when you created
the Postgres cluster. - rif40 — The schema owner.
- <user login> — Your user login. This must be in lowercase and without spaces.
The install script (rif40_database_install.bat) will create your local .pgpass/pgpass.conf files
(see Postgres documentation for its location on various OS) and create random passwords for rif40
and <user login>.
E.g. C:\Users\pch\AppData\Roaming\postgresql\pgpass.conf:
localhost:5432:*:postgres:<password>
localhost:5432:*:pch:<password>
localhost:5432:*:rif40:<password>
Fixing Windows Code page errors
H:\>psql
psql (9.3.2)
WARNING: Console code page (850) differs from Windows code page (1252)
         8-bit characters might not work correctly. See psql reference
         page "Notes for Windows users" for details.
SSL connection (cipher: DHE-RSA-AES256-SHA, bits: 256)
Type "help" for help.
- Type:
- Or: modify the cmd shortcut (find the cmd icon, right click, properties, shortcut panel) to run cmd.exe /k chcp 1252
Installing a production database
Run the database installer batch script as an administrator: rif40_database_install.bat.
The script will ask the user for:
- The production RIF user name (default: peter)
- The database name (default: sahsuland)
ONLY USE LOWERCASE LETTERS, UNDERSCORE AND THE DIGITS 0-9; START WITH A LTTER
The script will create the user pgpass.conf (in C:\Users\%USERNAME%\AppData\Roaming\postgresql) and the
create the psqlrc psql logon script. If required it will:
- Ask the user for the postgres databaase administrator password (set as part of the database install)
- Set RIF40 user password (default: rif40_<randon digits>_<randon digits>)
- The production RIF user password (default: <username>_<randon digits>_<randon digits>)
The script runs db_create.sql to create the database and users and then restores the database from the
supplied sahsuland.dump using pg_restore.
C:\Users\support\Downloads\OneDrive-2018-04-18\Postgres>rif40_database_install.bat
Creating production RIF Postgres database
PG_SYSCONFDIR=C:/PROGRA~1/POSTGR~1/9.6/etc
Administrator PRIVILEGES Detected!
New user [default peter]:       pch
New RIF40 db [default sahsuland]:       trumpton
Using previously created "C:\Users\support\AppData\Roaming\postgresql\pgpass.conf"
Adding pch to PG password file: "C:\Users\support\AppData\Roaming\postgresql\pgpass.conf"
##########################################################################################
#
# WARNING! this script will the drop and create the RIF40 trumpton Postgres database.
# Type control-C to abort.
#
# Test user pch; password pch_13958_373
# Postgres password       XXXXXXXXXX
# Schema (rif40) password rif4010669_20906
# PG password directory
# PG sysconfig directory  C:/PROGRA~1/POSTGR~1/9.6/etc
#
##########################################################################################
Press any key to continue . . .
Log: db_create.rpt
Working directory: C:\Users\support\Downloads\OneDrive-2018-04-18\Postgres
Command: psql
Arguments: -U postgres -d postgres -h localhost -w -e -P pager=off -v testuser=pch -v newdb=trumpton -v newpw=pch_13958_373 -v verbo
sity=terse -v debug_level=1 -v echo=all -v postgres_password=XXXXXXXXXX -v rif40_password=rif4010669_20906 -v tablespace_dir= -v pgh
ost=localhost -v os=Windows_NT -f db_create.sql
You are connected to database "postgres" as user "postgres" on host "localhost" at port "5432".
DO LANGUAGE plpgsql $$
DECLARE
        c1 CURSOR FOR
                SELECT p.proname
                  FROM pg_proc p, pg_namespace n
                 WHERE p.proname  = 'rif40_startup'
                   AND n.nspname  = 'rif40_sql_pkg'
                   AND p.proowner = (SELECT oid FROM pg_roles WHERE rolname = 'rif40')
                   AND n.oid      = p.pronamespace;
--
        c1_rec RECORD;
        sql_stmt VARCHAR;
BEGIN
        OPEN c1;
        FETCH c1 INTO c1_rec;
        CLOSE c1;
--
        IF c1_rec.proname = 'rif40_startup' THEN
                PERFORM rif40_sql_pkg.rif40_startup();
        ELSE
                RAISE INFO 'RIF startup: not a RIF database';
        END IF;
--
-- Set a default path, schema to user
--
        IF current_user = 'rif40' THEN
                sql_stmt:='SET search_path TO rif40, public, topology, gis, pop, rif_data, data_load, rif40_sql_pkg, rif_studies, ri
f40_partitions';
        ELSE
                sql_stmt:='SET search_path TO '||USER||',rif40, public, topology, gis, pop, rif_data, data_load, rif40_sql_pkg, rif_
studies, rif40_partitions';
        END IF;
        RAISE INFO 'SQL> %;', sql_stmt::VARCHAR;
        EXECUTE sql_stmt;
END;
$$;
psql:C:/Program Files/PostgreSQL/9.6/etc/psqlrc:48: INFO:  RIF startup: not a RIF database
psql:C:/Program Files/PostgreSQL/9.6/etc/psqlrc:48: INFO:  SQL> SET search_path TO postgres,rif40, public, topology, gis, pop, rif_d
ata, data_load, rif40_sql_pkg, rif_studies, rif40_partitions;
DO
BEGIN
DO
SET
SET
psql:db_create.sql:129: INFO:  db_create.sql() test new database name="trumpton" is OK
DO
Creating trumpton database if required
SET
SET
psql:db_create.sql:229: INFO:  db_create.sql() User check: postgres
psql:db_create.sql:229: INFO:  db_create.sql() rif40 password="<NULL>"
psql:db_create.sql:229: INFO:  db_create.sql() rif40 needs to be created encrypted password will be ="<NULL>"
psql:db_create.sql:229: INFO:  SQL> SET rif40.encrypted_rif40_password TO 'md515c55111bdb93bb7543f2480c7384531';
psql:db_create.sql:229: INFO:  SQL> SET rif40.rif40_password TO 'rif4010669_20906';
psql:db_create.sql:229: INFO:  db_create.sql() postgres password="XXXXXXXXXX"
psql:db_create.sql:229: INFO:  db_create.sql() postgres encrypted password="md588c29e12c569ac444b7381647f09e2e1"
psql:db_create.sql:229: INFO:  SQL> SET rif40.encrypted_postgres_password TO 'md588c29e12c569ac444b7381647f09e2e1';
DO
psql:db_create.sql:283: INFO:  db_create.sql() RIF required Postgres version 9.3 or higher OK; current version: PostgreSQL 9.6.8, co
mpiled by Visual C++ build 1800, 64-bit
DO
psql:db_create.sql:315: INFO:  db_create.sql() RIF required extension: adminpack V1.0 is installable
psql:db_create.sql:315: INFO:  db_create.sql() RIF required extension: postgis V2.3.7 is installable
psql:db_create.sql:315: INFO:  db_create.sql() RIF required extension: sslinfo V1.2 is installable
DO
Create users and roles
psql:db_create.sql:526: NOTICE:  db_create.sql() postgres user password is unchanged
psql:db_create.sql:526: INFO:  db_create.sql() RIF schema role rif_user exists
psql:db_create.sql:526: INFO:  db_create.sql() Role rif_user is not a superuser
psql:db_create.sql:526: INFO:  db_create.sql() RIF schema role rif_manager exists
psql:db_create.sql:526: INFO:  db_create.sql() Role rif_manager is not a superuser
psql:db_create.sql:526: INFO:  db_create.sql() RIF schema role rif_no_suppression exists
psql:db_create.sql:526: INFO:  db_create.sql() Role rif_no_suppression is not a superuser
psql:db_create.sql:526: INFO:  db_create.sql() RIF schema role rifupg34 exists
psql:db_create.sql:526: INFO:  db_create.sql() Role rifupg34 is not a superuser
psql:db_create.sql:526: INFO:  db_create.sql() RIF schema role rif_student exists
psql:db_create.sql:526: INFO:  db_create.sql() Role rif_student is not a superuser
psql:db_create.sql:526: INFO:  SQL> CREATE ROLE rif40 NOSUPERUSER NOCREATEDB NOCREATEROLE INHERIT LOGIN NOREPLICATION ENCRYPTED PASS
WORD 'md515c55111bdb93bb7543f2480c7384531';
psql:db_create.sql:526: INFO:  db_create.sql() privilege check OK for: gis
psql:db_create.sql:526: INFO:  db_create.sql() RIF schema user gis exists; password is username
psql:db_create.sql:526: INFO:  SQL> ALTER USER gis PASSWORD  'gis';
psql:db_create.sql:526: INFO:  db_create.sql() privilege check OK for: pop
psql:db_create.sql:526: INFO:  db_create.sql() RIF schema user pop exists; password is username
psql:db_create.sql:526: INFO:  SQL> ALTER USER pop PASSWORD  'pop';
psql:db_create.sql:526: INFO:  db_create.sql() privilege check OK for: notarifuser
psql:db_create.sql:526: INFO:  db_create.sql() RIF schema user notarifuser exists; password is username
psql:db_create.sql:526: INFO:  SQL> ALTER USER notarifuser PASSWORD  'notarifuser';
psql:db_create.sql:526: INFO:  db_create.sql() privilege check OK for: test_rif_no_suppression
psql:db_create.sql:526: INFO:  db_create.sql() RIF schema user test_rif_no_suppression exists; password is username
psql:db_create.sql:526: INFO:  SQL> ALTER USER test_rif_no_suppression PASSWORD  'test_rif_no_suppression';
psql:db_create.sql:526: INFO:  db_create.sql() privilege check OK for: test_rif_user
psql:db_create.sql:526: INFO:  db_create.sql() RIF schema user test_rif_user exists; password is username
psql:db_create.sql:526: INFO:  SQL> ALTER USER test_rif_user PASSWORD  'test_rif_user';
psql:db_create.sql:526: INFO:  db_create.sql() privilege check OK for: test_rif_manager
psql:db_create.sql:526: INFO:  db_create.sql() RIF schema user test_rif_manager exists; password is username
psql:db_create.sql:526: INFO:  SQL> ALTER USER test_rif_manager PASSWORD  'test_rif_manager';
psql:db_create.sql:526: INFO:  db_create.sql() privilege check OK for: test_rif_student
psql:db_create.sql:526: INFO:  db_create.sql() RIF schema user test_rif_student exists; password is username
psql:db_create.sql:526: INFO:  SQL> ALTER USER test_rif_student PASSWORD  'test_rif_student';
psql:db_create.sql:526: INFO:  SQL> REVOKE CREATE ON SCHEMA public FROM PUBLIC;
DO
SET
SET
SET
SET
psql:db_create.sql:660: INFO:  db_create.sql() test user account parameter="pch/pch" OK
psql:db_create.sql:660: INFO:  db_create.sql() test user password parameter="pch_13958_373"
psql:db_create.sql:660: NOTICE:  db_create.sql() C209xx: User account does not exist: pch; creating
psql:db_create.sql:660: INFO:  SQL> CREATE ROLE pch NOSUPERUSER NOCREATEDB NOCREATEROLE INHERIT LOGIN NOREPLICATION PASSWORD 'pch_13
958_373';
psql:db_create.sql:660: INFO:  SQL> GRANT CONNECT ON DATABASE postgres to pch;
psql:db_create.sql:660: INFO:  SQL> GRANT rif_manager TO pch;
psql:db_create.sql:660: INFO:  SQL> GRANT rif_user TO pch;
psql:db_create.sql:660: INFO:  SQL> GRANT CONNECT ON DATABASE postgres to rif40;
DO
COMMIT
SET
CREATE VIEW
Tuples only is on.
*****************************************************************************************************
* Try to connect as test user. This will fail if pgpass is not setup correctly
* Stored password file is in ~/.pgpass on Linux/Macos or: %APPDATA%/postgresql/pgpass.conf on Windows
* Format is: hostname:port:database:username:password
* An example is supplied in pgpass.conf in the current directory
*****************************************************************************************************
 localhost:5432:*:postgres:XXXXXXXXXX
 localhost:5432:*:pch:pch_13958_373
 localhost:5432:*:rif40:rif4010669_20906

Tuples only is off.
COPY 3
DROP VIEW
You are now connected to database "postgres" as user "pch".
Connection as pch to postgres OK!
           connected
-------------------------------
 Connected to: postgres AS pch
(1 row)

Try to connect as rif40. This will fail if if the password file is not setup correctly
You are now connected to database "postgres" as user "rif40".
Connection as rif40 to postgres OK!
            connected
---------------------------------
 Connected to: postgres AS rif40
(1 row)

You are now connected to database "postgres" as user "postgres".
************************************************************************************
*
* WARNING !!!
*
* This script will drop trumpton, re-create it in () or DEFAULT
*
************************************************************************************
SET
SET
SET
psql:db_create.sql:763: NOTICE:  db_create.sql() No -v tablespace_dir=<tablespace_dir> parameter
psql:db_create.sql:763: INFO:  SQL> SET rif40.tablespace_dir TO '';
DO
        param         |   value
----------------------+------------
 rif40.tablespace_dir |
 rif40.newdb          | trumpton
 rif40.os             | windows_nt
(3 rows)

CREATE VIEW
                                                     sql_stmt
------------------------------------------------------------------------------------------------------------------
 --
 -- ************************************************************************
 --
 -- Description:
 --
 -- Rapid Enquiry Facility (RIF) - Database creation autogenerated temp script to create tablespace and databases
 --
 DROP DATABASE IF EXISTS trumpton;
 CREATE DATABASE trumpton WITH OWNER rif40 /* No trumpton tablespace */;
 COMMENT ON DATABASE trumpton IS 'RIF V4.0 PostGres trumpton Example Database';
 --
 -- Eof
(12 rows)

COPY 12
DROP VIEW
\set ON_ERROR_STOP on
\i recreate_sahsu_dev_tmp.sql
--
-- ************************************************************************
--
-- Description:
--
-- Rapid Enquiry Facility (RIF) - Database creation autogenerated temp script to create tablespace and databases
--
DROP DATABASE IF EXISTS trumpton;
psql:recreate_sahsu_dev_tmp.sql:8: NOTICE:  database "trumpton" does not exist, skipping
DROP DATABASE
CREATE DATABASE trumpton WITH OWNER rif40 /* No trumpton tablespace */;
CREATE DATABASE
COMMENT ON DATABASE trumpton IS 'RIF V4.0 PostGres trumpton Example Database';
COMMENT
--
-- Eof

\c :newdb postgres :pghost
You are now connected to database "trumpton" as user "postgres".

--
-- Start transaction 2: :newdb build
--
BEGIN;
BEGIN
--
-- Check user is postgres on :newdb
--
\set ECHO none
SET
SET
psql:db_create.sql:915: INFO:  db_create.sql() User check: postgres
psql:db_create.sql:915: INFO:  SQL> CREATE EXTENSION IF NOT EXISTS postgis;
psql:db_create.sql:915: INFO:  SQL> CREATE EXTENSION IF NOT EXISTS adminpack;
psql:db_create.sql:915: INFO:  SQL> CREATE EXTENSION IF NOT EXISTS dblink;
psql:db_create.sql:915: INFO:  SQL> GRANT ALL ON DATABASE trumpton to rif40;
psql:db_create.sql:915: INFO:  SQL> REVOKE CREATE ON SCHEMA public FROM rif40;
psql:db_create.sql:915: INFO:  SQL> GRANT CONNECT ON DATABASE trumpton to pch;
psql:db_create.sql:915: INFO:  SQL> CREATE SCHEMA IF NOT EXISTS pch AUTHORIZATION pch;
psql:db_create.sql:915: INFO:  SQL> ALTER DATABASE trumpton SET search_path TO rif40, public, topology, gis, pop, rif_data, data_loa
d, rif40_sql_pkg, rif_studies, rif40_partitions;
DO
COMMIT
ALTER ROLE
SET
                                             search_path
------------------------------------------------------------------------------------------------------
 rif40, public, topology, gis, pop, rif_data, data_load, rif40_sql_pkg, rif_studies, rif40_partitions
(1 row)

*****************************************************************************************************
* Try to connect as test user and rif40
*****************************************************************************************************
You are now connected to database "trumpton" as user "pch".
Connection as pch to trumpton OK!
           connected
-------------------------------
 Connected to: trumpton AS pch
(1 row)

Try to connect as rif40. This will fail if if the password file is not setup correctly
You are now connected to database "trumpton" as user "rif40".
Connection as rif40 to trumpton OK!
            connected
---------------------------------
 Connected to: trumpton AS rif40
(1 row)

Command psql ran OK.
db_create.sql built trumpton OK
Log: pg_restore.rpt
Working directory: C:\Users\support\Downloads\OneDrive-2018-04-18\Postgres
Command: pg_restore
Arguments: -d trumpton -U postgres sahsuland.dump
pg_restore: WARNING:  database "sahsuland" does not exist
Command pg_restore ran OK.
pg_restore/psql restored trumpton OK
Changing the postgres database administrator password
Check you can logon using psql as the database adminstrator account; postgres.
psql -d postgres -U postgres
You are connected to database "postgres" as user "postgres" on host "wpea-rif1" at port "5432".
psql (9.3.5)
Type "help" for help.

postgres=#
It is possible to login to postgres as postgres without a password using the administrator or
root accounts. If you lock yourself out the hba.conf file will need the following line temporary
added at the top of the file:
or if local connections are not permitted by the Postgres build:
host all all 127.0.0.1/32 trust
Remove these lines after you have changed the password using:
psql -U postgres -d postgres
ALTER USER postgres PASSWORD <new password>;
Configuration File Examples
If you are running locally only (e.g. on a laptop) you do NOT need to edit the configuration files.
Postgres user password file
Postgres user password files are located in:
- Windows %APPDATA%\Roaming\postgresql\pgpass.conf, e.g. C:\Users\pch\AppData\Roaming\postgresql\pgpass.conf
- Linux/MacOS: ~/.pgpass
One line per host, database and account. Fields separated by “:”. Order is:
- Host
- Port
- Database (usually *)
- User
- Password
localhost:5432:*:postgres:XXXXXXX
localhost:5432:*:peterh: XXXXXXX
wpea-pch:5432:*:peterh: XXXXXXX
wpea-rif1:5432:*:postgres: XXXXXXX
wpea-rif1:5432:*:pch: XXXXXXX
Authentication Setup (hba.conf)
You MUST read the Postgres manuals before editing this file.
Fields separated by TAB.
- TYPE: Connection type:
- local: UDP
- host: TCP/IP
- hostssl: TCP/IP with TLS
- DATABASE: Database name
- USER: Username
- ADDRESS: Host/address mask
- METHOD:
- Non mappable:
- trust: Allow with authentication (useful if you have locked yourself out by chnaginbg hte password!
- reject: disallow
- md5: MD5 password authentication
- password: plain text password (INSECURE: DO NOT USE)
- krb5: Kerberos 5 (OBSOLETED: use GSSAPI)
- ldap: directory services
- radius: RADIUS authentication
- Mappable using ident.conf (i.e. support proxying):
- ident: Identification Protocol as described in RFC 1413 (INSECURE: DO NOT USE)
- peer: Peer authentication is only available on operating systems providing the getpeereid() function,
the SO_PEERCRED socket parameter, or similar mechanisms. Currently that includes Linux, most flavors
of BSD including OS X, and Solaris. - gss: GSSAPI/Kerberos
- pam: Linux PAM (Pluggable authentication modules)
- sspi: Windows native autentiation (NTLM V2)
- cert: Uses SSL client certificates to perform authentication. It is therefore only available for SSL connections.
- Non mappable:
# PostgreSQL Client Authentication Configuration File
# ===================================================
#
# Refer to the "Client Authentication" section in the PostgreSQL
# documentation for a complete description of this file.  A short
# synopsis follows.
#
# This file controls: which hosts are allowed to connect, how clients
# are authenticated, which PostgreSQL user names they can use, which
# databases they can access.  Records take one of these forms:
#
# local      DATABASE  USER  METHOD  [OPTIONS]
# host       DATABASE  USER  ADDRESS  METHOD  [OPTIONS]
# hostssl    DATABASE  USER  ADDRESS  METHOD  [OPTIONS]
# hostnossl  DATABASE  USER  ADDRESS  METHOD  [OPTIONS]
#
# (The uppercase items must be replaced by actual values.)
#
# The first field is the connection type: "local" is a Unix-domain
# socket, "host" is either a plain or SSL-encrypted TCP/IP socket,
# "hostssl" is an SSL-encrypted TCP/IP socket, and "hostnossl" is a
# plain TCP/IP socket.
#
# DATABASE can be "all", "sameuser", "samerole", "replication", a
# database name, or a comma-separated list thereof. The "all"
# keyword does not match "replication". Access to replication
# must be enabled in a separate record (see example below).
#
# USER can be "all", a user name, a group name prefixed with "+", or a
# comma-separated list thereof.  In both the DATABASE and USER fields
# you can also write a file name prefixed with "@" to include names
# from a separate file.
#
# ADDRESS specifies the set of hosts the record matches.  It can be a
# host name, or it is made up of an IP address and a CIDR mask that is
# an integer (between 0 and 32 (IPv4) or 128 (IPv6) inclusive) that
# specifies the number of significant bits in the mask.  A host name
# that starts with a dot (.) matches a suffix of the actual host name.
# Alternatively, you can write an IP address and netmask in separate
# columns to specify the set of hosts.  Instead of a CIDR-address, you
# can write "samehost" to match any of the server's own IP addresses,
# or "samenet" to match any address in any subnet that the server is
# directly connected to.
#
# METHOD can be "trust", "reject", "md5", "password", "gss", "sspi",
# "krb5", "ident", "peer", "pam", "ldap", "radius" or "cert".  Note that
# "password" sends passwords in clear text; "md5" is preferred since
# it sends encrypted passwords.
#
# OPTIONS are a set of options for the authentication in the format
# NAME=VALUE.  The available options depend on the different
# authentication methods -- refer to the "Client Authentication"
# section in the documentation for a list of which options are
# available for which authentication methods.
#
# Database and user names containing spaces, commas, quotes and other
# special characters must be quoted.  Quoting one of the keywords
# "all", "sameuser", "samerole" or "replication" makes the name lose
# its special character, and just match a database or username with
# that name.
#
# This file is read on server startup and when the postmaster receives
# a SIGHUP signal.  If you edit the file on a running system, you have
# to SIGHUP the postmaster for the changes to take effect.  You can
# use "pg_ctl reload" to do that.

# Put your actual configuration here
# ----------------------------------
#
# If you want to allow non-local connections, you need to add more
# "host" records.  In that case you will also need to make PostgreSQL
# listen on a non-local interface via the listen_addresses
# configuration parameter, or via the -i or -h command line switches.

# TYPE  DATABASE        USER            ADDRESS                 METHOD

# IPv4, IPv6 local connections:
#
host    all             postgres	127.0.0.1/32            md5
host    all             postgres      ::1/128                 md5
hostssl all		 postgres     146.179.138.xxx 	  255.255.255.255    md5
#
# Allow local connections as schema owner (usually use a proxy)
#
#hostssl    sahsuland	   pop             127.0.0.1/32            md5
#hostssl    sahsuland	   pop             ::1/128                 md5
#hostssl    sahsuland	   gis             127.0.0.1/32            md5
#hostssl    sahsuland	   gis             ::1/128                 md5
#hostssl    sahsuland	   rif40           127.0.0.1/32            md5
#hostssl    sahsuland	   rif40           ::1/128                 md5
#
# Active directory GSSAPI connections with pg_ident.conf maps for schema accounts
#
hostssl	sahsuland	all	 	127.0.0.1/32 		sspi 	map=sahsuland
hostssl	sahsuland	all	 	::1/128 		sspi 	map=sahsuland
hostssl	sahsuland_dev	all	 	127.0.0.1/32 		sspi 	map=sahsuland_dev
hostssl	sahsuland_dev	all	 	::1/128 		sspi 	map=sahsuland_dev
#
# Allow remote access from specified IP addresses by:
#
# a) SSPI (Windows native GSS [Kerberos] machanism
#
hostssl	sahsuland	all	 	146.179.138. xxx	255.255.255.255	sspi 	map=sahsuland
hostssl	sahsuland_dev	all	 	146.179.138. xxx	255.255.255.255	sspi 	map=sahsuland_dev
#
# b) LDAP (to be fixed – need to use different server
#
# hostssl	sahsuland_dev	all	 	146.179.138.157 	255.255.255.255 ldap ldapurl="ldaps:// xxx.ic.ac.uk/basedn;cn=;,o=Imperial College,c=GB"
#
# No LDAP URLs or username map on Windows
#
# 2014-03-12 13:44:24 GMT LOG: 00000: LDAP login failed for user "cn=pch,o=Imperial College,c=GB" on server " xxx.ic.ac.uk": Invalid Credentials 2014-03-12 13:44:24 GMT LOCATION: CheckLDAPAuth, src\backend\libpq\auth.c:2321
#
#host	sahsuland_dev	all	 	146.179.138.157 	255.255.255.255 ldap ldapserver= xxx.ic.ac.uk ldapprefix="uid=" ldapsuffix=",ou=phs,o=Imperial College,c=GB"
#
# 2014-03-12 13:50:33 GMT LOG: 00000: LDAP login failed for user "pch@IC.AC.UK" on server " xxx.ic.ac.uk": Invalid DN Syntax 2014-03-12 13:50:33 GMT LOCATION: CheckLDAPAuth, src\backend\libpq\auth.c:2321
#
#host	sahsuland_dev	all	 	146.179.138.157 	255.255.255.255 ldap ldapserver= xxx.ic.ac.uk ldapprefix= ldapsuffix="@IC.AC.UK"
#host	sahsuland_dev	all	 	146.179.138.157 	255.255.255.255 ldap ldapserver= xxx.ic.ac.uk ldapprefix= ldapsuffix=",o=Imperial College,c=GB"
#
# Other databases
#
hostssl	traffic		all	 	127.0.0.1/32 		sspi
hostssl	traffic		all	 	::1/128 		sspi
hostssl	traffic		all	 	146.179.138. xxx	255.255.255.255	sspi
#
#host    all             all             127.0.0.1/32            md5
#host    all             all             ::1/128                 md5
# Allow replication connections from localhost, by a user with the
# replication privilege.
#host    replication     postgres        127.0.0.1/32            md5
#host    replication     postgres        ::1/128                 md5
Proxy User Setup (ident.conf)
You MUST read the Postgres manuals before editing this file.
One line per per system user and map, fields separated by TAB in the order:
- MAPNAME: map name in hba.conf (not all authentication types can proxy — e.g. md5 cannot!)
- SYSTEM-USERNAME: account name to proxy for
- PG-USERNAME: account name to authenticate as
# PostgreSQL User Name Maps
# =========================
#
# Refer to the PostgreSQL documentation, chapter "Client
# Authentication" for a complete description.  A short synopsis
# follows.
#
# This file controls PostgreSQL user name mapping.  It maps external
# user names to their corresponding PostgreSQL user names.  Records
# are of the form:
#
# MAPNAME  SYSTEM-USERNAME  PG-USERNAME
#
# (The uppercase quantities must be replaced by actual values.)
#
# MAPNAME is the (otherwise freely chosen) map name that was used in
# pg_hba.conf.  SYSTEM-USERNAME is the detected user name of the
# client.  PG-USERNAME is the requested PostgreSQL user name.  The
# existence of a record specifies that SYSTEM-USERNAME may connect as
# PG-USERNAME.
#
# If SYSTEM-USERNAME starts with a slash (/), it will be treated as a
# regular expression.  Optionally this can contain a capture (a
# parenthesized subexpression).  The substring matching the capture
# will be substituted for \1 (backslash-one) if present in
# PG-USERNAME.
#
# Multiple maps may be specified in this file and used by pg_hba.conf.
#
# No map names are defined in the default configuration.  If all
# system user names and PostgreSQL user names are the same, you don't
# need anything in this file.
#
# This file is read on server startup and when the postmaster receives
# a SIGHUP signal.  If you edit the file on a running system, you have
# to SIGHUP the postmaster for the changes to take effect.  You can
# use "pg_ctl reload" to do that.

# Put your actual configuration here
# ----------------------------------

# MAPNAME       SYSTEM-USERNAME         PG-USERNAME
#
sahsuland	pch			pop
sahsuland	pch			gis
sahsuland	pch			rif40
sahsuland	pch			pch
#
sahsuland_dev	pch			pop
sahsuland_dev	pch			gis
sahsuland_dev	pch			rif40
sahsuland_dev	pch			pch
sahsuland_dev	pch			postgres
#
# Eof