
Настройка OpenVPN для доступа к приватной части сети.
- В первую очередь необходимо установить пакет
openvpn-client-export. Для этого следует открыть веб-интерфейс и выбратьSystem --> Package Manager --> Available Packages. В строке поиска ввести название пакетаopenvpn-client-exportи нажать“Install”. Окно установки пакета представлено на рисунке 1.
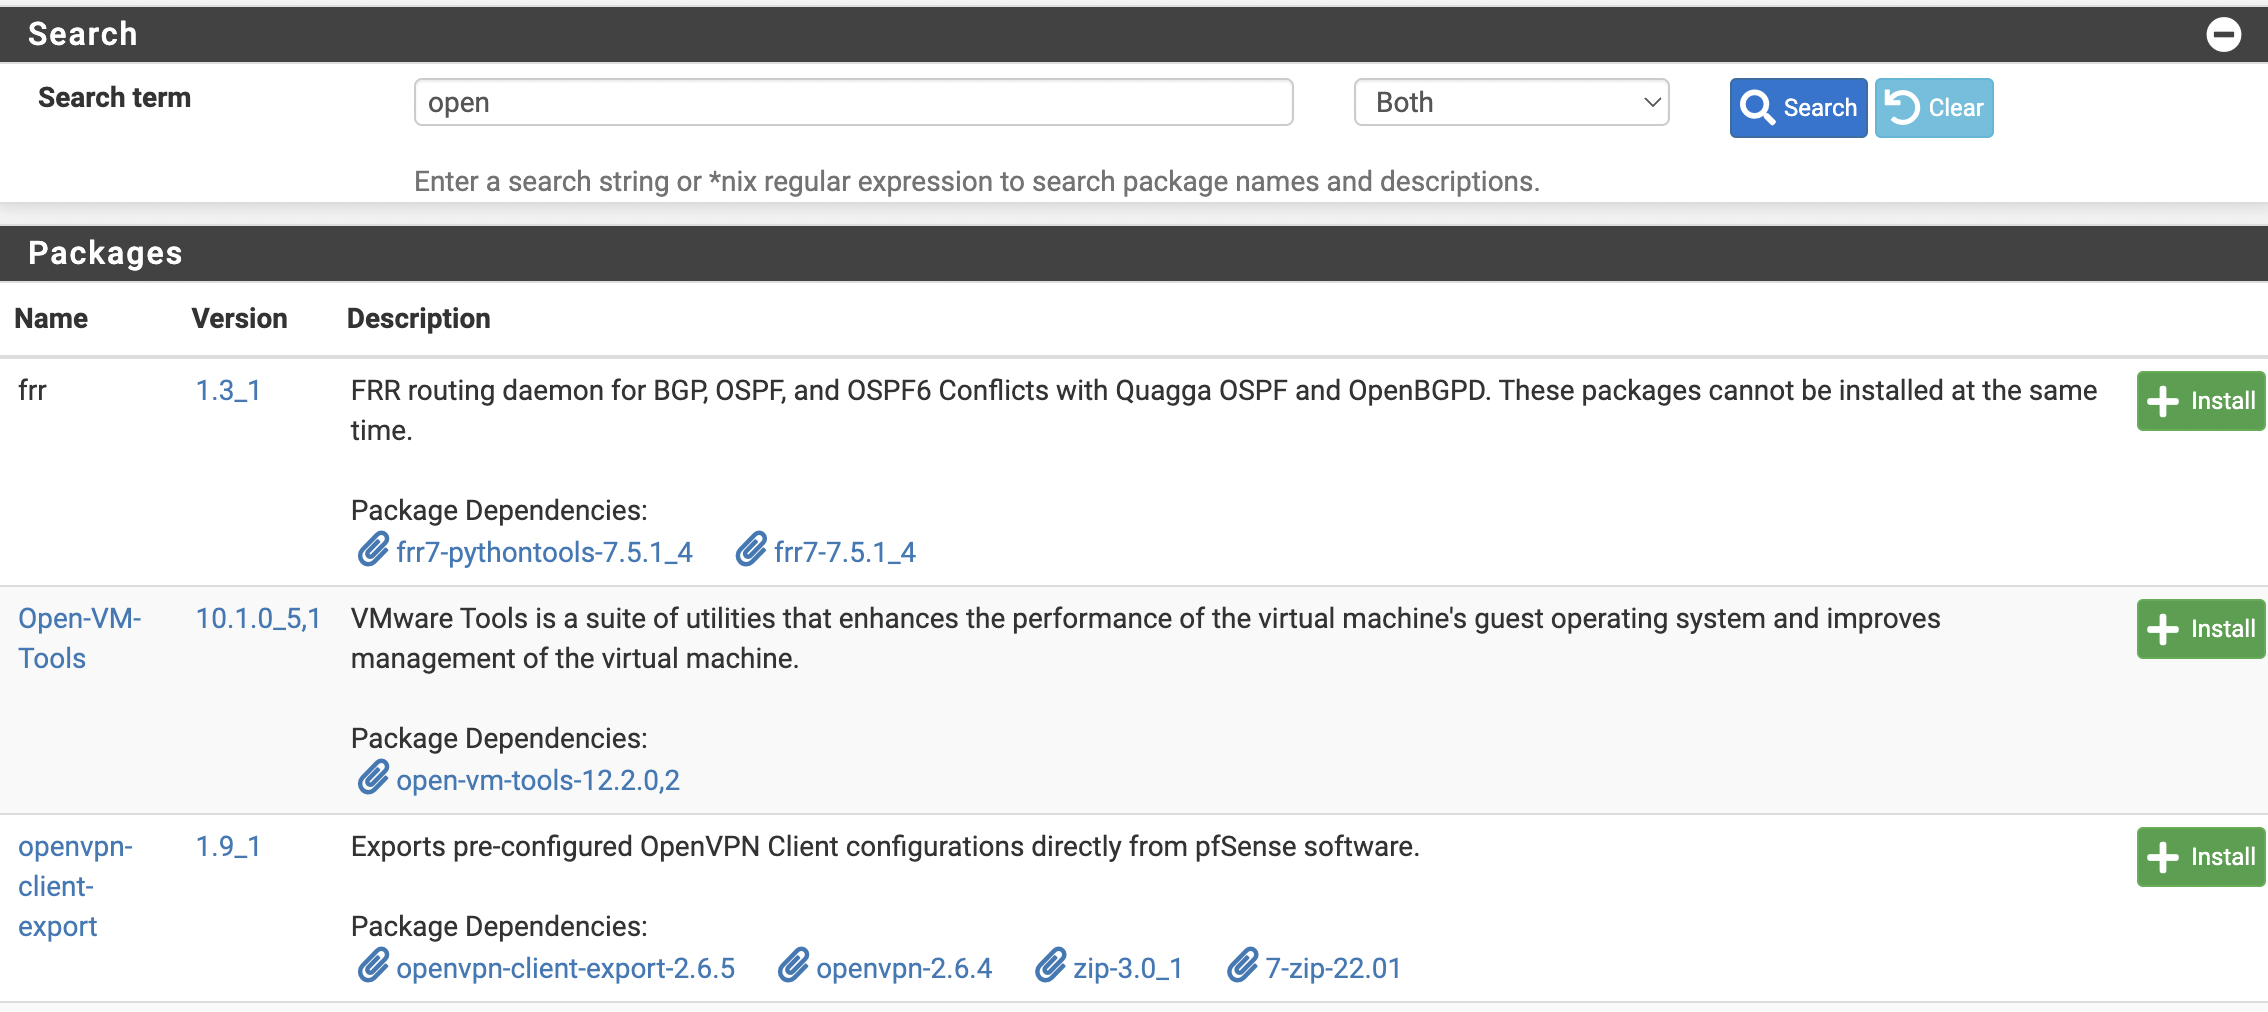
Рисунок 1. Установка openvpn-client-export
Необходимо дождаться завершения установки.
- После установки пакета можно перейти к настройкам. Для этого следует перейти
VPN --> OpenVPNи выбратьWizards.
В примере будут использоваться локальные пользователи, как это показано на рисунке 2.
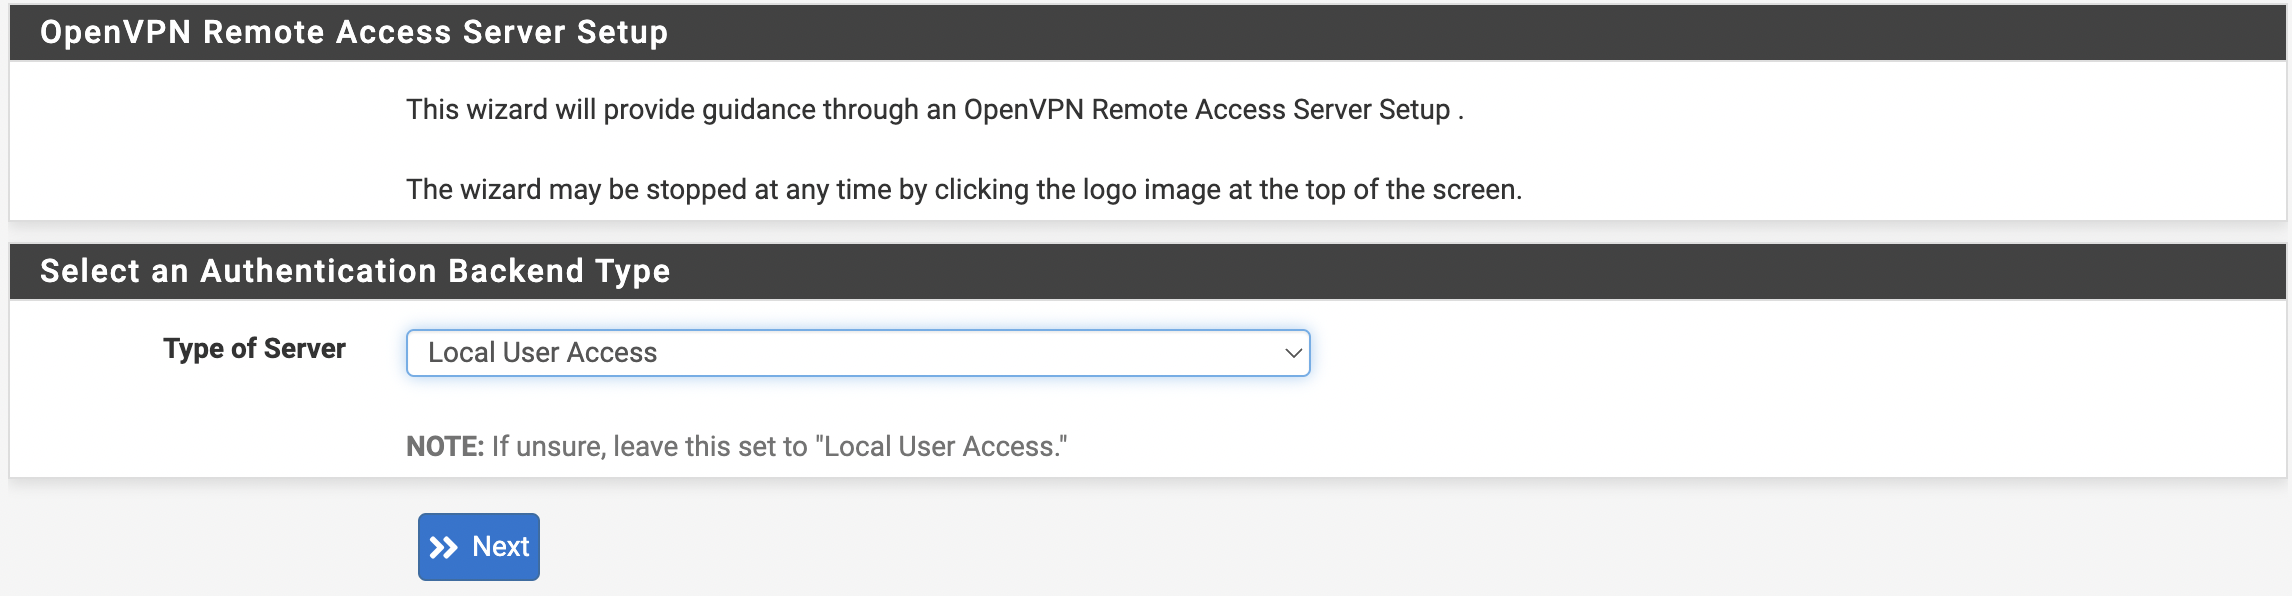
Рис. 2. Настройка openvpn-client-export
Необходимо нажать кнопку “Next” и на следующем экране создать Certification authority.
Параметры сертификата приведены в таблице 1.
| Название | Описание |
|---|---|
| Descriptive name | Задаем имя |
| Common Name | Внутреннее имя, если пустое то будет использоваться Descriptive name |
| Country Code | Двухбуквенный код страны |
| State or Province | Полное название штата/области |
| City | Название города |
| Organization | Имя организации |
| Organizational Unit | Имя отдела/департамента |
Таблица 1. Параметры CA
После введения всех необходимых данных, следует нажать кнопку “Add new CA” и повторить те же действия для Server Certificate.
- После создания сертификатов можно переходить к настройкам OpenVPN сервера.
Первым шагом следует заполнить описание (Description), как это показано на рисунке 2.

Рис. 2. Внесение основной информации о сервере
На следующем этапе требуется выбрать протокол (Protocol), интерфейс (Interface) и порт (Local Port) для будущего сервера, как это представлено на рисунке 3.
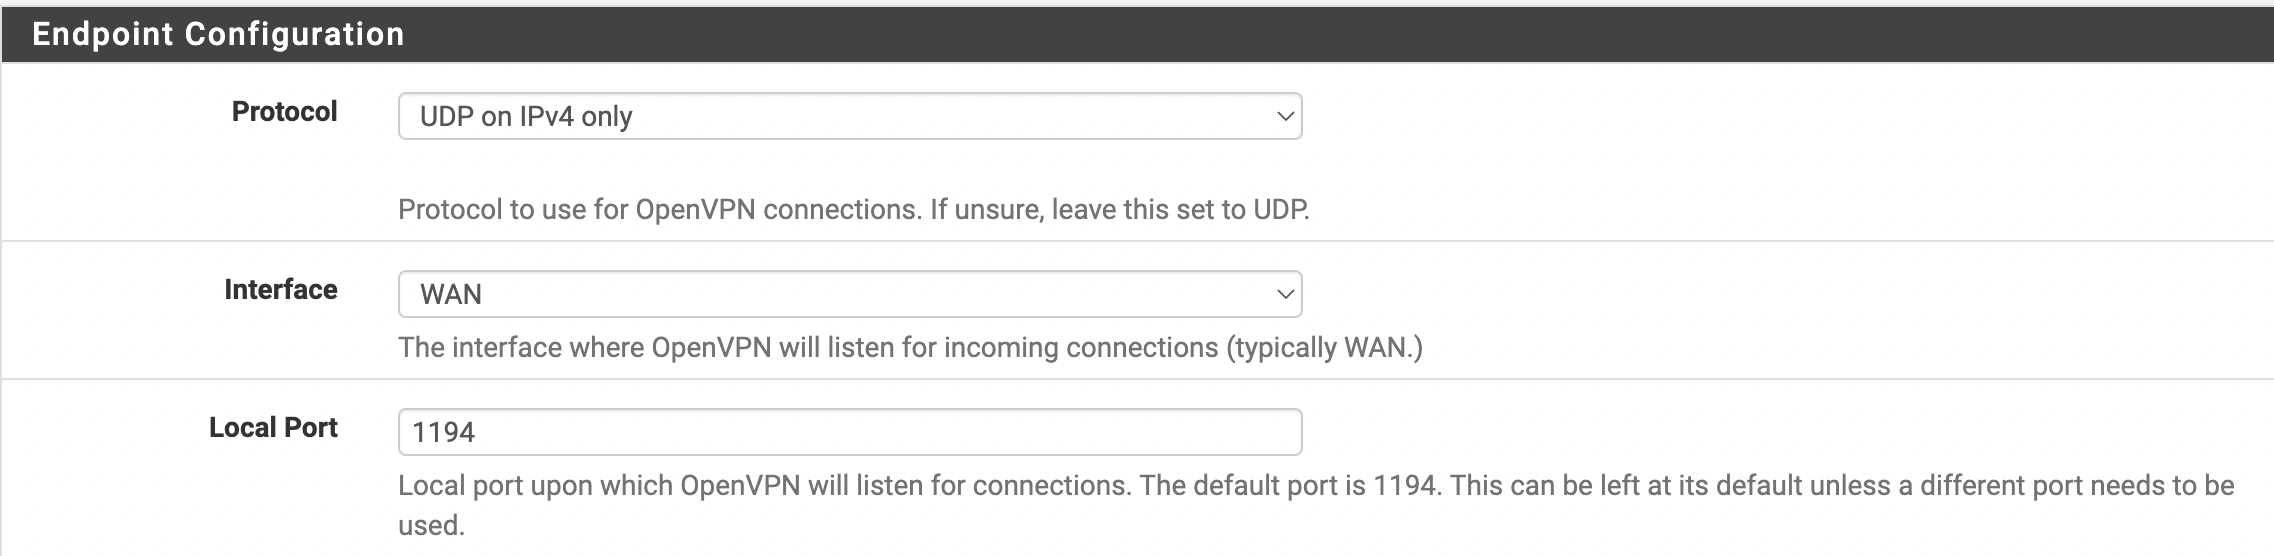
Рис. 3. Определение протокола, интерфейса и порта
Настройки Cryptographic Settings выставляются согласно заданным требованиям.
- Необходимо настроить туннель. Основные параметры настройки представлены на рисунке 5.
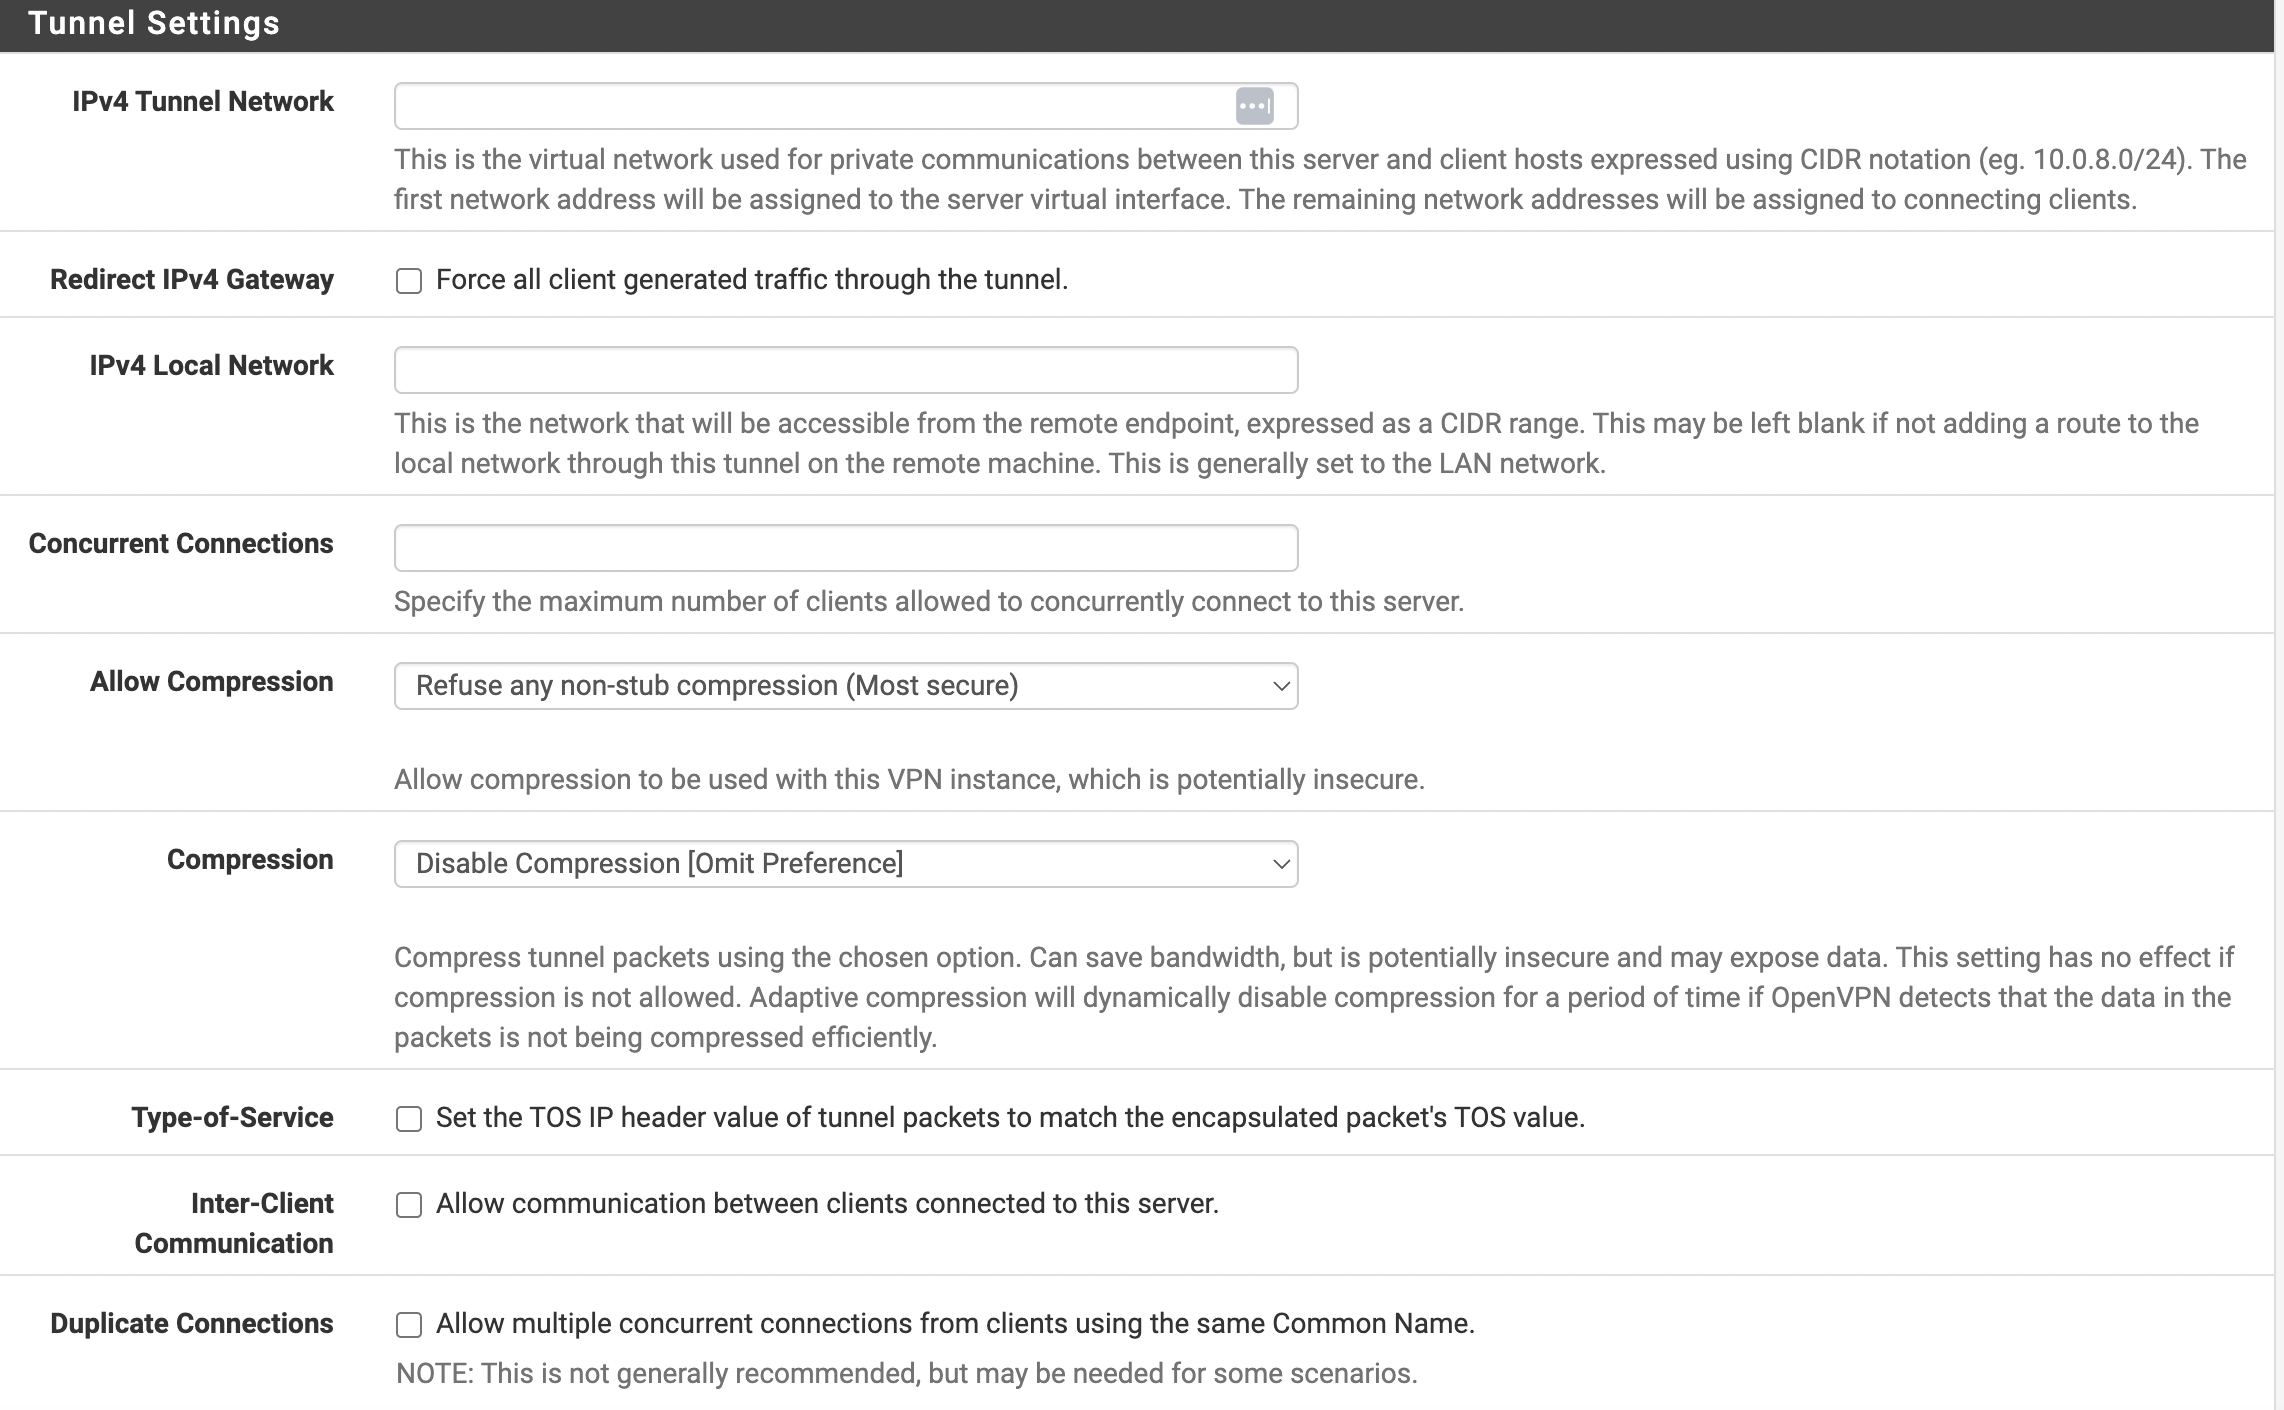
Рис. 5. Настройка туннеля
Необходимо заполнить следующие параметры:
- IPv4 Tunnel Network — сеть, выделяемая клиентам. Обратите внимание, что она не должна пересекаться с вашими сетями;
- IPv4 Local Network — сеть или сети, к которым будет предоставлен доступ из сети VPN.
Остальные настройки выставляются по желанию и потребностям. После заполнения всех нужных параметров требуется нажать кнопку Next.
Следующим шагом требуется отметить Firewall Rule и OpenVPN rule, как это показано на рисунке 6.
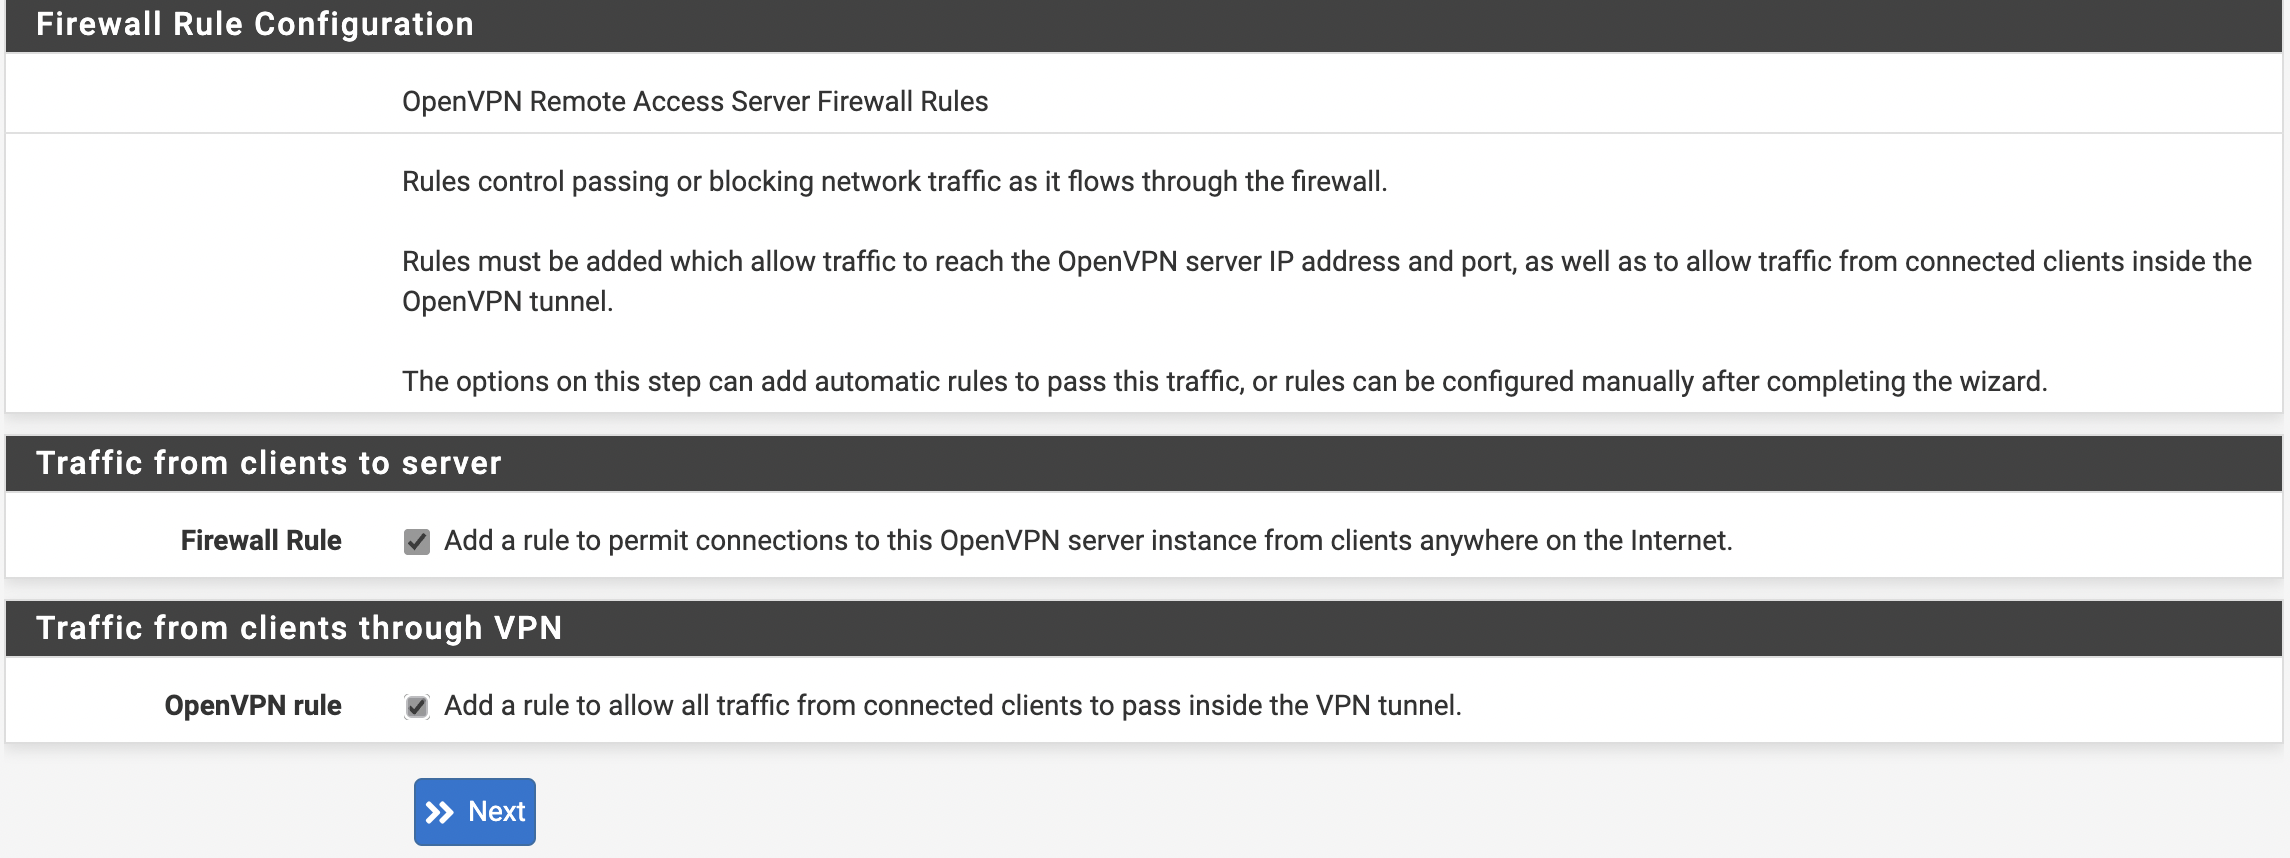
Рис. 6. Настройка Firewall и OpenVPN
После того, как выставите требуемые параметры, нажмите кнопку “Next”, а затем “Finish” для завершения. После этих действий, новый сервер должен появиться в списке, как это показано на рисунке 7.
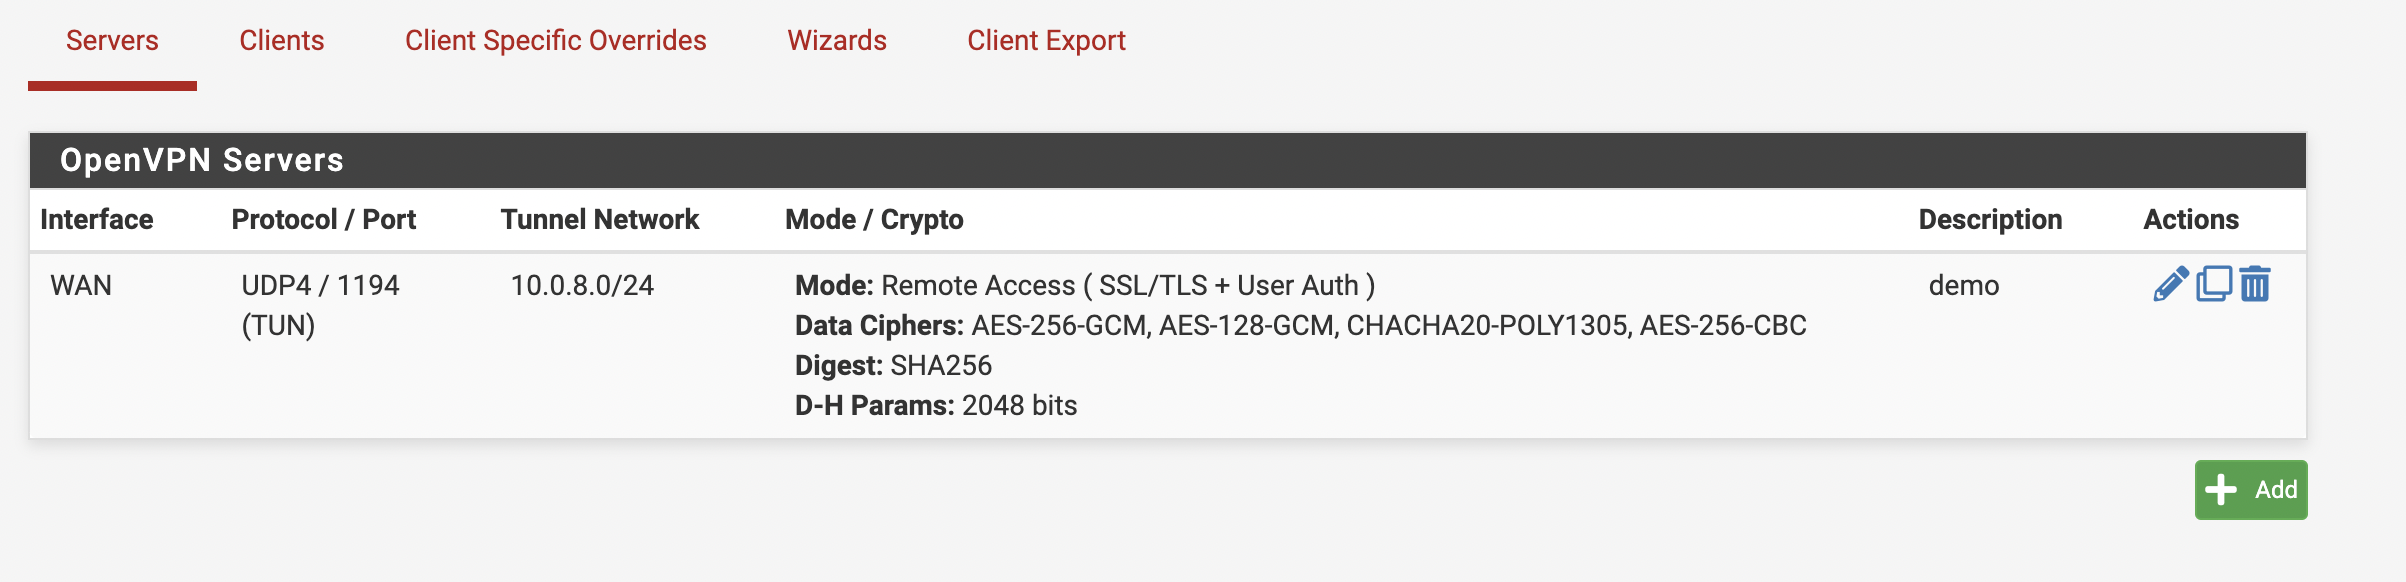
Рис. 7. Окно серверов OpenVPN
- Следующим шагом требуется создать нового пользователя. Для этого следует выбрать
System–>User Manager–>Usersи нажать кнопку “Add”. В открывшемся окне необходимо задать имя пользователя (Username) и придумать для него пароль (Password). Пример заполнения полей показан на рисунке 8.
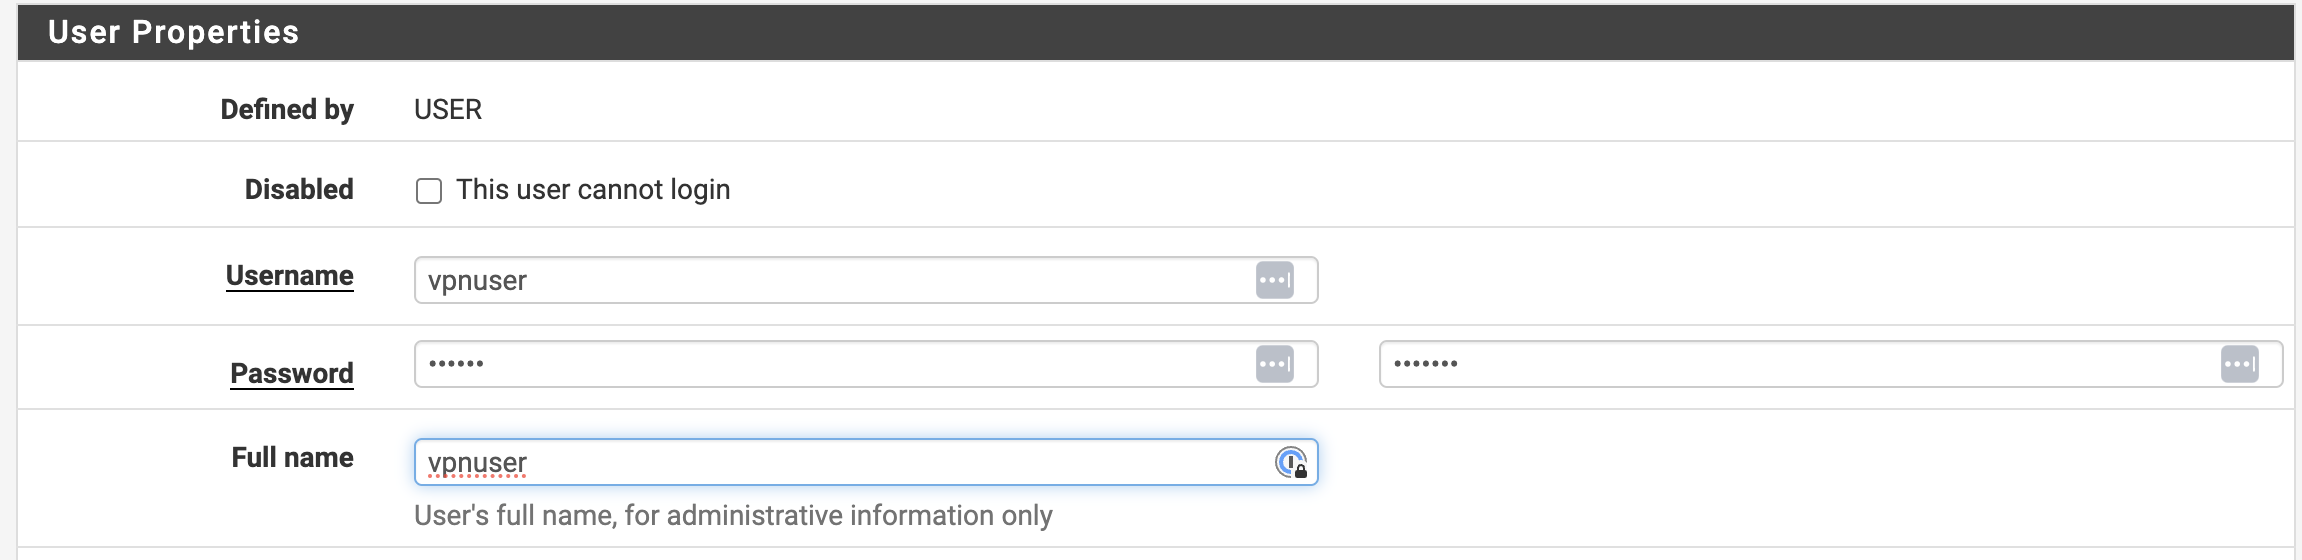
Рис. 8. Добавление нового пользователя
- Необходимо настроить сертификат. Для этого в окне Create Certificate for Users требуется заполнить все поля и выбрать сертификат, который был создан во время настройки OpenVPN сервера, как это показано на рисунке 9.
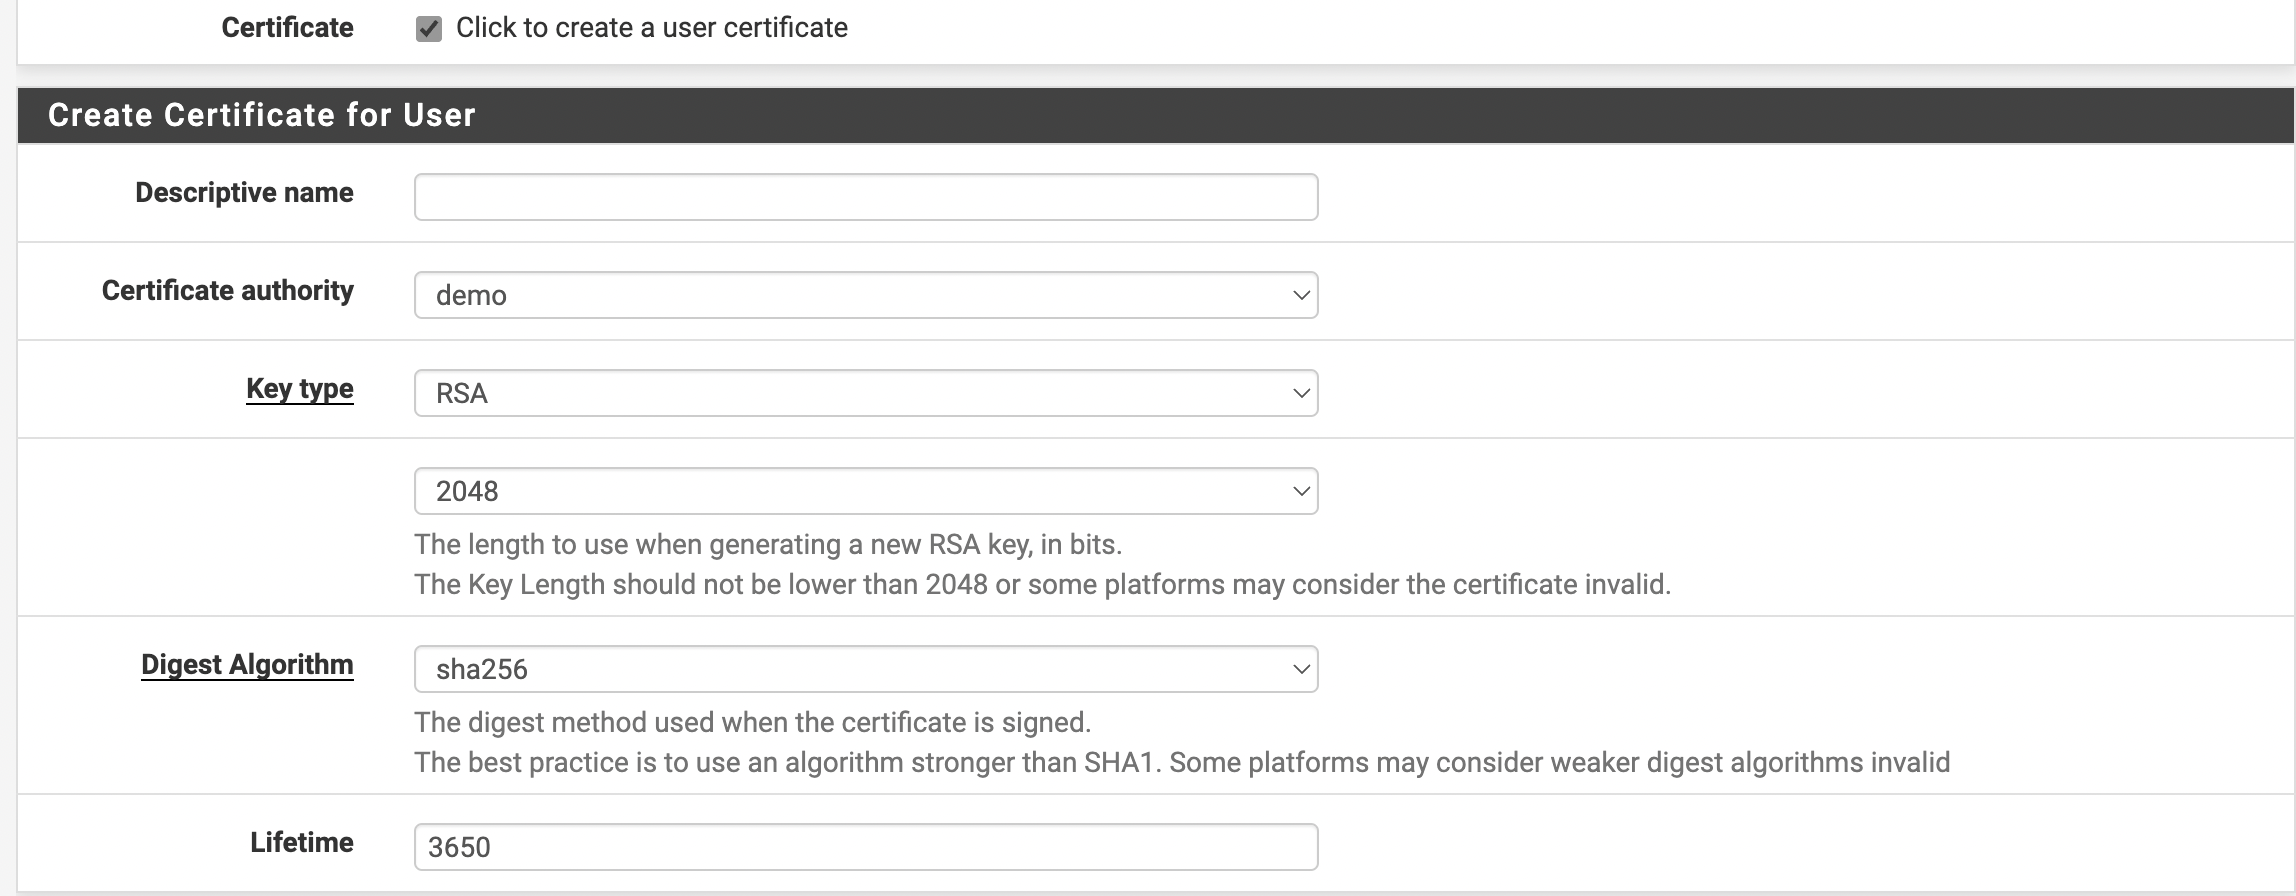
Рис. 9. Настройка сертификата
После заполнения всех полей требуется нажать кнопку “Save”.
Для дальнейшей настройки требуется перейти VPN --> OpenVPN и открыть вкладку “Client Export”. В разделе “Client Connection Behavior” нужно выбрать “Other” и прописать Public IP или доменное имя при наличии. Внешний вид окна показан на рисунке 10.
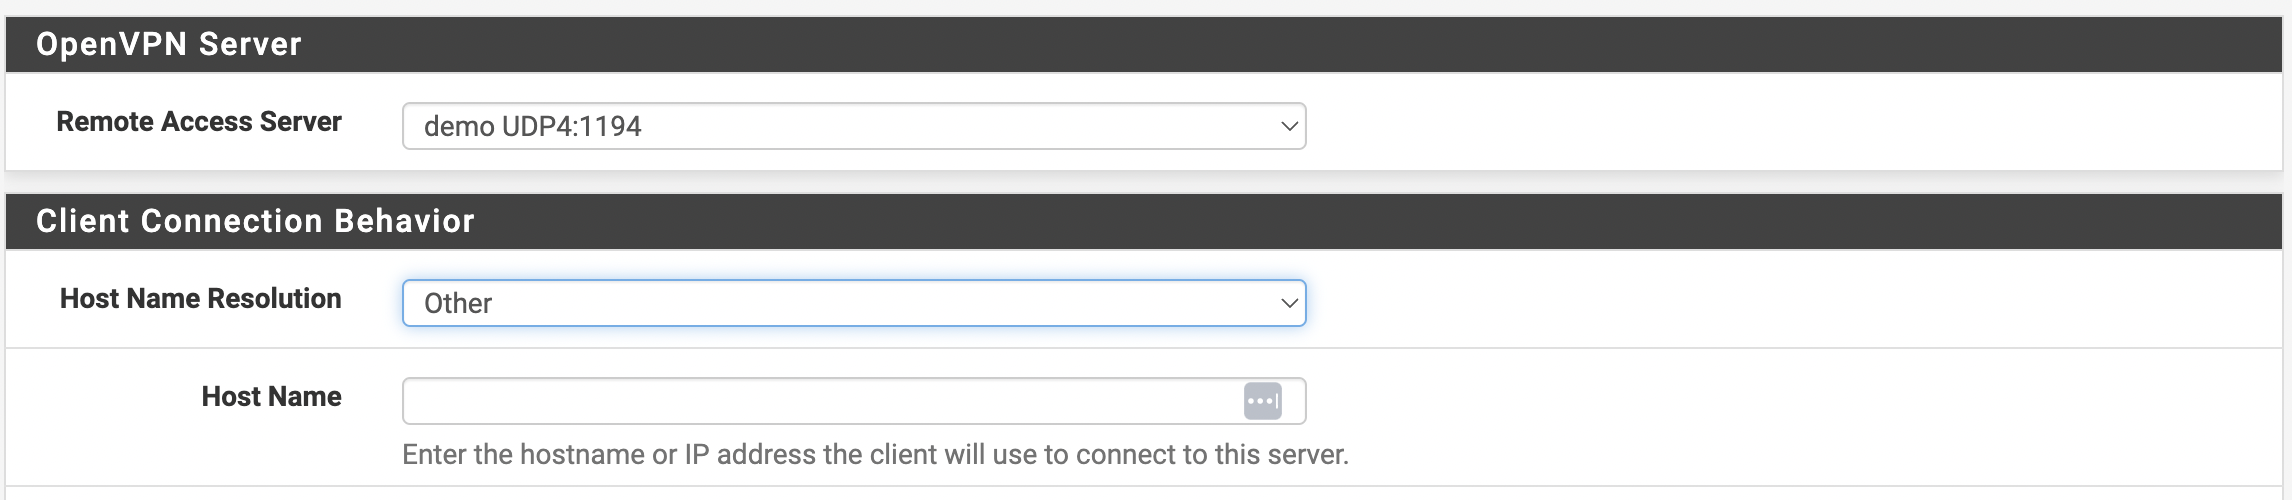
Рис. 10. Настройка Connection Behavior для клиентов
- В окне OpenVPN Clients требуется выбрать только что созданного пользователя, а затем экспортировать конфигурацию, как это представлено на рисунке 11.
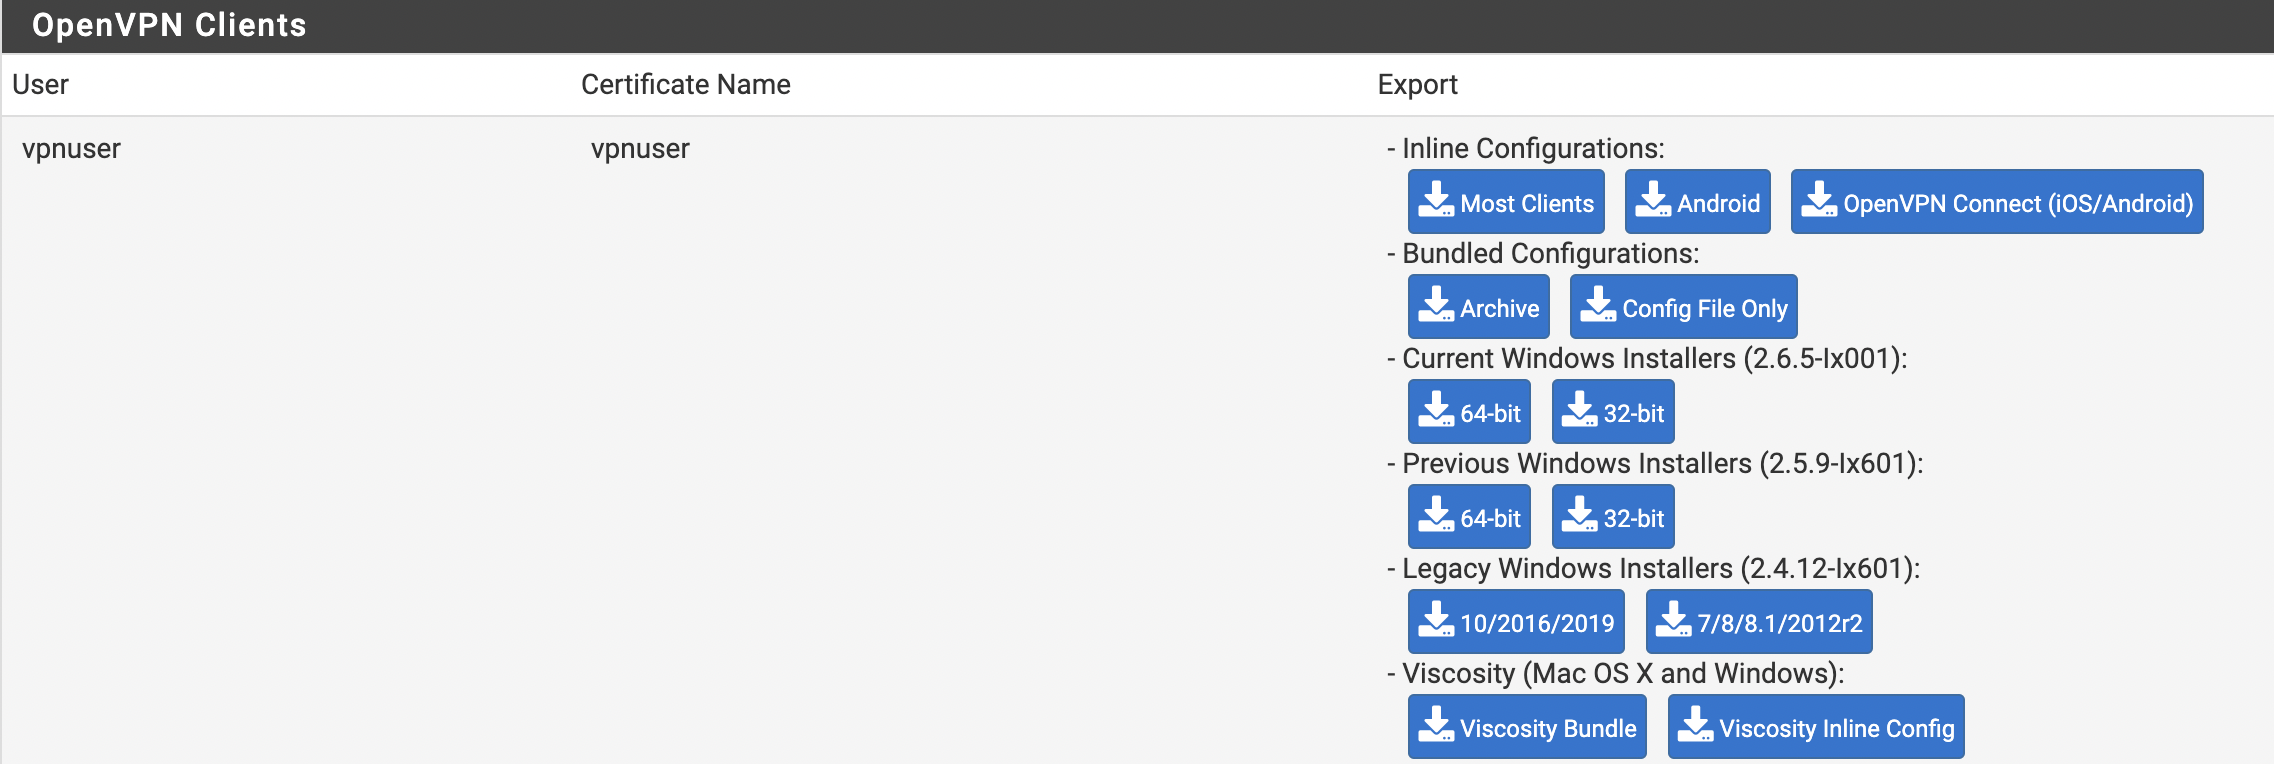
Рис. 11. Окно клиентов OpenVPN
ННастройка клиента производится в соответствии с ОС пользователя.
В рамках данного руководства проверка будет осуществляться на тестовой виртуальной машине без публичного IP-адреса. После настройки она должна быть доступна с подключенным VPN.
 ssh ubuntu@10.128.0.26
Welcome to Ubuntu 22.04.3 LTS (GNU/Linux 5.15.0-79-generic x86_64)

 * Documentation:  https://help.ubuntu.com
 * Management:     https://landscape.canonical.com
 * Support:        https://ubuntu.com/advantage

  System information as of Wed Aug 30 08:59:32 AM UTC 2023

  System load:  0.0                Processes:             131
  Usage of /:   23.5% of 17.63GB   Users logged in:       0
  Memory usage: 16%                IPv4 address for eth0: 10.128.0.26
  Swap usage:   0%

 * Strictly confined Kubernetes makes edge and IoT secure. Learn how MicroK8s
   just raised the bar for easy, resilient and secure K8s cluster deployment.

   https://ubuntu.com/engage/secure-kubernetes-at-the-edge

Expanded Security Maintenance for Applications is not enabled.

0 updates can be applied immediately.

Enable ESM Apps to receive additional future security updates.
See https://ubuntu.com/esm or run: sudo pro status


*** System restart required ***
Last login: Wed Aug 30 08:59:33 2023 from 10.0.8.2
ubuntu@test-vm:~$
Также необходимо удостовериться, что pfSense начал отслеживать пакеты. Для это следует выполнить следующие команды:
Проверка внешнего IP:
ubuntu@test-vm:~$ curl -4 icanhazip.com
51.250.89.142
ubuntu@test-vm:~$
Проверка, что pfSense стал шлюзом для виртуальной машины:
ubuntu@test-vm:~$ traceroute google.com
traceroute to google.com (64.233.165.102), 30 hops max, 60 byte packets
 1  _gateway (10.128.0.1)  0.821 ms  0.801 ms  0.792 ms
 2  * * *
 3  pfsense.ru-central1.internal (10.128.0.11)  1.161 ms  1.151 ms  1.142 ms
Как можно увидеть, после шлюза 10.128.0.1 идет LAN интерфейс pfSense.
На этом настройка закончена.
pfSense is an open-source router/firewall, based on FreeBSD. In this post we’ll show you how to create an OpenVPN client connection to a commercial VPN provider using pfSense.
Specialist in Online Privacy
Updated: November 18, 2020

pfSense is an open-source firewall, based on FreeBSD, that also acts as a router. You can install pfSense on older (or newer) hardware, as long as the system has two network cards (WAN & LAN), and use pfSense as your router. pfSense offers more power, control, and security than most commercial routers you can buy, and has the benefit of frequent OS updates. It’s also got an easy-to-use web-based interface through which you can configure every aspect of your router/firewall.
One of the many cool things you can do with pfSense is to configure a client connection to an OpenVPN provider. Then you can configure pfSense to route all of the traffic of all of the connected devices (PCs, tablets, smartphones) through the VPN connection. This enables you to:
- Connect as many devices as you want to the VPN and bypass and hard limits to simultaneous connections your provider may enforce.
- Connect devices that do not natively support VPN connections, such as gaming consoles and smart TVs
- Connect to the VPN without using a dedicated VPN application.
In this post, we’re going to look at how to set up an OpenVPN client connection to a commercial VPN provider in pfSense. This guide assumes that you’ve installed pfSense and that you have a standard configuration with at least one LAN interface and one WAN interface.
VPN providers
Not all commercial VPN providers support pfSense – though a great many do. When a VPN provider officially supports pfSense, it’s quite easy to find all of the files you need to set it up on pfSense. Other VPN providers don’t officially support pfSense, but still put the configuration files that you need to set up a client connection on pfSense at your disposal. These are typically providers that support Linux and they make the necessary configuration files available for a Linux configuration. But as it turns out that the files you need to make an OpenVPN client connection in Linux are the same ones you would need to set that up on pfSense as well.
Here’s a list of providers known to work with pfSense (officially or unofficially). The list is not exhaustive, so there may be others.
DEAL ALERT: Get 3 months free with ExpressVPN, our #1 rated VPN provider.
- AirVPN
- ExpressVPN
- Surfshark
- hide.me
- Hide My Ass
- iVPN
- Mullvad
- NordVPN
- OVPN
- Private Internet Access
- ProtonVPN
- PureVPN
- TorGuard
- VyprVPN
- Windscribe
There are also different ways of setting up the same provider on pfSense. For this guide, I chose the most straightforward way that works well with a typical basic pfSense installation.
What you’ll need
To get this working on pfSense, you’re going to need to obtain the following from your VPN provider’s website. VPN providers that support pfSense (officially or unofficially) will make their configuration files available for download.
- Your credentials: This would be a username & password, a client identifier, an account number – whatever they call it. It varies by provider. It can be any of the above. You simply need your means of identification and authentication for your account.
- The CA certificate: The VPN provider has a Certificate Authority that validates connections to its VPN servers. To configure pfSense as a VPN client, you’re going to need your provider’s CA certificate. It looks like this:

- The CA certificate private key: Some providers also require you to import the private key of the CA certificate. Not all do. It looks like this:

- The TLS key: Some VPN providers also require a TLS key to create a client connection to their servers. It is often referred to as a static key. If your VPN provider requires a static key to establish an OpenVPN connection, you’re going to need that as well. It looks like this:
So the first thing you need to do is obtain the OpenVPN configuration files from your VPN provider. Once you’ve got all that, you’re ready to start configuring the client connection in pfSense.
Configuring pfSense
Login
The first thing we need to do is to log into our pfSense box.
- Launch a web browser and type: https://<your LAN IP address> in the URL bar. pfSense defaults to 192.168.1.1.
- Enter your username and password. You’re taken to the pfSense Dashboard.
Importing the CA certificate and the key
We’re going to start by importing our VPN provider’s CA certificate.
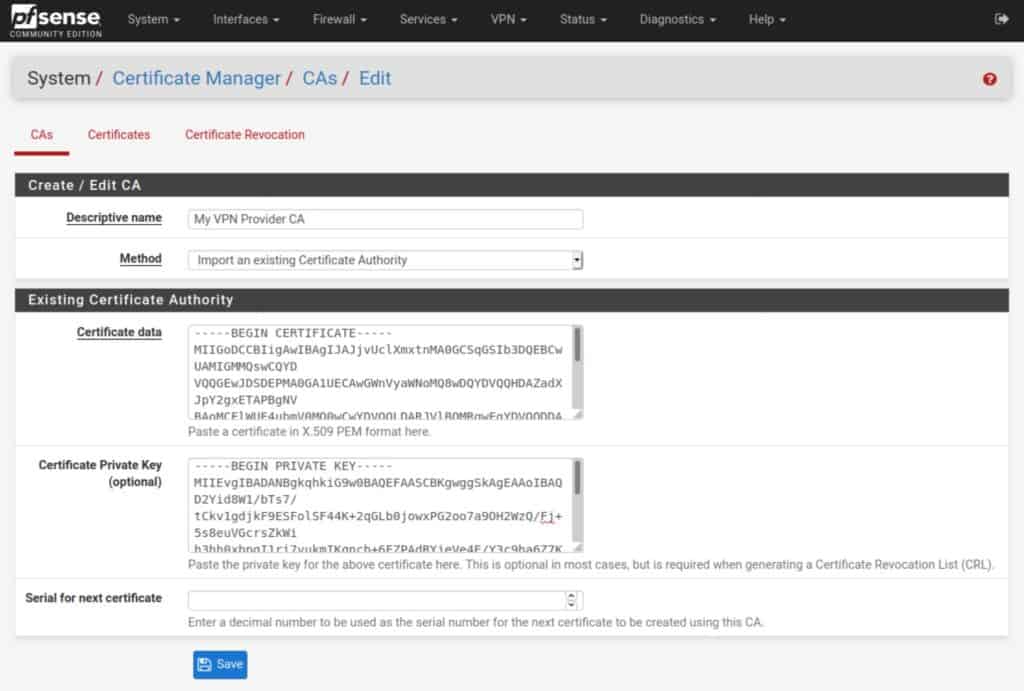
How to import a CA to pfSense
- Navigate to System > Cert. Manager > CAs and click the Add button at the bottom right.

- Give the CA a descriptive name. I’m using My VPN Provider CA for this example.
- Set the Method field to Import an existing Certificate Authority.
- Paste your provider’s CA certificate into the Certificate data field.

- Paste your CA key into the Certificate Private Key field (if your provider requires this).
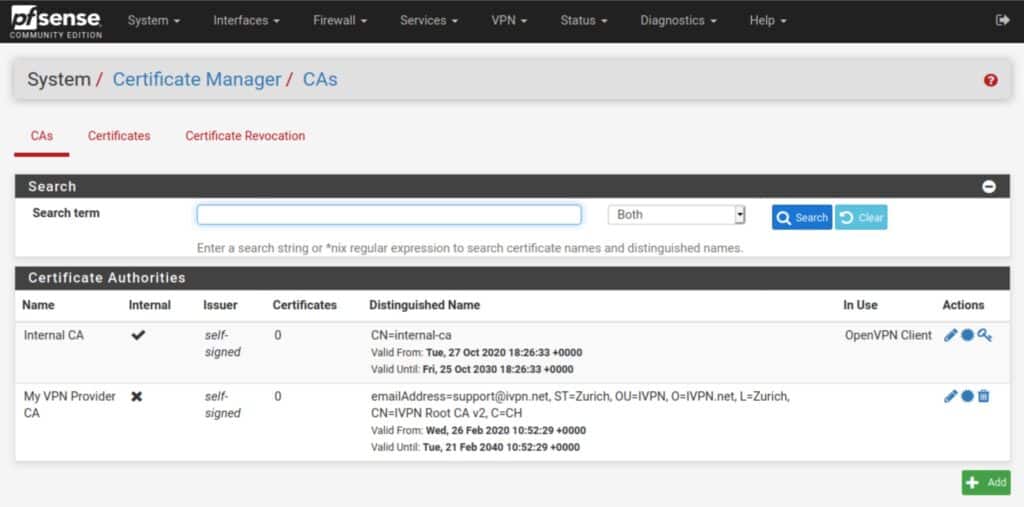
- Click Save. You’ve imported your VPN provider’s CA and are taken back to the CAs page where your newly imported CA is now displayed in the list.

Adding an OpenVPN client connection
Now that we’ve imported our CA certificate, we can go ahead and start configuring our VPN connection.
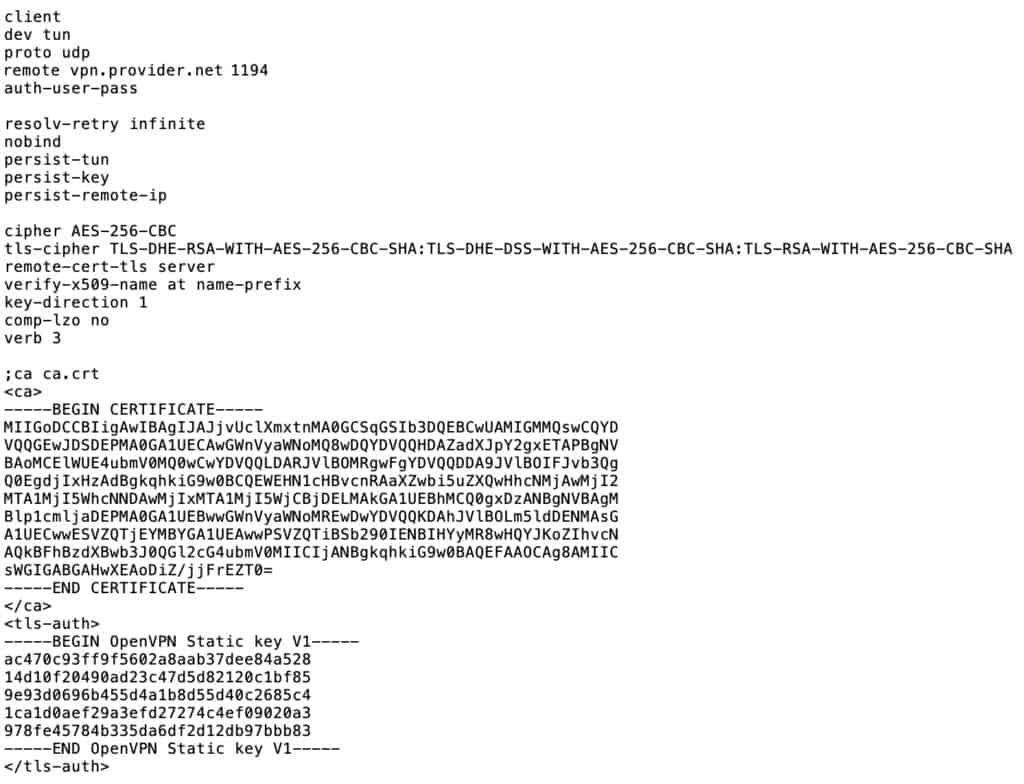
If your VPN provider explicitly supports pfSense, the information you need to set it up will be easy to find. If your VPN provider “unofficially” supports pfSense by supporting Linux, you can find the information needed in one of the .ovpn files made available for Linux. .ovpn files can be opened using a standard text editor. It will look something like this (the certificate and key have been shortened for the screenshot):
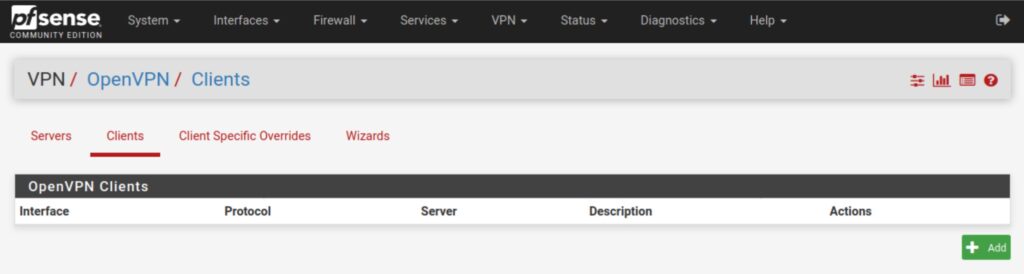
Navigate to VPN > OpenVPN > Clients and click the Add button.
The OpenVPN client configuration page is rather long. We’re going to break it down by section and go over all of the parameters required to set up an OpenVPN connection.
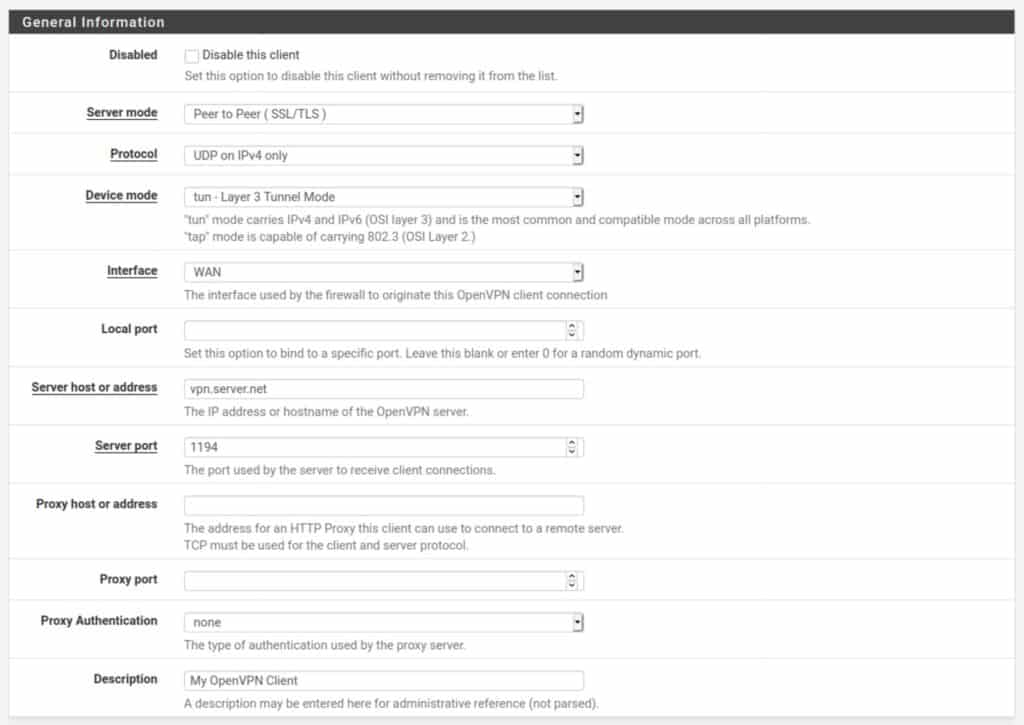
General Information
Disabled: Leave this unchecked or your client connection will be disabled.
Server mode: Set this to Peer to Peer (SSL/TLS). The other option, Shared Key, is typically used for point-to-point VPN connections that link two networks together over VPN.
Protocol: This is typically set to UDP, but can also be set to TCP if your provider supports TCP connections. UDP is usually faster and is the preferred choice for OpenVPN.
Interface: WAN
Local port: Leave blank unless specified by your VPN provider
Server host or address: The IP address or hostname of the VPN server to which you will connect.
Server port: The port over which the VPN connection will be made. This is determined by your VPN provider.
Proxy host or address: Leave blank
Proxy port: Leave blank
Proxy Authentication: Leave blank
User Authentication Settings
This is where you input your VPN provider credentials. As I mentioned above, this can be in the form of a username and password, or a client identifier, or an account number – whatever your VPN provider has chosen. If your provider does not require a password, simply leave the password field blank.
Username: Your username, client identifier, account number, etc.
Password: Your password (if required)
Automatic Retry: Leave unchecked so that your client will attempt to reconnect when authentication fails.

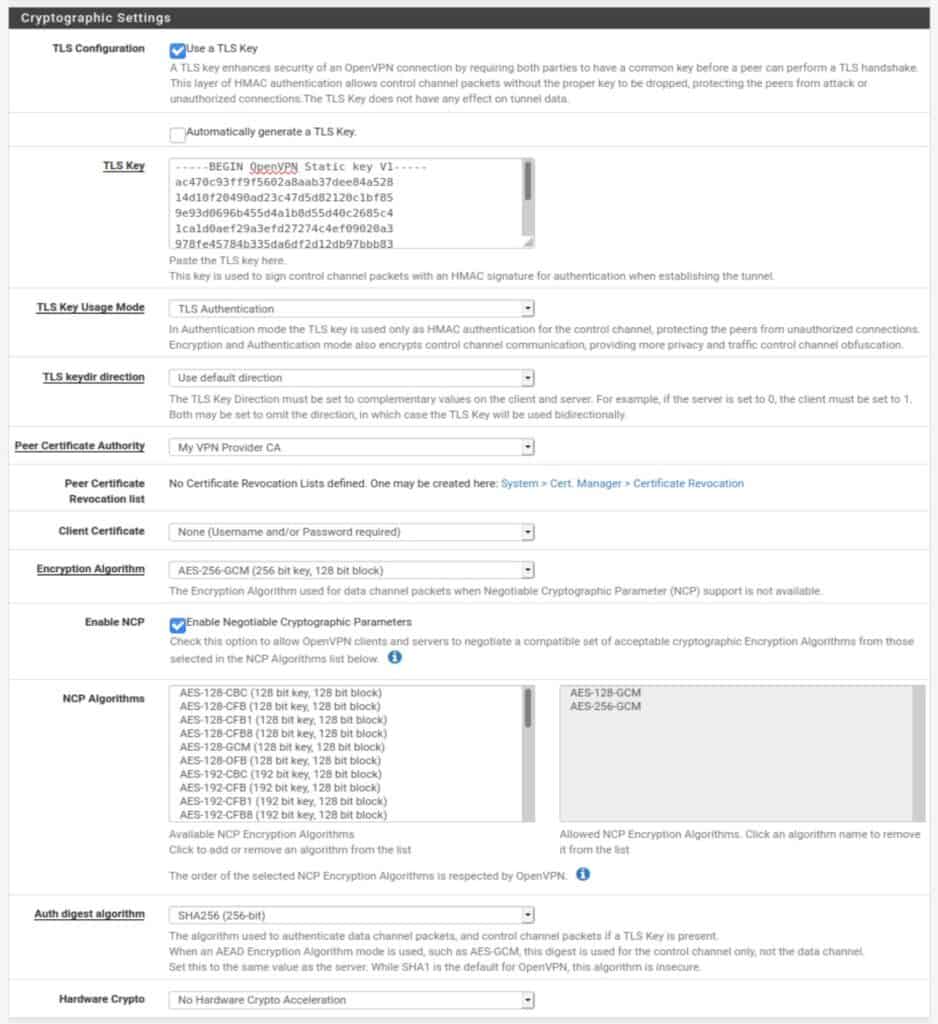
Cryptographic Settings
The way to configure the Cryptographic Settings section varies largely between VPN service providers. You will need to obtain the proper information from your VPN. Most providers make this information readily available.
TLS Configuration: Some VPN providers require a TLS key to be used for authentication of the OpenVPN connection. Others do not. If they do, the TLS key will have been bundled with the configuration files you downloaded. If your provider requires a TLS key, check Use a TLS key. Otherwise, uncheck it.
Automatically generate a TLS Key: Leave unticked.
TLS Key: Paste your VPN provider’s supplied TLS key here if required. Otherwise, leave the field blank.
TLS Key Usage Mode: TLS Keys can be used for either TLS authentication or for TLS authentication and encryption. This depends on your provider. Select the appropriate TLS Key usage mode from the drop-down menu.
TLS keydir direction: Leave at Use default direction unless a different setting is specified by your provider. The client and server TLS keys need to be set in opposite directions for TLS authentication to work.
Peer Certificate Authority: Select the CA we imported earlier.
Client Certificate: Leave this set to None. With OpenVPN, it is possible to use certificate-based authentication rather than a username & password, or both. However, every VPN provider I’ve seen uses credential-based authentication, presumably because distributing unique certificates to every customer would quickly become unmanageable.
Encryption Algorithm: This setting determines the cipher used to encrypt your connection. This again depends on your VPN provider. However, most providers use either AES-256-CBC or AES-256-GCM.
Enable NCP: NCP stands for Negotiable Cryptographic Parameters. If your VPN provider supports various encryption settings, NCP will negotiate the strongest possible encryption that is supported by both the client (your pfSense box) and the VPN server. Unless you know that your provider supports NCP, untick it and the cipher selected in Encryption Algorithm above will be used.
NCP Algorithms: If you use NCP, you can select which ciphers are available for negotiation. Clicking a cipher from the available list imports it into the allowed list.
Auth digest algorithm: This is the algorithm used to authenticate the data channel (the tunnel through which your traffic flows). This is determined by your VPN provider. Select the appropriate algorithm from the drop-down menu.
Hardware Crypto: If the system on which you installed pfSense supports hardware cryptographic acceleration, you can enable it here. If your system supports this setting, you can enable it regardless of which VPN provider you use.
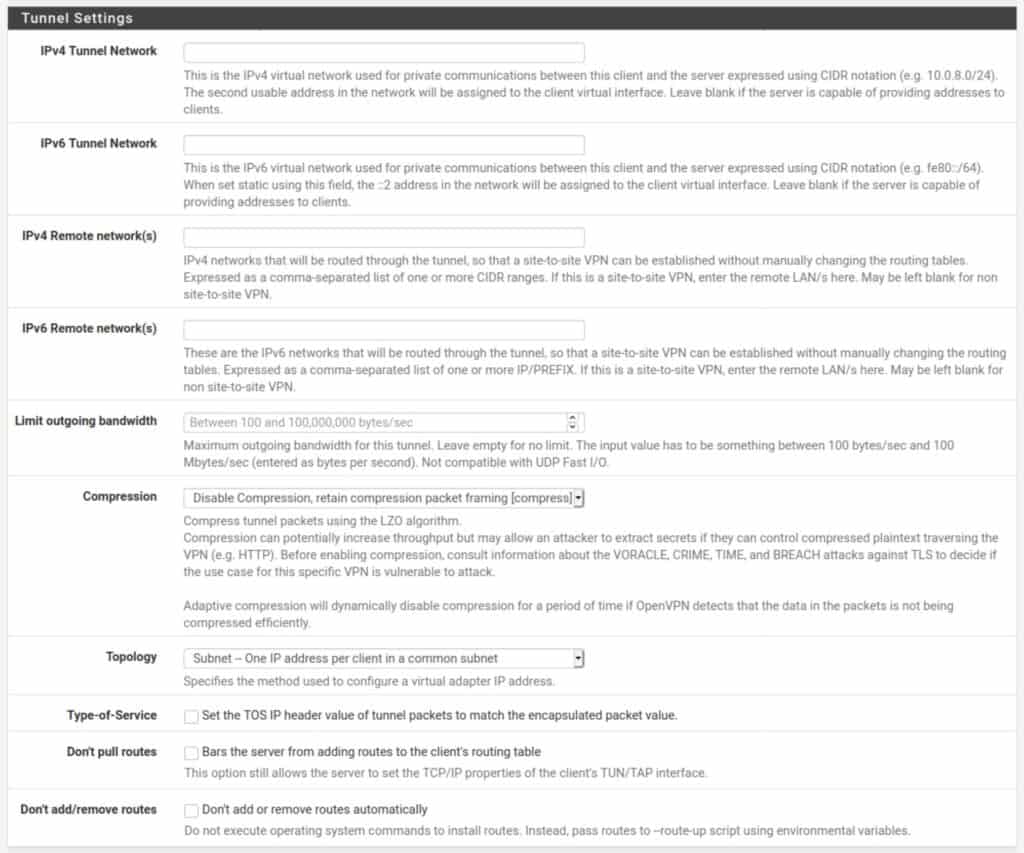
Tunnel Settings
The tunnel settings will be left largely blank. These settings have to do with routing between the client and the server and are typically handled by the VPN provider on the server-side.
IPv4 Tunnel Network: The IPv4 network between the client and the server. Leave blank.
IPv6 Tunnel Network: The IPv6 network between the client and the server. Leave blank.
IPv4 Remote network(s): The IPv4 networks that will be routed through the tunnel. Leave blank.
IPv6 Remote network(s): The IPv6 networks that will be routed through the tunnel. Leave blank.
Limit outgoing bandwidth: Sets a hard limit on outgoing bandwidth. Leave blank.
Compression: Some VPN providers may require you to enable compression on the traffic flowing through the VPN tunnel. If this is specified by your provider, select the appropriate option from the drop-down menu. Otherwise, leave it as is.
Topology: Specifies the topology of the VPN network. Leave as is.
Type-of-Service: Leave unticked.
Don’t pull routes: This setting bars the VPN server from pushing routes to the client. Some providers include the routing information in the client configuration and may ask you to enable this option (such as ExpressVPN). If this is specified by your provider, tick this option. Otherwise, leave it unticked.
Don’t add/remove routes: This option can be used to enable selective routing: sending some traffic through the VPN tunnel while sending the rest out the ISP gateway. This requires setting the VPN interface (which we will create below) as a gateway in pfSense and specifying some firewall and NAT rules to get it working. This is outside the scope of this guide. Also, in your typical commercial VPN scenario, you want all of your traffic to be tunneled through the VPN connection. Leave this setting unticked.
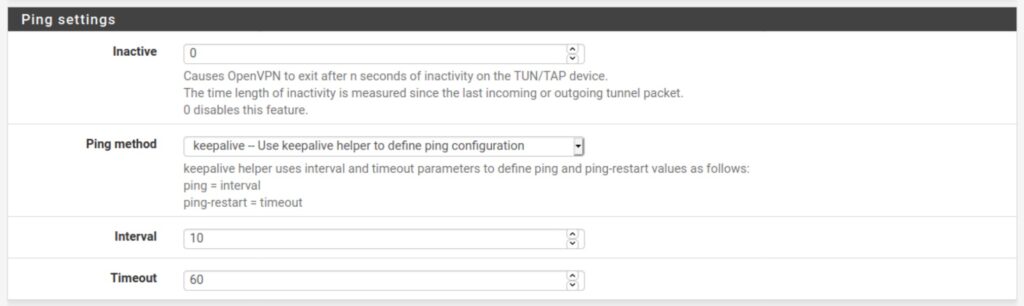
Ping Settings
The ping settings are used to determine if the connection is active or not and whether it should be closed or reinitiated. Leave all of the settings as they are.
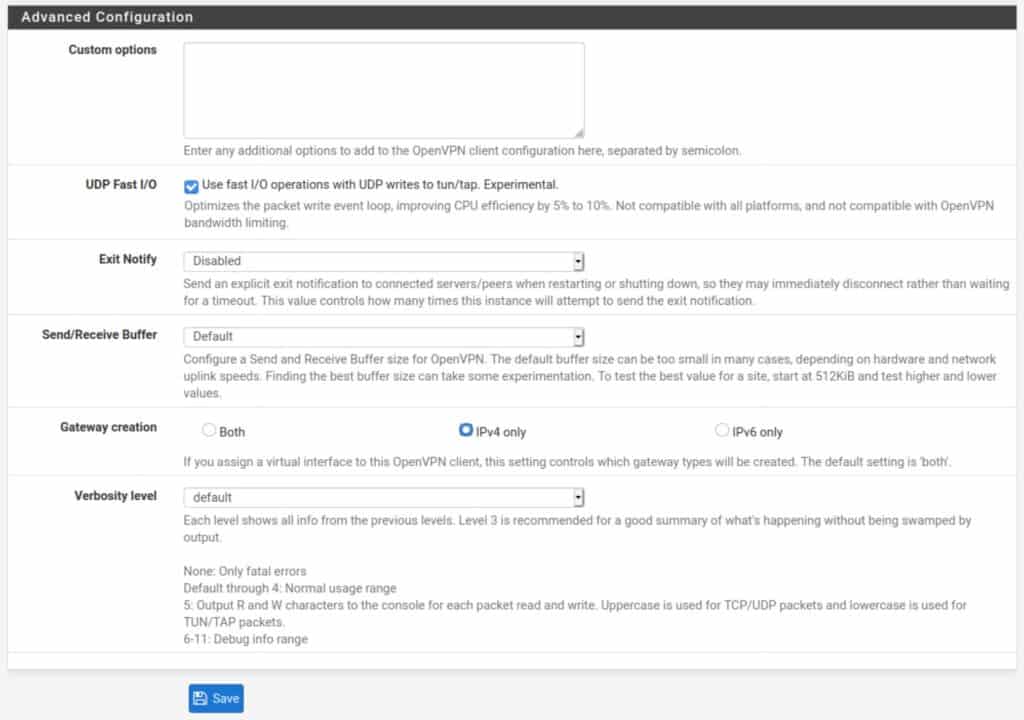
Advanced Configuration
Custom options: Some providers require setting some custom options to the client configuration. These can be added here. Unless your provider specifies the required custom options, leave this blank.
UDP Fast I/O: Optimizes packet writing and may speed up your VPN connection. This can be enabled and disabled at your leisure. I would say try both and see if you get a speed boost from it.
Exit Notify: This setting explicitly alerts the server when the client disconnects so that it can close the connection rather than wait for it to timeout. Leave this as-is unless specified by your provider.
Send/Receive Buffer: You can experiment with different buffer sizes within OpenVPN. Different settings will give different results in terms of speed. 512K is a good place to start. This setting is optional.
Gateway Creation: Selects whether OpenVPN gateways will be created for IPv4 only, IPv6 only, or both. Unless your VPN provider supports IPv6 (such as Mullvad), set this to IPv4 only. If your provider does support IPv6, set this to Both.
Verbosity level: Determines the verbosity level of the OpenVPN logs for this client. The default level is 1. But you can set this at a higher level to get more information when troubleshooting. OpenVPN logs in pfSense can be viewed by navigating to Status > System Logs > OpenVPN.
Now all that’s left to create our client connection is to click the blue Save button at the bottom of the screen and click Apply Changes.
Creating the VPN interface
The next thing we need to do is create the virtual interface that will host the VPN network segment (the subnet you become a part of after a successful VPN connection) on our pfSense box.
The interface was automatically created by pfSense when we hit save after configuring our connection earlier. But we still need to assign and configure it.
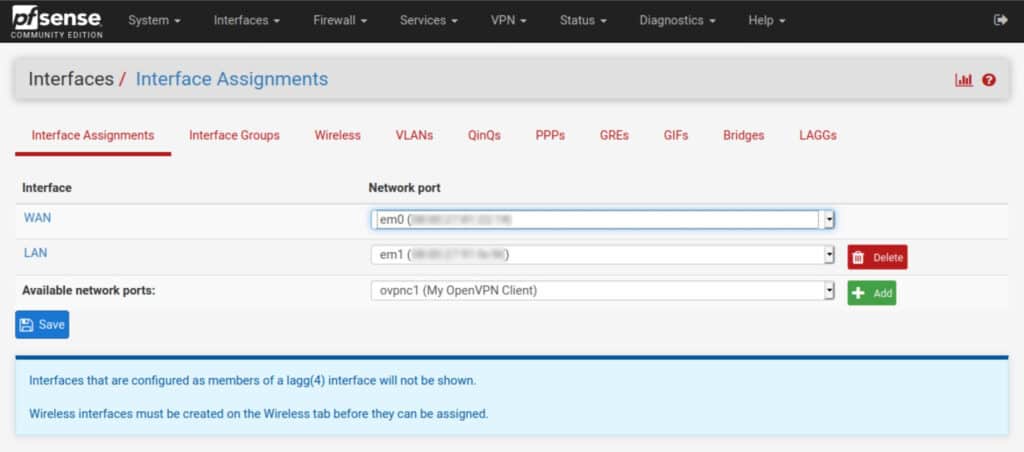
How to add an interface in pfSense
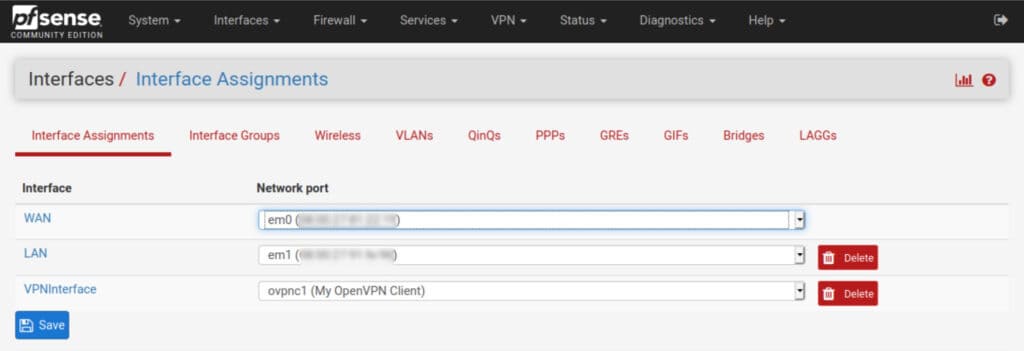
- Navigate to Interfaces > Assignments. You’ll see ovpnc1 listed to the right of Available network ports.

- Click the green Add button, to its right. The ovpnc1 interface is assigned and displayed as OPT1.

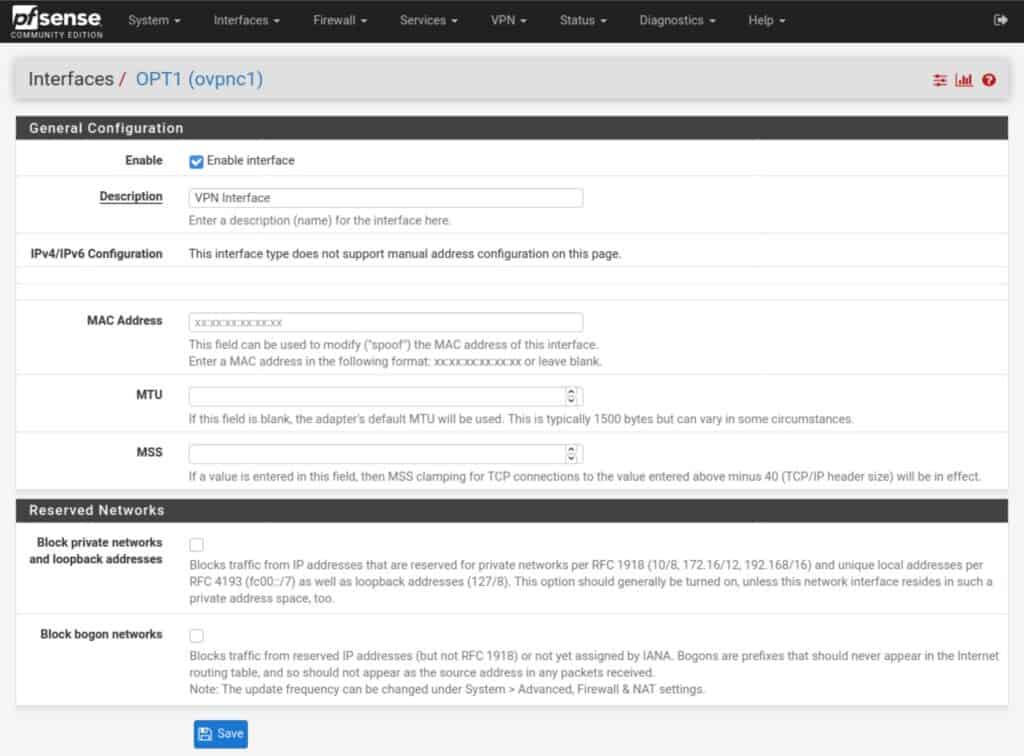
- Click OPT1. You are taken to the interface configuration page.

- Tick Enable interface and give it a name. Leave all of the other settings untouched.
- Click Save and Apply Changes. Your interface is assigned and enabled.
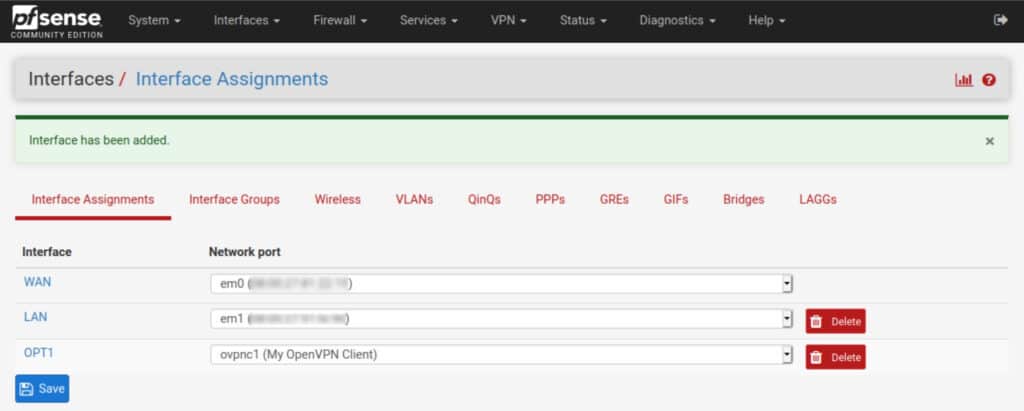
If you navigate back to the Interface Assignments page, you can see your named interface is now part of the list of active interfaces.
Checking the connection
OK, we now have our OpenVPN client connection configured and we’ve created our VPN interface. Our connection is working right now, but pfSense isn’t configured to route traffic through the VPN tunnel.
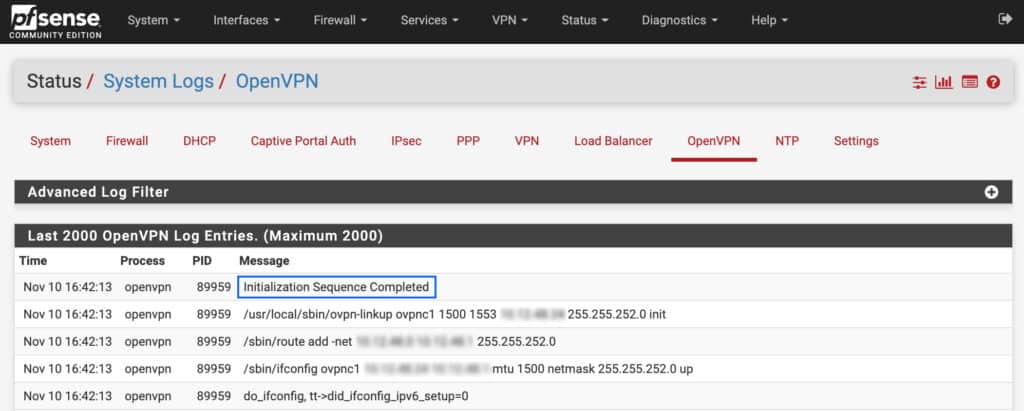
We can check that our connection is working, by navigating to Status > System Logs > OpenVPN. If the OpenVPN client is set up correctly, you should see Initialization Sequence Completed, somewhere near the top of the OpenVPN logs.
Now we just need to route traffic through the VPN tunnel.
Firewall rules
We need to make sure that the devices connected to the LAN interface can send traffic out to the internet via the default gateway. When you install pfSense, it automatically creates a rule allowing any type of traffic out of the LAN interface by default. So if you didn’t change anything there, you should be fine.
If you did change them, make sure that your rules allow the LAN devices you want to connect to the VPN to go out to the internet. Navigate to Firewall > Rules > LAN to view/update your LAN rules.
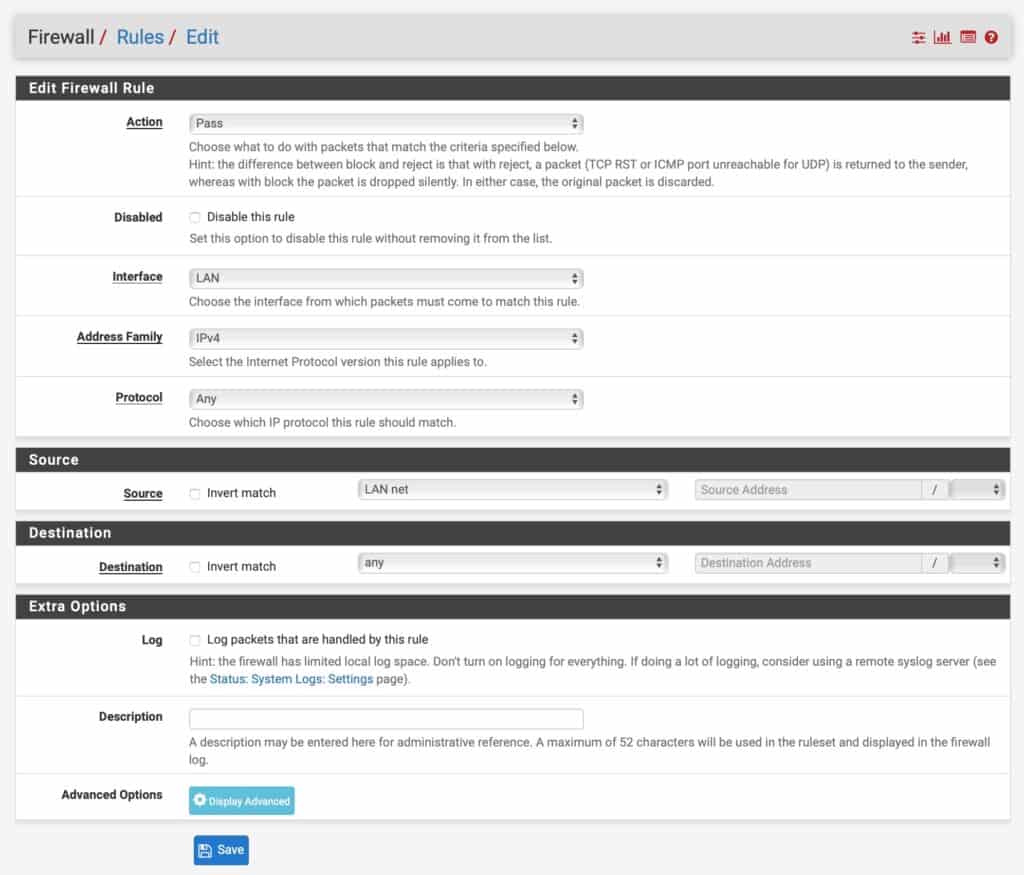
This is what the default LAN rules look like. By default, there is a rule for IPv4 and one for IPv6. Unless your VPN provider supports IPv6, you only need the IPv4 rule.

The rule allows any device on the LAN to connect to any destination, using any protocol over any port.
If the rule isn’t there, you can go ahead and create it.
How to create a LAN firewall rule
- Click the green Add button with an arrow pointing upward. It will place the rule at the top and pfSense will match that rule first.
- Set the Action field to Pass.
- Leave the Disabled box unticked.
- Leave the Interface field set to LAN.
- Set the Address Family to IPv4.
- Set the Protocol to Any
- Set the Source to LAN net.
- Set the Destination to any.
- If you need an IPv6 rule as well, repeat the process and select IPv6 from the Address Family drop-down menu.
NAT rules
The next thing we need to do is to configure our Network Address Translation (NAT) rules to properly route our VPN traffic.
How to add a NAT rule
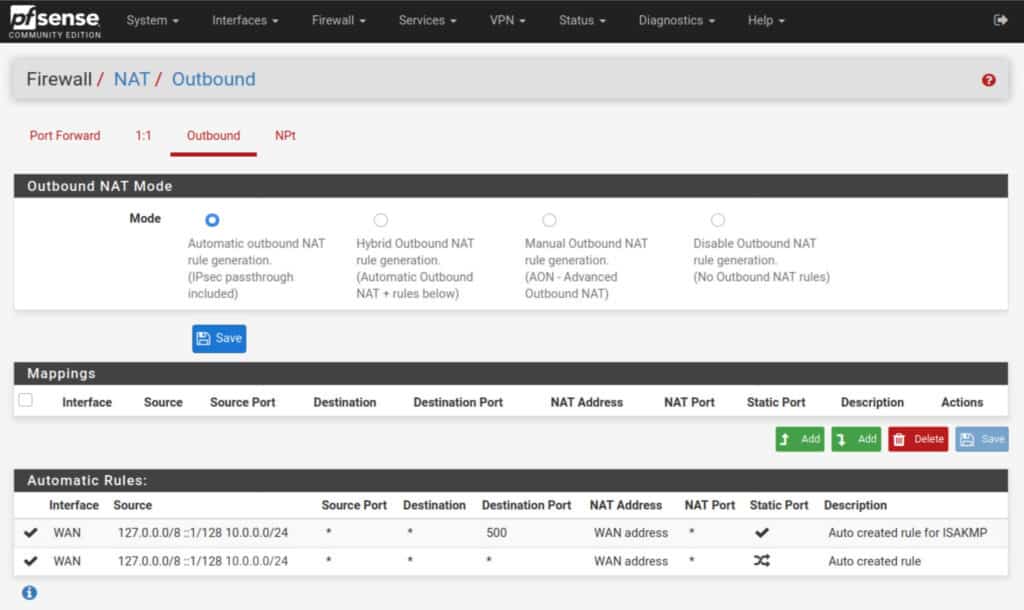
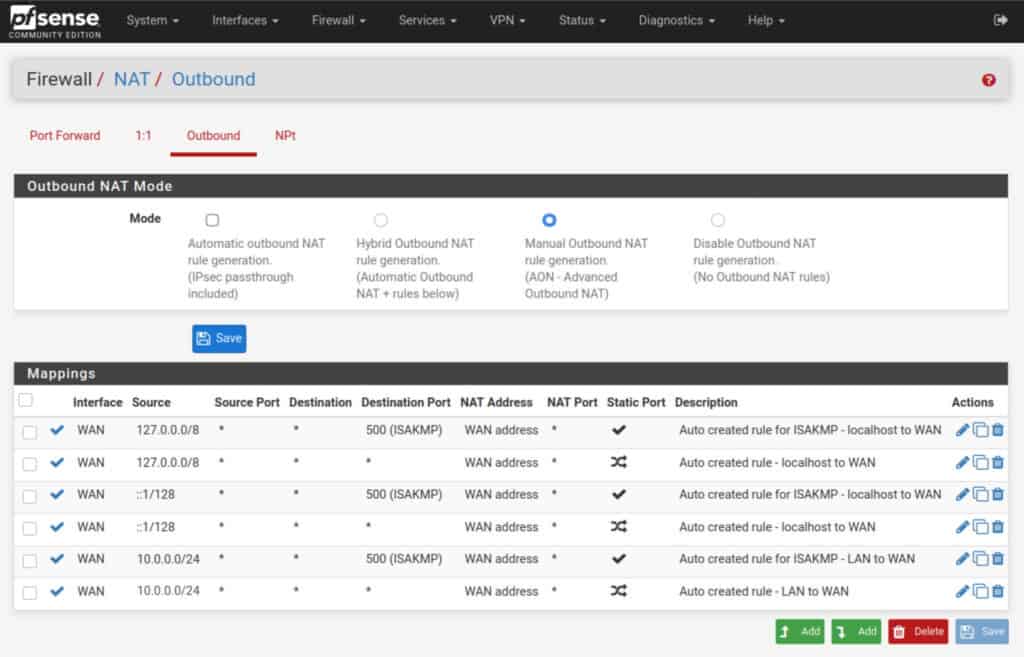
- Navigate to Firewall > NAT > Outbound.

- Set the Outbound NAT Mode to Manual, and then click Save and Apply Changes. Your NAT rules should now look like this (but with your LAN network instead of my 10.0.0.0/24):

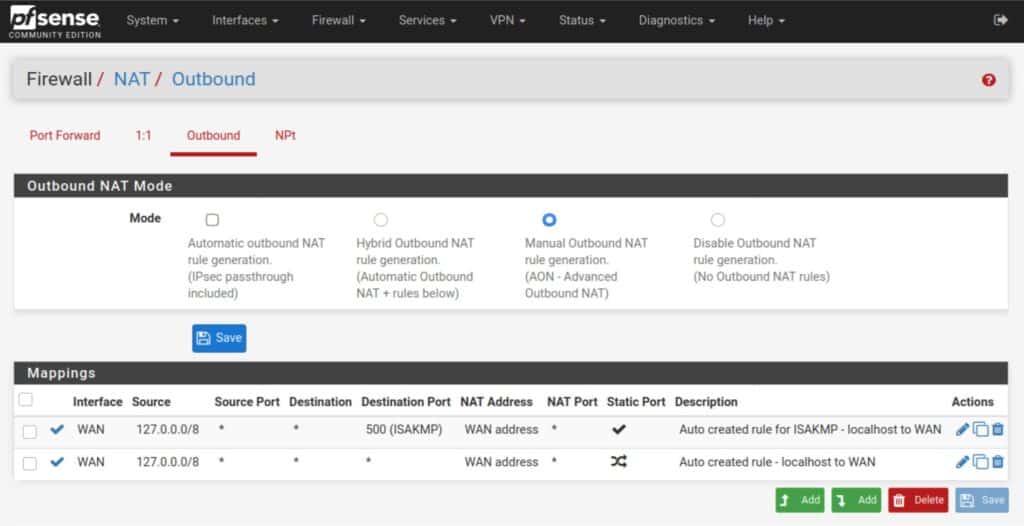
- Delete all of the rules, except the two top ones – the ones with 127.0.0.1.

- Click the green Add button with a downward pointing arrow, to create a new NAT rule.
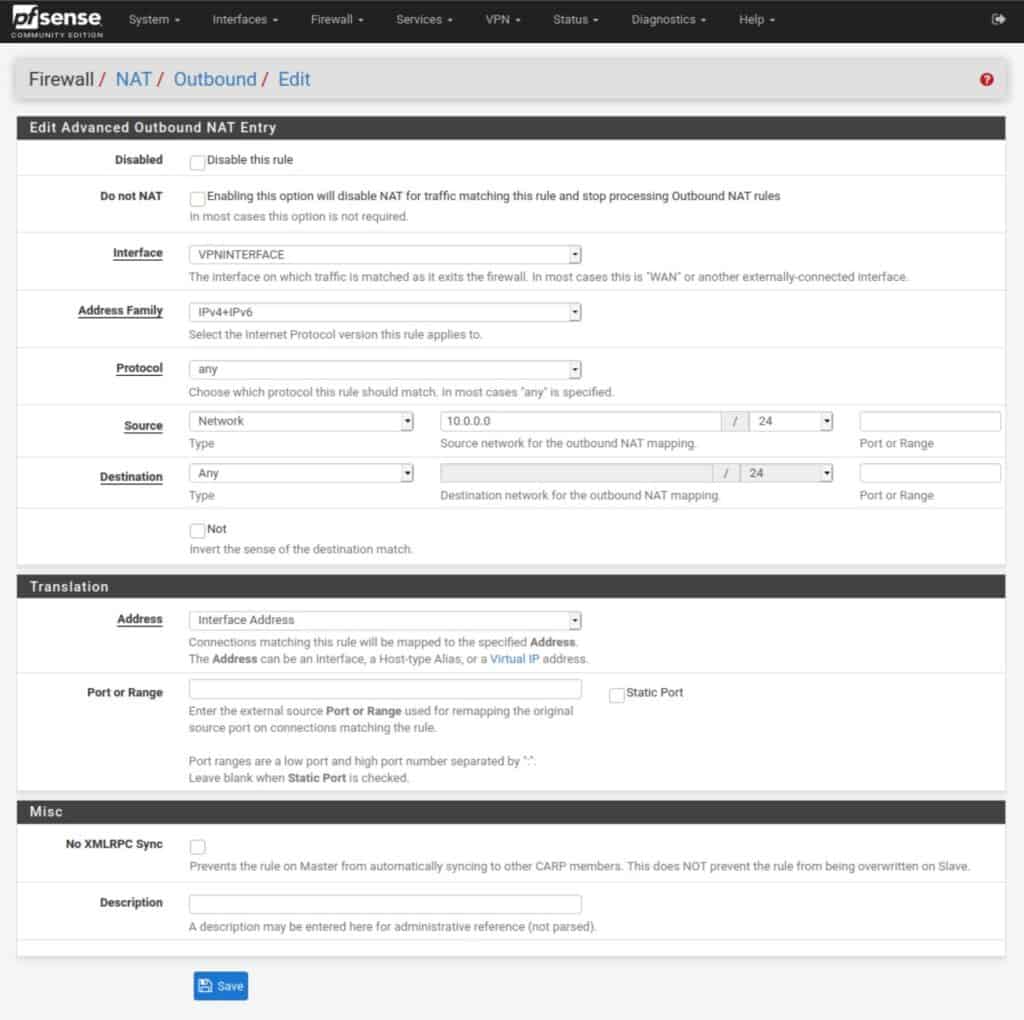
- Set the Interface field to the VPN interface we created earlier.
- Set the Address Family to either IPv4 or IPv4+IPv6 if your VPN provider explicitly supports IPv6.
- Set the source network to your LAN IP address, but make the last digit a 0 instead of a 1. So if your LAN IP address is 192.168.1.1, put 192.168.1.0 as the source network.
- Leave all the other settings untouched. Click Save and Apply Changes.
Your NAT rules should now look like this (but with your LAN network instead of my 10.0.0.0/24):
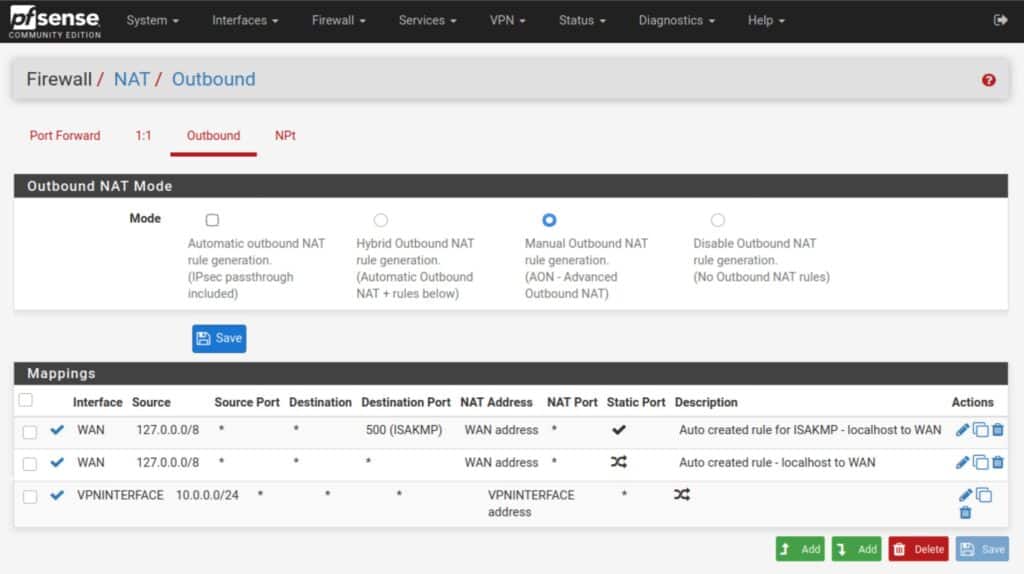
See also: What is a NAT Firewall
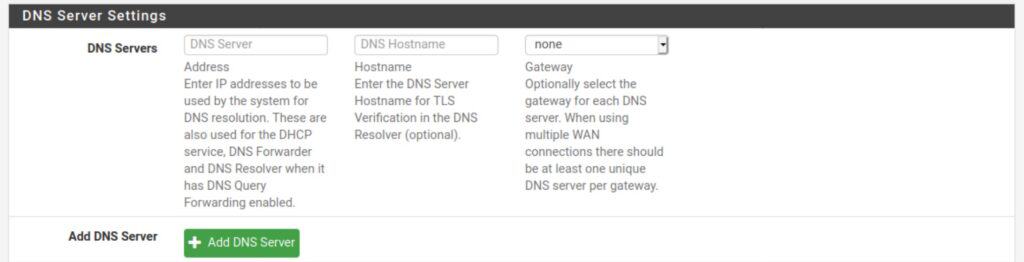
DNS
The last thing we need to configure is DNS for your VPN client. And there are different ways to do this depending on your pfSense configuration. Even if your VPN provider hard codes its DNS servers in their .ovpn configuration file, pfSense still needs to be aware of the DNS servers to be used.
DNS Resolver / DNS Forwarder
If you’re using the DNS Forwarder or the DNS Resolver in forwarding mode, you can simply add your VPN provider’s DNS server(s) to the General Setup page.
How to add a DNS server to pfSense
- Navigate to System > General Setup.
- Click Add DNS Server.
- Input the IP address of the hostname of the DNS server in the appropriate box.
- Leave the Gateway set to None.

- Click Save and Apply Changes.
- Repeat to add additional DNS servers.
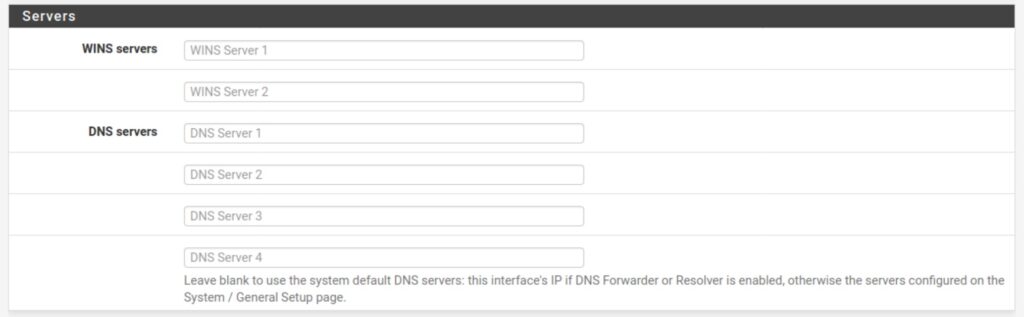
DHCP
How to push a DNS server to clients via DHCP
If you’re not using the DNS Resolver or the DNS Forwarder, you can have your DHCP server push the DNS server to any clients that request an IP address on your LAN.
- Navigate to Services > DHCP Server
- Under Servers, you can input up to four DNS servers.

- Insert your VPN provider’s DNS server(s).
- Click Save and Apply Changes.
Wrapping up
Congratulations, you’ve just configured an OpenVPN client connection on pfSense. All that’s left now is to reboot pfSense and connect a device to your LAN. Once connected, you can go to our IP address checking tool to verify that your public IP address has been changed to the VPN server’s IP address. You can also check for DNS leaks with our testing tool.
You can now use your commercial VPN with any device that’s connected to your pfSense box, without a dedicated VPN app. And remember, regardless of the limit your VPN provider places on the number of simultaneous connections, your router only counts as one device as far as your VPN provider is concerned. So you can connect as many devices as you like this way.
Установка openvpn-client-export
Первым делом установим openvpn-client-export, для экспорта файлов конфигурации пользователя vpn и самого OpenVPN client.
- Переходим в
System -> Package Manager -> Available Packages - В поле поиска вбиваем openvpn-client-export
- Ну и жмём
install
Создание OpenVPN server
Далее настраиваем OpenVPN сервер
- Переходим в
System -> Certificate Manager -> СAs - Создаём сертификат CA
- Переходим в
VPN -> OpenVPN -> Wizard - В графе Select an Authentication Backend Type выбираем Local User Access
- Далее в Choose a Certificate Authority (CA) выбираем наш сертификат, созданный во 2 пункте
- В следующем окне выбираем Add new certificte и создаем сертификат для сервера, или выбираем в списке уже существующий
- Собственно главный шаг при создании сервера OpenVPN со множеством настроек. Ниже список с применяемыми настройками:
- Interface — WAN
- Protocol — UDP
- Local Port — 1194 ( Лучше указать не стандартный )
- TLS Authentication — true
- Generate TLS Key — true
- DH Parameters Length — 4096 bit ( Тут на свое усмотрение )
- Encryption Algorithm — Тут на свое усмотрение
- Auth Digest Algorithm — Тут на свое усмотрение
- Tunnel Network — 10.10.1.0/24 ( Это будет сеть которая будет выдаваться клиентам OpenVPN )
- Redirect Gateway — false ( Но возможно для кого-то будет лучше true. Если включить, то после подключения весь трафик на клиенте будет уходить в vpn. Т.е если открыть youtube, то смотреть его вы будете через OpenVPN server )
- DNS Server 1 — можно указать конкретный DNS для клиентов
- Жмём
nextи выставляем галочки напротив Firewall Rule, OpenVPN rule - Жмём
Finish
После всего проделанного вVPN -> OpenVPN -> Serversпоявится VPN сервер.
Добавление routes
Тот кто хоть немного разбирается в сети сразу заметит что я остался без роутов, потому что выставил Redirect Gateway — false. Для того чтобы прописать роуты:
- Жмём
editна vpn сервере и в поле Custom options вбиваем наш route push “route 10.0.0.0 255.255.255.0”. Собственно в описании к полю всё понятно - Есть второй способ, о нём напишу ниже
Создание клиента OpenVPN
Следующий этап это создание клиента OpenVPN
- Переходим в
System -> User Manager -> Usersи жмёмadd- Username — test
- Password — password
- Full name — test
- Certificate — true
- Descriptive name — test
- Жмём
saveи пользователь создан
Экспорт файлов конфигурации для клиента через openvpn-client-export
Теперь всё готово для подключения ( !!! если у вас всё нормально на сетевом уровне ). Используем openvpn-client-export, который ставили в самом начале:
- Переходим в
OpenVPN -> Client Export Utility- Remote Access Server — настроенный OpenVPN servrer
- Host Name — Если вы используете nat для wan интерфейса PfSense пишем тут внешний IP. Если нет, то пусто
- Use Random Local Port — true
- Жмём
Save as default - Во вкладке
OpenVPN Clientsвидим созданного нашего пользователя test. Жмём на интересующую нас кнопку в полеExportи сохраняем файл установки с конфигурацией именно для этого пользователя.
Client Specific Overrides
Суть этой вкладки в том, что вы можете в зависимости от пользователя OpenVPN прописывать разные routes или выдавать им определенные ip.
Проще говоря своя конфигурация для каждого пользователя. Причем после изменения или создания не надо переустанавливать ничего у клиента, все применяется автоматически после соединения пользователя / клиента с OpenVPN сервером
Настройки
- Server List — сервер OpenVPN
- Common Name — имя пользователя ( test )
- IPv4 Tunnel Network — ip адрес клиента ( но с маской подсети чтобы был доступен шлюз 1.1.1.1/24 )
- Advanced — можно прописать route для конкретного пользователя
Подключение к серверу OpenVPN
После того как скачали файл установки с конфигурацией пользователя ( описано выше ) запускаем установку, где просто жмём далее.
После установки запускаем OpenVPN client, жмём правой кнопкой на значке в трее, выбираем наш конфиг и жмём connect. Приложение запросит логин и пароль ( создавали выше ). После удачного подключения значок в трее станет зелёным.
Вот и ВСЁ. Работает
Также настоятельно рекомендую добавить правила в Firewall и удалить стандартные для соблюдения правил ИБ. Но статья не об этом.

Когда-то я тоже был обычным эникейщиком, который ходил и включал мониторы, когда пользователь паниковал что у него комп не включается. Но в своё время мне это надоело, и я пошёл дальше.
Рекомендуем к прочтению
pfSense as an OpenVPN client for specific devices
Introduction
One of the most powerful features of pfSense is it’s ability to direct your data requests through different end-points using NAT rules. pfSense is amazing as an OpenVPN client because it can selectively route any device on the network through the VPN service (i.e., my tablets and TV go through US servers, while my smartphone, VoIP, computers go my local ISP).
This setup becomes extremely handy for use with applications which are not aware of OpenVPN protocol, eg. download managers, torrent clients, etc. Expecting privacy you should be positive that traffic won’t go through your ISP’s gateway in case of failure on side of VPN provider. And obviously OpenVPN client should automatically reconnect as soon as service goes live again.
Note: This How-To is meant for pfSense 2.1.x. For those using 2.2 Beta, there is a bug that prevents this from working. Read about here in the pfSense forum thread, “cannot NAT trough OPT1 interface on multiwan”. The bug has been filed in redmine and at the time of this writing, it has been fixed for IPv4 traffic.
Note: By the time of editing, in 2.2.4-RELEASE version of pfSense the only way to route traffic through OpenVPN client seems to be
"redirect-gateway def1"advanced option, which redirects absolutely all traffic and pfSense default gateway becomes the same thing with OpenVPN client’s gateway and not the ISP’s one. There is a way to still route traffic to ISP avoiding VPN tunnel. Basically, in such case pfSense becomes an OpenVPN client for it’s whole LAN subnet. This fact makes it clunky to use this guide on a main router because for each firewall rule you need to change default gateway to the right one. This why I use a separate pfSense virtual machine on a Proxmox server to provide VPN access for specific virtual machines using dedicated virtual subnet. Needles to say that I could also assign a physical interface for such purpose for use on some physical machines.
Configuration
Configure certificates:
- Go to
System>Cert Manager - In the
CAstab, click the+icon to add a new Certificate Authority - Fill in a
Descriptive namelike “[VPN PROVIDER] CA” - Copy and paste
Certificate data. It can be found in one of two.crtfiles, provided by VPN service. In some cases.ovpnfile may include Certificate Authority information between<ca>...</ca>tags. Do not include this tags. All certificates going into pfSense should have similar format:
-----BEGIN CERTIFICATE-----
MIIEYTCCA0mgAwIBAgIJAOP9Uyx2LzzOMA0GCSqGSIb3DQEBBQUAMH0xCzAJBgNV
BAThisIsOnlyAnExampleDoNotBotherThisIsOnlyAnExampleDoNotBotherEP
MAThisIsOnlyAnExampleDoNotBotherThisIsOnlyAnExampleDoNotBother0B
CQThisIsOnlyAnExampleDoNotBotherThisIsOnlyAnExampleDoNotBotherYw
MzThisIsOnlyAnExampleDoNotBotherThisIsOnlyAnExampleDoNotBothercT
DEThisIsOnlyAnExampleDoNotBotherThisIsOnlyAnExampleDoNotBotherUg
Q0ThisIsOnlyAnExampleDoNotBotherThisIsOnlyAnExampleDoNotBotherZI
hvThisIsOnlyAnExampleDoNotBotherThisIsOnlyAnExampleDoNotBothertL
o/ThisIsOnlyAnExampleDoNotBotherThisIsOnlyAnExampleDoNotBotherLM
liThisIsOnlyAnExampleDoNotBotherThisIsOnlyAnExampleDoNotBotherLB
xgThisIsOnlyAnExampleDoNotBotherThisIsOnlyAnExampleDoNotBotherEP
2QThisIsOnlyAnExampleDoNotBotherThisIsOnlyAnExampleDoNotBother/o
1lThisIsOnlyAnExampleDoNotBotherThisIsOnlyAnExampleDoNotBotherCB
4DThisIsOnlyAnExampleDoNotBotherThisIsOnlyAnExampleDoNotBotherAU
c8ThisIsOnlyAnExampleDoNotBotherThisIsOnlyAnExampleDoNotBotherUE
CBThisIsOnlyAnExampleDoNotBotherThisIsOnlyAnExampleDoNotBotherVN
RTThisIsOnlyAnExampleDoNotBotherThisIsOnlyAnExampleDoNotBotherBo
aWThisIsOnlyAnExampleDoNotBotherThisIsOnlyAnExampleDoNotBotherUA
A4ThisIsOnlyAnExampleDoNotBotherThisIsOnlyAnExampleDoNotBotherog
lpThisIsOnlyAnExampleDoNotBotherThisIsOnlyAnExampleDoNotBother2h
z1ThisIsOnlyAnExampleDoNotBotherThisIsOnlyAnExampleDoNotBother7W
NpThisIsOnlyAnExampleDoNotBotherThisIsOnlyAnExampleDoNotBother8Y
HmThisIsOnlyAnExampleDoNotBotherThisIsOnlyAnExampleDoNotBotherUo
brc4OSiSKdeskaqGQgWaObJCdsnB
-----END CERTIFICATE-----
- Click
Save. - Go to the
Certificatestab and click the+icon to add your VPN certificate and private key. - Fill in a
Descriptive namelike “[VPN PROVIDER] CERT” - Copy and paste
Certificate data. It can be found in one of two.crtfiles, provided by VPN service. In some cases.ovpnfile may include Certificate information between<cert>...</cert>tags. Do not include this tags. - Copy and paste
Private key data. It can be found in.keyfile, provided by VPN service. In some cases.ovpnfile may include private key information between<key>...</key>tags. Do not include this tags. All private keys going into pfSense should have similar format:
-----BEGIN PRIVATE KEY-----
MIIEYTCCA0mgAwIBAgIJAOP9Uyx2LzzOMA0GCSqGSIb3DQEBBQUAMH0xCzAJBgNV
BAThisIsOnlyAnExampleDoNotBotherThisIsOnlyAnExampleDoNotBotherEP
MAThisIsOnlyAnExampleDoNotBotherThisIsOnlyAnExampleDoNotBother0B
CQThisIsOnlyAnExampleDoNotBotherThisIsOnlyAnExampleDoNotBotherYw
MzThisIsOnlyAnExampleDoNotBotherThisIsOnlyAnExampleDoNotBothercT
DEThisIsOnlyAnExampleDoNotBotherThisIsOnlyAnExampleDoNotBotherUg
Q0ThisIsOnlyAnExampleDoNotBotherThisIsOnlyAnExampleDoNotBotherZI
hvThisIsOnlyAnExampleDoNotBotherThisIsOnlyAnExampleDoNotBothertL
o/ThisIsOnlyAnExampleDoNotBotherThisIsOnlyAnExampleDoNotBotherLM
liThisIsOnlyAnExampleDoNotBotherThisIsOnlyAnExampleDoNotBotherLB
xgThisIsOnlyAnExampleDoNotBotherThisIsOnlyAnExampleDoNotBotherEP
2QThisIsOnlyAnExampleDoNotBotherThisIsOnlyAnExampleDoNotBother/o
1lThisIsOnlyAnExampleDoNotBotherThisIsOnlyAnExampleDoNotBotherCB
4DThisIsOnlyAnExampleDoNotBotherThisIsOnlyAnExampleDoNotBotherAU
c8ThisIsOnlyAnExampleDoNotBotherThisIsOnlyAnExampleDoNotBotherUE
CBThisIsOnlyAnExampleDoNotBotherThisIsOnlyAnExampleDoNotBotherVN
RTThisIsOnlyAnExampleDoNotBotherThisIsOnlyAnExampleDoNotBotherBo
aWThisIsOnlyAnExampleDoNotBotherThisIsOnlyAnExampleDoNotBotherUA
A4ThisIsOnlyAnExampleDoNotBotherThisIsOnlyAnExampleDoNotBotherog
lpThisIsOnlyAnExampleDoNotBotherThisIsOnlyAnExampleDoNotBother2h
z1ThisIsOnlyAnExampleDoNotBotherThisIsOnlyAnExampleDoNotBother7W
NpThisIsOnlyAnExampleDoNotBotherThisIsOnlyAnExampleDoNotBother8Y
HmThisIsOnlyAnExampleDoNotBotherThisIsOnlyAnExampleDoNotBotherUo
brc4OSiSKdeskaqGQgWaObJCdsnB
-----END PRIVATE KEY-----
- Click
Save
Configure OpenVPN client:
- Go to
VPN>OpenVPN - Click the
Clienttab. - Click the
+icon to add a new client.
Note: Most of the settings on this tab totally depend on VPN provider.
These are important for the how-to:
Interfaceset toWANinterface.Server host name resolutionneeds to be checked in order for client to automatically reconnect.Peer Certificate AuthorityandClient Certificateset to previosly defined.redirect-gateway def1should persist inAdvancedoptions to actually route traffic through VPN.
These are the rest for my VPN provider:Server Mode=Peer to Peer ( SSL/TLS )Protocol=UDP=>Server port=1194Protocol=TCP=>Server port=443Device mode=tapDescription= «[VPN Provider name]»TLS Authentication: uncheckedEnable authentication of TLS packets
Note: if your VPN provider uses TLS Authentication you should check it,
uncheckAutomatically generate a shared TLS authentication key.and paste your shared key. It usually can be found in.ovpnconfiguration file between<tls-auth> ... </tls-auth>tags. Do not include this tags. Paste should look like this:
-----BEGIN OpenVPN Static key V1-----
4ThisIsOnlyAnExampleDoNotBother5
dThisIsOnlyAnExampleDoNotBother8
fThisIsOnlyAnExampleDoNotBother1
fThisIsOnlyAnExampleDoNotBother2
dThisIsOnlyAnExampleDoNotBother6
8ThisIsOnlyAnExampleDoNotBother2
5ThisIsOnlyAnExampleDoNotBother5
fThisIsOnlyAnExampleDoNotBotherd
8ThisIsOnlyAnExampleDoNotBother3
0ThisIsOnlyAnExampleDoNotBother5
5ThisIsOnlyAnExampleDoNotBother0
bThisIsOnlyAnExampleDoNotBother6
dThisIsOnlyAnExampleDoNotBotherc
3ThisIsOnlyAnExampleDoNotBother1
fThisIsOnlyAnExampleDoNotBother5
eThisIsOnlyAnExampleDoNotBother9
-----END OpenVPN Static key V1-----
Encryption algorithm=BF-CBC (128-bit)Auth Digest Algorithm=RSA-SHA1 (160-bit)Hardware Crypto=BSD cryptodev engine - RSA, DSA, DH(Depends on CPU)Compression=Enabled with Adaptive CompressionAdvanced=ns-cert-type server;redirect-gateway def1;persist-key;persist-tun;mute 20;explicit-exit-notifyVerbosity level=4- Click
Save
Validate connection status:
- Go to
Status>System Logs - Select the
OpenVPNtab. - Verify that you have successfully connected.
Specifically look forInitialization Sequence Completedstatement. It may be anywhere between other log entries but should be tagged with time when you clickedSaveon client configuration tab.
If you don’t see it, it means you are not connected. Check your configuration again. Use the log to look for errors. These are probably flags in your advance options or encryption settings. Double check that you pasted right certificates and keys.
####Configure OpenVPN gateway interface:
- Go to
Interfaces>(assign) - In
Available network ports:selectovpnc# [VPN Provider name]according to theDescriptiongiven on client configuration step. - Click the
+icon and add a new interface. It will be calledOPT# - Click the
OPT#name of new interface to configure it. - Change the name of
OPT#into something more useful, eg. name of VPN server. IPv4 Configuration Type=NoneIPv6 Configuration Type=None- You may want to decide on
Block private networksfor your setup. Mine is unchecked since this pfSense is a virtual machine in a private network. - Click
Save
Verify working gateways:
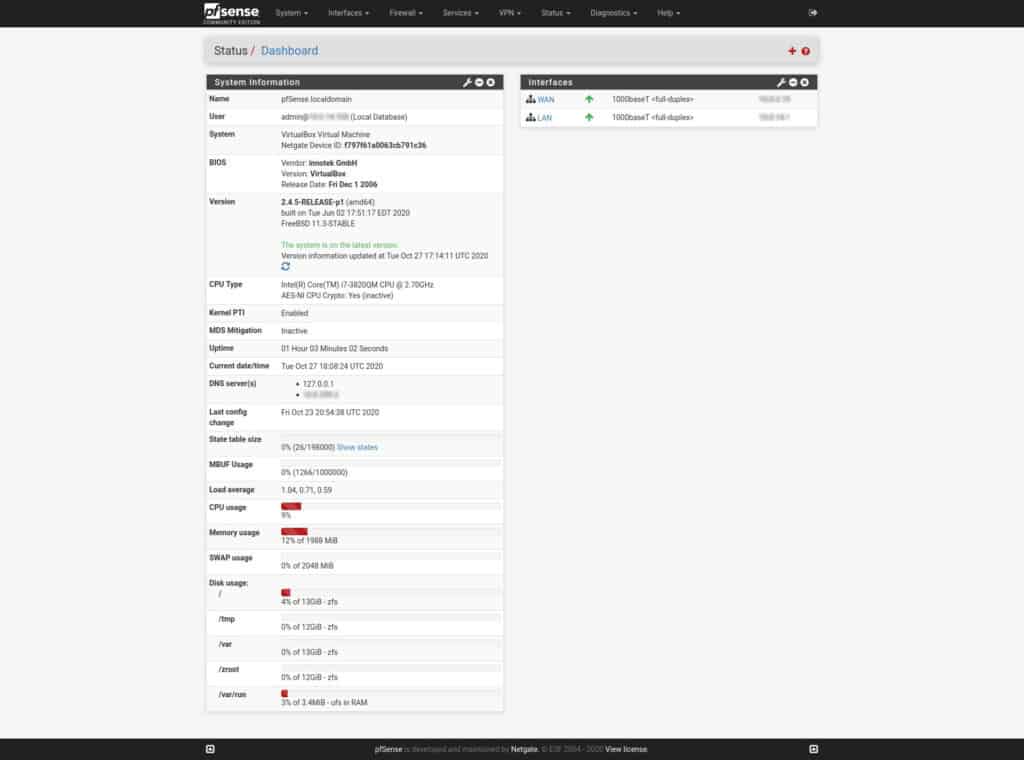
- Go to
Status>Dashboard - Look for
[VPN Provider name]entry inInterfacestable
(AlternativelyStatus>Interfaces) - Verify that you have an IP Address for your VPN.
- If no, try going to
Status>Servicesand restarting OpenVPN service by clicking the play button next toOpenVPN client: [VPN Provider name]
Note: you may want to have OpenVPN table on dashboard to see client connection status. Click
+icon right underStatus: Dashboardheader at the top of page, selectOpenVPNand clickSave Settingsbutton.
- Go to
System>Routing - Verify that your gateways are available:
there should be green play icon before[VPN Provider name]_VPNV4
Note: In pfSense 2.1.x or below that entry should have IP address
Gatewaycolumn. If no , try opening the entry, scrolling down and clickingSave. That seemed to restart it.
Note: In pfSense 2.2-Beta or above there probably would bedynamicinGatewaycolumn of VPN entry.
Configure NAT
- Go to
Firewall>NAT - Select the
Outboundtab. - Note rules in automatically generated table.
- Select the
Manual Outbound NAT Rule Generation (AON - Advanced Outboud NAT)radio button. - Click
Save - Now you should see all the same rules ungrouped and editable. Verify presence of all seing earlier rules.
- By clicking
+icon next to the rule entry, copy every rule changing only theinterfaceto the one you created for VPN client[VPN Server name]
Note: rules for VPN interface should follow the corresponding for WAN interface. Order is crucial here. That is the reason we are not able to use «convinient»
Hybrid Outbound NAT rule generation (Automatic Outbound NAT + rules below). As it stated on the bottom of the page: «If hybrid outbound NAT is selected, mappings you specify on this page will be used, followed by the automatically generated ones.»
Note: Rule of thumb: final NAT mappings table should have 4 rules for each interface on the system except OpenVPN client’s one (eg. 4x WAN + 4x LAN) (Theoretically, you may configure more then one OpenVPN client on single pfSense, but since
“redirect-gateway def1”option redirects all the traffic, I don’t believe in success of such setups).
Configure firewall:
From this moment you use Firewall rules to direct traffic from your IPs/networks/interfaces to either WAN gateway (for direct ISP connection) or VPN client gateway for VPN access.
I especially do not define any steps for further configuration because some pfSense version behave little bit different here and everyone’s setup would be different, so you should play a bit with rules, learn how they affect your network and you will be rewarded eventually with pretty good skills and understanding of the whole picture.
Source: Setup pfSense as an OpenVPN client for specific devices by Tai Toh
So, I started integrating the VPN category and its topics into my blog, you should find the section added to the main menu in the top while pfSense is the backbone for routing on my own Homelab and that’s why I have a lot of experience in this field
Correspondingly, as an openning for the series we started with explaing how to set up an OpenVPN server on Linux along with client configuration for different operating systems.
This time around, we will go ahead and explain how to configure a pfSense firewall as client for a server running OpenVPN which is going to let every device connecting to the router to be a part of the VPN private network, thus having the same public IP as the hosting server instead.
Advantages of OpenVPN Client on pfSense
In fact, you can configure any device as an OpenVPN cient for a VPN server, but if you already have all of your devices connected to a central pfSense router, you can utilize that conveniently.
It would definitely make sense to set the firewall itself to be configured as the sole OpenVPN client and let it handle session management to the server instead, here’s a couple of advanatges for that setup.
- You can assign a public static IP address to your pfSense router matching the VPN server.
- You can bypass the Carrier Grade NAT (CGN or CGNAT) restrictions which enables you to host your own services from home.
- You can connect multiple clients to an OpenVPN service and only use a single session, especially when the server has a limit on the number of sessions available.
- You don’t need to bother with OpenVPN configuration for each client but only configure the router once.
- Some client devices may not have the ability to be configured as an OpenVPN client which is irrelevant in this case.
I don’t even think the list ends here, many people will want to use VPN to hide and protect their identity. There’s no limit for the possibilities, you can always define your own and find a purpose.
Configure OpenVPN Certificates on pfSense
On one hand, if you have previously followed our tutorial to set up your own OpenVPN server then you should know by now that the end result for client configuration is an «.ovpn» file which contains all the certificates and authentication keys needed.
In the other hand, if your are using a public VPN provider that’s internally using OpenVPN to provide users with the service then again the result is the same, go ahead and refer to that «.ovpn» file, it doesn’t matter.
There’s a section called Certificate Manager on pfSense panel which you can find by navigating to System > Cert. Manager and you sould have your browser pointing to there by now to start.
Add CA Certificate
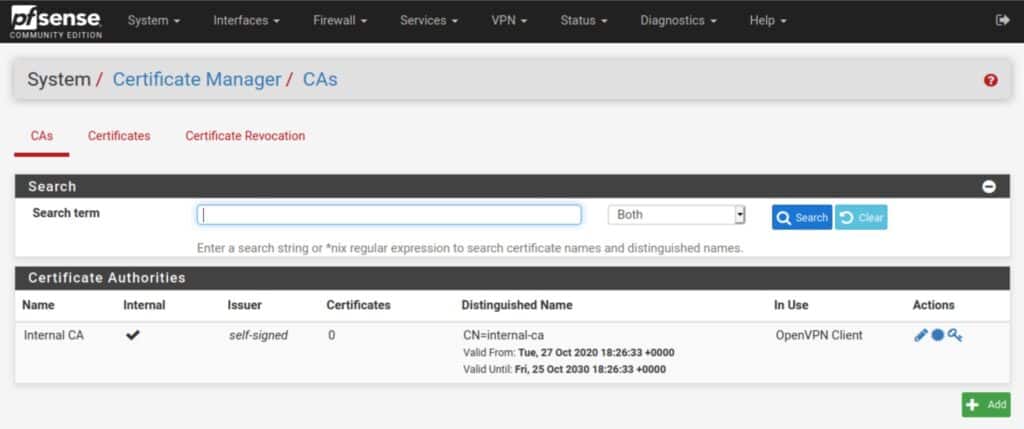
From the Certificate Manager, navigate to the CAs tab and press on the green Add button to add a new CA certificate.
Once clicked, you will find multiple input fields so just define your VPN service provider name in the «Descriptive name» field and change «Method» to Import an existing Certificate Authority so we can insert the certificate data.
Now, from the «.ovpn» file provided to you as client, copy everything in between the openning <ca> and closing </ca> tags and paste that into the «Certificate data» field then just press on the blue Save button.
Add Client Certificate
The instructions are almost the same for this as well, but this time navigate to the Certificates tab and from there press on the green Add button to add a new certificate.
Then again, once clicked you will find multiple fields so just define your VPN service provider name in the «Descriptive name» field and change «Method» to Import an existing Certificate so we can insert the certificate data and its private key data as well for this particular case.
Now, from the «.ovpn» file provided to you as client, copy everything in between the openning <cert> and closing </cert> tags and paste that into the «Certificate data» field.
Additionally, copy everything in between the openning <key> and closing </key> tags and paste that into the «Private key data» field, now you can safely press on the blue Save button to save the certificate.
Configure OpenVPN Client on pfSense
In order to successfully configure and authenticate an OpenVPN client on pfSense you must have all certificates correctly added and configured into the Certificate Manager as expained above, so make sure everything is set to proceed.
Add Client
Apparently, it’s simple to add and configure pfSense as an OpenVPN client, from the main menu just naviage to VPN > OpenVPN > Clients and once you arrive at Clients tab, you have to press on the green Add button.
Configure Client
You should now be presented with a set of options to configure the OpenVPN client and those should match the configurtion on the server, if you have followed our tutorial it would be pretty much standard options otherwise you might have to slightly change some options to match the configuration given specifically by your VPN service provider.
NOTE:
You should keep all settings presented in their default values except for the ones that will be mentioned to be changed down below.
In fact, you don’t have to worry much about it because once you acquire the «.ovpn» file it should contain all the information needed to do so, lets start.
- Server host or address: Change this to the IP address or the hostname for the VPN service provider.
- Description: You can change this to the name of the VPN service provider.
- Automatically generate a TLS Key: Untick this option then find what’s in between the openning
<tls-crypt>and closing</tls-crypt>tags and insert that key into the TLS Key field. - TLS Key Usage Mode: Change this to «TLS Encryption and Authentication» from the drop-down listed options.
- TLS keydir direction: Change this to «Both directions» from the drop-down listed options.
- Peer Certificate Authority: Select the CA certificate that we previously configured right from the drop-down listed options.
- Client Certificate: Select the Client certificate that we previously configured right from the drop-down listed options.
- Encryption Algorithm: Select «AES-256-CBC» right from the drop-down listed options unless for some reason confiugred differently by your VPN service provider.
- Enable Negotiable Cryptographic Parameters: Untick this option unless for some reason required by your VPN service provider.
- Auth digest algorithm: Select «SHA512» right from the drop-down listed options unless configured differently by your VPN service provider.
- Use fast I/O operations with UDP writes to tun/tap: I recommend ticking this option on.
- Gateway creation: I recommend ticking «Both» from the options available.
Normally, these steps are everything you need to follow in order to fully configure OpenVPN client for pfSense especially if you have used an installation script on the server.
You might need to do a little more or change few options in some cases, when required specifically by your VPN service provider.
Configure VPN Interface on pfSense
Assuming you have corretly configured the OpenVPN client on pfSense, we can now proceed to adding the VPN interface.
Add VPN Interface
Now, if you navigate to Interfaces > Assignments you should see that there’s a new interface called «ovpnc1» available to be added.
You have to go ahead and click «Add Interface» then just give it a name in the «Description» field, simply use «VPN» and save it.
Configure Outbound NAT
You have to allow mapping of the VPN interface through the firewall, so navigate to Firewall > NAT > Outbound and follow instructions.
Once your arrive at the Outbound tab change Mode to «Manual Outbound NAT rule generation. (AON — Advanced Outbound NAT)» from the options available.
Now, if you look under «Mappings» you will find entries originally created for the WAN interface, you have to similarly re-create every entry but this time for the VPN interface we have just added.
The easiest way is to use the second option beside every entry from «Actions» column, this will duplicate any entry you want, the only thing you have to change is the interface from «WAN» to «VPN» when duplicated.
Verify Connectivity
There’re two methods, you can refer to the «Interfaces» widget available on the pfSense dashboard, if you can see that VPN interface is up and has acquired an IP address on the VPN private nework, that means everything is well.
Alternatively, I think it’s more convient by navigating to Status > OpenVPN then just check whether the service is alive with Virtual Address and Remote Host assigned correctly as you would expect matching the server.