
Среди часто используемых для настройки системы Windows можно выделить «Параметры быстродействия», где пользователю доступна возможность изменения настроек визуальных эффектов, файла подкачки, предотвращения выполнения данных (DEP). Однако, не все пользователи знают, где находятся эти параметры.
В этой инструкции для начинающих подробно о способах открыть «Параметры быстродействия» в Windows 11 и Windows 10.
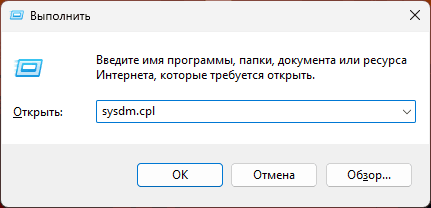
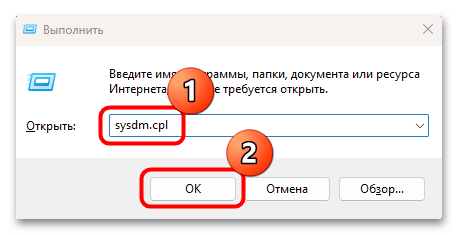
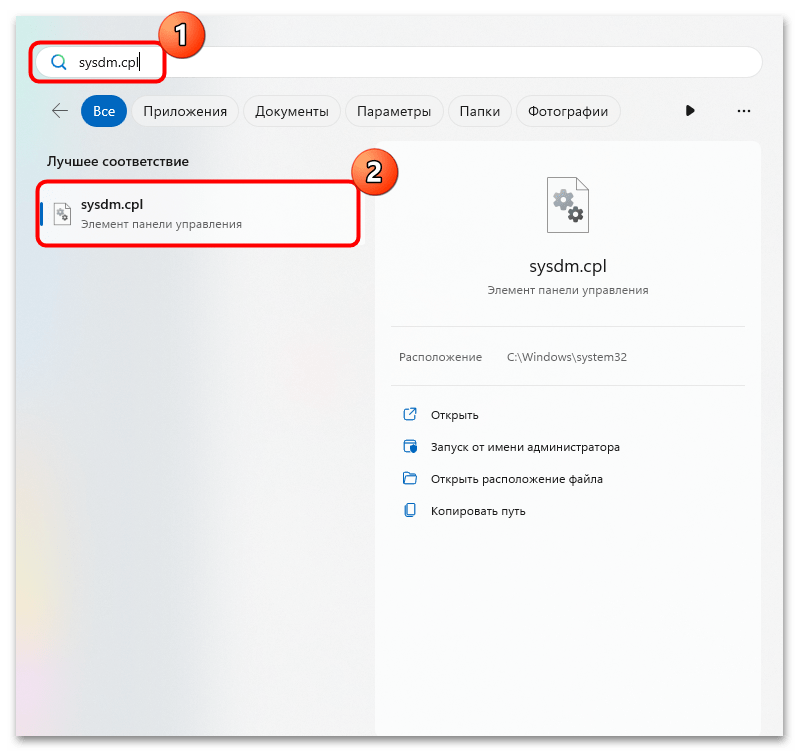
Диалоговое окно «Выполнить» (Win+R)
Возможно, самый быстрый способ открыть параметры быстродействия — использовать диалоговое окно «Выполнить». Шаги будут следующими:
- Нажмите клавиши Win+R на клавиатуре, либо нажмите правой кнопкой мыши по кнопке «Пуск» и выберите пункт «Выполнить».
- Введите команду sysdm.cpl и нажмите кнопку «Ок» или клавишу Enter.

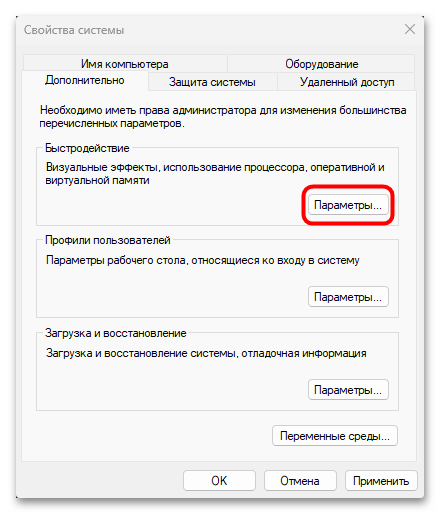
- Перейдите на вкладку «Дополнительно» в окне «Свойства системы» и нажмите кнопку «Параметры» в разделе «Быстродействие».

- Готово, вы окажетесь в нужном окне, где сможете настроить файл подкачки, включить или отключить DEP и выполнить другие действия.


Некоторые дополнительные нюансы в части использования команды, которые могут пригодиться:
- При использовании команды в виде
sysdm.cpl, 3
автоматически будет открыта вкладка «Дополнительно» в окне свойств системы.
- Команду можно использовать в командной строке, при запуске новой задачи в диспетчере задач и другими способами.
- Если требуется создание ярлыка, используйте sysdm.cpl как параметр при вызове control.exe:
control.exe sysdm.cpl
Параметры
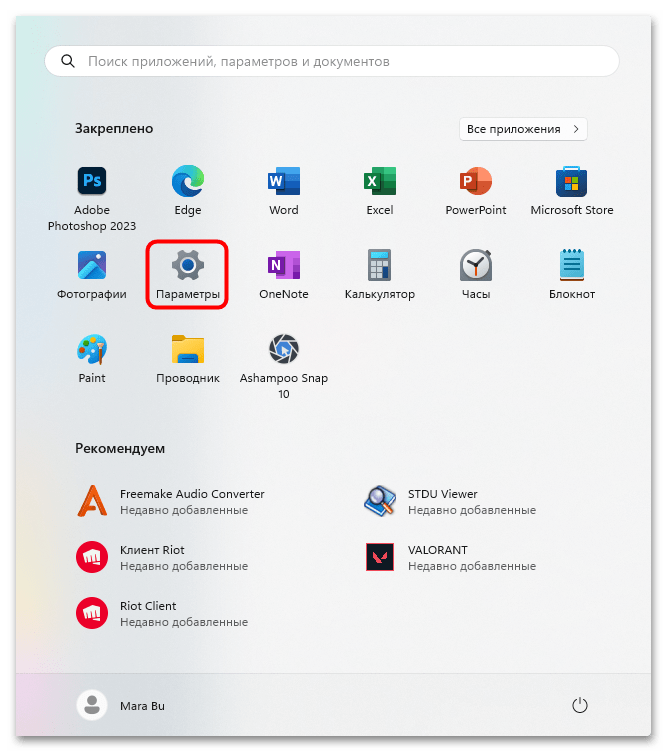
Способ попасть в нужное окно есть и в приложении «Параметры», но не очевиден.
- В Windows 11 откройте Параметры — Система — О системе и нажмите «Дополнительные параметры системы», вы попадете в окно свойств системы, где сможете открыть параметры быстродействия на вкладке «Дополнительно».

- В Windows 10 откройте Параметры — Система — О программе, нажмите «Дополнительные параметры системы» в разделе «Сопутствующие параметры», после чего перейдите в параметры быстродействия с вкладки «Дополнительно».


Это все основные способы, доступные в актуальных версиях Windows 11 и Windows 10. Остальные варианты являются вариациями приведенных выше, например: вы можете использовать поиск на панели задач для открытия sysdm.cpl, либо перейдите в раздел «Система» параметров из классической панели управления.
Windows 11 has ushered in a new era of user experience and performance enhancements, designed to cater to a wide range of computing needs—from gaming and media consumption to productivity and professional work. As with any operating system, the performance settings play a crucial role in how well your computer runs and how your resources are allocated. Optimizing these settings can lead to better speed, efficiency, and overall system responsiveness. This article will guide you on how to change performance settings on Windows 11, ensuring that you get the most out of your device.
Understanding Performance Settings
Performance settings in Windows 11 allow you to prioritize computer resources such as CPU, memory, and graphical outputs. These settings can be adjusted based on your specific needs, whether you require high performance for gaming, multimedia editing, or a balanced approach for regular use.
Why Change Performance Settings?
- Increased Speed: Adjusting settings can significantly impact your system’s speed, enabling it to handle demanding tasks more effectively.
- Better Resource Management: Tailoring settings allows for a more efficient allocation of CPU and memory resources.
- Improved Battery Life: For laptop users, optimizing performance settings can often prolong battery life, especially when using less power-hungry configurations.
- Enhanced Gaming Experience: For gaming enthusiasts, tweaking performance settings can lead to better frame rates and more stable gameplay.
- Customized User Experience: Everyone has unique computing needs and preferences; adjusting settings allows for a tailored experience.
Accessing Performance Settings in Windows 11
To change performance settings, you need to navigate through various interfaces in Windows 11. Here’s a step-by-step guide on how to access and modify these settings:
Step 1: Open the Settings App
- Click on the Start button (Windows icon) located in the taskbar.
- Select Settings from the Start menu. Alternatively, you can press Windows + I to open the Settings directly.
Step 2: Navigate to System Settings
- In the Settings window, click on System on the left sidebar.
- Look for the About section at the bottom and select it.
Step 3: Access Advanced System Settings
- Scroll down and click on Advanced system settings located under the related links on the right pane.
- A new window will pop up showing the System Properties. Under the Advanced tab, you will find the Performance section.
Step 4: Adjust Performance Options
- Click on Settings under the Performance section.
- You will be redirected to the Performance Options window, where several settings can be modified.
Modifying Performance Settings
Visual Effects
One of the most straightforward ways to improve performance is by adjusting the visual effects of Windows 11:
- In the Performance Options window, navigate to the Visual Effects tab.
- Here, you will find several options. You can choose from:
- Let Windows choose what’s best for my computer: This will automatically adjust the settings based on your system configuration.
- Adjust for best appearance: This will enable all visual effects, which may hinder performance.
- Adjust for best performance: This will disable all visual effects, providing the best performance.
- Custom: You can selectively toggle specific visual effects on or off according to your preference.
For optimizing performance, it is generally recommended to choose either «Adjust for best performance» or manually select which visual effects to disable.
Processor Scheduling
Processor scheduling determines how Windows allocates CPU time between foreground and background processes. To adjust this setting:
- Still within the Performance Options window, navigate to the Advanced tab.
- Under Processor scheduling, choose Adjust for best performance of: and select either:
- Programs: Prioritizes foreground applications for a smoother user experience.
- Background services: Optimizes the performance for services and applications running in the background.
Virtual Memory Settings
Virtual memory allows Windows to use disk space to supplement RAM, which can be useful when your system runs low on physical memory.
- In the Performance Options, go to the Advanced tab.
- Click on Change under the Virtual memory section.
- Uncheck Automatically manage paging file size for all drives to customize settings for your specific needs.
- You can choose to set a custom size for the paging file or allow Windows to manage it automatically. Setting a custom size may yield better results in specific scenarios, but make sure you have enough disk space.
Disable Background Apps
Background applications can consume resources and slow down performance. To manage which apps can run in the background:
- Again, in the Settings app, navigate to Privacy & security.
- Select Background apps.
- From here, you can turn off toggles for apps you don’t want running in the background.
Power Plan Settings
Windows 11 features different power plans that can significantly influence system performance. To change these settings:
- Search for Control Panel in the Start menu and open it.
- Click on Hardware and Sound and then select Power Options.
- Choose a power plan that best suits your usage:
- Balanced (recommended): Offers a mix of performance and energy savings.
- High performance: Maximizes performance but may use more energy.
- Power saver: Reduces performance to save energy, extending battery life on laptops.
Gaming Performance Settings
For gamers, optimizing settings in Windows 11 can lead to a seamless gaming experience:
- Go to Settings and select Gaming.
- Under Game Mode, ensure it is enabled. Game Mode helps prioritize gaming resources.
- In the Graphics section, you can set graphics preferences for individual applications. Here, you can choose between Power Saving and High Performance modes for specific games, especially if they are demanding.
Storage Sense
Storage Sense helps manage storage automatically, thus improving performance by freeing up space:
- Go to Settings and select System.
- Click on Storage and enable Storage Sense.
- You can schedule it to run periodically or manually trigger it to clear temporary files and unused content.
Windows Updates
Keeping your system updated is crucial for performance and security benefits. To check for updates:
- Open Settings and select Windows Update.
- Click on Check for updates and install any available updates.
Conclusion
Optimizing performance settings on Windows 11 not only enhances the responsiveness and speed of your machine, but it can also enrich your overall user experience. By understanding where to access these settings and how to modify them, you can tailor your computing environment to meet your specific needs—whether for work, gaming, or everyday use.
Make sure to regularly review your settings and tweak them based on your current activities and resource requirements. Windows 11 offers a plethora of tools and settings to help you maintain an efficient and high-performance computing experience.
By systematically adjusting the visual effects, scheduling preferences, virtual memory, power plans, background applications, and other related settings, you ensure that your system operates at peak efficiency, empowering you to achieve more without the frustration of lag.
Remember: the best performance settings are those that are specifically tailored to your unique usage patterns. Take the time to experiment with the various options available, and customize your performance settings to match the way you use your device. Enjoy exploring all that Windows 11 has to offer while ensuring that your system runs as smoothly as possible.
Все способы:
- Способ 1: Окно «Выполнить»
- Способ 2: Штатные «Параметры»
- Способ 3: Классическая «Панель управления»
- Способ 4: Строка системного поиска / поиск в «Пуске»
- Способ 5: «Диспетчер задач»
- Способ 6: Консоль
- Вопросы и ответы: 0
Способ 1: Окно «Выполнить»
Один из самых быстрых и простых способов открыть раздел с настройками быстродействия в Windows 11 – это непосредственный запуск окна «Свойства о системе», откуда, в свою очередь, можно перейти в необходимый раздел.
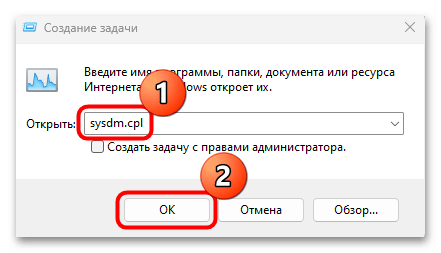
- Одновременно нажмите на клавиши «Win + R» для вызова диалогового окна «Выполнить». В текстовом поле введите запрос
sysdm.cplи нажмите на кнопку «ОК» или клавишу «Enter». - Вы попадете в «Свойства системы», где переключитесь на вкладку «Дополнительно».
- В блоке «Быстродействие» нажмите на кнопку «Параметры», после чего вас станут доступны все параметры быстродействия.

Следует отметить, что переход в раздел «Быстродействие» во всех случаях происходит через окно «Свойства системы». Способов открыть его есть несколько, о чем мы поговорим ниже. Но, чтобы не повторятся каждый раз, запомните Шаги 3-4 из инструкции выше, поскольку при разборе всех методов вы попадете в окно «Свойства системы», после чего нужно действовать аналогичным образом (вкладка «Дополнительно» и кнопка «Параметры» в блоке «Быстродействие»).
Способ 2: Штатные «Параметры»
Еще один метод попасть в «Свойства системы», откуда можно перейти к параметрам быстродействия, это предустановленное средство с настройками ОС – «Параметры»:
- Нажмите на кнопку «Пуск» и в главном меню найдите приложение «Параметры» — значок в виде шестерни.
- На вкладке «Система» пролистайте список разделов, расположенный в центральной части окна, и выберите «О системе».
- Под блоком «Характеристики устройства» кликните по ссылке «Дополнительные параметры системы».
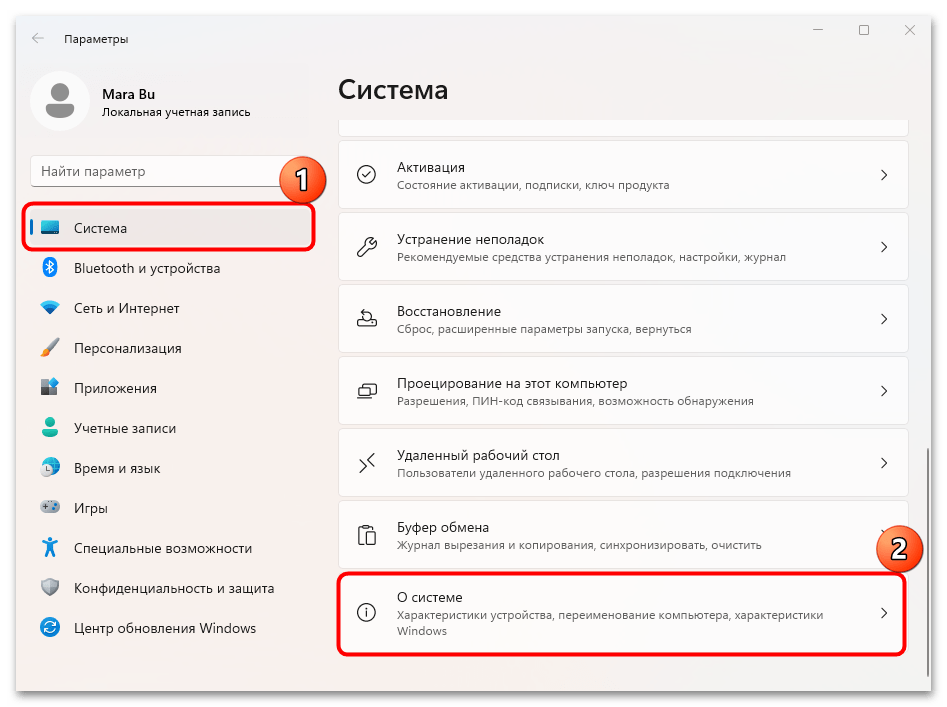
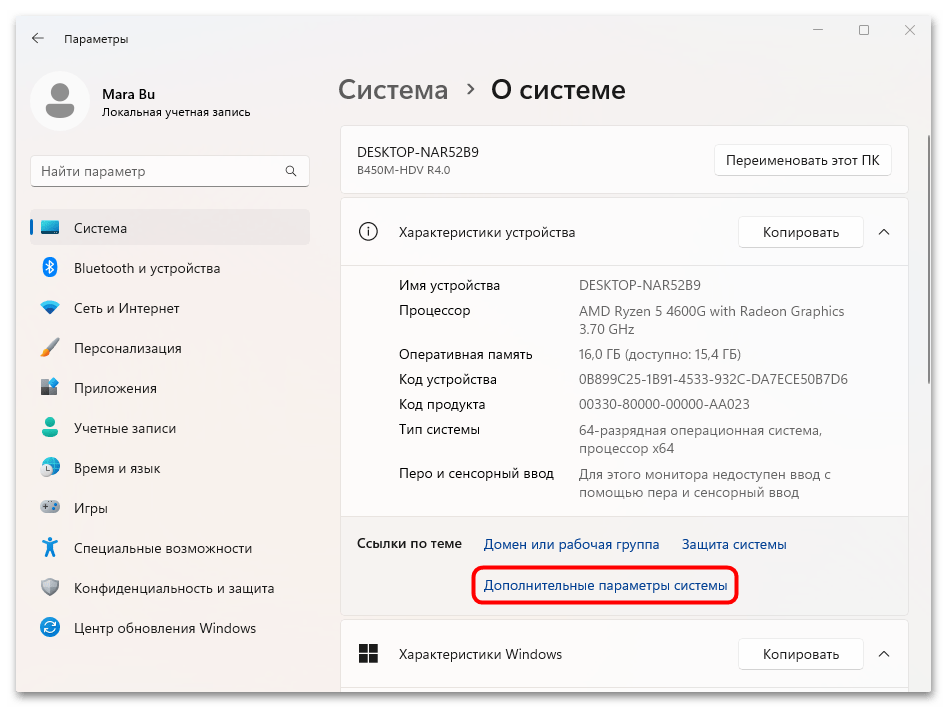
Как уже говорилось в статье, появится окошко «Свойства системы», после чего нужно проделать Шаги 3 и 4 из Способа 1.
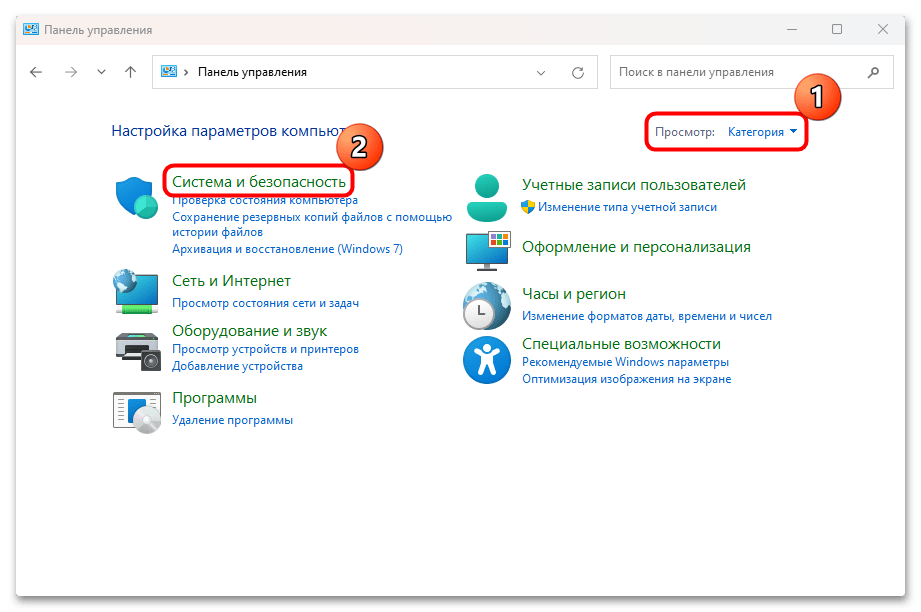
Способ 3: Классическая «Панель управления»
В Windows 11 до сих пор присутствует классическая «Панель управления», которая была свойственна более ранним операционным системам. Через нее также можно перейти к параметрам быстродействия:
- Отыщите в главном меню «Панель управления». Также можно использовать строку системного поиска или запрос
controlв диалоговом окне «Выполнить» (клавиши «Win + R»). - В качестве просмотра разделов для удобства выставьте «Категория», затем нажмите на раздел «Система и безопасность».
- В подразделе «Система» кликните по этому подзаголовку либо по ссылке «Просмотр имени этого компьютера».

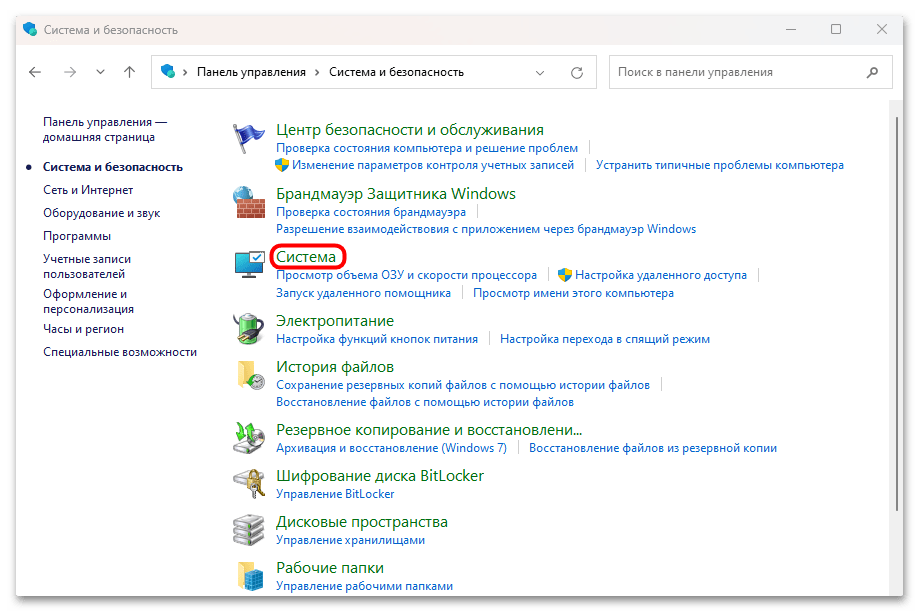
Далее запустится раздел «О системе» штатных «Параметров», откуда нужно перейти по ссылке «Дополнительные параметры системы».
Способ 4: Строка системного поиска / поиск в «Пуске»
Поскольку напрямую отыскать раздел с параметрами быстродействия нет возможности, попробуйте использовать строку системного поиска для открытия окна «Свойства системы». Для этого достаточно в поисковой строке либо в открытом «Пуске» написать запрос sysdm.cpl, в результате чего ниже отобразится список результатов. Кликните по строке с элементом «Панели управления».
Способ 5: «Диспетчер задач»
Как известно, «Диспетчер задач» — утилита для просмотра и управления запущенными процессами, а также для мониторинга потребляемых ресурсов. Кроме этого, в ней есть возможность вручную запускать различные процессы и приложения, зная определенные команды. В случае с параметрами быстродействия в Windows 11 действовать нужно следующим образом:
- Кликните правой кнопкой мыши по панели внизу и выберите «Диспетчер задач».
- Нажмите на кнопку «Запустить новую задачу».
- В текстовом поле «Открыть» введите
sysdm.cplи нажмите на кнопку «ОК».


При необходимости можно создать новую задачу с правами администратора, если отметить соответствующую опцию под запросом.
Способ 6: Консоль
Принцип действия с консолью похож на предыдущий способ – используя определенную команду, вам удастся запустить новый процесс, то есть окно «Свойства системы», откуда совершается переход к параметрам быстродействия.
- Запустите «Терминал» или «Windows PowerShell», отыскав одну из консолей в главном меню или с помощью поиска системы. Также можете нажать правой кнопкой мышки по «Пуску» и из меню выбрать нужный пункт.
- Вставьте команду
sysdm.cplи нажмите на клавишу «Enter», чтобы выполнить ее.
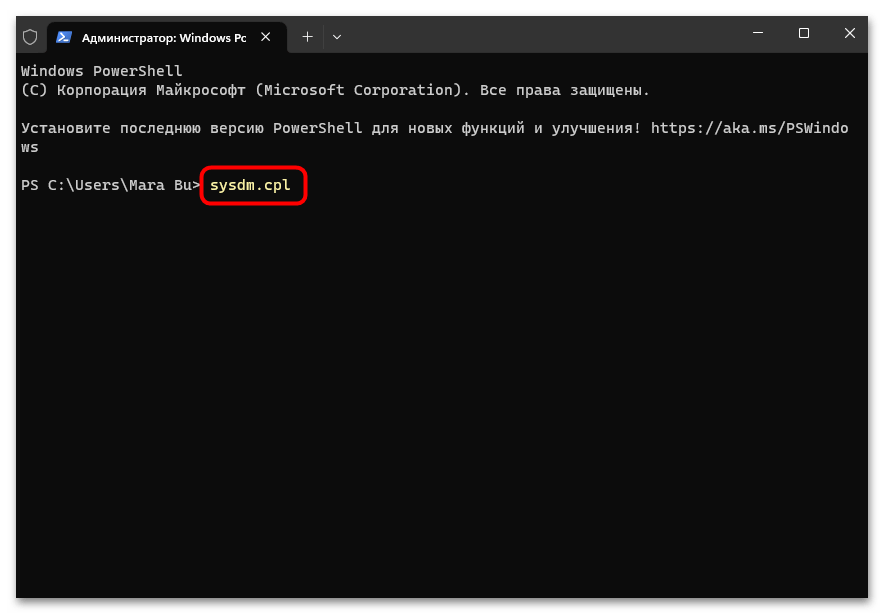
После этого откроется окно «Свойства системы», а запущенную консоль можно закрыть.
Наша группа в TelegramПолезные советы и помощь
Windows 11, with its sleek design and improved features, offers a wide range of tools to help users optimize their system performance. One of the key features that can help enhance your computing experience is the Performance Options settings. This section of Windows allows you to adjust various visual effects, processor scheduling, and memory usage to ensure your computer runs as efficiently as possible. In this article, we’ll explore how to open these Performance Options in Windows 11, along with other optimizations you can make for improved performance.
Understanding Performance Options
Before we dive into the steps to access Performance Options, let’s briefly discuss what they are and why they matter.
Performance Options in Windows essentially allow you to customize how your computer manages its resources. This can include:
- Visual Effects: Adjusting the amount of graphic enhancements, like animations and shadows, which can significantly affect performance on lower-end machines.
- Processor Scheduling: Configuring how the operating system prioritizes foreground and background processes.
- Virtual Memory: Modifying the size and allocation of your paging file, which acts as additional RAM, particularly useful for systems with limited physical memory.
By fine-tuning these options, you can improve the overall responsiveness and capability of your device. This is particularly beneficial for gamers, graphic designers, and anyone using resource-intensive applications.
Opening Performance Options in Windows 11
Method 1: Through System Properties
-
Press Windows + X: This shortcut opens the Quick Link menu.
-
Select System: Click on the «System» option, which will direct you to the settings page.
-
Scroll Down to About: On the left-hand side, look for «About.» Click on it to access information about your system.
-
Advanced System Settings: Under «Related settings» on the right panel, click on «Advanced system settings.» This will open the System Properties window.
-
Performance Settings: In the «System Properties» dialog, click on the «Settings» button under the Performance section. A new window will pop up containing various performance settings.
Method 2: Using the Run Command
-
Open Run Dialog: Press
Windows + Rto open the Run dialog. -
Type the Command: Enter
SystemPropertiesPerformanceand hitEnter. This command will directly take you to the Performance Options dialog. -
Adjust Settings: From here, you can tweak the visual effects, processor scheduling, and memory usage as necessary.
Method 3: Through Control Panel
-
Open Control Panel: Search for «Control Panel» in the Start menu and open it.
-
View by: Set the “View by” option to «Large icons» or «Small icons» for easier navigation.
-
Select System: Click on the “System” icon.
-
Advanced System Settings: On the left sidebar, click on «Advanced system settings.»
-
Performance Settings: Again, under the «Performance» section, click «Settings» to access the Performance Options.
Method 4: Direct Access through Settings App
With recent updates in Windows 11, Microsoft has integrated many system settings directly into the Settings app.
-
Open Settings: Click on the Start menu and select the gear icon to open Settings, or you can press
Windows + I. -
System: In the left sidebar, click on «System.»
-
About: Scroll down and select «About» from the list.
-
Advances System Settings: In the right pane, scroll down to find the «Related links» section and click on «Advanced system settings.»
-
Adjust Performance: Finally, click on the “Settings” button under Performance. This will bring up the Performance Options window.
Configuring Performance Options
Once you’ve accessed Performance Options, you can proceed to optimize your computer’s performance. Here’s an in-depth look at the various settings you can configure:
Adjust for Best Performance
-
Visual Effects: In the Performance Options window, you will see a section titled “Visual Effects.” Windows 11 comes with a plethora of visual enhancements. If your system is low on resources, you can select “Adjust for best performance,” which turns off all animations and shadows.
-
Custom Settings: Alternatively, you can select “Custom” and manually pick which visual effects you want to keep enabled or disable. For instance:
- Uncheck options like “Animate windows when minimizing and maximizing” or “Show shadows under mouse pointer” for improved performance.
Processor Scheduling
The Processor Scheduling tab allows you to decide how the CPU prioritizes processes.
-
Options Available: You can select between “Programs” (which gives priority to the programs you’re actively using) or “Background services” (which prioritizes services that run behind the scenes).
-
Recommendation: For general use, “Programs” is the recommended option, but if you’re running server applications or background services, you might want to switch to “Background services.”
Virtual Memory
Virtual Memory acts as a bridge between your RAM and storage disk. Adjusting it can enhance performance.
-
Change Settings: Click on the “Advanced” tab, then under the Virtual Memory section, click on “Change.”
-
Automatically Manage: You can uncheck «Automatically manage paging file size for all drives.»
-
Set Custom Size: Select your drive, then set a custom size according to your needs:
- Initial Size: Should typically be set to your RAM size.
- Maximum Size: Set this to double your RAM size.
-
Apply Settings: After adjusting these settings, be sure to click «OK» and then restart your computer for changes to take effect.
Data Execution Prevention (DEP)
Data Execution Prevention helps protect your system by preventing code execution from non-executable memory regions.
-
Accessing DEP Settings: In the Performance Options window, navigate to the “Data Execution Prevention” tab.
-
Choosing Settings: You can either enable DEP for essential Windows programs and services only, or you can choose to turn it on for all programs except those you manually select.
-
Apply and Restart: After modifying these settings, don’t forget to click «OK» and restart the computer.
Additional Performance Tuning Tips
While accessing the Performance Options is critical, improving the overall performance of your Windows 11 system also involves other considerations. Here are some additional tips:
Keep Windows Updated
Ensure your Windows 11 is up-to-date. Regular updates can help fix bugs, security vulnerabilities, and improve performance.
- Update Windows: Go to Settings → Windows Update and check for updates.
Disable Unnecessary Startup Programs
Too many applications starting up when you boot can slow down your system.
-
Open Task Manager: Right-click the Taskbar and select «Task Manager.»
-
Startup Tab: Navigate to the “Startup” tab, then disable any unnecessary programs.
Optimize Your Hard Drive
-
Defragmentation: Type «Defragment and Optimize Drives» in the Start menu to open the optimization tool.
-
Analyze and Optimize: Select your hard drive and click the «Optimize» button to reorganize data on your disks for improved speed.
Clean Up Disk Space
Use the built-in Disk Cleanup tool or a third-party application to remove unnecessary files that may be clogging your hard drive.
- Disk Cleanup: Search for “Disk Cleanup” in the Start menu, select the drive you want to clean, and follow the prompts to remove unneeded files.
Adjust Power Options
For laptops and desktops, adjusting the power plan can also affect performance.
- High Performance Plan: Go to Settings → System → Power & battery, and make sure you are using the High Performance option, especially when performing resource-intensive tasks.
Uninstall Unused Programs
Freeing up resources by uninstalling programs you no longer use can help optimize performance.
- Uninstall: Go to Settings → Apps → Apps & features, and remove any software you don’t need.
Check for Malware
Malware can significantly impede performance.
- Run a Scan: Use Windows Defender or any robust third-party antivirus to check for and remove any malicious software.
Monitor Hardware Performance
Use the Task Manager to monitor CPU, memory, disk, and GPU usage.
- Open Task Manager and click on the “Performance” tab. This can help identify any resource-hogging applications.
Conclusion
Optimizing your system through Performance Options in Windows 11 is a crucial part of ensuring that you can make the most out of your computing experience. Whether you need your computer for gaming, professional work, or just everyday tasks, configuring these settings can make a noticeable difference in the efficiency of your system.
By following the steps outlined in this guide, you will be able to manage visual effects, processor scheduling, and virtual memory. Additionally, incorporating other performance-enhancing practices such as keeping your system updated, optimizing startup programs, and monitoring hardware performance will result in a smoother and faster computing experience.
Remember, an efficiently running system not only enhances performance but also extends the lifespan of your hardware. Engage with these options regularly to maintain optimal conditions for your Windows 11 device.
How to Open Performance Options in Windows 11
Windows 11 introduces several new features and optimizations that aim to improve user experience, including an overall enhancement in performance. Knowing how to access performance options and tweak them can significantly impact the speed and efficiency of your system. This article will explore the detailed steps to open and configure performance options in Windows 11, including how to manage visuals for better performance, adjust processor scheduling, and implement system-level enhancements that can help streamline your computing experience.
Introduction to Performance Options
Performance options in Windows allow users to customize and optimize their PC settings to enhance speed and responsiveness, especially for resource-intensive tasks like gaming, video editing, and multitasking. Windows 11, with its sleek design and innovative features, still requires occasional adjustments to performance settings to ensure it runs smoothly according to individual usage patterns.
The Importance of Performance Options
Before diving into the steps to access performance options, it’s essential to understand why adjusting these settings is crucial. Performance settings can help in:
- Improving System Responsiveness: Optimizing visual effects and services can lead to a more responsive system, especially for older hardware.
- Enhancing Gaming Experience: Gamers often seek higher frame rates and lower input lag, which can be achieved by adjusting performance settings.
- Multi-Tasking Efficiency: For power users who run numerous applications at once, managing processor scheduling and virtual memory can lead to seamless performance.
- Extending Hardware Lifespan: Efficient usage of system resources minimizes wear and tear on hardware components.
Opening Performance Options in Windows 11
Method 1: Through System Properties
-
Access the Run Dialog:
- Press
Win + Ron your keyboard. This opens the Run dialog box.
- Press
-
Type «sysdm.cpl»:
- Enter
sysdm.cplin the box and hitEnter. This will open the System Properties window.
- Enter
-
Go to the Performance Tab:
- In the System Properties window, navigate to the “Advanced” tab. Here, you’ll find the Performance section.
- Click on the “Settings” button under the Performance category.
-
Performance Options Window:
- The Performance Options window will appear, with several tabs and options for adjusting settings.
Method 2: Using Windows Settings
-
Open Windows Settings:
- Click on the Start menu or press the
Windowskey, and select the Settings icon (a gear symbol).
- Click on the Start menu or press the
-
Navigate to System:
- In the Settings menu, click on “System.”
-
About Section:
- Scroll down and find the “About” section on the left-hand sidebar.
-
Advanced System Settings:
- Scroll down to the “Related settings” section and select “Advanced system settings.” This action will prompt the System Properties window to open.
-
Access Performance Settings:
- From here, follow the steps similar to Method 1 to reach the Performance Options window.
Configuring Performance Options
Now that you have accessed the Performance Options window, let’s dive into the components you can adjust to improve your system’s performance.
1. Visual Effects
The Visual Effects tab allows you to control graphical features that can impact system speed. There are several options to choose from:
- Let Windows Choose What’s Best for My Computer: This option allows Windows to automatically select settings based on your system configuration.
- Adjust for Best Appearance: This option enables all visual effects for the most aesthetically pleasing experience.
- Adjust for Best Performance: Selecting this will disable many visual effects to enhance system performance. It’s ideal for older systems or those looking for maximum speed.
- Custom: You can manually select which visual effects to enable or disable. Common adjustments include:
- Animations in the taskbar and windows
- Transparency effects
- Shadow effects for icons
To customize visual effects:
- Select “Custom” and check or uncheck the options based on your preference.
- Click “Apply” to save the changes.
2. Processor Scheduling
Under the “Advanced” tab within Performance Options, you can adjust how Windows 11 allocates processor resources.
- Programs: Optimize performance for programs when it is selected. This setting ensures that applications you actively use get the CPU resources needed for optimal performance.
- Background Services: Select this option if you run services in the background that require processor resources, such as servers or complex tasks.
Adjusting processor scheduling can make a significant difference, especially if you work with resource-heavy applications.
3. Virtual Memory
Virtual Memory acts as an additional resource for your RAM. It is located on your hard drive and can be configured based on your system’s needs.
- Click on the «Advanced» tab in Performance Options.
- Under the Virtual Memory section, click on “Change.”
You’ll see options for automatic and custom settings for managing virtual memory. Here’s how to set it up:
- Uncheck the box labeled “Automatically manage paging file size for all drives.”
- Select a drive, and choose “Custom size” to set specific minimum and maximum values, or use the “System managed size” option for Windows to determine the best size automatically.
- Keep in mind that increasing page file size can sometimes help with system performance, but it also consumes disk space.
After adjusting virtual memory settings, click “OK,” and restart your system to apply the changes.
Additional Performance Tips
Beyond the performance options available in Windows settings, there are several additional measures you can take to enhance system performance.
1. Keeping Drivers Updated
Regularly updating your device drivers is crucial for optimal performance. Manufacturers often release updates that fix bugs and improve compatibility with the operating system. You can update drivers via:
- Device Manager: Right-click the Start button and select Device Manager. From here, you can manually update drivers by right-clicking on the device and selecting “Update driver.”
- Windows Update: Go to Settings > Update & Security > Windows Update to check for any available updates for your system.
2. System Disk Cleanup
Regularly cleaning up your disk can free up space and improve performance. Windows includes a built-in Disk Cleanup tool:
- Search for “Disk Cleanup” in the Start menu.
- Select the drive you want to clean.
- Check categories to delete, such as Temporary Files, Thumbnails, etc., and click “OK.”
3. Disabling Startup Programs
Limiting the number of programs that run at startup can free up system resources:
- Press
Ctrl + Shift + Escto open Task Manager. - Go to the “Startup” tab.
- Right-click on applications you don’t need to start with Windows and select “Disable.”
4. Regular Updates
Always keep your system updated. Windows 11 regularly provides updates that include performance improvements, security patches, and additional features. Check for updates regularly via Settings > Update & Security > Windows Update.
5. Managing Background Apps
Background applications can consume resources and slow down your system. To manage these:
- Go to Settings > Apps > Apps & features.
- Review the list of installed applications and uninstall those that you do not use.
6. Power Options
Changing the power settings can also impact performance. For high performance:
- Right-click on the Start menu and select “Power Options.”
- Click on “Additional power settings.”
- Select the “High Performance” option to maximize performance over energy savings.
Monitoring Performance
Using Windows Performance Monitor or Task Manager can help keep track of system performance and identify problematic applications:
- For Task Manager: Right-click the taskbar and select “Task Manager.” The “Performance” tab provides insights into CPU, Memory, Disk, and GPU usage.
- For Performance Monitor: Search for “Performance Monitor” in the Start menu for a more detailed analysis of system performance.
Conclusion
Optimizing performance settings in Windows 11 is essential for getting the most out of your computer. By understanding how to access and change performance options, such as visual effects and processor scheduling, you can tailor your computing experience to fit your needs. Coupled with system maintenance tips like regular updates, disk cleanup, and background application management, you can ensure that your Windows 11 runs at its best.
Whether you’re a casual user, a gamer, or someone whose daily tasks involve heavy applications, paying attention to these performance settings can lead to a more enjoyable and efficient computing experience. Tailor the settings according to your unique requirements, and periodically revisit them as system updates and personal usage evolve.