
It’s the era of network engineers, so if you’re a starter in the field of networking, gear up to enhance your skill set by learning about the monitor mode. When you analyze packets and do your penetration testing, it is essential to understand how the Wi-fi monitor mode works.
Table of Contents
Establishing a Wi-fi Connection for Monitor Mode
When you connect to a wireless network or Wi-fi, your system sends a packet to the Wi-fi device. Once the device receives the packet, it sends back an acknowledgment that confirms the establishment of the connection.
Likewise, if you want to connect to another device on the same network, the Wi-fi will send the same packet to that device.
The Basics of Monitor Mode
In Linux operating systems understanding the monitor, the mode is quite simple. You need to run a few commands that we will discuss further. But what exactly is a Wi-fi monitor mode?
There is a central device or system in the monitor mode that monitors all the packets sent to the Wi-fi over that specific network. In this mode, the Wi-fi itself doesn’t have the monitoring capability.
Effectively, the system in monitor mode receives all the packets that circulate over that network. To set your system to the monitor mode, there are three simple ways to configure it in Linux operating systems. Let’s explore these methods:
Use Airmon-ng
To use the Airmon-ng method, you will first need the aircrack-ng. Here is a quick guide:
- To install it, write the following command in your Ubuntu or Kali Linux command line:
sudo apt-get install aircrack-ng
- Once you enter the command, it will output the successful installation of the packages. Next, you need to check the Wi-fi interface. To do that, type the following command:
sudo airmon-ng
- It will display the drivers, chipset and the Wi-fi interface on the system. After checking the wi-fi interface, it’s time to check for any interfering processes. Use this command:
sude airmon-ng check
- It will display the number of processes that might potentially cause trouble in the monitor mode. So, it would help if you killed these processes by using the kill command. Type in the following:
sudo airmon-ng check kill
- The system will summarize all the processes that it has killed. It’s time for the interface to enable monitor mode. Type the following command:
sudo airmon-ng start wlp1s0
- In Kali Linux, you can enter the monitor mode on a wireless network through the ‘airmon-ng start wlan0’ command.
- As it creates a new interface, you can proceed to check it through the iwconfig command. Type the following:
iwconfig
- Now return to the original interface. Type the following command:
sudo airmon-ng stop wlp1s0mon
- You can recheck the interface by using the iwconfig command.
Use Iw Configuration Tool
Using the iw wifi configuration tool is a simple option to manage wireless network settings. It’s mainly more potent than some of the other tools. For example, you can use the same tool to obtain wifi network info, different wifi commands, wireless wlan0, bit rates, scanning, interface modes, HT, etc.
Check Interface Information
First, you must check the information of the interface. Use the following instruction:
$ sudo iw dev
Accessing Other Users’ Traffic
Next, you may need to access other users’ traffic, so you must switch to the Monitor mode. Use the following set of commands to switch to monitor mode. We will assume the interface name as wlp1s0.
$ sudo ip link set wlp1s0 down
$ sudo iw wlp1s0 set monitor control
$ sudo ip link set wlp1s0 up
You may recheck the interface by typing the following:
$ sudo iw dev
Returning to Managed Mode using the sudo ip link set
To return the mode to manage, use the following set of commands.
$ sudo ip link set wlp1so down
$ sudo iw wlp1so set type managed
$ sudo ip link set wlp1so up
Does My Wi-fi Support Monitor Mode?
One of the critical aspects of using the monitor mode is Wi-fi support. So, you must first ensure that your Wi-fi card support monitor mode. The checking method varies according to the operating system, so we will see how it works for Ubuntu Linux.
So, before you buy a new wifi adapter, let’s see if you can work with the current model.
Checking Wi-fi Support in Ubuntu Linux
Ubuntu Linux has a relatively simple way to check the mode monitor. You don’t need any additional tools. Here is how to do it:
Find the Network Interface Name
First, you must find out the wifi interface name. Go to your Linux command line and type the following command:
ip a
This command outputs all wireless and wired connections. The display will show the IP address and state of your connection. In this example, let’s assume your wifi interface name is ‘wlp1s0’.
Disable Wifi
Next, you must turn down the Wi fi network. You don’t need to switch off the wireless adapter. Instead, write this command:
sudo ip link set dev wlp1s0 down
Switch to Monitor Mode
Once you’ve set down the interface, it’s time to switch your Wi-fi card to monitor mode. Type this command.
sudo iwconfig wlp1s0 mode monitor
This command does two things. Firstly, it will verify if your wifi card supports monitor mode. Secondly, it will successfully switch your wifi to monitor mode. In case there is monitor mode support, it will give an error.
You can also double check by:
iwconfig
Alternative Managed Mode
If the previous command doesn’t run successfully, your wi-fi will switch to managed mode. Unfortunately, it also means that the monitor mode isn’t supported.
No Internet During Monitor Mode
Remember that the Wi-fi monitor mode disables the internet. So, you need to turn the way back to manage if you want to turn on the internet. Here is how to do it:
sudo iwconfig wlp1s0 mode managed
sudo ip link set dev wlp1s0 up
The Use of Monitor Mode
If you’re an ethical hacker, you need to learn how to use and enable monitor mode. It helps capture data packets to check if any wi-fi adapter or access point is left vulnerable on the line. In addition, you can access critical information about the network to enhance security and traffic using the monitor mode.
Conclusion
It doesn’t matter if you’re using mac or windows or any other operating system. Whether it’s Ethernet or wi-fi connection, monitor mode gives you a lot of power as an analyst and network manager. For example, you can configure different networks.
Now that you know how to configure your way to the monitor mode, you can efficiently analyze packet capture, configure channel settings, monitor data reception, and view all devices available on the networks.
Also, we saw how to check if your adapter supports monitor mode. So, if you find that your internet hardware peripherals support monitor mode, it will be easier for you to practice ethical hacking on your device.
Не всякий адаптер, даже современный, поддерживает это режим. Так что вопрос не совсем корректный. Обычно выбирают заранее адаптер, поддерживающий этот режим. Любой адаптер может не подойти.
Выбор операционной системы тоже имеет значение. Виндовс для этого плохо подходит. Но с программами Npcap и Wireshark можно попробовать включить этот режим. С адаптером Alfa AWUS052 может что-то получиться. Просто в Wireshark в настройках поставить галочку «Monitor Mode» и разобраться с функциями и настройками.
Гораздо лучшее решение, по мнению многих — линюкс, а не виндовс. Есть готовое решение: операционка Kali Linux. В эту операционку уже встроены необходимые программы, позволяющие оценить саму возможность конкретного адаптера работать в режиме монитора, и включить его, если это доступно.
Это если кратко. Просто направления, по которым нужно смотреть. Описания программ, особенности работы с ними, списки поддерживающих режим монитора адаптеров отдельная обширная тема. Реализация на линюксе более эффективна, но требует некоторых знаний, на виндовсе реализовать проще, но как правило есть недостатки, проистекающие из-за ограничений, заложенных в саму операционную систему производителем.
This guide will show you how to enable monitor mode on the TP-Link TL-WN722N V2/V3 WIFI Adapter.
The Steps
- Plug your TP-Link TL-WIN722N USB WiFi Adapter into your Kali Linux machine.
- Open a terminal window and type the following commands:
sudo apt update
sudo apt upgrade
- Restart the Kali Linux machine
reboot- After the machine rebooted, type:
sudo apt install linux-headers-$(uname -r)
- Type the two following commands:
sudo apt install bc -y
sudo rmmod r8188eu.ko- Clone the RealTek driver from the GitHub repository:
git clone https://github.com/aircrack-ng/rtl8188eus
cd rtl8188eus
sudo -i
echo "blacklist r8188eu" > "/etc/modprobe.d/realtek.conf"
exit
reboot
The reboot is optional here, but if you encounter any error when running the remaining commands, reboot Kali Linux and try again.
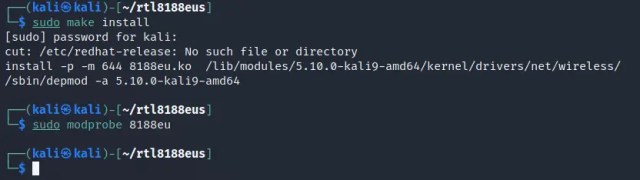
After rebooting Kali Linux, type these commands:
cd rtl8188eus
make
sudo make install
sudo modprobe 8188eu
Now, your TP-Link TL-WN722N USB WiFi Adapter can support monitor mode and packet injection.
To check it, do the following:
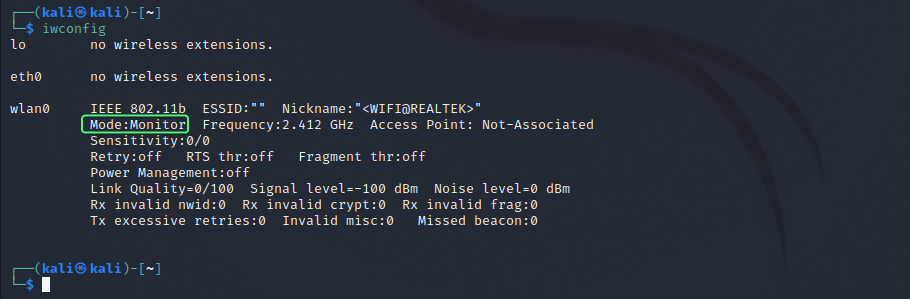
Type the iwconfig command to display the name of the wireless interface;

The wireless interface name is wlan0 and it’s on Auto mode.
To put the interface in monitor mode, type this command:

As shown in the screenshot, the TL-WN722N WiFi adapter operates now in monitor mode.
Enjoy!
Let me know in the comments if this method worked for you…
Related
In this tutorial we’ll enable monitor mode on a TP-LINK TL-WN722N V2/V3 wireless adapter, on a Kali Linux machine running on VMware or VirtualBox.
Some sources may be confusing, and lead you to believe that you can only enable monitor mode on TP-LINK TL-WN722N v1 because it has one of the required chipsets for monitor mode, Atheros AR9271, and that you can’t enable it on V2/V3. You can, however.
To start off, if you’re using a virtual machine, first you’ll have to connect your wireless adapter to your Kali Linux virtual machine.
Set up the Adapter
Next, we’ll run some commands to set up the adapter.
First update and upgrade your package index.
sudo apt update && sudo apt upgrade
Reboot your machine.
sudo reboot
Install Linux headers for your Kali Linux.
sudo apt install linux-headers-$(uname -r)
Run the following commands to install the bc package and remote the r8188eu.ko module.
sudo apt install bc
sudo rmmod r8188eu.ko
Clone the Realtek driver from the aircrack-ng Github repository.
git clone https://github.com/aircrack-ng/rtl8188eus
Run the following commands.
cd rtl8188eus
sudo -i
echo "blacklist r8188eu" > "/etc/modprobe.d/realtek.conf"
exit
reboot
After the reboot run the following commands (we have to cd back into the rtl8188eus directory that we cloned earlier):
cd rtl8188eus
make
sudo make install
sudo modprobe 8188eu
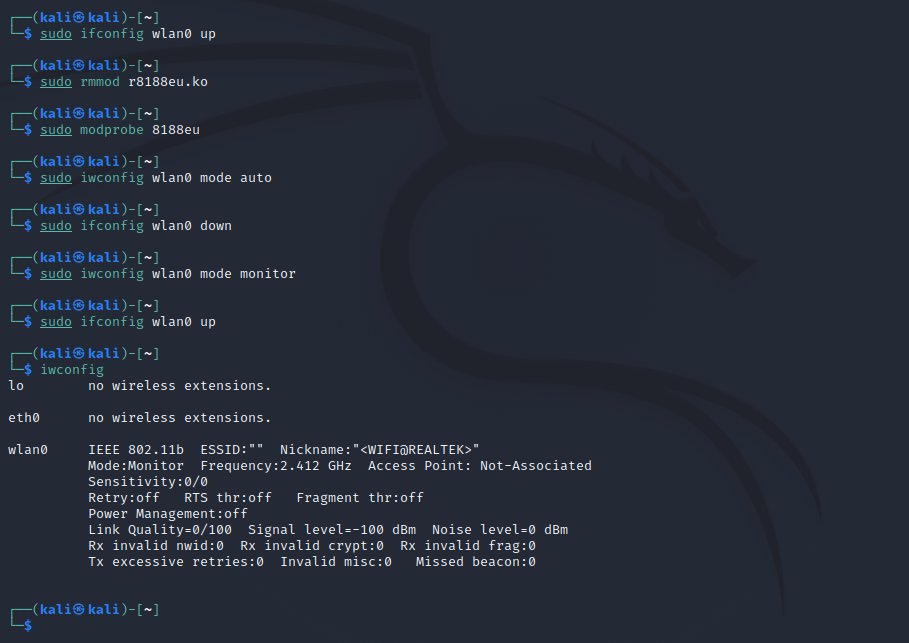
To enable monitor mode, run the following commands:
sudo ifconfig wlan0 down
sudo airmon-ng check kill
sudo iwconfig wlan0 mode monitor
sudo ifconfig wlan0 up
sudo iwconfig
Here’s the output you should be seeing. You can see that the adapter is set to Mode: Monitor.
Troubleshooting When Enabling Monitor Mode
In some cases it doesn’t work right away. For example you may get the error Error for wireless request "Set Mode" (8B06) : SET failed on device wlan0 ; Operation not permitted.
The solution that has worked for me every time is the following (credit to this Github user’s comment).
Run the following commands in this order:
sudo ifconfig wlan0 up
sudo rmmod r8188eu.ko
sudo modprobe 8188eu
sudo iwconfig wlan0 mode auto
sudo ifconfig wlan0 down
sudo iwconfig wlan0 mode monitor
sudo ifconfig wlan0 up
Now when you check iwconfig you should see the adapter is in monitor mode.
Conclusion
In this tutorial we set up a TP-LINK TL-WN722N V2/V3 adapter to run in monitor mode. If you have any issues or questions then please don’t hesitate to leave a comment. Hope this helped. Thank you.
Table of Contents
Monitor Mode (Promiscuous Mode or Listening Mode) and Native Capture Mode or Normal Mode are the two capture modes supported by the wifi cards in Windows and then we will see the differences of performing a capture in monitor mode vs. native.
While the capture in normal mode, focuses on identifying WiFi access points, in the capture in monitor mode, you can capture all WiFi packets, including data packets.
Depending on the type of capture, native or monitor mode, we will get a different level of information about our WiFi network and surrounding devices, here are the differences for each of these types of capture.
Native capture mode
It is the capture that supports any standard software that uses wifi. When monitoring using Native Capture Mode, wireless cards operate as a standard Wi-Fi adapter and uses the manufacturer’s drivers that are installed on the computer.
By using Windows native mechanisms, the wireless card only captures a certain type of Management packets, specifically Beacon packets, that are broadcasted by access points. These packets are transmitted several times per second by access points to broadcast networks that are currently available.
Acrylic Suite tools are compatible with any WiFi card on the market in native or normal capture mode, analyze and interpret these packets, displaying the information they contain and storing it in pcap files or in the current project.
To perform a native data capture, no special hardware is required, it is sufficient to have an integrated wifi or usb card.
Monitor mode
Monitor capture mode vs. native mode is a data capture mode that allows using the WiFi adapter in listening mode or promiscuous mode. Operating in this mode, WiFi network cards are able to capture all types of WiFi Management packets (including Beacon packets), Data packets and Control packets. This way, it is possible to visualize not only access points but also clients that are transmitting within WiFi frequency bands.
How to capture in monitor mode in windows.
Monitor capture on Windows can be enabled using Acrylic Wi-Fi Sniffer (802.11a/b/g/n/ac) to allow the other Acrylic Suite products to communicate with it to capture in monitor mode and also provide these capture capabilities to third party tools such as Wireshark.
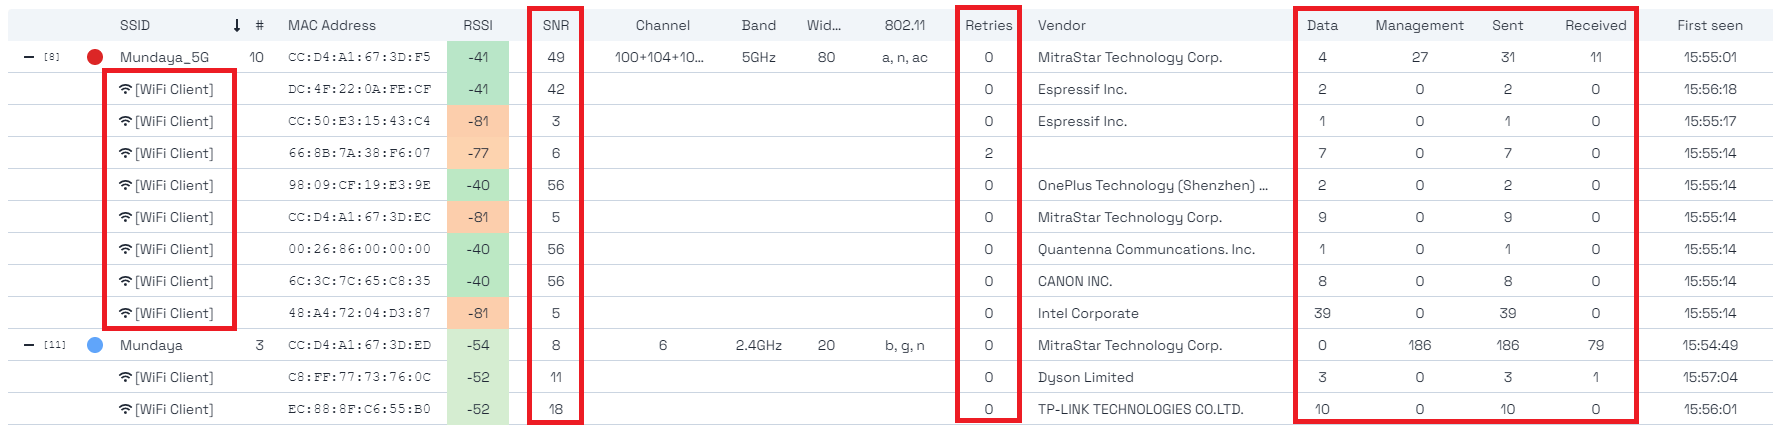
Acrylic Wi-Fi Sniffer allows monitor mode capture in a simple manner. Because it has been designed to be an easy-to-use and cost-effective alternative to use monitor mode capture in windows, it can retrieve all available data including information about SNR (Signal-to-Noise Ratio) values.
SNR is a good parameter to measure the quality of a communication since it takes into account the received signal strength and the noise present in the wireless environment. Its value varies between 0 (worst) and 100 (best) and is considered a good value above 20.
SNR is available in both Acrylic Wi-Fi Analyzer and Acrylic Wi-Fi Heatmaps through Acrylic Wi-Fi Sniffer, it also supports the latest 802.11ac standards with all channel widths (20, 40, 80 and 160 MHz).
You can check out Acrylic Wi-Fi Sniffer compatible cards.
Available information with Acrylic Wi-Fi Analyzer
Native Mode
- SSID
- MAC address
- Signal strength
- Channels
- Channel width
- Bandwidth
- IEEE 802.11
- Maximum packet transmission rate
- Encriptation type (WEP, WPA, WPA2, WPA3, WPS PIN)
- Manufacturer
- Latitude and longitude (this information is available when a GPS device is connected)
Monitor mode
While performing a data capture in monitor mode, Acrylic Wi-Fi Analyzer provides, in addition to all the information available with the normal mode capture, information about the following aspects:
- On which channels to monitor.
- Identification of the name of hidden wifi SSIDs.
- Client devices connected to the different access points (#)
- Retries of sent packets (Retries)
- Data packets (Data)
- Management packets (Mgt)
- Number of packets sent by that device.
- Number of packets received by that device.
Comparison: Monitor mode vs. native
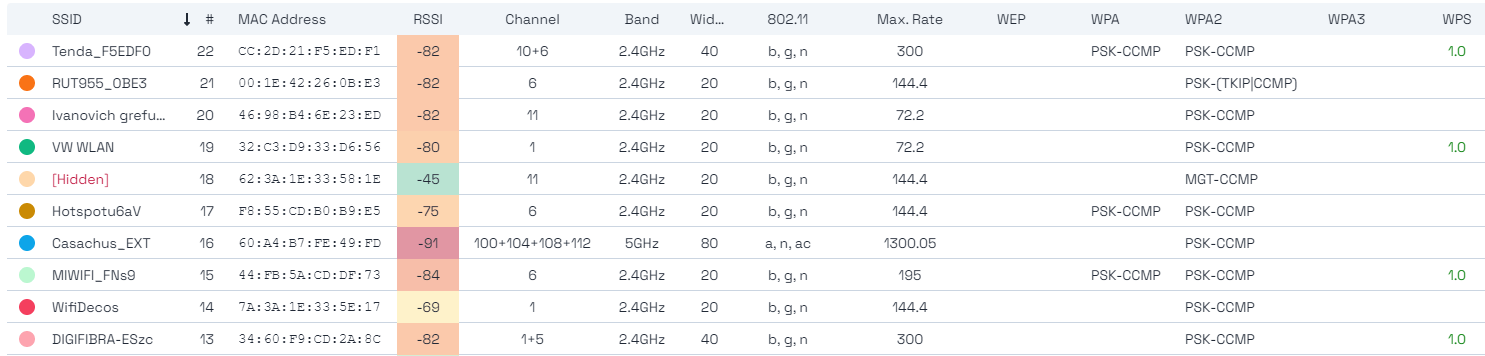
Access Point Detection
SSID, RSSI, Mac, channel, vendor,…
Geopositioning capture with Latitude and Longitude
Available when GPS is connected
Network client detection
Clients of the network you are connected to
Wifi client detection
Clients connected to any AP
Detection of any wifi device
Phones, laptops, game consoles, televisions, …
Hidden SSID name detection
Find out the name of a hidden network
Noise measurements (SNR)
Measures signal interference
Data packet capture
Detect all wifi traffic
Transmission quality metrics
Packet resending rate
Plots available in using Acrylic Wi-Fi Heatmaps
Acrylic Wi-Fi Heatmaps in addition to making use of Acrylic Wi-Fi Sniffer, has built-in support for two additional methods to make use of the monitor mode, one, as implemented by Acrylic Wi-Fi Sniffer, is the capture through a Windows NDIS driver, and the other is the use of specialized Airpcap hardware, right now both the NDIS driver and these cards are obsolete and Acrylic Wi-Fi Sniffer is the recommended alternative to Airpcap. These two methods are maintained for compatibility, but are not guaranteed to remain available in future updates.
NDIS wifi driver
The NDIS driver, besides being included in Acrylic Wi-Fi Sniffer, is also available in Acrylic Wi-Fi Heatmaps and allows capture in monitor mode for 802.11a/b/g/n and 20MHz channel widths, always depending on the card, to activate the monitor capture mode it is necessary to have a compatible card and install the driver, which can be done from the application itself.
AirPCAP card
We can also perform a capture in monitor mode using specific Wi-Fi analysis hardware, such as the AirPcap cards developed by Riverbed. These cards are currently discontinued and do not support the new 802.11ac/ax standards. They only support capture in monitor mode, they are not valid for use as conventional Wi-Fi cards. If we perform a capture in monitor mode with an AirPcap card, we will be able to display, in addition to all the data available with a capture in monitor mode using a card compatible with the NDIS driver, information about the SNR (Signal-to-Noise Ratio) values.
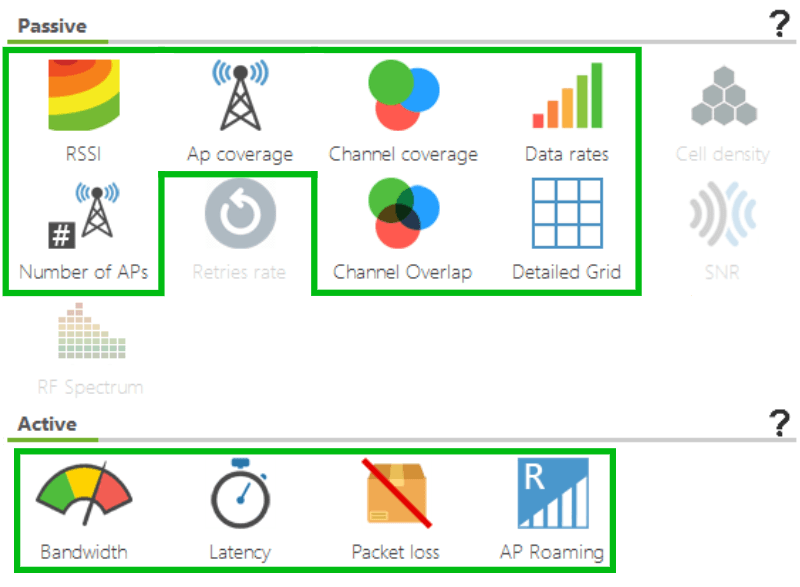
In Acrylic Wi-Fi Heatmaps, the native capture mode, compatible with all wifi cards on the market, allows generating the following charts and diagrams (plots).
- RSSI Wifi heatmap (Signal strength)
- AP coverage
- Channel coverage,
- Maximum transmission rates supported
- Number of APs
- Channel overlapping
- Cell-grouped data
- Bandwidth*
- Latency*
- Packet loss*
- Roaming*
*Plots available when performing an active site survey.
Native
NDIS
Airpcap
Acrylic Wi-Fi Sniffer
Coverage per access point
Maximum transfer rates supported
Device density
Number of wifi clients
Interference, signal-to-noise ratio
SNR
Capture on latest 802.11 standards
802.11 a/b/g/n/ac, widths 20,40,80,160MHz
Normal Mode
Charts available when capturing in native mode:
Monitor Mode
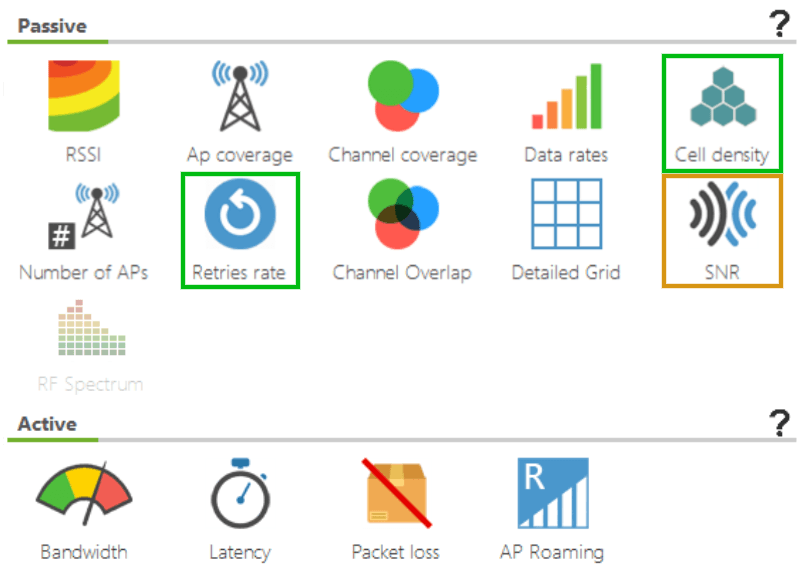
When performing data capture in monitor mode, in addition to all plots available using normal mode, we can show:
- Cell Density (the density of devices connected to access points)
- Retries rate
- SNR heatmap*
* Available using Acrylic Wi-Fi Sniffer or an AirPcap card
Acrylic Wi-Fi Sniffer allows capturing traffic transmitted using the latests 802.11ac standards with channel widths of 20, 40, 80 and 160Mhz. This enhancement applies to all software plots.
As you can see in the image, RF Spectrum graph is not available in any mode. This is because it is only available by using a specific device: a spectrum analyzer. If you want more information about what this chart is for, how to activate it and how to use it, please take a look at the article “Wi-Fi Spectrum Analysis, How to Perform One, and What Information It Provides“