
Привет друзья! Если у вас не запускается или некорректно работает какое-либо из встроенных в Windows 10 приложений: Магазин (Windows Store), Календарь, Музыка, Карты, Почта, Погода, Новости и другие, то самое распространённое на сегодняшний день решение, это просто переустановить проблемное приложение с помощью командной оболочки Windows PowerShell, что довольно трудно для начинающего пользователя. Но спешу обрадовать вас, в новейшей сборке Windows 10 build 1607 переустановка проблемного приложения происходит очень просто в окне системных параметров операционной системы.
Как переустановить стандартные приложения в Windows 10
Предлагаю для примера переустановить на моём ноутбуке магазин приложений для Windows 10 (Windows Store). С данным приложением многие пользователи часто испытывают проблемы, оно то не хочет открываться, а иногда наоборот аварийно закрывается во время работы и спасает только перезагрузка.
Откройте меню «Пуск» и щёлкните левой мышью на кнопке «Параметры»

«Система»
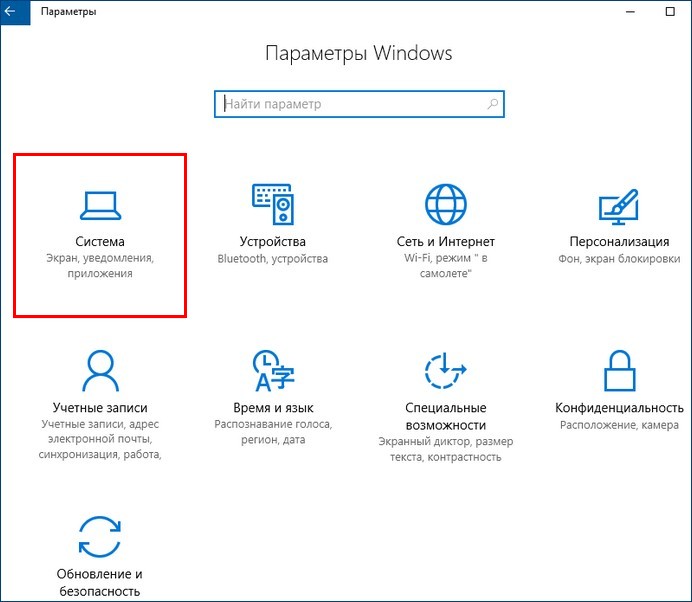
«Приложения и возможности»

Выберите проблемное приложение и щёлкните на нём левой мышью.

«Дополнительные параметры»

Жмите на кнопку «Сбросить»

Ещё раз жмём «Сбросить»
Происходит сброс всех параметров выбранного приложения.

Видим галочку рядом с кнопкой сброса, это значит, что операция успешно завершена.
Теперь приложение заработает должным образом!


Some people do not like the universal apps installed by default In Windows 10 or Windows 11 and want to get rid of them. They can manually uninstall most of them using the Settings app or PowerShell. Apps like Calendar, Mail, Camera, Photos, or Candy Crush Soda Saga can be gone from a Windows 10 or Windows 11 computer in no time. So how do you get all the default apps back when you learn that you need them or when they are broken and no longer work correctly? In this tutorial, we show you how to reinstall and re-register all the default apps shipped with Windows 10 or Windows 11. Don’t worry, this is a straightforward process. Let’s get started:
NOTE: If you’ve arrived here looking for ways to uninstall Windows apps with PowerShell, check this guide instead: How to uninstall Windows apps with PowerShell.
Things you should know about reinstalling Windows apps with PowerShell
The steps in this tutorial help you reinstall all the default apps from Windows 10 or Windows 11, including the Microsoft Store. Furthermore, they also allow you to reinstall Windows apps without the Store. However, note that everything we show is tested and confirmed to work only in the latest versions of Windows 10 and in Windows 11.
If you have an older version of Windows 10, you can follow the steps we show for getting the built-in apps back, but you might not be able to also re-install the Microsoft Store. The only proven way to get the Microsoft Store back in older versions of Windows 10 to then be able to install other apps is to reinstall Windows 10.
Step 1. Open PowerShell as Administrator
First of all, you must open PowerShell with administrative rights. The fastest way to do that in Windows 10 is to use the search bar on the taskbar. Type “powershell,” and then click or tap on “Run as administrator” on the panel to the right of the Windows PowerShell search result.
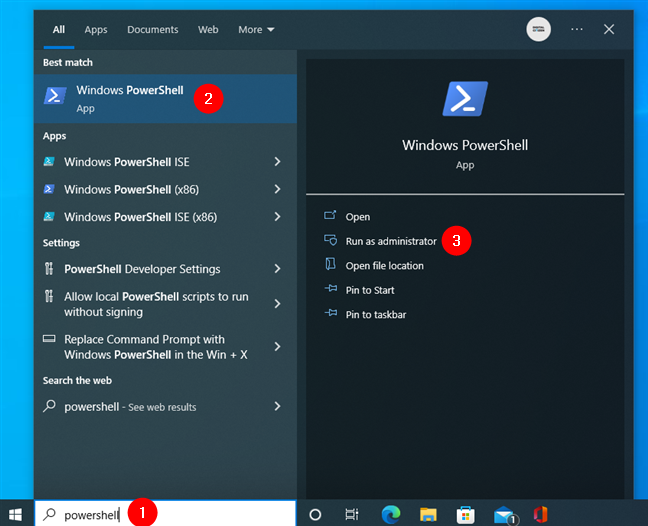
Open Windows PowerShell in Windows 10 as admin
If you’re using Windows 11, press the Search button on the taskbar and type “powershell” in the search box. Then, select the Windows PowerShell result on the left and click or tap “Run as Administrator” on the right-hand panel.
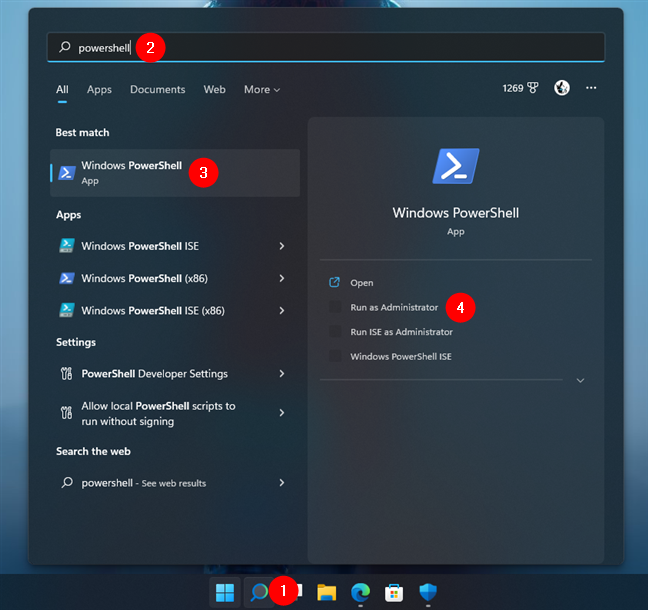
Open Windows PowerShell in Windows 11 as admin
TIP: You can find many other ways of opening PowerShell in this tutorial: 9 ways to open PowerShell in Windows (including as administrator).
Once PowerShell is launched, you should see a window similar to this one:
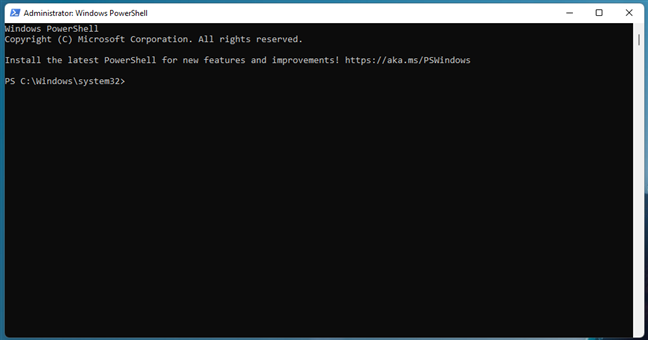
The PowerShell window
TIP: You can also start Windows Terminal as an administrator and run a PowerShell tab.
Opening a PowerShell tab in Windows Terminal works just as well
Step 2. Run the reinstall and re-register command for built-in Windows 10 or Windows 11 apps
To reinstall all the Windows apps that you uninstalled over time, all you have to do is run a specific command. Type or copy-paste the following command inside your PowerShell window:
Get-AppxPackage -allusers | foreach {Add-AppxPackage -register “$($_.InstallLocation)\appxmanifest.xml” -DisableDevelopmentMode}
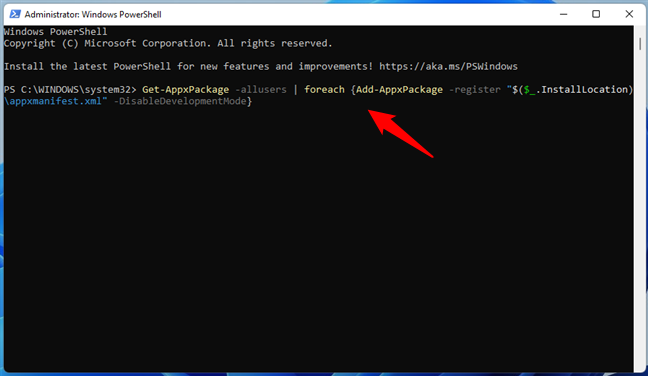
The PowerShell command for reinstalling all Windows apps
After you’ve entered the above command in PowerShell, press Enter. Then, your Windows 10 or Windows 11 PC begins reinstalling and re-registering all their default built-in apps. Note that this step might take a while, depending on the speed of your PC.
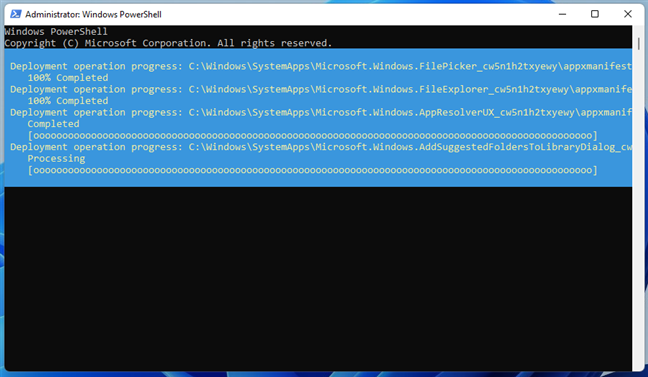
Default Windows apps are reinstalled in PowerShell
Step 3. Reboot your Windows PC
Once the command has finished running, PowerShell displays the current folder path. There are no messages or additional confirmations displayed. Close PowerShell and reboot your Windows 10 or Windows 11 PC or device. You should find all your missing Windows 10 or 11 default apps when you log in.
What if the Windows apps I reinstalled still don’t work well?
If your Windows 10 or Windows 11 built-in apps are reinstalled but still do not work correctly, you should try one more thing before losing hope: run the Windows Store Apps troubleshooter.
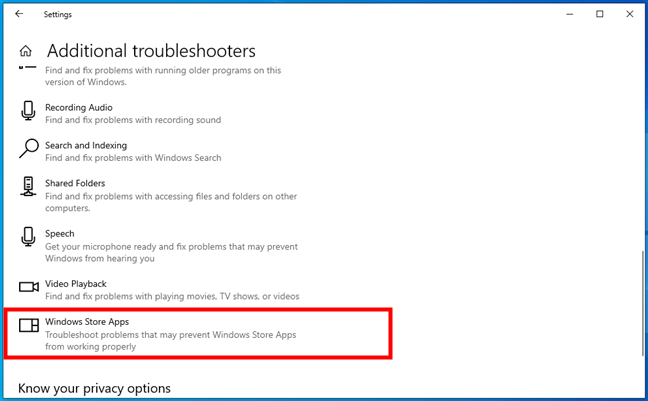
On Windows 10, open the Settings app (Windows + I), head to Update & Security > Troubleshoot, and click or tap Additional troubleshooters on the right.
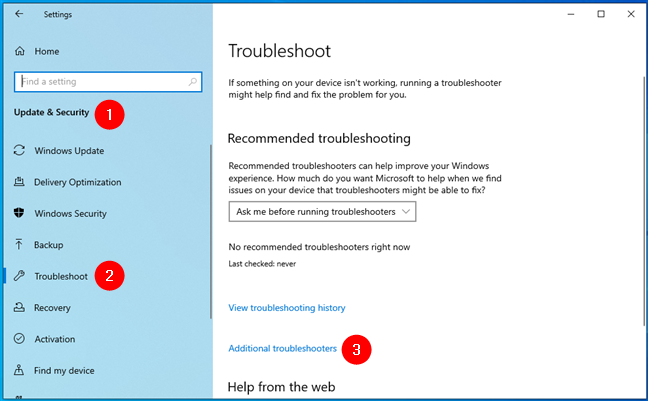
Additional troubleshooters in Windows 10
Then, scroll down to the end of the list and click or tap on Windows Store Apps.
The Windows Store Apps troubleshooter in Windows 10
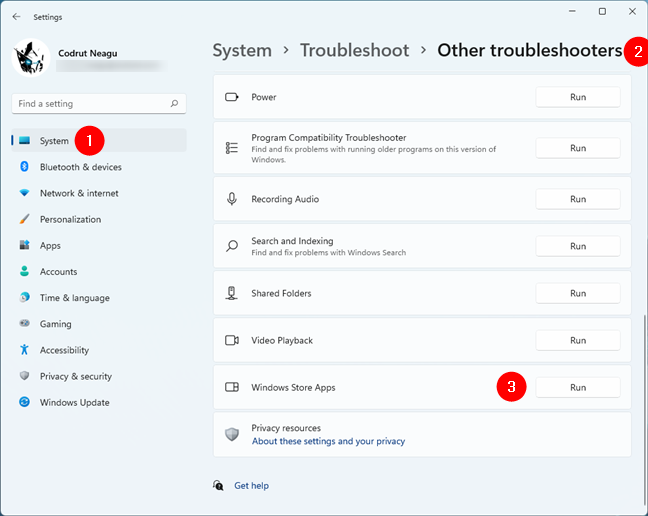
In Windows 11, launch Settings (Windows + I) and navigate to System > Troubleshoot > Other troubleshooters. Then, scroll down, and you’ll find the Windows Store Apps troubleshooter towards the end of the list. When you do, click or tap the Run button to its right.
Run the Windows Store Apps troubleshooter in Windows 11
Whether you’re using Windows 10 or Windows 11, once you start the Windows Store Apps troubleshooter, it will begin to detect potential problems.
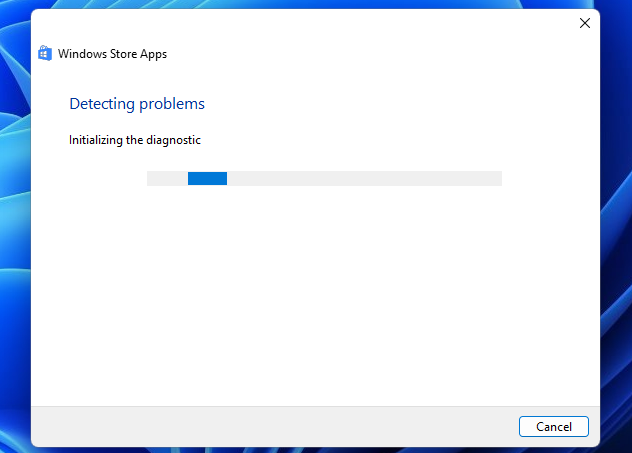
Using the Windows Store Apps troubleshooter
If it finds anything that could affect how the Windows apps run on your PC, it makes the necessary repairs. When that process is done, it might ask you to reboot your Windows 10 or Windows 11 computer or device. If that happens, restart it and check whether your apps are working correctly. If they still don’t, we’re sorry, but the best thing you can do is reset or reinstall each app on its own or even try resetting Windows altogether. If you need help with that, you might like these guides:
- How to reset apps in Windows 10 and clear their data
- How to reset Windows 10 without losing your files
- How to reset Windows 11 without losing your files
Did you reinstall Windows apps with PowerShell?
As you can see, bringing back all the Windows 10 or Windows 11 default apps is easy, at least in theory. Furthermore, it shouldn’t take too long. After all, it’s all about running just one PowerShell command. However, as with all things in life, it might not go as planned, and, in some cases, Windows can fail to reinstall its standard apps. So, do you know other ways to get the built-in apps back into Windows 10 or Windows 11? Don’t hesitate to let us know in the comments section below.
Windows 10 comes with a number of built-in universal apps such as Start menu, Cortana, Microsoft Edge browser, Xbox, Microsoft store, photos, paint 3D, one-note, skype etc. These are default build-in apps that come pre-installed while installing upgrade to windows 10. Sometimes after a recent windows 10 upgrade, you may notice certain apps missing. Or after installing the latest updates, Apps does not perform properly, Crashes, or Not respond. Or for some others number of apps get broken and not work properly.
In Such Causes, we recommend resetting the app following the steps below.
- Press Windows + I keyboard shortcut to open the Settings app,
- Click on apps then Apps and features,
- Now select the problematic app and click on Advanced options
- Scroll down and click on the reset option,
- Click reset again to reset the app to its default setup.
But if the reset option didn’t fix the problem, Or apps missing after Windows 10 1903 Upgrade, Here is how to restore removed apps on windows 10
Contents
- 1 How To Re-register default Windows apps
- 1.1 Reinstall All Built-in Apps in Windows 10
- 1.2 Reinstall a Specific Built-in App in Windows 10
- 2 Reset your PC to its default settings
How To Re-register default Windows apps
You Can Re-install or Re-register Build-in Windows apps by performing some command line on Windows PowerShell. Here step by step guide to re-install a particular default app or all the default built-in apps on your Windows 10 computer using PowerShell commands.
Reinstall All Built-in Apps in Windows 10
To Re-install All Built-in Windows apps
- Open the Windows PowerShell with administrative privileges.
- You can do this by press win + X and select PowerShell ( admin ).
- Now copy/paste the command below on PowerShell and hit the enter key to execute the same.
Get-AppXPackage | Foreach {Add-AppxPackage -DisableDevelopmentMode -Register “$($_.InstallLocation)\AppXManifest.xml”}
It then tries to install all of the default apps on Windows 10 for the account you are currently logged in to. Or you can use the below command to Re-register Windows Apps for All Users :
Get-AppxPackage -Allusers | Foreach {Add-AppxPackage -register “$($_.InstallLocation)\appxmanifest.xml” -DisableDevelopmentMode}
If one of the default apps is already installed on the computer, then you get shown the name of it in red. Simply Ignore the Red lines after complete the command Restart windows to get a fresh start. Now check apps related problems get resolved.
Reinstall a Specific Built-in App in Windows 10
If you Getting problems with any specific windows app and others working properly then no need to Re-register / Reinstall All apps by performing above command. Check the below commands to Re-register only a Specific windows app.
- Again open PowerShell (admin) by press Win + X and select.
- On the Administrator PowerShell prompt copy/paste command below and hit enter to execute the same.
- 3D Builder:
PowerShell -ExecutionPolicy Unrestricted -Command “& {$manifest = (Get-AppxPackage *3DBuilder*).InstallLocation + ‘\AppxManifest.xml’ ; Add-AppxPackage -DisableDevelopmentMode -Register $manifest}”
- Alarms & Clock:
PowerShell -ExecutionPolicy Unrestricted -Command “& {$manifest = (Get-AppxPackage *WindowsAlarms*).InstallLocation + ‘\AppxManifest.xml’ ; Add-AppxPackage -DisableDevelopmentMode -Register $manifest}”
- App Connector:
PowerShell -ExecutionPolicy Unrestricted -Command “& {$manifest = (Get-AppxPackage *AppConnector*).InstallLocation + ‘\AppxManifest.xml’ ; Add-AppxPackage -DisableDevelopmentMode -Register $manifest}”
- Calculator:
PowerShell -ExecutionPolicy Unrestricted -Command “& {$manifest = (Get-AppxPackage *WindowsCalculator*).InstallLocation + ‘\AppxManifest.xml’ ; Add-AppxPackage -DisableDevelopmentMode -Register $manifest}”
- Calendar and Mail:
PowerShell -ExecutionPolicy Unrestricted -Command “& {$manifest = (Get-AppxPackage *windowscommunicationsapps*).InstallLocation + ‘\AppxManifest.xml’ ; Add-AppxPackage -DisableDevelopmentMode -Register $manifest}”
- Camera:
PowerShell -ExecutionPolicy Unrestricted -Command “& {$manifest = (Get-AppxPackage *WindowsCamera*).InstallLocation + ‘\AppxManifest.xml’ ; Add-AppxPackage -DisableDevelopmentMode -Register $manifest}”
- Candy Crush Soda Saga:
PowerShell -ExecutionPolicy Unrestricted -Command “& {$manifest = (Get-AppxPackage *CandyCrushSodaSaga*).InstallLocation + ‘\AppxManifest.xml’ ; Add-AppxPackage -DisableDevelopmentMode -Register $manifest}”
- Connect:
PowerShell -ExecutionPolicy Unrestricted -Command “& {$manifest = (Get-AppxPackage *PPIProjection*).InstallLocation + ‘\AppxManifest.xml’ ; Add-AppxPackage -DisableDevelopmentMode -Register $manifest}”
- Contact Support:
PowerShell -ExecutionPolicy Unrestricted -Command “& {$manifest = (Get-AppxPackage *ContactSupport*).InstallLocation + ‘\AppxManifest.xml’ ; Add-AppxPackage -DisableDevelopmentMode -Register $manifest}”
- Cortana:
PowerShell -ExecutionPolicy Unrestricted -Command “& {$manifest = (Get-AppxPackage *Windows.Cortana*).InstallLocation + ‘\AppxManifest.xml’ ; Add-AppxPackage -DisableDevelopmentMode -Register $manifest}”
- Feedback Hub:
PowerShell -ExecutionPolicy Unrestricted -Command “& {$manifest = (Get-AppxPackage *WindowsFeedbackHub*).InstallLocation + ‘\AppxManifest.xml’ ; Add-AppxPackage -DisableDevelopmentMode -Register $manifest}”
- Get Office:
PowerShell -ExecutionPolicy Unrestricted -Command “& {$manifest = (Get-AppxPackage *MicrosoftOfficeHub*).InstallLocation + ‘\AppxManifest.xml’ ; Add-AppxPackage -DisableDevelopmentMode -Register $manifest}”
- Get Started:
PowerShell -ExecutionPolicy Unrestricted -Command “& {$manifest = (Get-AppxPackage *GetStarted*).InstallLocation + ‘\AppxManifest.xml’ ; Add-AppxPackage -DisableDevelopmentMode -Register $manifest}”
- Mail and Calendar:
PowerShell -ExecutionPolicy Unrestricted -Command “& {$manifest = (Get-AppxPackage *windowscommunicationsapps*).InstallLocation + ‘\AppxManifest.xml’ ; Add-AppxPackage -DisableDevelopmentMode -Register $manifest}”
- Maps:
PowerShell -ExecutionPolicy Unrestricted -Command “& {$manifest = (Get-AppxPackage *WindowsMaps*).InstallLocation + ‘\AppxManifest.xml’ ; Add-AppxPackage -DisableDevelopmentMode -Register $manifest}”
- Messaging:
PowerShell -ExecutionPolicy Unrestricted -Command “& {$manifest = (Get-AppxPackage *Messaging*).InstallLocation + ‘\AppxManifest.xml’ ; Add-AppxPackage -DisableDevelopmentMode -Register $manifest}”
- Microsoft Edge:
PowerShell -ExecutionPolicy Unrestricted -Command “& {$manifest = (Get-AppxPackage *MicrosoftEdge*).InstallLocation + ‘\AppxManifest.xml’ ; Add-AppxPackage -DisableDevelopmentMode -Register $manifest}”
- Microsoft Solitaire Collection:
PowerShell -ExecutionPolicy Unrestricted -Command “& {$manifest = (Get-AppxPackage *MicrosoftSolitaireCollection*).InstallLocation + ‘\AppxManifest.xml’ ; Add-AppxPackage -DisableDevelopmentMode -Register $manifest}”
- Money:
PowerShell -ExecutionPolicy Unrestricted -Command “& {$manifest = (Get-AppxPackage *BingFinance*).InstallLocation + ‘\AppxManifest.xml’ ; Add-AppxPackage -DisableDevelopmentMode -Register $manifest}”
- Movies & TV:
PowerShell -ExecutionPolicy Unrestricted -Command “& {$manifest = (Get-AppxPackage *ZuneVideo*).InstallLocation + ‘\AppxManifest.xml’ ; Add-AppxPackage -DisableDevelopmentMode -Register $manifest}”
- News:
PowerShell -ExecutionPolicy Unrestricted -Command “& {$manifest = (Get-AppxPackage *BingNews*).InstallLocation + ‘\AppxManifest.xml’ ; Add-AppxPackage -DisableDevelopmentMode -Register $manifest}”
- OneNote:
PowerShell -ExecutionPolicy Unrestricted -Command “& {$manifest = (Get-AppxPackage *Office.OneNote*).InstallLocation + ‘\AppxManifest.xml’ ; Add-AppxPackage -DisableDevelopmentMode -Register $manifest}”
- Paint 3D:
PowerShell -ExecutionPolicy Unrestricted -Command “& {$manifest = (Get-AppxPackage *MSPaint*).InstallLocation + ‘\AppxManifest.xml’ ; Add-AppxPackage -DisableDevelopmentMode -Register $manifest}”
- People:
PowerShell -ExecutionPolicy Unrestricted -Command “& {$manifest = (Get-AppxPackage *People*).InstallLocation + ‘\AppxManifest.xml’ ; Add-AppxPackage -DisableDevelopmentMode -Register $manifest}”
- Phone:
PowerShell -ExecutionPolicy Unrestricted -Command “& {$manifest = (Get-AppxPackage *CommsPhone*).InstallLocation + ‘\AppxManifest.xml’ ; Add-AppxPackage -DisableDevelopmentMode -Register $manifest}”
- Phone Companion:
PowerShell -ExecutionPolicy Unrestricted -Command “& {$manifest = (Get-AppxPackage *WindowsPhone*).InstallLocation + ‘\AppxManifest.xml’ ; Add-AppxPackage -DisableDevelopmentMode -Register $manifest}”
- Photos:
PowerShell -ExecutionPolicy Unrestricted -Command “& {$manifest = (Get-AppxPackage *Photos*).InstallLocation + ‘\AppxManifest.xml’ ; Add-AppxPackage -DisableDevelopmentMode -Register $manifest}”
- Settings:
PowerShell -ExecutionPolicy Unrestricted -Command “& {$manifest = (Get-AppxPackage *immersivecontrolpanel*).InstallLocation + ‘\AppxManifest.xml’ ; Add-AppxPackage -DisableDevelopmentMode -Register $manifest}”
- Skype:
PowerShell -ExecutionPolicy Unrestricted -Command “& {$manifest = (Get-AppxPackage *SkypeApp*).InstallLocation + ‘\AppxManifest.xml’ ; Add-AppxPackage -DisableDevelopmentMode -Register $manifest}”
- Sports:
PowerShell -ExecutionPolicy Unrestricted -Command “& {$manifest = (Get-AppxPackage *BingSports*).InstallLocation + ‘\AppxManifest.xml’ ; Add-AppxPackage -DisableDevelopmentMode -Register $manifest}”
- Sticky Notes:
PowerShell -ExecutionPolicy Unrestricted -Command “& {$manifest = (Get-AppxPackage *MicrosoftStickyNotes*).InstallLocation + ‘\AppxManifest.xml’ ; Add-AppxPackage -DisableDevelopmentMode -Register $manifest}”
- Microsoft Store:
PowerShell -ExecutionPolicy Unrestricted -Command “& {$manifest = (Get-AppxPackage *microsoftStore*).InstallLocation + ‘\AppxManifest.xml’ ; Add-AppxPackage -DisableDevelopmentMode -Register $manifest}”
- Sway:
PowerShell -ExecutionPolicy Unrestricted -Command “& {$manifest = (Get-AppxPackage *Office.Sway*).InstallLocation + ‘\AppxManifest.xml’ ; Add-AppxPackage -DisableDevelopmentMode -Register $manifest}”
- Twitter:
PowerShell -ExecutionPolicy Unrestricted -Command “& {$manifest = (Get-AppxPackage *Twitter*).InstallLocation + ‘\AppxManifest.xml’ ; Add-AppxPackage -DisableDevelopmentMode -Register $manifest}”
- Voice Recorder:
PowerShell -ExecutionPolicy Unrestricted -Command “& {$manifest = (Get-AppxPackage *WindowsSoundRecorder*).InstallLocation + ‘\AppxManifest.xml’ ; Add-AppxPackage -DisableDevelopmentMode -Register $manifest}”
- Weather:
PowerShell -ExecutionPolicy Unrestricted -Command “& {$manifest = (Get-AppxPackage *BingWeather*).InstallLocation + ‘\AppxManifest.xml’ ; Add-AppxPackage -DisableDevelopmentMode -Register $manifest}”
- Xbox:
PowerShell -ExecutionPolicy Unrestricted -Command “& {$manifest = (Get-AppxPackage *XboxApp*).InstallLocation + ‘\AppxManifest.xml’ ; Add-AppxPackage -DisableDevelopmentMode -Register $manifest}”
- Xbox One SmartGlass:
PowerShell -ExecutionPolicy Unrestricted -Command “& {$manifest = (Get-AppxPackage *XboxOneSmartGlass*).InstallLocation + ‘\AppxManifest.xml’ ; Add-AppxPackage -DisableDevelopmentMode -Register $manifest}”
Note: windows add new apps regularly. So may the app you are getting problem not listed above then you can follow the below steps to re-register the specific app.
On Admin PowerShell type Get-AppxPackage -AllUsers | Select Name, PackageFullName and hit the enter key. This will display available packages (for installation) on your computer. look for the App that you want to re-register (re-install) for the current user. ( for ex we want to re-install Skype app )
Here first copy the package name by select and press Ctrl + C and paste on notepad. ( for ex: Microsoft.SkypeApp_11.8.204.0_x64__kzf8qxf38zg5c ) and the perform command below.
Get-AppXPackage | Foreach {Add-AppxPackage -DisableDevelopmentMode -Register “C:\Program Files\WindowsApps\PackageFullName\appxmanifest.xml” -DisableDevelopmentMode
Note: Replace the package name which you copied from PowerShell. This means the command would be like bellow
Get-AppXPackage | Foreach {Add-AppxPackage -DisableDevelopmentMode -Register “C:\ProgramFiles\WindowsApps\Microsoft.SkypeApp_11.8.204.0_x64__kzf8qxf38zg5c\appxmanifest.xml” -DisableDevelopmentMode
Press enter and wait until executing the command, After that Restart windows and check the specific which you recently re-install working properly.
Reset your PC to its default settings
If the above solutions didn’t fix the problem then Reset this PC is probably a good fix that reinstalls Windows 10 without affecting your files and folder.
- Open Settings.
- Click on Update & Security.
- Click on Recovery.
- Under “Reset this PC,” click the Get Started button.
Select the Keep may files options. and follow on-screen instructions to reset Windows 10 Without effecting files.
Did this help to reinstall preinstalled apps for windows 10? Let us know on the comments below, also read:
- How to Remove Activate Windows 10 watermark permanently
- Windows 10 laptop won’t wake up from sleep mode? Here how to fix it
- Fix error status 0xc000012f Bad Image Error on Windows 10
- Fix This App Has Been Blocked For Your Protection in Windows 10
- How To Update, Re-install, Roll Back Device Drivers in Windows 10
In previous tutorials, we told you how to uninstall and remove all or some of built-in modern apps in Windows 10:
[Tip] How to Uninstall Modern Apps in Windows 10
[Guide] How to Remove All Built-in Apps in Windows 10
If you removed some or all built-in apps in Windows 10 and now you want to restore them in your computer, this tutorial will help you.
Today in this tutorial, we’ll tell you how to reinstall built-in apps in Windows 10 using PowerShell program:
We have divided this tutorial in 2 parts:
- PART 1: Reinstall a specific built-in app in Windows 10
- PART 2: Reinstall all built-in apps in Windows 10
Now lets start the tutorial:
STEP 1:
As usual we’ll need to open PowerShell as Administrator to execute the required commands.
Open Start Menu and type powershell. It’ll automatically start searching for the program and will show PowerShell in search results. Now press Ctrl+Shift+Enter keys together to launch PowerShell as Administrator. Alternatively, you can right-click on PowerShell and select “Run as Administrator” option.
PS: If you have replaced Command Prompt with PowerShell in WIN+X menu, you can directly launch it from there. [See this]
STEP 2:
Now you’ll need to execute commands in PowerShell as mentioned in following steps:
PART 1: Reinstall a Specific Built-in App in Windows 10
If you want to reinstall any specific app, you can use following command to restore that particular app:
Add-AppxPackage -register appxmanifest.xml_file_path -DisableDevelopmentMode
As you can see, the above mentioned command requires an essential parameter which is the full path of appxmanifest.xml file. Actually all modern apps contain this XML file in their program files folder and this XML file is required to restore the app.
All modern apps are stored in following folder:
C:\Program Files\WindowsApps
This folder is hidden as well as restricted. Check this guide to learn more about this folder. This folder contains several sub-folders (with the same name as the app’s PackageFullName info) which contain required files of all modern apps. You’ll find one appxmanifest.XML file in all those folders.
1. So to restore an app, you’ll need to know the PackageFullName information of that app which can be found using following command:
Get-AppxPackage -allusers | Select Name, PackageFullName

Now select the PackageFullName information of your desired app and press Enter key to copy it to clipboard.
2. Now execute following command to restore that app:
Add-AppxPackage -register “C:\Program Files\WindowsApps\PackageFullName\appxmanifest.xml” -DisableDevelopmentMode
Replace PackageFullName term in above command with the copied PackageFullName information from step 1. Just press CTRL+V keys together to paste copied PackageFullName information.

That’s it. It’ll reinstall the app. If you receive any error message, ignore it. You may need to restart the computer.
If you want, you can reinstall all built-in modern apps in a single step using following command:
Get-AppxPackage -allusers | foreach {Add-AppxPackage -register “$($_.InstallLocation)\appxmanifest.xml” -DisableDevelopmentMode}

This command will take a few moments and will reinstall all built-in apps. If you receive any error message, ignore it. You may need to restart the computer to take effect.
If you face any problem in restoring apps in Windows 10, you can also try the Reset this PC feature of Windows 10 to restore Windows 10 to factory settings which will perform a clean installation of Windows 10 and will restore all bundled modern apps.
Check out following tutorial to learn how to use Reset this PC feature in Windows 10:
How to Perform Clean Installation of Windows 10 with Activation?
You are here: Home » Troubleshooting Guides » [Guide] How to Reinstall All Default Built-in Apps in Windows 10
Applies ToWindows 11 Windows 10
Support for Windows 10 will end in October 2025
After October 14, 2025, Microsoft will no longer provide free software updates from Windows Update, technical assistance, or security fixes for Windows 10. Your PC will still work, but we recommend moving to Windows 11.
Learn more
Customizing default programs and app associations in Windows is a straightforward process that can enhance your computing experience. For instance, if you’re a developer who prefers a specific text editor for coding, changing the default application for .txt files can save you time and streamline your workflow. Similarly, changing your default browser to the one you use most can speed up your Internet tasks.
This article describes the steps to change default programs and app associations in Windows, enhancing your efficiency.
How to change the default apps
-
In the Settings app on your Windows device, select Apps > Default Apps, or use the following shortcut:
Default Apps
-
To change a default app, you can do either of the following:
-
Set a default for a file type or link type
In the search bar, type the file extension or protocol you wish to change, such as .txt. Select the corresponding result from the list that appears. Then, choose an app from the options provided to open files of that type
-
Set defaults for applications
Select an app to see what file types or link types it can open. If you want to change something, select the file or link type, then choose your preferred app
-
How to configure Microsoft Edge as the default browser
-
From Default apps, under Set defaults for applications, select Microsoft Edge
-
Next to Make Microsoft Edge your default browser, select Set default
Need more help?
Want more options?
Explore subscription benefits, browse training courses, learn how to secure your device, and more.