
Содержание
- Постановка задачи
- Как полностью удалить IIS в Windows
- Удаление IIS через диспетчер серверов
- Удаление IIS через PowerShell
- Удаление IIS через Windows Admin Center
- Удаление старых конфигурационных файлов
Добрый день! Уважаемые читатели и гости одного из крупнейших IT блогов рунета Pyatilistnik.org. В прошлый раз мы с вами устранили ошибку 0x80300024 при попытке установить Windows. Движемся дальше и сегодня пойдет речь, том, как выполнить чистую переустановку IIS роли. Для выполнения этой задачи у вас может быть ряд причин, например вы хотите начать работу с ролью IIS, так как будто вы ее только установили, вы можете захотеть попытаться устранить какие-то ошибки и проблемы. Давайте разбираться.
Постановка задачи
Ранее мы с вами производили установку роли IIS, мы настроили там сайты. Через какое-то время ко мне обратился разработчик, и сообщил, что у него есть ряд проблем с IIS. Начав разбираться я обнаружил, что есть повреждение файла конфигурации может привести к неисправностям или сбоям вашего веб-сайта/приложения. Пример ошибки:
The configuration section ‘system.webServer’ cannot be read because it is missing a section declaration
Иногда бывает проще произвести чистую переустановку IIS, чем проверять файлы конфигурации (такие как ApplicationHost.config или web.config) один за другим, построчно. При удалении IIS без выполнения дополнительных действий. вы обнаружите, что после переустановки у вас все та же конфигурация на сервере: те же веб-сайты, то же приложение и, вероятно, та же проблема. Это связано с тем, что в системе остаются старые конфигурационные файлы, которые так же нужно удалить перед новой установкой.
Как полностью удалить IIS в Windows
Чтобы вам произвести полную деинсталляцию роли IIS с удалением всех старых хвостов, нужно выполнить два этапа:
- Удалить роль IIS
- Удалить файлы из рабочих каталогов inetsrv, inetsrv, windows
ОБЯЗАТЕЛЬНАЯ РЕКОМЕНДАЦИЯ! Эта манипуляция сотрет всю вашу конфигурацию на IIS. Настоятельно рекомендуется сделать полную резервную копию вашего сервера перед выполнением этого действия.
Для начала давайте полностью удалим вашу роль Internet Information Services. Для этого есть два варианта, быстрый через PowerShell и более медленный, но через графический интерфейс.
Удаление IIS через диспетчер серверов
Самый простой метод, подходящий любому системному администратору, особенно начинающему. Откройте оснастку «Диспетчер серверов» и выберите пункт «Управление — Удалить роли и компоненты».
Указываем сервер на котором будет происходить деинсталляция Internet Information Services, просто у вас в диспетчер серверов может быть добавлен не один сервер, например мы так ранее собирали оснастку управления RDS фермой.
Снимаем галку с роли «Веб-сервер IIS» и нажимаем далее.
Так же убедитесь, что у вас убрана галка с компонента «Служба активации процессов Windows (Windows Process Activation Services)«. Служба активации процессов Windows (WAS) управляет конфигурацией пула приложений, а также созданием и временем жизни рабочих процессов для HTTP и других протоколов. Служба публикации в Интернете (W3SVC) и другие службы зависят от WAS. Список управляемых объектов, которые включены в этот управляемый объект:
- Пул приложений IIS (IIS Application Pool) — Пул приложений служб IIS представляет собой группу URL-адресов, которые направляются одному или нескольким рабочим процессам. Поскольку пулы приложений определяют набор веб-приложений, которые совместно используют один или несколько рабочих процессов, они предоставляют удобный способ администрирования набора веб-сайтов и приложений и их соответствующих рабочих процессов. Границы процесса отделяют каждый рабочий процесс; следовательно, веб-сайт или приложение в одном пуле приложений не будут затронуты проблемами приложений в других пулах приложений. Пулы приложений значительно повышают как надежность, так и управляемость веб-инфраструктуры.
- IIS Protocol Adapter — Адаптер протокола информационных служб Интернета (IIS) — это служба Windows, которая принимает сообщения по определенному сетевому протоколу и взаимодействует со службой активации процессов Windows (WAS) для направления входящих сообщений правильному рабочему процессу.
Подробнее на https://docs.microsoft.com/en-us/previous-versions/windows/it-pro/windows-server-2008-R2-and-2008/cc735229(v=ws.10)
Далее после удаления потребуется перезагрузка сервера. поэтому я рекомендую поставить галку «Автоматический перезапуск конечного сервера, если требуется» и смело нажимайте кнопку «Удалить».
Удаление IIS через PowerShell
Данный метод мне нравится больше, поскольку все делается одной командой. Во первых запустите оболочку PowerShell от имени администратора. Далее чтобы посмотреть список всех компонентов у роли IIS выполните вот такую команду.
get-windowsfeature *web* | Where-Object -FilterScript { $_.Installed -Eq $TRUE}
У вас будет выведен список всех установленных компонентов Internet Information Services. Чтобы удалить, вам необходимо добавить конвейер, в итоге получим:
get-windowsfeature *web* | Where-Object -FilterScript { $_.Installed -Eq $TRUE} | Remove-WindowsFeature
Можете еще раз проверить остались ли компоненты, хочу напомнить, что для завершения процедуры, нужно перезагрузить сервер, через командлет Restart-Computer
для удобства можете скачать готовый скрипт по удалению IIS через Powershell
Удаление IIS через Windows Admin Center
Не могу не упомянуть используемый мной новый инструмент администрирования и управления сервером Windows Admin Center. Заходим в нем в раздел «Роли и компоненты«, выбираем роль IIS и ее содержимое. После чего просто нажимаем удалить.
Вам покажут список затрагиваемых компонентов, если все устраивает, то нажимаем удалить.
ждем удаление роли, потребуется перезагрузка.
Удаление старых конфигурационных файлов
Вторым этапом очистки хвостов от роли IIS, выступает удаление или очистка некоторых каталогов.
ОБЯЗАТЕЛЬНАЯ РЕКОМЕНДАЦИЯ! Эта манипуляция сотрет всю вашу конфигурацию на IIS. Настоятельно рекомендуется сделать полную резервную копию вашего сервера перед выполнением этого действия.
- C:\Windows\system32\inetsrv\ — тут лежат конфигурационные файлы
- C:\inetpub\ — тут лежат ваши сайты, не забываем делать их копию
- C:\Windows\iis_версия.log — тут лежат логи
На этом чистую переустановку роли Internet Information Services можно считать оконченной. С вами был Иван Семин, автор и создатель IT портала Pyatilistnik.org.
1 Answer Web Server (IIS) under tab “Server Roles” in Server Manager. And Windows Process Activation Service in “Features” tab in Server Manager. Attention: A server restart is necessary after the uninstallation. Then delete the files or rename the folder (preferred) for C:\inetpub and C:\Windows\System32\inetsrv.
How do you check IIS is installed or not?
To check if you have IIS installed, click Start > Control Panel > Administrative Tools. Under the “Administrative Tools folder”, you should see an icon for “Internet Information Services (IIS) Manager”.
How do I install IIS on Windows Server?
To learn how to enable IIS and the required IIS components on Windows Server 2016, see the instructions below. Open Server Manager and click Manage > Add Roles and Features. Select Role-based or feature-based installation and click Next. Select the appropriate server. Enable Web Server (IIS) and click Next.
Where is IIS Manager?
On the Start menu, click Administrative Tools, and then click Internet Information Services (IIS) Manager.
How do I restore Inetpub folder?
open IIS Manager right click Sites node under your machine in the Connections tree on the left side and click Add Website. enter “Default Web Site” as a Site name. set Application pool back to DefaultAppPool! set Physical path to %SystemDrive%\inetpub\wwwroot.
How do I uninstall and reinstall IIS?
You could take the following steps to remove IIS: Open service. msc and Disable IIS admin service. Open Turn windows features on or off. Uncheck Internet information service. Click OK. Restart the Operating system.
What is the latest version of IIS?
Internet Information Services Screenshot of IIS Manager console of Internet Information Services 8.5 Developer(s) Microsoft Initial release May 30, 1995 Stable release 10.0.17763.1 / 2 October 2018 Written in C++.
How do I enable IIS in Windows 10?
Enabling IIS and required IIS components on Windows 10 Open Control Panel and click Programs and Features > Turn Windows features on or off. Enable Internet Information Services. Expand the Internet Information Services feature and verify that the web server components listed in the next section are enabled. Click OK.
How do I install IIS on Windows 10?
This article explains how to install IIS on a Windows 10 machine.Open the Start menu. Open the Start menu. Type features and select Turn Windows features on or off. Tick the Internet Information Services checkbox and hit OK. Wait for the installation to complete and hit Close.
Is Microsoft IIS free?
IIS (Internet Information Services) is Microsoft’s web server offering, playing second fiddle to market leader Apache. As is expected of a core Microsoft product, it only runs and is bundled on Windows operating systems, but is otherwise free for use.
How do I start IIS service?
To start or stop a web server Open IIS Manager and navigate to the web server node in the tree. In the Actions pane, click Start if you want to start the web server, Stop if you want to stop the web server, or Restart if you want to first stop IIS, and then start it again.
How do I setup a Windows web server?
Windows Step 1: Open the Server Manager. Step 2: Click Manage > Add Roles and Features. Step 3: Click Next. Step 4: Click Next. Step 5: Select the server and click Next. Step 6: Select Web Server and click Next. Step 7: Click Next. Step 8: Click Next.
How do I access IIS Manager?
To open IIS Manager from the Start screen On the Start screen, click Control Panel. Click System and Security, and then click Administrative Tools. In the Administrative Tools window, double-click Internet Information Services (IIS) Manager.
How do I open IIS Manager in Windows 2019?
To enable IIS and the required IIS components on Windows Server 2019, do the following: Open Server Manager and click Manage > Add Roles and Features. Select Role-based or feature-based installation and click Next. Select the appropriate server. Enable Web Server (IIS) and click Next.
What is IIS Manager?
Stands for “Internet Information Services.” IIS is a web server software package designed for Windows Server. The IIS Manager tool allows web administrators to modify website options, such as default pages, error pages, logging settings, security settings, and performance optimizations.
How do I restore IIS to default website?
open IIS Manager. right click Sites node under your machine in the Connections tree on the left side and click Add Website. enter “Default Web Site” as a Site name. set Application pool back to DefaultAppPool! set Physical path to %SystemDrive%\inetpub\wwwroot. leave Binding and everything else as is.
How do I restore Web config?
Restoring a Web Config Backup Right-click and copy the backup file you’d like to restore. Afterwards, go back to the realm folder. In this example, we will go back to D:\Secureauth\SecureAuth13. Almost done! Now, find the current web. config file, and rename it to “old. Lastly, rename your backup file to “web. config”.
How do I reset IIS in Windows 10?
How to reset Internet Information Services (IIS) Select the Windows Start icon. In the search box, type cmd. Right-click on cmd.exe and select Run as administrator. At the command prompt, type IISRESET. Press Enter. When Internet services successfully restarted appears, type exit. Press Enter.
Can we uninstall IIS?
To remove the IIS go to the Manage option on the upper right hand corner and click on “Remove Rolls and Features”. Now a Window will be opened that will inform you that you are going to removing the section. Just click on “Next” to proceed. After that you must select a Server from the Server Pool.
Can you uninstall IIS?
To uninstall IIS via the Server Manager: If you wish to remove certain roles (IIS in my case) and features, you will have to use the “Remove Roles and Features” wizard of Server Manager. By just unchecking the IIS Web Server Role, you will be able to remove (uninstall) the IIS web server role at once.
How do I start and stop IIS server?
From a command prompt: Type NET STOP IISADMIN and press Enter. Once the service has stopped, type NET START IISADMIN and press Enter. Type NET START W3svc and press Enter. Click Start, Settings, Control Panel, Administrative Tools. Open Services. Right-click on the IIS Admin Service and select Stop, Start, or Restart.
Служба IIS (Internet Information Services) необходима для работы ASP.NET серверной части СпрутМонитор.
1. Перейдите в Панель Управления -> Программы -> Установка программ. Щелкните на пункт меню (слева) Включение и отключение компонентов Windows.
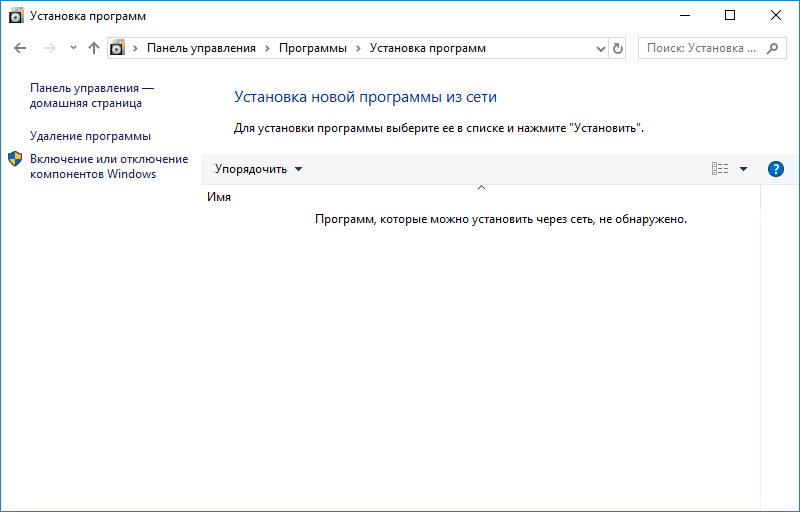
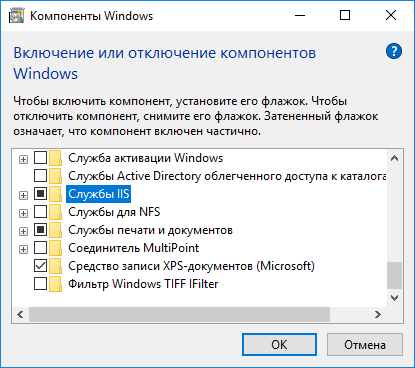
2. Отметьте пункт Службы IIS, и нажмите кнопку ОК:
3. Дождитесь окончания установки всех необходимых компонентов:
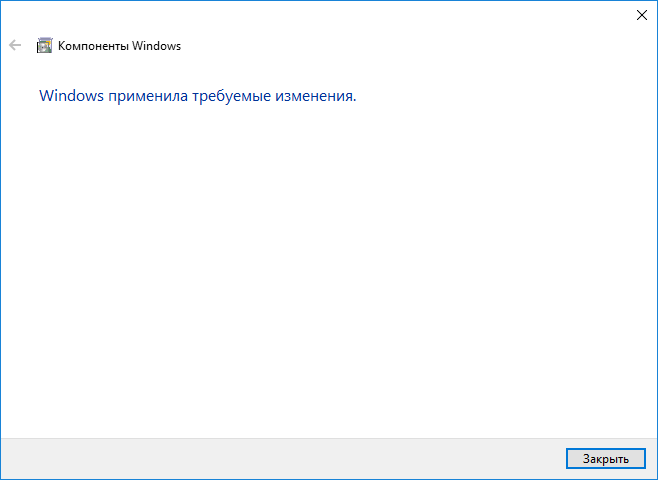
4. После завершения установки, рекомендуется перезагрузить компьютер.
5. Запустите браузер и перейдите по адресу http://localhost/. Если открылась тестовая страница IIS, значит установка произведена успешно.
См. также: Установка серверной версии СпрутМонитор.
- Author
- Recent Posts
I started writing code around 20 years ago, and throughout the years, I have gained a lot of expertise from hands-on experience as well as learning from others. This website has also grown with me and is now something that I am proud of.
Installing Internet Information Services (IIS) on Windows 10 might seem daunting at first, but it’s actually a straightforward process that enables you to host websites and applications directly on your PC. Whether you’re planning to use IIS for web development or to host a personal website, you’ll find that enabling and configuring this service can open up a world of possibilities for your online projects.

From my personal experience, I can say that once you’ve enabled IIS through the Control Panel, Command Line, or PowerShell, you’ll be ready to start hosting your own HTTPS-enabled websites. Imagine having your site up and running locally, making it easier to test and develop without extra complications. Enabling IIS gives you full control over your web server settings, making it a powerful tool for both novice and seasoned developers.
Moreover, configuring IIS allows you to set up a localhost environment, which is indispensable for testing new features before going live. Troubleshooting your own web server might sound tricky, but with IIS, you get extensive options to manage and configure settings easily. Starting and testing your first website through IIS is just a few steps away, making it an excellent choice for anyone serious about web development.
JUMP TO TOPIC
- Setting Up Your Windows Environment for IIS
- Understanding Windows Features Related to IIS
- Navigating the Control Panel and Using ‘Turn Windows Features on or Off’
- The Installation Process of IIS
- Using the GUI for IIS Setup
- Command Line Methods: DISM and PowerShell
- Configuring IIS
- Setting Up Websites and Application Pools
- Security Features and Protocols Configuration
- Performance Monitoring and Diagnostics Tools
- Hosting Web Applications on IIS
- Deploying ASP.NET and PHP Applications
- Integrating with Databases and Setting Up WordPress
- Managing the Default Website and Custom Web Pages
Setting Up Your Windows Environment for IIS
To install IIS on Windows 10, you need to configure your system correctly. Follow these steps to ensure that your environment is properly set up and ready for IIS.
Understanding Windows Features Related to IIS
Windows 10 includes several features that are essential for IIS. These “Windows Features” must be enabled to run IIS smoothly.
I start by checking the installed operating system. This varies slightly between Windows 8, Windows 10, and Windows Server 2012. Once verified, I proceed to the “Programs and Features” section.
Essential Windows Features for IIS:
- Internet Information Services
- Web Management Tools
- World Wide Web Services
- Application Development Features
- Common HTTP Features
These components are integral to the functionality of IIS. Without them, running a web server on your Windows operating system will be problematic.
Navigating the Control Panel and Using ‘Turn Windows Features on or Off’
Access “Turn Windows Features on or off” from the Control Panel. This is your hub for enabling and disabling optional features in your operating system.
I start by opening the Control Panel. This can be done by searching “Control Panel” in the Start menu. Once inside, I navigate to “Programs and Features”. Here I find “Turn Windows Features on or off.”
In the window that appears, I must ensure all necessary IIS components are checked.
| Feature | Description |
| Internet Information Services | The primary web server feature for hosting websites. |
| Web Management Tools | Tools for managing your IIS server. |
| World Wide Web Services | Essential for running websites and web applications. |
| Application Development Features | Supports development frameworks like .NET. |
| Common HTTP Features | Fundamental HTTP support for websites. |
After selecting the desired features, I click “OK” to install them. Windows will configure and install these components automatically.
Ensuring these steps are followed precisely means your Windows environment will be ready for IIS installation and configuration.
The Installation Process of IIS
Installing Internet Information Services (IIS) in Windows 10 can be done using different approaches. These include the graphical user interface (GUI) and command line methods such as DISM and PowerShell. Each method has its advantages, making it suitable for different user preferences.
Using the GUI for IIS Setup
To install IIS using the GUI, start by opening Control Panel from the Windows search bar. Once opened, make sure the View by option is set to Category. This setting makes navigation easier.
Next, select Programs followed by Turn Windows features on or off. In the window that appears, scroll down and check the box next to Internet Information Services. Clicking OK will start the installation process.
After installation, open IIS Manager by typing inetmgr in the Windows search bar. Here, you can manage sites, configure applications, and monitor performance.
Command Line Methods: DISM and PowerShell
For more control, you might prefer using command line tools like DISM and PowerShell. With DISM, open an elevated Command Prompt and type:
DISM /Online /Enable-Feature /FeatureName:IIS-DefaultDocument
This command starts installing IIS and any related features.
Alternatively, using PowerShell can simplify the process. Open a PowerShell window with administrative privileges and use:
Enable-WindowsOptionalFeature -Online -FeatureName IIS-WebServerRole
PowerShell’s flexibility also allows you to script multiple configurations at once, saving time for repeated setups.
Both methods require administrative rights and complete quickly, adding IIS to your system without the need for interactive dialogs.
Configuring IIS
Configuring IIS ensures optimal performance and security for your web server. It involves setting up websites and application pools, configuring security features, and utilizing performance monitoring tools.
Setting Up Websites and Application Pools
To set up a website in IIS:
- Open IIS Manager by typing
inetmgrin the search bar. - Navigate to the Sites folder, right-click, and select Add Website.
- Enter a name for your site in the Site name field.
- Set the Physical path to your website’s directory.
- Configure the Binding section to use
HTTPand set the IP address toAll Unassigned.
Creating and managing Application Pools is crucial for isolating different web applications. This helps in enhancing security and optimizing resource usage.
- In IIS Manager, go to Application Pools.
- Click Add Application Pool.
- Name the pool and choose the .NET CLR version.
- Ensure Start application pool immediately is checked.
Security Features and Protocols Configuration
Configuring security in IIS involves setting up protocols like SSL for secure communication and adjusting permissions to control access.
- To enable SSL, purchase and install an SSL certificate.
- Open IIS Manager, select your site, and click Bindings.
- Add an HTTPS binding, select the appropriate SSL certificate, and apply.
Additionally, FTP can be secured with FTPS:
- Install the FTP server role in IIS.
- Configure an FTP site and enable FTP over SSL (FTPS).
Permissions are critical in securing your server:
- In IIS Manager under your site, select Edit Permissions.
- Adjust the security settings under the Security tab by adding or restricting user access appropriately.
Performance Monitoring and Diagnostics Tools
Monitoring performance and diagnosing issues are key components in maintaining a healthy IIS environment.
Use the IIS Manager built-in tools for performance monitoring:
- Open IIS Manager and select your website.
- Under Manage Website, click Advanced Settings to review performance settings.
For detailed diagnostics:
- Use Failed Request Tracing in IIS to log detailed failure information.
- Enable Logging to monitor HTTP transactions.
Windows Performance Monitor provides real-time data and includes a variety of counters to track server performance:
- Type
perfmonin the search bar to open Performance Monitor. - Add counters related to IIS, such as Processor Time and Bytes Sent/sec.
These tools ensure that you can proactively manage and troubleshoot your IIS installations efficiently.
Hosting Web Applications on IIS
Hosting web applications on IIS involves deploying applications, integrating database services, and managing websites to ensure seamless access and functionality.
Deploying ASP.NET and PHP Applications
Deploying ASP.NET applications on IIS is straightforward. First, I ensure the IIS installation is complete and the ASP.NET modules are enabled. I use the Solution Explorer in Visual Studio to publish my application.
PHP applications are also easy to deploy. I usually install the PHP module for IIS, configure the relevant .ini files, and copy the PHP application files to the wwwroot directory. Then, I set appropriate handler mappings.
Key steps:
- Install relevant modules (ASP.NET or PHP)
- Publish and configure applications
- Set handler mappings and permissions
Integrating with Databases and Setting Up WordPress
Integrating databases with IIS-hosted applications is crucial for dynamic websites. For ASP.NET, I configure connection strings to my SQL Server database in the web.config file. In PHP, I primarily work with MySQL, editing the config.php file.
Setting up WordPress involves creating a MySQL database, downloading WordPress, and placing files in wwwroot. I run the WordPress installer via browser, follow the setup steps, and ensure the wp-content directory has writable permissions.
Important points:
- Database configuration in application files
- MySQL or SQL Server integration
- WordPress installation and setup
Managing the Default Website and Custom Web Pages
Managing the IIS Default Web Site and custom web pages includes configuring settings, managing bindings, and creating virtual directories. I modify the physical path of the Default Web Site to point to my application’s directory.
I use bindings to assign the site to specific IP addresses or hostnames. Creating virtual directories allows me to host multiple applications under one domain. Using SSL/TLS certificates ensures secure HTTPS access.
Steps include:
- Modify physical path
- Set up bindings and SSL certificates
- Create virtual directories for multiple apps
Handling the Default Web Site and custom web pages ensures a tailored, secure, and efficient hosting environment on IIS.
In this tutorial, we’ll explain, step by step, how to install IIS on Windows 10 so that you can test code or even publish web content from your desktop.
IIS is Microsoft’s web and FTP server and it is widely used by IT professionals around the world. This is mainly for two reasons. Firstly, it is already included with Microsoft Windows and is very easy to install, and secondly, it’s extremely simple to use.
It can also be installed on any Windows desktop or laptop, which means that you can even test changes or web content without needing to set up a special pilot or test environment.
NOTE: This tutorial will focus just on the installation process for Windows 10. We’re not going to go into any detail about how to use IIS today. If you’re like to learn how to install IIS on Windows Server, check out the tutorial on our blog, “How to Install IIS Web Server”.
Part 1 – Installing IIS on Windows 10
To install Internet Information Services (IIS) on a Windows 10 client device, first, click on the search bar and type «Control Panel» (1) and click on the app that appears in the results (2).

Next, double-click on Programs and Features (3).

A new window will appear. Click on «Turn Windows features on or off» (4).

Another window will now appear showing a list of features. Search the list to find Internet Information Services, expand the options and select the options you wish to install (5). The following options will be selected by default:
- Web Management Tools.
- World Wide Web Services.
«FTP Server» will be unchecked by default, but you can select it if you want to include it.
Once you’ve selected the options you want to install, click on OK (6) to begin the installation. You will then see a window with a progress bar until the process has finished.
There’s no need to restart your system to begin using the service, but we recommend it to clear the installation buffers, etc. and ensure the best performance.

Part 2 – Checking That IIS Has Been Installed Correctly
Now that the installation process has finished, it’s time to check that it has been installed correctly. First, open your web browser and type «127.0.0.1» in the address bar (7), which, if everything has run smoothly, will show the information loaded from the web server.

Another way of checking that IIS is running correctly is to open the Internet Information Services (IIS) Manager. Simply type «IIS» in the search bar (8) and click on Internet Information Services (IIS) Manager (9).

This will open the IIS Manager, which you can use to carry out all configuration and administration tasks for the web server.

If either of these two checks work correctly, you can safely say that you have installed IIS on your Windows 10 device. Congratulations!
Summary
In this tutorial, we’ve shown how you can quickly install IIS (Internet Information Services) on your Windows 10 device so that you can test out web content and changes from your desktop.
The process is really simple, and you should find everything you need in this tutorial, but if you have any problems, don’t hesitate to contact us.
And if you’re interested in learning about other things you can do on Windows 10, check out our article on How to Install Hyper-V on Windows 10.
Thanks for choosing Jotelulu!