
The Microsoft Photos app is one of the most popular and useful apps in Windows 11. This is the default image viewer, allows you to view, edit, and organize your photos and videos easily. Recently Microsoft updated the Photos app with significant features including the ability to blur the background and search by querying content from an image. However, sometimes you may notice the photos app not working, crashing, not opening, or displaying errors. This article explores the reason behind this and how to repair or reset the Photos app in Windows 11 to fix common issues and restore its functionality.
Contents
- 1 Why Photos app not working Windows 11?
- 1.1 How to repair or reset the Photos app in Windows 11?
- 1.2 Update Windows 11 and the Photos app
- 1.3 Run the Windows Store troubleshooter
- 1.4 Repair system files using SFC and DISM commands
- 1.5 Reinstall the Photos app using PowerShell
- 1.6 Perform system restore
Why Photos app not working Windows 11?
There are many possible causes for the Photos app not working in Windows 11. Some of the most common ones are:
- The Photos app is not set as the default app for opening photos and videos. This can happen if you have installed another app that changes the file associations or if you have changed them manually.
- The Photos app is outdated or has some bugs. This can happen if you have not updated Windows 11 or the Photos app for a long time or if there are some glitches in the app itself.
- May Photos app has some corrupted or missing files. This can happen if you have deleted or modified some files related to the Photos app or if your system has some disk errors or malware infections.
- The Photos app has some incompatible settings or preferences. This can happen if you have changed some settings or options in the Photos app that are not compatible with your system or hardware.
- The Photos app has some conflicts with other apps or programs. This can happen if you have installed some apps or programs that interfere with the Photos app’s performance or functionality.
How to repair or reset the Photos app in Windows 11?
Repairing the Photos app will try to fix any issues with the app without affecting your data or settings. Resetting the Photos app will reinstall the app and delete its data and settings, so you may need to set up the app again after resetting it. If the Photos app is not working properly in Windows 11, repairing or resetting the Photos app can resolve persistent issues.
- Open the Settings app by pressing the Windows + I keys on your keyboard or by clicking on the Start menu and selecting Settings.
- Select “ Apps ” in the left panel, and click “ Installed apps ” in the right panel.
- Click the three horizontal dots in front of the Microsoft Photos app, and click ” Advanced Options ” in the context menu.
- You will see two options: Repair and Reset. Click on Repair first and wait for the process to complete. This will try to fix any issues with the Photos app without affecting your data or settings.
- If repairing does not work, you can try to reset the Photos app by clicking on Reset. This will delete all your data and settings related to the Photos app and restore it to its default state.
- After resetting, you may need to sign in again with your Microsoft account and grant permission to access your photos and videos.
If repairing or resetting the Photos app does not solve your problem, you can try some other solutions, such as:
Update Windows 11 and the Photos app
Microsoft regularly releases updates to address bugs and improve system stability. Keeping your Windows 11 updated not only enhances system performance but also addresses compatibility issues, ensuring a seamless Photos app experience.
To update Windows 11:
- Press Windows key + I to open Settings
- Go to Windows Update then click Check for updates.
- If new updates are pending there allow them downlaod and install on your computer.
To update the Photos app, go to Microsoft Store > Library > Downloads and updates and click on Get updates.
Updating the app ensures you have the latest features and fixes, often resolving compatibility problems that could lead to malfunctions.
Run the Windows Store troubleshooter
Running the Windows Store troubleshooter can indeed be a helpful step if you’re facing issues with the Photos app, as the app is often associated with the Microsoft Store. The troubleshooter can identify and attempt to fix problems that might be affecting the store and its associated apps.
- Press the Windows key + I to open the Settings app.
- Go to the system then troubleshoot and click on Other troubleshooters,
- click Run next to Windows store apps, The troubleshooter will begin detecting and attempting to resolve issues.
This will scan and fix any issues with the Windows Store and its apps, including the Photos app. After the troubleshooter completes its process, it’s advisable to restart your computer.
Repair system files using SFC and DISM commands
If certain files essential for the proper functioning of the application are missing or damaged on Windows 11 you may experience photos app not working or crashes. If you’re experiencing problems with the Photos app and suspect that it might be due to corrupted system files, Run SFC and DISM commands to scan and repair any corrupted or missing system files that may affect the Photos app’s performance.
- First open Command Prompt as administrator, press Windows key + S, type cmd, and select run as administrator,
- Then type sfc /scannow and press Enter to run SFC (System File Checker).
- Wait for it to finish and then type DISM /Online /Cleanup-Image /RestoreHealth and press Enter to run DISM (Deployment Image Servicing and Management).
- Wait for it to finish and then restart your computer.
These steps are general troubleshooting measures and may not specifically target Photos app issues. They are more focused on resolving system file corruption that could impact various aspects of your operating system.
Reinstall the Photos app using PowerShell
This is a more advanced solution that will completely uninstall and reinstall the Photos app on Windows 11. Reinstalling Photos app ensures that any corrupted files causing the issue are replaced with fresh, functional ones.
- To do this, open PowerShell as administrator by pressing Windows + X keys on your keyboard and selecting Windows PowerShell (Admin) from the menu.
- Then type Get-AppxPackage *Microsoft.Windows.Photos* | Remove-AppxPackage and press Enter to uninstall the Photos app.
- The Microsoft Photos application has been uninstalled, close Windows Terminal, and restart your computer so that the application is correctly uninstalled.
- Open the Microsoft Store, type ” Microsoft Photos ” in the ” Search for apps ” field, and press the ” Enter ” key. Click the “ Get ” button to download and reinstall the Photos app on your device.
Now go to the Photos application to check if it is now fully functional.
In addition, Confirm that the Photos app is set as the default application for opening image files. Go to Settings > Apps > Default apps > Photo viewer, and select “Photos.”
Perform system restore
If none above solutions fix your problem, and the photos app not working on Windows 11, you should try system restore. Performing a system restore helps resolve issues with the Photos app, especially if the problem started after a recent system change, update, or installation.
Press Windows key + R, type sysdm.cpl and click ok, move to the system protection tab, and select the system restore option.
Note: System restore does not affect your personal files, but it may uninstall recently installed programs and drivers.
Also read:
- Photos App Opens Extremely Slow in Windows 10? Apply these solutions
- Windows 11 Photos App not opening or Not working? Try these solutions
- Microsoft Photos App not Working after Windows 10 Update
- How to Keep Windows 10 Secure after Microsoft Ends Support
- How to Enable File History in Windows 11 and 10 (Customize Backup)
This file contains hidden or bidirectional Unicode text that may be interpreted or compiled differently than what appears below. To review, open the file in an editor that reveals hidden Unicode characters.
Learn more about bidirectional Unicode characters
| **Reinstall Microsoft Photos app** | |
| Open Windows PowerShell as Admin (right-click start button and select «Windows Powershell (Admin)») | |
| Copy/paste this command | |
| Get-AppxPackage Microsoft.Windows.Photos | Remove-AppxPackage | |
| Install the latest version by opening Microsoft Store and searching for «Microsoft Photos»; click Get | |
| Restart computer |
Do you want to reinstall the Photos app in Windows 10?
Sometimes Microsoft Photos app is not working due to some reasons. The app may not respond or shows some errors. By reinstalling the app, you can easily resolve most of the problems.
In this guide, I’ll show you how to reinstall the Photos app in Windows 10.
Windows 10 comes with some universal pre-installed apps. And Microsoft Photos app is one of them. You can view and edit photos using this app. Well, Microsoft Photos is more than just an image viewer.
Moreover, this app allows you to edit videos, make movies, and create albums with basic editing features. You can add text, music, filters, camera motions, and other adjustments. Also, it offers to add 3D effects to the video.
Well, the Photos app replaces Windows Photo Viewer. But, Windows Photo Viewer is also available in Windows 10, and you can easily select the classic photo viewer from default apps.
Microsoft Photos app is slower than the classic Windows Photo Viewer program and it uses high resources of the system. If you have a low-end machine, you may need to use a classic photo viewer program to quickly access it.
Well, when it comes to the pre-installed apps on Windows 10, there is no uninstall option available by default. That’s why most people face problems when the default app is not responding and shows errors.
Below are the three methods to reinstall the Photos app. Let’s get started.
How to Reinstall the Photos App in Windows 10
You can restart and update
Method 1. Using Reset
Windows 10 offers the Reset option for apps. If any app isn’t working, you can use the reset option. This will reinstall the app and all app’s data will be deleted. The steps are given below.
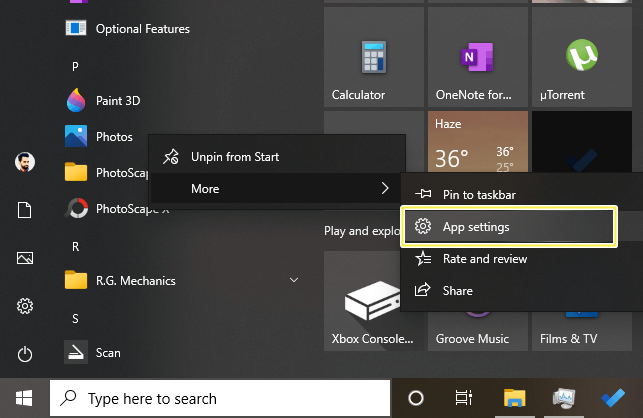
- Click on the Start menu and navigate to the Photos app from the programs list.
- Right-click on the Photos app and click on More » App Settings.

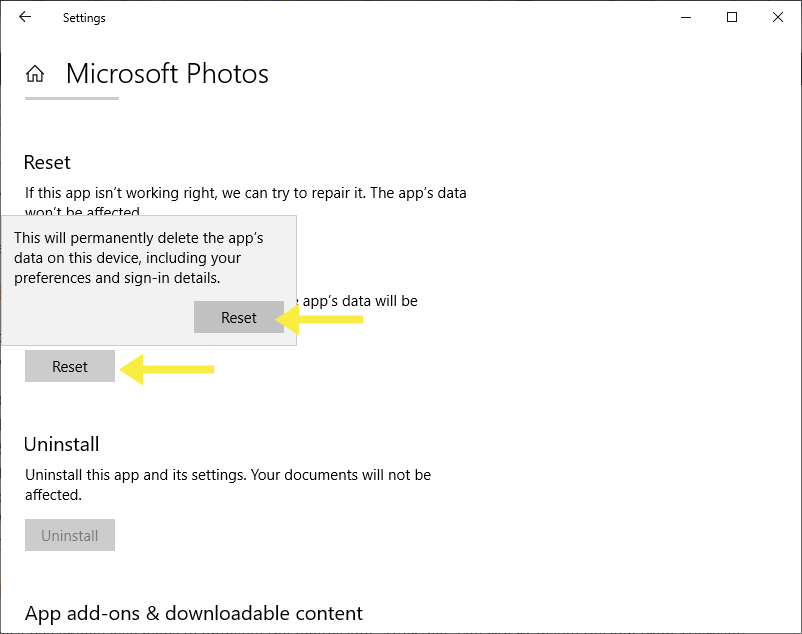
- Scroll down and click on the Reset button. You’ll see the confirmation message “This will permanently delete the app’s data on this device, including your preferences and sign-in details” with a Reset button. Click again on the Reset button.

- Wait for a few seconds and you’ll see the tick mark button when the progress will be completed.
- That’s it. Open the app from the Start menu or by clicking on the image.
Method 2. Reinstall Photos app Using Powershell
Windows Powershell also helps to uninstall the Photos app. After that, you can re-install the app from Microsoft Store.
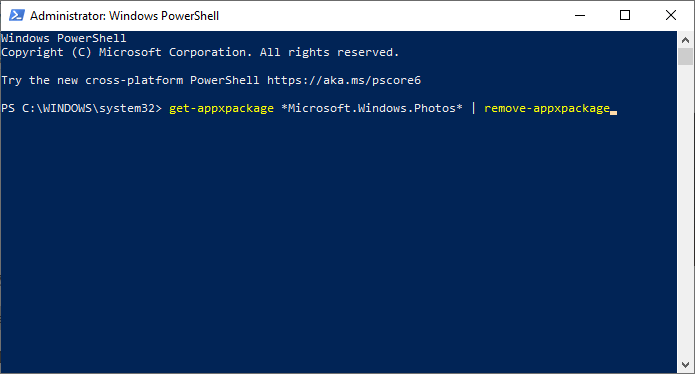
- At first, Run Windows Powershell as administrator. For this, click on the start menu and navigate to Windows Powershell from the programs list. After that, expand the folder and right-click on the Windows Powershell, and click on the “Run as administrator” option.
Click on the Yes button when you see the user account control pop-up window.
- Type or copy & paste the following command in Powershell and press the Enter button.
get-appxpackage *Microsoft.Windows.Photos* | remove-appxpackage
- Close the PowerShell and restart your PC to complete the process.

- After that, Open Microsoft Store and search for the Microsoft Photos app. Click on the Get button to install the app.

That’s all.
Fix if the Powershell command is not working
Sometimes, the PowerShell command may be unable to execute due to some reasons. To solve this problem, you need to know the app package’s full name.
To know the app package’s full name execute the following command in Powershell.
Get-AppxPackage Microsoft.Windows.Photos -allusers | select PackageFullName
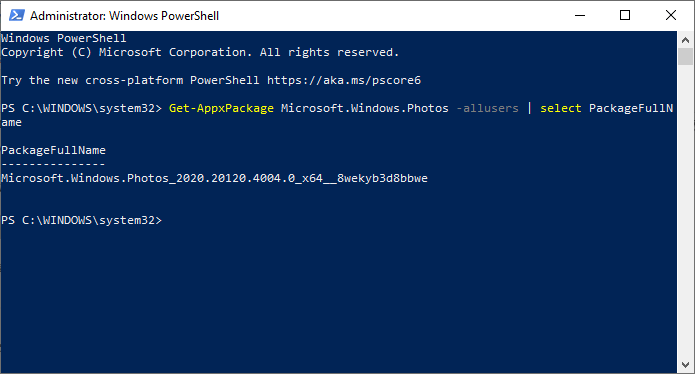
After executing, copy the App PackageFullName and execute the following command.
remove-AppxPackage PackageFullName
(Replace PackageFullName with the package name you copied from PowerShell)
After that, reinstall the app from Microsoft Store.
Method 3. Using Ccleaner
Ccleaner is one of the most popular PC Cleaner software to remove temporary/unwanted files, tracking files and cookies, invalid windows registries, system junk files, and more.
Well, you can also uninstall the Photos app using Ccleaner. The steps are given below.
- At first, download and install Ccleaner on your PC. After that, open the Ccleaner.
- Click on the Tools option from the left menu and click on the Uninstall option.
- Now you’ll see the apps and programs list that are installed on your PC. Navigate to the Photos app and right-click on it. Click on the Uninstall option from the context menu and select Ok to confirm.

- After uninstalling, Open Microsoft Store and search for the Microsoft Photos app and click on the Get or Free button to reinstall it.

That’s it.
Other Ways to fix if Photos App is not working
If the Photos app is not working and you don’t want to reinstall the app, then you can try other fixes.
1. Update the Photos app
If you’re getting trouble with any app, you should check for app updates from Microsoft Store. Every update adds a new feature and removes some bugs.
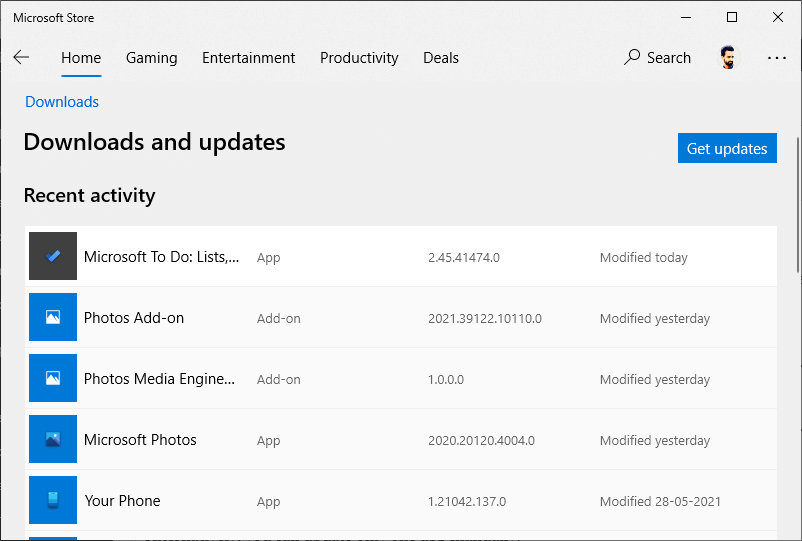
To update the app, Open Microsoft Store and click on the three horizontal dots from the top right of the window. After that, open the Downloads and Updates option.
Click on the Get Updates option. All available updates will be added to the download queue.
Alternatively, you can update only one app manually.
2. Run Windows Store Apps Troubleshooter
Windows 10 offers troubleshooting options. You can find and fix problems on your device with the help of a troubleshooter.
To run apps troubleshoot, follow the following steps.
- Open the Settings app by pressing Windows Key + I from the keyboard.
- Open Update and Security and click on the Troubleshoot option from the left menu.
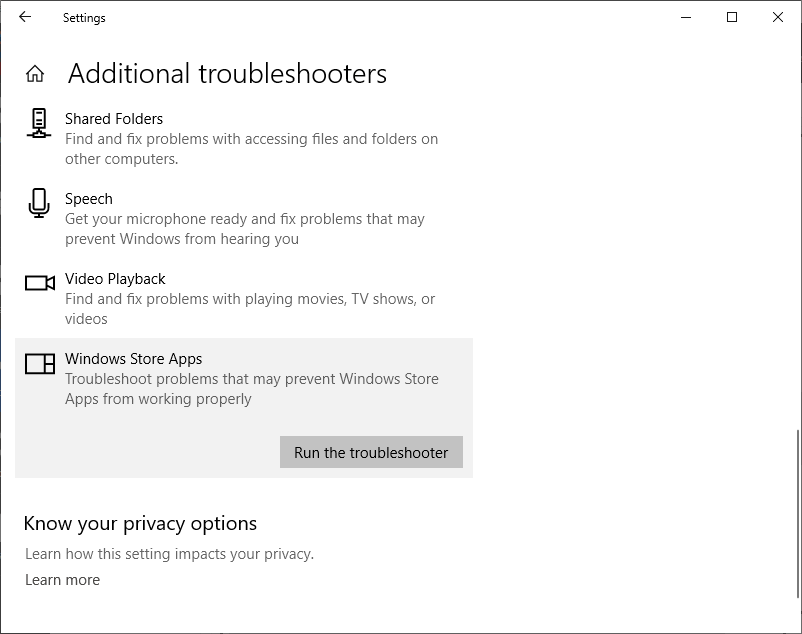
- Click on the Additional Troubleshooters. After that, Scroll down to the end of the page, and open the Windows Store Apps option. Click on the Run the troubleshooter button. This option troubleshoots problems that may prevent windows store apps from working properly.
- Wait for a while it detects problems. After that, it shows the suggestions to solve the problem. Click on the Next button.
- That’s it.
3. Update Windows OS
Keep your Windows 10 updated to prevent most of the problems. If you haven’t installed the latest updates, you should need to install them.
For this, Open Settings by pressing Windows key + I and open Update and Security. Click on the check for updates button and download & install all available updates.
4. Switch to Windows Photo Viewer
Classic Windows Photo Viewer is quick than the Photos app because it is lightweight and uses fewer system resources.
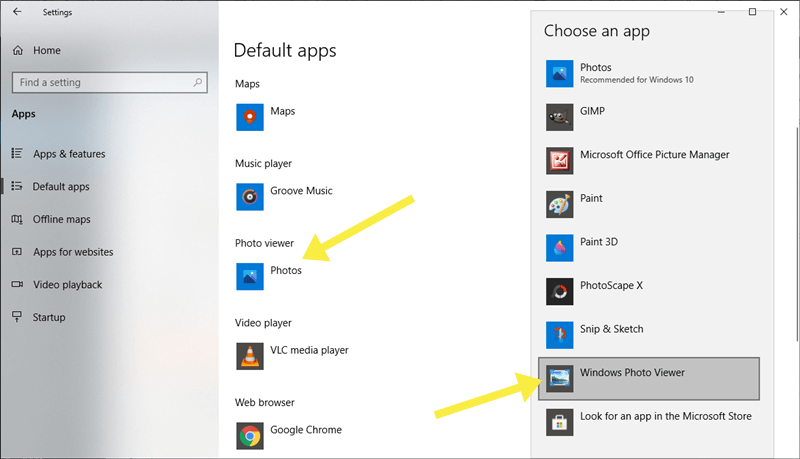
However, this program is disabled by default but still exists in Windows 10. You can add it to the default photo viewer from settings. The steps are given below.
- Open the Settings app on your PC. Press the Windows key + I keyboard shortcut to open it.
- Click on the Apps option. After that, click on the Default apps from the left menu.
- Now click on the select app from the photo viewer and select Windows Photo Viewer from the list.

Final Words
Now you know how to reinstall the photos app in Windows 10. Uninstalling the app using PowerShell is a convenient method. But, non-techy guys may not be friendly with this method. However, the Reset option may solve most of the problems. But, there are other fixes also available to solve the problems.
Microsoft Photos is one of the most popular built-in apps on Windows 11 and 10 but sometimes you might need to repair it. Specifically, when the application creates issues the easiest solution is to wipe out it from the system and then add to experience a fresh start. So here you will come across how to uninstall and reinstall Photos app in Windows 11 or 10.
You might experience the default Photo viewer app for Windows 11 and 10 is not working or missing then this is the super basic troubleshoot. Furthermore, if the application is not available for any reason after installing the OS you can install manually with a PowerShell command using the following method. On many occasions, Microsoft Photos app may stop working properly or may not load the pictures. You can solve it easily by only using the procedure for reinstalling the application.
Uninstall and reinstall Photos app in Windows 11 and 10
Here is how to Uninstall and reinstall Photos app in Windows 11 or 10 –
1] Uninstall the application
1st method – Via PowerShell
- Click on Start and type Powershell.
- Select Run as administrator from the right pane.
- Paste the following text and then hit Enter –
get-appxpackage *photos* | remove-appxpackage
- Wait for a while until the Microsoft photos app is removed.
2nd method – From Settings
- Click on Start and type photos.
- Right click on Photos app and select App settings.
- Select Uninstall from the Microsoft Photos settings page.
Note – Many times the Uninstall button is greyed out so use the first method in this case.
2] Reinstall Photos app in Windows 11 and 10
From Microsoft Store
- Click on Store icon from the Taskbar.
- Type Photos in the search bar.
- Select Microsoft Photos from result dropdown.
- Choose Install.
Using Powershell
- Open elevated Powershell as guided in previous method.
- Copy-paste the following command and hit enter –
Get-AppXPackage | Foreach {Add-AppxPackage -DisableDevelopmentMode -Register "C:\Program Files\WindowsApps\Microsoft.Windows.Photos_2020.20070.10002.0_x64__8wekyb3d8bbwe\AppxManifest.xml"}- Allow the code to complete running and then check the app.
Note – Path of the app is copied in Windows 10 2004.
Directly Uninstall and reinstall Photos app in Windows 11 or 10
Using a PowerShell cmdlet you can directly uninstall and reinstall entire inbuilt apps including Photos for all users. You don’t need to remove the same separately and add.
- Type the below command and press Enter –
Get-AppxPackage -AllUsers| Foreach {Add-AppxPackage -DisableDevelopmentMode -Register "$($_.InstallLocation)\AppXManifest.xml"}That’s all!!!
This article will serve as an informative guide and give you a clear understanding of how to perform silent or interactive installs and uninstalls of the Microsoft Photos (Microsoft Store App) using the Powershell App Deployment Toolkit. The PowerShell App Deployment Toolkit can be used to replace your WiseScript, VBScript and Batch wrapper scripts with one versatile, re-usable and extensible tool. This tool is an absolute must for Microsoft Endpoint Manager Configuration Manager (MEMCM) / (SCCM) Administrators or anyone who is responsible for packaging and deploying software.
How to Install the Microsoft Photos (Microsoft Store App) Using the PowerShell App Deployment Toolkit
- Download the Powershell App Deployment Toolkit 3.8.4:
- https://github.com/PSAppDeployToolkit/PSAppDeployToolkit/releases/download/3.8.4/PSAppDeployToolkit_v3.8.4.zip
- Download the zip file to a folder created at (C:\Downloads)
- Open Windows PowerShell by Right-Clicking on Windows PowerShell and selecting Run as Administrator
- Enter the following command to remove the Zone.Identifier:
Unblock-File -Path C:\Downloads\PSAppDeployToolkit_v3.8.4.zip
- Enter the following command to extract the contents of the zip file:
Expand-Archive -Path C:\Downloads\PSAppDeployToolkit_v3.8.4.zip -DestinationPath C:\Downloads\PADT
- Enter the following commands to copy the AppDeployToolkit & Files folder to “C:\Downloads\PhotosApp“:
Copy-Item -Path "C:\Downloads\PADT\Toolkit\AppDeployToolkit" -Destination "C:\Downloads\PhotosApp\AppDeployToolkit" -RecurseCopy-Item -Path "C:\Downloads\PADT\Toolkit\Files" -Destination "C:\Downloads\PhotosApp\Files"
You should now see the AppDeploymentToolkit folder with files & the empty Files folder at “C:\Downloads\PhotosApp”
Next we’ll want to download the Microsoft Photos (Microsoft Store App) & dependency files using PowerShell.
- Copy the PowerShell script below to “C:\Downloads” & name it Get_Store_Downloads.ps1
- Script Reference: https://flexxible.com/automating-msix-packaging-with-powershell/
#Requires -version 3
<#
.SYNOPSIS
Get links to Microsoft Store downloads and optionally download packages
.DESCRIPTION
Downloaded packages can be installed via Add-AppxPackage -Path
.PARAMETER packageFamilyName
A list of package family names to download
.PARAMETER name
A regular expression which will select the family package names for existing AppX package names that match
.PARAMETER packageTypeFilter
The types of package to download
.PARAMETER downloadFolder
The folder to download non-excluded files to. Will be created if does not exist. If not specified, files will not be downloaded
.PARAMETER ring
The release ring to download
.PARAMETER proxy
Proxy server to use
.PARAMETER excludeExtensions
List of file extensions to not download
.PARAMETER excluderegex
If download Links match this regular expression they will not be downloaded
.PARAMETER language
The language for downloading files
.PARAMETER force
Overwrite files which already exist
.PARAMETER all
Interrogate all local AppX packages rather than just those available to the user running the script (requires elevation). Use with -name
.EXAMPLE
Powershell.exe -ExecutionPolicy ByPass "&" '.\Get_Store_Downloads.ps1' -packageFamilyName Microsoft.Windows.Photos_8wekyb3d8bbwe -downloadFolder C:\Downloads\PhotosApp\Files -excludeRegex 'arm' -force
Downloads the resources from the Microsoft Store for the Microsoft Photos App, excluding files for arm and arm64 architecture and save the files to C:\Downloads\PhotosApp\Files
.NOTES
Modification History:
2022/03/18 @guyrleech Initial public release
2022/03/29 modified by Jason Bergner
#>
<#
Copyright © 2022 Guy Leech
Permission is hereby granted, free of charge, to any person obtaining a copy of this software and associated documentation files (the “Software”), to deal in the Software without restriction,
including without limitation the rights to use, copy, modify, merge, publish, distribute, sublicense, and/or sell copies of the Software, and to permit persons to whom the Software is furnished to do so, subject to the following conditions:
The above copyright notice and this permission notice shall be included in all copies or substantial portions of the Software.
THE SOFTWARE IS PROVIDED “AS IS”, WITHOUT WARRANTY OF ANY KIND, EXPRESS OR IMPLIED, INCLUDING BUT NOT LIMITED TO THE WARRANTIES OF MERCHANTABILITY, FITNESS FOR A PARTICULAR PURPOSE AND NONINFRINGEMENT.
IN NO EVENT SHALL THE AUTHORS OR COPYRIGHT HOLDERS BE LIABLE FOR ANY CLAIM, DAMAGES OR OTHER LIABILITY, WHETHER IN AN ACTION OF CONTRACT, TORT OR OTHERWISE, ARISING FROM, OUT OF OR IN CONNECTION WITH THE SOFTWARE OR THE USE OR OTHER DEALINGS IN THE SOFTWARE.
#>
[CmdletBinding()]
Param
(
[Parameter(Mandatory=$true,ParameterSetName='Family')]
[string[]]$packageFamilyName ,
[Parameter(Mandatory=$true,ParameterSetName='Name')]
[string]$name ,
[Parameter(Mandatory=$false,ParameterSetName='Name')]
[string]$packageTypeFilter = 'All' ,
[string]$downloadFolder ,
[ValidateSet('Slow','Retail','Fast,','RP')]
[string]$ring = 'retail' ,
[string]$proxy ,
[string[]]$excludeExtensions = ('','blockmap','eappx','eappxbundle') ,
[string]$excludeRegex ,
[string]$language = 'en-US' ,
[switch]$force ,
[Parameter(Mandatory=$false,ParameterSetName='Name')]
[switch]$all
)
[hashtable]$proxyParameters = @{}
if( ! [string]::IsNullOrEmpty( $proxy ) )
{
$proxyServer = New-Object -TypeName 'System.Net.WebProxy'
$proxyServer.Address = [uri]$proxy
$proxyServer.UseDefaultCredentials = $true
[System.Net.WebRequest]::DefaultWebProxy = $proxyServer
$proxyParameters.Add( 'Proxy' , $proxy )
$proxyParameters.Add( 'ProxyUseDefaultCredentials' , $true )
Write-Verbose "Proxy set to $proxy"
}
##https://stackoverflow.com/questions/41897114/unexpected-error-occurred-running-a-simple-unauthorized-rest-query?rq=1
Add-Type -TypeDefinition @'
public class SSLHandler
{
public static System.Net.Security.RemoteCertificateValidationCallback GetSSLHandler()
{
return new System.Net.Security.RemoteCertificateValidationCallback((sender, certificate, chain, policyErrors) => { return true; });
}
}
'@
[System.Net.ServicePointManager]::ServerCertificateValidationCallback = [SSLHandler]::GetSSLHandler()
[Net.ServicePointManager]::SecurityProtocol = [Net.ServicePointManager]::SecurityProtocol -bor [System.Net.SecurityProtocolType]::Tls12
if( $PSCmdlet.ParameterSetName -eq 'Name' )
{
Import-Module -Name AppX -Verbose:$false
[array]$packages = @( Get-AppxPackage -AllUsers:$all -PackageTypeFilter $PackageTypeFilter | Where-Object PackageFamilyName -Match $name )
if( $null -eq $packages -or $packages.Count -eq 0 )
{
Throw "No existing AppX packages found matching $name"
}
$packageFamilyName = $packages | Select-Object -ExpandProperty PackageFamilyName -Unique
}
Write-Verbose -Message "Got $($packageFamilyName.Count) packages"
$webclient = $null
if( -Not [string]::IsNullOrEmpty( $downloadFolder ) )
{
if( -Not ( Test-Path -Path $downloadFolder -ErrorAction SilentlyContinue ) )
{
$null = New-Item -Path $downloadFolder -Force -ItemType Directory -ErrorAction Stop
}
if( -Not ( $webClient = New-Object -TypeName System.Net.WebClient ) )
{
Throw "Failed to create a System.Net.WebClient object"
}
}
[int]$count = 0
ForEach( $package in $packageFamilyName )
{
$count++
[string]$requestBody = "type=PackageFamilyName&url=$package&ring=$ring&lang=$language"
$response = $null
$session = $null
$response = Invoke-WebRequest -URI 'https://store.rg-adguard.net/api/GetFiles' -body $requestBody -Method Post -ContentType 'application/x-www-form-urlencoded' -SessionVariable session @proxyParameters
if( $response -and $response.PSObject.Properties[ 'links' ] -and $response.Links.Count -gt 0 )
{
##Write-Verbose -Message "$count / $($packageFamilyName.Count) : Got $($response.Links.Count) links for $requestBody"
ForEach( $link in ($response.Links | Where-Object href -match '^https?://' ))
{
[string]$extension = [System.IO.Path]::GetExtension( $link.innerText ) -replace '^\.'
if( $extension -in $excludeExtensions )
{
Write-Verbose -Message "Ignoring `"$($link.innerText)`" as extension $extension in exclude list"
}
elseif( -Not [string]::IsNullOrEmpty( $excludeRegex ) -and $link.innerText -match $excludeRegex )
{
Write-Verbose -Message "Ignoring `"$($link.innerText)`" as matches $excludeRegex"
}
else
{
$result = [pscustomobject]@{
'PackageFamilyName' = $package
'File' = $link.innertext
'Link' = $link.href
}
if( -Not [string]::IsNullOrEmpty( $downloadFolder ) )
{
[string]$destinationFile = Join-Path -Path $downloadFolder -ChildPath $link.InnerText
if( ( Test-Path -Path $destinationFile -ErrorAction SilentlyContinue) -and -Not $force )
{
Write-Warning -Message "Not downloading to `"$destinationFile`" as already exists - use -force to overwrite"
}
else
{
try
{
$webclient.DownloadFile( ( $link.href -replace '&' , '&' ) , $destinationFile )
if( $properties = Get-ItemProperty -Path $destinationFile )
{
Add-Member -InputObject $result -NotePropertyMembers @{
'Download' = $properties.FullName
'Size (KB)' = [math]::Round( $properties.Length / 1KB , 1 )
}
}
else
{
Write-Warning -Message "Unable to get file properties for $destinationFile"
}
}
catch
{
Write-Warning -Message "Problem downloading $($link.href) - $_"
}
}
}
$result
}
}
}
else
{
## <img src="../img/stop.png">The server returned an empty list.<br>Either you have not entered the link correctly, or this service does not support generation for this product.</p><script type="text/javascript">
Write-Warning -Message "No data or links returned for $requestBody - $($response.Content -split "`n`r?" , 2 -replace '\<[^\>]+\>' | Select-Object -First 1)"
}
}
- Add the following registry key to suppress the “To Allow this website to provide information personalized for you, will you allow it to put a small file (cookie) on your computer?” popup message
REG ADD "HKCU\SOFTWARE\Microsoft\Windows\CurrentVersion\Internet Settings\Zones\3" /t REG_DWORD /v 1A10 /f /d 0
- Open Windows PowerShell by Right-Clicking on Windows PowerShell and selecting Run as Administrator
- Change the directory to “C:\Downloads”
- PS C:\Downloads>
- Enter the following command to download the installation files:
Powershell.exe -ExecutionPolicy ByPass "&" '.\Get_Store_Downloads.ps1' -packageFamilyName Microsoft.Windows.Photos_8wekyb3d8bbwe -downloadFolder C:\Downloads\PhotosApp\Files -excludeRegex 'arm' -force
- After the download completes, you should see .appx & .appxbundle files inside the “C:\Downloads\PhotosApp\Files” directory
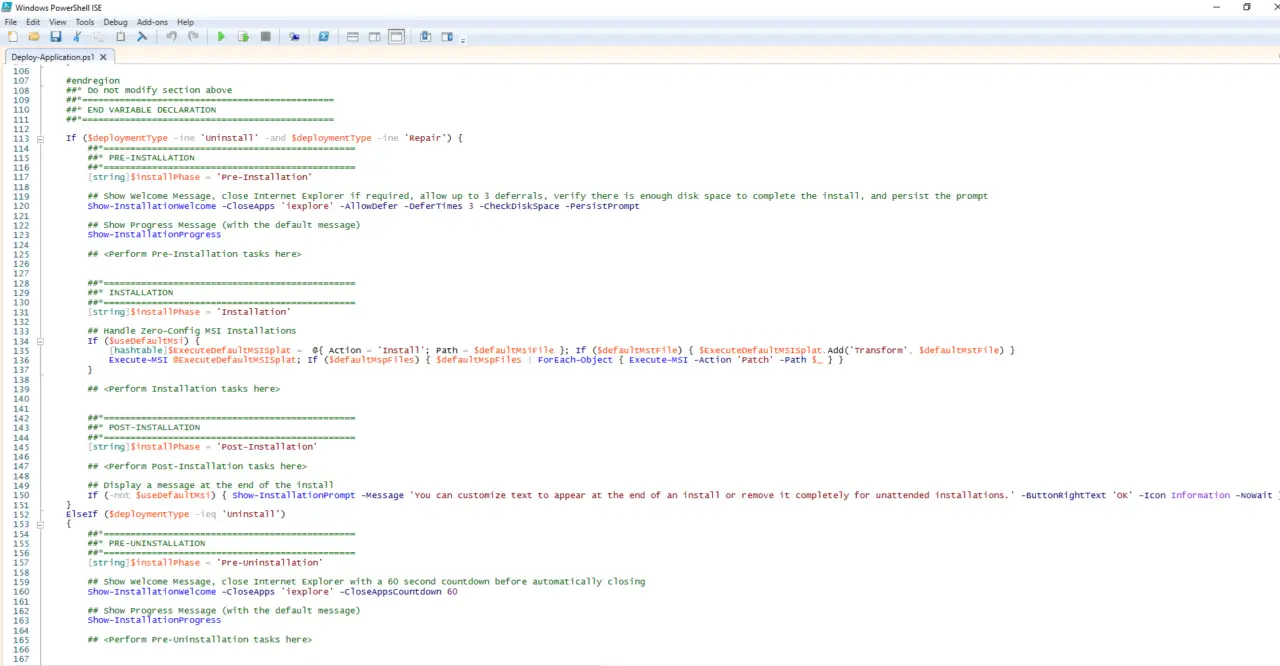
- Copy the PowerShell script below to “C:\Downloads\PhotosApp“ & name it Deploy-PhotosApp.ps1
<#
.SYNOPSIS
	This script performs the installation or uninstallation of the Microsoft Photos Microsoft Store App.
	# LICENSE #
	PowerShell App Deployment Toolkit - Provides a set of functions to perform common application deployment tasks on Windows.
	Copyright (C) 2017 - Sean Lillis, Dan Cunningham, Muhammad Mashwani, Aman Motazedian.
	This program is free software: you can redistribute it and/or modify it under the terms of the GNU Lesser General Public License as published by the Free Software Foundation, either version 3 of the License, or any later version. This program is distributed in the hope that it will be useful, but WITHOUT ANY WARRANTY; without even the implied warranty of MERCHANTABILITY or FITNESS FOR A PARTICULAR PURPOSE. See the GNU General Public License for more details.
	You should have received a copy of the GNU Lesser General Public License along with this program. If not, see <http://www.gnu.org/licenses/>.
.DESCRIPTION
	The script is provided as a template to perform an install or uninstall of an application(s).
	The script either performs an "Install" deployment type or an "Uninstall" deployment type.
	The install deployment type is broken down into 3 main sections/phases: Pre-Install, Install, and Post-Install.
	The script dot-sources the AppDeployToolkitMain.ps1 script which contains the logic and functions required to install or uninstall an application.
.PARAMETER DeploymentType
	The type of deployment to perform. Default is: Install.
.PARAMETER DeployMode
	Specifies whether the installation should be run in Interactive, Silent, or NonInteractive mode. Default is: Interactive. Options: Interactive = Shows dialogs, Silent = No dialogs, NonInteractive = Very silent, i.e. no blocking apps. NonInteractive mode is automatically set if it is detected that the process is not user interactive.
.PARAMETER AllowRebootPassThru
	Allows the 3010 return code (requires restart) to be passed back to the parent process (e.g. SCCM) if detected from an installation. If 3010 is passed back to SCCM, a reboot prompt will be triggered.
.PARAMETER TerminalServerMode
	Changes to "user install mode" and back to "user execute mode" for installing/uninstalling applications for Remote Destkop Session Hosts/Citrix servers.
.PARAMETER DisableLogging
	Disables logging to file for the script. Default is: $false.
.EXAMPLE
    PowerShell.exe .\Deploy-PhotosApp.ps1 -DeploymentType "Install" -DeployMode "NonInteractive"
.EXAMPLE
    PowerShell.exe .\Deploy-PhotosApp.ps1 -DeploymentType "Install" -DeployMode "Silent"
.EXAMPLE
    PowerShell.exe .\Deploy-PhotosApp.ps1 -DeploymentType "Install" -DeployMode "Interactive"
.EXAMPLE
    PowerShell.exe .\Deploy-PhotosApp.ps1 -DeploymentType "Uninstall" -DeployMode "NonInteractive"
.EXAMPLE
    PowerShell.exe .\Deploy-PhotosApp.ps1 -DeploymentType "Uninstall" -DeployMode "Silent"
.EXAMPLE
    PowerShell.exe .\Deploy-PhotosApp.ps1 -DeploymentType "Uninstall" -DeployMode "Interactive"
.NOTES
	Toolkit Exit Code Ranges:
	60000 - 68999: Reserved for built-in exit codes in Deploy-Application.ps1, Deploy-Application.exe, and AppDeployToolkitMain.ps1
	69000 - 69999: Recommended for user customized exit codes in Deploy-Application.ps1
	70000 - 79999: Recommended for user customized exit codes in AppDeployToolkitExtensions.ps1
.LINK
	http://psappdeploytoolkit.com
#>
[CmdletBinding()]
Param (
	[Parameter(Mandatory=$false)]
	[ValidateSet('Install','Uninstall','Repair')]
	[string]$DeploymentType = 'Install',
	[Parameter(Mandatory=$false)]
	[ValidateSet('Interactive','Silent','NonInteractive')]
	[string]$DeployMode = 'Interactive',
	[Parameter(Mandatory=$false)]
	[switch]$AllowRebootPassThru = $false,
	[Parameter(Mandatory=$false)]
	[switch]$TerminalServerMode = $false,
	[Parameter(Mandatory=$false)]
	[switch]$DisableLogging = $false
)

Try {
	## Set the script execution policy for this process
	Try { Set-ExecutionPolicy -ExecutionPolicy 'ByPass' -Scope 'Process' -Force -ErrorAction 'Stop' } Catch {}

	##*===============================================
	##* VARIABLE DECLARATION
	##*===============================================
	## Variables: Application
	[string]$appVendor = ''
	[string]$appName = 'Microsoft Photos Microsoft Store App'
	[string]$appVersion = ''
	[string]$appArch = ''
	[string]$appLang = ''
	[string]$appRevision = ''
	[string]$appScriptVersion = '1.0.0'
	[string]$appScriptDate = 'XX/XX/20XX'
	[string]$appScriptAuthor = 'Jason Bergner'
	##*===============================================
	## Variables: Install Titles (Only set here to override defaults set by the toolkit)
	[string]$installName = ''
	[string]$installTitle = 'Microsoft Photos Microsoft Store App'

	##* Do not modify section below
	#region DoNotModify

	## Variables: Exit Code
	[int32]$mainExitCode = 0

	## Variables: Script
	[string]$deployAppScriptFriendlyName = 'Deploy Application'
	[version]$deployAppScriptVersion = [version]'3.8.4'
	[string]$deployAppScriptDate = '26/01/2021'
	[hashtable]$deployAppScriptParameters = $psBoundParameters

	## Variables: Environment
	If (Test-Path -LiteralPath 'variable:HostInvocation') { $InvocationInfo = $HostInvocation } Else { $InvocationInfo = $MyInvocation }
	[string]$scriptDirectory = Split-Path -Path $InvocationInfo.MyCommand.Definition -Parent

	## Dot source the required App Deploy Toolkit Functions
	Try {
		[string]$moduleAppDeployToolkitMain = "$scriptDirectory\AppDeployToolkit\AppDeployToolkitMain.ps1"
		If (-not (Test-Path -LiteralPath $moduleAppDeployToolkitMain -PathType 'Leaf')) { Throw "Module does not exist at the specified location [$moduleAppDeployToolkitMain]." }
		If ($DisableLogging) { . $moduleAppDeployToolkitMain -DisableLogging } Else { . $moduleAppDeployToolkitMain }
	}
	Catch {
		If ($mainExitCode -eq 0){ [int32]$mainExitCode = 60008 }
		Write-Error -Message "Module [$moduleAppDeployToolkitMain] failed to load: `n$($_.Exception.Message)`n `n$($_.InvocationInfo.PositionMessage)" -ErrorAction 'Continue'
		## Exit the script, returning the exit code to SCCM
		If (Test-Path -LiteralPath 'variable:HostInvocation') { $script:ExitCode = $mainExitCode; Exit } Else { Exit $mainExitCode }
	}

	#endregion
	##* Do not modify section above
	##*===============================================
	##* END VARIABLE DECLARATION
	##*===============================================

	If ($deploymentType -ine 'Uninstall' -and $deploymentType -ine 'Repair') {
		##*===============================================
		##* PRE-INSTALLATION
		##*===============================================
		[string]$installPhase = 'Pre-Installation'

		## Show Welcome Message, Close Microsoft Photos App With a 60 Second Countdown Before Automatically Closing
		Show-InstallationWelcome -CloseApps 'Microsoft.Photos' -CloseAppsCountdown 60

		## Show Progress Message (with the default message)
		Show-InstallationProgress

        ## Remove Any Existing Versions of the Microsoft Photos Microsoft Store App
        $AppPackageNames = @(
        "Microsoft.Windows.Photos"
        )
        foreach ($AppName in $AppPackageNames) {
        Execute-ProcessAsUser -Path "$PSHOME\powershell.exe" -Parameters "-WindowStyle Hidden Get-AppxPackage -Name $AppName | Remove-AppxPackage" -Wait
        #Execute-ProcessAsUser -Path "$PSHOME\powershell.exe" -Parameters "-WindowStyle Hidden Get-AppxPackage -AllUsers -Name $AppName | Remove-AppxPackage -AllUsers" -Wait

        Execute-ProcessAsUser -Path "$PSHOME\powershell.exe" -Parameters "-WindowStyle Hidden Get-AppXProvisionedPackage -Online | Where-Object DisplayName -eq $AppName | Remove-AppxProvisionedPackage -Online" -Wait
        #Execute-ProcessAsUser -Path "$PSHOME\powershell.exe" -Parameters "-WindowStyle Hidden Get-AppXProvisionedPackage -Online | Where-Object DisplayName -eq $AppName | Remove-AppxProvisionedPackage -AllUsers -Online" -Wait
        }

		##*===============================================
		##* INSTALLATION
		##*===============================================
		[string]$installPhase = 'Installation'

        ## Install Microsoft Photos Microsoft Store App Dependencies
        $DependencyPath = Get-ChildItem "$dirFiles" -Include *.appx -File -Recurse -ErrorAction SilentlyContinue

        ForEach ($Dependency in $DependencyPath) {
        Show-InstallationProgress "Installing the Microsoft Photos Microsoft Store App Dependencies. This may take some time. Please wait..."
        Execute-ProcessAsUser -Path "$PSHOME\powershell.exe" -Parameters "-WindowStyle Hidden Add-AppxPackage ""$Dependency""" -Wait
        }

        ## Install Microsoft Photos Microsoft Store App
        $AppPath = Get-ChildItem "$dirFiles" -Include *.appxbundle -File -Recurse -ErrorAction SilentlyContinue

        ForEach ($App in $AppPath) {
        Show-InstallationProgress "Installing the Microsoft Photos Microsoft Store App. This may take some time. Please wait..."
        Execute-ProcessAsUser -Path "$PSHOME\powershell.exe" -Parameters "-WindowStyle Hidden Add-AppxPackage ""$App""" -Wait
        }

		##*===============================================
		##* POST-INSTALLATION
		##*===============================================
		[string]$installPhase = 'Post-Installation'

	}
	ElseIf ($deploymentType -ieq 'Uninstall')
	{
		##*===============================================
		##* PRE-UNINSTALLATION
		##*===============================================
		[string]$installPhase = 'Pre-Uninstallation'

		## Show Welcome Message, Close Microsoft Photos App With a 60 Second Countdown Before Automatically Closing
		Show-InstallationWelcome -CloseApps 'Microsoft.Photos' -CloseAppsCountdown 60

        ## Show Progress Message (With a Message to Indicate the Application is Being Uninstalled)
        Show-InstallationProgress -StatusMessage "Uninstalling the $installTitle. Please Wait..."


		##*===============================================
		##* UNINSTALLATION
		##*===============================================
		[string]$installPhase = 'Uninstallation'

        ## Uninstall Any Existing Versions of the Microsoft Photos App
        $AppPackageNames = @(
        "Microsoft.Windows.Photos"
        )
        foreach ($AppName in $AppPackageNames) {
        #Execute-ProcessAsUser -Path "$PSHOME\powershell.exe" -Parameters "-WindowStyle Hidden Get-AppxPackage -Name $AppName | Remove-AppxPackage" -Wait
        Execute-ProcessAsUser -Path "$PSHOME\powershell.exe" -Parameters "-WindowStyle Hidden Get-AppxPackage -AllUsers -Name $AppName | Remove-AppxPackage -AllUsers" -Wait

        #Execute-ProcessAsUser -Path "$PSHOME\powershell.exe" -Parameters "-WindowStyle Hidden Get-AppXProvisionedPackage -Online | Where-Object DisplayName -eq $AppName | Remove-AppxProvisionedPackage -Online" -Wait
        Execute-ProcessAsUser -Path "$PSHOME\powershell.exe" -Parameters "-WindowStyle Hidden Get-AppXProvisionedPackage -Online | Where-Object DisplayName -eq $AppName | Remove-AppxProvisionedPackage -AllUsers -Online" -Wait
        }

        ## Add Registry Keys to Prevent Windows Apps from Reinstalling
        Write-Log -Message "Adding Registry Keys to Prevent Windows Apps from Reinstalling."

        [scriptblock]$HKCURegistrySettings = {
        Set-RegistryKey -Key 'HKCU\Software\Microsoft\Windows\CurrentVersion\ContentDeliveryManager' -Name 'ContentDeliveryAllowed' -Value 0 -Type DWord -SID $UserProfile.SID
        Set-RegistryKey -Key 'HKCU\Software\Microsoft\Windows\CurrentVersion\ContentDeliveryManager' -Name 'FeatureManagementEnabled' -Value 0 -Type DWord -SID $UserProfile.SID
        Set-RegistryKey -Key 'HKCU\Software\Microsoft\Windows\CurrentVersion\ContentDeliveryManager' -Name 'OemPreInstalledAppsEnabled' -Value 0 -Type DWord -SID $UserProfile.SID
        Set-RegistryKey -Key 'HKCU\Software\Microsoft\Windows\CurrentVersion\ContentDeliveryManager' -Name 'PreInstalledAppsEnabled' -Value 0 -Type DWord -SID $UserProfile.SID
        Set-RegistryKey -Key 'HKCU\Software\Microsoft\Windows\CurrentVersion\ContentDeliveryManager' -Name 'PreInstalledAppsEverEnabled' -Value 0 -Type DWord -SID $UserProfile.SID
        Set-RegistryKey -Key 'HKCU\Software\Microsoft\Windows\CurrentVersion\ContentDeliveryManager' -Name 'SilentInstalledAppsEnabled' -Value 0 -Type DWord -SID $UserProfile.SID
        Set-RegistryKey -Key 'HKCU\Software\Microsoft\Windows\CurrentVersion\ContentDeliveryManager' -Name 'SubscribedContent-314559Enabled' -Value 0 -Type DWord -SID $UserProfile.SID
        Set-RegistryKey -Key 'HKCU\Software\Microsoft\Windows\CurrentVersion\ContentDeliveryManager' -Name 'SubscribedContent-338387Enabled' -Value 0 -Type DWord -SID $UserProfile.SID
        Set-RegistryKey -Key 'HKCU\Software\Microsoft\Windows\CurrentVersion\ContentDeliveryManager' -Name 'SubscribedContent-338388Enabled' -Value 0 -Type DWord -SID $UserProfile.SID
        Set-RegistryKey -Key 'HKCU\Software\Microsoft\Windows\CurrentVersion\ContentDeliveryManager' -Name 'SubscribedContent-338389Enabled' -Value 0 -Type DWord -SID $UserProfile.SID
        Set-RegistryKey -Key 'HKCU\Software\Microsoft\Windows\CurrentVersion\ContentDeliveryManager' -Name 'SubscribedContent-338393Enabled' -Value 0 -Type DWord -SID $UserProfile.SID
        Set-RegistryKey -Key 'HKCU\Software\Microsoft\Windows\CurrentVersion\ContentDeliveryManager' -Name 'SubscribedContentEnabled' -Value 0 -Type DWord -SID $UserProfile.SID
        Set-RegistryKey -Key 'HKCU\Software\Microsoft\Windows\CurrentVersion\ContentDeliveryManager' -Name 'SystemPaneSuggestionsEnabled' -Value 0 -Type DWord -SID $UserProfile.SID
        }
        Invoke-HKCURegistrySettingsForAllUsers -RegistrySettings $HKCURegistrySettings -ErrorAction SilentlyContinue

        ## Add Registry Key to Disable Auto-Updating of Microsoft Store Apps
        Write-Log -Message "Adding Registry Key to Disable Auto-Updating of Microsoft Store Apps."
        Set-RegistryKey -Key 'HKLM\SOFTWARE\Policies\Microsoft\WindowsStore' -Name 'AutoDownload' -Value 2 -Type DWord

        # Add Registry Key to Prevent Suggested Applications from Returning
        Write-Log -Message "Adding Registry Key to Prevent Suggested Applications from Returning."
        Set-RegistryKey -Key 'HKLM\SOFTWARE\Policies\Microsoft\Windows\CloudContent' -Name 'DisableWindowsConsumerFeatures' -Value 1 -Type DWord

		##*===============================================
		##* POST-UNINSTALLATION
		##*===============================================
		[string]$installPhase = 'Post-Uninstallation'


	}
	ElseIf ($deploymentType -ieq 'Repair')
	{
		##*===============================================
		##* PRE-REPAIR
		##*===============================================
		[string]$installPhase = 'Pre-Repair'


		##*===============================================
		##* REPAIR
		##*===============================================
		[string]$installPhase = 'Repair'


		##*===============================================
		##* POST-REPAIR
		##*===============================================
		[string]$installPhase = 'Post-Repair'


    }
	##*===============================================
	##* END SCRIPT BODY
	##*===============================================

	## Call the Exit-Script function to perform final cleanup operations
	Exit-Script -ExitCode $mainExitCode
}
Catch {
	[int32]$mainExitCode = 60001
	[string]$mainErrorMessage = "$(Resolve-Error)"
	Write-Log -Message $mainErrorMessage -Severity 3 -Source $deployAppScriptFriendlyName
	Show-DialogBox -Text $mainErrorMessage -Icon 'Stop'
	Exit-Script -ExitCode $mainExitCode
}
Ok, all the hard work is done and now you can install or uninstall the Microsoft Photos (Microsoft Store App) using one single PowerShell script. Simply change the DeploymentType parameter to install or uninstall. Logging functionality is built-in automatically and you can view the log files under “C:\Windows\Logs\Software”.
Microsoft Photos (Microsoft Store App) NonInteractive Install (PowerShell)
NonInteractive means Very Silent, i.e. no blocking apps. This is automatically set if it is detected that the process is not running in the user session and it is not possible for anyone to provide input using a mouse or keyboard.
- Open Windows PowerShell by Right-Clicking on Windows PowerShell and selecting Run as Administrator
- Change the directory to “C:\Downloads\PhotosApp”
- PS C:\Downloads\PhotosApp>
- Enter the following command:
Powershell.exe -ExecutionPolicy Bypass .\Deploy-PhotosApp.ps1 -DeploymentType "Install" -DeployMode "NonInteractive"
Microsoft Photos (Microsoft Store App) Silent Install (PowerShell)
Silent means no dialogs (progress and balloon tip notifications are suppressed).
- Open Windows PowerShell by Right-Clicking on Windows PowerShell and selecting Run as Administrator
- Change the directory to “C:\Downloads\PhotosApp“
- PS C:\Downloads\PhotosApp>
- Enter the following command:
Powershell.exe -ExecutionPolicy Bypass .\Deploy-PhotosApp.ps1 -DeploymentType "Install" -DeployMode "Silent"
Microsoft Photos (Microsoft Store App) Interactive Install (PowerShell)
Interactive means the install will show dialogs including progress and balloon tip notifications.
- Open Windows PowerShell by Right-Clicking on Windows PowerShell and selecting Run as Administrator
- Change the directory to “C:\Downloads\PhotosApp“
- PS C:\Downloads\PhotosApp>
- Enter the following command:
Powershell.exe -ExecutionPolicy Bypass .\Deploy-PhotosApp.ps1 -DeploymentType "Install" -DeployMode "Interactive"
How to Uninstall the Microsoft Photos (Microsoft Store App) Using the PowerShell App Deployment Toolkit
Microsoft Photos (Microsoft Store App) NonInteractive Uninstall (PowerShell)
NonInteractive means Very Silent, i.e. no blocking apps. This is automatically set if it is detected that the process is not running in the user session and it is not possible for anyone to provide input using a mouse or keyboard.
- Open Windows PowerShell by Right-Clicking on Windows PowerShell and selecting Run as Administrator
- Change the directory to “C:\Downloads\PhotosApp“
- PS C:\Downloads\PhotosApp>
- Enter the following command:
Powershell.exe -ExecutionPolicy Bypass .\Deploy-PhotosApp.ps1 -DeploymentType "Uninstall" -DeployMode "NonInteractive"
Microsoft Photos (Microsoft Store App) Silent Uninstall (PowerShell)
Silent means no dialogs (progress and balloon tip notifications are suppressed).
- Open Windows PowerShell by Right-Clicking on Windows PowerShell and selecting Run as Administrator
- Change the directory to “C:\Downloads\PhotosApp“
- PS C:\Downloads\PhotosApp>
- Enter the following command:
Powershell.exe -ExecutionPolicy Bypass .\Deploy-PhotosApp.ps1 -DeploymentType "Uninstall" -DeployMode "Silent"
Microsoft Photos (Microsoft Store App) Interactive Uninstall (PowerShell)
Interactive means the install will show dialogs including progress and balloon tip notifications.
- Open Windows PowerShell by Right-Clicking on Windows PowerShell and selecting Run as Administrator
- Change the directory to “C:\Downloads\PhotosApp“
- PS C:\Downloads\PhotosApp>
- Enter the following command:
Powershell.exe -ExecutionPolicy Bypass .\Deploy-PhotosApp.ps1 -DeploymentType "Uninstall" -DeployMode "Interactive"
Always make sure to test everything in a development environment prior to implementing anything into production. The information in this article is provided “As Is” without warranty of any kind.