
В процессе работы с компьютером мы часто используем комбинации клавиш Ctrl+C и Ctrl+V, чтобы быстро скопировать и вставить нужную информацию. Это упрощает нашу работу с компьютером и экономит время. Но иногда эти комбинации могут перестать работать. Разные причины могут быть у этой проблемы. В этой публикации, друзья, поговорим о том, почему на компьютере в Windows не работают клавиши Ctrl+C и Ctrl+V, и как исправить это.
Если не работают сочетания Ctrl+C и Ctrl+V, первым делом можно выполнить выход из Windows на экран блокировки и войти в систему снова. Это решит проблему, если причина была в зависшем проводнике или каких-то других процессах, связанных с работой горячих клавиш копирования и вставки. Если не помогло, перезагружаем компьютер. Это перезапустит системные процессы, связанные с копированием и вставкой, причина сбоя которых кроется в текущем сеансе работы компьютера.
Иногда причиной неработоспособности отдельных клавиш клавиатуры может быть плохой контакт клавиатуры с компьютером. Устранить эту причину может переподключение клавиатуры.
В диспетчере устройств Windows удаляем все пункты клавиатуры, затем обновляем конфигурацию оборудования.

Если не поможет, переподключаем физически клавиатуру. Для USB-клавиатур можно попробовать другие порты USB. При использовании беспроводной клавиатуру проверяем батарейки и сигнал.
Иногда при сбоях в работе клавиатуры может помочь обновление или переустановка её драйвера, а также обновление драйвера чипсета.
Причина проблемы может крыться в залипшей какой-то клавише клавиатуре, блокирующей работу сочетаний и отдельных клавиш. Сами клавиши Ctrl, C и V могут застрять и не срабатывать. Возможно, клавиатура имеет локальные повреждения, в частности, из-за пролития жидкости. Клавиатуру необходимо разобрать, почистить, протереть контакты спиртом. Клавиши Ctrl, C и V могут плохо работать элементарно из-за износа клавиатуры.
Понять, что причиной проблемы является неисправность клавиатуры, можно, подключив клавиатуру к другому компьютеру. Или как минимум запустив текущий компьютер в среде WinPE. Работают ли там комбинации Ctrl+C и Ctrl+V.
На текущем компьютере в среде Windows проверить работу комбинаций и ввод в принципе можно с помощью экранной клавиатуры, запускаемой клавишами Ctrl+Windows+O. Либо с помощью сенсорной клавиатуры.

Отображение сенсорной клавиатуры в Windows 10 и 11 настраивается в системном приложении «Параметры». Идём по пути «Персонализация → Панель задач». В Windows 11 в блоке настроек сенсорной клавиатуры выставляем значение «Всегда».

В Windows 10 жмём «Включение и выключение системных значков».

Устанавливаем переключатель сенсорной клавиатуры на «Вкл.».

При повреждении клавиш Ctrl, C и V клавиатуру придётся менять. Если покупка новой клавиатуры невозможна прямо сейчас, можно попробовать временные решения. В самой Windows есть альтернативные комбинации копирования и вставки — Ctrl+Insert и Shift+Insert. Эти комбинации делают то же, что и комбинации Ctrl+C и Ctrl+V. Ctrl+Insert – копирует, Shift+Insert — вставляет. Ещё, друзья, вы можете функции клавиш Ctrl, C и V переназначить на другие клавиши с помощью программ типа AutoHotkey, Microsoft PowerToys и др.
Если у вас продвинутая игровая или мультимедийная клавиатура, предусматривающая её программирование – макросы переназначения клавиш и комбинаций, возможно, причина кроется в программе-драйвере клавиатуры. Кто-то, либо вы сами могли назначить макрос, конфликтующий с комбинациями Ctrl+C и Ctrl+V. Может быть так, что программа-драйвер клавиатуры сбоит, и это проявляется в срабатывании комбинаций Ctrl+C и Ctrl+V. Отключите программу-драйвер клавиатуры и проверьте эту версию. Если подтвердится, разбирайтесь с программой-драйвером клавиатуры.
Программирование клавиатуры можно использовать для переназначения клавиш Ctrl, C и V, если те неисправны.
Если не работают комбинации клавиш Ctrl+C и Ctrl+V, возможно, на компьютере орудует вирус или шпионская программа. Они перехватывают нажатия клавиш, либо конфликтуют с комбинациями Ctrl+C и Ctrl+V. Необходимо проверить компьютер на вирусы.
Блокировать работу комбинаций Ctrl+C и Ctrl+V могут сторонние программы, которые используют эти клавиши для своих функций. Эти программы могут вызывать конфликт, либо предусматривать настройки отключения этих клавиш. Такого рода программы это обычно:
- Программы переназначения клавиш;
- Программы для записи макросов или горячих клавиш;
- Оптимизаторы;
- Твикеры
Нужно отключить эти программы и проверить работу комбинаций Ctrl+C и Ctrl+V. Возможно, эти комбинации блокируют службы сторонних программ, которые вы не знаете, как отключить. В таком случае поможет чистая загрузка Windows. Если версия подтвердится, необходимо разобраться с этими программами – пересмотреть их настройки, обновить (возможно, дело в каком-то баге), в крайнем случае отказаться от этих программ.
Блокировать работу любых клавиш в Windows 10 и 11 может активная системная функция фильтрации ввода. Нужно отключить её и проверить работу комбинаций Ctrl+C и Ctrl+V. В обоих операционных системах запускаем системное приложение «Параметры». Открываем путь «Специальные возможности → Клавиатура». Переключатель функции фильтрации ввода выставляем на «Откл.». В Windows 11 настройка эта функция так и называется «Фильтрация ввода».
Скрин-6

В Windows 10 она значится как «Использовать фильтрацию ввода».

Если Ctrl+C и Ctrl+V не срабатывают, в частности, после обнаружения на компьютере вируса, причина может крыться в повреждённых системных файлах Windows. Необходимо проверить целостность файлов Windows.
Если комбинации Ctrl+C и Ctrl+V перестали работать не по аппаратной причине, можно откатить Windows к ранее созданной точке восстановления или резервной копии, когда проблемы ещё не было.
Друзья, если у вас комбинации Ctrl+C и Ctrl+V не работают в некоторых программах, при этом работают в Windows и других программах, очевидно, разбираться нужно с настройками этих некоторых программ. Вот, в частности, какие могут быть случаи:
- В текстовых редакторах, таких как Microsoft Word, OpenOffice, LibreOffice и т.п., причиной может быть отключение комбинаций Ctrl+C и Ctrl+V внутри программы или присвоение этих комбинаций макросам. Нужно проверить и изменить настройки горячих клавиш. Возможно, удалить макросы;
- В командной строке или PowerShell по Windows 10 включительно причиной может быть отключение опции «Разрешить сочетания клавиш с Ctrl» в свойствах окна, запускаемого в контекстном меню на окне приложения;

- В Windows 11 все консольные приложения объединены в единый терминал, и в его параметрах могут быть отключены копирование и вставка по клавишам Ctrl+C и Ctrl+V;

- В браузерах причиной может быть конфликт с расширениями, которые перехватывают или изменяют горячие клавиши. Нужно проверить работу комбинаций Ctrl+C и Ctrl+V в браузере без расширений, выявить причинное расширение и разобраться с ним.
Вот это, друзья, возможные варианты исправления, если не работает Ctrl+C и Ctrl+V.
Приветствую всех, кто зашел на мою страницу! Сегодня я хочу поделиться с вами своей историей о том, как я столкнулся и решил проблему с неработающими горячими клавишами в Windows 10. Это было непростое испытание, но благодаря нему я узнал много нового и теперь готов поделиться этими знаниями с вами.
Первые Признаки: Горячие Клавиши Отказываются Работать
Все началось довольно неожиданно. Однажды я попытался использовать привычные комбинации клавиш, такие как Ctrl+C для копирования текста, и ничего не произошло. Сначала я подумал, что это просто маленький сбой, но со временем понял, что проблема куда серьезнее.
Проверка Индивидуальных Клавиш
Первым делом я убедился, что проблема не в самих клавишах:
1. Проверил работу Ctrl, Alt и Shift в других сочетаниях и приложениях.
2. Убедился, что проблема касается всех горячих клавиш в целом.
Поиск и Устранение Неполадок: Мои Шаги
Поняв, что дело не в отдельных клавишах, я начал поиск способов решения проблемы.
Перезагрузка Системы
Как часто бывает, первый и самый простой шаг – это перезагрузка компьютера. Иногда это помогает решить множество небольших проблем.
Проверка Языковых Настроек
1. Я проверил, не были ли изменены языковые настройки клавиатуры, так как это могло повлиять на работу горячих клавиш.
Обновление Драйверов Клавиатуры
1. Через «Диспетчер устройств» я обновил драйверы клавиатуры, чтобы исключить возможные проблемы с ними.
Более Глубокие Решения: Технические Действия
Когда базовые методы не помогли, я перешел к более серьезным шагам.
Использование Встроенной Функции Устранения Неполадок Windows
1. Я запустил встроенный инструмент устранения неполадок Windows для клавиатуры через «Панель управления«.
Сброс Настроек Системы
1. Я пробовал восстановить систему до последней рабочей точки восстановления, чтобы отменить возможные изменения, повлиявшие на работу горячих клавиш.
Финальные Шаги: Решение Найдено
В итоге, проблема оказалась в конфликте между недавно установленным программным обеспечением и системными настройками горячих клавиш. После удаления этой программы и повторной настройки горячих клавиш все вернулось в норму.
Это был настоящий вызов, но я рад, что смог найти и устранить причину проблемы. Надеюсь, что мой опыт окажется полезным для всех, кто сталкивается с подобными трудностями. Помните, что для каждой проблемы найдется решение, главное – не сдаваться и методично искать источник неполадки. Удачи вам, и до новых встреч в моем блоге!
This post will guide you on what to do if your keyboard shortcuts or hotkeys are not working on your Windows 10 computer. A lot of users use hotkeys as they make things easier for them as they use their computer. However, there are instances when these hotkeys suddenly stop working. It’s actually one of the most common problems with keyboards. And so to resolve this problem, you can try out some suggestions prepared on this post.
Option 1 – Clean the keyboard keys physically
Your keyboard might not be working properly due to some dirt or other corrosion. First, you need to shut down your computer and then unplug the keyboard if you are using a desktop computer and then prepare it for cleaning. After that, use a small cotton ear cleaning tool to get between the creases and clean them. You can dip it slightly in alcohol to make it more efficient in cleaning dust and dirt. And if you can, you have the option to pull apart the keyboard completely and then wipe away all the corrosion from the inside. Once you’re done, put the keyboard back together and then plug it back into your PC. Now turn your PC on and check if the hotkeys are now working.
Option 2 – Try running the Hardware and Devices Troubleshooter
The first thing you can do to fix the problem is by running the Hardware Troubleshooter. Although it won’t make much of a difference, there’s still a possibility that it could automatically fix the problem with these function keys. To use it, refer to these steps:
- The first thing you need to do is click on Start and then on the gear-like icon to pull up the window for Settings.
- After opening Settings, look for the Update and Security option and select it.
- From there, go to the Troubleshoot option located on the left-hand side of the list.
- Next, select Hardware and Devices from the list and open the Troubleshooter and run it. Once it is doing its job, wait for it to complete the process and then restart the system.
- After the system restarts, check if the problem’s now fixed. If not, refer to the next option given below.
Option 3 – Try connecting the keyboard to a different USB port
The problem might have something to do with the USB port that’s currently in use by your keyboard. It could be that it’s not working so it makes sense to unplug it and attach it to another USB port. You can also clean the USB port on both ends to ensure that they are not affected by corrosion.
Option 4 – Uninstall previously installed keyboard software
If you have been previously using another keyboard, it might be better if you make sure that the software for the old device has been removed since there are instances when multiple software can cause problems due to similarities in actions.
Option 5 – Update the keyboard driver
You can also update the keyboard driver to fix the problem. There are cases when an outdated or corrupted driver can fix the problem. To do so, follow the steps below.
- Tap the Win + R keys to open the Run dialog box.
- Then type “devmgmt.msc” in the field and hit Enter to open the Device Manager.
- From there, look for the keyboard driver and click on it.
- Next, right-click on the keyboard driver and select the Update driver option.
- After that, click the “Search automatically for updated driver software” option to proceed.
Option 6 – Reinstall the keyboard driver
If updating the keyboard driver didn’t help, then you might want to reinstall it. How? Follow the steps below.
- Tap the Win + R keys to launch Run.
- Type in MSC into the box and tap Enter or click OK to open the Device Manager.
- After that, a list of device drivers will be displayed. Look for keyboard driver, right-click on it and then select “Uninstall device”.
- After that, unplug the device and restart your PC.
- Then plug your device back in. Assuming your device is connected to your PC, open the Device Manager again.
- Next, click on the Action button and click the Scan for hardware changes button. That should fix the problem.
Note: You could also completely uninstall the driver and go directly to the manufacturer’s website and download the latest driver for your hardware and then install it.
Option 7 – Enable Human Interface Device (HID) Service
Another thing to consider is the Human Interface Device Service. If this service is disabled, then no wonder why your hotkeys are not working. Thus, you need to enable this service. Refer to the following steps to do that:
- Tap the Win + R key to launch the Run dialog box.
- Then type “services.msc” in the field and hit Enter to open Services.
- After opening Services, scroll down until you see the Human Interface Device service.
- Double click on HID and make sure that its Startup Type is set to “Automatic” and then click OK.
- Restart your PC and check if the hotkeys are now working or not.
Option 8 – Try resetting the keyboard
You might also want to try resetting the keyboard as it can also help in fixing the problem. Setting it back to its default state will surely help.
Do You Need Help with Your Device?
Our Team of Experts May Help
Troubleshoot.Tech Experts are There for You!
GET HELP
Troubleshoot.Tech experts work with all versions of Microsoft Windows including Windows 11, with Android, Mac, and more.
Share this article:
You might also like
NoteHomepage (by MyWay) is a browser extension that may be bundled with other free software that you download off of the Internet, or delivered via other advertising means. When installed NoteHomepage will set the homepage and search engine for your web browser to http://search.myway.com.
While installing this extension will gather information from your browsing sessions, including website visits, clicked links, and sometimes even private information, that it later sends back to display unwanted ads into your browser.
Several anti-virus scanners have marked this extension as a Browser Hijacker and are therefore not recommended to keep on your computer. It is considered potentially unwanted, and many users wish to remove it, so it is flagged for optional deletion.
About Browser Hijackers
Browser hijacking is a form of unwanted software program, usually a web browser add-on or extension, which then causes modifications in the web browser’s settings. Browser hijacker malware is developed for many different reasons. Generally, browser hijacking is utilized for earning advertising revenue from forced advert mouse clicks and site visits. Even though it might seem harmless, these tools are designed by malicious individuals who always look to take full advantage of you, so that they can earn money from your naivety and distraction. Some browser hijackers are programmed to make certain modifications beyond the browsers, like altering entries on the system registry and letting other malware further damage your machine.
Find out how to identify a browser hijack
Below are some signs and symptoms that suggest your browser has been hijacked: the home page of your browser is changed unexpectedly; your browser is constantly being redirected to adult websites; the default search engine is changed; you are getting browser toolbars you have never noticed before; never-ending pop-up advertisements show up and/or your web browser popup blocker is disabled; your web browser gets sluggish, buggy, crashes regularly; Inability to navigate to certain websites, particularly anti-malware and also other security software websites.
So how exactly does a browser hijacker infect a computer?
Browser hijackers might use drive-by downloads or file-sharing networks or an e-mail attachment in order to reach a targeted PC. They could also come from add-on programs, also called browser helper objects (BHO), web browser plug-ins, or toolbars. Browser hijackers sneak into your computer in addition to free software application downloads also that you unknowingly install alongside the original. A good example of some infamous browser hijackers includes Babylon, Anyprotect, Conduit, SweetPage, DefaultTab, Delta Search, and RocketTab, however, the names are regularly changing.
Browser hijackers will affect the user’s web surfing experience severely, track the websites frequented by users and steal personal information, cause difficulty in connecting to the web, and eventually create stability problems, causing software programs and systems to crash.
Learn how to remove browser hijackers
Some hijackers can be removed by just uninstalling the corresponding freeware or add-ons through the Add or Remove Programs in the Windows control panel. But, many browser hijackers are difficult to get rid of manually. No matter how much you try to get rid of it, it might keep returning again and again. Additionally, manual removals demand in-depth system knowledge and thus can be a very difficult job for novices.
Industry experts always suggest users remove any malicious software including browser hijacker with an automatic malware removal tool, which is easier, safer, and quicker than the manual removal method. Employ a PC optimizer along with your anti-malware software to solve various registry issues, remove computer vulnerabilities, and boost your computer performance.
Download the software in Safe Mode with Networking
If the malware is set to run immediately when Windows starts, stepping into safe mode may block the attempt. Just minimal required applications and services are loaded whenever you start your laptop or computer in Safe Mode. To launch your Windows XP, Vista, or 7 PCs in Safe Mode with Networking, follow the instructions below.
1) At power on, hit the F8 key before the Windows splash screen begins to load. This would invoke the “Advanced Boot Options” menu.
2) Select Safe Mode with Networking with arrow keys and press ENTER.
3) As soon as this mode loads, you should have an internet connection. Now, get the malware removal software you want by utilizing the web browser. To install the program, follow the directions in the installation wizard.
4) Immediately after installation, run a full scan and let the software remove the threats it discovers.
Switch over to an alternate browser
Some viruses may target vulnerabilities of a particular web browser that obstruct the downloading process. If you’re not able to download the anti-virus software program using Internet Explorer, this means malware is targeting IE’s vulnerabilities. Here, you need to switch to a different internet browser such as Firefox or Chrome to download the antivirus program.
Run anti-virus from a pen drive
To successfully get rid of the malware, you have to approach the problem of installing anti-malware software on the affected computer system from a different perspective. Adopt these measures to run the anti-virus on the affected computer system.
1) Download the anti-malware software on a virus-free computer.
2) Plug the USB drive into the clean computer.
3) Double click on the downloaded file to open the installation wizard.
4) Select flash drive as the location when the wizard asks you exactly where you wish to install the application. Follow the on-screen instructions to finish the installation process.
5) Remove the flash drive. Now you can utilize this portable anti-malware on the affected computer.
6) Double-click the anti-malware software EXE file on the USB drive.
7) Press the “Scan” button to run a full computer scan and remove viruses automatically.
Technical Details and Manual Removal (Advanced Users)
To eliminate NoteHomepage manually, navigate to the Add or Remove programs list in the Windows Control Panel and select the program you want to get rid of. For web browser plug-ins, go to your web browser’s Addon/Extension manager and choose the add-on you want to disable or remove. You might also want to reset your home page and search providers, as well as clear your web browser cache and cookies.
Finally, check your hard disk for all of the following and clean your Windows registry manually to remove leftover application entries after uninstalls. Please be aware that this is for professional users only and could be challenging, with incorrect file removal resulting in additional PC errors. In addition to that, certain malware is capable of replicating or preventing deletion. You’re advised to do this procedure in Windows Safe Mode.
Files:
C:\Users\%USERNAME%\AppData\Local\Google\Chrome\User Data\Default\Extensions\lamecoaceiheggdhlnjnmciaonfdamlg.600.11.14900_0
C:\Users\%USERNAME%\AppData\Local\Google\Chrome\User Data\Default\Local Extension Settings\lamecoaceiheggdhlnjnmciaonfdamlg
C:\Users\%USERNAME%\AppData\Local\Google\Chrome\User Data\Default\Sync Extension Settings\lamecoaceiheggdhlnjnmciaonfdamlg
C:\Users\%USERNAME%\AppData\Local\NoteHomepageTooltab
C:\Users\%USERNAME%\AppData\Roaming\Mozilla\Firefox\Profiles\profile\extensions\[email protected]
C:\Users\%USERNAME%\AppData\Roaming\Mozilla\Firefox\Profiles\profile\extensions\[email protected]\chrome
C:\Users\%USERNAME%\AppData\Roaming\Mozilla\Firefox\Profiles\profile\extensions\[email protected]\META-INF
C:\Users\%USERNAME%\AppData\Roaming\Mozilla\Firefox\Profiles\profile\notehomepage_j
Registry:
HKLM\SOFTWARE\Classes\AppID\NoteHomepage Toolbar.exe
HKEY_LOCAL_MACHINE\SOFTWARE\Microsoft\Internet Explorer\Extensions
HKEY_LOCAL_MACHINE\Software\Microsoft\Windows\CurrentVersion\Explorer\Browser Helper Objects
HKEY_LOCAL_MACHINE\Software\Microsoft\Internet Explorer\Toolbar
HKEY_LOCAL_MACHINE\SOFTWARE\Google\Chrome\Extensions
HKEY_LOCAL_MACHINE\SOFTWARE\Mozilla\Firefox\Extensions
HKEY_CURRENT_USER\Software\Opera Software\Explorer\Main\Start Page Redirect=http://random.com
HKEY_LOCAL_MACHINE\SOFTWARE\Microsoft\Windows NT\CurrentVersion\NoteHomepage
HKEY_CURRENT_USER\Software\Microsoft\Windows NT\CurrentVersion\Winlogon Shell = %AppData%\IDP.ARES.Generic.exe
HKEY_CURRENT_USER\Software\Microsoft\Windows\CurrentVersion\Run Random
HKEY_LOCAL_MACHINE\Software\Microsoft\Windows NT\CurrentVersion\Random.
HKEY_CURRENT_USER\Software\Microsoft\Internet Explorer\Main
HKEY_CURRENT_USER\Software\Microsoft\Windows\CurrentVersion\Uninstall\NoteHomepageTooltab Uninstall Internet Explorer
HKEY_CURRENT_USER\Software\NoteHomepage
Read More
This post will guide you through fixing the INTERNAL_POWER_ERROR Blue Screen Error on your Windows 10 computer. If you encounter this kind of Blue Screen of Death error, this means that the policy manager experienced a fatal error which in turn means that it can happen because of Drivers or Software or even due to external hardware. And so to resolve the issue, here are some suggestions that might be of help.
Option 1 – Update the Device drivers
As mentioned, the INTERNAL_POWER_ERROR BSOD error might have something to do with the drivers. It could be that the drivers are outdated so you need to update them in order to resolve the issue.
- Tap the Win + R keys to launch Run.
- Type in devmgmt.msc into the box and tap Enter or click OK to open the Device Manager.
- After that, a list of device drivers will be displayed. If you see a red or yellow sign that shows up against the driver, right-click on the driver’s name and select “Update Driver Software” or “Uninstall”. And if you find any drivers with a label saying, “Unknown device”, you need to update them as well.
- Select the “Search automatically for updated driver software” option and then follow the instructions to complete the process.
- Restart your PC.
Option 2 – Check the Device performance and health
You can also try checking the device’s performance and health in the Windows Defender Security Center.
- Open the Windows Defender Security Center.
- From there, check if there is a yellow exclamation icon in the Device performance and health section.
- After that, click on the View report option and you might see Health Report that points towards Storage Capacity, Device Drivers, or Apps and Software which should give you an idea of what the root cause of the problem really is.
Option 3 – Try to run the Chkdsk utility
Running the CHKDSK utility might also help you resolve the INTERNAL_POWER_ERROR Blue Screen error. If your hard drive has issues with integrity, the update will really fail as the system will think that it’s not healthy and that’s where the CHKDSK utility comes in. The CHKDSK utility repairs hard drive errors that might be causing the problem.
- Open Command Prompt with admin privileges.
- After opening Command Prompt, execute the following command and hit Enter:
chkdsk /f /r
- Wait for the process to be completed and then restart your computer.
Option 4 – Try increasing the size of the Hibernation file
- In the Cortana search box, type “command prompt” in the field, and from the search results that appear, right-click on Command Prompt and select “Run as administrator”.
- Next, type in the following command and hit Enter to execute it:
powercfg /hibernate /size 100
- Note that the default size of the Hibernation file is 75% and after executing the command, it should increase to 100%. Now exit Command Prompt and check if the problem’s now fixed or not.
Option 5 – Try to run the troubleshooters
Blue Screen Troubleshooter:
- Tap the Win + I keys to open the Settings panel.
- Then go to Update & Security > Troubleshoot.
- From there, look for the option called “Blue Screen” on your right-hand side and then click the “Run the troubleshooter” button to run the Blue Screen Troubleshooter and then follow the next on-screen options. Note that you might have to boot your PC into Safe Mode.
Performance Troubleshooter:
- Tap the Win + R keys to open the Run dialog box.
- Type “msdt.exe /id PerformanceDiagnostic” in the field and hit Enter to open the Performance troubleshooter.
- Then click on Next to get started. Wait until the process is completed.
System Maintenance Troubleshooter:
- Tap the Win + R keys to open the Run dialog box.
- Type “msdt.exe /id MaintenanceDiagnostic” in the field and hit Enter to open the System Maintenance Troubleshooter.
- After that, click on Next to start troubleshooting the problem and wait until it’s done then check if it fixes the problem or not.
Option 6 – Uninstall the programs you installed recently
Chances are, some programs that you just installed might be the one that’s causing the BSOD error. Thus, you need to uninstall the program to resolve the problem.
- In the search box, type in “control” and then click on Control Panel (desktop app) among the search results.
- After that, select Programs and Features from the list which will give you a list of all the programs installed on your computer.
- From there, look for the concerned program and select it and then uninstall it.
Note: If you have downloaded the app from the Windows Store, you can simply right-click on it from the application list and then uninstall it.
Option 7 – Run Windows Defender offline
You also have the option to run Windows Defender offline and scan your computer to see if any malware has infected the computer and the one that’s causing the INTERNAL_POWER_ERROR Blue Screen Error.
Read More
Living in today’s world sadly is still living in the COVID-19 pandemic. It has been more than a year and sadly pandemic is still very strong and we are battling it on a daily basis.
Governments all over the world are trying to battle pandemics in their own way with their own ideas and prevention measures. We as individuals can not very much influence how will the pandemic itself go but fortunately in this modern age of information we can at least follow and be in the loop at the current state of the situation regarding it.
Today instead of having a troubleshooting article or tips and trick for your PC we are doing something else but in the domain of internet technology, you know, just to keep everything still IT related ????
Below you will find websites with small descriptions of what they do to keep yourself informed and hope to get over this dreadful pandemic.
-
The WHO’s COVID-19 Dashboard
If you are interested in real-time COVID-19 information about active cases, death tool so far, new cases and the number of vaccines administrated so far I would recommend WHO’s dashboard. How WHO is a non-government institution composed of doctors from all over the world with just a single goal in mind, to help and put an end to this pandemic is a great non-biased source of information on the current state of virus spread.
-
Vaccine Finder
Please be aware that Vaccinefinder is working only on the territory of the United States of America. The reason why it was included in this list is that basically it is a great idea and I hope to see this site expand on other world regions or at least that inspires the emergence of another worldwide website with this type of content.
If you live in the USA, this site will be a great help since you can track where and how many shots are distributed to states and even towns in America. -
COVID tracking project
This site is also for U.S. residents, this time it is about tracking cases in each state with details and statistics. If you are interested in more detailed statistics of hospitalized patients per state or overall you are just interested in statistics about the pandemic in the U.S. this site might provide all the information about your needs.
-
NPR
On national public radio or NPR for short, there is a special section devoted to the coronavirus where new articles about pandemic are released daily with new information and new findings on how to battle it and the current state of things. A great informational site to keep up with the current state of things.
-
Google’s COVID-19 page
Google has not been inactive during this pandemic and on its page specially dedicated to the COVID-19 virus you can find a lot of free information updated daily. From safety and prevention tips to data about pandemics there is a lot of ground covered on-page and we recommend at least going through the prevention section to inform yourself how to keep yourself and others safe.
-
Coronavirus tracker
This daily updated chart can show how many cases and deaths are from chosen time period all in form of a chart, you can see charts for each country in the world how COVID cases rose or dropped along with the death tool it brought.
There you go, 6 websites to track and inform yourself about this dreaded pandemic which has managed to change the world and people’s lives forever, sadly on the bad side.
Read More

Windows 11 will bring some old applications in new looks and some will get additional features as well. One of the old apps that will get new stuff is a calculator.
The calculator was always a way to go application for quick calculations but Microsoft aims to expand on that and make the calculator a little more useful.
The first thing that you will notice is the calculator look, the calculator has now an application theme setting that allows you to change the look of the application. It comes in standard and professional mode as usual but this time calculator will come with features that will enable it to handle some programming and engineering tasks.
The new calculator features a full graphing mode that lets you visually analyze a graph to identify key features. It also packs a deep converter that can switch between more than 100 units and currencies.
Other Windows 11 apps
A new snipping tool will be delivered with this latest update as well packed with new functionality. We have covered new features of the snipping tool in another article, if you are interested you can find the article here: https://errortools.com/windows/new-snipping-tool-redesigned-in-windows-11/
Mail and Calendar apps will also get a redesign, sadly all redesign that they will include will be of visual nature to fit in the overall Windows 11 theme, functionality will remain the same.
Read More
Operating systems now give users a feature that allows them to create separate partitions out of HDD or SSD-based storage in order to store data in an organized manner. This small yet powerful feature has always been supported by Microsoft. However, there are times when users might fill up on some particular very soon. This may result in the lack of space for that partition which makes the entire process of using PCs slower since there is a large chunk of files that has to be indexed in a smaller partition. If you are one of the users experiencing this dilemma, you need to either delete the other partitions to allocate their storage to the partition that is short on storage or simply recreate the partition so that all the useless data will be deleted and you can start afresh with the overflowing partition.
In this post, you will be guided on how you can delete any storage partition from your Windows 10 PC via Disk Management, Command Prompt as well as Windows PowerShell.
Option 1 – Delete storage partition via Disk Management
This is one of the simplest ways you can use to delete a storage partition. Go to the WinX Menu and from there, open Disk Management and then select the Drive you want to get rid of, right-click on it and then select Delete Volume.
Option 2 – Delete storage partition via Command Prompt
- Tap the Win + X keys or right-click on the Start button and select Command Prompt (Admin) or you could also type in “cmd” in the Cortana search box and right-click on the Command Prompt icon and then select the “Run as Administrator” option from the context menu.
- Once you have Command Prompt pulled up as admin, type in and enter this command – diskpart
- After entering this command, the Diskpart Utility will start. Diskpart Utility is a command line-based utility just like Command Prompt but it will get a UAC Prompt after you invoke it so you have to click Yes for the UAC Prompt.
- After that, type in list volume and tap Enter to see the list of all the partitions created on your PC. This includes both types of partitions that are visible to a normal user in the File Explorer as well as the ones that are created by Windows 10 by default which helps it in storing the boot files and other essential system files.
- You should see a list of all the partitions made on your computer. Select the partition you want to delete by its Unique Identification number as Volume X where X denotes the Unique Identification Number.
- Next, type in the select volume number command and hit Enter to select the desired volume.
- Then delete the volume you’ve selected and type in the delete volume command and hit Enter to delete the volume you just selected and convert it into unallocated space.
Option 3 – Delete storage partition via Windows PowerShell
- Start by tapping the Win + X keys or simply right click on the Start button and select Windows PowerShell (Admin) or you could also type in “windows powershell” in the Cortana search box and right-click on the Windows PowerShell icon and select the “Run as administrator” option.
- Once you’ve opened the Windows PowerShell, type in the Get-Volume command and hit Enter to get a list of all the partitions on your PC.
- Next, select the drive letter you want to delete and then type in the Remove-Partition –DriveLetter command and hit Enter to delete the selected partition. Note that you need to replace the drive letter with the letter of the partition you want to get rid of.
- After that, it will ask you for confirmation. Just hit the Y key for Yes or hit the A key to say Yes to All. This will delete all the partition you’ve selected and will move them in as unallocated space.
And that’s how you delete a Drive Partition or Volume in Windows 10. Note that you should only follow the last two options given in case the Disk Management is not able to fulfill the user requirements.
Read More

Microsoft just released Windows 11 ISo file, based on the latest Insider Preview Build 22000.132. Inside build, you can try all-new features like clock updated app, snip tool, and everything releases so far via various patches. You can also use Windows 11 ISO file to do a clean install on your computer, but if you go with this option all of your existing files will be deleted.
Microsoft says it added the ability to name your PC during the setup experience. You’ll also get to experience the Get Started app that’s designed to help you get going on your new Windows 11 PC (even if it’s not actually a new one).
Download ISO
- Go to the Windows Insider Downloads page. You will need to sign in with a Microsoft account registered with the Insider Program.
- Scroll down to Select Edition and select the build you want to download. You will most likely want the one at the top from the developer channel, as this is where Windows 11 should arrive first. So far, only Windows 10 builds are available. Click confirm.
- Select your preferred language. Not all languages available for Windows are compatible with the Insider program, so you may have to stop depending on where you are from.
- Click the download button and the ISO file will start downloading.
- This is definitely an easier method, but unfortunately, it is not available yet. We will update this article once Windows Insider ISOs are available. Later, once Windows 11 64 bit is available to everyone, you can also download the stable build of Windows 11 iso. Microsoft offers the Media Creation Tool and Upgrade Assistant, which usually do just that. It will be some time before Windows 11 versions of the tools are available, as the operating system is only getting closer to this holiday.
Read More
It is common knowledge that when you open a file that contains viruses, it will automatically infect the operating system. This is why most antivirus programs like Windows Defender won’t allow the opening of a file or execution of any associated program if they detected that the file or program could potentially harm the computer. In situations like this, you may get an error stating, “Operation did not complete successfully because the file contains a virus”.
In addition, it is also possible that this error message can pop up even for known programs. To open the program or file that triggered the error, you will be given a couple of options in this post but make sure that the program or file is really safe to open and does not contain any virus. You can open the file or execute the program by disabling the Windows Defender or any antivirus program temporarily. You could also try to add an exclusion in your antivirus program or repair File Explorer or run the Disk Cleanup tool. For more details, refer to each one of the options provided below.
Option 1 – Try to temporarily disable the Windows Defender program
Although you could encounter this error with any antivirus program, it is more common in Windows Defender. Thus, you can try to disable it for a while when you open the file or execute the program. To do so, follow these steps:
- First, click on the Start button and go to Settings > Update and Security > Windows Security.
- Here, select the “Open Windows Security” option located in the right pane.
- After that, click on the “Virus and threat protection” option.
- Next, click on Manage settings under the Virus and threat protection settings.
- Then turn off the switch for both Real-time protection and Cloud-delivered protection.
- Now restart your computer and try to open the file or execute the program again and see if it works.
- Note: Do not forget to enable the Real-time protection and Cloud-delivered protection back in Windows Defender.
Option 2 – Try adding an exclusion in the Windows Defender program
- Open the Windows Defender Security Center from the system tray area.
- Next, click the “Virus & threat protection” option and then open the “Virus and threat protection settings”.
- After that, scroll down until you find the “Exclusions” and click on the “Add or remove exclusions” option.
- Then click the plus button and select the type of exclusion you want to add and from the drop-down list, select Folder.
- Next, navigate to the path where the file or program is located.
- When a User Account Control or UAC prompt, just click on Yes to proceed.
- Now try to run the program or file again and see if it worked. If it did, then make sure to turn on your antivirus. However, if it didn’t work, proceed to the next given options below.
Option 3 – Try to run a System File Checker scan
System File Checker or SFC is a built-in command utility that helps in restoring corrupted files as well as missing files. It replaces bad and corrupted system files with good system files that might be the cause why you’re getting the errors 0x8024a11a and 0x8024a112. To run the SFC command, follow the steps given below.
- Type “cmd” in the Start search and then right-click on the appropriate search result.
- Next, select “Run as administrator” to open Command Prompt with admin privileges.
- After opening Command Prompt, type in sfc /scannow
The command will start a system scan which will take a few whiles before it finishes. Once it’s done, you could get the following results:
- Windows Resource Protection did not find any integrity violations.
- Windows Resource Protection found corrupt files and successfully repaired them.
- Windows Resource Protection found corrupt files but was unable to fix some of them.
Now restart your computer and see if the problem is fixed or not.
Option 4 – Run the Disk Cleanup tool
You can also try using the Disk Cleanup tool. To use it, refer to these steps:
- Tap the Win + R keys to open the Run dialog box and then type “cleanmgr” in the field and hit Enter to open the Disk Cleanup window.
- After that, select the drive you want to clean.
- Now click OK to clean the disk and restart your computer.
Read More
If you are typing inside the Search bar, Cortana, Taskbar, Windows 10 apps, etc., and then everything seems invisible then read on as this post will guide you in fixing this issue. At first, you might think that something is wrong with your keyboard but it really has nothing to do with it. The problem actually lies with the apps from Microsoft Store. Thus, if you can’t type anything in any of the apps from Microsoft Store in Windows 10, refer to the options given below to fix them.
Option 1 – Ensure that ctfmon.exe is running
Ctfmon.exe is a Microsoft process in Windows 10 that controls the Alternative User Input as well as the Office Language bar. In other words, it enables end-users to control the computer using on-screen keyboard inputs, speech, and even pen for various languages. It would be better if you launch the program once by going to the C:/Windows/system32 folder. Doing so will ensure that whatever API is needed for the keyboard typing to work properly again. You also have to make sure that its startup status is not disabled. In addition, you can also try the following steps, alternatively.
- Open the Task Scheduler.
- Then go to Microsoft > Windows > TextServicesFramework.
- And on the MsCtfMonitor, right-click and enable the task.
- Now restart your computer.
This will ensure that all the text boxes will start to work again. And if the task MsCtfMonitor is missing from the list of tasks, you can import it with the XML file from basics.net. Then download and create a task to run it each time you log in to your PC.
Option 2 – Use the Windows Store Apps Troubleshooter
You might also try running the Windows Store Apps Troubleshooter as it can help in resolving issues with the Windows Store apps. This built-in tool can resolve most of the app-related problems. To use it, go to Settings > Update & Security > Troubleshooting > Windows Store Apps and from there, click the start the troubleshooter button. The Windows Store Apps Troubleshooter will scan the computer for any issues with the Windows store apps and will automatically fix them if it finds any.
Option 3 – Re-register all the Windows 10 UWP apps using PowerShell
- First, make sure to close all the running applications on your computer.
- Next, in the Start search, type in PowerShell and right click on the result, and select the “Run as administrator” option.
- After that, type the following commands to re-register the Windows 10 apps. Make sure to hit Enter on each line:
- reg delete «HKCUSoftwareMicrosoftWindows NTCurrentVersionTileDataModelMigrationTileStore» /va /f
- get-appxpackage -packageType bundle |% {add-appxpackage -register -disabledevelopmentmode ($_.installlocation + «appxmetadataappxbundlemanifest.xml»)}
- $bundlefamilies = (get-appxpackage -packagetype Bundle).packagefamilyname
- get-appxpackage -packagetype main |? {-not ($bundlefamilies -contains $_.packagefamilyname)} |% {add-appxpackage -register -disabledevelopmentmode ($_.installlocation + «appxmanifest.xml»)}
Option 4 – Try to run the DISM tool
You can also run the DISM Tool as it helps in repairing the Windows System Image as well as the Windows Component Store in Windows 10. Using this built-in tool, you have various options such as the “/ScanHealth”, “/CheckHealth”, and “/RestoreHealth” which could help in fixing the problem.
- Open the Command Prompt with admin privileges.
- Then type in the following commands and make sure to hit Enter right after you type each one of them:
- Dism /Online /Cleanup-Image /CheckHealth
- Dism /Online /Cleanup-Image /ScanHealth
- exe /Online /Cleanup-image /Restorehealth
- Do not close the window if the process takes a while as it will probably take a few minutes to finish.
Option 5 – Run the System File Checker Scan
System File Checker or SFC is a built-in command utility that helps in restoring corrupted files as well as missing files. It replaces bad and corrupted system files to good system files. To run the SFC command, follow the steps given below.
- Tap Win + R to launch Run.
- Type in cmd in the field and tap Enter.
- After opening Command Prompt, type in sfc /scannow
The command will start a system scan which will take a few whiles before it finishes. Once it’s done, you could get the following results:
- Windows Resource Protection did not find any integrity violations.
- Windows Resource Protection found corrupt files and successfully repaired them.
- Windows Resource Protection found corrupt files but was unable to fix some of them.
- Restart your PC.
Read More
If an error suddenly pops up that states, “A problem prevented the document from being scanned” when you’re scanning a document in your computer, then you’ve come to the right place as this post will guide you on how exactly you can fix the problem.
A lot of users have reported that they receive a two-layer error message when they try to scan their documents – the first screen throws an error message that says, “Error applying Settings to Driver” while the next error message states, “A problem prevented the document from being scanned”. As a result, the scanning won’t be completed which defeats the whole process of buying a printer with a scanner. As you can see the two error messages point to two different situations, while the other one is pointing at the driver, the second one points to the scanning problem. To resolve these issues, there are several suggestions you need to check such as follows:
Option 1 – Run the Printer Troubleshooter
One of the first basic troubleshooting you can perform to resolve the printer issue is running the Printer Troubleshooter. This built-in troubleshooter can detect and automatically fix the problem for you. To use it, follow these steps:
- Tap the Win + R keys to open the Run dialog box.
- Next, type “msdt.exe /id PrinterDiagnostic” in the field and click OK or hit Enter to open the Printer Troubleshooter.
- Then click the Next button and follow the next on-screen instructions to fix the issue with the printer.
Option 2 – Try updating the Printer drivers
You might also want to try updating your printer drivers. All you have to do is locate the USB Composite Device. For complete details, follow the steps below.
- First, click the Start button and type “device manager”.
- Then click on the “Device Manager” from the search results to open it.
- From there, look for the USB Composite Device option and right-click on it, and select the Update Driver from the options.
- Restart your PC and then click the “Search automatically for updated driver software” option.
Note: You also have the option to download the latest version of your Printer from the manufacturer’s website.
Option 3 – Try to reset the settings of the Printer or reinstall it
If none of the two options given above worked, you can try to either reset the printer settings or reinstall the printer so that it can go back to its default state. However, if it doesn’t work, you can try to uninstall the printer as well as its related drivers. To do so, follow these steps:
- First, go to Settings > Devices > Printer and Scanners.
- After that, select the printer and select the Remove Device option.
- Once done, restart your computer and check again and see if the error is now fixed.
Option 4 – Try to modify the Registry settings for the Still Image devices
In case you don’t know, Windows has Registry settings for the Still Image devices like Scanners and Printers. And these devices have vendor-specific settings that if ended up getting corrupted or misconfigured then you will most likely encounter errors like “A problem prevented the document from being scanned”. Thus, to fix this error, you can try modifying the Still Image devices registry settings, and to do that, you need to follow the instructions below but before that, make sure that you create a System Restore Point first.
- Once you’ve created a System Restore point, tap the Win + R keys to open the Run dialog box and type “Regedit” in the field, and then hit Enter to open the Registry Editor.
- Next, navigate to this registry key: HKEY_LOCAL_MACHINESYSTEMCurrentControlSetControlStillImage
- From there, right-click on the “StillImage” registry key and delete it.
- After that, exit the Registry Editor and restart your computer.
- Once your computer has restarted, Windows will recreate the settings of the Still Image devices back to their default settings.
Read More

Skinning of applications is not new to PC users, but did you knew you could skin Steam?
With skin, you can customize the UI and style of the client to what you want making it more personal and to your liking. First thing is to find the skin that you would like to install. There are a lot of sites where you could find custom made Steam skins but we would recommend steamskins.org
The site itself is organized in tabs with different sections, once you click on the tab you will get a list of skins available for chosen section. If you click on the skin you will be taken to skin page detail where you can find what skin is aiming for, its legibility, a record of how the skin has been altered over time, or some mix of these aspects.
Note that some skins might have issues like some buttons might be missing from big picture mode but so far none of the skins has any kind of client breaking feature, only functionality one.
Downloading skin
Once you have chosen desired skin and while on the skin details page, scroll to the middle of the page just above the Related Skins sections with two options: Direct Download and External Download. Now usually I would recommend Direct download but in this case, I would advise going with External Download for the simple reason that the External link will send you to the developer’s website where there is a higher chance to get the latest updated skin.
Installing it in Steam
Once the skin is downloaded you will first need to create a skin folder inside your Steam installation location. Navigate to your Steam installation folder (default: C:\Program Files (x86)\Steam) and create a new folder inside it. Give new folder name Skins and confirm.
Extract the skin zip file in the newly made folder. Once the file is extracted you can delete the ZIP file if you wish.
Go to your Steam client and go to Steam>Settings. In settings select Interface on the left bar and on the right part then click the Select the skin you wish Steam to use the drop-down menu and select the skin that you wish to use. Confirm and restart your Steam client
Reverting to old skin
If you found skin unappealing or, unfortunately, has some functions missing you can always choose another skin or revert back to default Steam skin.
Default Steam skin is named in the drop-down menu as < default skin >.
Read More
Copyright © 2023, ErrorTools. All Rights Reserved
Trademark: Microsoft Windows logos are registered trademarks of Microsoft. Disclaimer: ErrorTools.com is not affiliated with Microsoft, nor claims direct affiliation.
The information on this page is provided for information purposes only.
Всем привет! Что же делать, если не работают горячие клавиши в Windows 10 или 11? В статье ниже мы постараемся с этим разобраться. В частности мы поговорим про неработающую клавишу «Win», которая находится в нижней части клавы. Но советы помогут и для других сочетаний быстрых кнопок.
Содержание
- Причина 1: Игровые клавиатуры и доп ПО
- Переустановка драйвера
- Средства устранения неполадок
- Фильтрация ввода
- Реестр
- Дополнительные советы
- Видео
- Задать вопрос автору статьи
Причина 1: Игровые клавиатуры и доп ПО

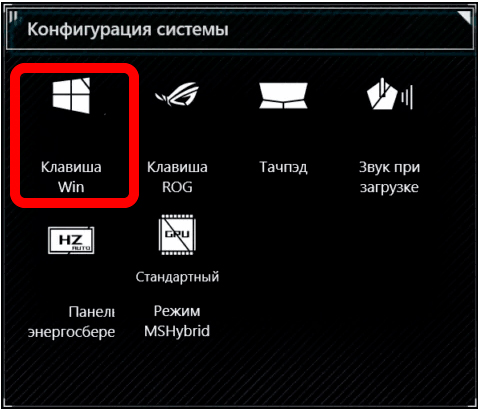
В некоторых игровых клавиатурах есть специальная клавиша или функция дополнительного программного обеспечения, отключающая кнопку «Win» или другие вспомогательные клавиши. Это нужно, чтобы она не мешала во время игры. Например, у ASUS есть отдельная программа Armoury Crate или iCUE. Поэтому если у вас в Виндовс стоит что-то подобное, проверьте, чтобы там была отключена функция деактивации кнопки Win.
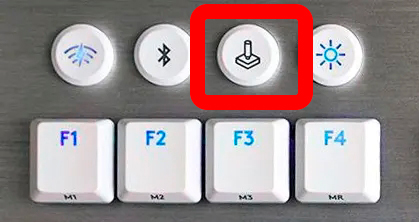
Помимо этого, кнопка может отключаться с помощью специального сочетания кнопок у отдельных моделей:
- Red Square: Fn + или Fn + + L
- XPG: Fn + F1
- Logitech: Fn + F8
- Другие модели: Fn + F6
Внимательно ознакомьтесь со всеми возможными комбинациями для вашей клавиатуры на официальном сайте производителя. Также эта информация может быть написана в руководстве пользователя, которую обычно кладут в коробку. Некоторые модели имеют отдельную кнопку, которая переключает устройство в «Игрой режим» (Game Mode).
Игровой режим также есть и в Виндовс, его можно попробовать тоже отключить. Более подробно про то, как это сделать – читаем в этой статье.
Переустановка драйвера
Первое что мы можем сделать – это переустановить драйвера для клавиатуры. Это может помочь, если у вас обычная клавиатура и перестала работать какая-то из функциональных кнопок, в том числе и клавиша «Win».
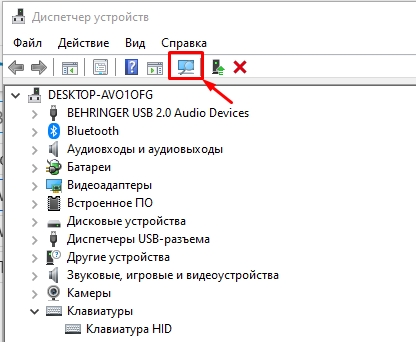
- Заходим в «Диспетчер устройств».
- Откройте «Клавиатуры» и удалите все устройства через правую кнопку мыши.

- Перезагрузите компьютер.
- Проверьте, чтобы драйвера установились повторно. Если этого не произошло, кликните по кнопке обновления конфигурации ПК.
Если и это не помогло, попробуйте обновить все драйвера, скачав их с официального сайта. В особенности сделайте упор на дрова для материнской платы. Дополнительно можно попробовать переподключить клавиатуру в другой USB порт. Если у вас стационарный компьютер, используйте задние подключения, напрямую к материнской плате. В переднюю панель лучше не подключать, так как там не всегда есть достаточно питания.
Средства устранения неполадок
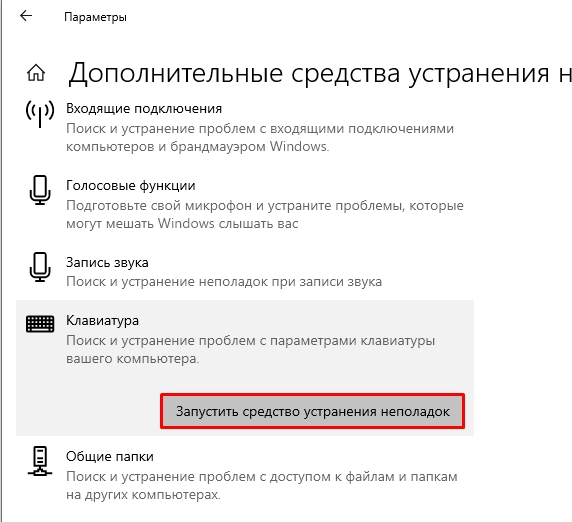
Можно позволить системе самой решить проблему с помощью встроенного функционала. Для этого воспользуемся «Средством устранения неполадок».
- «Пуск» – «Параметры».
- Откройте раздел «Обновление безопасность».
- «Устранение неполадок» – «Дополнительные средства устранения неполадок».
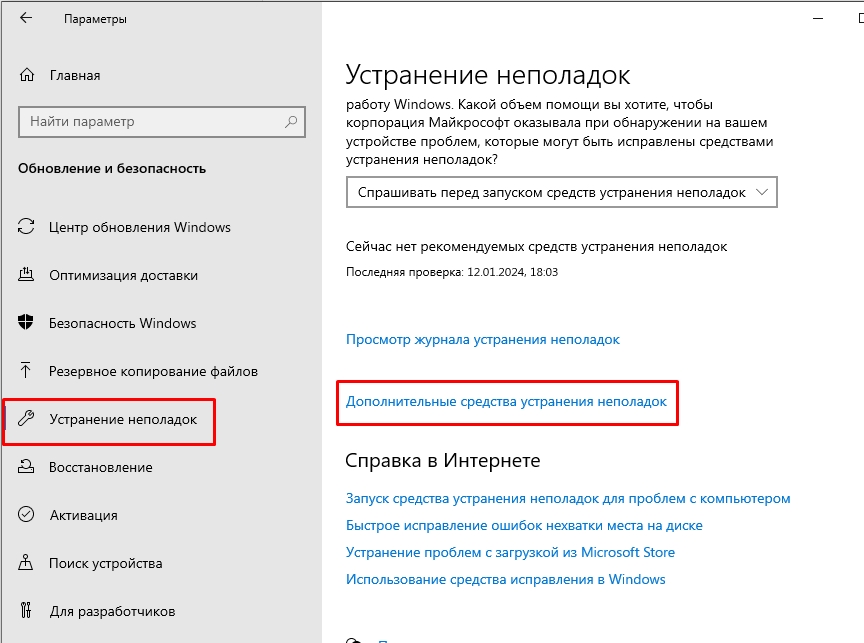
- Выберите клавиатуру и запустите средство. Далее действуем согласно инструкциям на экране.
Фильтрация ввода
Данная функция позволяет выключить реагирование системы на краткое или повторное нажатие на определенные кнопки. Лучше её выключить
- В «Параметрах» системы в меню «Пуск» найдите пункт «Специальные возможности».
- Перейдите на вкладку «Клавиатура».
- Найдите саму функцию справа и отключите.
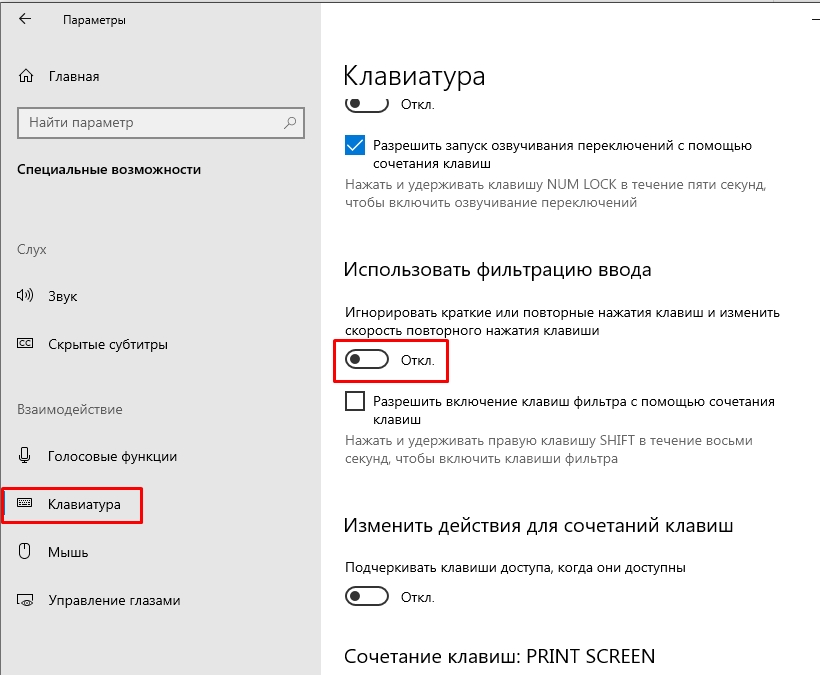
- Можете дополнительно перезагрузить ПК.
Реестр
- Через поиск найдите «Редактор реестра» и откройте его.
- Перейдите по пути:
HKEY_CURRENT_USER\Software\Microsoft\Windows\CurrentVersion\Policies\Explorer
- Посмотрите, нет ли параметра «NoWinKeys», если он есть – удалите!
- И аналогично проверьте путь:
HKEY_LOCAL_MACHINE\Software\Microsoft\Windows\CurrentVersion\Policies\Explorer
- Перезагрузите комп.
Дополнительные советы
- Если вы до этого устанавливали какие-то программы, работающие с клавиатурой, типа Punto Switcher – удалите их с ПК.
- Проверьте систему на наличие вирусов.
- Откатите систему до самой ранней точки восстановления.
- Не забываем, что проблема может быть аппаратная – то есть кнопка просто сломалась.
- С помощью программы AutoHotkey, можно переназначить клавишу на другую.
Остались какие-то вопросы, может появилась ошибка? – Пишите в комментариях, чтобы команда портала WiFiGiD.RU вам помогла.
Видео
Unable to use keyboard shortcuts on your Windows PC? There may be problems with your keyboard hardware, drivers, shortcut change, or some Windows setting. Whatever the reason that is causing the keyboard shortcuts issue on your Windows PC, we will show every possible way to fix keyboard shortcuts not working on your Windows PC.
1. Check if Keyboard Hardware is Working
Let’s begin with minor and common issues. The first thing you should do is a hardware check. Try to plug the keyboard into another USB port if any of the keys are not working.
If you are facing an issue with only some specific keys, try using another keyboard with your PC to verify. If other keyboards are working properly, then the issue is with your keyboard itself. Similarly, you can also try using your keyboard with other PCs. If shortcuts are working fine on the other PC, then the issue may be with your PC’s software. This will help you understand if the problem is with your keyboard or with the software.
If the issue is with the hardware, make sure to clean the keyboard. There can be specks of dirt or debris accumulated under the keyboard keys. If cleaning isn’t helping you, then you have to replace the keyboard. You can also check out these tips to use your PC with a broken keyboard.
2. Restart the PC
If the issue is with the software, before tweaking the Windows settings, try restarting your PC first. Often, a simple restart can iron out many issues like keyboard shortcuts not working on Windows PC by clearing the bugs present in the memory on your computer. To restart, click on the Windows icon in the bottom bar > Power icon and then select the Restart option.

3. Troubleshoot the Keyboard
Windows comes preinstalled with troubleshooting tools that can find and fix common errors. Running the keyboard troubleshooter may fix keyboard shortcuts not working on Windows.
1. On Windows 11, Open the Settings app > System > Troubleshoot > Other troubleshooters. Whereas on Windows 10, open the Settings app > Update and security > Additional troubleshooters.

2. Here, click on the Run button beside the Keyboard option to run the Keyboard Troubleshooter.

3. This process can run up to 5 minutes.
4. Update/Reinstall Keyboard Drivers
For the most part, troubleshooting the keyboard should fix the problems. But if it does not, try updating the keyboard drivers. Drivers are a piece of software that connects hardware to the OS. Updating keyboard drivers to the latest version will ensure there are no bugs in the connection.
1. Right-click on the Windows icon and then select the Device Manager option.

2. In the Device Manager window, select the Keyboards option to open the drop-down.

3. Here you should find all the attached keyboards. Right-click on the keyboard where shortcuts are not working and then select the Update driver option.

4. In the pop-up window, select Search automatically for drivers.

5. If there is an available driver update, your PC will automatically install it.

If updating the driver isn’t solving the issue, you can try reinstalling the driver.
1. To do that, just right-click on the keyboard and then select Uninstall driver option.

2. In the pop-up, click on Uninstall button to confirm.

3. Finally, restart your PC for Windows to install the available driver again.
5. Update to the Latest Windows Version
Windows updates also include driver updates. So updating Windows to the latest version will also update the keyboard drivers and can also fix many other bugs.
1. To update to the latest version of Windows 11, open the Settings app > Windows update. On Windows 10, open the Settings app > Updates and security > Windows updates.
2. Then click on Check for updates. If there are any updates available, click on Download & install all option.

Are keyboard shortcuts now working on your Windows 10/11 computer? If not, maybe you have a keyboard with a gaming mode?
6. Disable Special Keyboard Modes
Some keyboards come with special modes such as gaming. These modes disable some keyboard shortcuts to prevent you from pressing the wrong buttons accidentally while gaming. If you own a gaming keyboard, for instance, try disabling them in order to use your Keyboard shortcuts properly.
7. Turn Off Sticky Keys
Sticky keys are a Windows feature that changes the behavior of Windows shortcuts. For example, instead of pressing Windows Key + I to open Settings, you need to press the Windows key and then press the I key (one at a time instead of together) to open Settings. This can be helpful for people who have issues using keyboard shortcuts on Windows. Anyhow, if this setting is turned on, it will disable the default Windows shortcuts behavior.
1. To disable it on Windows 11, open the Settings app > Accessibility > Keyboard. On Windows 10, open the Settings app > Ease of Access and then select Keyboard.
2. In the Keyboard settings, make sure the toggle beside the Sticky Keys is turned off.

8. Reset Keyboard Settings
If none of the above options worked, try resetting the Keyboard Settings. On Windows, there is no special option that can reset the keyboard settings. But if you change the language and then change it back to your preferred language, it will reset all keyboard settings including your layout, themes, text correction, autosuggestion, etc.
1. Open the Settings app > Time and language > Language and region. Under the Preferred Languages section, you will see a list of installed language packs.

2. Click on the meatballs menu beside the language name and then select the Remove option.

3. You cannot remove the primary language directly. To remove it, click on Add a language button and add any language.

4. Now drag that added language to the top making it a primary language.
5. Now click on the meatballs menu beside your preferred language and then select Remove to remove it. This will remove all the keyboard settings.

6. Once done, click on Add a language button and add your preferred languages back.
7. Drag your preferred language to the top making it primary again. Now you can remove the added language by clicking on the Meatballs icon beside it and then selecting the Remove option.
9. Disable NoWinKeys from Registry Editor
Registry Editor is a graphical tool that helps users to configure system files and settings. On Registry Editor, there is an option to toggle off Windows keyboard shortcuts. If other shortcuts are working fine, but you have an issue with only shortcuts that include the Windows key, then Registry Editor might be the culprit. Making any changes in the registry editor can damage your device beyond repair. So make sure to take a backup before making any changes.
1. Click on the Windows icon and search for the Registry Editor app and open it. In the pop-up, click on Yes to make changes in the Registry Editor.
2. Now paste this path into the address bar above.
HKEY_CURRENT_USER\Software\Microsoft \Windows\CurrentVersion\Policies\ExplorerNote: If you are not able to find the Explorer option, then you can consider NoWinKeys is set to default. This means that the shortcuts issue is not with the Registry Editor.

3. Now in the right pane, right-click on the NoWinKeys option and select Modify.

4. Make sure the value is set to 0 and click on OK.

10. Turn on Shortcuts from Group Policy Editor
Group policy is a graphical tool similar to the Registry editor. Unlike on the Registry editor where you can disable the Windows key shortcuts, with Group Policy, you can disable all shortcuts. However,
1. Open Command Prompt and enter gpedit.msc and press Enter.
Note: Group Policy Editor is not available on the Windows Home edition. If you do not have Group Policy Editor, you can skip this step considering all the settings in Group Policy are set to default.
2. Now on the Group Policy Editor, navigate to User Configuration > Administrative Templates > Windows Components > File Explorer.
3. Now in the right pane, double-click on Turn off Windows keys hotkeys.
4. In the pop-up window, select the Disabled option and then click on OK and then Apply.
11. Run DISM
Deployment Image Servicing and Management (DISM) tool fixes any defects in the Windows image. Running it on your PC can change a few settings like Registry Editor settings to their default settings.
1. Open the Command Prompt in administrator mode.

2. Then in the Command Prompt, enter the following command and press Enter.
Dism /Online /Cleanup-Image /ScanHealth 
3. The process may take 2 – 5 minutes. Once the above command scans the Windows image health, enter the following command and then press Enter.
Dism /Online /Cleanup-Image /RestoreHealth

4. Within a few minutes, the tool will fix any defects in the Windows image.
12. Run System File Checker
Similar to DISM, System File Check (SFC) tool can scan for any corrupted system files and replace them with their original state.
1. Open the Command Prompt as an administrator.
2. Then type the following command and press Enter.
sfc /scannow
3. Once the tool does its work, check if the problem is solved.

13. Restart Human Interface Device Service
Human Interface Device (HID) Services are just services that control human interface devices such as keyboards, mice, game controllers, etc.
1. Click on the Windows icon, search for the Services app, and open it.
2. In the Services app, scroll down and right-click on the Human Interface Device Services option.

3. In the pop-up menu, click on the Start option. If the service is already in the start, click on Restart.

4. Now double-click on the Human Interface Device Services option. In the pop-up window, click on the drop-down beside the Startup type and change it from Manual to Automatic, To save, click on OK and then Apply.

14. Check Third-Party Apps
On Windows, third-party apps can change system features such as keyboard shortcuts. You might have installed an app that disabled or remapped the Windows keyboard shortcuts. There are also apps like Power Toys, that can even remap keyboard keys on your Windows PC.
Check for apps that you might have installed on your PC. You can disable any setting in those apps that are causing the issue or you can clean and uninstall those apps.
Fix Keyboard Shortcuts on Windows
We have covered troubleshooting the keyboard to enabling shortcuts from Group Policy Editor. If any of the above-mentioned ways failed to fix keyboard shortcuts not working on Windows error, try resetting the device in order to get back to the default state. If you have any backup of your Windows PC when it is working fine, then you can also system restore to that working version.
Ravi Teja KNTS
Tech writer with over 4 years of experience at TechWiser, where he has authored more than 700 articles on AI, Google apps, Chrome OS, Discord, and Android. His journey started with a passion for discussing technology and helping others in online forums, which naturally grew into a career in tech journalism. Ravi’s writing focuses on simplifying technology, making it accessible and jargon-free for readers. When he’s not breaking down the latest tech, he’s often immersed in a classic film – a true cinephile at heart.