
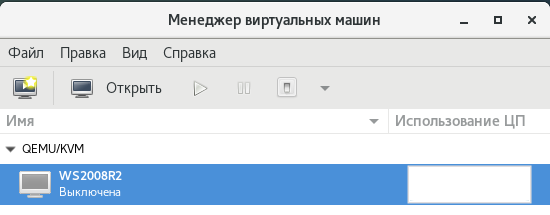
Эта статья посвящен переносу Windows Server с реальной машины на виртуальную под управлением гипервизора KVM, приспичило уже….
Инструкций по переносу ОС с физического сервера в виртуальную среду много, не все проверены, многие не работают или непонятны, вот решил собрать в один рабочий и проверенный мануал. Материал предназначен для всех, поэтому отступим от UNIX-way и будет всё в основном в графическом режиме.
Для начала поднимаем сервер KVM на CentOS 7, и если вас не забанили в Google, то ничего сложного, например вот.
Подключаем репозиторий и добавляем необходимые пакеты:
wget https://fedorapeople.org/groups/virt/virtio-win/virtio-win.repo -O /etc/yum.repos.d/virtio-win.repo
yum install virt-v2v libguestfs-winsupport virtio-win -y
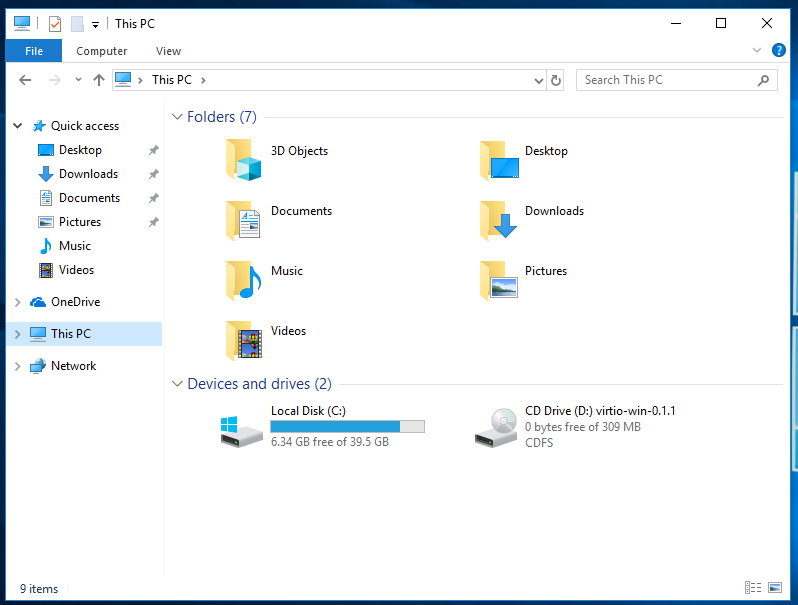
Для переноса сервера в виртуальную среду KVM, есть два варианта — при наличии физического доступа и отсутствии raid загрузить сервер с диска p2v от Red Hat и напрямую скопировать образ сервера в KVM или воспользоваться простенькой утилитой disk2vhd от Mark Russinovich (из пакета Sysinternals).
Благодаря утилите можно создать из реального физического диска виртуальный образ в формате VHD, поддерживается конвертация операционных систем Windows XP, не ниже SP2 и Windows Server, не ниже 2003 обеих разрядностей.
Лучше запускать Disk2vhd с другого тома, а не с того, который предполагается конвертировать — тогда процесс преобразования пойдет быстрее.
Перед переносом необходимо установить драйверы для виртуальной машины NetKVM — сетевой драйвер Virtio и Viostor — дисковый дрйвер Virtio через «Диспетчер устройств» > «Установить старое устройство». Иначе получите синий экран при загрузке перенесённой системы.
Полученный образ перенесите любым доступным способом на гипервизор и конвертируйте в приемлемый для KVM формат qcow2 командой:
qemu-img convert -O qcow2 Test.vhdx /vm/disk.qcow2
Создайте подходящую виртуальную машину и подключите диск…
После установки всех драйверов, необходимо установить службу Balloon (balloon — драйвер устройства PCI standard RAM Controller), для этого скопируйте каталог с подходящими для версии Windows службой Balloon в нужное место, например в C:\Program Files\Balloon, откройте командную строку от имени администратора, передите в папку, выполните установку командой:
После переноса, из-за смены «железа», Windows потребуется активация, так что придётся снова активировать систему, но это не беда, за то всё получилось.
В начале статьи упоминалось о некоторых ограничениях замечательного инструмента от Red Hat — диске p2v, к стати нет худа без добра, с установкой драйверов заморачиваться не нужно, интегрируются в процессе переноса, в этой части применим вундервафлю в деле.
Сначала скачиваем ISO по ссылке и загружаем с него сервер-донор, при этом ОС может быть как Windows, так и Linux. Вводим данные для сервера-реципиента и жмём кнопку [Test connection], если всё хорошо — жмём [Next], если нет, то проверяем введённые данные и сетевые настройки в [Configure network]:
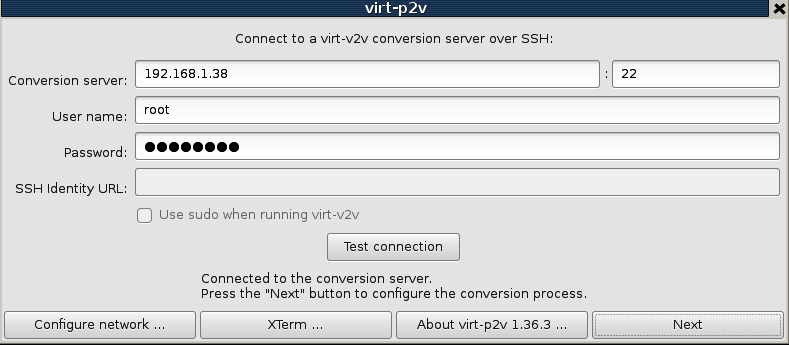
Когда всё правильно, после нажатия [Next] перейдём к следующим настройкам:
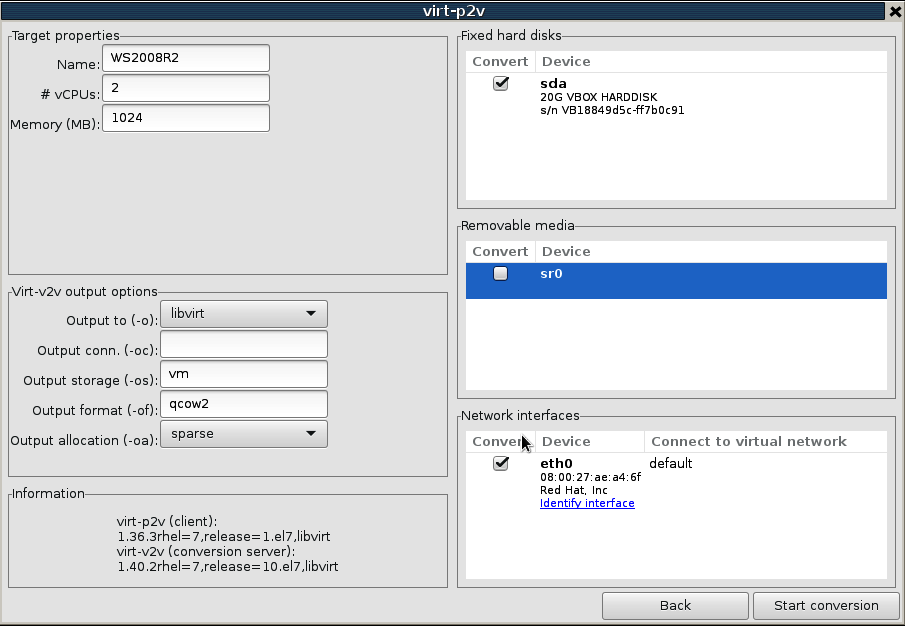
Здесь самое интересное, то есть параметры будущей виртуальной машины.
В «Target properties» — название машины, количество процессоров и памяти.
В «Virt-v2v output options» — через как общаться с KVM , в какой пул загрузим диск и в каком формате.
В «Fixed hard disk» — что собственно будем конвертировать.
В какой пул на KVM будем грузить диск можно определиться командой:
Имя Статус Автозапуск
—————————————
default не активен yes
vm активен yes
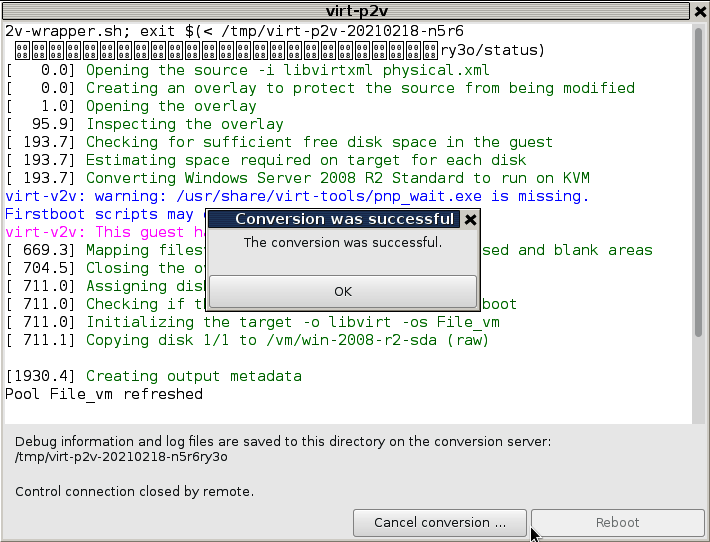
Жмём [Start conversion], ждём…………
Сколько ждать — зависит от размера дисков и скорости передачи.
Дождались и видим, что всё у нас замечательно:
Новая виртуальная машина сразу отобразится в менеджере виртуальных машин.
Вот как бы и всё, успехов.
Обсудить на форуме (комментариев 3).
Because I was turning my Windows 10 Pro server into an Linux (unRAID) machine I already had a Windows installation running on the bare metal that I had spent a fair bit of time setting up. I didn’t want to lose that installation and the work put into it. So, rather than starting over with a fresh Windows installation I took the operating system that was already installed, copied it, and started running it as a virtual machine (VM). Here are the steps I took to convert that Windows installation into a functioning VM.
Most of these steps come from the well-written unRAID Manual on Physical to Virtual Machine Conversion – the main thing I add in here are the Windows-specific steps for reducing the size of the virtual machine image.
They’re also useful for anyone running KVM as a hypervisor – not just specific to unRAID.
Before you begin
- Makes sure you have access to your Windows license. If you upgraded from Windows 7 or 8 to Windows 10 for free this is really important. If you haven’t already, follow the steps here in “Before you shutdown Windows”.
- Your hardware must be capable of processor virtualization (Intel VT-x or AMD-V), and it must be enabled in your BIOS. Depending on what you plan to do with your VM, you may need to meet other hardware requirements.
- unRAID must have VMs enabled and configured. An important step here is to download the VirtIO Drivers ISO
- unRAID needs to have User Shares created to hold the virtual machine images; by default, these are created for you by a new installation at /mnt/user/domains/
- Check to make sure that your User Share (above) has enough room for the full size of your Windows Operating System hard drive. You’re going to copy the entire hard drive including the empty space.
By default, most of these things were done already on my machine, but it’s good to check them before proceeding.
If you’re unfamiliar with unRAID and how to take those steps, they are described in the “System Preparation” section of the unRAID manual quite well.
Add a new Virtual Machine
From your unRAID web UI (e.g. http://tower), perform the following steps.
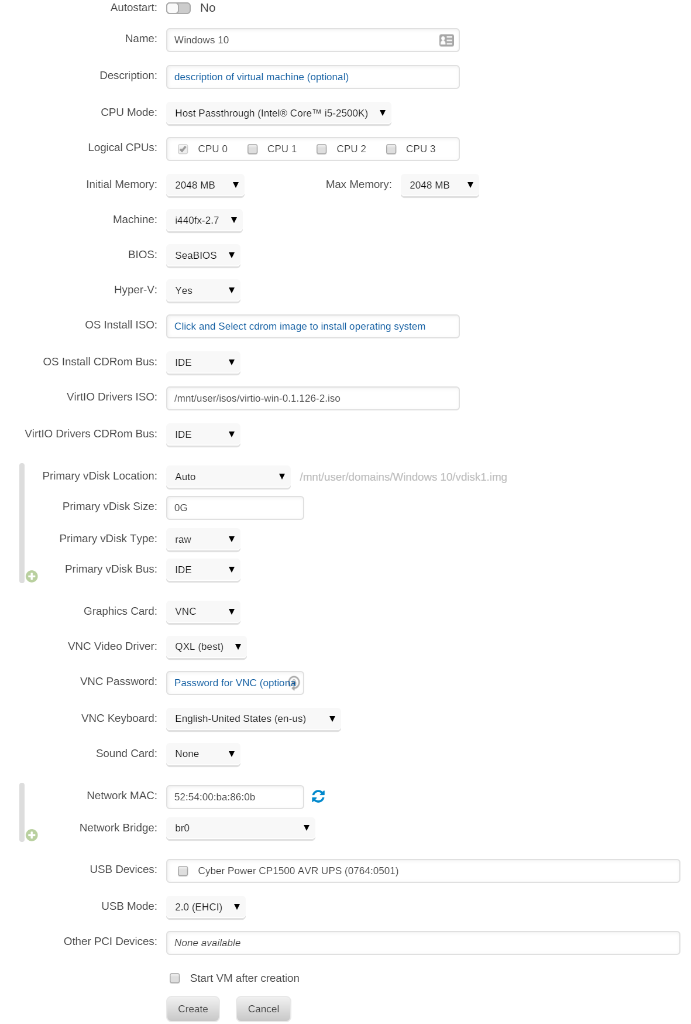
- On the VMs tab, click the Windows 10 template (or template for your version of Windows).
- Click on the switch for the Basic View to toggle it to the Advanced View (in the upper-right corner of the screen) if it isn’t already set.
- Configure the VM with the following settings:
- Name your VM whatever you wish: For this example, I’m using “Windows 10”
- CPU Mode: Host Passthrough
- Logical CPUs: However many you wish (at least one)
- Initial Memory / Max Memory: at least 2GB is recommended
- Machine: i440fx-* (whatever the newest is)
- BIOS: SeaBIOS
- Hyper-V: Yes
- OS Install ISO: Leave empty
- VirtIO Drivers ISO: Select the virtio-win*.iso that (should have been) downloaded as part of enabling VMs on unRAID.
- VirtIO Drivers CDRom Bus: IDE
- Primary vDisk Location: Auto
- Primary vDisk Bus: IDE
- Primary vDisk Type: raw
- Primary vDisk Size: 0G (You’ll be overwriting this file in the next step)
- Graphics Card: VNC
- VNC Video Driver: QXL
- VNC Password: Set it if you’d like – this is how you’ll access the ‘screen’ of the running VM
- VNC Keyboard: Set to the right language for your OS
- Sound Card: None (or select one if your device supports passthrough)
- Network MAC: this is set randomly, though you can change it.
- Network Bridge: br0
- USB Devices: I recommend leaving all unchecked for now.
- USB Mode: 2.0 (EHCI) is what I found worked for me.
- Other PCI Devices: I recommend leaving all unassigned until you confirm the VM launches correctly.
- Uncheck Start VM after creation
- Hit Create.
Copy the OS Drive to an image
Next up, you need to copy the data from your OS drive to an virtual disk image that the VM can boot off of.
- Identify the disk that contains your Windows Operating System. You can find it by looking in the unRAID web UI in the Main tab under Unassigned Devices. Look for the drive that you booted windows off of before you installed unRAID. Make note of the disk id (e.g. sdb, sdc, sde, etc.)
- SSH into your unRAID system as root. By default unRAID doesn’t have a root password, but you should have set a strong one by now… right?
- Enter the following command to convert the physical disk
qemu-img convert -p -O raw /dev/sdX /mnt/user/domains/Windows\ 10/vdisk1.img
- Replace sdX with the drive id for your Windows OS installaton
- Replace Windows\ 10 with the name you gave your Virtual Machine (if you need to see what it is run the ls /mnt/user/domains command to see what it’s name is on disk)
- Wait. It’ll take a while, assuming you have a reasonably large OS installation disk.
Start your Windows VM & Install the VirtIO Drivers
Because Windows is now running as a Virtual Machine on KVM, it will think there is new “hardware” and will require (and benefit from) having the right drivers installed.
- In the unRAID VMs tab, click on your newly created VM and click Start

- After the VM has started, you can VNC into the machine and interact with it. You can do this one of two ways.
- Click on the running Windows VM and select “VNC Remote”
- (Preferred) Install a VNC client like TightVNC and connect to the VM directly. To do so, you’ll need to know the IP address of your server and connect to the VNC port of the VM (which is listed next to the running VM)
- In Windows File Explorer, navigate to the VirtIO virtual CD-Rom (likely disk D:\)
- Navigate to Balloon > w10 > amd64
- Or your specific version of Windows and Architecture
- Right click on the .inf file (i.e. balloon.inf) and click install. (You may need to enable the viewing of file extensions to find the right file)

- Repeat the above process for each of the following folders
- NetKVM
- vioserial
- viostor
- You may want to check Windows Device Manager to make sure there are no devices which have yellow warning exclamations next to them – if so, you’ll likely need to install an additional driver.
- When done with the driver installation, navigate to the guest-agent folder and double click on qemu-ga-x64.msi to install the QEMU/KVM guest agent.

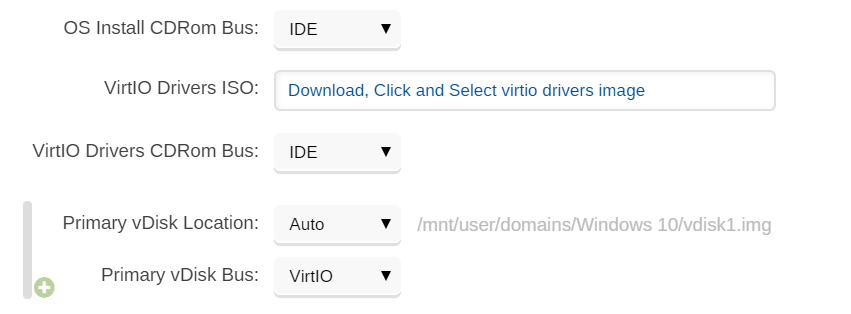
Shutdown the VM & update disk settings
Now that you know that the VM boots and you’ve got the drivers installed, you can stop the VM and update the physical disk to use the VirtIO bus which will give you better performance.
- Stop the Windows VM. You can do this one of two ways – one, by initiating a Shutdown from within Windows. Or, you can click on the VM image in unRAID and select Stop which will also gracefully shut down Windows.
- In the unRAID web UI, in the VMs tab, select the Windows VM and select Edit
- Change the following settings:

- Primary vDisk Bus: VirtIO
- VertIO Drivers ISO: delete the entry
- Restart the VM and make sure it’s operating correctly.
Reactivate your Windows license
Windows checks it’s license validity based on your machine’s hardware. Any time you change the hardware, Windows needs you to reactivate your license. You’ll need to run through the activation steps in the VM to re-activate your Windows license because Windows will think you just changed a lot of hardware.
To do that, search for “Activation” from the Windows 10 Start menu. From there, you should be able to follow the prompts to activate your copy of Windows. Somewhere along the way, in smallish font, it’ll ask you if you recently changed hardware. Click that option and go from there – i.e. log into your Microsoft Account, select the machine/license associated with this Windows installation.
(Optional) Remove Unneeded Software & Drivers
Because your old Windows machine had a lot of device specific drivers installed on it to operate on your hardware, you may have a lot of cruft that can now be removed. Log into your Windows machine and take a stroll through the “Add or Remove Programs” menu to see if there’s anything that can be removed. For me, I could uninstall any Intel and RealTek Drivers, ASUS motherboard features, etc. that were no longer relevant. It’s a nice thing to slim up the now VM’d Windows OS.
(Optional) Optimize the Window VM
The unRAID wiki has a good set of steps to consider to optimize your Windows VM. I personally don’t believe in disabling the search indexer, but most of the other tips are worth while.
(Optional) Reduce / Shrink the size of the VM image
Now, you’re probably saying to yourself… geez, I don’t need a XXX GB image file that just happened to be the size of your old OS hard drive just to run Windows. You probably want to slim that down. Here’s instructions on exactly how to do that.
Let me know if I missed anything here.
Делал подобную операцию, только в обратную сторону (с KVM на Hyper-v). Для вашего случая алгоритм такой:
Сделайте образ VHD с помощью утилиты disk2hvd, либо для VHDx виртуальной машины выполните в PowerShell:
Convert-VHD source.vhdx destination.vhd -VHDType Dynamic
скопируйте VHD на новый сервер, выполните команду:
qemu-img convert -O qcow2 source.vhd destination.qcow2
Этот образ можно использовать для виртуальных машин на KVM.
Как вариант, можно конвертировать VHD в так называемый Raw формат.
kvm-img convert -f vpc -O raw source.vhd destination.img
и сделать LVM для виртуальной машины, куда загрузите данные из полученного образа в Raw.
Самое сложное у меня было — это закачать из Амазона на сервер в РФ файл размером 30-60Гбайт, не нарушив его консистентности. После нескольких неудачных попыток с ftp, http и sftp я использовал программу BitTorrentSync: https://www.getsync.com
Linux KVM is getting more and more useable for desktop virtualization thanks to the the virtio and QXL/SPICE drivers.
Most Linux distributes have the virtio & QXL drivers you might need to install the spice-vdagent.
On Windows you can download and install the virtio and QXL drivers.
Using the virtio drivers will improve your guest system performance and your virtualization experience.
Convert the disk image
merge the vmware disk images…
If you use split disk images on vmware ( or vmware player ) migrate them to a single disk images with the vmware-vdiskmanager command.
$ vmware-vdiskmanager -r mywin.vmdk -t 0 /tmp/mywin._combined.vmdk
Creating disk '/var/lib/libvirt/images/tmp/mywin._combined.vmdk'
  Convert: 100% done.
Virtual disk conversion successful.
$
convert the vmdk image to qcow2
Convert the VMDK disk image to qcow2
[staf@vicky vboxes]$ qemu-img convert -f vmdk -O qcow2 mywin._combined.vmdk mywin.qcow2
mv
[staf@vicky vboxes]$ sudo mv mywin_combined.qcow2 /var/lib/libvirt/images/
[sudo] password for staf:
Import the disk image to KVM
We’ll inport the disk image with virt-install it’s also posible to import the images with virt-manager if you prefer a graphical interface or or just being lazy 
Available os options
To list the supported operation system you can use the osinfo-query os command
[staf@vicky ~]$ osinfo-query os | head
 Short ID             | Name                                               | Version  | ID
----------------------+----------------------------------------------------+----------+-----------------------------------------
 alpinelinux3.5       | Alpine Linux 3.5                                   | 3.5      | http://alpinelinux.org/alpinelinux/3.5
 alpinelinux3.6       | Alpine Linux 3.6                                   | 3.6      | http://alpinelinux.org/alpinelinux/3.6
 alpinelinux3.7       | Alpine Linux 3.7                                   | 3.7      | http://alpinelinux.org/alpinelinux/3.7
 altlinux1.0          | Mandrake RE Spring 2001                            | 1.0      | http://altlinux.org/altlinux/1.0
 altlinux2.0          | ALT Linux 2.0                                      | 2.0      | http://altlinux.org/altlinux/2.0
 altlinux2.2          | ALT Linux 2.2                                      | 2.2      | http://altlinux.org/altlinux/2.2
 altlinux2.4          | ALT Linux 2.4                                      | 2.4      | http://altlinux.org/altlinux/2.4
 altlinux3.0          | ALT Linux 3.0                                      | 3.0      | http://altlinux.org/altlinux/3.0
[staf@vicky ~]$ osinfo-query os |  grep -i windows
 win1.0               | Microsoft Windows 1.0                              | 1.0      | http://microsoft.com/win/1.0
 win10                | Microsoft Windows 10                               | 10.0     | http://microsoft.com/win/10
 win2.0               | Microsoft Windows 2.0                              | 2.0      | http://microsoft.com/win/2.0
 win2.1               | Microsoft Windows 2.1                              | 2.1      | http://microsoft.com/win/2.1
 win2k                | Microsoft Windows 2000                             | 5.0      | http://microsoft.com/win/2k
 win2k12              | Microsoft Windows Server 2012                      | 6.3      | http://microsoft.com/win/2k12
 win2k12r2            | Microsoft Windows Server 2012 R2                   | 6.3      | http://microsoft.com/win/2k12r2
 win2k16              | Microsoft Windows Server 2016                      | 10.0     | http://microsoft.com/win/2k16
 win2k3               | Microsoft Windows Server 2003                      | 5.2      | http://microsoft.com/win/2k3
 win2k3r2             | Microsoft Windows Server 2003 R2                   | 5.2      | http://microsoft.com/win/2k3r2
 win2k8               | Microsoft Windows Server 2008                      | 6.0      | http://microsoft.com/win/2k8
 win2k8r2             | Microsoft Windows Server 2008 R2                   | 6.1      | http://microsoft.com/win/2k8r2
 win3.1               | Microsoft Windows 3.1                              | 3.1      | http://microsoft.com/win/3.1
 win7                 | Microsoft Windows 7                                | 6.1      | http://microsoft.com/win/7
 win8                 | Microsoft Windows 8                                | 6.2      | http://microsoft.com/win/8
 win8.1               | Microsoft Windows 8.1                              | 6.3      | http://microsoft.com/win/8.1
 win95                | Microsoft Windows 95                               | 4.0      | http://microsoft.com/win/95
 win98                | Microsoft Windows 98                               | 4.1      | http://microsoft.com/win/98
 winme                | Microsoft Windows Millennium Edition               | 4.9      | http://microsoft.com/win/me
 winnt3.1             | Microsoft Windows NT Server 3.1                    | 3.1      | http://microsoft.com/winnt/3.1
 winnt3.5             | Microsoft Windows NT Server 3.5                    | 3.5      | http://microsoft.com/winnt/3.5
 winnt3.51            | Microsoft Windows NT Server 3.51                   | 3.51     | http://microsoft.com/winnt/3.51
 winnt4.0             | Microsoft Windows NT Server 4.0                    | 4.0      | http://microsoft.com/winnt/4.0
 winvista             | Microsoft Windows Vista                            | 6.0      | http://microsoft.com/win/vista
 winxp                | Microsoft Windows XP                               | 5.1      | http://microsoft.com/win/xp
[staf@vicky ~]$
import
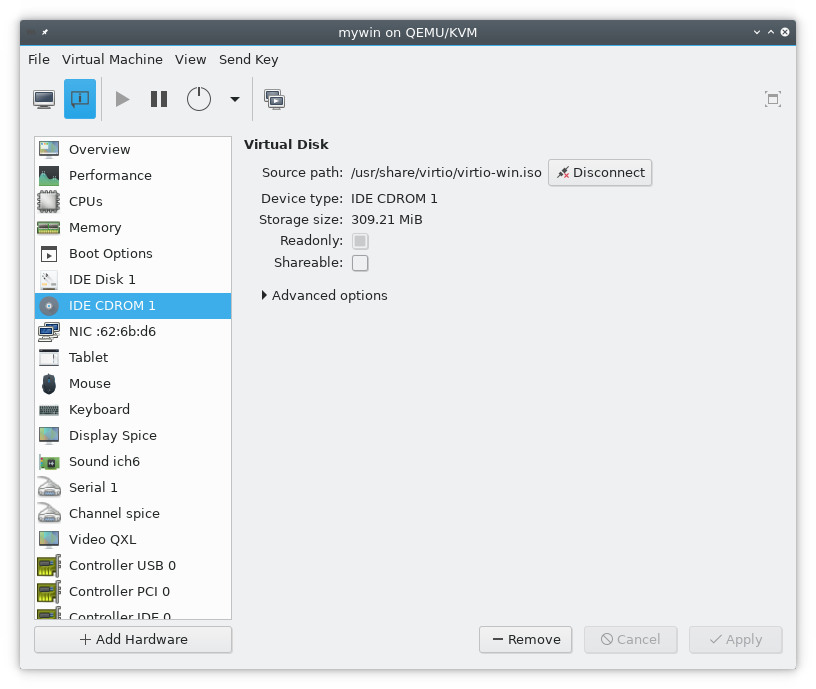
We need to import the disk image as IDE device since we don’t have the virtio driver in our windows disk image (yet).
[root@vicky ~]# virt-install --name "mywin" --ram 8192 --cpu host --os-variant win10 --vcpu 8 --disk /var/lib/libvirt/images/mywin_combined.qcow2,bus=ide --network bridge=virbr0 --import

Starting install...

(virt-viewer:3361): GSpice-WARNING **: 16:49:26.546: Warning no automount-inhibiting implementation available
Install the virtio drivers and QXL graphics drivers
Get them…
Type of virtio drivers
The following virtio windows drivers are available.
- block (disk drivers)
- network
- baloon ((dynamic memory management)
The fedoraproject provides pre compiled iso images containig all the virtio drivers and installation images for
windows XP.
ISO contents
- NetKVM/ — Virtio network driver
- viostor/ — Virtio block driver
- vioscsi/ — Virtio Small Computer System Interface (SCSI) driver
- viorng/ — Virtio RNG driver
- vioser/ — Virtio serial driver
- Balloon/ — Virtio memory balloon driver
- qxl/ — QXL graphics driver for Windows 7 and earlier. (build virtio-win-0.1.103-1 and later)
- qxldod/ — QXL graphics driver for Windows 8 and later. (build virtio-win-0.1.103-2 and later)
- pvpanic/ — QEMU pvpanic device driver (build virtio-win-0.1.103-2 and later)
- guest-agent/ — QEMU Guest Agent 32bit and 64bit MSI installers
- qemupciserial/ — QEMU PCI serial device driver
- *.vfd VFD floppy images for using during install of Windows XP
Download
The virtio windows driver images are available from
https://docs.fedoraproject.org/quick-docs/en-US/creating-windows-virtual-machines-using-virtio-drivers.html
I use arch linux and download virtio-win AUR package with pacaur. You can download the images directly or use the installation packages for your Linux distribution.
[staf@vicky ~]$ pacaur -S virtio-win
:: Package virtio-win not found in repositories, trying AUR...
:: resolving dependencies...
:: looking for inter-conflicts...

AUR Packages  (1) virtio-win-0.1.149.2-1

:: Proceed with installation? [Y/n]
<snip>
  -> Compressing package...
==> Leaving fakeroot environment.
==> Finished making: virtio-win 0.1.149.2-1 (Sat Jun 16 20:00:22 2018)
==> Cleaning up...
:: Installing virtio-win package(s)...
loading packages...
resolving dependencies...
looking for conflicting packages...

Packages (1) virtio-win-0.1.149.2-1

Total Installed Size:  314.84 MiB

:: Proceed with installation? [Y/n]
(1/1) checking keys in keyring                                         [#######################################] 100%
(1/1) checking package integrity                                       [#######################################] 100%
(1/1) loading package files                                            [#######################################] 100%
(1/1) checking for file conflicts                                      [#######################################] 100%
(1/1) checking available disk space                                    [#######################################] 100%
:: Processing package changes...
(1/1) installing virtio-win                                            [#######################################] 100%
Optional dependencies for virtio-win
    qemu [installed]
:: Running post-transaction hooks...
(1/1) Arming ConditionNeedsUpdate...
[staf@vicky ~]$ ls -l /var/li
This install virtio images to /usr/share/virtio/
[staf@vicky ~]$  ls -l /usr/share/virtio/
total 321308
-rw-r--r-- 1 root root 324233216 Jun 16 19:58 virtio-win.iso
-rw-r--r-- 1 root root   2949120 Jun 16 19:58 virtio-win_x86_32.vfd
-rw-r--r-- 1 root root   2949120 Jun 16 19:58 virtio-win_x86_64.vfd
[staf@vicky ~]$
virtio-win.iso is the ISO cdrom image containing all the drivers.
Installation
mount the iso image
Make sure that the cdrom is mounted in windows.
Install
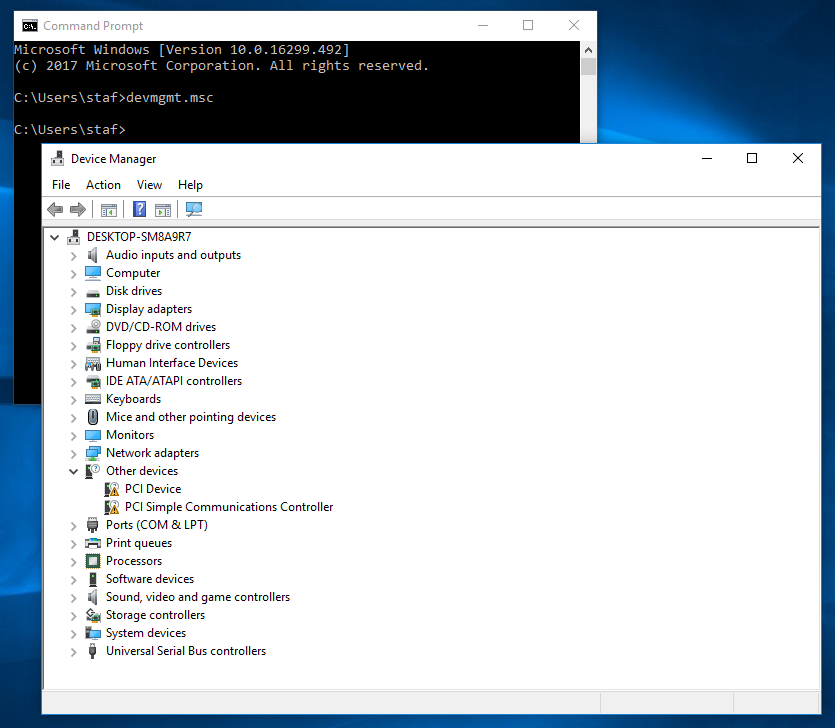
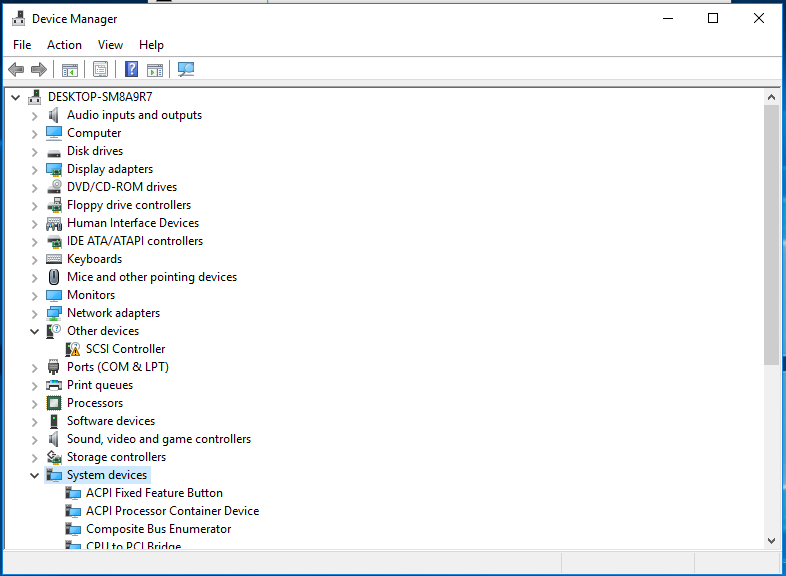
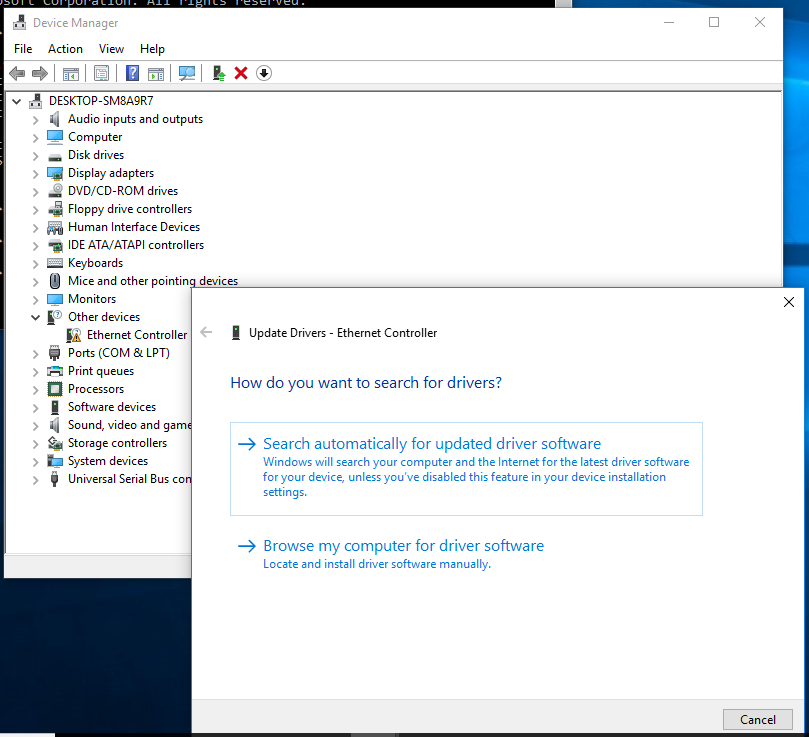
Open Device Manager
Open device Manager in the control panel or type devmgmt.msc on the command prompt.
Update the drivers
- balloon, the balloon driver affects the PCI device
- vioserial, affects the PCI simple communication controler
- NetKVM, the network driver affects the Network adapters.
- viostor, the block driver affects the Disk drives.
Update the PCI drivers
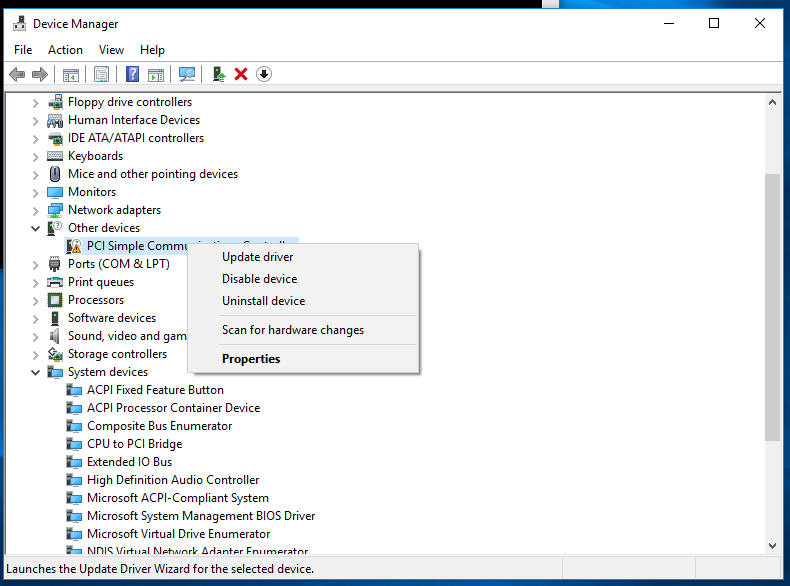
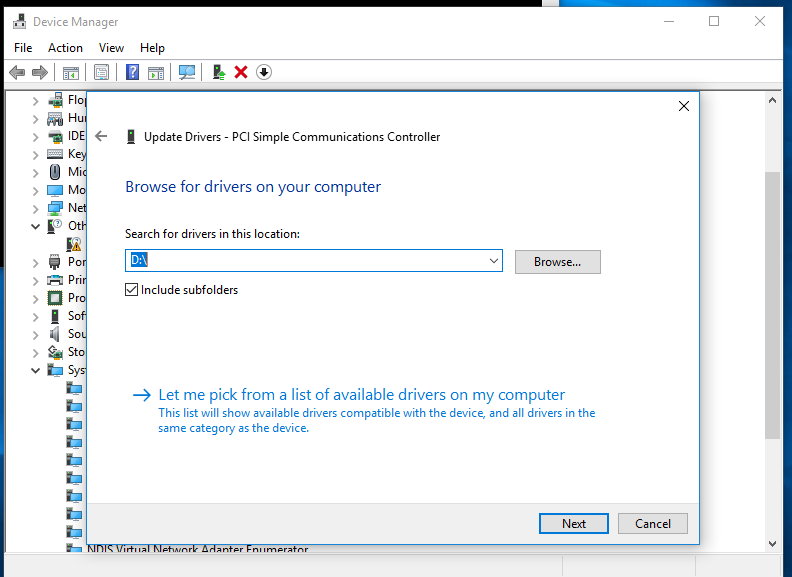
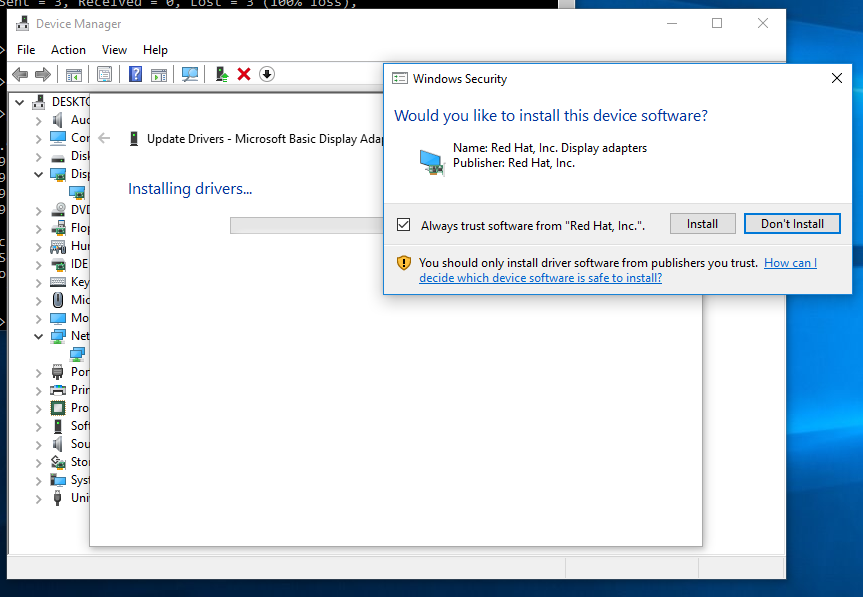
In windows 10 the PCI device and the PCI Simple Communications Controller have the missing driver icon.
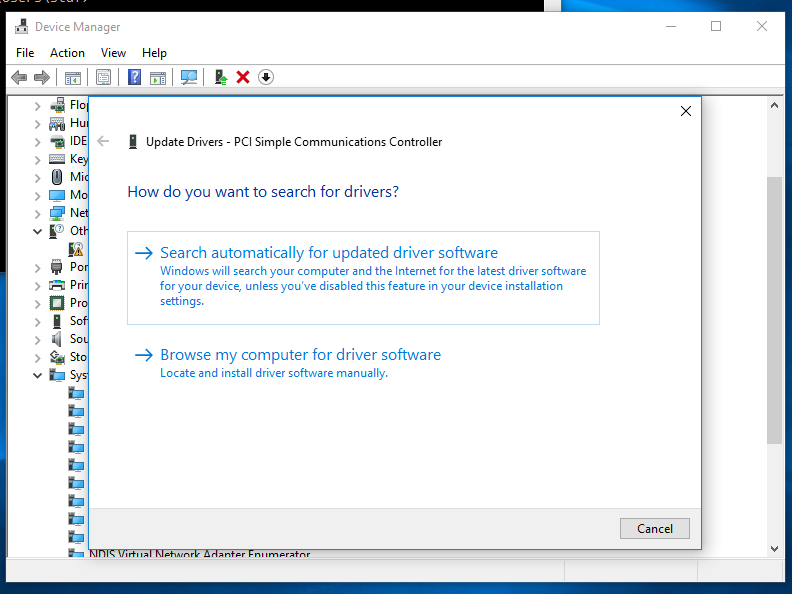
Right click on the PCI device and select update driver -> click on Browse my computer for driver software
Specify the cdrom as the search location and click Next, this will install the Balloon driver.
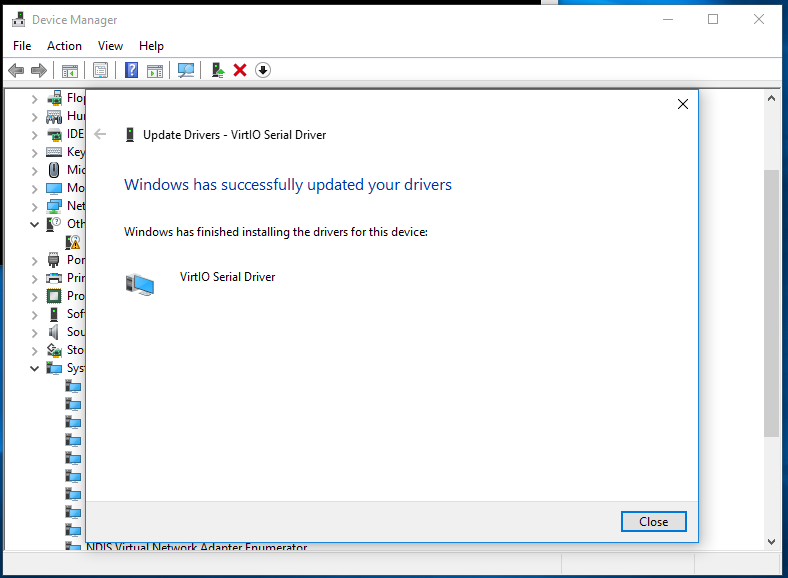
Do the same for the PCI Simple Communications Controller this will install the “VirtIO Serial Driver”
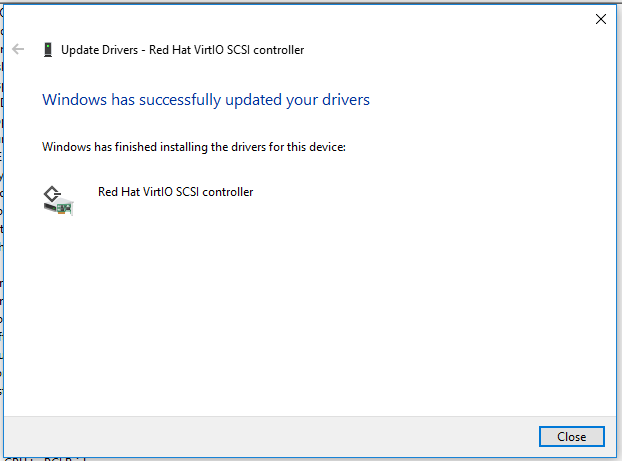
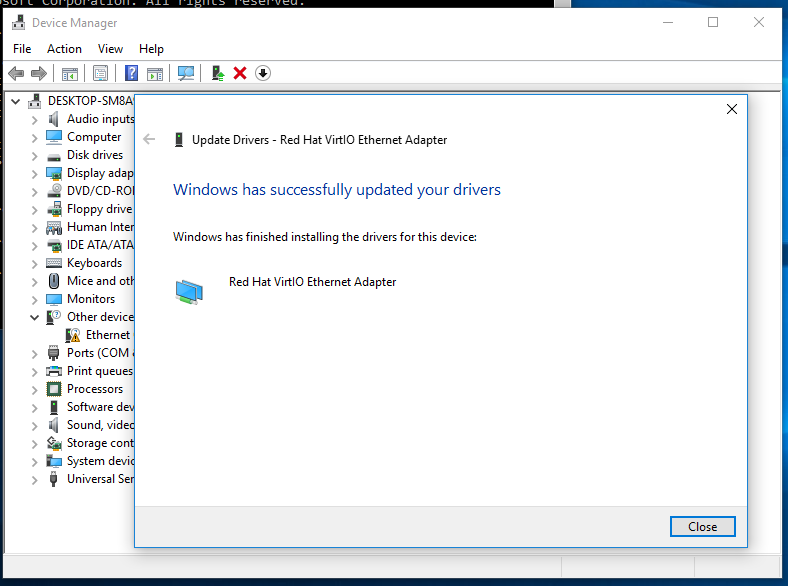
install the VioStor driver
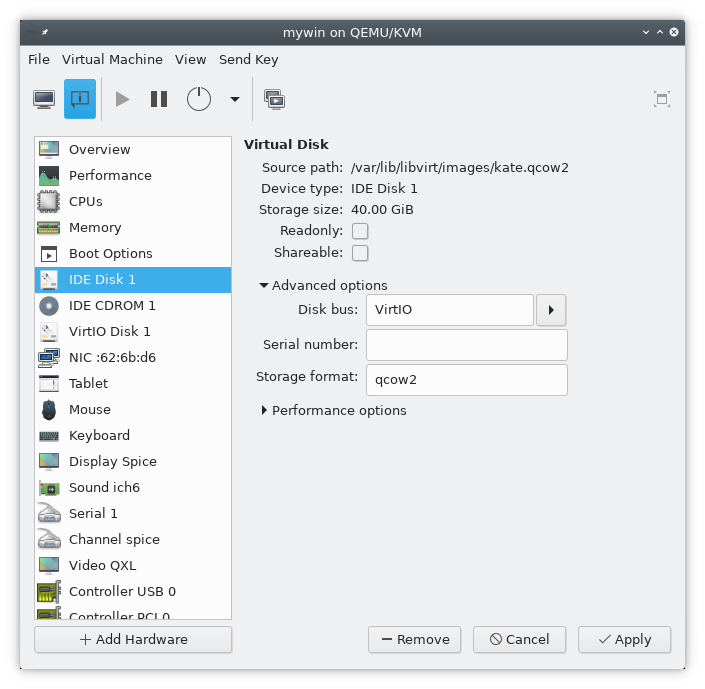
Add a temporary disk to the virtual machine and use VirtIO as the Bus Type
In the Device Manager you’ll get a new device SCSI Controller right click it and update the driver.
This will install the Red Hat VirtIO SCSI controller
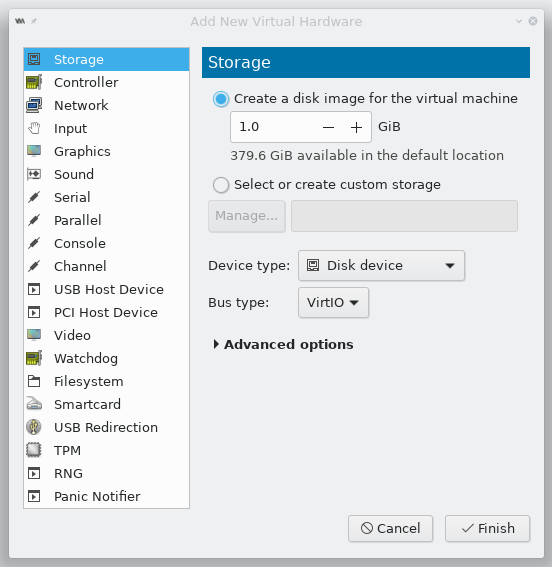
Go to the device settings of your virtual machine and change the Disk bus to VirtIO
and shutdown you virtual machine.
You can remove the temporary disk now or leave it if you can find some use for it…
Make sure that you disk is selected as the bootable device.
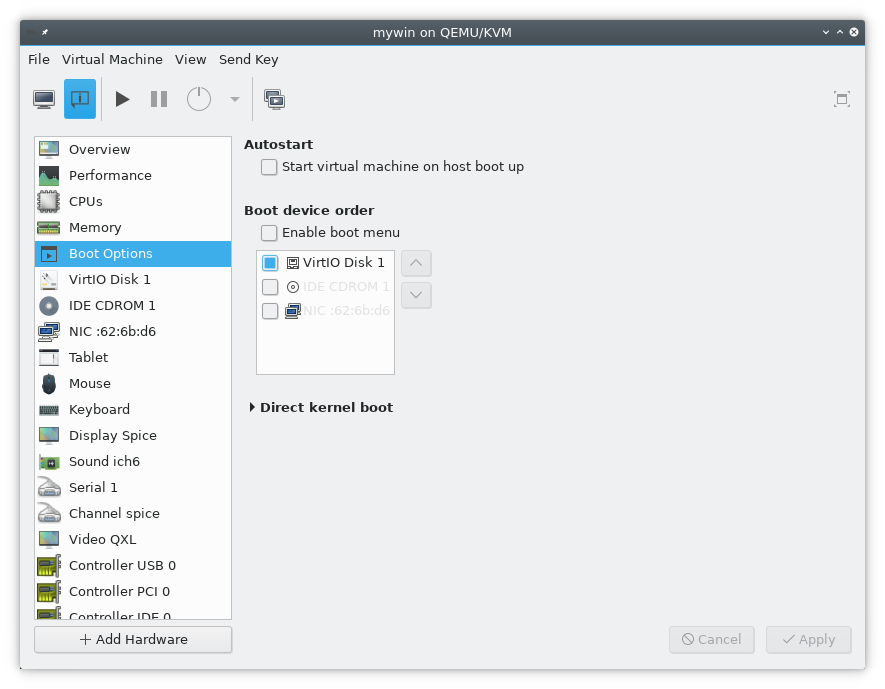
Start the virtual machine and make sure that the system is bootable.
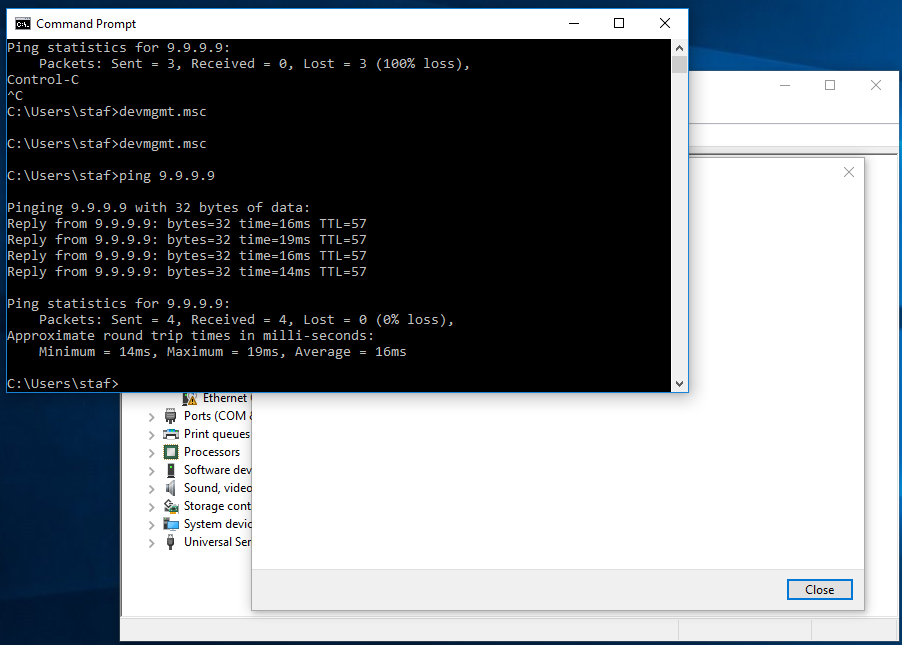
install the netKVM driver
Update the Device model to virtio.
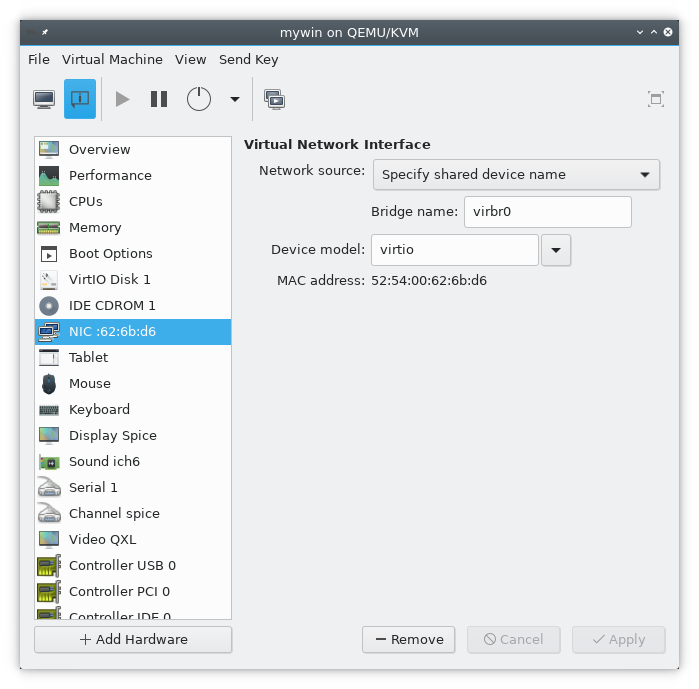
Start devmgmt.msc and update the driver as we did before….
And verify that you network card works correctly.
install the QXL graphical driver
Update the Microsoft Basic Display Adapter

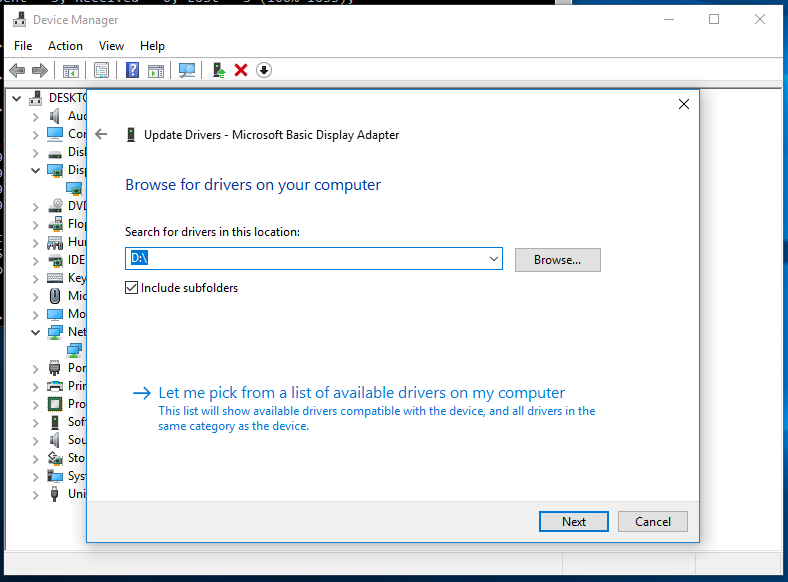
After the installation you can change the the display resolution.
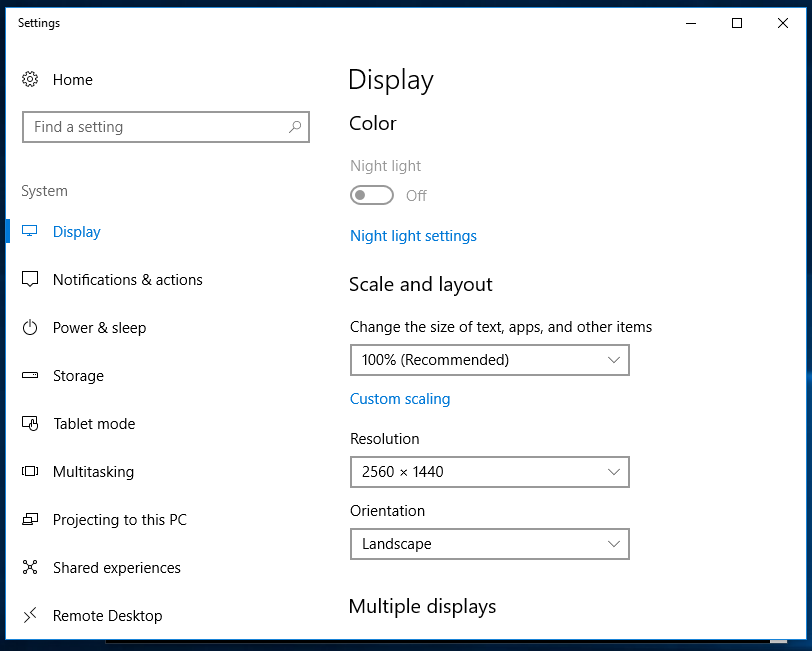
If you want to use higher screen resolutions you need to increase the video ram
Have fun!
Links
- https://raymii.org/s/articles/virt-install_introduction_and_copy_paste_distro_install_commands.html
- http://bart.vanhauwaert.org/hints/installing-win10-on-KVM.html
- https://docs.fedoraproject.org/quick-docs/en-US/creating-windows-virtual-machines-using-virtio-drivers.html
- https://pve.proxmox.com/wiki/Windows_VirtIO_Drivers
- https://access.redhat.com/documentation/en-us/red_hat_enterprise_linux/6/html/virtualization_host_configuration_and_guest_installation_guide/form-virtualization_host_configuration_and_guest_installation_guide-para_virtualized_drivers-mounting_the_image_with_virt_manager
As described in another post, I had a Windows 10 (version 1607) installation on an Acer laptop. I wondered whether I could use Microsoft’s Disk2VHD to convert that physical installation to a virtual machine (VM) that would run in KVM. This post describes the steps I took to find out. (Note that commands are presented here in italics, and that I don’t indicate every time I had to click OK or Close or some other “next step” button to move things along.)
Contents
Trying a VHDX
Trying a VHD
Via VirtualBox
Via VMware
Recap
.
Trying a VHDX
As detailed in a TenForums tutorial, the first step was to download the latest version of Disk2VHD and run it on the laptop. The version I got was 2.01, dated January 20, 2014. It was a portable, so I didn’t need to install it; I just put it on the desktop and ran it from there. It offered to create VHDs of every partition it could find. I deselected all except drive C. I selected the desktop as the destination, and gave it a filename that I would recognize. For Me (i.e., the user account that I had created during installation), Disk2VHD translated the destination and filename as C:\Users\Me\Desktop\ACER-Disk2VHD.vhdx. I left the boxes checked by default for the Use Vhdx and Use Volume Shadow Copy options. (Microsoft said .vhdx was generally superior to .vhd, except when software required the latter.) Then I clicked Create.
I wasn’t watching the clock closely, but that took maybe 25 minutes to produce a 90GB .vhdx file from the laptop’s original 57GB Windows installation (i.e., a 58% inflation). I was dismayed but not really surprised that the resulting .vhdx was so large: I had previously seen a 28GB .tib converted into a 40GB .vhd file (43% inflation). For purposes of conserving disk space and creating a fast VM, one would hope that KVM would find a way to reduce that .vhdx. But we weren’t there yet. For now, to facilitate transfer of the .vhdx to another computer where I could try using it in KVM on Linux, on the Windows 10 laptop I right-clicked on the .vhdx on the Desktop > Send to > Compressed (zipped) folder. It didn’t ask for a destination; it just took a long time and produced a 36GB .zip file on the desktop.
I moved that .zip file over to a computer running KVM on Linux Mint Cinnamon (LMC) 18. It was a dual-boot machine, and I found I needed to boot it in Windows, and use a Windows program (I chose WinRAR, my preferred zip program) to unzip the .zip file. Apparently Win10’s compression algorithm was not familiar to LMC 18. Then I rebooted into LMC.
The TenForums tutorial and others (e.g., OnlineTechTips) described a process in which the .vhdx file would be imported into Hyper-V on a Windows 10 system. I assumed that would work without many problems: presumably Microsoft made sure that the output of its Disk2VHD program would work as input for its Hyper-V program. But I wasn’t interested in running the new VM in Hyper-V. So I had to switch, now, to other sources of guidance.
Taking me partway there, gHacks (Brinkmann, 2017) offered instructions for using the .vhdx file in VirtualBox and VMware. I had previously found that, among VMs running Windows XP, 7, and 10 in VirtualBox .vdi files, the Windows 10 .vdi was the only one that was able to run in KVM without conversion. So one route forward would be to use VirtualBox to convert this Win10 .vhdx to .vdi, and then try running that .vdi in KVM.
But was there a more direct route? A search led to an indication that Proxmox (a server-oriented, Ubuntu-based Linux distribution that appeared to focus on using KVM), at least, could directly import .vhdx without conversion. LMC didn’t come with KVM installed, so I used the steps described in a previous post to install it. That gave me Virtual Machine Manager (VMM) as a KVM graphical user interface (GUI).
To avoid permissions problems, I ran VMM via sudo virt-manager. Then, to see if I could open the .vhdx with KVM, I used VMM > menu > File > New Virtual Machine > Import existing disk image > Browse > Browse Local > Other Locations > find the .vhdx > select > Open. That put me back in VMM’s “Create a new virtual machine” dialog. I designated the operating system (using Windows 8.1 as the most recent surrogate for Win10). I got a notice that “The emulator may not have search permissions” for the folder where the .vhdx was located. I accepted its offer to fix that. I gave the new VM 4GB RAM and all four processors on this particular machine, based on the impression that the VM would seize full control of the RAM but would share the CPUs. Then I proceeded to create the VM with the name of AcerWin10.
That produced “Error connecting to graphical console: Error opening Spice console, SpiceClientGtk missing.” A search led to advice to install gir1.2-spice-client-gtk-3.0. I ran sudo apt-get install gir1.2-spice-client-gtk-3.0. Then, in VMM, I used the power button drop-down > Force Off (because the VM was running and wouldn’t respond to the Shut Down option). I killed and re-ran sudo virt-manager. With the AcerWin10 VM listed, I went to VMM > toolbar > Open button > toolbar > Power (i.e., the rightward-pointing black triangle button, with the “Power on the virtual machine” tooltip). This time, it did not stall at the same error message. So it did seem that gir1.2-spice-client-gtk-3.0 had helped. Therefore, I added it to the list of programs to install, in the KVM installation instructions in the other post cited above.
Unfortunately, I still wasn’t out of the woods. This time, the attempt to open the .vhdx using VMM produced “Boot failed: not a bootable disk. No bootable device.” That was possible, but was it true? A search led to Azitech’s advice to go into VMM > select the VM (i.e., AcerWin10) > VMM menu > Virtual Machine Details > menu > View > Details > IDE Disk 1 (or, presumably, whatever the VMM’s virtual hard disk drive (HDD) was called) > Advanced Options > change storage format. This and other sources said the problem was that KVM assumed the source file was of RAW format, even if it had a .vhdx (or other) extension. So apparently I had to replace “raw” with “vhdx” in the Storage Format box. Then Apply. That produced “Error changing VM configuration: unsupported configuration: unknown driver format value ‘vhdx.’” I tried using .vhd instead of .vhdx here in the Storage Format box. It accepted that. Hmm. So maybe I should have exported a .vhd rather than a .vhdx from Disk2VHD. I went to VMM > toolbar > Power On icon. That gave me “Error starting domain: Cannot access storage file . . . . No such file or directory.” Oops. I had meanwhile booted into Windows 7 and back, and had not yet mounted the drive where the .vhdx file was located. I mounted it and tried again. This time, the Power button gave me a different error:
Error starting domain: internal error: early end of file from monitor, possible problem . . . . Unknown driver ‘vhd’
A search on that produced nothing. A different search led to a statement that “QEMU doesn’t support VHD, but does support VHDx.” I wasn’t sure if that was relevant, but possibly it was telling me that the VMM GUI and the underlying QEMU software were not consistently supporting the same formats.
Since I wasn’t seeing better solutions, I contemplated Red Hat’s indication that qemu-img supported several formats, including .raw, .qcow2, .vdi, .vhdx (but not .vhd), and .vmdk. This was interesting because I had previously used qemu-img commands to convert .raw to .qcow2. In other words, giving up for now on the direct use of .vhdx in KVM, it seemed I might use qemu-img to produce a one-step conversion (i.e., without taking the .vhdx through the VirtualBox .vdi format first). For that, a search led to sources (e.g., Aitek, Cisco, OpenStack) recommending these commands:
qemu-img check -r all [.vhdx file name (and path, if needed)]
qemu-img convert -O qcow2  [output .qcow2 file]
The first command checked the .vhdx file for errors. I got “No errors were found on the image.” The second command (adding paths to filenames when necessary) ran without errors — except that I ran out of disk space. I attached an external USB drive and tried the second command again. Then it did produce a 52GB .qcow2 file, for a shrinkage of 37% from the 90GB .vhdx and 9% from the original Windows 10 installation size on disk. I went through the same steps to create a VM in VMM (above). But when I selected the .qcow2 as the storage unit for a new VM, VMM said,
Input Error
Storage parameter error.
Could not define storage pool: operation failed: Storage source conflict with pool: ‘BACKROOM’
BACKROOM was the name of the partition where I had put the .qcow2. I saw, from my previous post, that I had previously resolved this error, running as root, by (a) putting a copy of the source file (in that case, an .iso; in this case, the .qcow2) in /var/lib/libvirt/images, (b) running VMM, and (c) finding the .qcow2, in VMM, as an item already listed (i.e., I didn’t have to browse to find it) when I was going through the steps (above) to Create a new virtual machine. So I repeated those steps. From that point, I had no further problems in creating the VM. When I clicked the last button in the VMM creation process, we went on into a running VM window that named SeaBIOS and said, “Booting from Hard Disk …”
Unfortunately, it hung at that point. It wouldn’t go any further. A search led to a ServerFault suggestion to make sure it was trying to boot as UEFI rather than BIOS (i.e., Legacy). Apparently that would matter because the source physical installation was running UEFI. To check that, I used VMM’s toolbar > Power button > Force Off; I closed the VM and deleted the VM (but not its underlying .qcow2 file), and then I redid the process of creating the VM. This time, I selected the option to Customize configuration before install. That configuration screen opened at Overview, and that’s where I wanted to be. I went down to Hypervisor Details > Firmware = BIOS. The tooltip when I hovered over the accompanying orange Information icon said, “Libvirt did not detect any UEFI/OVMF firmware image installed on the host.” The point seemed to be that BIOS was the only viable option because, as indicated by the greyed-out alternative to BIOS in the drop-down box, UEFI was “not found.” So I searched for guidance on that Libvirt message. Some sources said I had to tell Libvirt where the OVMF files were located. Another said the solution was sudo apt-get install ovmf. I killed VMM and tried that, and then restarted VMM and tried again. That changed the situation: now, in the Firmware drop-down, I had an alternative to BIOS: UEFI x86_64: /usr/share/OVMF/OVMF_CODE.fd. I left the chipset at i440FX. I clicked Apply and then Begin Installation.
That produced a more promising start — I got a TianoCore splash screen, apparently related to a memory check, followed by information related to “Mapping table.” So at least it wasn’t hung. But then it said, “Press ESC in 1 seconds to skip startup.nsh or any other key to continue.” I did neither, and in response it continued without me, dumping me at a UEFI Interactive Shell prompt whose purpose and functioning were alien to me. A retry > Esc did not help. A search led to an Ubuntu forum suggestion to change the chipset from i440FX to Q35. But how? I could see what the VM’s settings were — I could see the i440FX — but there was no option to change it. I deleted the VM (but not its associated storage files) and recreated it. This time, I chose Q35. When I did that, I got a warning:
Q35 is not the default chipset and has received far less testing. Once this change is made it is difficult to go back. Only use this if you know what you are doing.
Well. I, personally, did not know what I was doing, but I knew what someone else was doing, viz., s/he was advising me to use Q35. Did that count? I forged ahead. But I didn’t forge far. I got another error:
Unable to complete install: ‘unsupported configuration: IDE controllers are unsupported for this QEMU binary or machine type’
No problem. They hadn’t let me escape from the VM details screen, so I went directly over to the IDE Disk 1 item > Advanced options > Disk bus: SATA. But no, that still put me back at the UEFI Interactive Shell. Returning to that Ubuntu forum discussion, now, I saw that the advisee there found that advice equally unhelpful. But s/he did achieve success with a fresh Windows install — which I could do too, with the aid of a nice fresh Windows 10 retail license.
Typing “exit” at the UEFI shell prompt gave me a choice of several options, including Boot Manager, Device Manager, and Boot Maintenance Manager. I tried Boot Manager. That led to what seemed to be a choice between booting the EFI hard drive, internal shell, or network. I tried hard drive. I also tried internal shell. No joy. The Lime Technology wiki suggested a one-time procedure starting with fs0 but that was for VMs created with older software; in my case fs0 was not recognized.
In response to suggestions from 1 2 3 sources, I tried creating another VM, this time setting the VM’s Video setting to Cirrus rather than QXL. I still had to choose UEFI rather than BIOS to get past the “Booting from Hard Disk …” hangup. That just put me back at the UEFI Interactive Shell. Cirrus, by itself, was not my salvation.
I seemed to be struggling. My impression, after looking at a number of websites, was that there was not an obvious current solution. It seemed like a good time to drop this line of inquiry.
Trying a VHD
I re-ran Disk2VHD on the laptop, this time seeking to produce a .vhd rather than .vhdx file. I no longer had the option of creating it before activation, because the laptop had activated itself. I wasn’t sure when that happened. It may have been while I was updating the system from Windows 10 version 1607 to version 1803. Possibly Acer’s OEM software played a role.
Once the updating and rebooting and more updating were done, I found that the Windows 10 installation on drive C had grown quite a bit: now it was 89GB. If the 58% inflation calculated above still held, Disk2VHD would convert that into a 140GB .vhd.
It seemed I had better see whether there were any large excesses I could remove. One obvious candidate: the C:\Windows.old folder. Microsoft explained that this folder was created during my upgrade from a previous version of Windows. Evidently they meant to include, not only upgrades from some previous version of Windows (e.g., Windows 7), but also upgrades from earlier versions of Windows 10. I had no desire to go back to Win10 version 1607 — or, if I did, from what I had heard, the faster and more reliable way of doing so would be to restore from a drive image. I had a viable drive image, so that was an option.
Therefore, I was quite willing to delete the 24GB of material in the Windows.old folder. To do that, the Microsoft webpage essentially advised Win-I > System > Storage > This PC > Temporary Files. The Remove Files button was grayed, and after a moment I saw why: Win10 was figuring out what could be removed. When it was done with that, it said the only substantial (i.e., > 1GB) candidates for removal were Windows.old (25GB) and Delivery Optimization Files (1.6GB). Removing those and a few other moderately large items took quite a while, during which I was not sure whether maybe it had frozen; but in the end it brought drive C down to 70GB. From that, the .vhd produced by Disk2VHD was 101GB, for an inflation of 44%.
I went back through the same steps as with the .vhdx (above): briefly, create the .vhd; put it on an external USB NTFS drive; connect that to a Linux computer; run sudo virt-manager > VMM menu > File > New Virtual Machine > Import existing disk image > Browse > Browse Local > Other Locations > find the .vhd > select > designate the operating system > Customize configuration before install > IDE Disk 1 > Advanced Options > Storage Format = vhd > Apply > Begin installation. That re-produced the “Unknown driver” error quoted above. So, giving up on the direct route and opting for the one-step conversion, I canceled the installation and tried the commands shown above:
qemu-img check -r all [.vhd file name (and path, if needed)]
qemu-img convert -O qcow2  [output .qcow2 file]
The first command produced “qemu-img: This image format does not support checks” — referring, presumably, to the .vhd format. The second command ran. It produced a 53GB .qcow2, for a 47% reduction from the .vhd and a 24% reduction from the original drive C. As above, I copied the .qcow2 to /var/lib/libvirt/images. When I tried to turn VMM on to that, I got the same hangup at “Booting from Hard Disk.” Alternately, when I went into Customize configuration before install > Overview > Hypervisor Details > Firmware = UEFI (now that I had installed OVMF), Chipset = i440FX, I got the same TianoCore splash screen and then the same UEFI Interactive Shell.
Via VirtualBox
To review, I had tried to create a working Windows 10 VM in KVM by using Disk2VHD to create a .vhdx or .vhd file, and then either importing that file directly into VMM or using qemu-img to convert that file to .qcow2 and accessing that .qcow2 in VMM. These approaches had produced the same failing results — suggesting that, if I could ever find a solution for one, that might also solve the other. I was not confident that I had exhausted all possible routes to make these two approaches work, but I was increasingly confident that I was not optimistic about this exploration.
To rephrase what I just said, I had tried no-conversion and one-step conversion approaches. I had not yet tried a two-step conversion approach, which would involve using VirtualBox to convert the .vhd or .vhdx file into .vdi format, and then converting the .vdi to .qcow2. Or maybe that second step wouldn’t be necessary after all, once I had the .vdi. As noted above, I had previously found KVM able to run a Windows 10 .vdi without conversion.
I began with a search. It yielded instructions from SuperUser, recommending the following command format (with a warning that it did not work for .vhd files created by Hyper-V): VBoxManage clonehd source.vhd target.vdi –format vdi. But VirtualBox.org seemed to say that the clonehd option had been superseded by clonemedium. That page also offered other options for the command. In particular, BrainWreckedTech (2012) said the –variant Standard and –variant Fixed options were good for resizing and converting between fixed and dynamic sized VDIs. How-To Geek (Hoffman, 2017) offered additional information on that, and also on additional steps needed to use the VBoxManage command in Windows. (Basically, since VirtualBox installation did not add VBoxManage to the command path, the user would have to do that, or run VBoxManage from the folder where VirtualBox was installed. By default, that would be C:\Program Files\Oracle\VirtualBox. So either open a command prompt and navigate to that folder, and then run the VBoxManage command from there, or add that folder to the path. Then, on the command line, replace references to “VBoxManage” with “VBoxManage.exe” to invoke that executable (i.e., to run VBoxManage.exe). (See also Embark.pm.) Aside from that change of reference to VBoxManage.exe, the same VBoxManage commands would apparently work in both Windows and Linux.)
Taking those remarks into account, the Linux command I needed appeared to be as follows:
VBoxManage clonemedium source.vhd target.vdi --format vdi
Regarding that last –format option, VirtualBox.org seemed to say that conversion formats could include .vdi, .vmdk, .vhd, and some .hdd (i.e., Mac Parallels) files. VirtualBox.org also seemed to say that my designation of source and target files could consist of either filenames or UUIDs. In this case, I had filenames. I assumed paths could be included in source and target names, using quotation marks if the path or file name contained spaces. To use the VBoxManage command, of course, VirtualBox had to be installed. For that, the advice seemed to be to install the latest version from Oracle, so as to avoid bugs in the older versions offered by the standard Linux Mint repositories. I did that, choosing the Ubuntu 16.04 (Xenial) x64 .deb download. (Linux Mint 18 was reportedly based on Ubuntu 16.04.) Installing this way did not add an icon to the Linux Mint Menu. If I wanted to run the VirtualBox GUI, I would have to start it via virtualbox on the command line.
With VirtualBox installed, I proceeded to run the relevant version of the conversion command. In the directory containing the .vhd file, my command was VBoxManage clonemedium AcerWin10Updated.vhd /media/ray/BACKROOM/AcerWin10Updated.vdi –format vdi, where that internal BACKROOM partition was actually an NTFS partition. That command ran. From the 109GB .vhd, it produced a 59GB .vdi. Then I ran virtualbox > VirtualBox Manager menu > File > Preferences > choose Default Machine Folder. I moved the new .vdi into that default folder, and then went back to VirtualBox > menu > Machine > New > create a Win10 VM called AcerWin10Updated > Expert Mode > Use an existing virtual hard disk file > navigate to the newly created .vdi > Create. I went into Settings and configured a few items, and then started the VM.
That effort persuaded VirtualBox to greet me with a black screen saying “FATAL: No bootable medium found! System halted.” At this point, I was distracted from this project. When I came back to it, days later, I took off on a tangent, as reported by the remainder of this paragraph. A search (which I would later realize was faulty) led to an Ask Ubuntu answer indicating that this message could result from failing to tell the VM where to find its operating system, or designating the wrong operating system. To address that possibility, a Stack Overflow answer seemed to say I should another storage device via VirtualBox Manager > select VM > Settings > Storage > Storage Devices > Add IDE Controller > click on its icon to Add Optical Drive > Choose Disk > point to a Windows 10 ISO. I wasn’t sure whether that had to be the ISO from which the physical installation was created originally, or if I could just use something like ImgBurn to create an ISO from the physical installation. I didn’t install the physical Win10 installation from an ISO — it was the factory Win10 installation — so I would have to use some other Win10 .iso file. I tried that, using the Win10 version 1803 ISO that I had recently downloaded and used to upgrade the physical installation. I put that ISO onto the external 1TB HDD that I was using as overflow storage for these operations (because the laptop on which I was running these processes had limited storage), and I pointed the VirtualBox Add Optical Drive dialog to that. That worked, at least in the sense that I didn’t get the FATAL error message when I saved that and started the VM. Instead, I got an option of choosing Windows 10 32- or 64-bit setup. That sounded like it was going to create a new VM. But when I selected the 64-bit option and hit F8 instead of Enter, it gave me options to boot into Safe Mode or Start Windows Normally. I tried the latter. That just gave me the Win10 installer. A SuperUser discussion said, “When you first create a Virtual Machine with VirtualBox, there is no OS installed on the HD image. You have to have the VM mount a bootable ISO image to install the OS from.” So … was it going to wipe out the contents of the .vhd, using the contents of the .iso? A comment in that discussion seemed to say that I should designate the .vhd as an IDE rather than SATA controller: “The important point is to use IDE as for some reason it does not work with SATA.” I killed the Win10 installation dialog, went back to VirtualBox > Storage Devices, and deleted everything except an empty “Controller: IDE” entry. My only option then was to add the .vdi as a hard disk. I saved that and tried starting the VM. Hidden behind the message, “You have the Auto capture keyboard option turned on,” there it was: “FATAL!” etc. So that wasn’t the answer.
Eventually, I realized I was on a tangent. Now, hoping that I was recovering from that misdirection, I reviewed the situation. I had used Disk2VHD to create a .vhd from the physical Win10 installation. I had then used VBoxManage clonemedium to create a .vdi from that .vhd. Sadly, VirtualBox had shown no interest in booting the .vdi that its own command had created. But possibly I just hadn’t done it right. A Spiceworks Community tutorial seemed to say I could fix the nonbooting .vdi. Their suggestion, starting from the very beginning: sudo virtualbox > Machine > New > Expert Mode > Use an existing virtual hard disk file > select the .vdi created by VBoxManage > Create > Settings > System > Motherboard tab > Boot Order > enable only Hard Disk and Optical; also make sure Optical precedes Hard Disk, and check Enable I/O APIC down below. In my case, those instructions entailed only unchecking the Floppy disk from Boot Order; everything else was already as they described. Then they told me to do something with the optical drive in Storage. I didn’t have one. So, drawing on the remarks about IDE in the previous try (above), I went to Settings > Storage > Storage Devices > Add new storage controller (i.e., the icon at bottom) > Add IDE Controller > click on that IDE Controller’s option to add a new optical drive > Choose Disk > point it at the Windows 10 installation ISO. That was a lot like what I had already tried. The difference was, when I saved these changes and then started this VM (this time going directly into the Windows 10 64-bit setup) and got to the Windows Setup screen (asking re language to install, time zone, etc.), they said I should hit Shift-F10 > enter diskpart at the command prompt > wait for the DISKPART prompt > list vol > look in the Fs (presumably short for “filesystem”) column for a RAW partition. I had two. The Spiceworks instructions didn’t say what to do in that case. Both were small: Volume 3 was 1024 MB and Volume 4 was 100 MB. A search led to a WindowsOSHub page that said the EFI volume “can easily be recognized by its size of 100 MB and FAT32 file system.” That got me excited for a minute, but then I realized that FAT32 is not RAW, so the 100MB match didn’t tell me anything there, except that this could not be a recovery partition, which I knew anyway. Someone said that a recovery partition might actually be a RAW partition of many gigabytes, which made more sense, but I didn’t have any RAW partitions of that size. In short, I didn’t know what these were, or which one to choose, and my search was a bust. Well, Spiceworks did say that list vol “should show Volume 3 as a RAW FS,” and it did, and Volume 3 was the larger of the two, so I took a chance and followed their instructions, ignoring the apparent fact that their disk configuration didn’t match mine. At the DISKPART prompt, I entered sel vol 3 and then format quick fs=fat32 label=”System” and then repeated list vol. (It made sense that the RAW partition being formatted with that command would be small; it would seem not to make sense to format a multi-gigabyte partition as FAT32.) List vol now showed Volume 3 as Label = System, Fs = FAT32. I typed exit and then bcdboot C:\Windows. That was supposed to “add the required boot records.” Instead, it said, “Failure when attempting to copy boot files.” Well, do you suppose I should have tried those steps with the smaller 100MB partition instead? I tried now, repeating the steps just listed. Nope, failure there too.
It was time to try a different approach. I cleared that VM from VirtualBox Manager (i.e., right-click > Remove > Remove Only). As I reviewed my notes (above) from days earlier, it seemed that I had not yet tried to run the .vhd directly in VirtualBox. If that worked, I might be able to use VirtualBox to export a different format. I went through the VirtualBox steps to create a new VM (above), this time responding to “Use an existing virtual hard disk drive” by selecting the .vhd. But no: FATAL.
So, OK, what about the option of just skipping VirtualBox, and proceeding directly from the .vdi (or even from the .vhd) to the .qcow2 format, this time doing the conversion with VBoxManage instead of qemu-img? Unfortunately, as noted above, VirtualBox.org indicated that .qcow2 was not among the available VBoxManage conversion formats. Leaving aside the irrelevant .hdd and the .vhd that I had already tried, it seemed I could use VBoxManage only to produce a .vdi (which I had already done) or a .vmdk (which VMware software could also do). If VirtualBox couldn’t boot a .vdi that its own VBoxManage had created, I didn’t think KVM would fare any better.
I could not tell whether the conversions had actually produced VMs that could or should function. The problem I was encountering, the inability to boot these VMs, seemed to be a problem with the VM’s structure, not with its contents. Like, maybe something was not set correctly in the VM, and I was not seeing what that might be. But eventually, in my browsing, one possibility emerged in this remark from a VirtualBox forum:
[I]f the source PC is from Dell, HP, etc, big company PC makers, and 10 was pre-installed on the PC when it was first turned on, then you may not be able to get it to boot or activate at all, since these companies may tie the OS to the BIOS of the source PC’s motherboard.
It was possible, in other words, that the instructions from various sources weren’t working for me because this was a virtualization of an Acer OEM Windows 10 installation, and maybe that installation would work only on the laptop where it was physically installed. I had thought I would at least be able to boot the VM, though maybe not activate it, but this remark suggested I might not even get that far.
Via VMware
I didn’t think VMware would provide a better kind of conversion. But I hoped that VMware-specific instructions would help me see how to make the converted VM bootable. To that end, following various leads, I downloaded StarWind V2V Converter and ran it. I had intended to use it to convert to .vmdk, but was pleasantly surprised to see that it offered direct conversions from Local File > .vhd to .qcow2 and raw image, both of which were KVM-compatible. I tried the QCOW2 option. For some reason, it interpreted the input file size as being 932GB (i.e., the size of the entire 1TB external USB HDD), even though the .vhd was actually only 101GB. So I had to designate an output partition with enough free space to accommodate that 932GB output file. I hoped that was just miscalculation, and that the actual output would be much smaller. This hope proved accurate — the resulting .qcow2 was only 50GB — but StarWind concluded with an “Internal error (9) [0]QCOW2: L1 table isn’t initialized!” A search on that produced no results. I tried ignoring it. I made sure VirtualBox was powered down, since KVM and VirtualBox were said not to coexist well, before I started sudo virt-manager. But the attempt to create a VM from the .qcow2 failed with “Unable to complete install . . . L1 table is too small.” There, again, a search produced nothing.
I tried again, this time producing a .vmdk instead of a .qcow2. StarWind offered several VMware destination format options, including growable, stream-optimized, or preallocated images. I chose the growable option, to minimize the size of this test output, and I went with the default IDE (rather than SCSI) disk type. This time, StarWind demanded only 122GB of disk space. The actual resulting .vmdk file was actually about 53GB. There was no error message: StarWind said, “Converted successfully!” I used that .vmdk to create a VM in virt-manager, choosing the customize option (as above) to go to Overview > Hypervisor Details > Firmware = UEFI > Apply > Begin Installation. But as above, it died at the UEFI Interactive Shell. So although VMM appeared willing to create a VM from a .vmdk, the result was the same. A search led to additional discussions, though it seemed most had to do with VirtualBox rather than KVM. After fiddling further as advised by some comments, I concluded that there might be a way, and I might find it with considerable additional tinkering, but I wasn’t going to do that now.
Recap
This post began with the question of whether I could convert a physical Windows 10 installation to a VM that would run in KVM. As I pursued that question, there appeared to be no doubt that Disk2VHD was a perfectly capable tool for that purpose. I believed the resulting .vhd and .vhdx files were probably valid. It also seemed that I had properly followed the instructions for converting those files to formats (i.e., .vdi, .vmdk, .qcow2) that KVM could use directly or after additional conversion using VBoxManage or qemu-img commands.
In short, it should have worked. Something, at least, should have worked. And yet nothing did. To explain that, there were two general possibilities. One was that I was overlooking something that none of the instructions conveyed to me. That was conceivable. This investigation was interrupted long enough, on at least one occasion, to leave me confused when I came back to it. I might have missed something. It was possible that I would have seen the explanation if I had been able to stay with it more consistently.
But I tried these approaches multiple times, and I wasn’t interrupted consistently at the same place every time. So I didn’t think that was a very good explanation. What seemed more likely was that, as some said, the OEM version of Windows 10 installed on the laptop would simply fail to boot on any other system, including a VM. This was separate from the concern that, even if I did get the Win10 VM to run on this separate computer, I might not be able to activate it.
To explore these possibilities, I was tempted to try one source’s suggestion: just use a 90-day renewable Win10 ISO downloaded directly from Microsoft. But that would defeat the purpose. I wasn’t trying to set up any old Win10 VM; I was trying to virtualize the physical installation. While I was off on that tangent (above), I had already seen that the Win10 ISO download was willing to go ahead and install a new Windows 10 installation.
Nonetheless, at this point, if I wasn’t going to succeed with attempts to virtualize the physical Win10 installation, a 90-day renewable was one way to have a Win10 VM. Another was to keep the Win10 physical installation, install a Linux dual-boot, and access the Win10 physical installation through raw disk access in a VM, if I could figure out how to do that. Alternately, if I had a working Win10 VM from another computer, maybe I could bring that over. There was also the option of buying a Windows 10 retail license and installing it in the VM. As another possibility, I had obtained an emergency system restore USB from Acer; I could try installing that in a VM.
Among those options, raw disk access was the only one that would preserve whatever I wanted to keep from the existing physical installation. It would be tied to the hardware, thus not portable, and in my impression (based on a search yielding 1 2 sets of instructions) it would be difficult to set up, requiring a fair amount of Linux learning — which might be OK at some point in the future, when I had a working system and had time to fiddle with it. It would also be vulnerable, insofar as the dual-booted Linux host would reportedly be at risk of damage or destruction through Windows 10 physical system updates. Maybe I could run that raw VM from a Linux host based on a USB or SD card that, unlike a regular dual-boot, could be protected from Microsoft’s predations, but I suspected it would be slow, and I feared the setup would be complicated.
I wasn’t actually that desperate to have a Windows 10 system. It was more a matter of curiosity, and of trying to make use of what I had. I liked the idea of using the OEM Win10 installation somehow. But there were alternatives. I could use Win7 in a VM and/or accept Linux alternatives for key programs. I could keep tinkering with virtualization and/or Wine, for purposes of running Windows software on Linux.
In short, for me, given a commitment to running Linux, it seemed the native OEM Win10 installation would be useful only as a dual-boot installation. In that capacity, it would take a lot of space on my SSD and, again, would pose that risk of leaving my Linux installation unbootable. Thus, it seemed the better solution was to make an image backup of the Win10 installation, using something like Macrium Reflect or AOMEI Backupper, and restore that if I really needed a native Win10 installation. Before restoring, I might want to pop the cap off the back of the laptop and swap HDDs, so as to restore to a HDD that I didn’t mind wiping as needed, maybe accessing my data on an external USB HDD; and I might also want to disable the SSD in BIOS, so as to protect the Linux installation while running Win10. Leaving aside that unusual scenario, on a day-to-day basis, to use Win10 on this system, it seemed I would be limited to whatever I could figure out with booting Win10 from USB or running some Win10 ISO in a VM.