
Хочу поделиться своим опытом переноса. Нужно было перенести Windows 2008 Enterprise в среду Hyper-V.
Сначала предполагал использовать утилиту Disk2vhd, но потом был установлен Acronis Backup Advanced и я воспользовался его встроенной возможностью при создании бекапа конвертировать бекап в виртуальную машину. Для этого достаточно при настройке свойств задания резервного копирования для пункта «Преобразование в виртуальную машину» выбрать Преобразовать, затем выбрать тип машины и месторасположение, где будут созданы файлы.

После выполнения этого задания создался vhd-файл и файл настроек. Добавил в диспетчере Hyper-V новую виртуальную машину и указал данный vhd-файл. Машина нормально загрузилась. Может быть лучше было выполнить импорт виртуальной машины, а не просто создать машину и затем подцеплять vhd. В дальнейшем уже пользовался именно импортом, где это возможно.
Не всегда импорт возможен. Так при импорте между хостами Hyper-V 2008/2008 R2 проблем нет, но если переносить с хоста Hyper-V 2008/2008 R2 на хост Hyper-V 20012 R2 и выше — непосредственно при самом импорте не будет найдено доступных машин для импорта. Решение такое:
- Выключить виртуальные машины (VM) на хосте Hyper-V 2008/2008 R2;
- Остановить службу Hyper-V Virtual Machine Management Service (VMMS) на хосте 2008/2008 R2;
- Скопировать папки VM на хост Hyper-V Windows Server 2012 R2;
- Импортировать.
Между Hyper-V 2012 R2/2016 и обратно ещё пока импортировать VM не пробовал.
Проблемы
Далее оказалось, что не пробрасывается на виртуальную машину мышь. При попытке работы мышью в окне виртуальной машины через Подключение к виртуальной машине Hyper-V сразу появлялось сообщение «ввод с помощью мыши не перенаправлен». Первое найденное решение было переустановить службы интеграции внутри гостевой ОС:

но это ничего не дало. Далее при просмотре Диспетчера устройств обнаружилось, что устройство шина VMBus с восклицательным знаком, а состояние устройства «Не найдены свободные ресурсы, которые устройство может использовать». Помогла эта статья MS. После выполнения указанных в статье действий и перезагрузки, сразу заработала мышь, появилась виртуальная сетевая карта и виртуальный видеоадаптер.
Дальше, нет доступа к сети. Искал, искал, нашёл. Криво создался виртуальный коммутатор (в Hyper-V 2008 R2, куда осуществлялся перенос, он называется Виртуальная сеть ), оказывается и такое бывает. 🙂
Следующая трабла, не подключается сеанс RDP с других машин. Нашёл. В Конфигурации служб терминалов, в свойствах подключения (имя по умолчанию TCP-RDP), на вкладке Сетевой адаптер пусто, и сразу выпрыгивает ошибка «Средству настройки узла сеансов не удалось получить свойства этого подключения. Подключение удалено или его внутреннее состояние повреждено», выбрать новый адаптер при этом нельзя. Удалить подключение тоже нельзя, ошибка. Удалось удалить через реестр по адресу:
HKEY_LOCAL_MACHINE\SYSTEM\CurrentControlSet\Control\Terminal server\WinStations

Отсюда понятно, что перед конвертацией сервера в виртуальную машину эту настройку нужно снять с конкретного сетевого адаптера и выставить настройку «Все сетевые адаптеры настроены для этого протокола»:

Ну и последний пункт переноса это удаление лишних теперь программ и драйверов.
Выводы
Перед переносом:
- Для Windows 2008 в msconfig отметить чекбокс «Определить HAL»;
- Если это сервер RDP, то в Конфигурации служб терминалов выставить «Все сетевые адаптеры настроены для этого протокола».
При соблюдении этих условий перенос пройдем максимально гладко.
Следующим этапом планирую опробовать для архивирования виртуальных машин прекрасный по отзывам Veem Backup Free Edition.
Добавление от 19.11.2016
Переносил ещё одну машину, уже под управлением Windows XP на хост Hyper-V. Теперь уже воспользовался программой Disk2vhd. Программа использует теневое копирование и очень легко и просто создаёт образ прям с работающей машины. Можно выбрать конвертацию как в vhd, так и в более новый vhdx. После переноса та же проблема: неправильный драйвер уровня аппаратных абстракций HAL. Поэтому нет виртуальных устройств и не работает мышь.
Опция Disk2vhd «Подготовить машину к переносу в виртуальную среду» не помогла. Опции «Определить HAL», которая есть в Windows 2008, в Windows XP нет. Решилось установкой служб интеграции, ещё можно попробовать напрямую указать HAL в Boot.ini, это же делает и опция «Подготовить машину к переносу в виртуальную среду», но драйвер она подписывает неправильный. Должно быть, как я понял:
multi(0)disk(0)rdisk(0)partition(1)\WINNT="Microsoft Windows XP" /HAL=hal.dll
Возникла необходимость перенести реальный сервер windows 2008 r2 в виртуальную среду на Hyper-V.
Диск был преобразован утилитой Disk2vhd и запущен на Hyper-V.
Первая ошибка была STOP: 0x0000007B
Решение нашел тут

Решение для Hyper-V
После восстановления бекапа Windows Server 2008 R2 сделанного с физической машины на виртуальную машину, windows не запускается с ошибкой «STOP: 0x0000007B«.
01. Вставьте в CD/DVD-ROM установочный диск Windows Server 2008 R2 DVD.
02. Загрузите с него виртуальную машину.

03. В окне «Install Windows», нажмите «Next».

04. Нажмите «Repair your computer»
05. Выберите «Use recovery tools that can help fix problems starting Windows. Select an operating system to repair»
06. Нажмите «Next»

07. Нажмите «Command Prompt» (командная строка)

08. Введите «regedit», запустится «Registry Editor»
09. Перейдите в «HKEY_LOCAL_MACHINE»

10. В меню «File» выберите «Load Hive» (Загрузить куст»)
Примечание: Пока не кликнешь на ветку «HKEY_LOCAL_MACHINE»
в Меню не будет активна «Загрузить куст»

11. Выберите там файл «\Windows\System32\Config\SYSTEM»
12. Нажмите «Open»
13. В поле «Key Name», введите «Recovery»
14. Нажмите «OK»

15. Перейдите в «HKEY_LOCAL_MACHINE\Recovery\ControlSet001\services\intelide»
16. Откройте свойства ключа «Start»
17. Измените «Value data» на «0».
18. Нажмите «OK».
19. Перейдите в «HKEY_LOCAL_MACHINE\Recovery»

20. В меню нажмите «File» — «Unload Hive»

21. В окне «Confirm Unload Hive» нажмите «Yes»
22. Закройте «Registry Editor»

23. В окне «System Recovery Options», нажмите «Restart»

После перезагрузки восстановленный Windows должен запустится
Примечание: Если Windows Server 2008 R2 не запустился то вернитесь в шагу 18 и проверьте следующие параметры реестра
HKLM/Recovery/System/CurrentControlSet/Services/
Имя сервиса = Значение параметра Start
Aliide = 3
Amdide =3
Atapi = 0
Cmdide = 3
iaStorV = 3
intelide = 0
msahci = 3
pciide = 3
viaide = 3
LSI_SAS = 0
_
от меня: надо изменить во всех ветках HKLM/Recovery/System/CurrentControlSet/Services/
There are several reasons you may get get this error. The most common being a corrupt Active Directory database (NTDS.DIT). I know this sounds detrimental, but it’s actually easy to fix this blue screen.
*** This is the Active Directory Database we’re talking about here, so make sure you have a good backup of the server, in case this doesn’t work***
This Stop code is only seen on a system with Active Directory on it. You notice it when the server is booting. You’ll get a blue screen and an error code, like the following:
STOP: c00002e2 Directory Services could not start because of the following error:
A device attached to the system is not functioning.
Error Status: 0xc0000001.
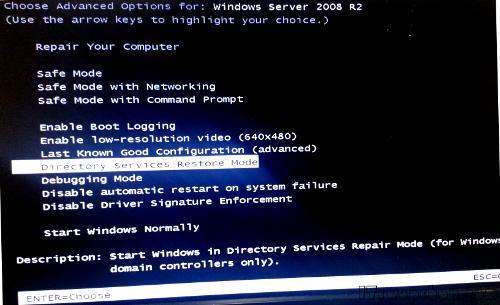
Please shutdown this system and reboot into Directory Services Restore Mode, check the event log for more detailed information.

To begin, do as the message says, and boot into Directory Services Restore Mode. When the server powers on, press F8 before the OS begins to load. You should see a selection screen like this. Choose Directory Services Restore Mode:
Once in Directory Services Restore Mode, you can check if there is a problem with the database by running the following commands:
ntdsutil.exe
activate instance ntds
files
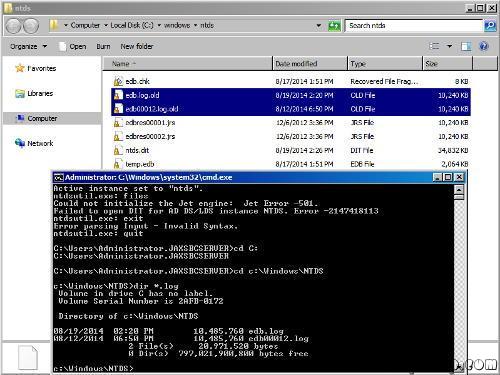
If there is a problem with it, you’ll see something like this returned:
Could not initialize the Jet engine: Jet Error -501. Failed to open DIT for AD DS/LDS instance NTDS. Error -2147418113
To fix, just rename all of the .log files located in C:\windows\ntds to .log.old, or anything else, so they can be recreated.
Now reboot the server. For most people, this fixed the database, and the server booted up. For others, it still blue screened after this. If you continue to get a blue screen, run the following command in Directory Services Restore Mode, and then reboot:
esentutl /p “c:\windows\ntds\ntds.dit”
—– Same instruction above in details —
STOP: c00002e2 Directory Services could not start because of the following error: A device attached to the system is not functioning.
Error Status: 0xc0000001. Please shutdown this system and reboot into Directory Services Restore Mode, check the event log for more detailed information.
- Restart the server and press F8 key, select Directory Services restore mode.
- Log in with the local administrator username and password
- Type: cd \windows\system32
- Type: NTDSUTIL
- Type: activate instance NTDS
- Type: files
- If you encounter an error stating that the Jet engine could not be initialized exit out of ntdsutil.
- Type: cd\
- Type: md backupad
- Type: cd \windows\ntds
- Type: copy ntds.dit c:\backupad
- Type: cd \windows\system32
- Type: esentutl /g c:\windows\ntds\ntds.dit
- This will perform an integrity check, (the results indicate that the jet database is corrupt)
- Type: esentutl /p c:\windows\ntds\ntds.dit
- Agree with the prompt
- Type: cd \windows\ntds
- Type: move *.log c:\backupad (or just delete the log files)
This should complete the repair. To verify that the repair has worked successfully:
- Type: cd \windows\system32
- Type: ntdsutil
- Type: activate instance ntds
- Type: files (you should no longer get an error when you do this)
- Type: info (file info should now appear correctly)
I then rebooted and windows started normally.
После этого у меня заработало!!! 
Некоторые полезные статьи:
1. Переименование контроллера домена ТУТ и ТУТ
2. Перенос настроек DHCP (мне помогло следующее — нашел в инете):
У меня в своё время тоже не получилось перенести DHCP-сервер при помощи команды netsh с ключами import и export. Похоже они действуют только в пределах одной версии Windows Server. Зато помогла команда netsh dhcp server [IPAddress] dump > dhcp.conf
В полученном текстовом файле (dhcp.conf) остается только заменить адрес старого DHCP-сервера на новый (менял везде где он встречается), а затем дать команду (на новом сервере) netsh < dhcp.conf
меня в своё время тоже не получилось перенести DHCP-сервер при помощи команды netsh с ключами import и export. Похоже они действуют только в пределах одной версии Windows Server. Зато помогла команда
netsh dhcp server [IPAddress] dump > dhcp.conf
В полученном текстовом файле (dhcp.conf) остается только заменить адрес старого DHCP-сервера на новый, а затем дать команду (на новом сервере)
netsh < dhcp.conf
In this article I will explain all steps included for restoring physical machine to 2012 R2 Hyper-V host. Reason for doing this is testing software upgrade on test virtual machine instead on production server, or any other when you are dealing with testing anything. This is long process and you need to be patient.
Part 1. Creating boot media
For starters we need to have full Windows server backup of physical machine. Because it is usually big, we will do restore over network. To do that we need network connectivity from virtual machine we boot from 2008 R2 CD. To get drivers for Hyper-V we need to extract it from Windows integration disc. Mount it on virtual machine or if you don’t have one, mount it from this location (%windir%\system32\vmguest.iso) . Let say that mounted ISO get drive letter D:, and we will create folder to extract drivers named c:\AIPx64.
We need to extract drivers (only x64 because 2008 r2 is 64bit OS) and we do it with next command.
msiexec /a d:\support\amd64\Windows5.x-HyperVIntegrationServices-x64.msi TARGETDIR=C:\AIPx64\.
We will get folders like on picture on the right. To integrate drivers to instalation ISO of W2008R2 SP1 we need ADK (Automated Deployment Kit). you can use any version compatible but let say that we will use the latest one you can found in this link: http://www.microsoft.com/en-us/download/details.aspx?id=39982
After installation of ADK create next folders on the same root preferably. Root can be new folder you can name newISO or what ever you like. Folders are:
- WindowsISO- where you will unpack windows installation CD
- drivers – copy all drivers folders you extracted from Integration CD
- wim – temporary folder for wim file
- WindowsISOdrivers – folder for creation of new iso installation disc with integrated drivers.
Start ADK from command prompt
Mount install.wim from c:\newiso\windowsISO to c:\newiso\wim folder
imagex /mountrw C:\newiso\WindowsISO\SOURCES\install.wim 1 C:\newiso\wim
After that add rivers to mounted install.wim
cd c:\newiso\drivers
dism /image:C:\newiso\wim /add-driver /driver:. /recurse
You get something like this

Commit and unmount changes to install.wim
imagex /unmount /commit C:\newiso\wim
Result is looking like this
After that we create new ISO with integrated drivers
oscdimg -n -m -bc:\newiso\WindowsISO\boot\etfsboot.com C:\newiso\WindowsISO C:\newiso\WindowsISOdrivers\windows.iso

Part 2. Booting and restoring
After creating boot media with hyper-v drivers, mount it to newly created virtual machine. Configure VM in such way it virtual hard disk can accommodate all data from physical machine.
On first screen chose your settings and click Next

Chose “Repair you computer”

Chose Use Recovery tools …… Click Next

Go to command prompt

If you type ipconfig on command prompt you will get nothing. That is because PE enviroment is not started, and without it we can not get our backup from network. Start WinPE with this command
Try ipconfig after that and you will see that you now have ip address. On picture below you will see that we have APIPA address. My server LAN doesn’t have DHCP so we will need to enter IP address manually .

Use this command to enter ip address manually (Enter your values. You can see my example on picture):
“netsh interface ipv4 set address name = "<idx>" source=static address=<staticIP> mask=<SubnetMask> gateway=<DefaultGateway>”
After you successfully get ip address you can ping you environment

Lets now connect to network share and see what backup we have. Type next command to check backup we have:
wbadmin get versions -backuptarget:\\server\share
You should get output similar to this

After that we should start restore. you will start it with next command:
wbadmin start sysrecovery -backuptarget:\\server\share -version:01/08/2009-19:20 -recreatedisks -restoreallvolumes
It will ask you for password to connect to share and then one more confirmation. After that wait for restore to finish

It will take some time. If it happens that you think something is wrong during restore( percentage of restore status stopped) , open another command prompt and type:
You will get updated status of restore operation. Shutdown VM and don’t forget to connect it to internal virtual switch. We don’t want to have 2 same machines on network. 🙂
Part 3. Post restore “problems”
After restore you will probably get next error. It is normal because physical server has enabled SCSI or some other drivers for booting from disks. Now we have to enable proper drivers.

First boot again from installation media and choose all options like in part 2. to enter command prompt. In command prompt type “regedit” to enter Registry editor.

Select “HKEY_LOCAL_MACHINE“. On the menu, click “File > Load Hive“. Navigate to “C:\Windows\System32\Config\SYSTEM“. Restored Windows directory can be on another drive letter. Click “Open“. Under “Key Name“, type “Recovery“. You can use any other name for loaded hive but we use here Recovery.

Click “OK“. Navigate to “HKEY_LOCAL_MACHINE\Recovery\ControlSet001\services\intelide“. Double-click “Start“. Change the “Value data” to “0“.

Depending on drivers needed you will maybe need to enable some other drivers. Usual setting for booting on VMWare VM are:
aliide 3
amdide 3
atapi 0
cmdide 3
iastorv 3
intelide 0
msahci 3
pciide 3
viaide 3
LSI_SAS 0
Navigate to “HKEY_LOCAL_MACHINE\Recovery“. On the menu, click “File > Unload Hive“. Close “Registry Editor“. On “System Recovery Options“, click “Restart“. After that your machine should be booted and you can log in.
I hope I helped you in the process that is little bit troublesome but is needed from time to time. If you have any question please comment and also correct me if I told something wrong. I know there is other easier options to do this, but I wanted to show core edition of this process.
Расскажу о простом и эффективном способе переноса Windows системы из физической среды в виртуальную, который я сам оттестировал на Microsoft Hyper-V Server R2 и Microsoft Windows Server 2008 R2. Последним, мигрировавшим таким образом, был контроллер домена Windows Server 2003 SP2.
Конечно, если вы поклонник “правильных” решений, у вас много свободного времени и к тому же вы любитель квестов, то я порекомендую воспользоваться возможностями System Center Virtual Machine Manager с его визардом P2V, Microsoft Virtual Server Migration Toolkit (VSMT) и Automated Deployment Service (ADS), или другими решениями аналогичной задачи.
Я же в последнем случае не рискнул воспользоваться даже утилитой Disk2vhd от Sysinternals а решил сделать все офлайн при помощи проверенного Norton Ghost.
Так вот:
1. Делаем образ диска/системного раздела исходной системы. Как уже сказал, я использую для этого Norton Ghost.
2. Создаем виртуальную машину с диском достаточного размера на шине IDE. (Я, к слову, в рабочей среде использую только диски фиксированного размера)
3. Подключаем вновь созданный диск в хостовой системе, назначаем ему букву. В Windows Server 2008 R2 это можно сделать прямо из Диспетчера сервера/Управление дисками.
В Hyper-V Server R2 для этого придется воспользоваться diskpart-ом. Читаем “DISKPART> help select vdisk” и “DISKPART> help attach vdisk”.
4. Создаем нужных размеров разделы.
5. Делаем загрузочный раздел виртуального диска активным.
6. Помещаем загрузочную запись в MBR виртуального диска. Я использую для этого утилиту “mbrfix”. Читаем соответственно “MbrFix /?”. Если этого не сделать, то виртуальная машина не загрузится с этого диска.
7. Разворачиваем созданный образ раздела/диска. Опять же давно знакомый Norton Ghost нам в помощь.
Казалось бы, что уже можно включать виртуальную машину. Но в большинстве случаев система выпадет в синий экран с ошибкой “STOP: 0x0000007B INACCESSIBLE_BOOT_DEVICE ”. Так происходит, когда в переносимой системе используется не стандартный контроллер IDE. Теорию и практику по этому поводу можно глянуть в базе знаний Microsoft. Соответственно, нужно установить стандартный контроллер IDE вручную и мы продолжаем:
8. Подгрузим куст реестра, отвечающий за стандартный контруллер IDE, в нашу пока еще офлайн систему. Я делаю это следующим образом. В regedit.exe в ветку “HKEY_USERS” в новый раздел “123” загружаю реестр из файла “System32\config\SYSTEM”. В рег файле, созданном под руководством упомянутой статьи делаю массовую замену строки “HKEY_LOCAL_MACHINE\SYSTEM\CurrentControlSet” на “HKEY_USERS\123\ControlSet001”. Импортирую, измененный таким образом рег файл. И выгружаю временный куст “123”.
9. Проверим наличие и если необходимо добавим в папку “%SystemRoot%\System32\Drivers” драйвера: Atapi.sys, Intelide.sys, Pciide.sys, Pciidex.sys. Их можно взять из установочного диска соответствующей версии Windows или файла “%SystemRoot%\Driver Cache\I386\Driver.cab”.
10. Отключим виртуальный диск от хостовой системы.
11. Загружаем виртуальную машину.
Дальше на ваше усмотрение, но я рекомендую также проделать:
1. Сразу же после первой загрузки установить службы интеграции и перезагрузиться.
2. Очистить систему от лишних устройств. Обычно диспетчер устройств не показывает отсутствующие девайсы. Но системная переменная “devmgr_show_nonpresent_devices” со значением “1” заставляет его это делать. Соответственно, установив эту переменную, я выставляю в диспетчере устройств “Вид\Показывать скрытые устройства” и вручную удаляю все не активные девайсы.
На этом этапе перенос Windows из физической среду в виртуальную можно считать завершенным.
In an earlier article, based on the full version of Windows Server 2008 R2, I explained the new Live Migration option in Hyper-V R2. For security reasons it is recommended to use Windows Server 2008 R2 Server Core (or Hyper-V Server) for your Hyper-V needs but, from a management perspective, using Server Core can be painful, as I recently experienced at a customer. Not only is the setup of the server itself a different process, but setting up the iSCSI Shared Storage and Remote Management are also subtly different. Time for some guidance…
Server Core
In an even earlier article on Simple-Talk, I explained the architecture of Windows Server 2008 and Hyper-V. It is clear that the parent partition, sometimes referred to as the root partition, is basically a normal instance of Windows Server 2008 R2, with all its habits. So, that means you have to patch (and therefore reboot) the parent partition on a regular basis, which can be difficult, especially when a large number of virtual machines are running on this Hyper-V host. Also, the ‘attack surface’ can be significant, especially when (unwanted) applications are installed in the parent partition or when the parent partition is used for browsing the Internet, for example. Given that the parent partition controls the entire Hyper-V host, it’s therefore necessary to take significant steps to keep the root partition as safe as possible.
One option is to use Windows Server 2008 R2 Server Core as the operating system in the root partition. Server Core is a ‘stripped down’ version of Windows Server 2008 R2, and doesn’t contain a lot of the software and services that a normal version of Windows Server 2008 R2 would, which is reflected in the comparatively small number of hotfixes that should be applied to Server Core Servers. To be specific, Server Core only has a command prompt and a small number of graphical programs, like the date/time applet, the iSCSI applet or notepad, so most management has to be performed from the command line.
Just so we’re all on the same page, throughout this article, I’ll be assuming you want to set up a 2-server failover cluster (just because it’s a simple configuration), but you can, of course, extend the steps we’ll cover to setup as many servers as you need. Also, bear in mind that I’ll only be looking at the Windows Server side of the setup at this stage, and I’ll be covering the Hyper-V side of things in my next article. With that in mind, let’s get stuck in.
Installation of Windows Server 2008 R2 Server Core is easy; simply boot the server from the Windows Server 2008 R2 DVD and select “Windows Server 2008 R2 Enterprise (Server Core installation)” as the operating system. The Enterprise Edition is needed because we want to create a failover cluster to facilitate the Live Migration option.
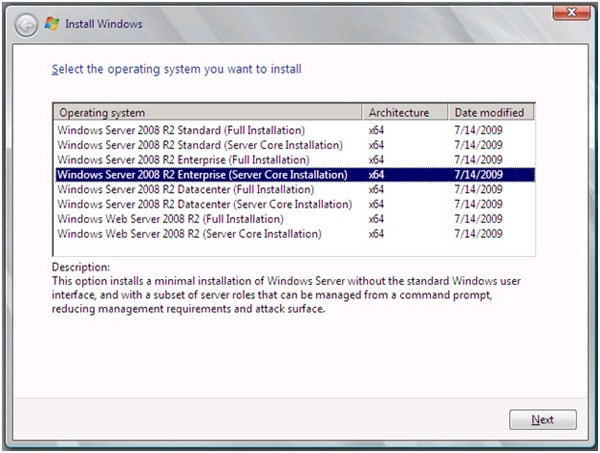
Figure 1. Select the Server Core option
Follow the installation wizard as you would for a regular Windows Server 2008 R2 Server. Since the process doesn’t have to install as many features as a Full Installation, it will finish rather quickly. After entering an Administrator password, rebooting the server and logging in, you’ll get the following screen:
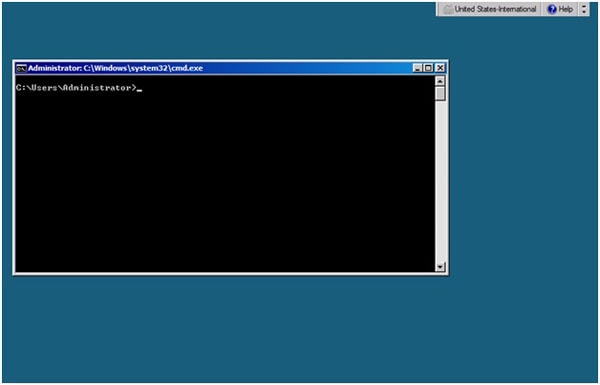
Figure 2. Windows Server 2008 R2 Server Core screen
Configuring a Windows Server 2008 Server Core (not R2, but the previous version) was always challenging, as we had to configure everything using command line tools like NETSH, WMIC, NETDOM and ISCSICLI. Not only was this difficult, but most Windows Administrators had absolutely no idea what they were doing, so they never knew if, for example, they had made the proper changes to the Windows Firewall, or maybe completely disabled the Firewall!
In Windows Server 2008 R2, Microsoft is using a utility called SCONFIG (which, in turn, is taken from Microsoft’s Hyper-V Server), which is a small, character-based utility that can be used to configure an R2 Server Core. This makes the Windows Administrator’s life much easier, and the Server Core Servers more safe. Now we’re going to look at configuring the newly-installed server, and while some of the steps will employ the SCONFIG utility, not all of them will. In any case, there are only a handful of options in SCONFIG you need to worry about at this stage, and we’ll go through them in order.
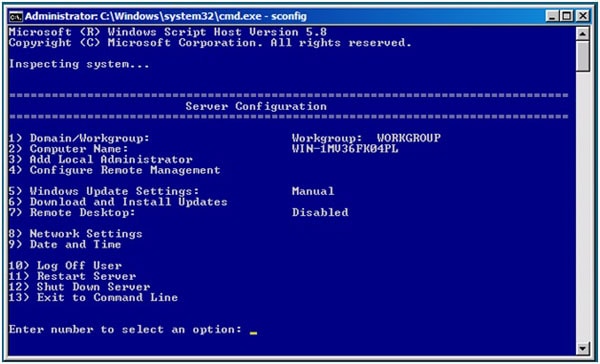
Figure 3. The SCONFIG utility to configure an R2 Server Core.
The Servers in this example are connected to three different networks:
- Public – this network is used by the clients to connect to the Virtual Machines running on the Hyper-V Servers;
- iSCSI – this network is used by both Hyper-V Servers to connect to the iSCSI Storage solution;
- Private – this network is used by both Hyper-V Servers for internal cluster communication.
To begin setting things up for the live migration, select option 8 In the SCONFIG menu (see figure 3, above) and enter the various network settings for the new server, like IP Address, Subnet Mask, Default Gateway and DNS Servers. Unfortunately, not all settings can be changed through the SCONFIG application; if you want to change the name of the network connection, for example if you want to change “Local Area Connection ” to a name like “Public“, you have to use the NETSH command. This cannot be done using the SCONFIG utility, so to change the network name from “Local Area Connection” to “Public”, you’ll need to enter the following command:
|
netsh interface set interface id=«local« area connection« newname=«Public« |
Repeat this step for the other 2 network interfaces as appropriate, and when you’re finished you can check the network configuration using the IPCONFIG command:
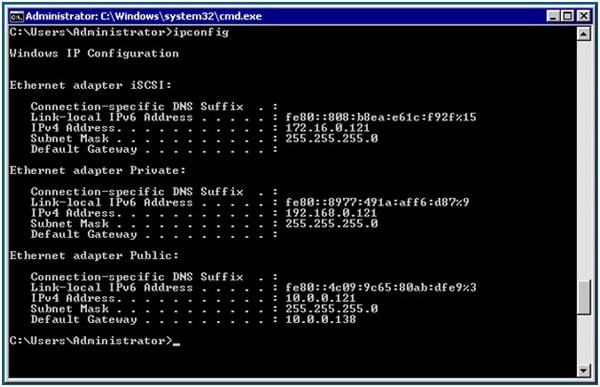
Figure 4. Checking your new network configuration.
When you’re finished with that, the newly installed server can be given a real name (using option 2 from the SCONFIG utility menu) and be joined to the network. Joining a domain is mandatory at this point, since this is a prerequisite for Windows Server 2008 R2 Failover clustering.
You should also consider option 7 in SCONFIG (remote desktop), as enabling the RDP functionality is very useful for administration purposes. Windows Server 2008, which required you to use the <netsh advfirewall firewall set rule group=”Remote Administration” new enable=yes> and the <cscript %windir%\system32\SCRegEdit.wsf /ar 0> commands, made the administrator’s life both difficult and dangerous, since this approach was prone to error. More to the point, most GUI-based administrators had no idea what the effect of all the commands were.
Lastly, Option 4 in the SCONFIG utility allows us to enable remote management on the server, which is useful for managing the server using a remote MMC snap-in, as you’ll see when configuring the iSCSI storage.
Once both servers are fully configured, it’s time to install the Hyper-V Server role on them; To do this, after logging on, enter the following command:
|
start /w ocsetup Microsoft—Hyper—V |
…and reboot the server when requested.
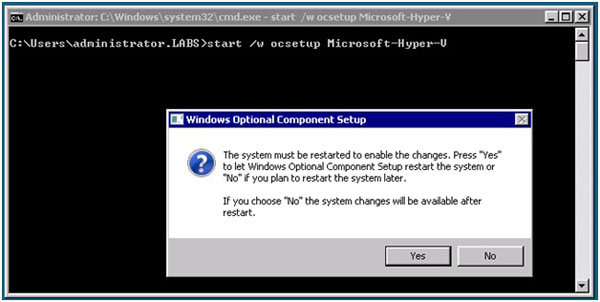
Figure 5. Sometimes you will see some graphical popup windows appear
The last step in preparing the servers is to install the Windows Server 2008 R2 Failover clustering software. After logging in to the server, you have to install the failover clustering role by entering the following command:
|
start /w ocsetup FailoverCluster—Core |
…and of course you have to repeat all the steps outlined above on all servers that will be members of the Failover Cluster, and make sure that all servers are configured identically.
iSCSI Shared Storage
When creating a Failover Cluster, you need some sort of shared storage; I’ll use an iSCSI solution, but this can just as easily be a Fiber Channel solution . Before configuring the iSCSI service on the servers, I’ve created two LUNs on the iSCSI storage, one of which is a mere 1GB in size (yes, one Gigabyte) and will be used as a quorum disk in the cluster. All cluster-specific information will be stored on this disk by the Failover Cluster. A second LUN of 1TB is created and will be used as the “Cluster Shared Volume” or CSV in the Failover Cluster, and the Virtual Machines will be stored on this CSV.
To configure access to the iSCSI shared storage solution, you have to start the iSCSI applet. This iSCSI applet is new in Windows Server 2008 R2 Server Core, and in the previous version (Windows Server 2008) all iSCSI functionality had to be configured from the command line, which was a horrible experience.
To start the iSCSI applet, just enter “iscsicpl” from the command line. The first time you start the applet, a pop-up window will appear to alert you to the fact that the iSCSI service not running on this server; click “Yes” to automatically start the iSCSI service.
Configuring iSCSI is extremely easy with this applet; just enter the IP address of the iSCSI Target and click on “Quick Connect“. The iSCSI applet will automatically detect the first iSCSI target, and also automatically connect. In our example there are two targets (the Quorum and he CSV), so select the 2nd target and click “Connect“. That’s it!
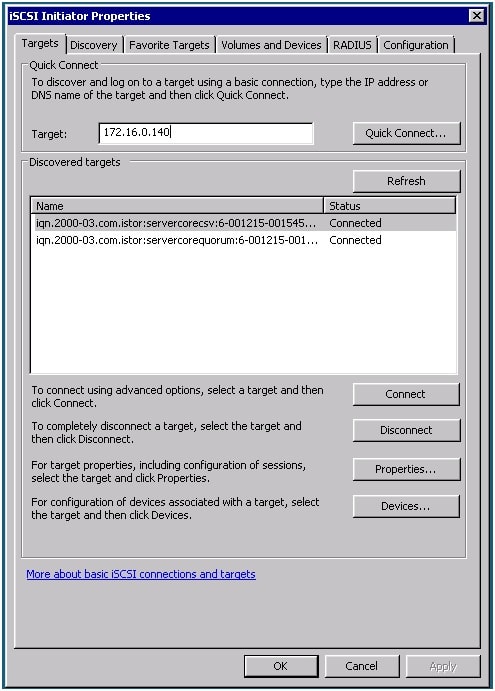
Figure 6. Configure the iSCSI storage using the iSCSI applet in Windows Server 2008 R2 Server Core.
Remote Management
From now on in this article, most of the Server Core Management will be performed from a Management Workstation which is running on Windows 7. To configure the disks on the Server Core servers, open the Computer Management MMC snap-in on the Management Workstation. Right-click on the server and select “Connect to Server” from the menu. Enter the Server Name (or use the Browse Button to search in Active Directory for the Computer Object) and, if you’ve enabled remote management on the Server Core servers, the Management Workstation will automatically connect. Select “Disk Management” and create a volume and format this volume appropriately: I’ve assigned the drive letter “Q” to the Quorum disk and the drive letter “F” to the CSV disk. Do this only on the first node of the cluster, as the other nodes will be configured automatically when creating the Failover cluster.
To manage the Hyper-V Servers and the Failover cluster, you’ll need the administration tools on the Management Workstation. You can easily download these from the Microsoft website. After installing these tools, you have to configure which ones you want to use using the “Turn Windows Features on or off” option in the “Programs” section of the Management Workstation’s “Control Panel“:
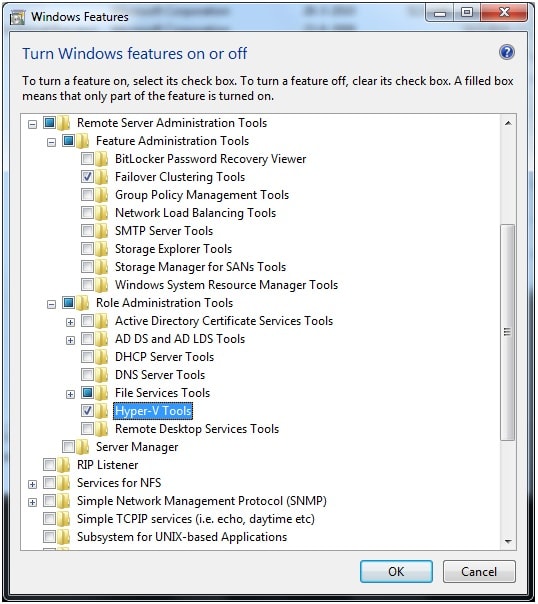
Figure 7. Enable the Failover Clustering and the Hyper-V Management Tools
From now on, configuring and managing the R2 Server Core Hyper-V Failover Cluster is no different from managing a “normal” Failover Cluster, except that it is managed from another server. Of course, you might be interested to note is that it is still possible to manage the cluster using cluster.exe.
To create the Failover Cluster, start the Failover Cluster Management snap-in on your Management Workstation, and select “Validate a configuration” in the Actions Pane. In the resulting wizard, enter both (or all) server nodes and select “Run all tests“. The Cluster service will now test the complete configuration and, when done, will create a Validation Report (stored as an HTML page) which you can use to see if any errors show up in the Cluster configuration. If there are any errors, correct them and run the Validation Wizard again. Alternatively, if no errors show up, you can then select “Create a Cluster” in the actions pane.
In the wizard that pops up, enter both (or all) server nodes again, enter the name and the IP address of the cluster you want to create, and then finish the wizard; the Failover Cluster is now ready to use. The Failover cluster manager will open automatically, and you can browse through your fresh cluster to see the 1GB Quorum disk and the 1TB disk of additional storage. You’ll also see the three network we created earlier.
But wait, you’re not done yet; you still have to configure the Cluster Shared Volume. In the Failover cluster manager, select the newly created cluster and, in the actions pane, select “Enable Cluster Shared Volumes“. Be aware that the CSV option is only available (and accessible) for Hyper-V. So, Hyper-V can access this shared storage from all cluster nodes at the same time, but all other services and application cannot, as explained by the pop-up window which will appear with this warning:
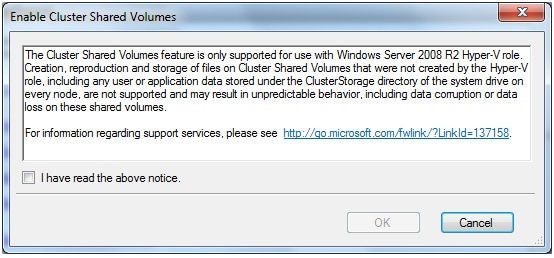
Figure 8. Cluster Shared Volumes are only available for Hyper-V!
When you’ve enabled Cluster Shared Volumes, it’s time to add the 2nd, larger disk as a CSV disk. In the navigation pane of the Failover cluster manager, select “Cluster Shared Volumes” and then, in the actions pane, select “Add Storage“. Select the 2nd disk and click OK, and this disk will now be added as a Cluster Shared Volume to the Hyper-V Failover Cluster.
Conclusion
Using Windows Server 2008 R2 Server Core, you can create Hyper-V Servers which are more secure than using full server Windows Server 2008 R2. However, managing Server Core servers is more difficult than managing it’s more full-featured relative, and you’ll need to take more steps to achieve the same goal. That being said, Microsoft made some considerable changes to R2 when compared to the previous version of Windows Server 2008, and these changes makes life for a SysAdmin much easier.
Just to recap, In this article I explained the steps needed to install and fully configure Server Core, as well as install Hyper-V and Failover clustering, and configure a CSV cluster. In my next article I’ll describe the Hyper-V part of such a cluster.
This article was commissioned by Red Gate Software, engineers of ingeniously simple tools for optimizing your Exchange email environment.
Learn more about Exchange Server Archiver and PST Importer.