
Windows Server 2019 was available for public (GA) from early October 2018. In past I have written many articles about domain migrations by covering different Active Directory versions. So, it is time me to write about AD 2019 migrations. In this demo I am going to demonstrate how to migrate from Active Directory 2012 R2 to Active Directory 2019. The same procedure is going to apply for any AD version from Windows Server 2008.
Migration itself is very straight forward task, however, there are other things you need to consider before you do an AD migration. I have listed a checklist below you can use in many occasions.
- Evaluate business requirement for active directory migration
- Perform Audit on Existing Active Directory Infrastructure
- Provide Plan for implementation Process
- Prepare Physical / Virtual resources for Domain Controller
- Install Windows server 2019 Standard / Datacenter
- Patch Servers with latest Windows Updates
- Assign Dedicate IP address to Domain Controller
- Install AD DS Role
- Migrate Application and Server Roles from the Existing Domain Controllers.
- Migrate FSMO roles to new Domain Controllers
- Add New Domain controllers to the Existing Monitoring system
- Add New Domain controllers to the Existing DR Solution
- Decommission old domain controllers
- Raise the Domain and Forest Functional level
- On Going Maintenance
As per the above figure therebeladmin.com domain has two domain controllers. In here, the FSMO role holder is running windows server 2012 R2. Domain and forest functional level currently operating at Windows server 2012 R2. A new domain controller with Windows server 2019 will be introduce and it will be the new FSMO role holder for the domain. once FSMO role migration completed, Domain controller running windows server 2012 R2 will be decommissioned. After that forest and domain function level will raised to the windows server 2019.
In the demonstration, REBEL-DC2012 is the domain controller with windows server 2012 R2 and REBEL-DC2016 is the domain controller with windows server 2019.
Note – When you introduce new domain controllers to the existing infrastructure it is recommended to introduce to the forest root level first and then go to the domain tree levels.
- Log in to the Server 2019 as a member of local administrators group.
- Add server to the existing domain as member
- After restart, log in to the server as Enterprise Administrator
- Assign static IP address to the server
- Launch the PowerShell Console as an Administrator
- Before the configuration process, we need to install the AD DS Role in the given server. In order to do that we can use Following command.
Install-WindowsFeature –Name AD-Domain-Services -IncludeManagementTools
- Configure the new server as additional domain controller.
Install-ADDSDomainController
-CreateDnsDelegation:$false
-NoGlobalCatalog:$true
-InstallDns:$true
-DomainName «therebeladmin.com»
-SiteName «Default-First-Site-Name»
-ReplicationSourceDC «REBEL-DC2012.therebeladmin.com»
-DatabasePath «C:\Windows\NTDS»
-LogPath «C:\Windows\NTDS»
-NoRebootOnCompletion:$true
-SysvolPath «C:\Windows\SYSVOL»
-Force:$true
There are no line breaks for the command and I have listed it as above to allow readers to identify on the parameters clearly.
|
Argument |
Description |
|
Install-ADDSDomainController |
This cmdlet will install the domain controller in active directory infrastructure. |
|
-NoGlobalCatalog |
If you do not need to create the domain controller as global catalog server, this parameter can use. By default, system will enable global catalog feature. |
|
-SiteName |
This Parameter can use to define the active directory site name. the default value is Default-First-Site-Name |
|
-DomainName |
This parameter defines the FQDN for the active directory domain. |
|
-ReplicationSourceDC |
Using this parameter can define the active directory replication source. By default, it will use any available domain controller. But if need we can be specific. |
Once execute the command it will ask for SafeModeAdministrator Password. Please use complex password to proceed. This will be used for DSRM.
- After configuration completed, restart the system and log back in as administrator to check the AD DS status.
Get-Service adws,kdc,netlogon,dns
Will confirm the status of the AD DS service.
Get-ADDomainController -Filter * | Format-Table Name, IPv4Address, Site
Will list down the domain controllers along with the IP address and Sites it belongs to.
- Migrate all five FSMO roles to the New domain controller using following command,
Move-ADDirectoryServerOperationMasterRole -Identity REBEL-DC2019 -OperationMasterRole SchemaMaster, DomainNamingMaster, PDCEmulator, RIDMaster, InfrastructureMaster
In above the REBEL-DC2019 is domain controller running with Windows Server 2019.
Once its completed, we can verify the new FSMO role holder using
Netdom query fsmo
- The new step of the process is to decommission the old windows domain controller which running with Windows Server 2012 R2. To do that execute the following command as enterprise administrator from the relevant DC.
Uninstall-ADDSDomainController -DemoteOperationMasterRole -RemoveApplicationPartition
After execute the command it will ask to define password for the local administrator account.
Once its completed it will be a member server of the rebeladmin.com domain.
- Next step is to raise the domain and forest functional level to windows server 2019. To do that can use the following commands.
To upgrade domain functional levels
Set-ADDomainMode –identity therebeladmin.com -DomainMode Windows2016Domain
To upgrade forest function levels
Set-ADForestMode -Identity therebeladmin.com -ForestMode Windows2016Forest
Note – With Windows Server 2019, there is no domain or forest functional level called windows2019. It is still 2016.
Now we have completed the migration from AD DS 2012R2 to AD DS 2019. Same steps apply when migrate from windows server 2008, Windows server 2008 R2, Windows server 2012 & Windows server 2016.
- After the migration completes, we still need to verify if its completes successfully.
Get-ADDomain | fl Name,DomainMode
This command will show the current Domain functional level of the domain after the migration.
Get-ADForest | fl Name,ForestMode
Above command will show the current forest functional level of the domain.
Статью конечно надо было назвать немного по другому (ибо на гуру претендовать смысла нет), а именно «Как я мигрировал контроллер домена на Windows Server 2012», но всё же…
Начальная ситуация такова. В конторе есть контроллер домена на Windows Server 2012 Standart, используется в техподдержке и фактически только для того, чтобы операторы могли скакать с компа на комп без проблем. После нескольких лет работы, внезапно, появилось «Windows License is expired», всякие ломалки(KMS и прочие) почему-то не работают, он стал вырубаться каждые два часа. Это есть не удобно. Было решено поднять рядом новый сервер и перенести на него. Приступаем.
Домен называется: office.esteit.com
Старый контроллер: thetwo.office.esteit.com
Новый контроллер: dc01.office.esteit.com
1. Ставим Windows Server 2012 R2 Standart, активируем, настраиваем что надо и вводим сервер в существующий домен
2. Устанавливаем роль Active Directory Domain Services
3. После установки повышаем роль нового сервера до контроллера домена. Используем для этого учетную запись в существующем домене, которая входит в группу Enterprise Admins и обладает требуемыми правами
4. Далее указываем, что этот сервер будет выполнять роль DNS сервера и глобального каталога (Global Catalog – GC) и задаём пароль для восстановления
5. На экране Additional Options нужно указать с какого контроллера домена будет выполнена репликация
6. Дальше можно ничё не менять без особой надобности. Next, Next, Next, Install
7. Дожидаемся завершения установки и перезагружаемся. В итоге, получаем новый контроллер домена
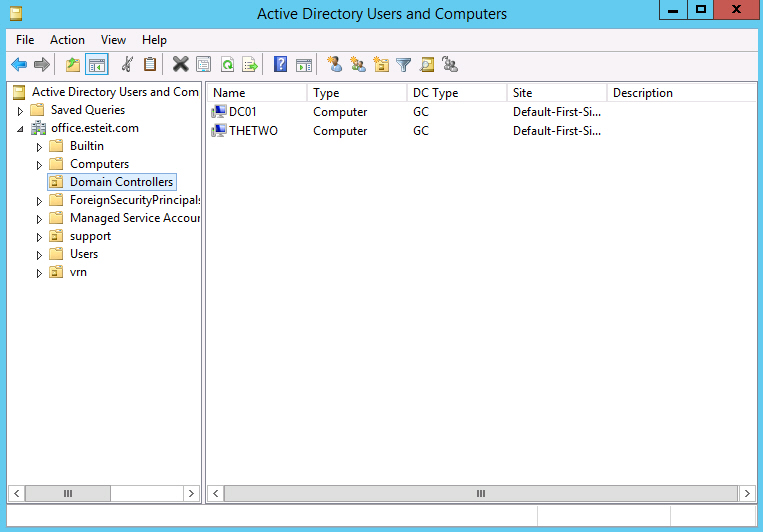
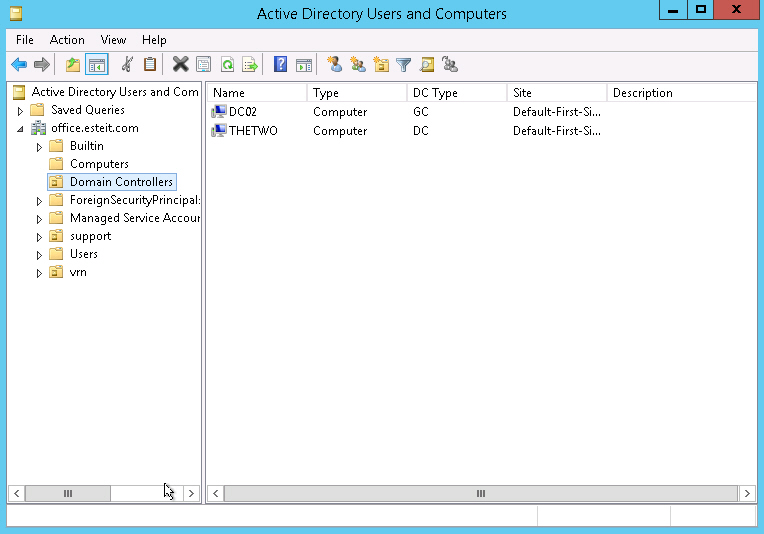
8. Подключаемся под учётной записью домена и проверяем в оснастке Active Directory Users and Computers, что в нашей сети есть два контроллера домена
После выполнения всех шагов, переходим к переносу Active Directory. Все действия проводим на новом контроллере домена в следующем порядке:
- Перенос роли FSMO (Flexible Single Master Operations)
- Изменение контроллера домена Active Directory
- Изменение Мастера схемы (Schema Master)
- Удаление старого контроллера домена из глобального каталога (Global Catalog)
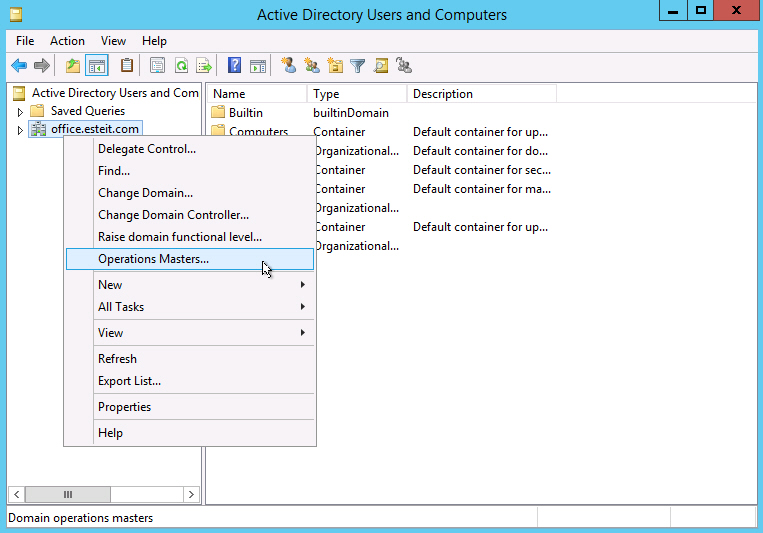
Перенос роли FSMO (Flexible Single Master Operations)
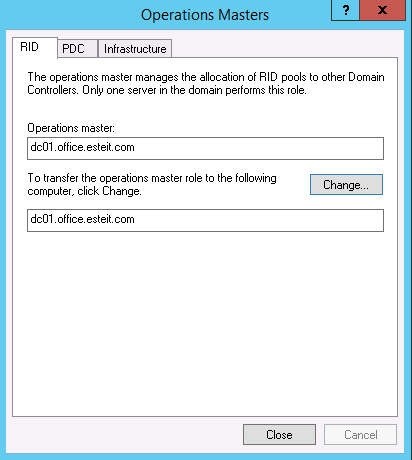
Для переноса роли FSMO, открываем оснастку Active Directory Users and Computers, щёлкаем по нашему домену и в появившемся подменю выбираем Operations Masters
Переносим роль хозяина операций. Для этого на каждой вкладке во вновь появившемся окне нажимаем кнопку Change и переносим роль со старого сервера на новый
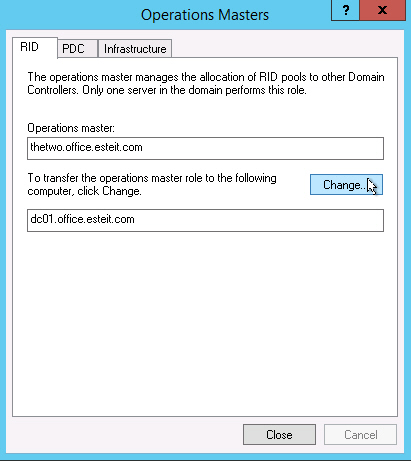
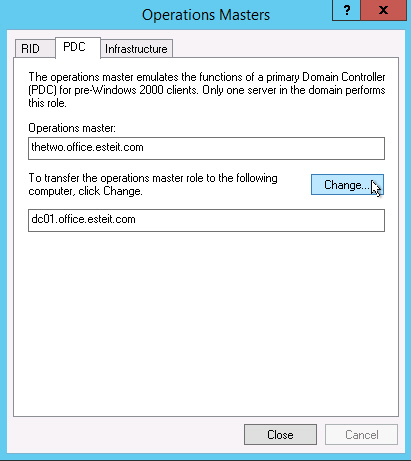

Подтверждаем операцию переноса и дожидаемся ее завершения. Проверяем, что в итоге роль хозяина операций теперь находится на новом сервере
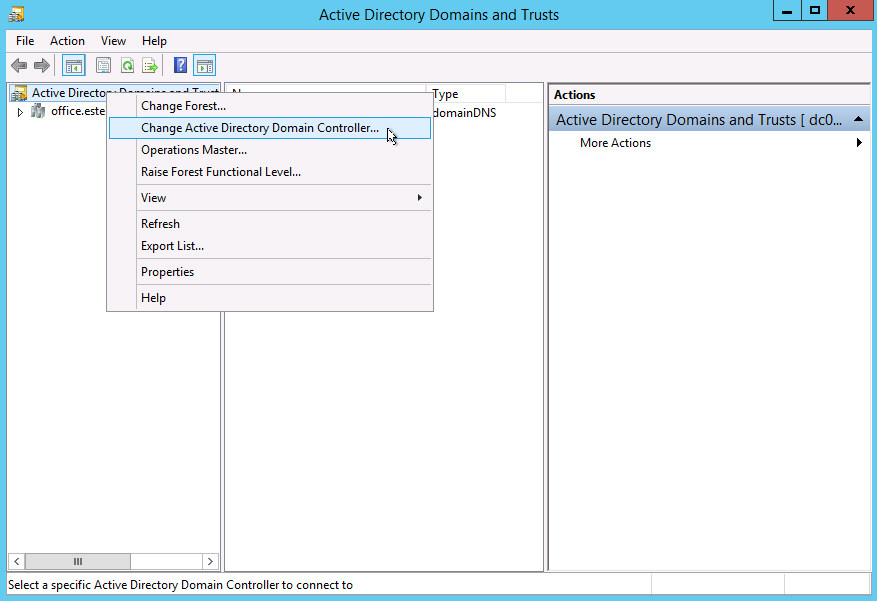
Изменение контроллера домена Active Directory
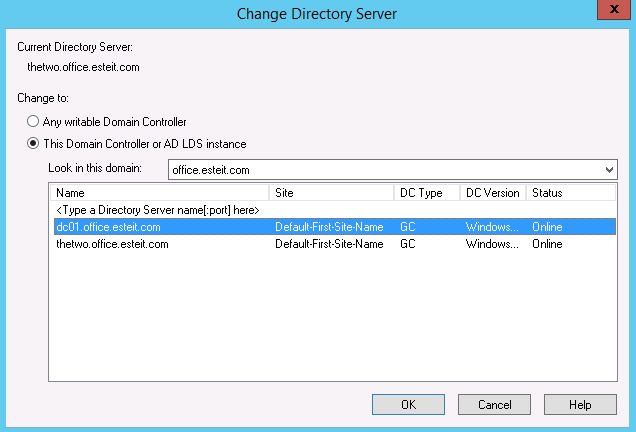
Переходим к изменению контроллера домена Active Directory. Открываем консоль Active Directory Domains and Trusts, щёлкаем по Active Directory Domain and Trusts и выбираем пункт Change Active Directory Domain Controller
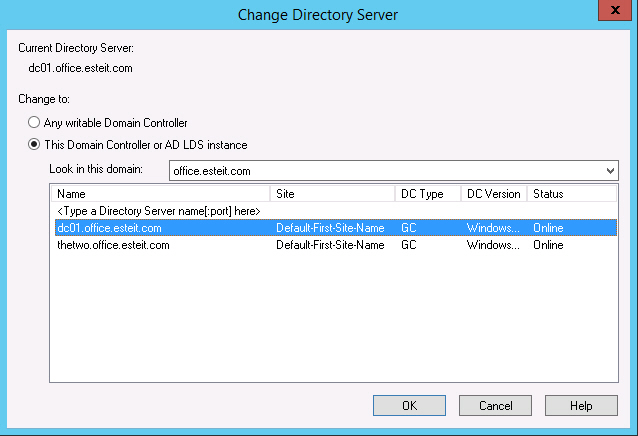
В новом окне выбираем пункт This Domain Controller or AD LDS instance и указываем новый сервер
Теперь снова щёлкаем по Active Directory Domains and Trusts и выбираем пункт Operations Master
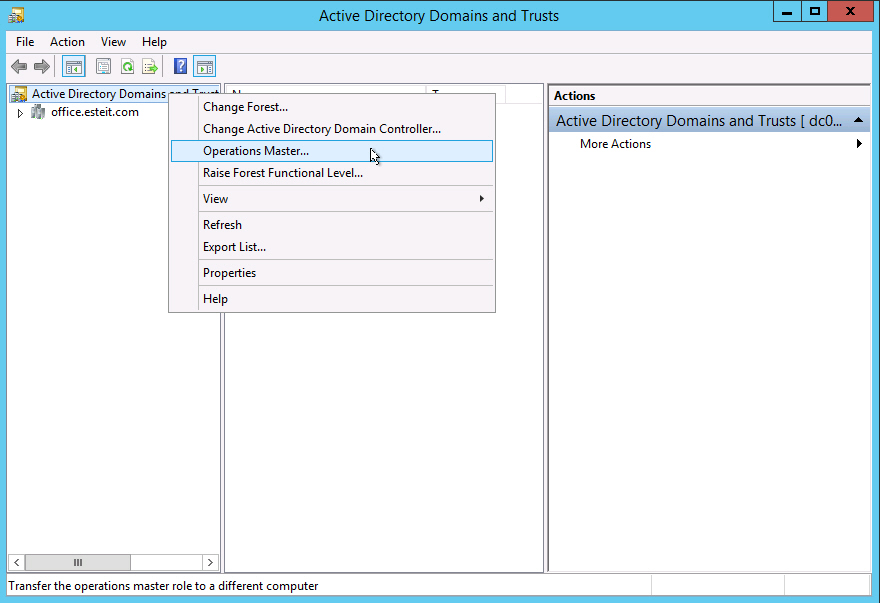
Переносим роль хозяина операций именования домена, нажав Change
Изменение Мастера схемы (Schema Master)
Теперь приступаем к изменению мастера схемы (Schema Master). Запускаем командную строку с правами Администратора и вводим команду regsvr32 schmmgmt.dll
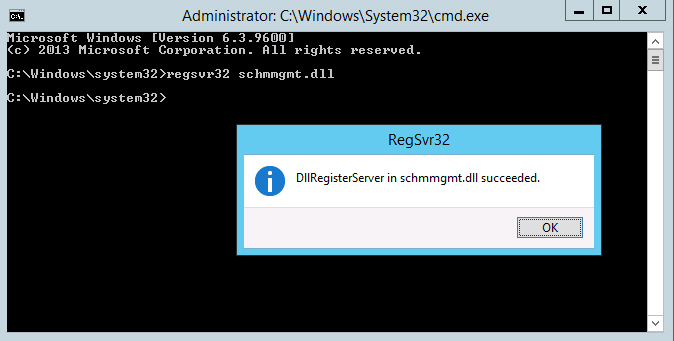
С помощью этой команды происходит первичная регистрация динамической библиотеки DLL, которая является обязательной для оснастки Active Directory Schema.
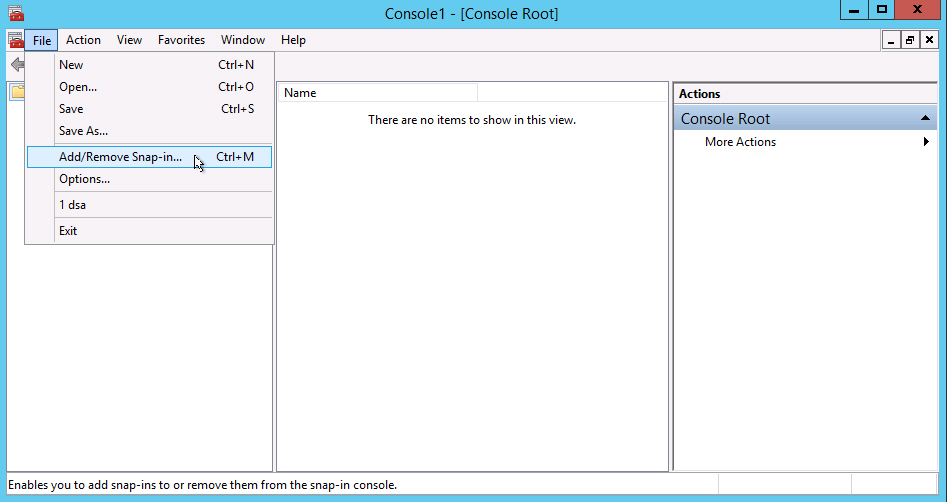
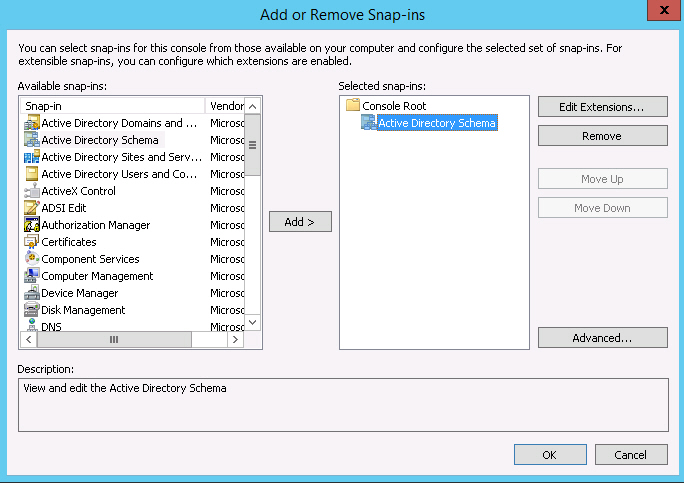
После того, как команда выполнена, запускаем консоль MMC и добавляем оснастку Active Directory Schema (для этого выбираем File > Add/Remove Snap-in)
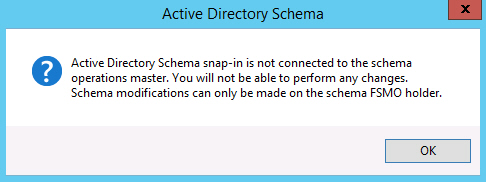
В этой же консоли MMC щёлкаем по Active Directory Schema и выбираем Change Active Directory Domain Controller
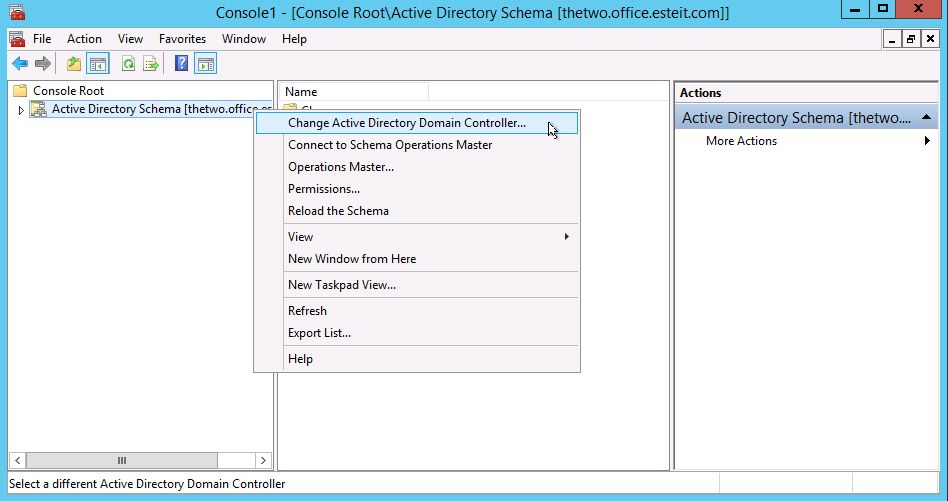
В новом окне выбираем пункт This Domain Controller or AD LDS instance и указываем новый сервер
Появится предупреждение о том, что оснастка схемы Active Directory не подключена. Нажимаем ОК
Теперь снова щёлкаем по Active Directory Domains and Trusts и выбираем пункт Operations Master
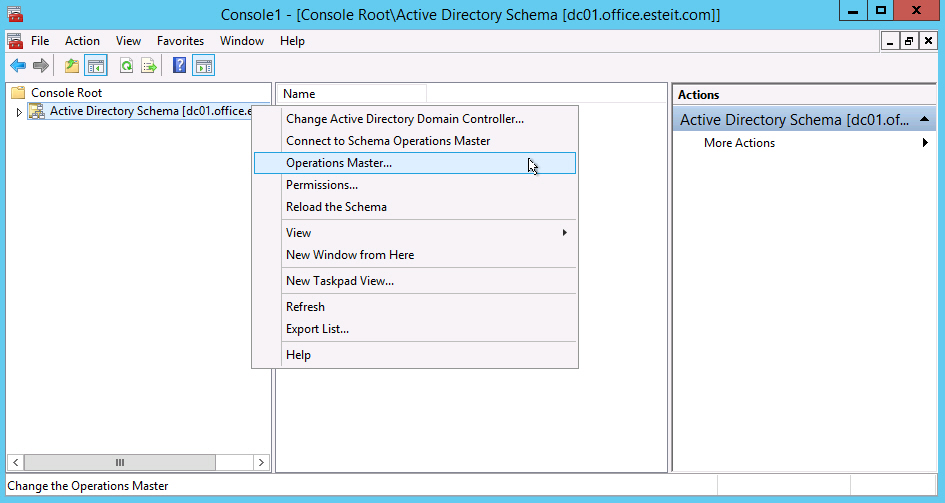
Для переноса роли хозяина схемы в новом окне нажимаем Change
Удаление контроллера домена под управление Windows Server 2003 из глобального каталога (Global Catalog)
Осталось удалить старый контроллер домена из глобального каталога. Для этого открываем Active Directory Sites and Services, разворачивает папку Sites, затем Default-First-Site-Name, затем Servers и, наконец, разворачиваем оба сервера
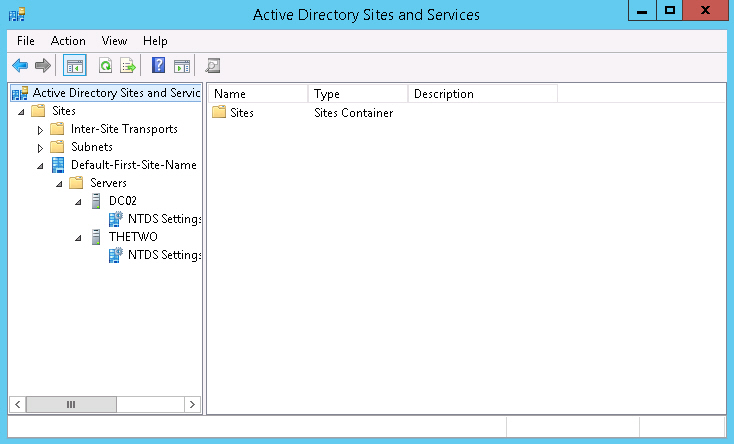
Щёлкаем по NTDS Settings для старого сервера, выбираем Properties. Во вновь появившемся окне убираем галочку с пункта Global Catalog и жмём ОК
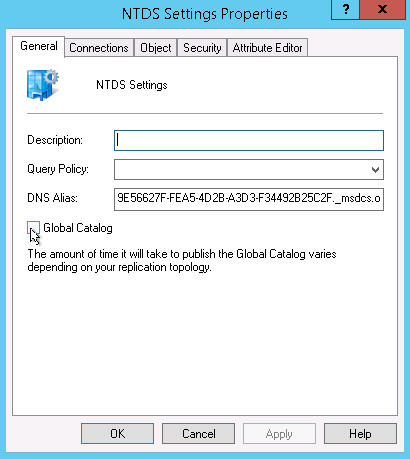
В Active Directory Users and Computers контроллер домена на старом сервере теперь не является глобальным каталогом
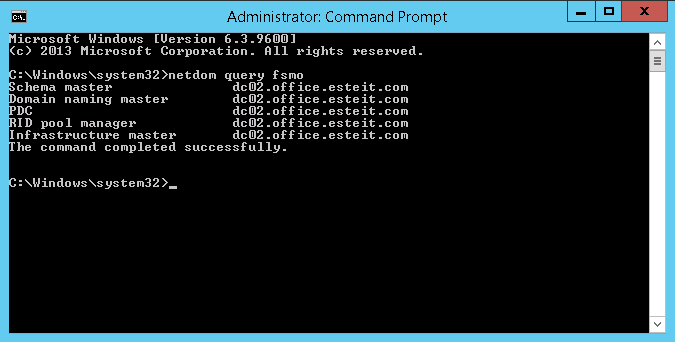
Проверяем, что теперь роль FSMO запущена на новом сервере. Для этого в командной строке, открытой с правами Администратора запускаем команду netdom query fsmo
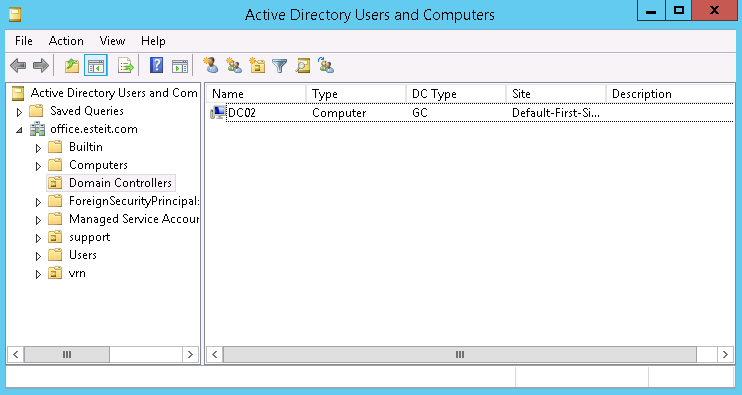
На этом миграция Active Directory завершена. Понижаем роль компьютера с контроллера домена на старом сервере. Если после этого посмотреть на консоль Active Directory Users and Computers, увидим, что остался только один(новый) контроллер домена – под управлением Windows Server 2012 R2
Так уж получилось в нашей организации, что инфраструктуру надо было делать быстро, а на покупку лицензий требовалось время. Поэтому было решено использовать образы Windows Server 2012R2 Evaluation, а после тестового периода уже лицензировать. Тогда еще никто не знал, что нельзя просто так взять, прописать лицензию Standard в релизе Evaluation, и на выходе получить лицензионный Standard, иначе, думаю, сначала бы все таки купили лицензии. Но делать нечего, что имеем, с тем и работаем. Итак.
Задача: после покупки лицензий Microsoft на Windows server 2012R2 Standard необходимо активировать их на наших серверах. Приступаем.
При выполнении задачи была обнаружена проблема. Так как изначально мы устанавливали Windows server 2012R2 Standard Evaluation, то при попытке прописать ключ для Standard — сервер говорит, что ему этот ключ не подходит. Начали поиск решения проблемы перевода сервера из версии Evaluation в Standard. Ответ был найден на сайте microsoft в статье TechNet.
Частично статья помогла решить проблему. Мы смогли поменять версию на трех физических серверах и активировать их нашими лицензиями. Но, к сожалению, не все так просто складывалось с контроллерами домена. В вышеуказанной статье прямым текстом говорится, что контроллеры домена НЕВОЗМОЖНО перевести из выпуска Evaluation в Standard. Нам же это необходимо сделать в самые кратчайшие сроки, т.к. количество возможных /rearm у PDC закончилось, а дней до окончания ознакомительной версии осталось меньше 3 дней.
Варианта решения вопроса я видел два. Либо поочередно между BDC и PDC передавать права хозяина схемы и прочие роли, понижать до рядовых серверов и после поднимать обратно. Но идею этого доменного волейбола я отмел, по причине того, что просто напросто делал все это впервые и боялся поломать.
Поэтому было решено поднимать новый сервер, повышать до контроллера домена и передавать ему хозяина схемы, а после выключать старый PDC и назначать новому его IP, этот вариант тогда мне показался проще и безопаснее. Замечу, что после описанных ниже событий, я по прежнему считаю это хорошим решением, по крайней мере все прошло без эксцессов, иначе бы статья имела совсем другой заголовок, или ее бы не было вовсе.
Схему можно без проблем воспроизвести в течение рабочего дня. Оставалось полтора дня, так что, помечтать о том, как я буду все это делать времени не было, надо было срочно приступать. Далее действия по пунктам.
1. Создаем новую виртуальную машину с параметрами соответствующими текущему PDC. Желательно создать на физическом сервере, на котором нет других контроллеров домена, но это если у вас несколько гипервизоров, как в моем случае, если нет, то это не принципиально, вопрос только в отказоустойчивости. Ну а если вы работаете не с гипервизорами, а с реальными серверами, то отказоустойчивость PDC и BDC вещь и так само собой разумеющаяся.
2. Устанавливаем Windows Server 2012R2. Выбираем выпуск Standard с графическим интерфейсом. Настраиваем TCP/IP и переименовываем сервер в соответствии со стандартном наименований в IT инфраструктуре.
3. После установки в диспетчере серверов включаем серверу новые роли. Нас интересует AD, DNS и прочие роли и компоненты, используемые на текущих домен-контроллерах.
4. Повышаем сервер до контроллера домена. Проходит репликация между основным контроллером домена и новым.
5. Передаем роли хозяина схемы со старого DC на новый.
Для этого заходим на контроллер домена, которому будут назначаться роли FSMO, запускаем командную строку, и вводим команды в указанной ниже последовательности:
ntdsutil
roles
connections
connect to server <имя сервера PDC>
q
Успешно подключившись к серверу, мы получим приглашение к управлению ролями (FSMO maintenance), и можем приступать к передаче ролей:
transfer naming master — передача роли хозяина доменных имен.
transfer infrastructure master — передача роли хозяина инфраструктуры;
transfer rid master — передача роли хозяина RID;
transfer schema master — передача роли хозяина схемы;
transfer pdc — передача роли эмулятора PDC
Для завершения работы Ntdsutil вводим команду q.
6. После передачи хозяина схемы смотрим системный журнал и dcdiag на предмет ошибок. Их быть не должно. Если есть, исправляем. (я столкнулся с ошибкой dns, где сервер жаловался на неправильно указанные сервера пересылки. В этот же день я узнал, что в серверах пересылки DNS не должен быть указан сервер на котором установлен DNS (как правило указывают сервера DNS провайдера и Yandex(Google), что в общем-то логично, это по сути порождает петлю в DNS.
7. Если ошибки исправлены, или их нет. Приступаем к сменам IP-адресов. Назначаем старому PDC любой свободный IP-адрес в сети, а новому PDC назначаем адрес старого.
8. Снова проверяем на ошибки. Проводим тесты. Выключаем старый PDC и BDC. Проверяем возможность авторизации в домене. Затем оставляем включенным только BDC, проверяем принимает ли он на себя роль контроллера домена в случае недоступности PDC.
9. Если все тесты проходят удачно. Можно уничтожать старый PDC и приниматься за смену версии BDC.
10. В нашем случае cтарый PDC все еще нельзя было выкинуть на помойку так как на нем функционировала роль пространства имен DFS, а мы не знали, как ее реплицировать на новый сервер.
11. Все оказалось очень просто. Входим в графическую оснастку «Управление DFS». В «Пространстве имен» добавляем существующие пространства имен, затем каждому пространству имен добавляем сервер пространства имен и в общем-то все. Корень dfs автоматически вместе с ссылками на сетевые ресурсы появляется на c:\ и все работает. На всякий случай проверяем работу выключением старого PDC. Сначала сетевые ресурсы будут недоступны (DFS нужно 300 секунд для репликации). По истечении 5 минут сетевые ресурсы снова должны стать доступны.
12. Оставляем старый PDC выключенным и через какое то время понижаем до рядового сервера и после удаляем. Можно конечно и сразу, но мне было страшно и я до последнего не верил, что все получилось без проблем.
P.S.: Все вышеописанные действия проводились после внимательного изучения книги Windows server 2012R2 — Полное руководство. В частности глав посвященных конкретно AD, DNS и DFS, а так же контроллерам домена. Без понимания и планирования к данным действиям лучше не приступать, т.к. можно потерять рабочую инфраструктуру.
Надеюсь, для кого-то эта статья окажется полезной и нужной. Спасибо за внимание!
I have written this article to help you migrate your existing Active Directory Domain Controller which is running on Windows Server 2012 R2 to Windows Server 2016. So, let’s get started!
This is very straight forward process, but make sure you test it 1st in your Test Environment.
I’m using 2 Hyper-V Machine, which is my Previous domain Server (Microsoft.lk.com).
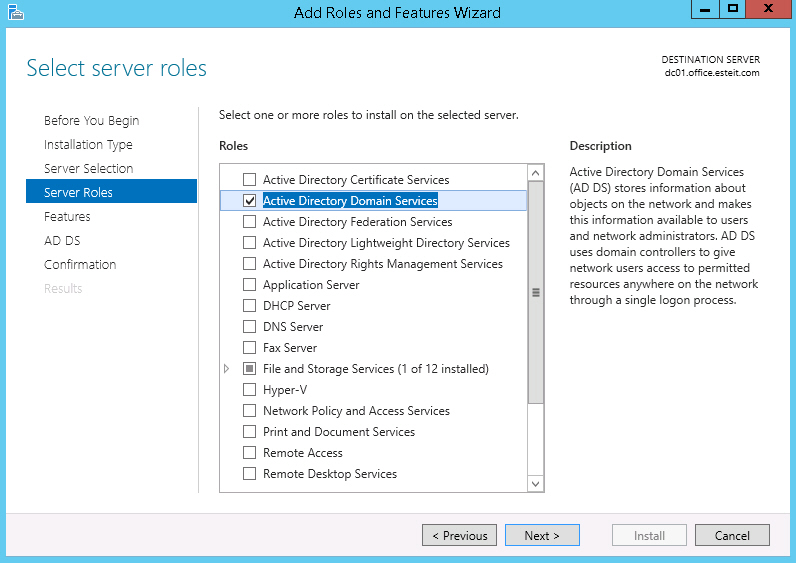
1- Login to windows Server 2016 machine with local admin credentials, Open server manager dashboard, click Add Roles and features.

2 – Click Next, Choose “Role-based or feature-based installation” radio button and click Next, Scroll down and choose Active Directory Domain Services from server roles. When a new window appears, click Add Features, Click Next until confirm installation selections page, When an installation has been completed and server prompts you for further configuration, click Promote this server to a domain controller. (refer picture).


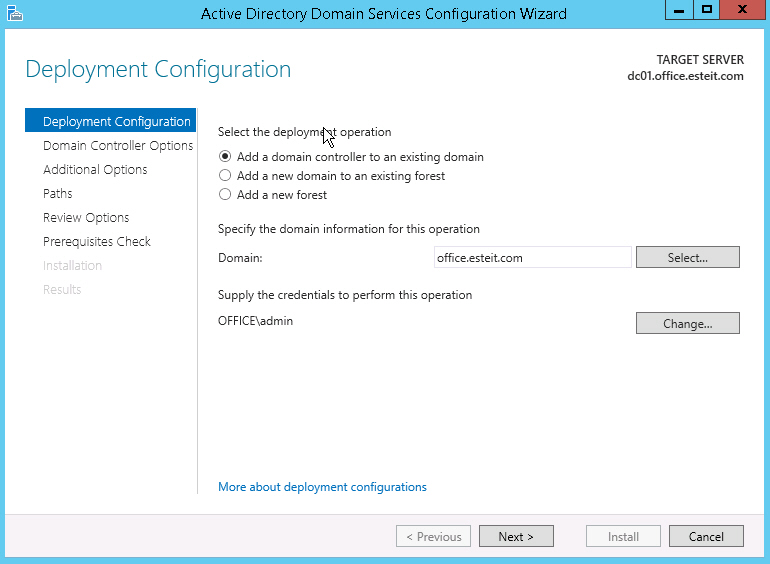
3 – Deployment Configuration interface, click Add a domain controller to an existing domain, then click select button and browse to Microsoft.lk.com, verify that credentials is Administrator, and then click Next. (refer picture).


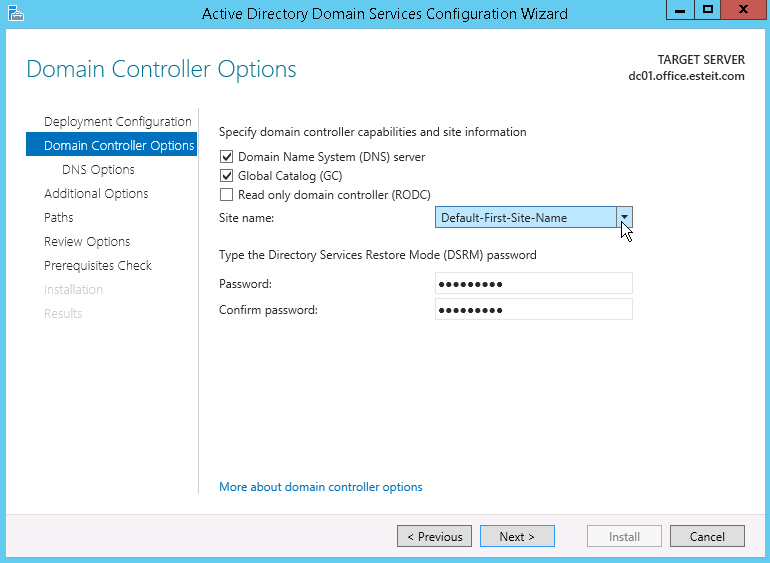
4 – On the Domain Controller Options interface, verify that Domain Name System (DNS) server and Global Catalog (GC) is selected and fill up the Password for DSRM, and then click Next.

5 – On the DNS Options interface, click Next

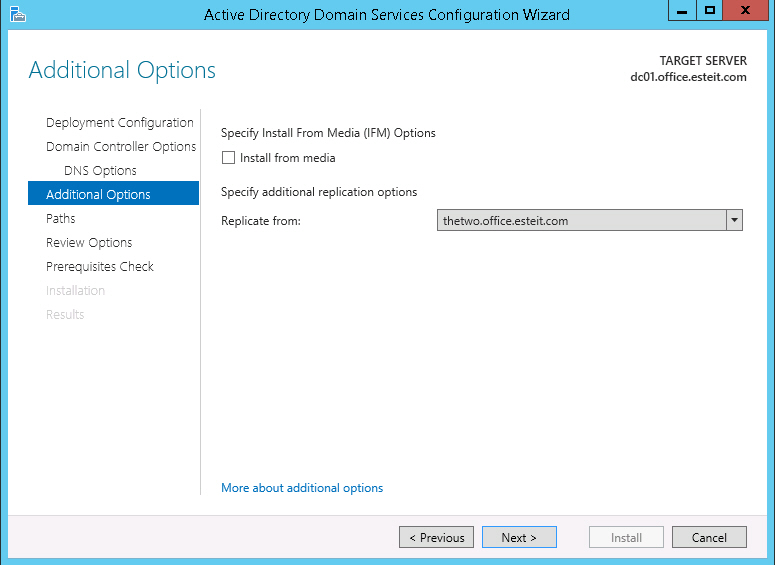
6 – on the Additional Options interface, beside the Replicate from : click Dc-Server.Microsoft.lk.com (this is our Server 2012 R2 AD), and then click Next.


7 – On the Paths interface, click Next to proceed.

8 – On the Preparation Options interface, click Next.

9 – On the Reviews Options interface, verify all the information and then click Next.

10 – On the Prerequisites Check interface, verify that All prerequisites checks passed successfully, and then click Install.

11 – Please wait for few minutes for the process to complete.

12 – Once your Server 2016 restart, log in as domain Administrator.

13 – Follow this steps must :– Migrating FSMO (Flexible Single Master Operation) roles to Windows Server 2016.
Open active directory users and computers console. Right-click your domain and then click Operations Masters .

Open RID tab and click Change.

When you are asked for confirmation, click Yes.

Click OK.

Open PDC tab and click Change.

When you are asked for confirmation, click Yes.

Click OK.

Open Infrastructure tab and click Change.

When you are asked for confirmation, click Yes.

Click OK.

14 – Still on our Dc-Server.Microsoft.lk.com server, open Active Directory Domain and Trusts console, right click Active Directory Domain and Trusts and then click Change Active Directory Domain Controller.

15 – On the Change Directory Server interface, click This Domain Controller or AD LDS instance and then choose your new Windows Server 2016 which is DC-CLOUD.Microsoft.lk.com, and then click OK.

16 – On the Active Directory Domains and Trusts interface, hover over the Active Directory Domains and Trusts and verify that the server now reflects your new Windows server 2016 which is DC-CLOUD.Microsoft.lk.com.

17 – On the Active Directory Domains and Trusts interface, right click Active Directory Domains and Trusts found in the folder tree and select Operations Manager.

18 – In the Operations Master interface, click Change to transfer the domain naming master role to the Windows Server 2016.

19 – Click Yes when the wizard asked if you are sure you wish to transfer the operations master role to a different computer.

20 – Once the Operations Master is successfully transferred, click OK

21 – On the Operation Master interface, verify that Domain naming operations master is now transferred to DC-CLOUD.Microsoft.lk.com server.

22 – On the DC-CLOUD.Microsoft.lk.com server, open Command Prompt and then type regsvr32 schmmgmt.dll to change the Schema Master.


23 – Next we need to change Schema Master, on the DC-CLOUD.Microsoft.lk.com server, open Run Type MMC, click File and then click Add/Remove Snap-in.


24 – On the Add or Remove Snap-ins interface, click Active Directory Schema, click Add and then click OK.


25 – On the Console, right click Active Directory Schema and then click Change Active Directory Domain Controller.

26 – On the Change Directory Server interface, click This Domain Controller or AD LDS instance, click DC-CLOUD.Microsoft.lk.com server and then click OK.

27 – On the Active Directory Schema box just click OK to proceed.

28 – on the Console, right click Active Directory Schema and select Operations Master.

29 – On the Change Schema Master interface, click Change to transfer the schema master role to the Windows Server 2016 (DC-CLOUD.Microsoft.lk.com).

30 – When asked if you are sure you wish to transfer the schema master role to a different computer, just click Yes.

Once the schema master is successfully transferred, click OK to proceed.

31 – Verify the current schema master (online) is now DC-CLOUD.Microsoft.lk.com, and then click Close.
32 – Open PowerShell with elevated privileges and execute “netdom query fsmo” command. Check if all the five FSMO roles have been transferred to Active Directory Domain Controller Windows Server 2016.

33 – Uninstalling Active Directory Domain Services from Windows Server 2012 R2.
Login to Windows Server 2012 R2 machine with domain administrator credentials.
Open PowerShell with elevated privileges and execute command:
Uninstall-ADDSDomainController -DemoteOperationMasterRole –RemoveApplicationPartition

Provide the local administrator password and press enter.


Be patient. The operation will be completed in few minutes and server will be rebooted automatically.

34 – Upgrading Forest and Domain Functional Levels to Windows Server 2016.
Login to Windows Server 2016 domain controller, Open PowerShell with elevated privileges Execute command to change domain functional level,
Set-ADDomainMode –identity yourdomain.com –DomainMode Windows2016Domain


Login to Windows Server 2016 domain controller, Open PowerShell with elevated privileges Execute command to forest functional local,
Set-ADForestMode –identity yourdomain.com –ForestMode Windows2016Forest


35 – Last step, confirm if domain and forest functional levels have really been changed. Execute command,
Get-ADDomain | fl Name, DomainMode
Get-ADForest | fl Name, ForestMode

that’s all for now.., any Doubts type a commend.. 🙂
This project explains how to upgrade your infrastructure to the latest server 2012 R2 Active Directory Domain Services.
First of all, to perform this procedure, you must use a domain account which is a member of Domain Admins, Enterprise Admins Groups and Schema Admins group in the domain. Like as Administrator below:

We need to follow steps below to upgrade your infrastructure to the latest server 2012 R2 Active Directory Domain Services:
- Check Forest and Domain Functional Level
- Preparing Active Directory Schema
- Install Windows Server 2012 R2 server
- Join Windows Server 2012 R2 to the Windows Server 2008 R2 Domain
- Install an Additional Active Directory Domain Controller With Windows Server 2012 R2
- Transferring the Flexible Single Master Operations (FSMO) Role to new installed Active Directory Domain Controller
- Configuring external time source on your Primary Domain Controller
1. Check Forest and Domain Functional Level
The Forest Functional level and Domain Functional Level must be at least Windows Server 2003. To check that Open Active Directory Domain and Trust :

Right click on the Active Directory Domains and Trusts and click on Raise Forest Functional Level…

In our forest, the functional level is Windows server 2008 R2

Right click on the Domain name and then click on Raise Domain Functional Level…

In our Domain functional level is Windows server 2008 R2

So that is means We can upgrade DC.
2. Preparing Active Directory Schema You can use Our article :
How to Prepare(Schema Upgrade) the Active Directory Schema for Windows Server 2012 R2
3. Install Windows Server 2012 R2 server You can use Our article :
Install Windows Server 2012 R2 server
4. Join Windows Server 2012 R2 to the Windows Server 2008 R2 Domain You can use Our article :
How To Join Windows Server 2012 R2 to a Domain
5. Install an Additional Active Directory Domain Controller With Windows Server 2012 R2 You can use Our article :
Install an Additional Active Directory Domain Controller With Windows Server 2012 R2
6. Transferring the Flexible Single Master Operations (FSMO) Role to new installed Active Directory Domain Controller You can use Our article :
Transferring the Flexible Single Master Operations (FSMO) Role to new installed Active Directory Domain Controller
7. Configuring external time source on your Primary Domain Controller You can use Our article :
Configuring external time source on your Primary Domain Controller
If You have any question about this or another topic Please feel free contact with us. You can also ask to create specific articles which you want to see on our blog.