
#статьи
-
0
Советы SRE-инженера про смену операционки и перенос данных: простая инструкция из 4 шагов без магии и лишних обещаний.
Иллюстрация: Wikimedia Commons / Polina Vari для Skillbox Media
Журналист, коммерческий автор и редактор. Пишет про IT, цифровой маркетинг и бизнес.
Сайт: darovska.com.

SRE-инженер. Работал системным администратором в Медицинском университете им. И. И. Мечникова. Увлекается медиафилософией, в том числе философией компьютерных игр, Unix и Open Source.
Я никогда не был фанатом Microsoft, но какое-то время чувствовал себя комфортно в рамках Windows. А полгода назад решил снова полностью перейти на Linux. Расскажу, как это было.
Первое, что я сделал, — стал читать, какие проблемы с Linux могут проявиться на моём ноутбуке. О чём речь? Например, macOS нельзя поставить никуда, кроме MacBook (хотя некоторые умудряются инсталлировать так называемый «Хакинтош»). Похожая ситуация и с Linux: его лучше ставить только на те ноутбуки, у которых нет проблем с драйверами, — и до сих пор существует железо, на котором с драйверами придётся повозиться. Если говорить о процессорах, то лучше всего Linux дружит с AMD.
Учтите: хороший ноутбук с полноценной поддержкой Linux порой стоит сопоставимо с MacBook.
Почитайте, что пишут про работу конкретной модели ноутбука с Linux на сайте производителя и профильных форумах. Если есть жалобы на то, что не получается завести звук, не работает веб-камера или тачпад, задумайтесь — а точно ли вам так нужен этот переход и сможете ли вы работать с этим конкретным ноутбуком в принципе.
И ещё одно предупреждение: обычно при установке Linux всегда чего-то не хватает — приходится это искать, качать и даже собирать из исходников. Например, если официальный драйвер работает некорректно, надо будет поискать его исходный код или даже написать драйвер самостоятельно.
Фотки, мемы, видео, документы — всё нужное, родное и близкое. Перед тем как начать перенос данных с Windows на Linux, нужно точно разобраться, где и что хранится.
Все файлики, приложения, проекты, созданные вами, рекомендую всегда держать в одном определённом месте — так вы точно ничего не забудете и не потеряете. Это та часть, которую всегда легко перенести и которая никак не зависит от типа операционной системы.
В идеале эти данные лучше хранить не на жёстком диске ноутбука или компьютера, а в облаке, отдельном хранилище или на внешнем диске. Ещё хорошая практика — объединить несколько пунктов этого списка. Такой подход к хранению позволит в принципе не бояться отказа операционной системы или выхода диска из строя.
Вкладки браузеров экспортировать довольно просто. Например, недавно я обновлял elementary OS (ну как обновлял — переустанавливал): чтобы перенести профиль Google Chrome, достаточно было скопировать папку с профилем пользователя. Большая часть моих конфигураций была доступна сразу после переустановки.
В Linux есть хорошая практика — при установке системы помещать на отдельный диск пользовательскую папку, которая называется Home. При переустановке системы директория Home не трогается, но в ней остаётся весь мусор, с прошлой установки. Сама система в корне другая, но все пользовательские файлы вашего профиля остаются в Home. Если вы используете KDE, при обновлении KDE не сильно меняется — какие-то базовые настройки сохранятся. Но всегда есть риски, что новая версия KDE работает не так и смотрит не на те переменные. Это базовый вариант, когда профиль сохраняется и подключается к новой системе. Вы устанавливаете PyCharm, а у вас уже есть все папки с проектами.
Данные так или иначе переносятся, а вот с файлами Word могут быть проблемы. То, что заточено под конкретную операционную систему, всегда будет болью для любого переезда на другую ОС. Макросы или разметка документов отличаются, потому что Microsoft пока не использует формат OpenDocument. Но это особенность экосистем: в рамках экосистемы всё неплохо работает и переносится — именно поэтому есть смысл, если телефон на Android, использовать Chromebook, ведь там есть интеграция с сервисами Google.
Данные приложений и сами приложения, настройки системы нельзя полностью перенести с одной ОС на другую — это будет сложно и точно не на 100%. Ведь даже при переходе между двумя устройствами с одной операционкой на борту абсолютно все настройки не перенести — что-то придётся заново конфигурировать вручную. Скорее всего, вам удастся перенести только данные и конфигурацию отдельных приложений — да и то не всех, потому что логика работы некоторых программ сильно зависит от ОС.
При переходе с Windows на Linux надо проверять, насколько ваши приложения в принципе поддерживаются в новой ОС — и есть ли у них вообще версии для Linux. Даже если вместо Photoshop и Corel вы уже использовали кросс-платформенные GIMP с Inkscape, части настроек вы лишитесь. А у того же Lightworks переменные окружения в Windows и Linux могут сильно отличаться — то есть настройки придётся делать заново. В LibreOffice можно перенести готовые шаблоны и макросы.
Некоторые программы вообще не портированы под Linux (те же Sony Vegas или Adobe Premiere) — хотя вы всегда можете попробовать запустить их с помощью эмулятора Wine. Правда, для этого понадобится немало свободного времени.
Когда несколько лет назад я переходил с Linux на Windows, то сразу решил использовать кросс-платформенные приложения типа Lightworks. Потому что знал: если надо будет работать под Linux, я просто перенесу все свои проекты.
Например, вместо популярного Lightroom можно поставить кросс-платформенный Darkroom. Он тоже позволяет работать с фотографиями в RAW-формате — хотя, конечно, он не настолько удобный и приятный в работе, как продукт Adobe. В общем, если есть вероятность, что придётся переходить на Linux — лучше сразу поставить кросс-платформенное ПО.
Важно: не забудьте перенести ключи SSH для всех своих виртуалок и приложений (если они у вас есть). И первое время не стоит форматировать раздел с Windows — вдруг вы что-то забыли и вам это вдруг понадобится.
Просмотрщик фотографий точно не перенесётся, потому что пути сменятся. Базу нужно закэшировать заново — это не большая проблема, но она есть. Нужно также посмотреть основные приложения, в которых вы работаете, посмотреть переносимость. После этого нужно сделать перечень приложений, которые в теории могут быть портированы на другую систему, но для них тоже надо будет менять пути.
Нужно перенести важные для работы приложения. Например, для разработчика это могут быть VS Code, GoLand, IntelliJ IDEA, PyCharm. У JetBrains много продуктов, и все они — кросс-платформенные, их несложно перенести с Windows на Linux, а на официальном сайте VS Code есть гайд для установки под Linux.
В Linux и Windows разные файловые пути, поэтому если конфигурация текстовая и в ней можно поменять пути к модулям, файлам, библиотекам — значит, можно подправить конфигурацию и сохранить настройки. Если нет — тогда нужно посмотреть, какие варианты есть, как их переносить.
С фреймворками тоже обычно больших проблем не возникает: даже .NET и PowerShell поднимаются под Linux. Однако некоторые неудобства будут — не все функции .NET и PowerShell в Linux и Windows реализованы одинаково. Я тестировал их на прошлой работе — в целом работает нормально, хотя команды немного отличаются: например, где-то будет меньше доступных параметров, потому что это всё-таки не родной для Linux язык. Как по мне, ставить PowerShell на Linux — это несколько порнографично. Правда, иногда без этого не обойтись.
Сколько я телефонов ни менял, переход на новую модель — это всего одно действие, когда ты совмещаешь два телефона, и у тебя всё подтягивается, вплоть до приложений и известных Wi-Fi-сетей. Но попробуйте так сделать с Android и iPhone — ничего не получится.

Научитесь: Старт в DevOps: системное администрирование для начинающих
Узнать больше
Introduction
While there are various methods available for file transfers from a Windows system to a Linux system, using the Command lines provides a straightforward and reliable approach. In this guide, we’ll walk you through the step-by-step process, highlighting the necessary commands and techniques to seamlessly transfer your files from Windows to Linux.
Prerequisites
Verify Your Remote Linux Server is Ready
If you have ordered one from Database Mart, you will receive an email containing the information of your VPS, including server IP and login credentials. You can also obtain the information on the overview page in the control panel. Please refer to this guide on how to get server credentials if you need assistance.
Steps to Transfer Files from Windows to Linux Using Command Prompt
Step 1. Open the Command Prompt in Local Windows
Search cmd in the search bar, and double-click the Command Prompt to open it. Or press the Windows key + R, then type cmd or cmd.exe in the Run command box, and press Enter.
Then, you should see the command prompt interface as below.
Step 2. Transfer Files between Local Windows and Remote Linux
Before the transfer, we will explain some terms used in the command. When using the command, you should replace these terms with the actual value.
filename.extension: it’s the name of a file and file extension that’s to be transferred. In this case, we may use mydata.txt and website.txt.
folderName: it’s the name of a folder that’s to be transferred. In this case, we may use the Website folder.
customPort: it’s the custom port you use to connect to your remote Linux server.
localFilePath: it’s the path on your local Windows PC.
username: it’s the username used to log into the remote Linux server.
remoteServerAddress: it’s the server IP of the remote Linux server.
remoteFilePath: it’s the path on the remote Linux server. In this case, we use /home/administrator.
2.1 Transfer a File from Local to Remote Server
For demonstration purposes, we have created a file in the desktop>website named «mydata.txt». First, we need to go to the file’s directory by inputting cd, followed by the file path on our local Windows. In this case, the file is located at desktop\website. Therefore, we enter the following command.
After that, you can see that we navigate to the folder where the file is located.
Then, we use the following command to transfer the «mydata.text» from local Window to the remote Linux server.
scp filename.extension username@remoteServerAddress:remoteFilePath
After entering the command, you will be prompted for the password for connecting to the remote server. Input the password and hit the Enter button, the file will be transferred. In this case, we have transferred the local file mydata.txt (located at desktop/website) to the /home/administrator directory on the remote Linux server.
2.2 Transfer a File from Remote Server to Local
You can run the following command to copy a file from the remote server to your local Windows PC.
scp username@remoteServerAddress:remoteFilePath/filename.extension localFilePath
In this case, we have transferred the mydata.txt (located at home/administrator on the remote server) to the desktop directory on the local server.
2.3 Transfer Multiple Files from Local to Remote Server
The SCP command also allows you to transfer multiple files in a single command. Navigate to the file folder and run the following command.
scp localFilePath/filename1.extension localFilePath/filename2.extension username@remoteServerAddress:remoteFilePath
In this case, we have transferred two local files mydata.txt (located at desktop) and mywebsite.txt (located at desktop/website) to the /home/administrator directory on the remote Linux server.
2.4 Transfer a Folder from Local to Remote Server
Besides files, the SCP command also allows you to securely copy folders between the local and remote server. Use the following command to copy a folder from local to the remote server.
scp -r localFilePath/folderName username@remoteServerAddress:remoteFilePath
In this case, we have transferred the local Website folder, which contains two files mydata.txt and mywebsite.txt, to the /home/administrator directory on the remote Linux server.
2.5 Transfer a File Faster
Adding the -c option after the scp command will compress the file while it’s being transferred. Once the file reaches its destination, it returns to its normal size.
scp -c localFilePath/filename.extension username@remoteServerAddress:remoteFilePath
In this case, we have transferred the local Website folder, which contains two files mydata.txt and mywebsite.txt, to the /home/administrator directory on the remote Linux server.
2.6 Transfer a File Using a Custom Port
The scp command uses the 22 port by default. If you have changed to a custom port, please run the following command to transfer a file. Make sure to capitalize the P.
scp -P customPort localFilePath/filename.extension username@remoteServerAddress:remoteFilePath
In this case, we have transferred the local file mydata.txt to the /home/administrator directory on the remote Linux server using a custom port.
Step 3. Verify the File has been Transferred
Then, Use a preferred editor to open the file. Here, we use the «Nano editor.» In this example, the remoteFilePath is /home/administrator, and the filename.extention can be mydata.txt, mywebsite.txt, and myweb.txt.
nano remoteFilePath/filename.extention
We can also check if the folder has been copied to the remote server. Go to the /home/administrator directory and check if the Website folder is there.
cd /home/administrator
ll
Conclusion
In conclusion, transferring files from a local Windows machine to a remote Linux server using the command prompt (CMD) is a powerful and efficient method for managing data. By following the step-by-step guide outlined in this blog, you can establish a secure connection, utilize the SCP (Secure Copy Protocol) command, and successfully transfer files between these two platforms.
Other Methods to Transfer Files between Windows and Linux Server

This guide has everything you need to successfully transfer files from Windows to Linux with Rsync and SSH. Rsync is a reliable tool for file synchronization, and when combined with SSH, it ensures secure file transfers between systems. In this step-by-step guide, we’ll show you how to set up Rsync and SSH on your Windows computer and Linux server, making file transfers effortless.
Setting up SSH on both Windows and Linux systems
Let’s start by setting up SSH on both your Windows and Linux environments.
For Windows, you can use the built-in OpenSSH client, which was introduced in Windows 10 version 1809 and later. To enable the OpenSSH client, open the Windows PowerShell or Command Prompt and run the following command:
Get-WindowsCapability -Online | Where-Object {$_.Name -like 'OpenSSH.Client*'} | Add-WindowsCapability -OnlineThis command will install the OpenSSH client on your Windows system.

Once the installation is complete, you can test the SSH connection by running the following command:
ssh user@remote_linux_serverReplace user with the username you use to log in to your Linux server, and remote_linux_server with the IP address or hostname of your Linux server.

On the Linux side, SSH is typically pre-installed, but you may need to ensure that the SSH server (sshd) is running. Open a terminal on your Linux system and run the following command to check SSH is available or not:
ssh -VIf this command shows an output, it means the SSH is installed on the machine. If not install OpenSSH and also make sure to check the status of the SSH on your machine before going to the next steps.
Refer to this article: How to install and use SSH on Linux for OpenSSH installation and checking status of it.

Now that you have SSH set up on both your Windows and Linux systems, you’re ready to move on to the next step.
Installing and configuring Rsync on Windows and Linux
Rsync is a powerful file synchronization tool that can be used in combination with SSH to efficiently transfer files between Windows and Linux systems. Let’s start by installing Rsync on your Windows computer.
For Windows, you can download and install the Cygwin tool, which includes the Rsync utility. Visit the Cygwin website (https://www.cygwin.com/) and download the Cygwin installer. During the installation process, make sure to select the “Rsync” package from the list of available packages.

Alternatively, you can use the WinSCP application, which includes a built-in Rsync implementation. Visit the WinSCP website (https://winscp.net/eng/index.php) and download the latest version of the software.
On the Linux side, Rsync is typically pre-installed, but you can install it using your distribution’s package manager. For example, on Ubuntu or Debian-based systems, you can run the following command:
sudo apt-get update
sudo apt-get install rsync
Once Rsync is installed on both your Windows and Linux systems, you can configure it to work seamlessly with SSH.
Also, you’ll need to ensure that the SSH server is set up to allow Rsync connections in the Linux machine. You can do this by editing the SSH server configuration file, typically located at /etc/ssh/sshd_config. Look for the line that says Subsystem sftp /usr/lib/openssh/sftp-server and uncomment it (remove the “ at the beginning of the line).
vi /etc/ssh/sshd_configSave the configuration file and restart the SSH service using the following command:
sudo systemctl restart sshThe command to restart the SSH service can differ based on the Linux distribution you’re using. It’s essential to use the appropriate command that corresponds to the OpenSSH version installed on your machine to ensure a smooth and successful restart.

With Rsync and SSH set up on both your Windows and Linux systems, you’re now ready to start transferring files between the two environments.
Experience the Power of Veeble VPS Hosting
Experience the power of Veeble VPS hosting. Our plans are affordable, reliable, and packed with features that will help you take your business to the next level.
Choose Your Plan
Transferring files from Windows to Linux using Rsync and SSH
Now that you have Rsync and SSH configured on both your Windows and Linux systems, let’s explore how to use them to transfer files from your Windows computer to your Linux server.
Open a Command Prompt or PowerShell window on your Windows computer and navigate to the directory containing the files you want to transfer. Then, use the following Rsync command to copy the files to your Linux server:
rsync -avzc --delete -e "ssh" /path/to/local/files user@remote_linux_server:/path/to/remote/destination
When using rsync in Cygwin, you need to reference Windows directories through the /cygdrive mount point. For example, if your folder to sync is located in the Downloads directory of your user profile, the path would be something like /cygdrive/c/Users/your_username/Downloads/<your folder>.
Here’s what each part of the command does:
rsync: Invokes the Rsync utility.-avzc: Enables the following options:-a: Preserves file attributes and permissions.-v: Enables verbose mode, providing more detailed output.-z: Compresses the data during transfer to reduce the amount of data sent.-c: Checks the file checksums to ensure data integrity.--delete: Deletes any files on the remote server that are not present in the local directory.-e "ssh": Specifies that the transfer should be done over an SSH connection./path/to/local/files: The path to the local files or directory you want to transfer.user@remote_linux_server:/path/to/remote/destination: The SSH username and the path to the remote destination on your Linux server.
Replace the placeholders in the command with the appropriate values for your setup.
The first time you run this command, it will prompt you to accept the host key of the remote Linux server. Once you’ve accepted the host key, the transfer will begin, and you’ll see the progress displayed in the console.
If you need to transfer files regularly, you can create a batch file or a PowerShell script to automate the process. This will save you time and ensure that the file transfers are consistent and reliable.
Troubleshooting common issues during file transfer
While Rsync and SSH generally provide a seamless file transfer experience, you may occasionally encounter some issues. Let’s explore some common problems and their solutions.
- SSH connection refused: If you encounter an error message indicating that the SSH connection was refused, it’s likely that the SSH server on your Linux system is not running or is not accessible. Please refer to the article: Troubleshooting “SSH Connection Refused” Error and Regaining Access to resolve it.
- Permission denied: If you receive a “Permission denied” error during the file transfer, it means that the user account you’re using on the Linux server does not have the necessary permissions to access the destination directory. You can either log in as a user with higher privileges or change the permissions of the destination directory using the
sudo chmodcommand.
Reference: Managing File Ownership and Group Ownership in Linux - Checksum mismatch: Rsync uses checksums to ensure data integrity during the transfer process. If you encounter a checksum mismatch error, it could be due to a network issue or a problem with the source files. Try running the Rsync command with the
--checksumoption to perform a more thorough checksum verification. - Insufficient disk space: If the transfer fails due to insufficient disk space on the remote Linux server, you’ll need to free up some space or transfer the files to a different location with more available storage.
- Firewall or network issues: If the transfer is slow or intermittent, it could be due to firewall or network-related issues. Ensure that the necessary ports (typically 22 for SSH) are open and accessible between your Windows computer and the Linux server.
To troubleshoot these issues, you can try the following steps:
- Check the SSH server logs on the Linux system for any error messages.
- Verify the user permissions and directory access on the Linux server.
- Run the Rsync command with additional verbose options (
-vvv) to get more detailed output. - Test the network connectivity between your Windows computer and the Linux server using tools like
pingortelnet. - Temporarily disable any firewalls or antivirus software that might be interfering with the file transfer.
By addressing these common issues, you can ensure a smooth and reliable file transfer process between your Windows and Linux systems.
Best practices for efficient file transfer between Windows and Linux
To get the most out of your file transfers using Rsync and SSH, consider the following best practices:
- Use compression: Enabling the
-zoption in the Rsync command compresses the data during the transfer process, which can significantly reduce the amount of data sent over the network, especially for large files or directories. - Exclude unnecessary files: Use the
--excludeoption in the Rsync command to exclude files or directories that you don’t need to transfer, such as temporary files, log files, or hidden system files. This can help speed up the transfer process and reduce the amount of data transferred.
Refer: Optimizing Rsync: Ignore Unwanted Files and Directories - Maintain a consistent file structure: Try to keep the file structure and directory hierarchy the same on both the Windows and Linux systems. This will make it easier to manage and locate files after the transfer is complete.
- Use relative paths: When specifying the source and destination paths in the Rsync command, use relative paths instead of absolute paths. This will make the command more portable and easier to use in different scenarios.
- Automate the transfer process: Create a batch file or a PowerShell script to automate the Rsync command, making it easy to run the file transfer regularly or as needed.
- Monitor the transfer progress: Use the verbose options (
-vvv) in the Rsync command to get detailed output on the transfer progress, file sizes, and any errors that may occur. This will help you troubleshoot issues more effectively. - Leverage incremental backups: Rsync is particularly useful for performing incremental backups, where it only transfers the files that have changed since the last backup. This can save a significant amount of time and bandwidth, especially for large data sets.
- Consider using a graphical tool: While the command-line Rsync approach is powerful, you may also want to explore graphical tools like WinSCP or FileZilla, which provide a user-friendly interface for managing file transfers between Windows and Linux.
- Secure the SSH connection: Ensure that the SSH connection is secure by using strong passwords or SSH keys for authentication. Avoid using weak or default passwords, and consider implementing two-factor authentication for added security.
- Monitor disk space on the Linux server: Keep an eye on the available disk space on the Linux server to ensure that there is enough room to accommodate the transferred files. Set up alerts or monitoring tools to notify you when disk space is running low.
By following these best practices, you can streamline the file transfer process, improve efficiency, and maintain the security and integrity of your data during the transfer between your Windows and Linux systems.
Alternatives to Rsync and SSH for file transfer
While Rsync and SSH are a powerful combination for transferring files between Windows and Linux, there are alternative tools and methods you can consider:
- FTP/FTPS/SFTP: File Transfer Protocol (FTP) and its secure variants, FTPS (FTP over SSL/TLS) and SFTP (SSH File Transfer Protocol), are widely used for file transfers. These protocols can be used with various FTP client applications, such as FileZilla or WinSCP, to transfer files between Windows and Linux systems.
- Cloud storage services: Services like Dropbox, Google Drive, or Microsoft OneDrive provide a convenient way to transfer files between Windows and Linux systems. Simply upload the files to the cloud storage, and then download them on the other system.
- Network file sharing: You can set up network file sharing between your Windows and Linux systems using protocols like SMB (Server Message Block) or NFS (Network File System). This allows you to access and transfer files directly between the two systems over the network.
- Web-based file transfer tools: There are various web-based file transfer tools, such as WeTransfer or Sendspace, that you can use to transfer files between your Windows and Linux systems. These tools typically provide a simple and user-friendly interface for uploading and downloading files.
- Portable storage devices: If you have a portable storage device, such as a USB flash drive or an external hard drive, you can use it to physically transfer files between your Windows and Linux systems.
Each of these alternatives has its advantages and disadvantages, and the choice will depend on your specific requirements, such as the size of the files, the frequency of transfers, and the level of security needed.
For example, FTP/FTPS/SFTP may be a good option if you need to transfer files regularly, but they may not provide the same level of security as Rsync and SSH. Cloud storage services can be convenient, but they may not be suitable for transferring sensitive or large files. Network file sharing can be efficient, but it may require additional configuration and setup.
When choosing an alternative method, consider factors such as ease of use, transfer speed, security, and compatibility with your Windows and Linux systems. Evaluate the trade-offs and select the solution that best fits your needs.
By following these guidelines, you’ll be able to seamlessly transfer files between your Windows computer and Linux server, whether you need to perform regular backups, share important documents, or synchronize project files. The combination of Rsync and SSH provides a robust and secure solution for your file transfer needs.
Scale Without Limits
Adapt to changing demands with flexible and scalable solutions. Grow your business seamlessly.
Choose Your Plan
Are you looking for a way to quickly transfer files from your Windows computer to your Linux computer and back again? The open source PSCP utility makes it easy to transfer files and folders, and of course it’s open source.
Setting your PATH in Windows
Knowing how to set your command path in Windows makes it easier to use a handy utility like PSCP. If you’re unfamiliar with that process, read how to set a PATH on Windows.
Using PSCP
PSCP (PuTTY Secure Copy Protocol) is a command-line tool for transferring files and folders from a Windows computer to a Linux computer.
-
Download
pscp.exefrom its website. -
Move
pscp.exeto a folder in your PATH (for example,Desktop\Appif you followed the PATH tutorial here on Opensource.com). If you haven’t set a PATH variable for yourself, you can alternately movepscp.exeto the folder holding the files you’re going to transfer. -
Open Powershell on your Windows computer using the search bar in the Windows taskbar (type ‘powershell` into the search bar.)
-
Type
pscp –versionto confirm that your computer can find the command.
IP address
Before you can make the transfer, you must know the IP address or fully-qualified domain name of the destination computer. Assuming it’s a computer on your same network, and that you’re not running a DNS server to resolve computer names, you can find the destination IP address using the ip command on the Linux machine:
[linux]$ ip addr show | grep 'inet '
inet 127.0.0.1/8 scope host lo
inet 192.168.1.23/24 brd 10.0.1.255 scope global noprefixroute eth0
In all cases, 127.0.0.1 is a loopback address that the computer uses only to talk to itself, so in this example the correct address is 192.168.1.23. On your system, the IP address is likely to be different. If you’re not sure which is which, you can try each one in succession until you get the right one (and then write it down somewhere!)
Alternately, you can look in the settings of your router, which lists all addresses assigned over DHCP.
Firewalls and servers
The pscp command uses the OpenSSH protocol, so your Linux computer must be running the OpenSSH server software, and its firewall must allow SSH traffic.
If you’re not sure whether your Linux machine is running SSH, then run this command on the Linux machine:
[linux]$ sudo systemctl enable --now sshd
To ensure your firewall allows SSH traffic, run this command:
[linux]$ sudo firewall-cmd --add-service ssh --permanent
For more information on firewalls on Linux, read Make Linux stronger with firewalls.
Transfer the file
In this example, I have a file called pscp-test.txt that I want to transfer from C:\Users\paul\Documents on my Windows computer to my destination Linux computer home directory /_home_/paul.
Now that you have the pscp command and the destination address, you’re ready to transfer the test file pscp-test.txt. Open Powershell and use the dir command to change to the Documents folder, where the sample file is located:
PS> dir %USERPROFILE%\Documents\
Now execute the transfer:
PS> pscp pscp-test.txt paul@192.168.1.23:/home/paul
| Password:
End of keyboard-interactive prompts from server
pscp-test.txt | 0 kb | 0.0 kB/s | ETA: 00:00:00 | 100%
Here’s the syntax, word for word:
-
pscp: The command used to transfer the file. -
pscp-test.txtis the name of the file you want to transfer from Windows. -
paul@192.168.1.23is my username on the Linux computer, and the IP address of the Linux computer. You must replace this with your own user and destination information. Notice thatpscprequires a destination path on the target computer, and:/home/paulat the end of the IP address specifies that I want the file copied to my home folder.
After you authenticate to the Linux computer, the pscp-test.txt file is transferred to the Linux computer.
[ Related read Share files between Linux and Windows computers ]
Verifying the transferred
On your Linux computer, open a terminal and use the ls command to verify that the file pscp-test.txt appears in your home directory.
[linux]$ ls
Documents
Downloads
Music
Pictures
pscp-test.txt
Copying a file off of a Linux system
You aren’t limited to just copying files to your Linux system. With pscp, you can also copy a file from Linux onto Windows. The syntax is the same, only in reverse:
PS> pscp paul@192.168.1.23:/home/paul/pscp-test.txt %USERPROFILE%\Documents\pscp-win.txtHere’s the syntax:
-
pscp: The command used to transfer the file. -
paul@192.168.1.23:/home/paul/pscp-test.txtis my username on the Linux computer, the IP address of the Linux computer, and the path to the file I want to copy. -
%USERPROFILE%\Documentsis the location on my Windows computer where I want to save the file. Notice that in copying the file back to my Windows computer, I can give it a new name, such aspscp-win.txt, to differentiate it from the original. You don’t have to rename the file, of course, but for this demonstration it’s a useful shortcut.
Open your file manager to verify that the pscp-win.txt file was copied to the Windows C:\Users\paul\Documents path from the Linux computer.
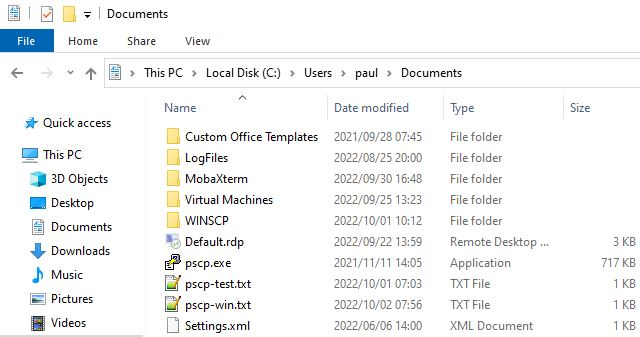
Image by:
(Paul Laubscher, CC BY-SA 4.0)
Remote copying
With the power of the open source pscp command, you have access to any computer in your house, and servers you have accounts on, and even mobile and edge devices.
This work is licensed under a Creative Commons Attribution-Share Alike 4.0 International License.
Transferring files between Windows and Linux systems may seem daunting due to their different operating systems and file systems. However, there are several methods to accomplish this task securely and efficiently.
This article will explore four simple ways to transfer files from Windows to Linux, ensuring seamless data exchange.
4 Ways to Transfer Files From Windows to Linux
This section will explore four straightforward and efficient methods to transfer files from Windows to Linux. These methods offer practical solutions for seamless data exchange between the two operating systems. Let’s dive in and discover how to make file transfers hassle-free!
Securely Copy Files via SSH
Secure Shell (SSH) is a cryptographic network protocol that allows secure data communication between two devices. You can use SSH for remote access and file transfer. To securely transfer a file from Windows to Linux, you can use the SSH protocol with the scp command.
Example:
Let’s say you have a file called data.txt on your Windows machine, and you want to transfer it to your Linux server with the IP address 192.168.1.100. Open the Command Prompt on your Windows machine and use the following command:
Replace C:\path\to\data.txt with the actual path to your file and username with your Linux username. When you initiate the transfer, the system will prompt you to enter your Linux password for authentication. After providing the correct password, the system securely copies the file to the specified location on the Linux server.
Windows to Linux File Transfer with FTP
With File Transfer Protocol (FTP), you can conveniently transfer a file from Windows to Linux using an FTP client connected to the Linux FTP server. In this method, one device acts as an FTP server, and the other connects to it as an FTP client to exchange files.
Example:
First, set up an FTP server on your Linux machine. Install vsftpd, a widely used FTP server for Linux:
Next, start the FTP server:
Now, on your Windows machine, use an FTP client like FileZilla to connect to the Linux FTP server using its IP address, username, and password. Once connected, you can transfer files by dragging and dropping them between the Windows and Linux systems.
Utilize sync software like Resilio Sync to keep specific directories up-to-date when you transfer a file from Windows to Linux. Sync software enables seamless synchronization of files and folders between multiple devices. This method helps you keep specific directories up-to-date between your Windows and Linux systems.
Example:
One popular sync software is Resilio Sync (formerly known as BitTorrent Sync). Install it on both your Windows and Linux machines. Set up a sync folder on your Windows machine and share it with your Linux machine using a secret key. Once both devices are connected, any changes made to the shared folder on Windows will automatically sync to the Linux machine and vice versa.
The key to seamlessly transferring a file from Windows to Linux is to share the secret key for synchronization using sync software.
Use Shared Folders in Your Linux Virtual Machine
When running Linux as a virtual machine on your Windows PC, you can easily transfer a file from Windows to Linux using shared folders. It enables seamless file sharing between Windows and Linux.
Example:
Imagine you have Oracle VirtualBox running a Linux VM on your Windows PC. In VirtualBox settings, set up a shared folder that directs to a directory on your Windows host. Once the shared folder is set up within your Linux virtual machine, you can effortlessly transfer a file from Windows to Linux as needed.
Use these four methods to transfer and share files between Windows and Linux systems. Whether using the secure SSH protocol, the traditional FTP method, sync software, or shared folders in a virtual machine, these techniques provide flexible solutions for your data exchange needs. Choose the method that suits your requirements and start transferring files with ease.
Moving files between Windows and Linux through a network share is indeed possible and can be an effective method for file transfer. Network shares allow folders on one system to be accessed by another over the network, enabling seamless data exchange between the two operating systems.
To set up file sharing between Windows and Linux, follow these steps:
-
Configure File Sharing on Windows:
- Select the folder or directory you want to share on your Windows machine.
- Right-click on the folder, choose Properties, and navigate to the Sharing tab.
- Click Advanced Sharing and check the box for Share this folder.
- Optionally, you can modify the share name for easier identification.
-
Access the Shared Folder from Linux:
- On your Linux machine, open the file manager or use the mount command to access the shared folder.
- In the file manager’s address bar, type the Windows machine’s IP address or hostname in the following format:
The command smb://<windows-ip-or-hostname>/<share-name> is a URI used in Linux to access a shared folder on a Windows machine. It requires the Windows machine’s IP address or hostname and the name of the shared folder. By entering this command in the Linux file manager’s address bar, users can connect to the specified Windows machine’s shared folder and seamlessly transfer files between Windows and Linux systems using the SMB protocol.
- Alternatively, use the mount command to mount the network share to a specific directory on your Linux system.
-
Transfer Files Between Windows and Linux:
- Once the network share is accessible from your Linux machine, you can transfer files by dragging and dropping them to and from the shared folder.
- Changes made to the files in the shared folder will be reflected on both systems, ensuring data consistency.
Ensure you configure network share permissions to grant access to the shared folder. Additionally, consider security aspects such as using strong passwords and restricting access to authorized users only.
You can utilize network shares to conveniently move files between Windows and Linux without additional software or complex configurations. This method streamlines the file transfer process and facilitates seamless collaboration between the two operating systems.
Conclusion
In conclusion, transferring and sharing files between Windows and Linux systems can be achieved seamlessly through various methods.
Here are the key takeaways from the article:
- Securely copy files using SSH with the scp command.
- Utilize FTP for Windows to Linux file transfers by setting up an FTP server on the Linux machine and using an FTP client on Windows.
- Keep specific directories in sync between Windows and Linux using sync software like Resilio Sync.
- Share folders between your Windows host and Linux virtual machine to facilitate file sharing within the virtual environment.
Users can effortlessly exchange data between the two operating systems using SSH, FTP, sync software, or shared folders in a virtual machine. Each method offers its unique advantages, ensuring seamless and secure file transfer.