
С помощью перенаправления папок (Folder Redirection) вы можете хранить некоторые стандартные каталоги профиля пользователя (специальные папки, типа Desktop, Documents, Pictures, Downloads) в сетевой папке на файловом сервере. Перенаправленные папки работают примерно также как подключенные сетевые диски (информация читается и записывается непосредственно на файловый сервер). В этой статье мы рассмотрим, как настроить перенаправления папок на компьютерах пользователей в домене Active Directory с помощью групповых политик.
Преимущества использования перенаправляемых папок:
- Возможность организации централизованного резервного копирования данных пользователей на файловом сервере (вместо резервного копирования на рабочих станциях);
- Пользователь при входе на любой компьютер может получить доступ к своим персональным файлам;
- Возможность управления разрешенным контентом в документах (с помощью роли FSRM в Windows Server) и ограничения размера профиля пользователя с помощью дисковых NTFS квот;
- Перенаправленные папки можно использовать как для рабочих станций, так и для терминальных серверов (Remote Desktop Services);
- При использовании Folder Redirection в RDS совместно с перемещаемыми профилями User Profile Disks или профилями FSlogix можно добиться уменьшения нагрузки на сеть и ускорения загрузки профиля за счет того, что данные из перенаправленных папок не нужно каждый копировать на RDS хост при входе и обратно при выходе.
Настройка перенаправленных папок выполняется в два шага:
- Создание сетевой папки на файловом сервере и настройка прав доступа;
- Настройка перенаправления папок в GPO.
Создайте в домене группу пользователей, для которых вы хотите включить перенаправление папок. Можно создать группу и добавить в нее пользователей с помощью PowerShell или из консоли ADUC:
New-ADGroup spb-FolderRedirection -path 'OU=Groups,OU=SPB,DC=corp,dc=winitpro,DC=ru' -GroupScope Global -PassThru –Verbose
Add-AdGroupMember -Identity spb-FolderRedirection -Members user1,user2,kbuldogov
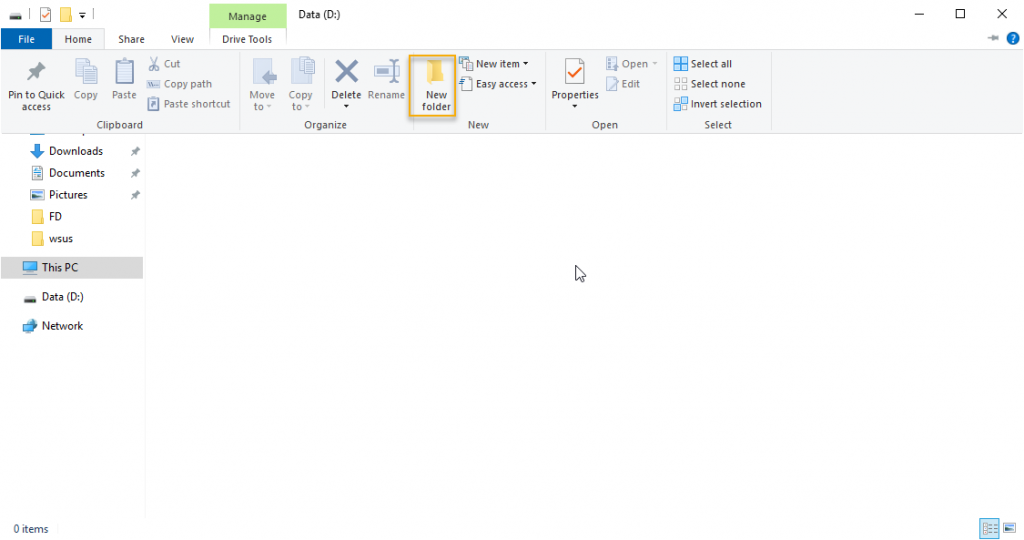
Создайте на файловом сервере сетевую папку, в которой вы будите хранить перенаправленные папки
Для файлового сервера Windows Server, на котором будут хранится личные каталоги пользователей желательно использовать отказоустойчивую конфигурацию с помощью Windows Failover Cluster, DFS и/или обеспечить отказоустойчивость на уровне виртуализации: VMware HA, кластер Hyper-V, и т.д.).
Для хранения папок пользователей желательно использовать отдельный диск (а не системный диск C:). Создайте и опубликуйте сетевую папку на файловом сервере из проводника Windows или с помощью команды PowerShell New-SmbShare
New-SmbShare -Name RedirFolder -Path D:\RedirFolder –description “Users Redirected Folders”
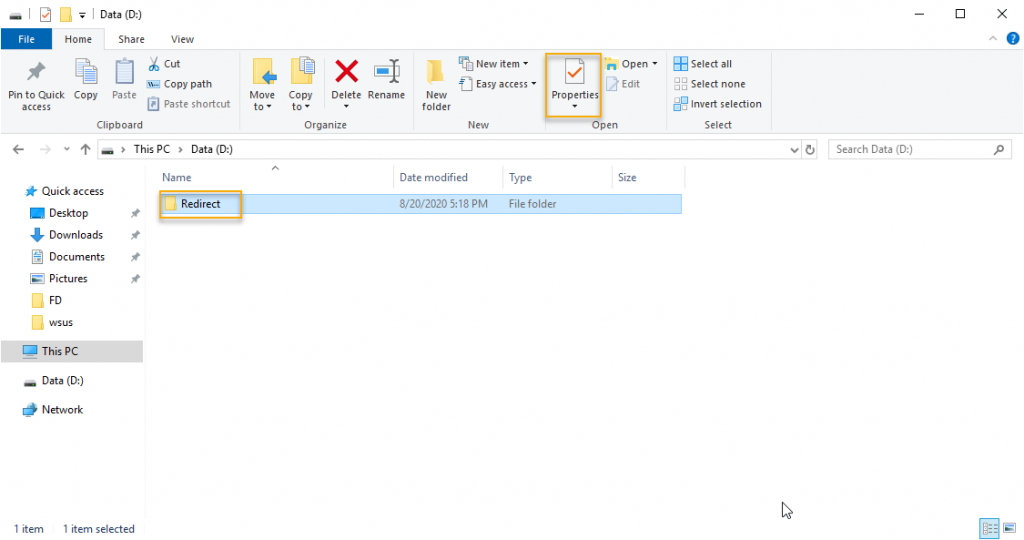
Теперь нужно настроить корректные NTFS разрешения на папку, чтобы каждый пользователь мог получить доступ только к своим файлам.
На вкладке Security (Безопасность) необходимо нажать кнопку Advanced и отключить наследование нажав на кнопку Disable Inheritance. При появлении запроса, выберите Convert inherited permissions into explicit permissions on the object.
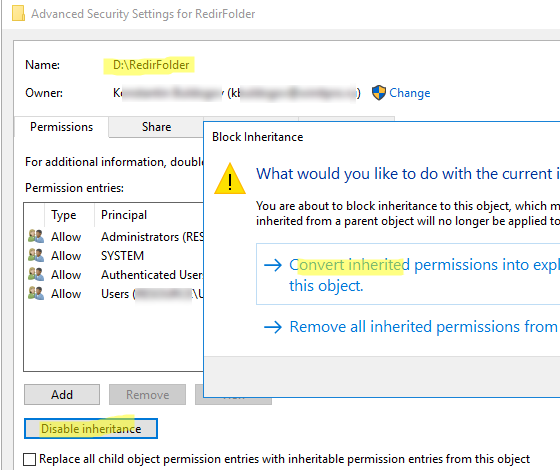
Удалите из списка NTFS разрешений группы Users /Authenticated Users, и оставьте такие права:
-
Administrators
(Full control, This folder, subfolders and files) -
SYSTEM
(Full control, This folder, subfolders and files) -
CREATOR OWNER
(Full control, Subfolders and files only)
Теперь добавьте группу безопасности spb-FolderRedirection, и предоставьте такие разрешения на корневую папку (This folder only):
- Traverse Folder/Execute File
- List Folder/Read Data
- Read Attributes
- Read Extended Attributes
- Create Folder/Append Data
- Read Permissions
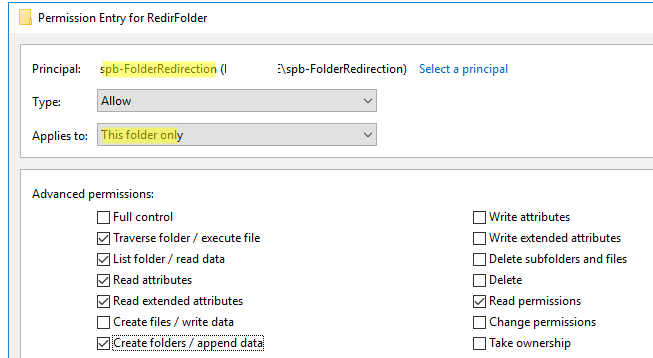
В свойства сетевой папки предоставьте (Sharing –> Advanced Sharing -> Permissions) предоставьте Full Control.
В такой конфигурации пользователям разрешено создать папки в каталоге, а доступ к содержимому вложенных папок будет только у владельцев-пользователей.
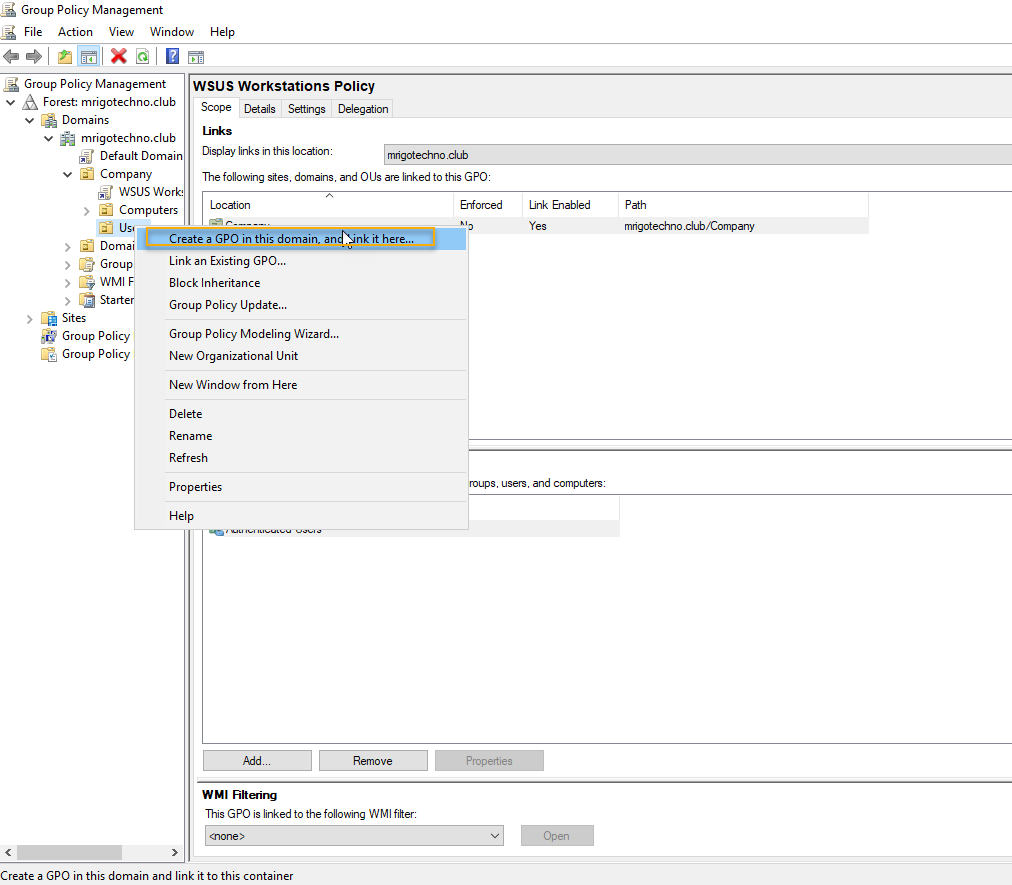
Теперь можно создать групповую политику перенаправления папок для пользователей.
Запустите консоль управления доменными политиками (
gpmc.msc
), создайте новую GPO и назначьте на Organizational Unit с пользователями.
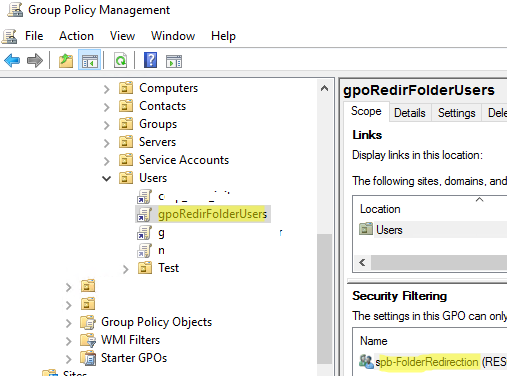
Чтобы политика применялась только для указанных пользователей, нужно в Security Filtering убрать Authenticated Users и добавить группы
spbFolderRedirection
и
Domain Computers
.
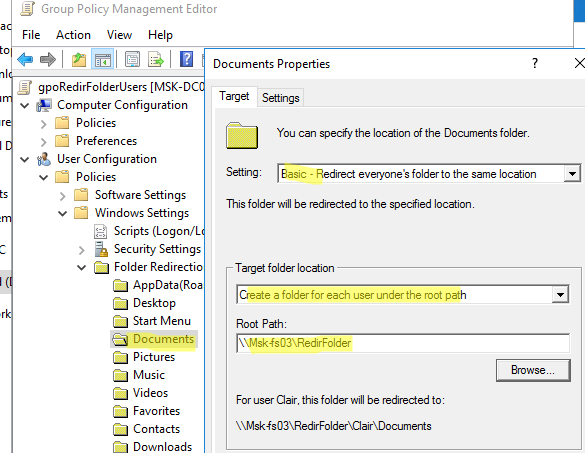
Перейдите в режим редактирования GPO и разверните секцию User Configuration -> Policies -> Windows Settings -> Folder Redirection.
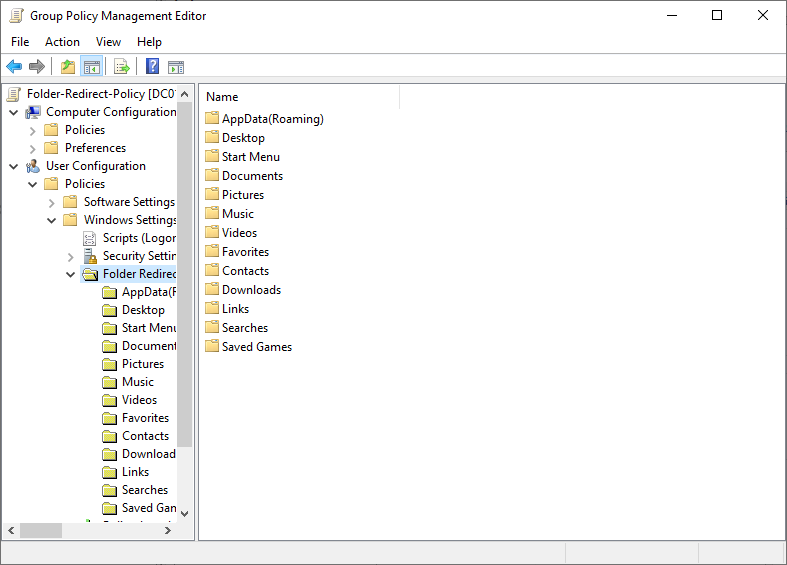
Здесь находятся опции для перенаправления различных папок профиля пользователя. В этом примере я настрою перенаправления только для папки Documents (остальные папки настраиваются по аналогии).
Перенаправление каталога AppData(roaming) профиля используется крайне редко.
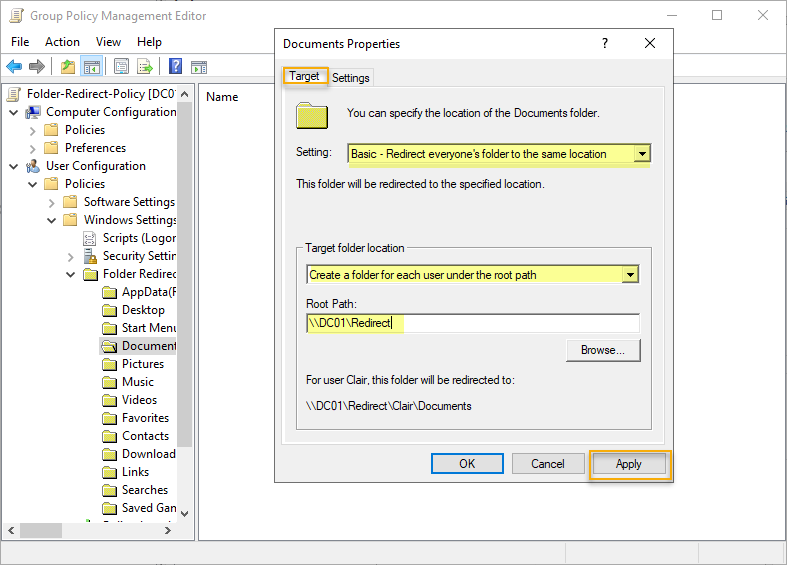
Откройте свойства раздела Documents и укажите следующие параметры перенаправления каталога:
- Settings: –
Basic, Redirect everyone’s folder to the same location - Target folder location:
Create a folder for each user under the root path - Root path:
\\msk-fs03\RedirFolder
(UNC путь к ранее созданному сетевому каталогу)
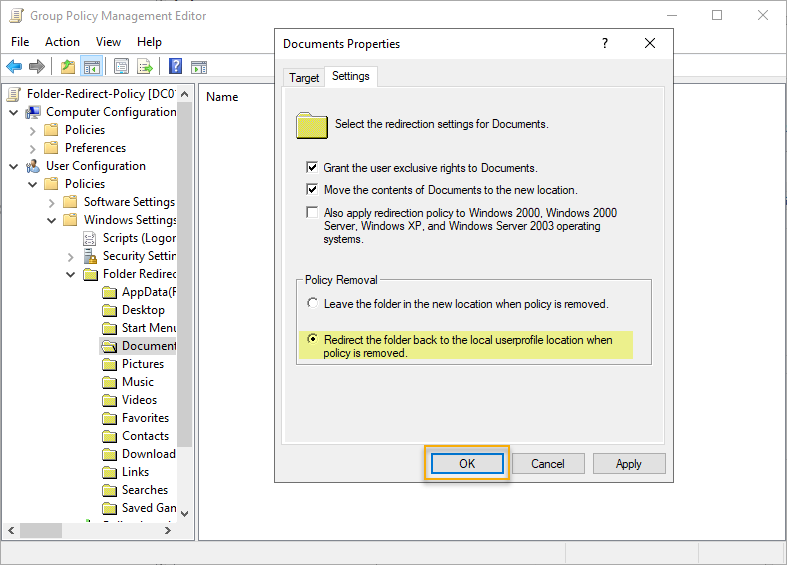
На вкладке Settings есть еще несколько настроек:
- Grant the user exclusive rights to Documents – можно отключить, т.к. мы ранее уже настроили корректные NTFS разрешения
- Move the contents of Documents to the new location – нужно ли перемещать имеющиеся файлы в документах пользователя в папку на файловом сервере
- Redirect the folder back to the local user profile location when the policy is removed – эта опция позволяет включить офлайн доступ к данным (через автономные файлы Windows), и определяет поведение при отключении GPO
Добавьте ваш файловый сервер и/или домен в доверенную местную интрасеть с помощью параметра GPO Site to Zone Assignment List (Список назначений зоны для веб-сайтов) в Computer Configuration -> Administrative Templates -> Windows Components -> Internet Explorer -> Internet Control Panel -> Security Page;
В настройках политики нужно указать список доверенных серверов в формате:
- Имя сервера или домена (в виде
file://server_name
,
\\server_name
или IP ) - Номер зоны (
1
– Для местной интрасети)
Иначе при запуске ярлыков и исполняемых файлов из перенаправленного каталога могут появляться предупреждения системы безопасности Windows.
Теперь можно проверить работу групповой политики перенаправления папки. Завершите сеанс пользователя на компьютере и войдите опять (для обновления настроек GPO).
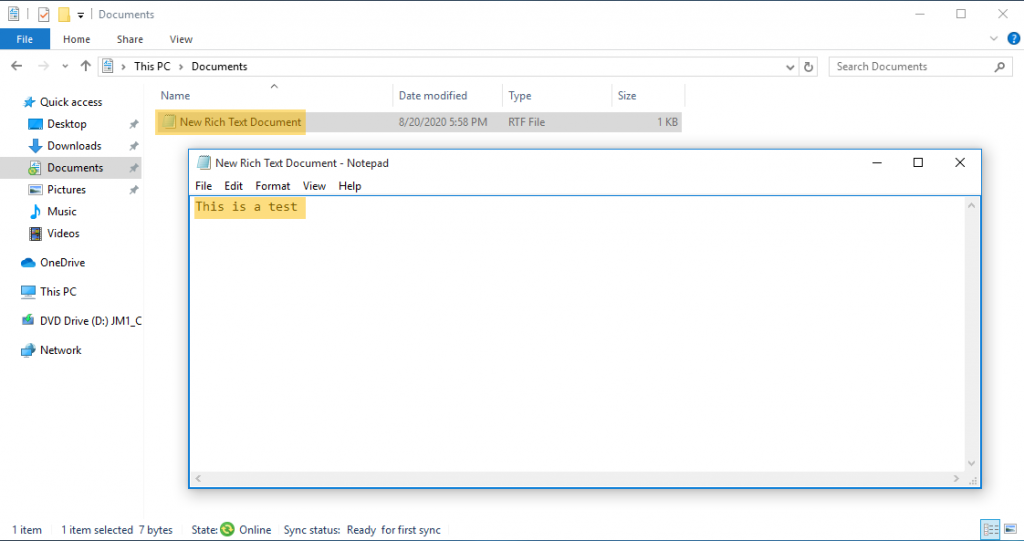
Теперь откройте свойства папки Documents и убедитесь, что теперь в качестве Location указан UNC путь к вашему файловому серверу.

Вы можете создавать файлы и папки в каталоге Documents, и они будут доступны пользователюс любого компьютера в вашем домене.
Provide feedback
Saved searches
Use saved searches to filter your results more quickly
Sign up
Preface
Folder redirection is a group policy setting which used to store user data on the profile, usually Documents, Desktop, and so on stored on a server share. By using these policy settings, the domain users assigned to the folder redirection will get the same data when they log in from a different computer. So, the users can move from one computer to another computer and retain the data stored on the profile. Folder redirection is also helpful to back up the user’s data at the server level, so the user’s data will not be scattered and lost when the user computer is down or disk problem. Let’s get to how to Redirect Folders in Windows Server 2019
In this article, I have demonstrated the folder redirection setup with redirect folder shared on the domain controller and applied group policy to a domain-joined client computer.
The following key points demonstrated and explained to setup folder direction on your environment.
- Create a security group and add test user as a member
- Create a folder to store the redirected file
- Configure security settings and share the folder
- Create group policy and link it to company users OU
- Redirect documents folder with offline access
- Test folder redirection policy with Windows 10 client computer
Create a security group and add test user as a member for Folder Redirection
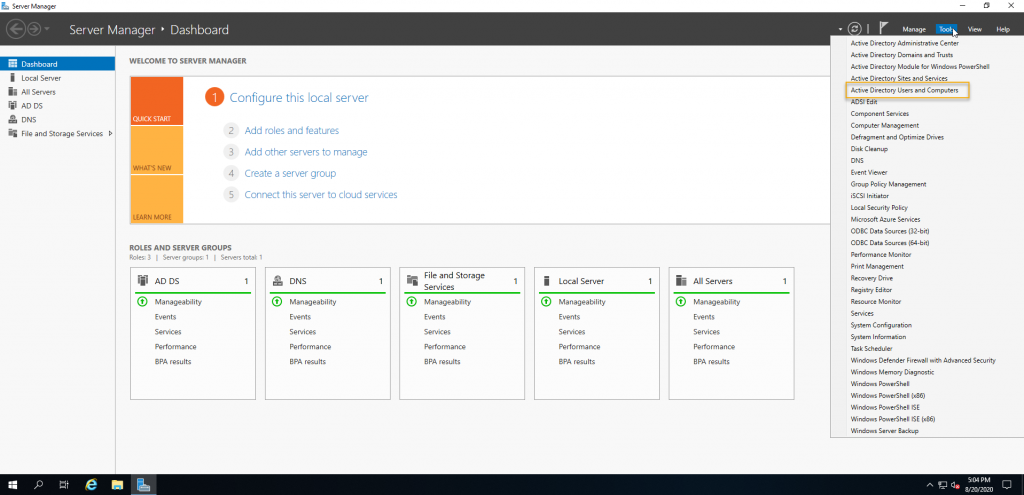
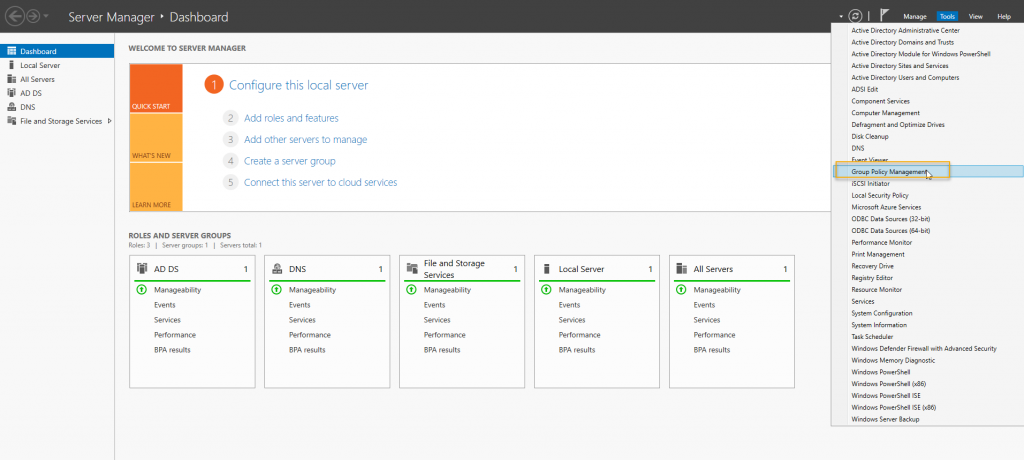
We are going to create a security group in Active Directory and add a test user as a member to it assign permission for redirect folder shared on the server and filter the group to permit group policy settings to apply. To create a security group, we need to launch Active Directory Users and Computers from the tools menu of the Server Manager.
The security group can be created on the OU that is relevant to your environment. In this demonstration, there is an OU called Users under Company OU. Right-click on Users OU and point to New and click group.
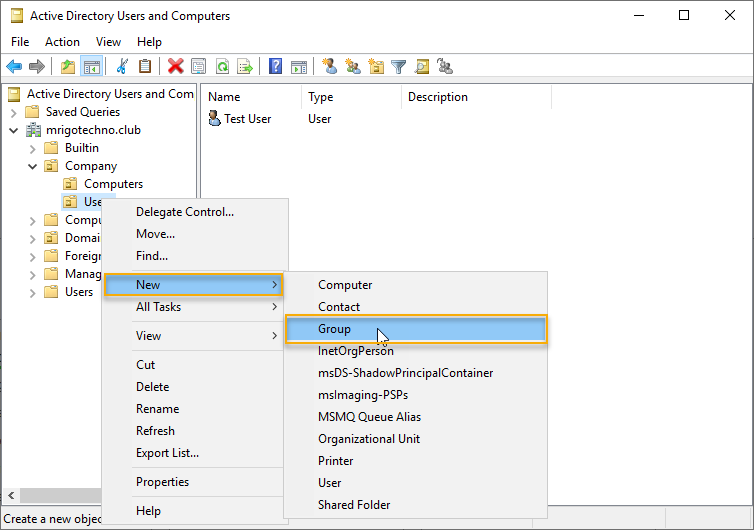
Type a descriptive group name, her I named Folder-redirect-Users, and leave the group scope to Global and group type to security and click OK.

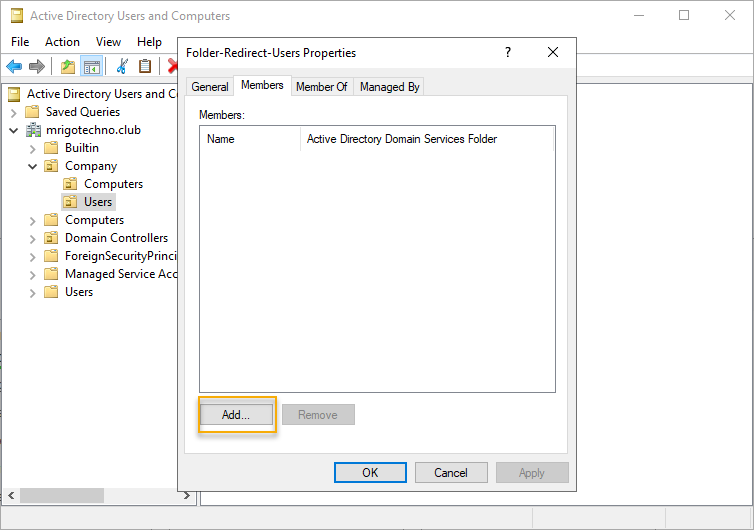
Right-click on the group just created, and go to properties to add members to the security group.

Go to Members tab and click add to add members to the group.
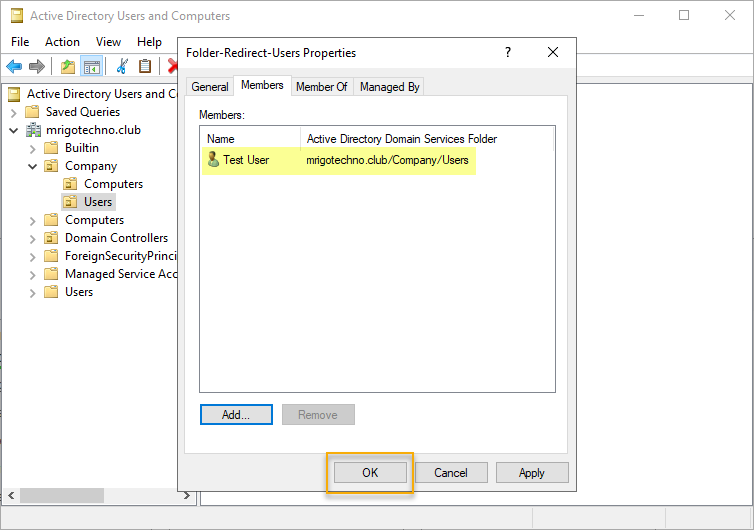
I have added a test user for this demonstration, once users are added click OK and close out the Active Directory Users and Computer management snap-in.
Create a folder to store the redirected file
The folder redirection needs a shared folder on the server. Share it with the security group so that the user’s data will be stored in that folder. On windows explorer, go to the home tab and click New folder to create a folder. You can right-click on the windows explorer pane and create a new folder as well.
A new folder with the name Redirect is created on the data drive, as in the picture below.
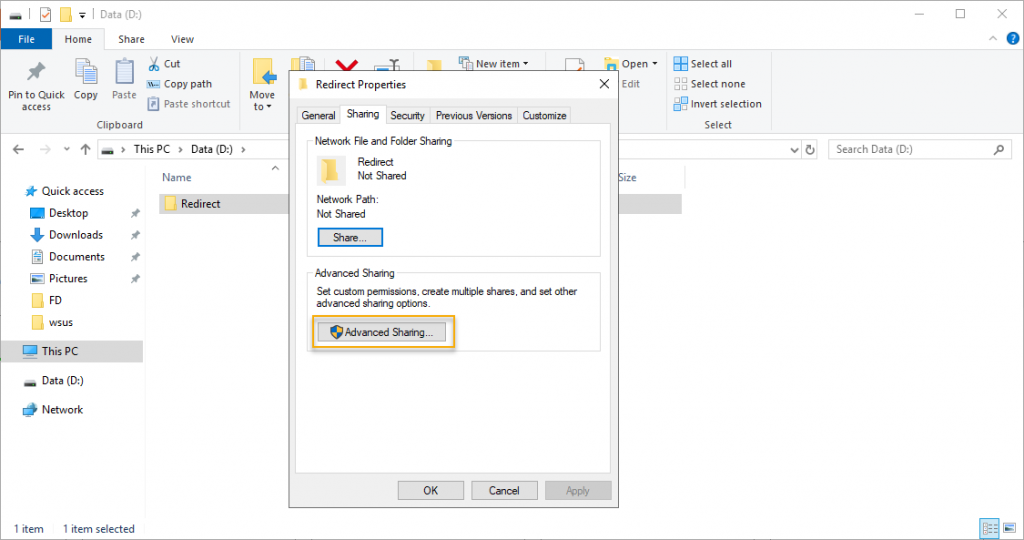
Configure security settings and share the folder
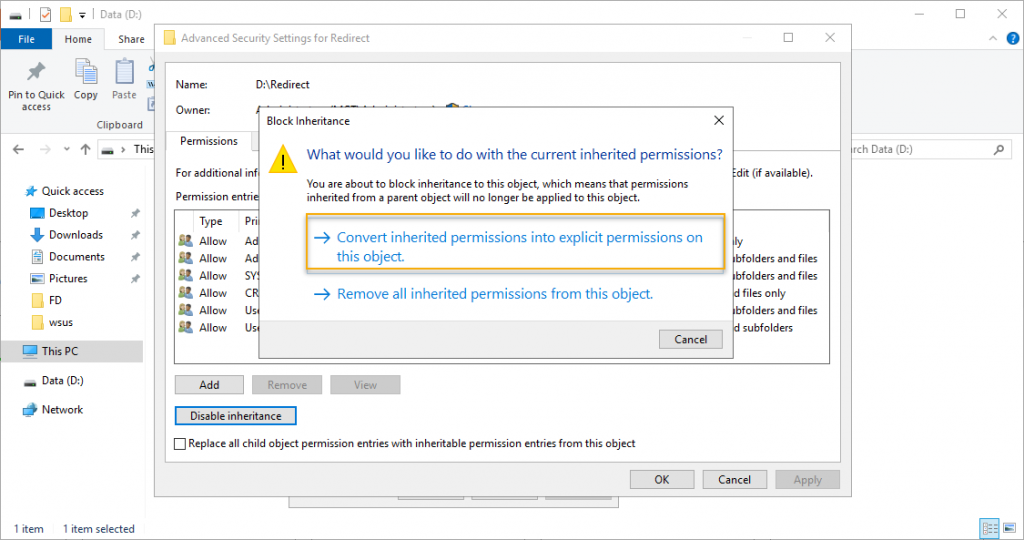
We are going to set permission for the folder to store the user’s data with the highest level of security. Right-click the Redirect folder and click properties and go to the security tab and select advanced.
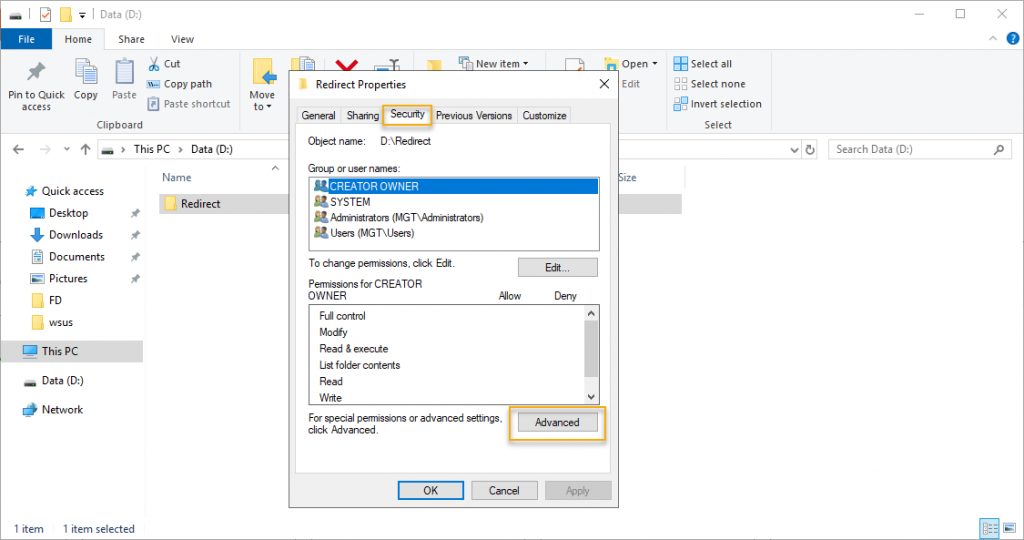
On the advanced properties disable inheritance, you will get a popup window to select a type of permission option you want to have for ease of further permission assignment.
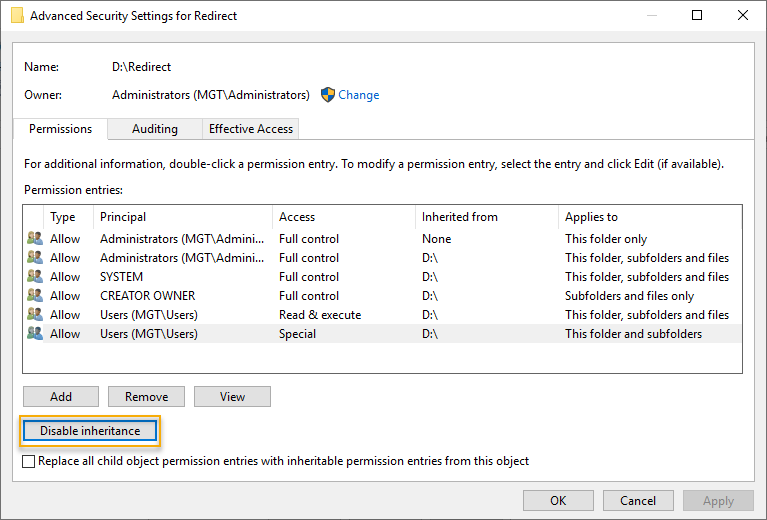
To retain some of the permissions to tweak, select “Convert inherited permissions into explicit permissions on the object.” And click Add to go to permission entry for the redirect folder.
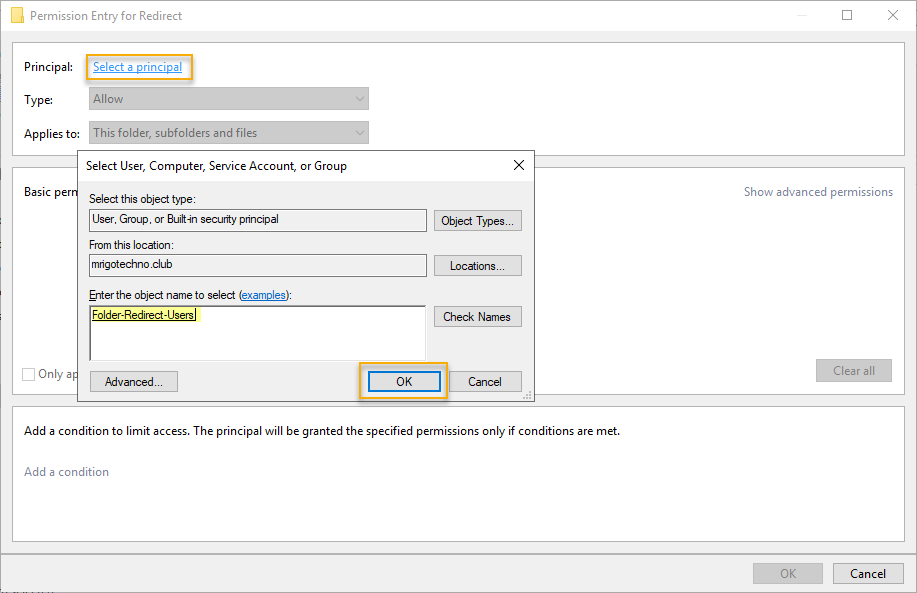
On the Permission entry, select the principal to add the security group that we had created before. In this case, Folder-Redirect-Users is the group name and click OK.
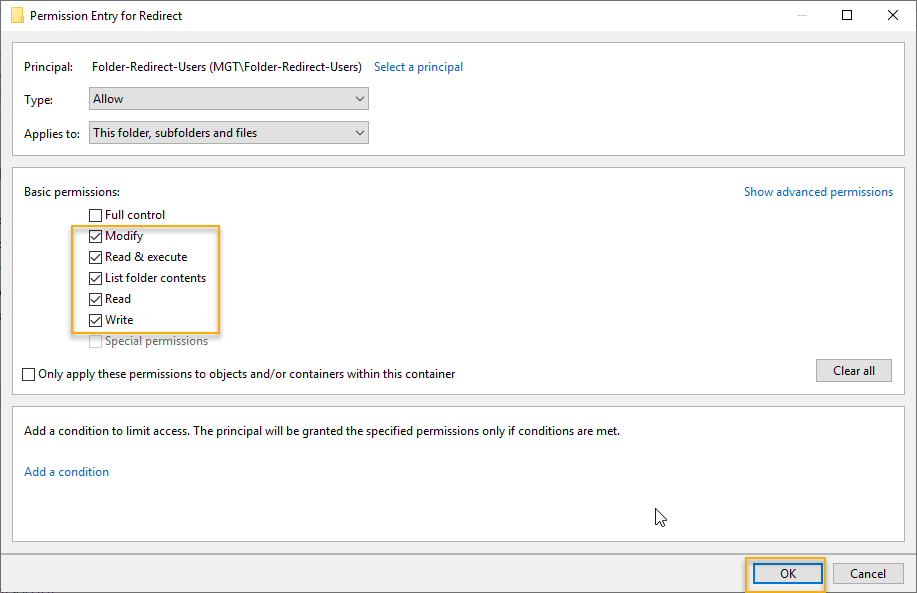
The permission type is Allow and applies to the folder that we are in and its subfolder and files. On the basic permission, leave full control and select all other checkboxes and click OK.
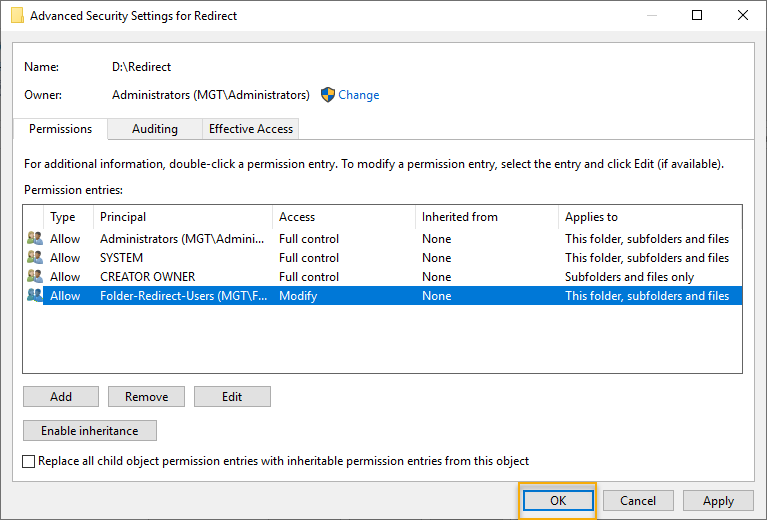
As we have added the security group and disabled inheritance, click OK and go to the Sharing tab on the same property settings.
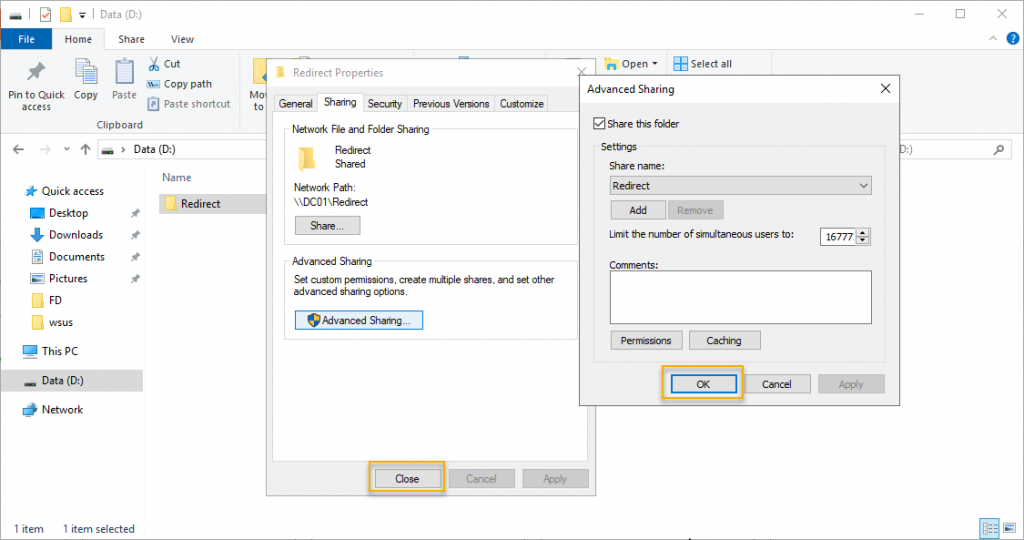
On the Sharing tab of properties, click advanced sharing to share this folder and give share permissions to the security group.
Remove Everyone share permission and add the security group and check Full Control that will add remaining sharing permission.
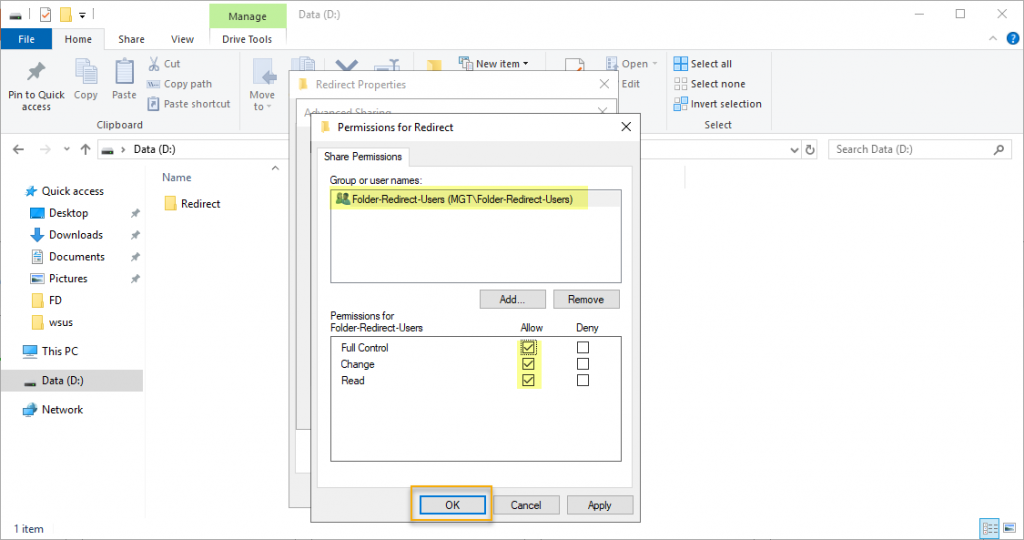
Click on the Advanced sharing tab and closeout folder properties. We have set security permission and share permission.
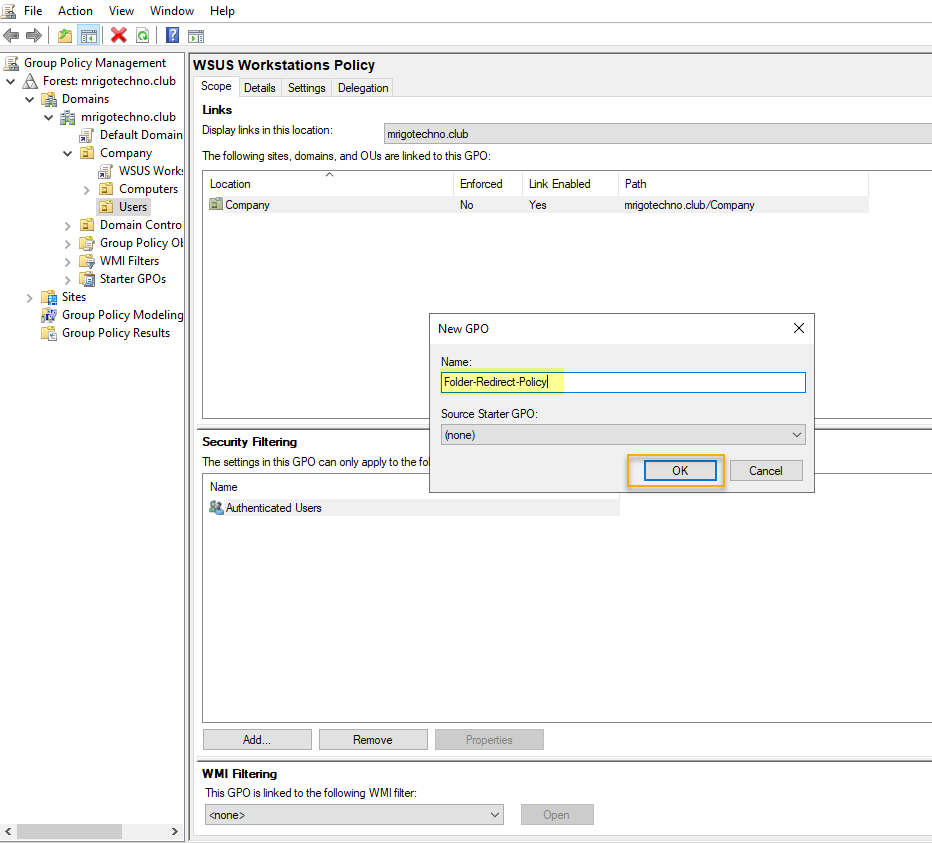
Create group policy and link it to company users OU
The next step in the folder redirection setup is to create a GPO and link it to the OU where the active directory user object resides. To launch the Group policy management console, go to the server manager, click the Tools menu, and select Group Policy management as in the picture below.
Expand the group policy management until the Users OU and click Create a GPO in the domain, and link it here… to create a new Group Policy Object and link it to the Users OU.
Give New GPO a descriptive name and click OK. In this demo, I have given Folder Redirect Policy.
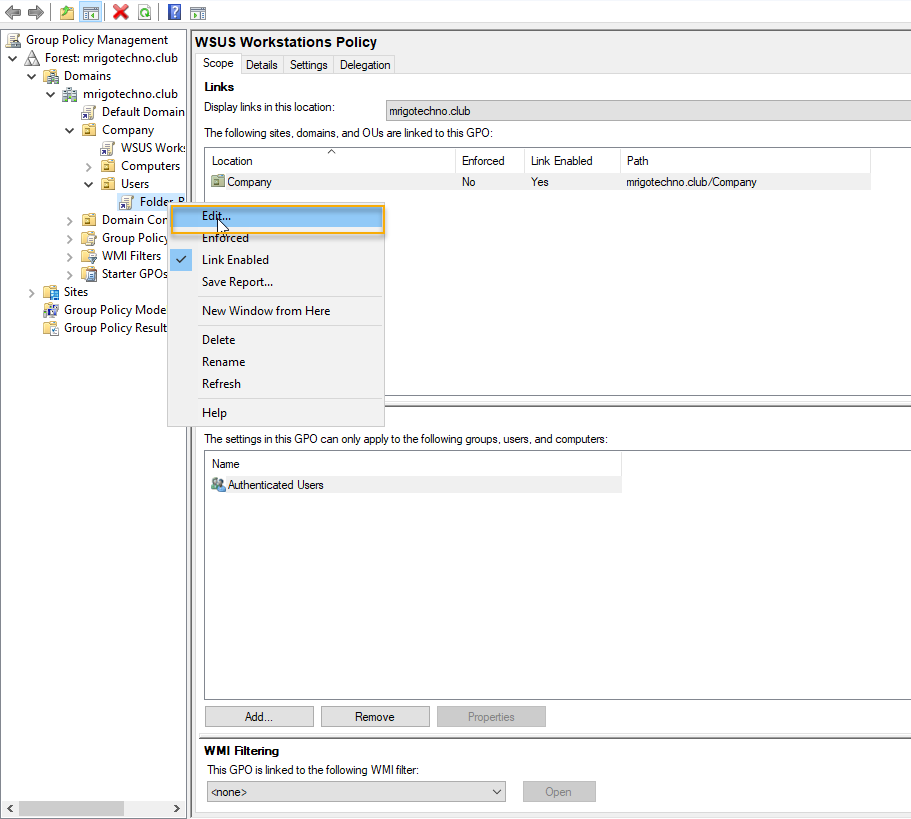
Redirect documents folder with offline access
Once GPO created, right-click and edit the policy to modify the settings of the folder redirection policy settings.
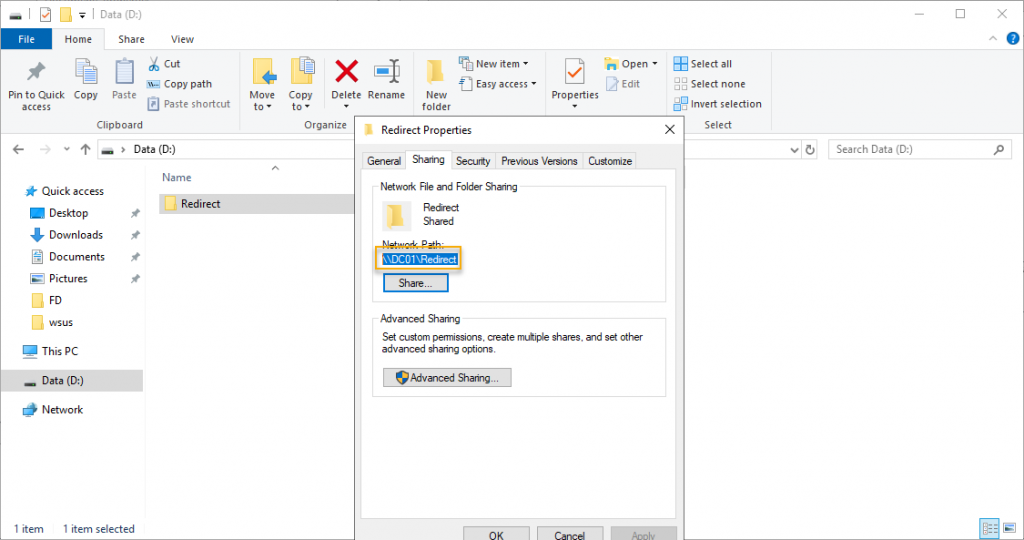
Before going into group policy settings go back to the folder that we had created for folder redirection properties and on the sharing tab take down the Network path to use it on the folder redirection policy settings.
Return to the Folder-redirect-policy GPO and expand the GPO until Folder Redirection policy settings.
The path is User Configuration -> Policies -> Windows Settings -> Folder Redirection
In this demonstration, we are going to see the Folder redirection for the Documents folder. To make it simple and understandable, we are going to set up only one folder here. These settings apply to all other folders and have to go through the same settings to set them up.
Right-click Documents folder and go to properties, and on the target tab, choose a setting basic or advanced, in this demo basic is selected under settings property, that is “Redirect everyone’s folder to the same location.” On the Target folder location, the option “Created a folder for each user under the root path” selected and Root path is the one we have taken down in the previous step, which is the shared folder created earlier. Click Apply and move on to settings.
On the settings tab following option is selected and explained below. The option
Grant the user exclusive rights to Documents – This checkbox is for the user data on the shared folder only exclusively available for the particular user to access, for the administrator to access, the owner’s permission has to be set.
Move the contents of Documents to the new location. This checkbox is for if the folder on the local path has some documents or files in it that will be moved to the respective shared folder.
Redirect the folder back to the local user profile location when the policy is removed. This option is for offline access to the files, and also, when the policy is removed, the user will have the documents on the local profile.
Click OK to accept the settings modified so far.
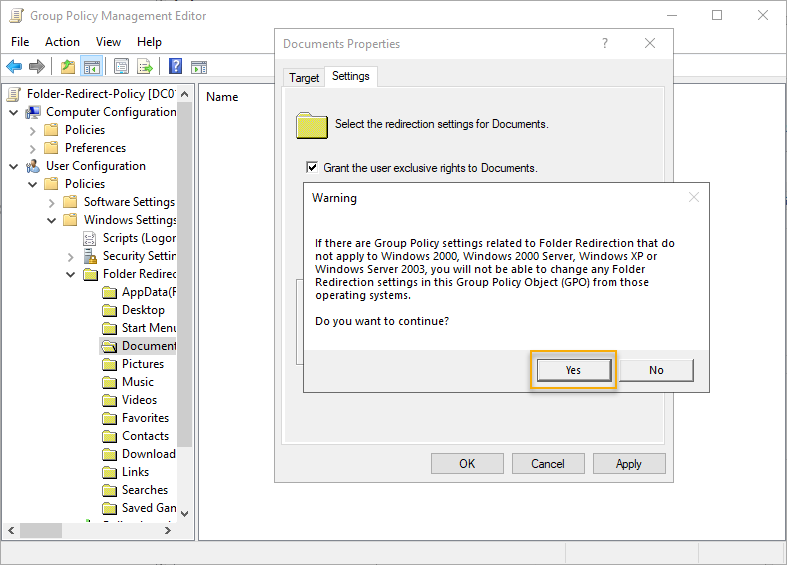
There will be a warning message popped out as we have not selected the support for the older client operating system. Select yes and closeout the group policy management console, go to Windows 10 client computer to test the folder redirection.
We have returned to Group Policy management editor, so we can either set up other folders as we want or if we have completed, we can close the management edit and management console and test the Windows 10 client.
Test Folder Redirection policy
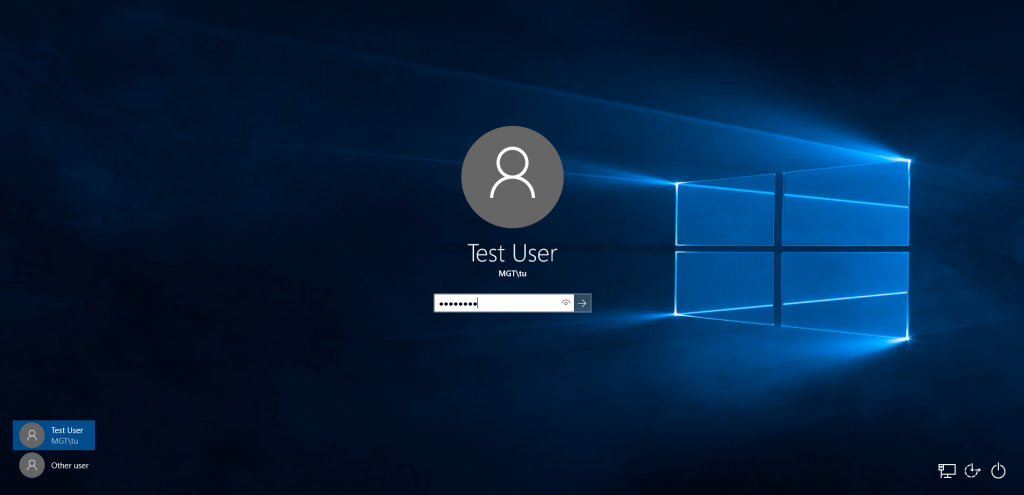
We are on the Windows 10 client computer and try to login as a test user with credentials.
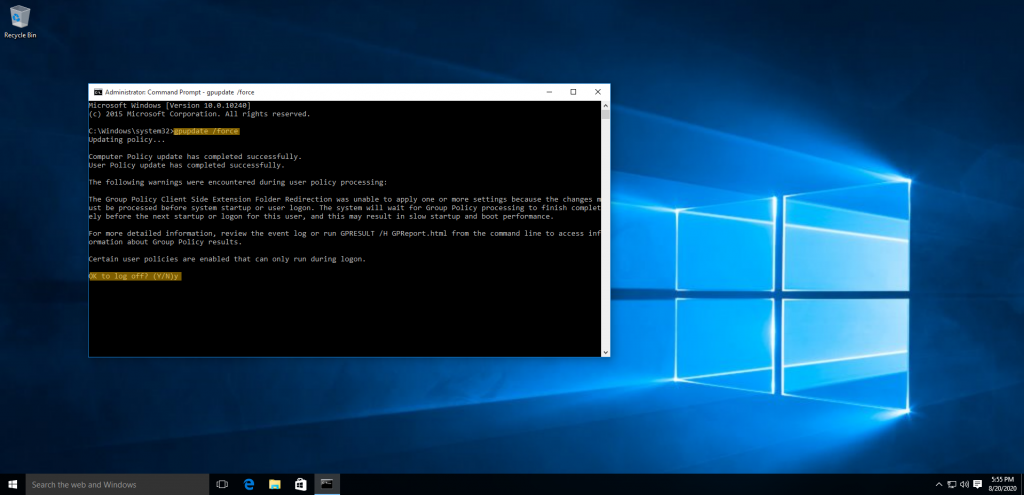
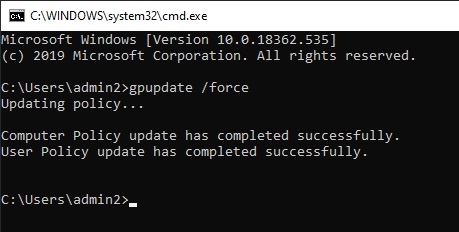
Once logged on to the Windows 10 client computer, open command prompt window, and type below command.
Gpupdate /force
The command will prompt to logoff and login as the user to apply the policy. Click ‘y’ on the prompt and let the client system logoff.
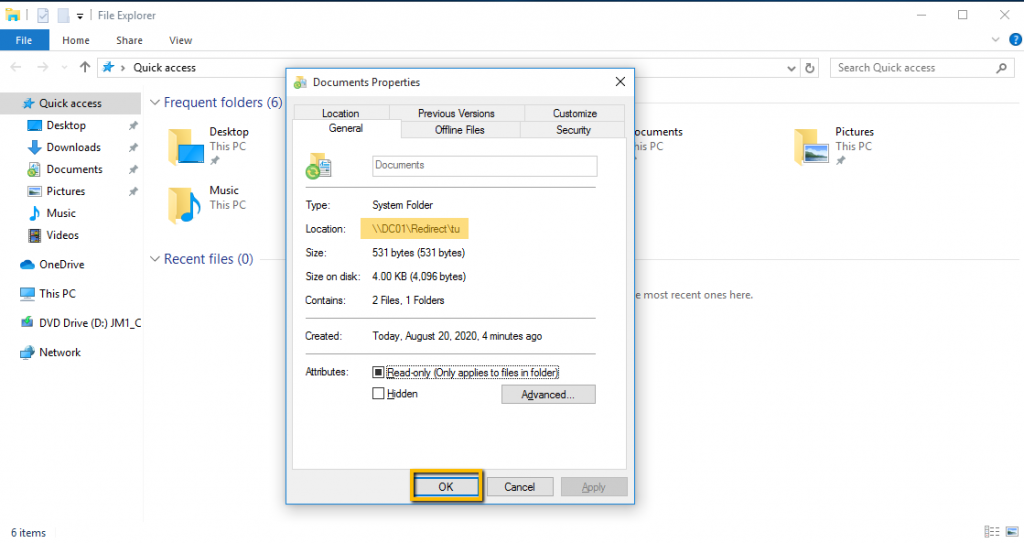
Now, to confirm folder direction work, right-click documents folder, and click properties.
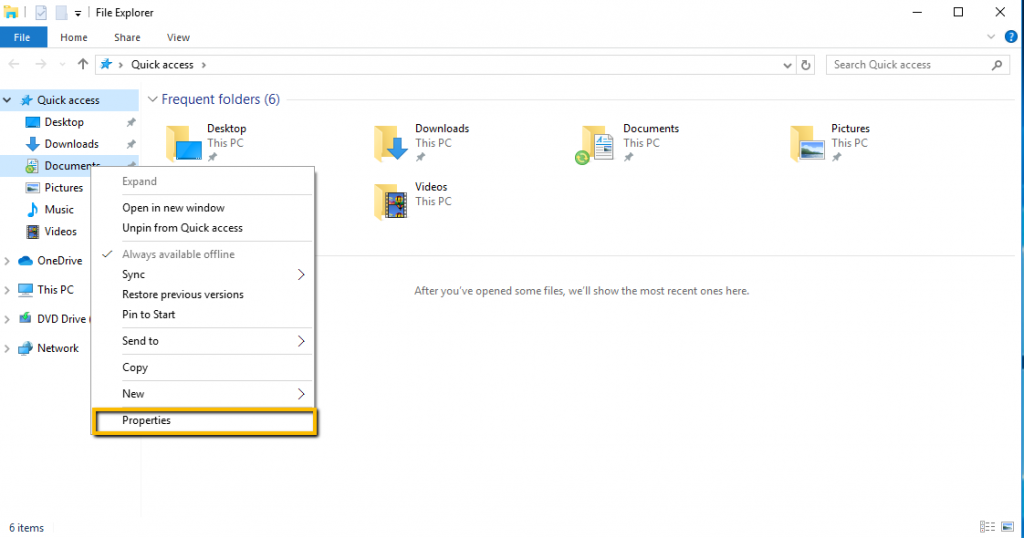
If you look closely, the location of the documents folder is on the shared drive.
We are going to do one more test whether we can create a file and save them, we have created a test file and save it to the documents folder.
If you goto the network share and the user Redirect folder, you can see the file created in the folder under network share.

Conclusion
In this article, we have gone through the settings of redirect folders in Windows Server 2019 using a group policy object. On demonstrating the concept, we created a folder and shared it with a security group. A new GPO has been created and set up the folder redirection for the documents for the user’s profile data. We also have demonstrated the folder redirection test with Windows 10 client.
If you want to go through my other articles about Windows Server 2019, you can visit the link Get an Admin
You can use this article to setup folder redirection in your environment. You may have some questions or feedback to share with me, please click the comments below and share your thoughts. I am so happy to answer your questions.
User’s personal folders, including My Documents, Desktop, Favorites and Start Menu, can be redirected using Group Policy in a domain environment. Folders that have been redirected will be available to users on any system they log onto. Since these folders reside on the Server, it is easier for administrators to manage and back them up.
To the user, a redirected folder looks and acts like a locally stored personal folder. Redirecting folders, unlike the folders that make up a roaming user profile, are not copied across the network when a user logs on or off the network. Redirected folders can provide users with easy access to their documents without placing a strain on the network.
1. We need to first setup our shared folder where the user’s redirect folders will reside. On our server, we added a folder called folderredirect on our E: Drive (DATA) and then shared the folder as folderredirect$ to make it hidden. Add your permissions as needed. We set the Share Permissions to Full for Everyone. You can then use the Security tab to tune the permissions.
2. Next, we setup an Active Directory Organizational Unit called Folder Redirect to allow us to determine which users should be affected by this.

3. Now we can setup our Group Policy to set which folders should be redirected from the client system to the server’s redirect folder. Open Group Policy and navigate to the Folder Redirect OU. Right-click on it and select “Create a GPO in this domain, and Link it here…:”. We named it Folder Redirect.

4. Now right-click on your new Folder Redirect Group Policy and select Edit. Navigate to User Configuration > Policies > Windows Settings > Folder Redirect. Right-click the folder(s) you would like to redirect and select Properties. In our example, we selected Basic and then created the target folder under the root path. See NOTE below before clicking OK.

NOTE: When setting up folder redirection, one of the default properties on the SETTINGS tab is “Grant the user exclusive rights to…”. If this is enabled, the administrator will not be able to access the newly created shares without having to run a script or take ownership. We recommended for administrative and backup purposes to uncheck this box. The redirected folders will still have the appropriate security and permissions applied to them.

Repeat this for other folders you would like to redirect. My typically choose Desktop, Downloads, Documents and Favorites. You can include Pictures if your customer stores those for business needs.
5. Now go to one of the client workstations, open a command prompt and run gpupdate /force and then log off afterwards and sign back on. Depending on how many folders you configured for the Folder Redirect and the size of those user folders, the next Sign On process may take several minutes while those folders are moved to the Server. Once logged back in, you’ll see those folders redirected to the server now (ie. RIght-click the Documents folder and verify the new path to the Server).
NOTE: Now you can include those user folders in the Windows Server Backup or other Server Backup software. Also, if some reason you need to access the redirect folders on the local client workstation, they are located under C:\Windows\CSC. You’ll likely need to take permission/ownership of that folder.
What is Folder Redirection?
This article shows you how simply you can redirect folder in Windows Server with group policy. The folder redirection is the way to keep a profile folders to a network location or other location in the local computer. Typically user profiles and settings are stored in local profile. By redirecting folders, you can access to data regardless of which computers you are logs in.
In addition to the immediate benefit of having that data on a file server that is much easier to keep backed up, the user also gets the benefit of being able to go to multiple computers in your organization and still have access to their data. Using the default Windows settings and the default share settings on your file server, these redirection will be even made available offline automatically for your users.
The Policy-Based QoS node
This quality of service (QoS) node, known as the Policy-Based QoS node, defines policies that manage network traffic. For example, you might want to ensure that users in the Finance department have priority to run a critical network application during the end-of-year financial reporting period. You can do that by using the Policy-Based QoS node.
In the User Configuration node only, the Windows Settings folder contains the additional Folder Redirection node. With folder redirection, you can redirect user data and settings folders such as AppData, Desktop, Documents, Pictures, Music, and Favorites from their default user profile location to an alternate location on the network, where you can manage them centrally.
Infrastructure Requirement :
- 1 DC SERVER (DC-CLOUD)
- Client PC running Windows 10 (CLIENT-10)
Lets get started.
01 – Create a Shared Folder
1 – On DC-CLOUD, on the taskbar, click the File Explorer icon, In the navigation pane, click This PC.

2 – In the details pane, double-click Local Disk (C:), and then on the Home tab, click New folder.

3 – In the Name text box, type Redir, and then press Enter.

4 – Right-click the Redir folder, click Share with, and then click Specific people.

5 – In the File Sharing dialog box, click the drop-down arrow, select Everyone, and then click Add.

6 – For the Everyone group, click the Permission Level drop-down arrow, and then click Read/Write.

7 – Click Share, and then click Done.

Close the Local Disk (C:) window
02 – Create a GPO to redirect the Documents folder
1 – In Server Manager, click Tools and then click Group Policy Management.

2 – In the navigation pane, right-click the Windows.ae domain, and then click Create a GPO in this domain and Link it here.

3 – In the New GPO dialog box, in the Name text box, type Folder Redirection, and then click OK.

4 – In the navigation pane, right-click Folder Redirection, and then click Edit.

5 – In the Group Policy Management Editor window, under User Configuration, expand Policies,expand Windows Settings, and then expand Folder Redirection.

6 – Right-click Documents, and then click Properties.

7 – In the Document Properties dialog box, on the Target tab, click the Setting drop-down arrow, and then select Basic-Redirect everyone’s folder to the same location.

8 – Ensure that the Target folder location box is set to Create a folder for each user under the root path.

9 – In the Root Path text box, type \\DC-CLOUD\Redir, and then click OK.

10 – In the Warning dialog box, click Yes.

Close the Group Policy Management Editor
03 – Test Folder Redirection
1 – Sign in to CLIENT-10 as Windows\Administrator with the password asd@123.

2 – Right-click Start, and then click Command Prompt.

3 – In the Command Prompt window, type the following command, and then press Enter:
Gpupdate /force

4 – In the command prompt window, when prompted, type the following, and then press Enter:
Y

5 – Sign in to CLIENT-10 as Windows\Administrator with the password asd@123.
6 – On the taskbar, click the File Explorer icon.

7 – In the navigation pane, in the Quick Access section, right-click Documents, and then click Properties.

8 – Verify that on the General tab, the Location field has a value of \\DC-CLOUD\redir\Administrator.

If this is not successful, repeat steps 2 through 7, and then check the redirection once again.
9 – Sign out of CLIENT-10.
that’s all for now.., any Doubts type a commend.. 🙂