
С помощью PowerShell вы можете получать, добавлять, удалять, или изменять значения переменных окружения (среды). В переменных окружения Windows хранит различную пользовательскую и системную информацию (чаще всего это пути к системным и временным папкам), которая используется операционной системой и приложениями, установленными на компьютере.
В Windows доступны несколько типов переменных окружения:
- Переменные окружения процесса – создаются динамически и доступны только в текущем запущенном процесс
- Пользовательские переменные окружения – содержат настройки конкретного пользователя и хранятся в его профиле (хранятся в ветке реестре
HKEY_CURRENT_USER\Environment
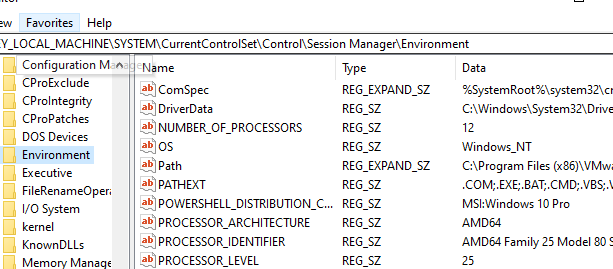
) - Системные переменные окружения – глобальные переменные окружения, которые применяются для все пользователей (хранятся в ветке
HKLM\SYSTEM\CurrentControlSet\Control\Session Manager\Environment
)
Типы переменных окружения Windows указаны в порядке уменьшения приоритета. Т.е. значение переменной окружения %TEMP% в пользовательском профиле будет иметь больший приоритет, чем значение системной переменной окружения %TEMP%.
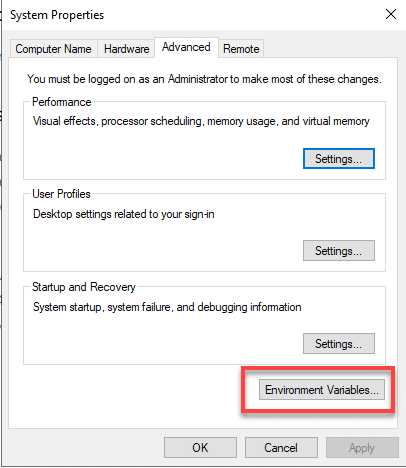
Для управления переменными окружениями обычно используется вкладка Advanced в свойствах системы. Чтобы открыть System Properties, выполните команду
SystemPropertiesAdvanced
и нажмите на кнопку Environment Variable.
В этом окне можно создать и отредактировать переменные среды для текущего пользователя или системные переменные окружения.
Чтобы вывести полный список переменных окружения и их значения в PowerShell, выполните команду:
Get-ChildItem Env:
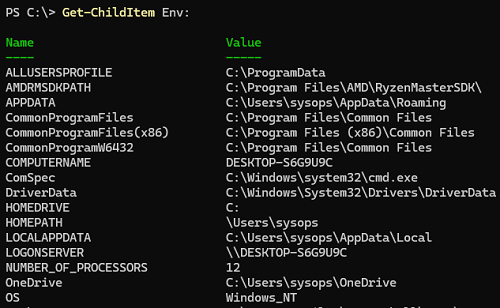
Как вы видите, для доступа к переменным окружения в PowerShell используется отдельный виртуальный диск Env:, доступный через провайдер Environment.
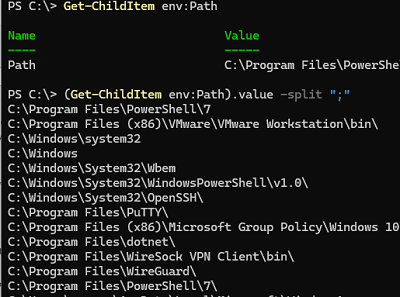
Получить значение определенной переменной окружения Path:
Get-ChildItem env:Path

Т.к. переменные окружения, по сути, это файлы на виртуальном диске, нажатием кнопки TAB вы можете использовать автозавершение для набора имени переменной окружения.
Чтобы разбить значение переменной окружения на строки, выполните:
(Get-ChildItem env:Path).value -split ";"
Добавить значение в переменную окружения Path:
$Env:Path += ";c:\tools"
Однако это добавляет временное значение в переменную окружения
Path
. При следующей перезагрузке новое значение в переменной будет сброшено. Чтобы добавить постоянное значение в системную переменную окружения, используется такая конструкция:
$path = [System.Environment]::GetEnvironmentVariable("Path","Machine")
[System.Environment]::SetEnvironmentVariable("Path", $path + ";C:\tools", "Machine")
[System.Environment]::GetEnvironmentVariable("Path","Machine") -Split ";"
Чтобы изменить пользовательскую переменную окружения, замените в предыдущих командах область Machine на User.
Несмотря на то, что фактически переменные окружения и их значения хранятся в реестре, прямое изменение их значений в реестре используется редко. Причина в том, что текущий процесс при запуске считывает значение переменных окружения из реестра. Если вы измените их, процесс не будет уведомлён об этом.
Если вам нужно из PowerShell изменить в реестре значение переменной окружения, используются команды:
$variable = Get-ItemPropertyValue -Path 'HKCU:\Environment\' -Name 'Path'
$add_path = $variable + ';C:\Git\'
Set-ItemProperty -Path 'HKCU:\Environment\' -Name 'Path' -Value $add_path
Вы можете создать локальную переменную окружения. По умолчанию такая переменная окружения будет доступна только в текущем процессе (PowerShell), из которого она создана. После того, как процесс будет закрыт – переменная окружения будет удалена.
$env:SiteName = 'winitpro.ru'
Get-ChildItem Env:SiteName
Если нужно создать глобальную системную переменную (нужны права администратора), используйте команду:
[System.Environment]::SetEnvironmentVariable('siteName','winitpro.ru',"Machine")
Очистить и удалить глобальную переменную окружения:
[Environment]::SetEnvironmentVariable('siteName', $null, "Machine")
Introduction to PowerShell Environment Variables
Environment variables are predefined variables in an operating system, they are available in the form of key-value pairs which store important system-level or user-specific information, such as paths, user configurations, and system settings. These variables are accessible in PowerShell scripts and sessions, playing a significant role in tasks like configuring software, adjusting system paths, and managing user-specific settings. They function as global variables, accessible across the operating system and scripting environment. While PowerShell allows easy manipulation of these variables, it is important to be cautious when modifying or deleting them, as incorrect changes can lead to system instability or application failures. For instance, the PATH variable, which stores directories containing executable files, is critical for the system to locate and execute commands.
Listing PowerShell Environment Variables
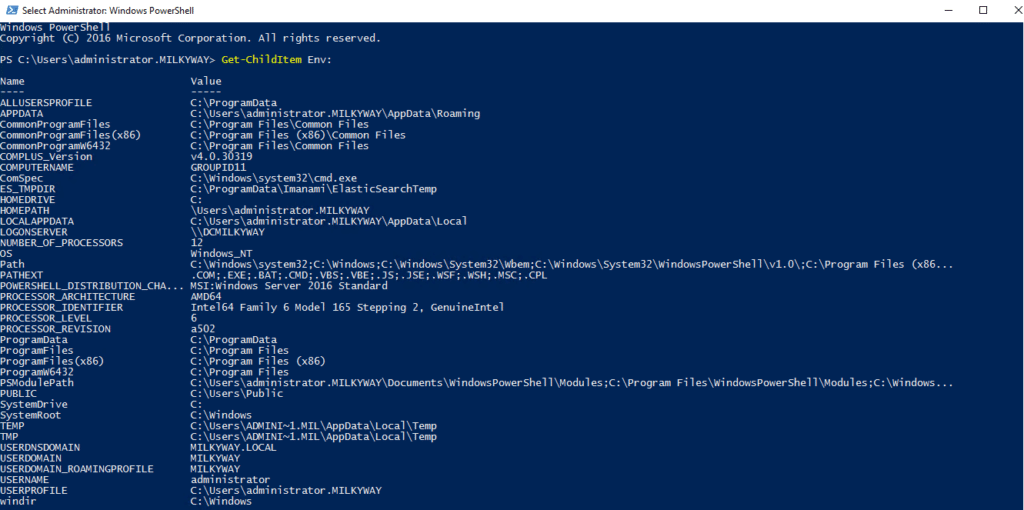
In PowerShell, one of the most straightforward methods to list all environment variables is by using the Get-ChildItem cmdlet with the “Env:” drive. This command allows users to access and display the contents of the environment variable repository in a clean and organized format.
To list all the environment variables available in your PowerShell session, simply execute the following command.
Get-ChildItem Env:
The output will typically include a wide array of environment variables, some of which you may recognize.
- PATH: A list of directories where executable files are stored.
- TEMP: The path to the temporary file storage directory.
- USERPROFILE: The path to the current user’s profile directory e.g., C:\Users\Administrator.Milkyway.
- COMPUTERNAME: The name of the computer.
- OS: The operating system name e.g., Windows_NT.
- HOMEPATH: The home directory of the user.
Accessing and Printing Environment Variables
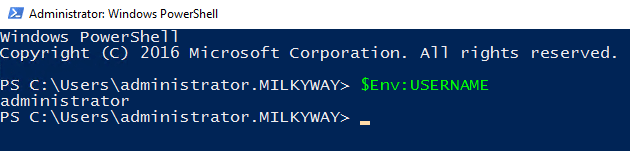
There are two primary methods to accomplish this: using the “$Env:<variable-name>” syntax or employing the “Get-ChildItem” cmdlet along with the variable name. For example, if you want to access the USERNAME variable, you will use the following command in PowerShell to get environment variable.
$Env:USERNAME
Simply executing this command will print the logged in user’s name to the console.
Second method is by using the Get-ChildItem cmdlet. You can specify the environment variable you want to check, as below.
(Get-ChildItem Env:USERNAME).Value

You can follow the same pattern to print other environment variables, such as PATH, COMPUTERNAME, USERPROFILE or TEMP.
$Env:Path

(Get-ChildItem Env:Path).Value

Setting PowerShell Environment Variables
The process of creating or updating environment variables is straightforward and can be accomplished using the below syntax.
$Env:<variable-name> = “<value>”
Creating Environment Variables
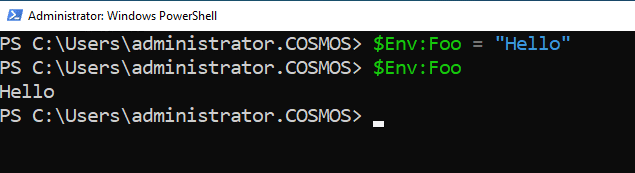
Creating a new environment variable is as simple as assigning a value to a variable name. For example, if you want to create an environment variable named “Foo” and set it to a specific value, you can use the following command.
$Env:Foo = “Hello”
You can confirm that the variable has been set correctly by accessing it using below cmdlet.
$Env:Foo
Updating Environment Variables
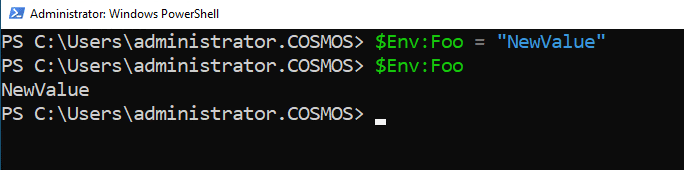
If the variable “Foo” already exists and you wish to update its value, you can use the same syntax.
$Env:Foo = “NewValue”
You can check the value of variable as below.
$Env:Foo
One important thing to note is that changes made to environment variables using the $Env: prefix only persist for the duration of the current PowerShell session. Once you close the session, any custom environment variables created or modified in that session will be lost. If you need to create or update environment variables that persist beyond the session, you will need to use the “SetX” command, which allows you to define environment variables at the user or system level. For example, to create a permanent environment variable named “Foo” with the same value, you can use the below cmdlet.
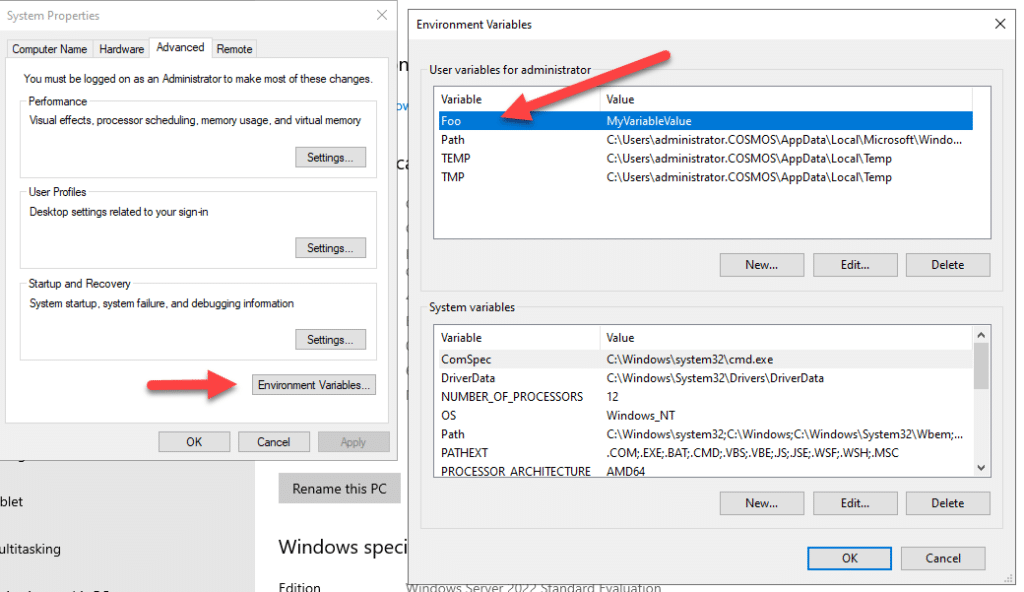
SetX Foo “MyVariableValue”
You can check the permanent variable by going into System PropertiesèAdvanced TabèEnvironment VariablesèUser Variables for current user.
Appending Values to Existing Environment Variables
Appending values to existing environment variables in PowerShell can be useful when you want to expand the current configurations without overwriting their existing values. One common scenario for this is with the PATH environment variable, where you may want to add additional directories for executable files. In PowerShell, the “+=” operator allows you to accomplish this seamlessly, this operator is specifically designed to append values to variables.
For example, if you want to append a new directory to the `Path` environment variable, you can use the following command.
$Env:Path += “;C:\Test\SecurityService”
The semicolon ( ; ) is important because it acts as a separator between individual paths in the PATH variable. Without it, the new path would be concatenated directly to the existing paths, which could lead to unintended results. To verify that the value has been successfully appended, you can print the updated variable using the below cmdlet.
$Env:Path

Scopes of PowerShell Environment Variables
Understanding the scopes of PowerShell environment variables is important for effective scripting and system configuration. Environment variables can exist in different scopes, which determine their availability and lifespan in different contexts.
Explanation of machine, user, and process scopes for environment variables.
The three primary scopes for environment variables are machine, user, and process. Each scope has its own rules regarding accessibility and inheritance, which can significantly influence how scripts and applications behave.
Machine Scope
Machine-scoped environment variables are system-wide variables that apply to all users and processes running on the computer. These variables are typically set by the operating system or an administrator and are persistent across sessions and reboots. To access or modify machine-scoped environment variables, you need administrative privileges.
User Scope
User-scoped environment variables, on the other hand, are specific to the individual user profile, and are visible to all processes running under that user’s profile. These variables are persistent but only available to the user who created them and can be modified without requiring administrator privileges. If one user sets a user-scoped variable, other users on the same machine do not have access to it.
Process Scope
Process-scoped environment variables exist only in the instance of the process or session, in which they were created. They are temporary and will disappear once the process ends. This scope is commonly used in scripts and applications where you want to define settings that are relevant only for the duration of execution.
How environment variables are inherited by child processes
Environment variables are inherited by child processes from their parent process. This means that if you create an environment variable in a PowerShell session (process scope), any external application or script launched from that session will inherit the variable. If you set a user-level environment variable, such as MY_USER_VAR, it will persist across PowerShell sessions, and any process launched under that user will inherit its value. If you set a machine-wide variable, such as MY_MACHINE_VAR, it will be inherited by every user on the system, and all processes will have access to that variable.
Modifying Environment Variables Across Platforms
When it comes to modifying environment variables, the approach can vary significantly between operating systems, particularly between Windows and Unix-like systems such as macOS and Linux. This variability includes syntax, case sensitivity, and available commands for modification.
Case sensitivity on macOS/Linux versus Windows.
One of the key differences between operating systems is how they handle the case sensitivity of environment variable names.
Windows
Environment variable names in Windows are not case-sensitive. For instance, PATH, Path, and path, all refer to the same environment variable. This means that you can reference or modify these variables without worrying about the case used in the commands.
macOS/Linux
Unix-like systems are case-sensitive when it comes to environment variable names. Thus, PATH and path would be recognized as two different variables. This means that scripts or commands must use the exact casing when dealing with environment variables to avoid confusion or errors.
Temporary vs Persistent Environment Variables
Environment variables in PowerShell can be categorized as either temporary or persistent depending on how they are set and the scope of the changes. Understanding the difference between these two types of environment variables is important for managing configurations and ensuring that variables last across sessions or system restarts.
How temporary variables work within a PowerShell session
Temporary environment variables are defined and used solely within the context of the current PowerShell session. These variables can be created and modified using the $Env: prefix. Once the PowerShell session is closed, any temporary variables will be lost, and their values will not be retained in subsequent sessions. Temporary variables are particularly useful when you need a quick configuration for the current session without affecting the global or user-specific settings.
Persistent Environment Variables
Persistent environment variables are stored within the system configuration and will remain available even after you close and reopen PowerShell or restart your computer. To create or modify persistent environment variables in PowerShell, you can use the .NET “System.Environment” class.
The syntax for adding or modifying a persistent environment variable are as follows.
[Environment]::SetEnvironmentVariable(‘VariableName’, ‘Value’, ‘Scope’)
The Scope parameter can be one of three values, Machine, User or Process.
For example, to create a persistent user-scoped environment variable named “Foo” with the value “Bar”, you can run the following command.
[Environment]::SetEnvironmentVariable(‘Foo’, ‘Bar’, ‘User’)
If you wanted to set a machine-scoped variable, you would run below command.
[Environment]::SetEnvironmentVariable(‘Foo’, ‘Bar’, ‘Machine’)
Above command will require administrative privileges, as machine-scoped changes affect all users on the system.
GetEnvironmentVariable()method shows the value of an environment variable. You can specify the name of the environment variable. Below is an example cmdlet.
[System.Environment]::GetEnvironmentVariable(‘Foo’)

May need to verify the above command for scope
Working with Environment Provider and Item Cmdlets
Using the environment provider to manage environment variables as a file system drive
PowerShell provides an environment provider that treats environment variables as a file system drive, allowing users to manage them much like files and directories. The Env: drive in PowerShell provides access to environment variables. Each environment variable is treated as an item in the Env: drive, and you can use standard cmdlets to interact with these variables. Below is an overview of the key cmdlets for working with the environment provider, such as New-Item, Set-Item, Get-Item, and Remove-Item.
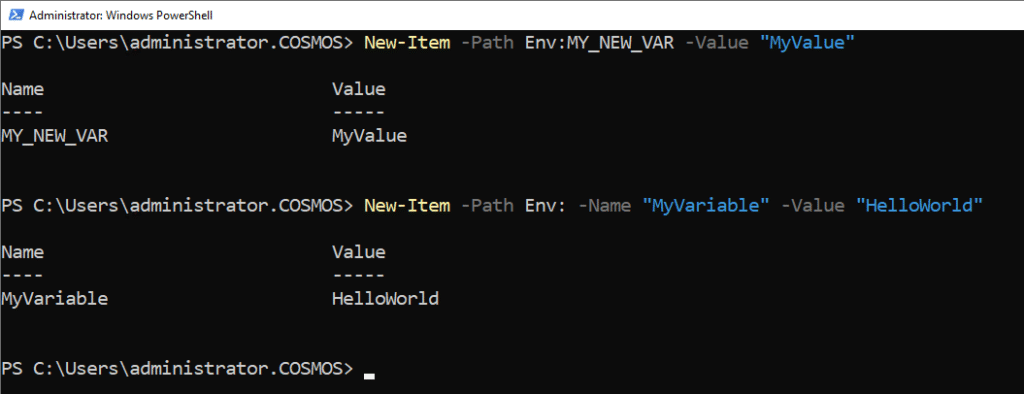
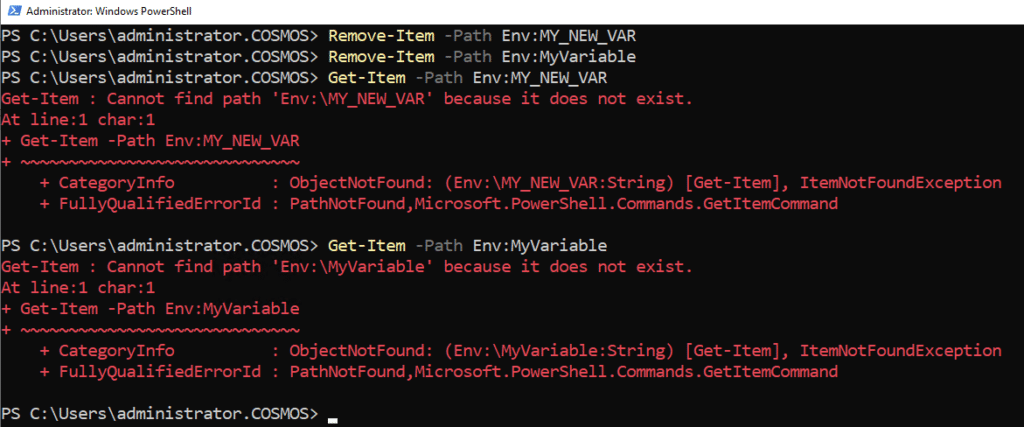
New-Item
The New-Item cmdlet can be used to create a new environment variable, by following the below example syntax and cmdlet.
New-Item -Path Env:MY_NEW_VAR -Value “MyValue”
New-Item -Path Env: -Name “MyVariable” -Value “HelloWorld”
This command creates a new environment variable that will be available for the duration of the current session.
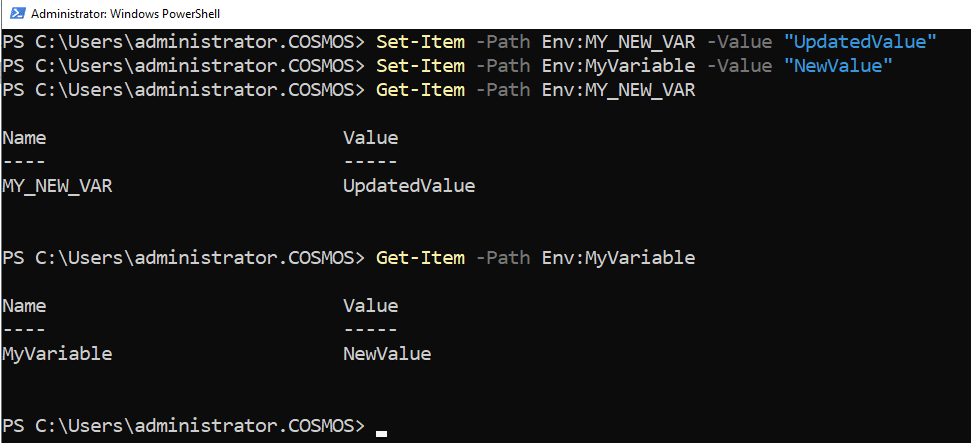
Set-Item
If you want to update the value of an existing environment variable or create it if it does not already exist, you can use the Set-Item cmdlet, using the below example cmdlet.
Set-Item -Path Env:MY_NEW_VAR -Value “UpdatedValue”
Set-Item -Path Env:MyVariable -Value “NewValue”
This command will set environment variable value to new. If variable does not exist, this command will create it with the specified value.
Get-Item
To retrieve the value of an existing environment variable, the Get-Item cmdlet can be used by following the below example cmdlet.
Get-Item -Path Env:MY_NEW_VAR
Get-Item -Path Env:MyVariable
This will return an object representing the environment variable, including its name and the value assigned to it.
Remove-Item
To delete an existing environment variable, you can use the Remove-Item cmdlet.
Remove-Item -Path Env:MY_NEW_VAR
Remove-Item -Path Env:MyVariable
This command will remove variable from the environment variables, you can use Get-Item cmdlet to verify. It is important to note that once this variable is removed, it cannot be recovered unless it is recreated.
Common PowerShell Environment Variables
PowerShell has several key environment variables that can affect its behavior and configuration. These variables are created and used to configure how PowerShell behaves, where it looks for modules, scripts, and several user preferences. Below are some of the key environment variables commonly used in PowerShell.
POWERSHELL_TELEMETRY_OPTOUT
This environment variable controls whether PowerShell sends telemetry data to Microsoft. If you set this variable to 1, it opts out of sending usage data and crash reports to Microsoft. By default, PowerShell sends anonymous usage data for improvement purposes, but you can opt out.
POWERSHELL_DISTRIBUTION_CHANNEL
Specifies the distribution channel through which PowerShell was installed. This can be useful for identifying whether PowerShell was installed via Windows Package Manager (winget), MSI, or other package managers. This helps Microsoft track which channels are most used.
POWERSHELL_UPDATECHECK
This environment variable controls whether PowerShell automatically checks for updates. If set to 1, PowerShell will check for updates to the shell. If set to 0, it disables automatic update checking. This is useful to manage how PowerShell handles updates.
PSExecutionPolicyPreference
This environment variable specifies the default PowerShell execution policy to use when running scripts. If it is set, it overrides the execution policy configured through Set-ExecutionPolicy. For example, setting this to RemoteSigned means only locally created scripts can run without signing.
PSModulePath
This variable contains the paths where PowerShell modules are stored and loaded from. It is a colon-separated list of directories that PowerShell searches to find modules. You can modify this variable to include additional directories for custom modules.
PSModuleAnalysisCachePath
This variable specifies the path where PowerShell stores module analysis cache. PowerShell uses module analysis to optimize performance when loading modules, and the cache stores parsed metadata about the modules. Setting a custom path allows for redirecting this cache location.
PSDisableModuleAnalysisCacheCleanup
If this variable is set to 1, PowerShell will disable the automatic cleanup of the module analysis cache. By default, PowerShell automatically clears unused analysis cache to save disk space, but this variable can be set to prevent that action.
There are several other environment variables that you can use to configure your environment or retrieve system-related information using PowerShell. Some of them are already mentioned already in this blog above, below are some more common environment variables.
- USERNAME: Returns the current user’s username.
- ProgramFiles: Points to the “Program Files” directory, usually C:\Program Files.
- ProgramFiles(x86): Points to the “Program Files (x86)” directory, typically used for 32-bit applications on a 64-bit system.
- ALLUSERSPROFILE: Points to the all-users profile directory (usually C:\ProgramData).
- WINDIR: Points to the Windows directory (usually C:\Windows).
Managing Environment Variables via the Control Panel
You can set or modify environment variables directly through the Windows Control Panel. By following the steps below, you can easily manage environment variables through the Windows Control Panel, customizing your system’s settings as needed.
- Open the Control Panel, by pressing “Windows + R” to open the Run dialog. Type “control” and hit Enter to open the Control Panel, or search for control panel in search bar beside Start button and select it.
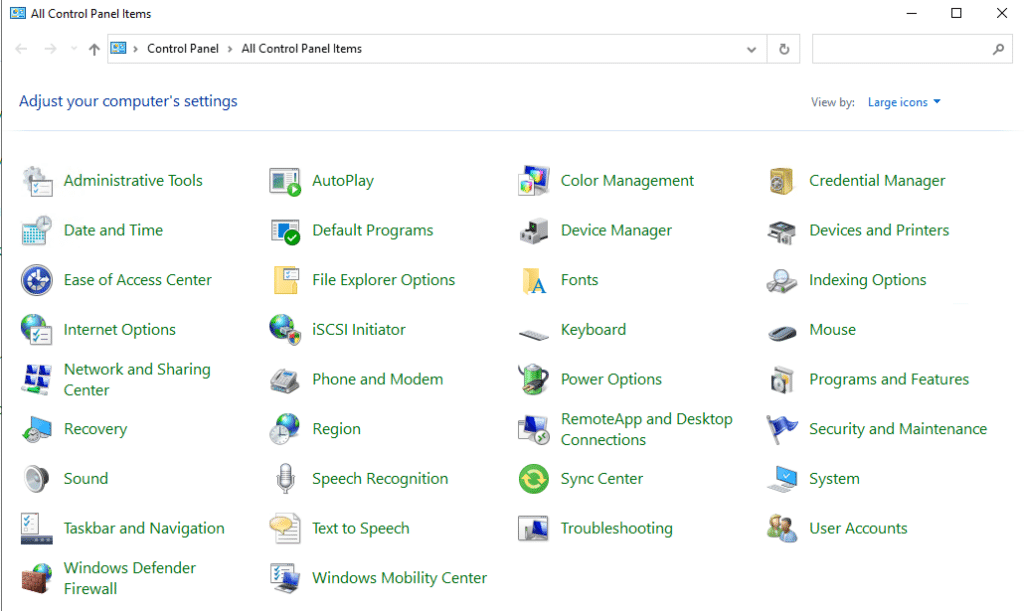
- In the Control Panel, click on “System”. In the left sidebar, click on “Advanced system settings”.

- In the System Properties window, click on the “Environment Variables*” button located in the bottom right corner.
- In the Environment Variables window, you will see two sections, “User variables” (for the current user) and “System variables” (for all users).
- To create a new variable, click New under the respective section.
- To edit an existing variable, select the variable from the list and click Edit.
- To delete a variable, select it and click Delete.
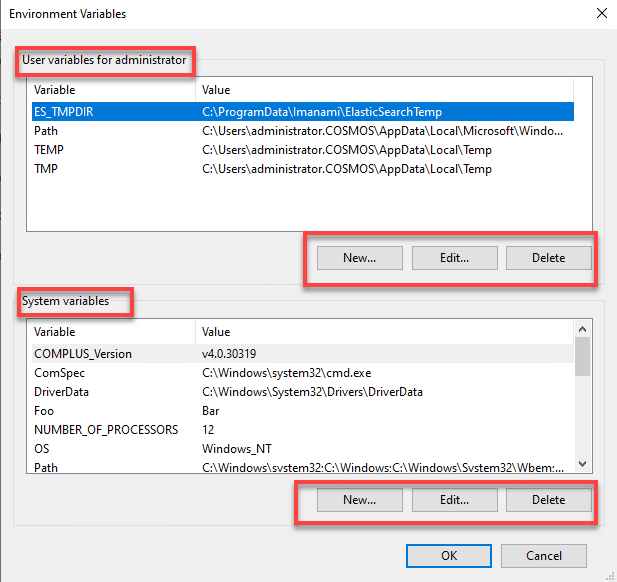
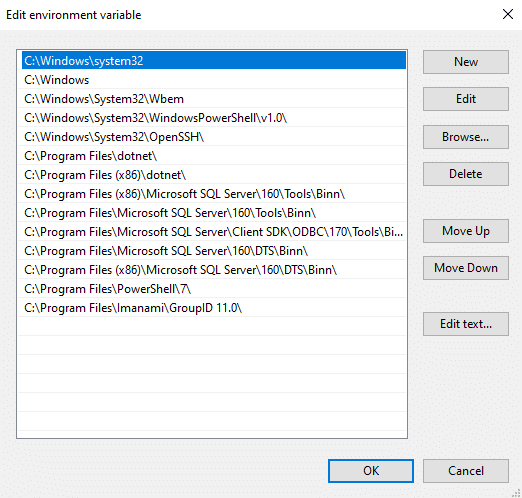
- If you are creating or editing a variable, enter the “Variable name” and “Variable value” in the respective fields. For variables like Path, you can add new paths by separating them with semicolons. Below is the screenshot of PATH variable.
- After making your changes, click OK to close each dialog, saving your modifications.
- For your changes to take effect, you may need to restart any open applications or command prompts.
Troubleshooting Common Issues with PowerShell Environment Variables
Environment variables in PowerShell can be tricky to work with, especially when dealing with scopes, persistence, or trying to set invalid values. Below are some common issues users face when working with environment variables.
Setting an Environment Variable to an Empty String
When you attempt to set an environment variable to an empty string, you may not see the expected behavior. Instead of clearing the variable, it might still hold its previous value. Setting an environment variable to an empty string does not remove it, it just assigns an empty value. To completely remove the environment variable instead of setting it to an empty string, you can use the Remove-Item cmdlet.
Incorrect Scope Used for Setting Environment Variables
When setting an environment variable, if you specify the wrong scope (User vs. Process vs. Machine), the variable might not be available where you expect it to be. To set the variable for the user or system scope permanently, you can use the below cmdlet.
[System.Environment]::SetEnvironmentVariable(‘Variable’, ‘Value’, ‘scope’)
Changes Not Reflected After Setting Environment Variables
After modifying an environment variable, you might find that changes do not immediately reflect in subprocesses or other applications. Environment variables are cached in the process. When you modify an environment variable in one session, other sessions may not see the change until restarted. To make sure that other applications see the changes, restart them. In some cases, for applications to pick up the changes, a system restart may be necessary.
Permission Errors When Setting System Variables
When trying to set a system-level environment variable, you may encounter an “access denied” error. Modifying system environment variables typically requires administrator privileges. Run PowerShell as an administrator.
Variables Not Persisting Across Sessions
You set an environment variable expecting it to persist across sessions, but it disappears.
If the variable is set only in the current session using “$env:”, it will not persist after closing PowerShell. Make sure you are setting the variable at the user or system level using System.Environment class or registry editor.
Mismatch in Case Sensitivity
Environment variable names are case-insensitive on Windows, but you might encounter case-sensitivity issues when working with cross-platform scripts such as in PowerShell Core on Linux or macOS. When writing scripts that will run on multiple platforms, make sure that you consistently use the correct case for environment variable names.
Best Practices for managing Environment Variables
Managing environment variables effectively is crucial for maintaining a stable and efficient working environment in PowerShell. Below are some best practices for using environment variables efficiently across platforms.
Use Descriptive Names
Choose clear and descriptive names for your environment variables to make them easily identifiable. For example, use MY_APP_CONFIG_PATH instead of something vague like CONFIG_PATH. This makes it easier for others (and future you) to understand the role of the variable. Another example would be, instead of “Var_Database”, use “DatabaseConnectionString” which is more descriptive.
Limit Scope Appropriately
Understand the different scopes of environment variables (Process, User, Machine) and set the scope according to your needs. Limit variables to the smallest needed scope to avoid potential conflicts. Use process scope for temporary or session-specific variables. Use user scope for variables that should be available to the current user across sessions but not to other users. Use machine scope for system-wide configurations that should be accessible by all users and processes, such as database connection strings or system-wide configuration files.
Document Your Variables
Keep a documentation file or comments in your scripts explaining the purpose of each environment variable, how it is used, and any dependencies. This will help others or yourself in the future to understand your setup.
Avoid Hardcoding Sensitive Data
Rather than hardcoding sensitive information like API keys, passwords, or values into your scripts, use environment variables to make your scripts more flexible and portable. This allows the same script to run on different machines with different configurations.
Check for Existing Variables
Before creating a new environment variable, check if it already exists to avoid unintentional overrides. This ensures that your scripts or applications do not fail due to missing environment variables.
Use Profile Scripts for Persistency
For environment variables that you want to have persist across sessions, consider placing them in your PowerShell profile. This way, they will be set every time you open a new PowerShell session.
Cleaning Up Unused Environment Variables
Remove unused environment variables to prevent clutter and potential conflicts, especially in long-running sessions or large systems. You can remove environment variables using PowerShell’s Remove-Item cmdlet. This helps maintain a clean environment and avoids accidental use of outdated or irrelevant variables.
Test in a Safe Environment
Before making changes to key environment variables, especially in a production environment, test them in a development or staging environment to avoid disruptions.
Be careful with Path modifications
When modifying the PATH variable, make sure you do not inadvertently remove important paths. Always append (+=) rather than overwrite (=) and make a backup of the existing PATH if necessary.
Consider Cross-Platform Compatibility
If your scripts will run in different environments (Windows, Linux, macOS), consider the case sensitivity of environment variable names on Linux and macOS. Windows environment variables are case-insensitive, but Linux/macOS environment variables are case-sensitive. Test scripts on all target platforms to make sure environment variables work correctly and adjust your approach accordingly.
FAQs
- How to set an environment variable using PowerShell?
To set an environment variable, you can use the following syntax.
$Env:VariableName = “Value”
Replace VariableName with the desired name of your variable and Value with the value you want to assign to it, as example below.
$Env:MY_VAR = “MyValue”
2. How do I list all variables in PowerShell?
To list all variables in your PowerShell session, you can use:
Get-ChildItem Env:
This command will show all currently defined variables in the session, including environment variables.
3. How to check if an environment variable exists in PowerShell?
To check if a specific environment variable exists, you can use the following command.
Test-Path Env:MY_VAR Replace MY_VAR with the name of the environment variable you want to check. If the variable exists, it will return True; if not, it will return False.
Since 2012, Jonathan Blackwell, an engineer and innovator, has provided engineering leadership that has put Netwrix GroupID at the forefront of group and user management for Active Directory and Azure AD environments. His experience in development, marketing, and sales allows Jonathan to fully understand the Identity market and how buyers think.

Тема этого урока – переменные окружения или переменные среды (environment variable). Они используются для настройки операционной системы и в работе некоторых приложений (приложения дописывают свои пути в системную переменную %PATH%).
Переменные среды бывают двух типов – системные и локальные.
Системные переменные содержат одинаковое для всех пользователей значение, например %SYSTEMROOT% или %SYSTEMDRIVE%.
- %SYSTEMROOT% – указывает в какой папке установлена Windows. Как правило это C:\Windows
- %SYSTEMDRIVE% – указывает на системный диск. В большинстве случаев это C:\
Локальные переменные такие как %userprofile% или %temp% возвращают, в зависимости от имени пользователя, различное значение которое указывает на местонахождение профиля пользователя и на папку временных файлов.
Для проверки введите в окне командной строки последовательно команды:
echo %SYSTEMROOT%
echo %USERPROFILE%
echo %USERNAME%
set
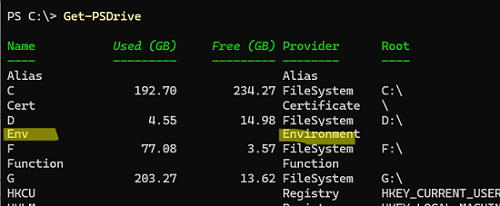
В PowerShell переменные окружения вынесены на специальный диск Env: его поставщиком является провайдер Environment который предоставляет доступ к переменным среды Windows.
cd env:
dir
В более привычном виде можно использовать команду Get-ChildItem
Как видите полученные результаты ничем не отличаются от переменных выводимых командой set из командной строки.
Для демонстрации возможности получения значений переменных средствами Powershell создайте небольшой скрипт
$computer = $env:computername
$user = $env:username
cd $env:windir
Write-Host «$user, welcome to $computer!»
Сохраняем, запускаем, смотрим результат.
Для отображения и изменения значения переменных окружения служит конструкция представленная ниже. У нее следующий синтаксис:
$env:{имя переменной}
К примеру, чтобы вывести значение переменной %TEMP% необходимо ввести следующую команду:
$env:temp
Стоит отметить что в x64 системах переменная COMMONPROGRAMFILES(x86) указывающая на расположение каталога “Common Files” в Program Files (x86) для x64 ОС (обычно %ProgramFiles(x86)%\Common Files) пишется как
${env:CommonProgramFiles(x86)}
Так же обстоят дела с переменной PROGRAMFILES(x86) которая содержит путь к папке Program Files (x86) в x64 системах, для приложений архитектуры x86.
${env:ProgramFiles(x86)}
Изменение переменных окружения
Для изменения значений переменных среды можно использовать стандартные для Powershell командлеты Item, такие как Set-Item, Remove-Item и Copy-Item. Единственным исключением является Invoke-Item.
Для примера, можно взять сценарий – вам нужно добавить к переменной среды Path фрагмент “;c:\temp”. Вы используя командлет Set-Item выполняете следующую команду:
Set-Item -path env:path -value ($env:path + «;c:\temp»)
Задачу можно слегка упростить потому что значения переменных можно изменять без применения командлета, используя следующий синтаксис:
$env:{имя_переменной} = «{новое_значение}»
Вот пример использования.
$env:path = $env:path + «;c:\temp»
$env:path += «;c:\temp»
Переменные подвержены переименованию вполне стандартными для Powershell методами
rename-item -path env:My_Var -newname My_NewVar
Их даже можно копировать
copy-item -path env:My_Var -destination env:Other_Var
Сохранение изменений переменных среды
Чтобы создать или изменить значение переменной среды во всех сеансах Windows PowerShell, необходимо добавить изменение в профиль PowerShell.
Например, чтобы добавить каталог “C:\Temp” в переменную среды Path, необходимо добавить в профиль PowerShell следующую команду.
$env:path = $env:path + «;c:\temp»
Чтобы добавить команду в существующий профиль, например в профиль CurrentUser и AllHosts, введите:
add-content -path $profile.CurrentUserAllHosts -value ‘$env:path = $env:path + «;c:\temp»’
Закрываем консоль, открываем заново, проверяем что значение переменной PATH изменилось.
Примечание: Профилей в Powershell всего четыре, подробное их описание не укладывается в тематику переменных окружения и поэтому будет приведено отдельным уроком.
Создание собственных переменных окружения
Есть несколько различных способов создания новых переменных среды с помощью PowerShell.
Предположим, вам необходимо создать переменную окружения TestVar которую видно только в пределах текущего сеанса Powershell. В этом случае вы можете создать новую переменную окружения с помощью кода:
$env:TestVar = «This is a test environment variable.»
Или вторым методом
new-item -path Env: -name TestVa -value «This is a test environment variable.»
После этого вы сможете использовать созданную переменную в своих скриптах в пределах текущего сеанса.
Удаление переменных окружения
Удаление ненужной переменной производится командой Remove-Item, вот так:
Или альтернативный метод очистки
clear-item -path env:TestVar
Для чего это нужно?
Самый последний и самый важный пункт моего повествования…
Практическое применение переменных окружения на мой взгляд возможно в следующих сценариях:
- Скрипт по сбору данных который использует переменные окружения %USERDOMAIN%, %USERNAME% и пр.
- Скрипты генерирующие отчеты. Например промежуточные результаты очень удобно собирать во временнй папке (переменная %TEMP%).
Похожие статьи
Информация об авторе
Using PowerShell to set Windows environment variables, read environment variables and create new environment variables is easy once you know the trick. The tricks you learn in this article will work for Windows 10 environment variables as well as any Windows client/server after Windows 7 SP1/Windows Server 2008.
Not a reader? Watch this related video tutorial!
Not seeing the video? Make sure your ad blocker is disabled.
PowerShell provides many different ways to interact with Windows environment variables from the $env: PSDrive. the registry, and the [System.Environment] .NET class. You’ll learn about each method including understand environment variable scope in this step-by-step walkthrough.
Assumptions
Throughout this article, I’ll be using Windows PowerShell 5.1 on Windows 10. But if you have any version of Windows PowerShell later than v3 on Windows 7 SP1 or later, the techniques I’m about to show you should work just fine.
What are Environment Variables?
Environment variables, as the name suggests, store information about the environment that is used by Windows and applications. Environment variables can be accessed by graphical applications such as Windows Explorer and plain text editors like Notepad, as well as the cmd.exe and PowerShell.
Using environment variables helps you to avoid hard-coding file paths, user or computer names and much more in your PowerShell scripts or modules.
Common Environment Variables
As you begin to learn more about how to work with environment variables in PowerShell, you’ll come across many different variables. Some are more useful than others. Below is a list of some of the common environment variables and their usage for reference.
| Variable | Usage |
|---|---|
| ClientName | The name of the remote computer connected via a Remote Desktop session. |
| SessionName | This helps to identify if the current Windows session is regarded by the operating system as running at the console. For console sessions SessionName will be ‘Console’. Enhanced Session connections to Hyper-V Virtual Machines do not report SessionName as ‘Console’, whereas Standard Sessions do. |
| ComputerName | The name of the computer. |
| SystemRoot and Windir | The path to the current Windows installation. |
| ProgramFiles and ProgramFiles(x86) | The default locations for x64 and x86 programs. |
| ProgramW6432 | The default location for programs, avoiding 32/64 bit redirection. This variable only applies for 32 bit processes running on a 64 bit platform. This means that you can use it to identify when a 32 bit instance of PowerShell is running on a 64 bit system. |
| UserDNSDomain | The Fully Qualified Domain Name of the Active Directory domain that the current user logged on to. Only present for domain logons. |
| UserDomain | The NETBIOS-style name of the domain that the current user logged on to. Can be a computer name if there’s no domain. |
| UserDomainRoamingProfile | The location of the central copy of the roaming profile for the user, if any. Only present for domain logons. |
| UserName | The name of the currently logged on user. |
| UserProfile | The location of the profile of the current user on the local computer. |
Environment Variable Scopes
There are three scopes of environment variables. Think of scopes as layers of variables that build up to give a total picture. Combined, these “layers” provide many different environment variables to any running process in Windows.
Environment Variable Scope “Hierarchy”
Each of these “layers” either combine or overwrite one another. They are defined in a hierarchy like: machine –> user –> process with each scoped variable overwriting the parent variable if one exists in the parent scope.
For example, a common environment variable is TEMP. This variable stores the folder path to Windows’ local temporary folder. This environment variable is set to:
C:\WINDOWS\TEMPin the machine scopeC:\Users\<username>\AppData\Local\Tempin the user scopeC:\Users\<username>\AppData\Local\Tempin the process scope.
If there’s no TEMP environment variable set in the user scope then the end result will be C:\WINDOWS\TEMP.
Environment Variable Scope Types
There are three different environment variable scopes in Windows.
Machine
Environment variables in the machine scope are associated with the running instance of Windows. Any user account can read these, but setting, changing or deleting them needs to done with elevated privileges.
User
Environment variables in the user scope are associated with the user running the current process. User variables overwrite machine-scoped variables having the same name.
Note: Microsoft recommends that Machine and User scoped environment variable values contain no more than 2048 characters.
Process
Environment variables in the process scope are a combination of the machine and user scopes, along with some variables that Windows creates dynamically.
Below is a list of environment variables available to a running process. All of these variables are dynamically created.
ALLUSERSPROFILEAPPDATACOMPUTERNAMEHOMEDRIVEHOMEPATHLOCALAPPDATALOGONSERVERPROMPTPUBLICSESSIONSystemDriveSystemRootUSERDNSDOMAINUSERDOMAINUSERDOMAIN_ROAMINGPROFILEUSERNAMEUSERPROFILE
Environment Variables in the Registry
Environment variables are stored in two registry locations, one for the user scope and one for the machine scope.
Don’t Use the Registry to Manage Environment Variables
There’s a catch when making changes to variables inside of the registry. Any running processes will not see variable changes in the registry. Processes only see the registry variables and values that were present when the process was started, unless Windows notifies them that there has been a change.
Instead of modifying the registry directly, you can use a .NET class instead. The .NET [System.Environment] class can modify machine and user–scoped environment variables and handle the registry housekeeping for you.
Modifying environment variables in the registry directly, whilst possible, doesn’t make sense. The .NET class offers a simpler, Microsoft-supported approach. You’ll learn about using the [System.Environment] .NET class later in this article.
Environment Variable Registry Locations and Querying
I hope you’ve been convinced to not modify the registry directly but if you’d like to take a peek at what’s in there, you can find all user environment variables in the HKEY_CURRENT_USER\Environment key. Machine-scoped environment variables are stored at HKEY_LOCAL_MACHINE\SYSTEM\CurrentControlSet\Control\Session Manager\Environment.
Inside of either of these keys lies registry values of type REG_SZ or REG_EXPAND_SZ. REG_EXPAND_SZ values hold environment variables embedded as part of their value. These environment variables are expanded when the value is retrieved.
To demonstrate this, use the REG utility. This is a small command-line utility included with Windows.
Query the TEMP environment variable as seen below. Run REG with the QUERY parameter to retrieve the value of the TEMP variable.
> REG QUERY HKCU\Environment /V TEMP

HKEY_CURRENT_USER\Environment
    TEMP    REG_EXPAND_SZ    %USERPROFILE%\AppData\Local\Temp
You’ll sometimes notice environment variables displayed surrounded by percentage symbols (
%COMPUTERNAME%) like above. This is the old-school way of showing environment variables via cmd.exe and batch files. Know that PowerShell does not recognize this format.
The REG utility allows us to see the native value of the registry value. The value type is REG_EXPAND_SZ and the value contains the %USERPROFILE% environment variable.
If you’d rather use PowerShell to retrieve the registry value, you can so using the Get-Item cmdlet as shown below.
PS51> Get-ItemProperty -Path HKCU:\Environment -Name TEMP

TEMP         : C:\Users\<your username>\AppData\Local\Temp
PSPath       : Microsoft.PowerShell.Core\Registry::HKEY_CURRENT_USER\Environment
PSParentPath : Microsoft.PowerShell.Core\Registry::HKEY_CURRENT_USER
PSChildName  : Environment
PSDrive      : HKCU
PSProvider   : Microsoft.PowerShell.Core\Registry
View and Set Windows Environment Variables via the GUI
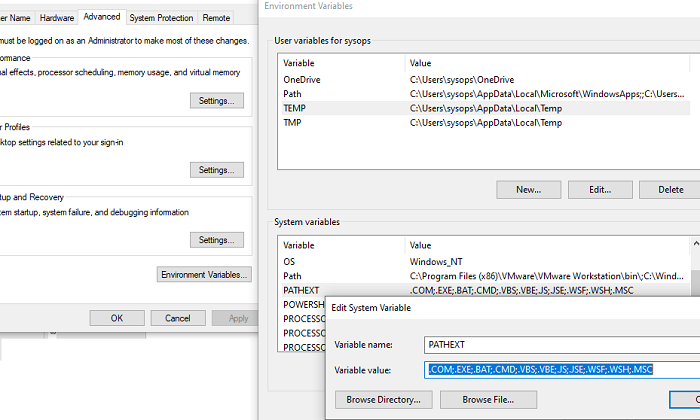
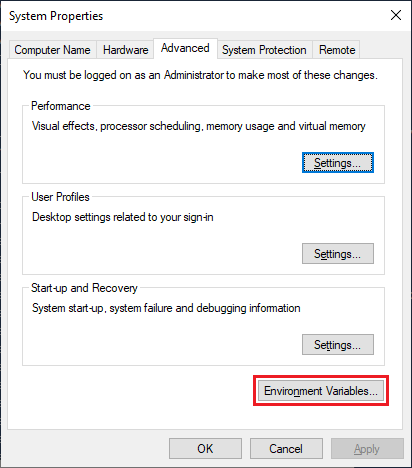
To see a GUI view of the user and system environment variables, run SystemPropertiesAdvanced.exe from PowerShell, a command prompt or from Windows Key+R to display the System Properties Advanced tab. Click on the EnvironmentVariables button, which is highlighted in the image below.
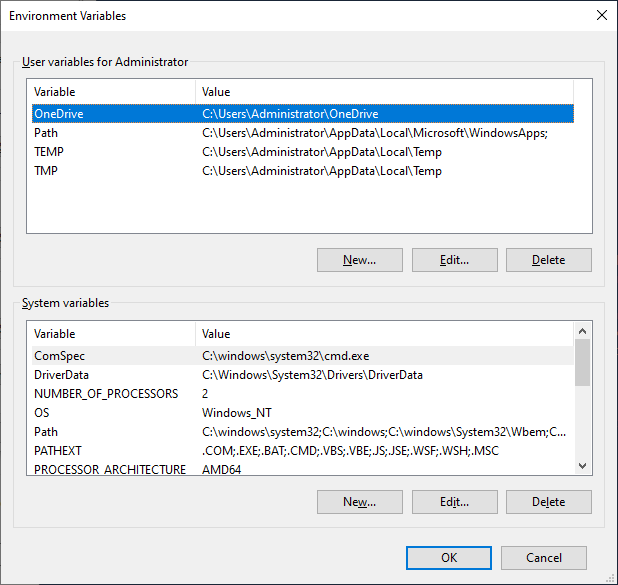
The Environment Variables dialog, shown below, allows you to view, create and modify user and machine-scoped environment variables. Note that the dialog refers to machine scoped variables as System variables.
Now that you have an understanding of environment variables, let’s get to what you’re here for, managing them with PowerShell!
There are a few different ways you can interact with environment variables using PowerShell.
- The
Env:PSDrive and Provider – session-based. Only sets the values of environment variables for the current PowerShell session $env:variables – session-based. Only sets the values of environment variables for the current PowerShell session- The
[System.Environment].NET Class – allows you to persist user and system-scoped environment variables across sessions and reboots
The Env: PSDrive and Provider
One of the best way to read environment variables is a PowerShell concept known as PowerShell drives (PS drives). A PS drive allows you to treat environment variables as if they are a file system through the Env: drive.
Switching to the Env: Drive
Like all PS drives, you reference it via paths like Env:\TEMP, Env:\COMPUTERNAME, etc. But to save some keystrokes, switch to the Env: drive just as you would any file system drive, as shown below.
PS51> cd Env:
PS51 Env:\>

## or

PS51> Set-Location Env:
PS Env:\>
Tab-Completion with the Env: Drive
You can use the same commands you would use to access a file system, such as Get-Item and Get-ChildItem to access environment variables. But instead of the file system, you’re reading the Env: drive.
Because environment variables are stored in a PS drive, you can use the tab completion feature of PowerShell to cycle through the available variables, as shown below.
Let’s now jump into a couple of examples of how you can use the Env: PS drive to work with environment variables.
Listing Environment Variables with Env:
PS51> Get-Item -Path Env:
PS51> Get-Item -Path Env:USERNAME
Listing Environment Variables Using a Wildcard with Env:
PS51> Get-Item -Path Env:user*Finding Environment Variable Values with Env:
The results of these commands are key/value [System.Collections.DictionaryEntry] .NET objects. These objects hold the environment variable’s name in the Name property and the value in the Value property.
You can access a specific value of an environment variable by wrapping the Get-Item command reference in parentheses and referencing the Value property as shown below:
PS51> (Get-Item -Path Env:computername).Value
MYCOMPUTERHOSTNAME
In situations where you need to only return certain environment variables, use standard PowerShell cmdlets such as Select-Object and Where-Object to select and filter the objects returned by the Env: provider.
In the example below, only the environment variable COMPUTERNAME is returned.
PS51> Get-ChildItem -Path Env: | Where-Object -Property Name -eq 'COMPUTERNAME'As an alternative method, use the Get-Content cmdlet. This cmdlet returns a [String] object containing the value of the environment variable. This object is simpler to deal with as it returns only the value, rather than an object with Name and Value properties.
PS51> Get-Content -Path Env:\COMPUTERNAMEDemo: Inserting Environment Values in a String
Using Get-Content, you can find the value of an environment variable and insert the COMPUTERNAME environment variable, for example, into a text string.
PS51> 'Computer Name is: {0}' -f (Get-Content -Path Env:COMPUTERNAME)
Computer Name is: MYCOMPUTER
Setting an Environment Variable (And Creating) with Env:
Create new environment variables with PowerShell using the New-Item cmdlet. Provide the name of the environment variable in the form Env:\<EnvVarName> for the Name value and the value of the environment variable for the Value parameter as shown below.
PS51> New-Item -Path Env:\MYCOMPUTER -Value MY-WIN10-PC
Name                           Value
----                           -----
MYCOMPUTER                     MY-WIN10-PC
Use the Set-item cmdlet to set an environment variable, or create a new one if it doesn’t already exist. You can see below using the Set-Item cmdlet, you can both create or modify and environment variable.
PS51> Set-Item -Path Env:testvariable -Value "Alpha"Copying an Environment Variable with Env:
Sometimes the situation arises that you need to replicate the value of an environment variable. You can do this using the Copy-Item cmdlet.
Below you can see that the value of the COMPUTERNAME variable is copied to MYCOMPUTER, overwriting its existing value.
PS51> Get-Item -Path Env:\MYCOMPUTER

Name                           Value
----                           -----
MYCOMPUTER                     MY-WIN10-PC

PS51> Copy-Item -Path Env:\COMPUTERNAME -Destination Env:\MYCOMPUTER
PS51> Get-Item -Path Env:\MYCOMPUTER

Name                           Value
----                           -----
MYCOMPUTER                     WIN10-1903
Removing an Environment Variable with Env:
Situations will arise where an environment variable is no longer needed. You can remove environment variables using one of three methods:
- Use the
Set-Itemcmdlet to set an environment variable to an empty value
PS51> Set-Item -Path Env:\MYCOMPUTER -Value ''- Use the
Remove-Itemcmdlet.
PS51> Remove-Item -Path Env:\MYCOMPUTER- Use the
Clear-Itemcmdlet.
PS51> Clear-Item -Path Env:\MYCOMPUTERRenaming an Environment Variable with Env:
In situations where the name of an environment variable needs to be changed, you have the option to rename, rather than delete and recreate with the Env: provider.
Use the Rename-Item cmdlet to change the name of an environment variable whilst keeping its value. Below you can see that you can see that the MYCOMPUTER variable is renamed to OLDCOMPUTER whilst retaining its value.
PS51> Rename-Item -Path Env:\MYCOMPUTER -NewName OLDCOMPUTER
PS51> Get-Item -Path OLDCOMPUTER
Name                           Value
----                           -----
OLDCOMPUTER                    WIN10-1903
$Env: Variables
Having mastered the Env: drive to treat environment variables as files, this section shows you how to treat them as variables. Another way you can manage in-session environment variables is using the the PowerShell Expression Parser. This feature allows you to use the $Env: scope to access environment variables.
Getting an Environment Variable with $Env:
Using the $Env scope, you can reference environment variables directly without using a command like Get-Item as shown below.
This method makes it easy to insert environment variables into strings like below:
PS51> "The Computer Name is {0}" -f $env:computername
The Computer Name is WIN10-1809
PS51> "The Computer Name is $env:computername"
The Computer Name is WIN10-1809
Setting or Creating an Environment Variable with $Env:
Setting an environment variable using this method is straightforward. This will also create a new environment variable if one does not already exist like below.
PS51> $env:testvariable = "Alpha"Use the += syntax to add to an existing value, rather than overwriting it.
PS51> $env:testvariable = "Alpha"
PS51> $env:testvariable += ",Beta"

PS51> $env:testvariable
Alpha,Beta
Removing an Environment Variable with $Env:
To remove an environment variable using this method, simple set its value to an empty string.
PS51> $env:testvariable = ''Using the [System.Environment] .NET Class
The .NET class [System.Environment] offers methods for getting and setting environment variables also. This is only method to access various environment scopes directly and set environment variables that survive across PowerShell sessions.
In all of the following examples, if no scope is provided, the process scope is assumed.
When using the [System.Environment], you’ll use a few different .NET static class methods. You don’t need to understand what a static method is. You only need to understand to use any of the techniques you’re about to learn, you’ll need to first reference the class ([System.Environment]) followed by two colons (::) then followed by the method.
Listing Environment Variables with [System.Environment]
If you’d like to see all environment variables in a particular scope, you’d use the GetEnvironmentVariables method. This method returns all environment variables by the scope specified as the method argument (in parentheses).
PS51> [System.Environment]::GetEnvironmentVariables('User')
PS51> [System.Environment]::GetEnvironmentVariables('Machine')
PS51> [System.Environment]::GetEnvironmentVariables('Process')

# The same as Process
PS51> [System.Environment]::GetEnvironmentVariables()
Getting Single Environment Variables with [System.Environment]
If you need to find a specific environment variable you can do so two different ways.
GetEnvironmentVariables().<var name>– not recommendedGetEnvironmentVariable('<var name>','<scope>')
GetEnvironmentVariables()
Using the GetEnvironmentVariables() method, you use dot notation to reference the value. Enclose the [System.Environment] class and static method reference in parentheses followed by a dot then the name of the environment variable like below:
PS51> ([System.Environment]::GetEnvironmentVariables()).APPDATANote that when referencing environment variables this way, you must ensure you match capitalization! In the example above, try to reference the
APPDATAvariable usingappdata. Use theGetEnvironmentVariable()instead.
GetEnvironmentVariable()
Rather than using the GetEnvironmentVariables() method, instead use GetEnvironmentVariable() to find single environment variables. It gets around the issue with capitalization and also allows you to specify the scope.
To use this method, specify the environment variable name and the scope you’d like to look for that variable in separated by comma.
PS51> [System.Environment]::GetEnvironmentVariable('ComputerName','User')
# Blank

PS51> [System.Environment]::GetEnvironmentVariable('ComputerName','Machine')
# Blank

PS51> [System.Environment]::GetEnvironmentVariable('ComputerName','Process')  WIN10-1903

# The same as Process
PS51> [System.Environment]::GetEnvironmentVariable('ComputerName')
WIN10-1903
Setting an Environment Variable with [System.Environment]
Use the SetEnvironmentVariable() method to set the value of an environment variable for the given scope, or create a new one if it does not already exist.
When setting variables in the process scope, you’ll find that the process scope is volatile while changes to the user and machine scopes are permanent.
PS51> [System.Environment]::SetEnvironmentVariable('TestVariable','Alpha','User')

PS51> [System.Environment]::SetEnvironmentVariable('TestVariable','Alpha','Process')

PS51> [System.Environment]::SetEnvironmentVariable('TestVariable','Alpha','Machine')

 # The same as Process
PS51> [System.Environment]::SetEnvironmentVariable('TestVariable','Alpha')
Note: Calling the SetEnvironmentVariable method with a variable name or value of 32767 characters or more will cause an exception to be thrown.
Removing an Environment Variable with [System.Environment]
Use the SetEnvironmentVariable() method to remove an environment variable for the given scope by setting its value to an empty string.
PS51> [System.Environment]::SetEnvironmentVariable('TestVariable', '', 'User')

PS51> [System.Environment]::SetEnvironmentVariable('TestVariable', '', 'Process')

PS51> [System.Environment]::SetEnvironmentVariable('TestVariable', '', 'Machine')

# The same as process
PS51> [System.Environment]::SetEnvironmentVariable('TestVariable', '')
Useful PowerShell Environment Variables
Like many other Windows applications, PowerShell has some environment variables of it’s own. Two useful environment variables to know about are PSExecutionPolicyPreference and PSModulePath.
PSExecutionPolicyPreference
The PSExecutionPolicyPreference environment variable stores the current PowerShell execution policy. It is created if a session-specific PowerShell execution policy is set by:
- Running the
Set-ExecutionPolicycmdlet with aScopeparameter ofProcess - Running the
powershell.exeexecutable to start a new session, using theExecutionPolicycommand line parameter to set a policy for the session.
PSModulePath
The PSModulePath environment variable contains the path that PowerShell searches for modules if you do not specify a full path. It is formed much like the standard PATH environment variable, with individual directory paths separated by a semicolon.
PS51> $env:PSModulePath
C:\Program Files\WindowsPowerShell\Modules;C:\WINDOWS\system32\WindowsPowerShell\v1.0\Modules
Quick tip: Split each folder to get a string array to process each path individually using $env:PSModulePath.split(‘;’)
Summary
Environment variables are a useful method for getting information about a running system, or storing information across sessions and reboots. Whether you’re just reading the default Windows operating system environment variables and creating your own, you now can manage them using a variety of ways with PowerShell!
Further Reading
- about_Environment_Variables
- The .NET [System.Environment] Class on Microsoft docs
- Learn the PowerShell string format and expanding strings
Исторически утилиты командной строки в Unix-системах развиты лучше чем в Windows, однако с появлением нового решения ситуация изменилась.

Для PowerShell можно писать сценарии на интерпретируемом мультипарадигменном языке, в котором есть элементы классического процедурного, объектно-ориентированного и даже функционального программирования: условный переход, циклы, переменные, массивы, хэш-таблицы, классы, обработка ошибок, а также функции, командлеты и конвейеры. Предыдущая статья была посвящена основам работы в среде, а сейчас мы предлагаем вниманию читателей небольшой справочник для программистов.
Оглавление:
Комментарии
Переменные и их типы
Системные переменные
Области видимости
Переменные окружения (среды)
Арифметические операторы и операторы сравнения
Операторы присваивания
Логические операторы
Условный переход
Циклы
Массивы
Хэш-таблицы
Функции
Обработка ошибок
Писать код можно в любом текстовом редакторе или с использованием интегрированной среды разработки — проще всего взять Windows PowerShell ISE из комплекта поставки серверных операционных систем Microsoft. Нужно это только для достаточно сложных скриптов: короткие наборы команд проще выполнять в интерактивном режиме.
Комментарии
Использование комментариев считается частью хорошего стиля программирования наряду с правильными отступами и пробелами:
# Для строчных комментариев используется символ решетки — содержимое строки интерпретатор не обрабатывает.

<#

       Так обозначаются начало и конец блочного комментария.
       Заключенный между ними текст интерпретатор игнорирует.

#>
Переменные и их типы
Переменные в PowerShell — это именованные объекты. Их названия могут включать символ подчеркивания, а также буквы и числа. Перед именем всегда используется символ $, а чтобы объявить переменную, достаточно указать интерпретатору допустимое имя:

Для инициализации переменной (присвоения ей значения) применяется оператор присваивания (символ =):
$test = 100Объявить переменную можно с указанием ее типа в квадратных скобках (оператор приведения типов) перед именем или значением:
[int]$test = 100

$test = [int]100
Важно понимать, что переменные в PowerShell — это полноценные объекты (классы) со свойствами и методами, типы которых основаны на имеющихся в .NET Core. Перечислим основные:
PowerShell поддерживает неявное преобразование типов, кроме того тип переменной может меняться на ходу (например, при помощи оператора присваивания), если он не указан принудительно — в этом случае интерпретатор выдаст ошибку. Определить тип переменной из предыдущего примера можно при помощи вызова метода GetType():
$test.GetType().FullName
Существует некоторое количество командлетов для управления переменными. Их список в удобной форме выводится с помощью команды:
Get-Command -Noun Variable | ft -Property Name, Definition -AutoSize -Wrap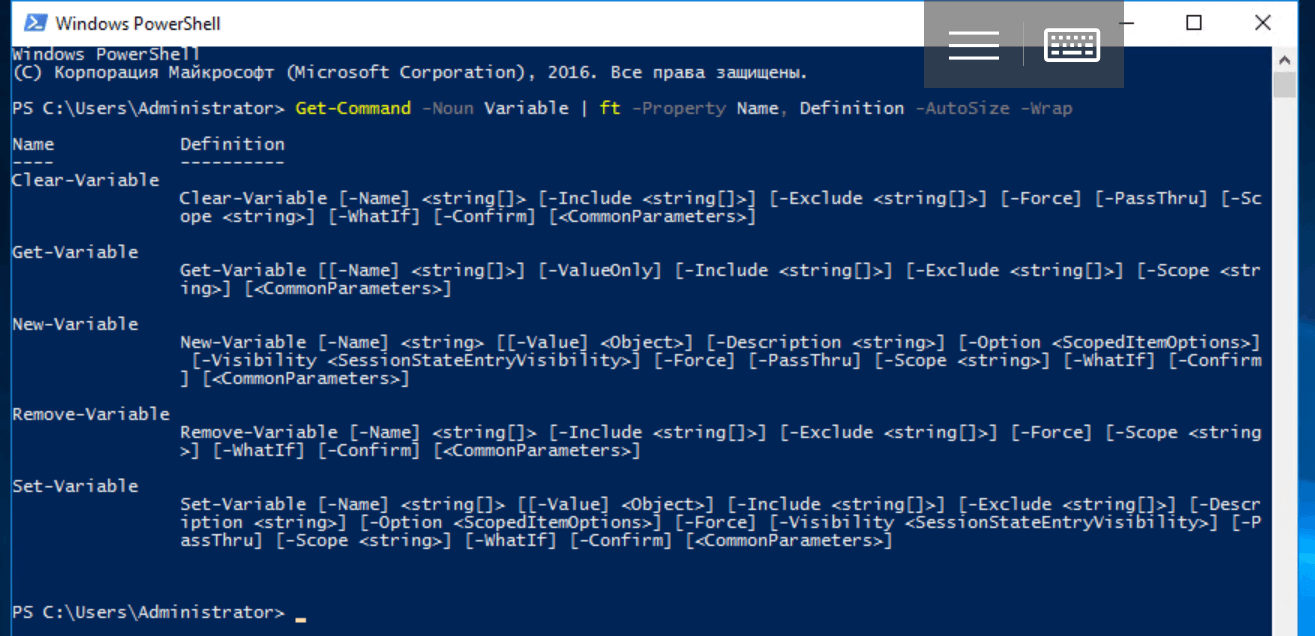
Для просмотра объявленных переменных и их значений можно использовать специальный командлет:
Get-Variable | moreТакой способ кажется чрезмерно громоздким, с переменными намного удобнее работать через операторы или обращаясь к их свойствам и методам напрямую. Тем не менее командлеты имеют право на существование, поскольку позволяют задать некоторые дополнительные параметры. Важно понимать, что пользовательские переменные определены только в рамках текущего сеанса. После закрытия консоли или завершения сценария они удаляются.
Системные переменные
Помимо объявленных пользователем существуют встроенные (системные) переменные, которые не удаляются после завершения текущего сеанса. Делятся они на два типа, при этом данные о состоянии PowerShell хранятся в автоматических переменных, которым нельзя самостоятельно присвоить произвольные значения. К их числу относится, например, $PWD:
$PWD.Path
Для хранения пользовательских настроек нужны переменные предпочтений, значения которых можно изменить. К примеру, с помощью $ErrorActionPreference задается реакция интерпретатора команд на возникновение некритических ошибок.
Вдобавок к операторам и командлетам для обращения к объявленным переменным существует псевдонакопитель Variable:. Работать с ним можно по аналогии с другими накопителями, а переменные в этом случае напоминают объекты файловой системы:
Get-ChildItem Variable: | moreили
ls Variable: | more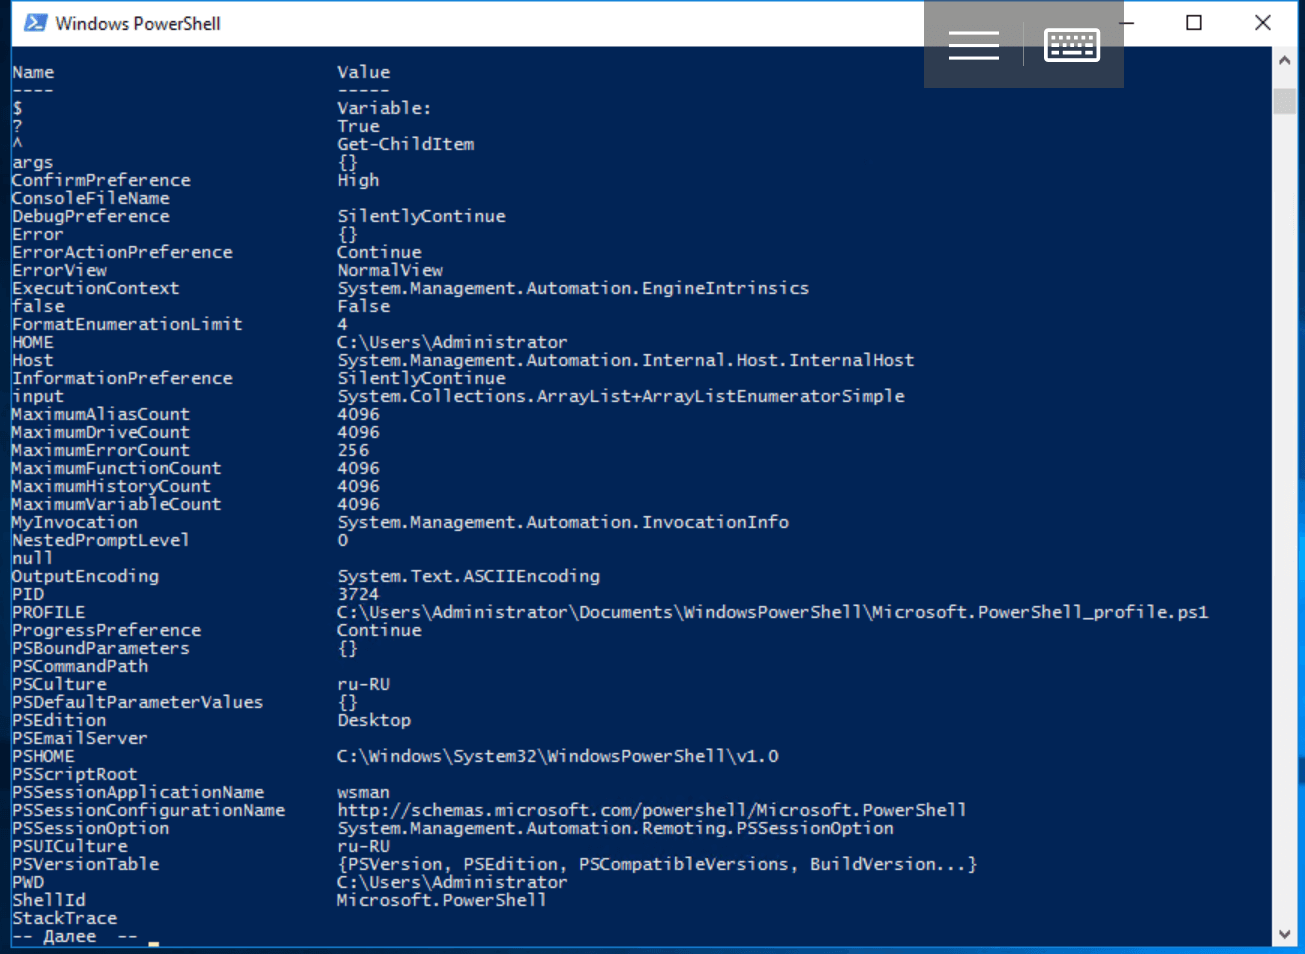
Области видимости
Для переменных в PowerShell существует понятие области видимости (Scope). Действие глобальной области (Global) распространяется на весь текущий сеанс — в нее входят, например, системные переменные. Локальные (Local) переменные доступны только в области, где они были определены: скажем внутри функции. Есть еще понятие области действия сценария (Script), но для команд скрипта она по сути является локальной. По умолчанию при объявлении переменных им задается локальная область действия, а чтобы это изменить, нужна специальная конструкция вида: $Global: переменная = значение.
Например, так:
$Global:test = 100Переменные окружения (среды)
Из PowerShell доступен еще один псевдонакопитель Env:, с помощью которого можно обратиться к переменным среды. При запуске оболочки они копируются из родительского процесса (т.е. из инициировавшей текущий сеанс программы) и обычно их первоначальные значения совпадают со значениями в панели управления. Для просмотра переменных окружения используется командлет Get-ChildItem или его псевдонимы (алиасы): ls и dir.
dir Env: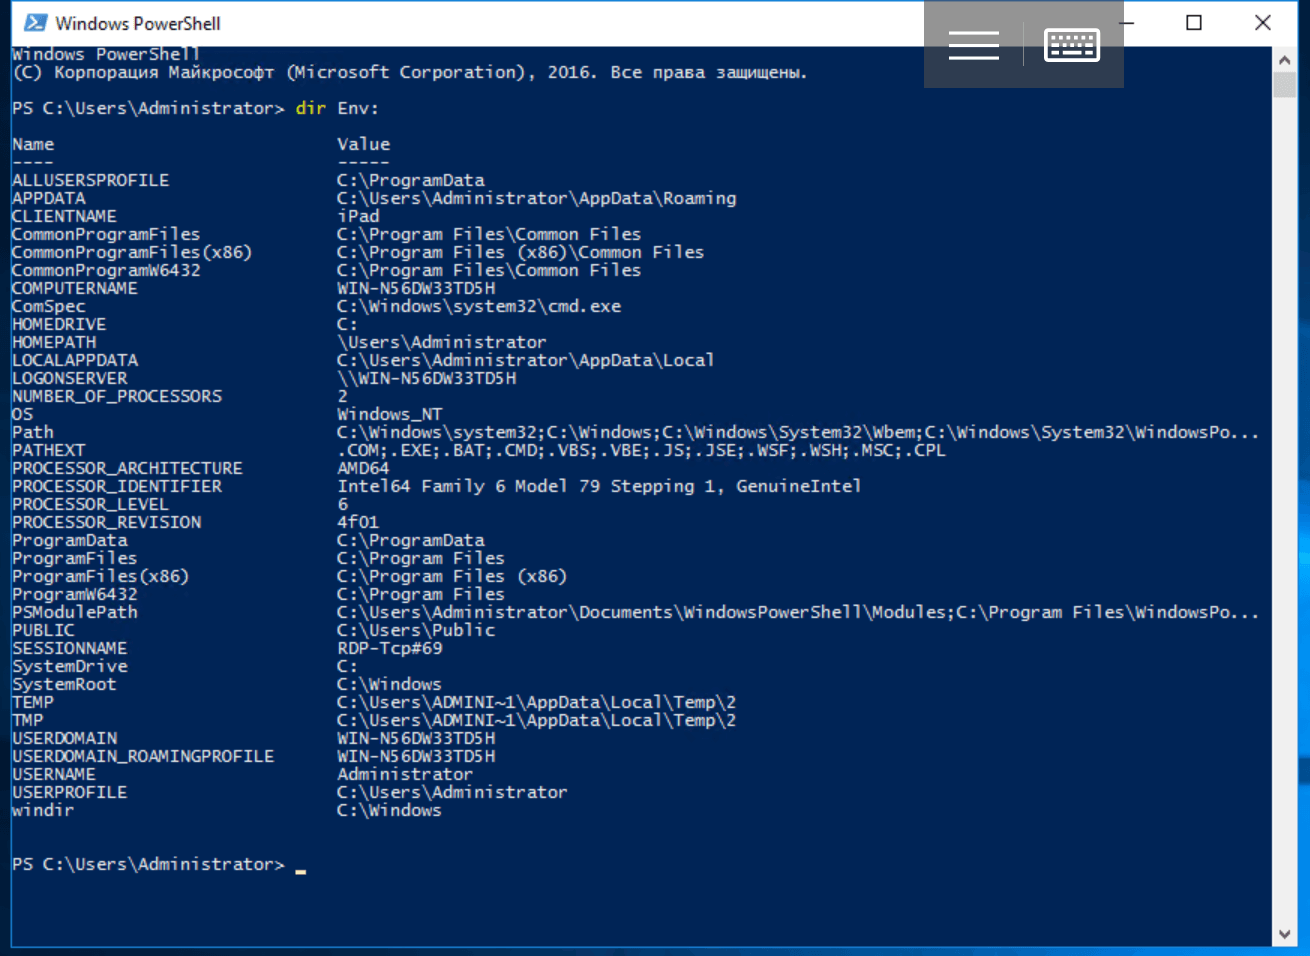
Эти переменные представляют собой последовательности байтов (или символов, если угодно), интерпретация которых зависит только от использующей их программы. Командлеты *-Variable с переменными среды не работают. Чтобы обратиться к ним, придется использовать префикс диска:
$env:TEST = "Hello, World!"
Арифметические операторы и операторы сравнения
В PowerShell есть следующие арифметические операторы: + (сложение), — (вычитание), * (умножение), / (деление) и % (модуль или остаток от деления). Результат арифметического выражения вычисляется слева направо в соответствии с общепринятым порядком операций, а для группировки частей выражения применяются круглые скобки. Пробелы между операторами игнорируются, их используют только для облегчения восприятия. Оператор + также объединяет, а оператор * повторяет строки. При попытке прибавить число к строке оно будет преобразовано в строку. Кроме того, в языке PowerShell есть множество операторов сравнения, которые проверяют соответствие между двумя значениями и возвращают логические True или False:
Существуют и другие подобные операторы, позволяющие, например, сравнивать строки с учетом символа подстановки или использовать регулярные выражения для поиска соответствия образцу. Их мы подробно рассмотрим в следующих статьях. Символы <, > и = для сравнения не используются, поскольку задействованы для других целей.
Операторы присваивания
Помимо самого распространенного оператора = существуют и другие операторы присваивания: +=, -=, *=, /= и %=. Они изменяют значение перед присвоением. Аналогично ведут себя унарные операторы ++ и —, которые увеличивают или уменьшают значение переменной — они тоже относятся к операторам присваивания.
Логические операторы
Для описания сложных условий одного только сравнения недостаточно. Записать любые логические выражения можно с помощью операторов: -and, -or, -xor, -not и!.. Работают они как и в других языках программирования, при этом можно использовать круглые скобки, чтобы задать порядок вычисления:
("Тест" -eq "Тест") -and (100 -eq 100)

-not (123 -gt 321)

!(123 -gt 321)
Условный переход
Операторы ветвления в PowerShell стандартные: IF(IF…ELSE, IF…ELSEIF…ELSE) и SWITCH. Рассмотрим их использование на примерах:
[int]$test = 100
if ($test -eq 100) {
      Write-Host "test = 100"
}


[int]$test = 50
if ($test -eq 100) {
       Write-Host "test = 100"
}
else {
      Write-Host "test <> 100"
}


[int]$test = 10
if ($test -eq 100) {
      Write-Host "test = 100"
}
elseif ($test -gt 100) {
      Write-Host "test > 100"
}
else {
       Write-Host "test < 100"
}


[int]$test = 5
switch ($test) {
     0 {Write-Host "test = 0"}
     1 {Write-Host "test = 1"}
     2 {Write-Host "test = 2"}
     3 {Write-Host "test = 3"}
     4 {Write-Host "test = 4"}
     5 {Write-Host "test = 5"}
     default {Write-Host "test > 5 или значение не определено"}
}
Циклы
В языке PowerShell есть несколько разновидностей циклов: WHILE, DO WHILE, DO UNTIL, FOR и FOREACH.
Цикл с предусловием работает, если/пока оно выполняется:
[int]$test = 0
while ($test -lt 10) {
      Write-Host $test
      $test = $test + 1
}
Циклы с постусловием отработают хотя бы один раз, потому что проверка условия производится после выполнения итерации. При этом DO WHILE работает, пока условие истинно, а DO UNTIL — пока оно ложно:
[int]$test = 0
do {
      Write-Host $test
      $test = $test + 1
}
while ($test -lt 10)


[int]$test = 0
do {
      Write-Host $test
      $test = $test + 1
}
until ($test -gt 9)
Количество итераций цикла FOR известно заранее:
for ([int]$test = 0; $test -lt 10; $test++) {
       Write-Host $test
}
В цикле FOREACH осуществляет перебор элементов массива или коллекции (хэш-таблицы):
$test_collection = "item1", "item2", "item3"
foreach ($item in $test_collection)
{
        Write-Host $item
}
Массивы
В переменных PowerShell хранятся не только единичные объекты (число, строка и т.д.), но и множественные. Самая простая разновидность таких переменных — массивы. Массив может состоять из нескольких элементов, из одного элемента или быть пустым, т.е. не содержать элементов. Для его объявления используется оператор @(), который понадобится нам в следующей статье — он очень важен для добавления в массив других массивов (создания многомерных массивов), передачи массивов в функции в качестве аргумента и тому подобных задач:
$test_array = @() #создаем пустой массивПри инициализации массива его значения перечисляются через запятую (специальный оператор ,):
$test_array = @(1, 2, 3, 4) # создаем массив из четырех элементов В большинстве случаев оператор @() можно опустить:
$test_array = 1, 2, 3, 4В этом случае массив из одного элемента инициализируется следующим образом
$test_array = , 1Для обращения к элементам массива используется начинающийся с нуля целочисленный индекс и оператор индекса (квадратные скобки):
$test_array[0] = 1Можно указать несколько индексов через запятую, в т.ч. повторяющихся:
$test_array = "один", "два", "три", "четыре"
$test_array[0,1,2,3]
$test_array[1,1,3,3,0]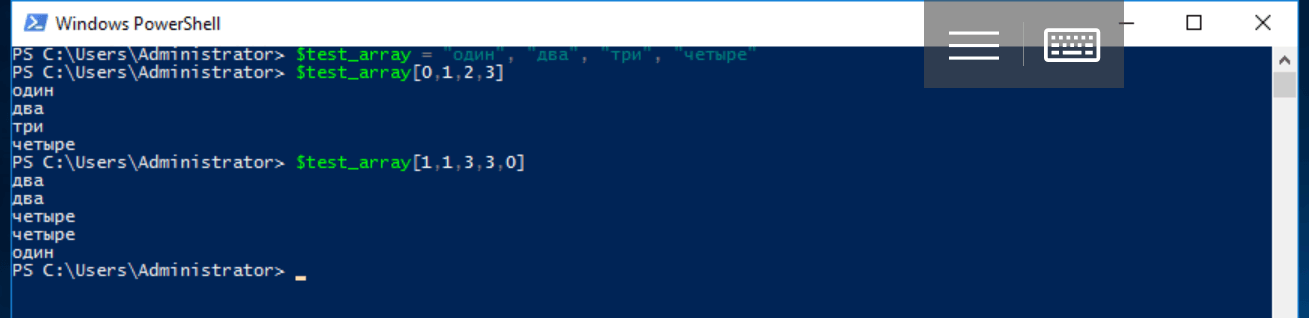
Оператор .. (две точки — оператор диапазона) возвращает массив целых чисел на определенном верхней и нижней границей отрезке. Например, выражение 1..4 выводит массив из четырех элементов @(1, 2, 3, 4), а выражение 8..5 — массив @(8, 7, 6, 5).
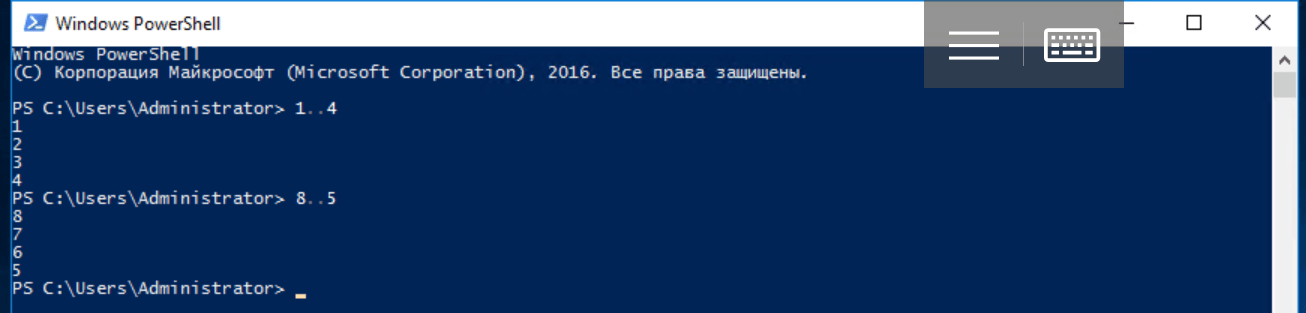
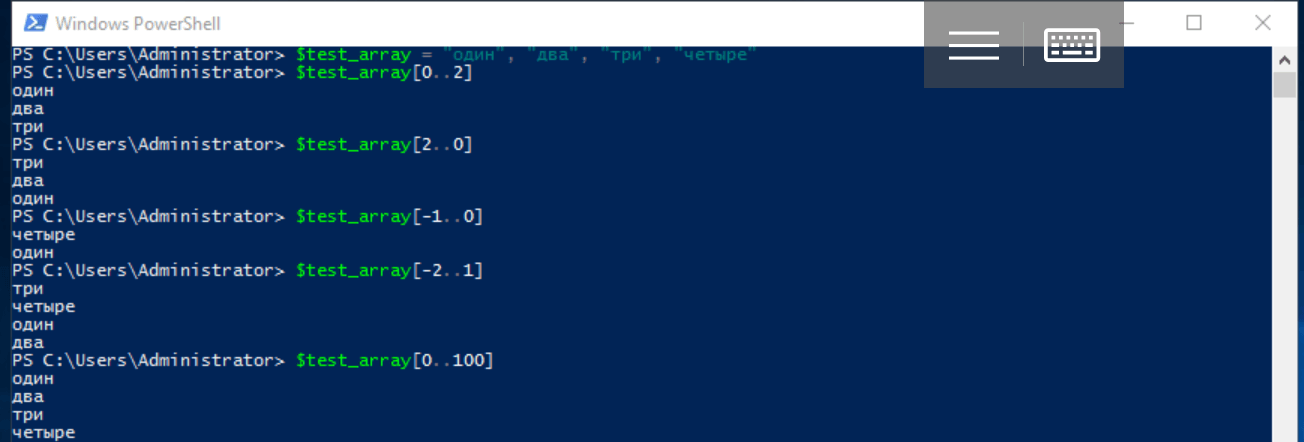
С помощью оператора диапазона можно инициализировать массив ($test_array = 1..4) или получить срез (slice), т.е. последовательность элементов одного массива с индексами из другого. При этом отрицательное число -1 обозначает последний элемент массива, -2 — предпоследний и т.д.
$test_array = "один", "два", "три", "четыре"
$test_array[0..2]
$test_array[2..0]
$test_array[-1..0]
$test_array[-2..1]
Обратите внимание, что значения целочисленного массива могут быть больше максимального значения индекса массива с данными. В этом случае возвращаются все значения до последнего:
$test_array[0..100]Если попытаться обратиться к единственному несуществующему элементу массива, возвращается значение $null.
В PowerShell массивы могут содержать элементы разных типов или быть строго типизированными:
$test_array = 1, 2, "тест", 3, 4
for ([int]$i = 0; $i -lt $test_array.count; $i++)
{
          Write-Host $test_array[$i]
}
Где свойство $test_array.count — количество элементов массива.
Пример создания строго типизированного массива:
[int[]]$test_array = 0, 1, 2, 3, 4, 5, 6, 7, 8, 9Хэш-таблицы
Еще один базовый тип переменных в языке PowerShell — хэш-таблицы, которые также называют ассоциативными массивами. Hashtable похожи на JSON object и строятся по принципу ключ-значение. В отличие от обычных массивов, доступ к их элементам осуществляется по именованным ключам, которые являются свойствами объекта (также можно использовать оператор индекса — квадратные скобки).
Пустая хэш-таблица объявляется с помощью служебного символа @ и операторных скобок:
$test_hashtable = @{}При объявлении можно сразу создать ключи и присвоить им значения:
$test_hashtable = @{one="один"; two="два"; three="три"; "some key"="some value"}Для добавления элемента в хэш-таблицу нужно присвоить ей еще несуществующий ключ или воспользоваться методом Add(). Если присваивание делается с существующим ключом, его значение изменится. Для удаления элемента из хэш-таблицы используется метод Remove().
$test_hashtable."some key"
$test_hashtable["some key"]
$test_hashtable.Add("four", "четыре")
$test_hashtable.five = "пять"
$test_hashtable['five'] = "заменяем значение"
$test_hashtable.Remove("one")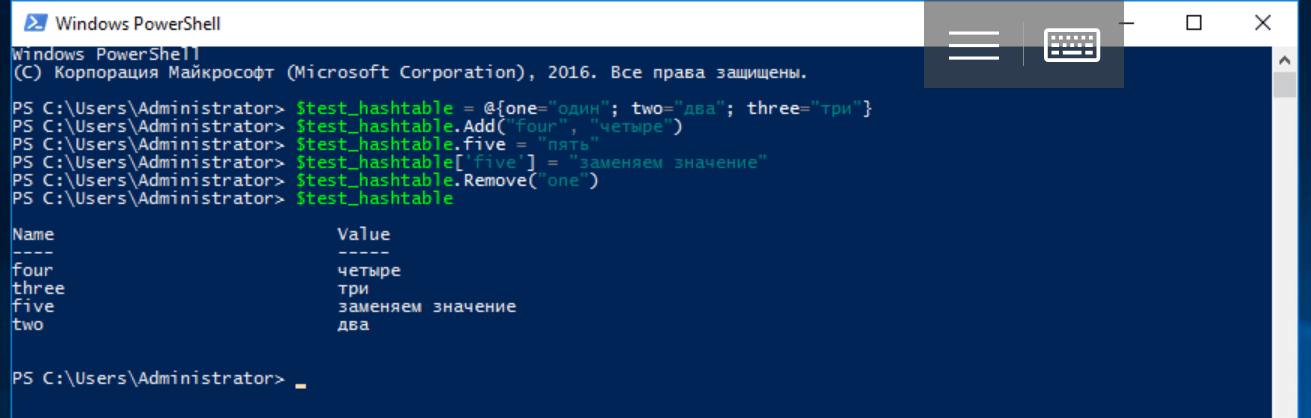
Переменные этого типа можно передавать в качестве аргументов функциям и командлетам — в следующей статье мы изучим как это делается, а также рассмотрим еще один сходный тип — PSCustomObject.
Функции
В языке PowerShell есть все необходимые для процедурного программирования элементы, включая функции. Для их описания используется служебное слово Function, после которого требуется указать имя функции и заключенное в операторные скобки тело. При необходимости передать в функцию аргументы их можно указать сразу после имени в круглых скобках.
function имя-функции (аргумент1, ..., аргументN)
{
        тело-функции
}
Функция всегда возвращает результат — это массив результатов всех ее стейтментов, если их более одного. Если стейтмент один, возвращается единственное значение соответствующего типа. Конструкция return $value добавляет элемент со значением $value к массиву результатов и прерывает выполнение statement list, а пустая функция возвращает $null.
Для примера создадим функцию возведения числа в квадрат:
function sqr ($number)
{
      return $number * $number
}
Отметим, что в теле функции можно использовать любые объявленные до ее вызова переменные, а вызов функций в PowerShell может показаться непривычным: аргументы (если они есть) не заключаются в круглые скобки и разделяются пробелами.
sqr 2или так:
sqr -number 2Из-за способа передачи аргументов саму функцию иногда приходится заключать в скобки:
function test_func ($n) {}
test_func -eq $null     # функция не вызывалась
(test_func) -eq $null   # результат выражения — $true
При описании функции можно присвоить аргументам значения по умолчанию:
function func ($arg = value) {
         #тело функции
}
Существует и другой синтаксис для описания аргументов функции, кроме того параметры могут считываться из конвейера — все это пригодится в следующей статье, когда мы будем рассматривать экспортируемые модули и создание собственных командлетов.
Обработка ошибок
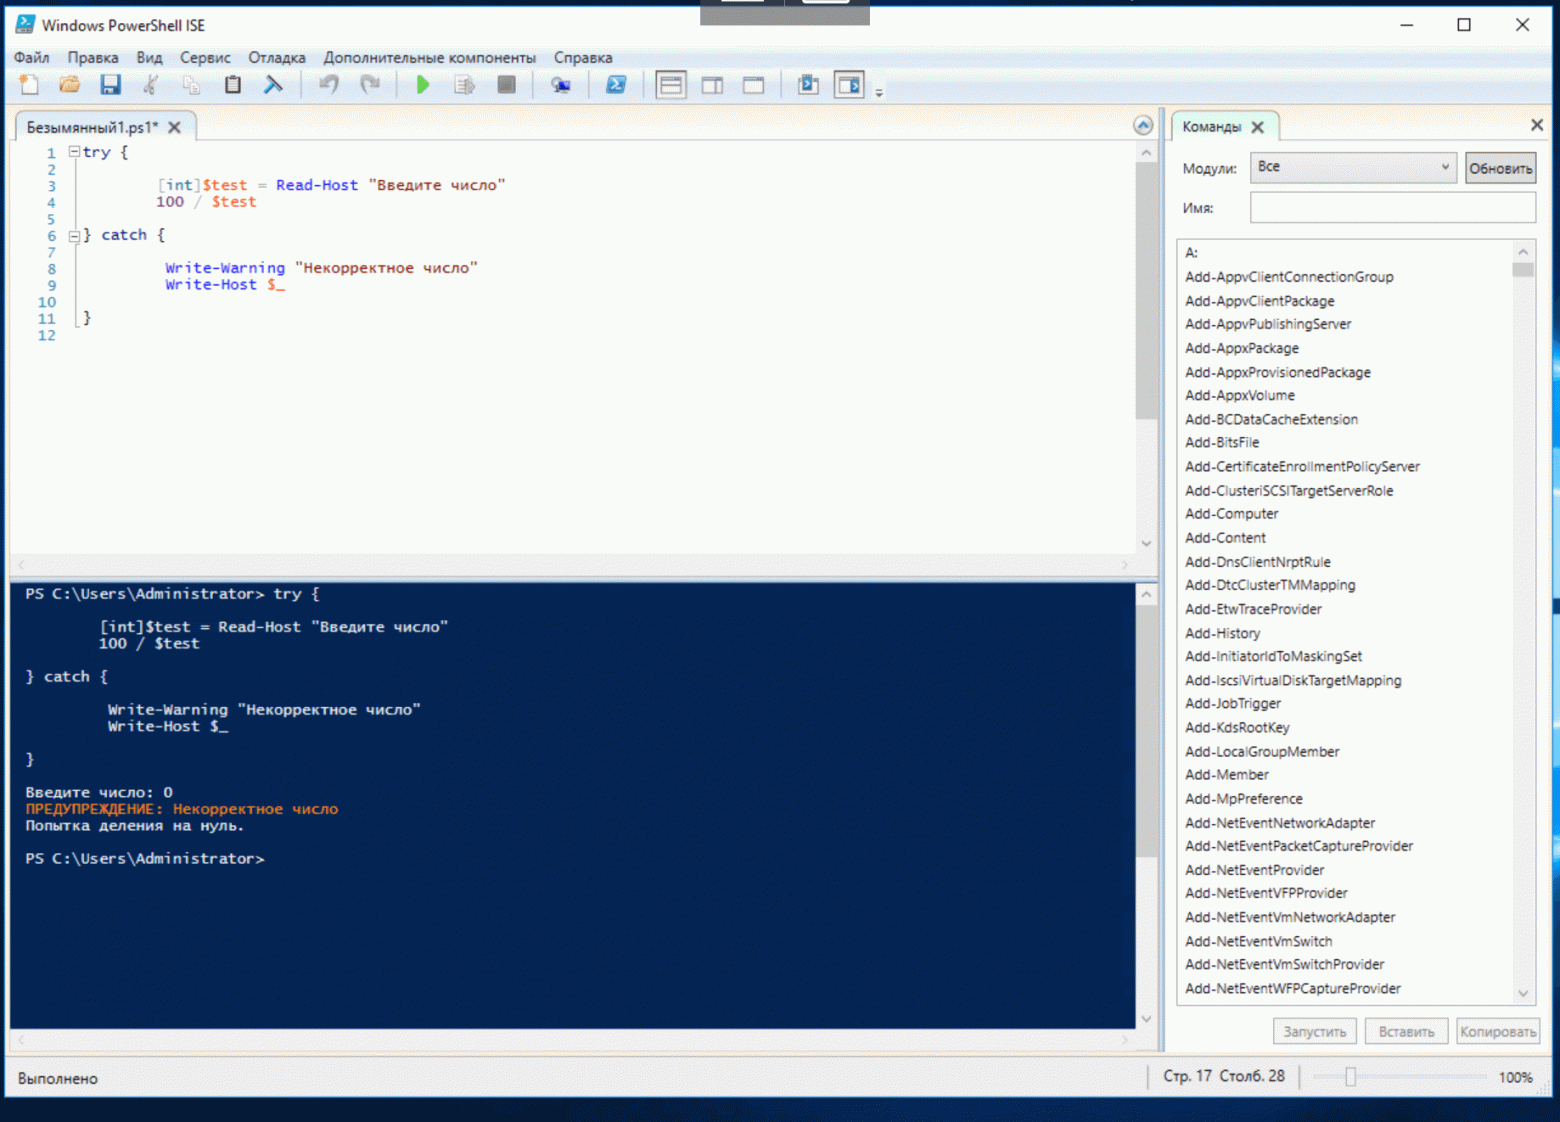
В PowerShell существует механизм Try…Catch…Finally, позволяющий обрабатывать исключительные ситуации. В блок Try помещается код, в котором может возникнуть ошибка, а в блок Catch — ее обработчик. Если ошибки не было, он не выполняется. Блок Finally выполняется после блока Try вне зависимости от возникновения ошибки, а блоков Catch может быть несколько для исключений различных типов. Само исключение записывается в не требующую объявления переменную по умолчанию ($_) и может быть легко извлечено. В примере ниже мы реализуем защиту от ввода некорректного значения:
try {

        [int]$test = Read-Host "Введите число"
        100 / $test

} catch {

         Write-Warning "Некорректное число"
         Write-Host $_

}
На этом рассмотрение основ программирования на языке PowerShell стоит закончить. В следующих статьях мы подробнее изучим работу с переменными разных типов, коллекции, регулярные выражения, создание функций, модулей и собственных командлетов, а также объектно-ориентированное программирование.
Часть 1: основные возможности Windows PowerShell
Часть 3: передача параметров в скрипты и функции, создание командлетов
Часть 4: Работа с объектами, собственные классы
