
Настройка переменных среды Windows может помочь сократить время, необходимое для набора команд в командной строке или, если вы часто пишете скрипты для собственных задач, сделать их более читаемыми. В большинстве случаев обычные пользователи добавляют записи в системную переменную среды PATH, хотя бывают и другие задачи.
В этой пошаговой инструкции базовая информация о том, как открыть переменные среды Windows 11 и Windows 10, создать или отредактировать их.
Что такое переменные среды
Переменные среды в Windows — записи о расположении системных папок, свойствах системы и другие, которые доступны для любой программы или скрипта.
Одна из наиболее часто используемых переменных среды — PATH, указывающая на папки, в которых выполняется поиск файлов, вызываемых в командной строке, терминале Windows, файле bat или из других источников. В качестве примера её назначения:
- Если вы откроете командную строку (или диалоговое окно «Выполнить»), введёте regedit и нажмете Enter — вы сможете запустить редактор реестра, не указывая полный путь к файлу regedit.exe, поскольку путь C:\Windows добавлен в переменную среды Path.
- Если же тем же образом в командной строке написать имя программы, путь к которой не добавлен в Path (chrome.exe, adb.exe, pip и другие), вы получите сообщение «Не является внутренней или внешней командой, исполняемой программой или пакетным файлом».
Если предположить, что вы часто используете команды adb.exe (например, для установки приложений Android в Windows 11), pip install (для установки пакетов Python) или любые другие то для того, чтобы не писать каждый раз полный путь к этим файлам, имеет смысл добавить эти пути в переменные среды.
Также вы можете добавлять и иные переменные среды (не обязательно содержащие пути), а в дальнейшем получать и использовать их значения в сценариях BAT (командной строки) или PowerShell. Пример получения и отображения значения системной переменной PATH для обоих случаев:
echo %PATH%
echo $Env:PATH
Получить список всех переменных среды в командной строке и PowerShell соответственно можно следующими командами:
set
ls env:
Редактирование переменных среды Windows 11/10
Прежде чем приступать, учтите: изменение системных переменных среды по умолчанию может привести к проблемам в работе системы, не удаляйте уже имеющиеся переменные среды. Возможно, имеет смысл создать точку восстановления системы, если вы не уверены в своих действиях.
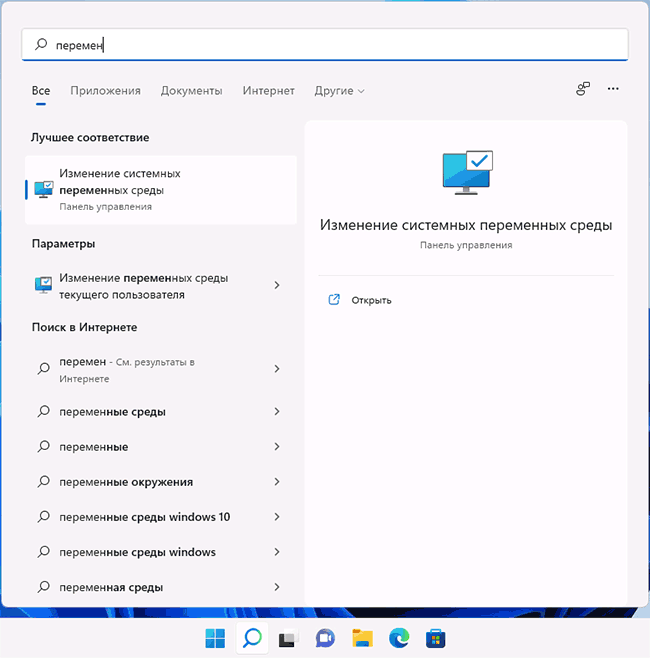
- Чтобы открыть переменные среды Windows вы можете использовать поиск в панели задач (начните вводить «Переменных» и откройте пункт «Изменение системных переменных среды») или нажать клавиши Win+R на клавиатуре, ввести sysdm.cpl и нажать Enter.

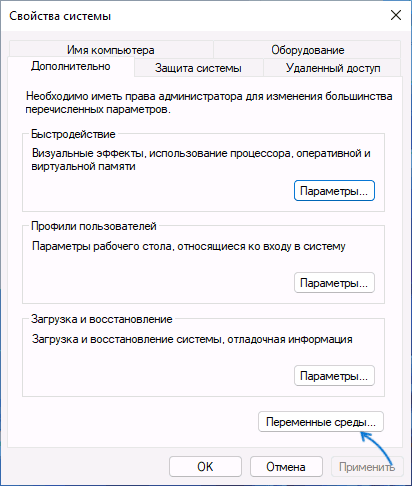
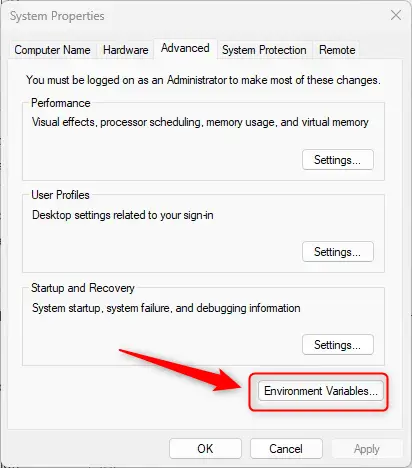
- На вкладке «Дополнительно» нажмите кнопку «Переменные среды…»

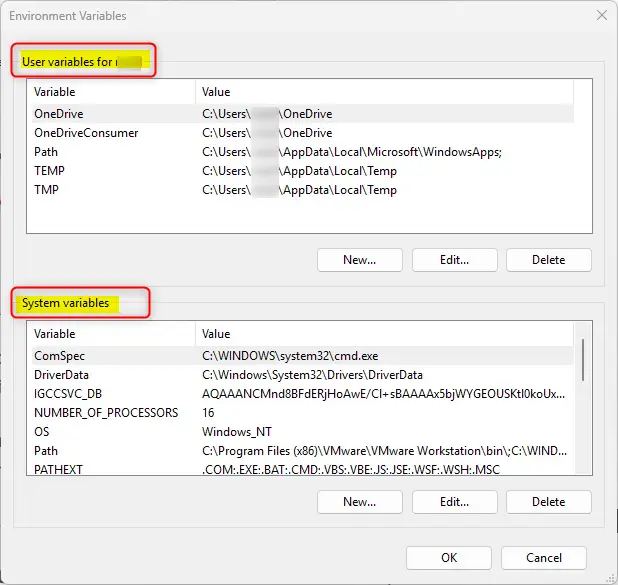
- В разделе «Переменные среды пользователя» (если требуется изменение только для текущего пользователя) или «Системные переменные» выберите переменную, которую нужно изменить и нажмите «Изменить» (обычно требуется именно это), либо, если необходимо создать новую переменную — нажмите кнопку «Создать». В моем примере — добавляем свои пути в системную переменную Path (выбираем эту переменную и нажимаем «Изменить»).

- Для добавления нового значения (пути) в системную переменную в следующем окне можно нажать кнопку «Создать», либо просто дважды кликнуть по первой пустой строке, затем — ввести нужный путь к папке, содержащей нужные нам исполняемые файлы.

- Также вы можете использовать кнопку «Изменить текст», в этом случае окно изменения системной переменной откроется в ином виде: имя переменной, а ниже — её значение. В случае указания путей значение будет представлять собой все пути, хранящиеся в переменной, разделенные знаком «точка с запятой».

- При создании новой переменной среды окно будет тем же, что и в 5-м шаге: необходимо будет указать имя системной переменной в верхнем поле, а её значение — в нижнем.


После создания или изменения переменной среды и сохранения сделанных настроек, переменная или обновленные значения сразу становятся доступны для текущего пользователя или в системе в целом в зависимости от того, какие именно переменные редактировались или создавались. Также есть методы добавления переменных среды в командной строке или PowerShell, подробнее в статье: Как добавить путь в переменную среды PATH
This article explains how to set up environment variables in Windows 11.
Environment variables are a powerful feature in Windows systems. Various processes and applications use them to determine operational behaviors based on specific system-wide or user-specific settings.
They store configuration data and system state information that can be accessed by different software applications and services running on a Windows system.
You can customize your System’s behavior for different applications and tasks by setting up environment variables. For example, you can set a variable to specify the path to a specific tool or define a variable that controls the behavior of a specific application.
In Windows 11, environment variables can be created through System Properties, the Command Prompt, or PowerShell.
Using System Properties
To create an environment variable using System Properties, follow these steps:
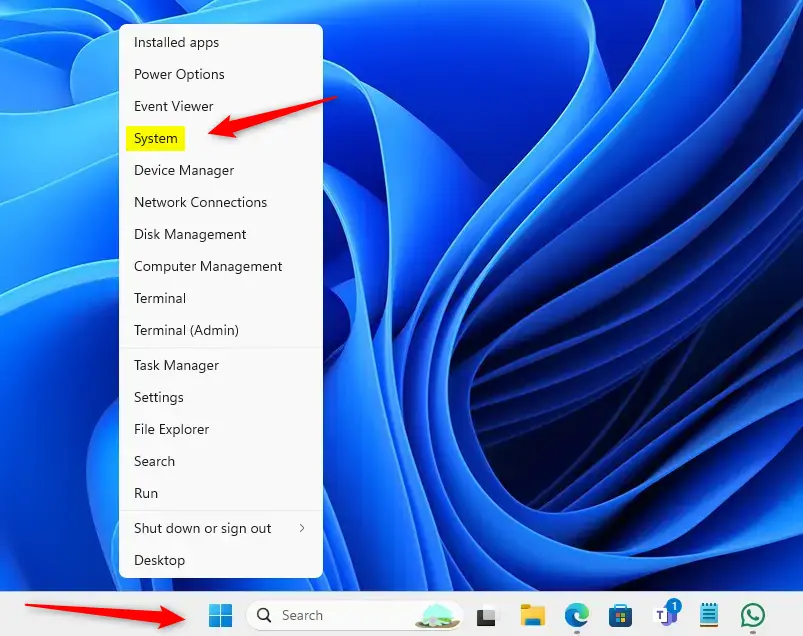
Right-click the Start button and select System on the Power User menu.
Next, click the Advanced system settings link under “Related settings” on the right.
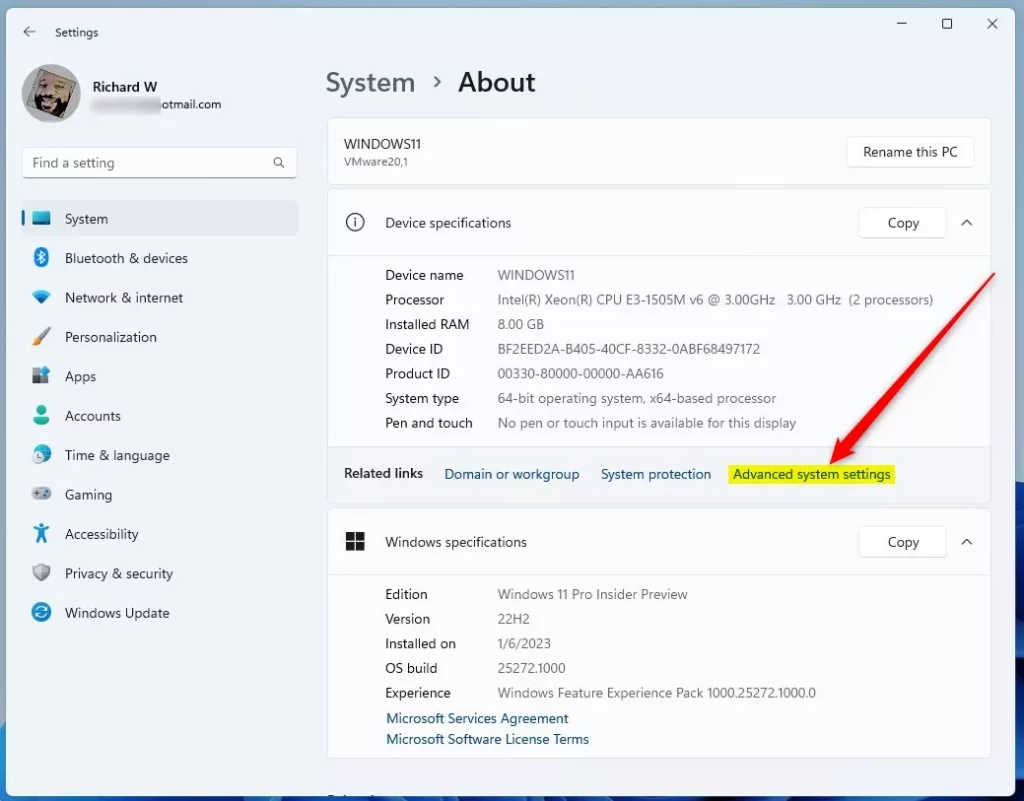
This will open the System Properties window with the Advanced tab selected. Click the Environment Variables… button at the bottom of the System Properties window.
To create a user-specific variable, under the “User variables for [Your Username]” section, click the New… button.
To create a system-wide variable (accessible to all users), under the “System variables” section, click the New… button.
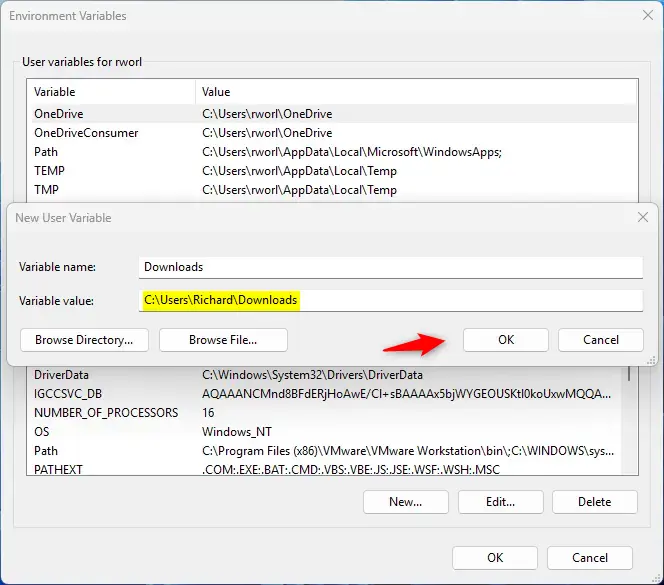
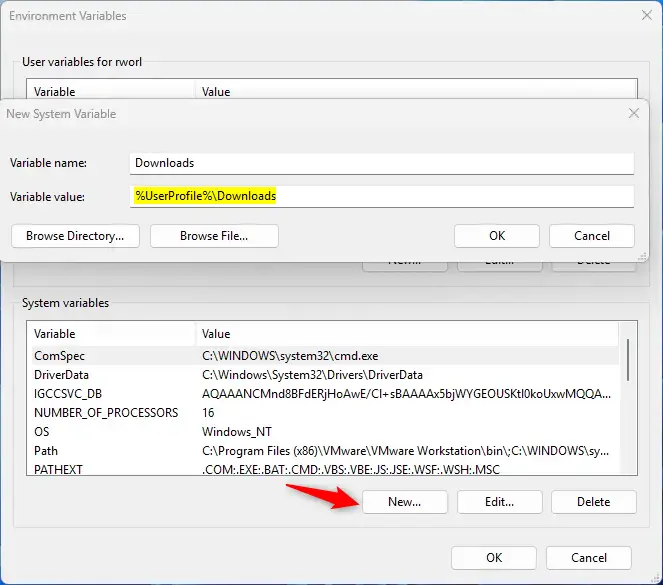
In the New System Variable or New User Variable window, enter the variable’s Name and its Value.
Create User Variable:
Under the User variables for the [Username] section, click New. Then, type in the Variable name and Variable value.
Click OK to close the new variable window.
Create System Variable:
Under the System Variables section, click the New button. Then, enter the Variable name and Variable value.
Click OK again to close the Environment Variables window.
You might need to restart your System or log out and back in for some changes.
Using the Command Prompt
You can also create environment variables via Command Prompt.
First, open the Windows Terminal app as administrator. You can also right-click the Start button and select Windows Terminal (Admin).
In the Windows Terminal, open a Command Prompt tab by clicking the down arrow icon next to the new tab button and selecting Command Prompt.
Create User Variable
Type the command
setx VARIABLE_NAME "VARIABLE_VALUE"
Replace VARIABLE_NAME with the name you wish to assign to the variable and VARIABLE_VALUE with the actual value.
Example:
setx Downloads "C:\Users\rworl\Downloads"
Create System Variable:
Type the command
setx /M VARIABLE_NAME "VARIABLE_VALUE"
Replace VARIABLE_NAME with the name you wish to assign to the variable and VARIABLE_VALUE with the actual value.
Example:
setx /M Downloads "C:\Users\rworl\Downloads"
Using Windows PowerShell
You can create environment variables using Windows PowerShell.
First, open the Windows Terminal app as administrator. Right-click the Start button and select Windows Terminal (Admin) on the Power User menu.
In the Windows Terminal, open a PowerShell tab if it’s not already open by default.
Create a User Variable
For a user-specific variable, replace Machine with User:
[System.Environment]::SetEnvironmentVariable('VARIABLE_NAME', 'VARIABLE_VALUE', [System.EnvironmentVariableTarget]::User).Example:
[Environment]::SetEnvironmentVariable("Downloads","C:\Users\Richard\Downloads","User")
Create a System Variable
Type the command
[System.Environment]::SetEnvironmentVariable('VARIABLE_NAME', 'VARIABLE_VALUE', [System.EnvironmentVariableTarget]::Machine)
Example:
[Environment]::SetEnvironmentVariable("Downloads","%UserProfile%\Downloads","Machine")
After using the command line methods, the environment variable is immediately available in new Command Prompt or PowerShe instances.
However, you may still need to restart applications or the System to see the changes everywhere.
Verifying the Creation of the Variable
To confirm that your environment variable has been set, you can use the Command Prompt or PowerShell to echo its value:
- In Command Prompt:
echo %VARIABLE_NAME% - In PowerShell:
$env:VARIABLE_NAME
If the environment variable has been successfully created, the commands above should display its value.
That should do it!
Conclusion:
- Environment variables in Windows 11 are a powerful feature that can be used to store configuration data and system state information.
- Users can customize system behavior for applications and tasks by setting up environment variables.
- This article provides detailed steps for creating environment variables using System Properties, Command Prompt, and Windows PowerShell in Windows 11.
- After creating environment variables, users can verify their successful creation using Command Prompt or PowerShell.
- Feel free to leave a comment if you have any feedback or additional information to share regarding this guide.
If you want to see or check the names and values of Environment Variables in Windows 11 or Windows 10, here is how you can do that. There are mainly four ways to find almost everything about the Environment Variables in Windows 11/10, and this article explains all the possible methods.
What are Environment Variables in Windows 11/10
Environment Variables contain some information related to WindowsApps path, currently logged-in user’s information, Temporary folder’s path, running processes, etc. Although Windows 11/10 comes with a few of those, you can add or modify Environment Variables in Windows PC easily.
However, if you want to find those Environment Variables in Windows 11 or Windows 10, this guide will be handy for you. As said earlier, there are four ways – using the Windows Settings panel, using Command Prompt, using the Registry Editor, and using Windows PowerShell.
To see the names and values of Environment Variables in Windows 11/10, follow these methods:
- Using Windows Settings panel
- Using Command Prompt
- Using Registry Editor
- Using Windows PowerShell
To learn more about these steps, continue reading.
1] Using Windows Settings panel

It is the most common method to find the names and values of the Environment Variables in Windows 11/10 PC. Earlier, it was possible to do the same using Control Panel. However, if you are using Windows 11, there is no need to go through the Control Panel since it will eventually open the Windows Settings.
Follow these steps to find the Environment Variables:
- Press Win+I to open Windows Settings.
- Go to System > About.
- Click on the Advanced system settings.
- Click the Environment Variables button.
- Find the Environment Variables.
Next, you need to click on each variable to find the details. It displays a detailed list in the System variables box.
2] Using Command Prompt
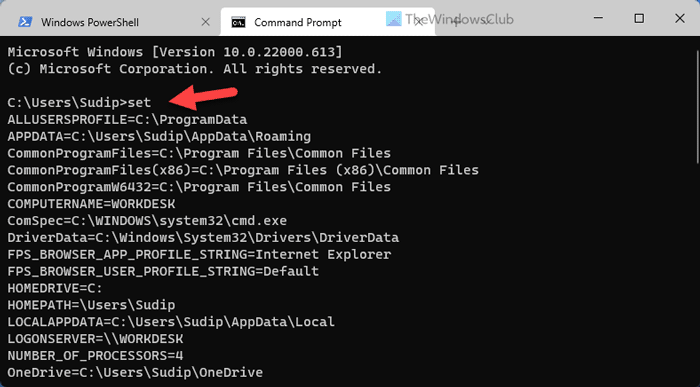
It is probably the easiest method to find almost everything about the Environment Variables on Windows 11/10 PC. For this purpose, we are going to use the Command Prompt instance in Windows Terminal. However, you can open the standalone Command Prompt window and enter the following command:
set
In case you do not know the process to open the Windows Terminal, you can press Win+X and select the Windows Terminal from the WinX menu.
3] Using Registry Editor
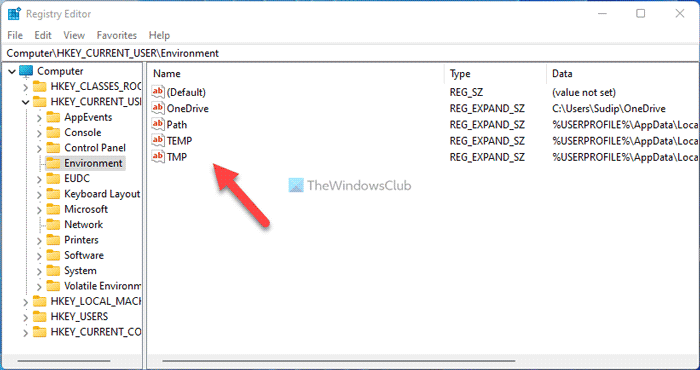
If you do not want to do much with the Environment Variables and want to check them only, you can use the Registry Editor. As these variables depend on the user profile, you need to open the HKEY_CURRENT_USER. To find the names and values of the Environment Variables using Registry Editor, do the following:
- Press Win+R to open the Run prompt.
- Type regedit and hit the Enter button.
- Click on the Yes button in the UAC prompt.
- Navigate to this path: HKEY_CURRENT_USER\Environment
- Find the variables.
In case you want to modify the existing variables using Registry Editor, you need to double-click on each of them and change them according.
4] Using Windows PowerShell
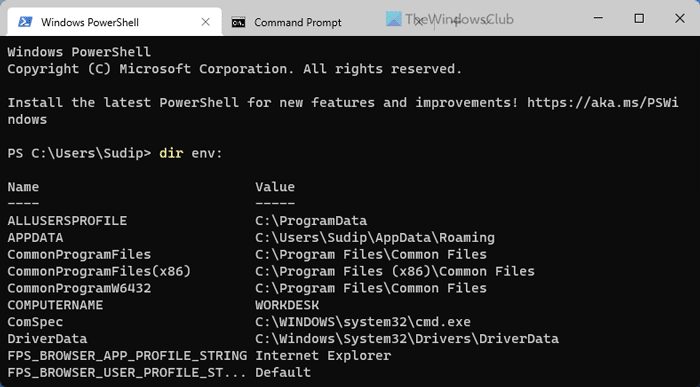
Like, Command Prompt, you can use Windows PowerShell to find the same Environment Variables on your Windows 11 or Windows 10 computer. However, it displays all the Environment Variables of all the users, whereas other methods display only the current user’s variables. That being said, the list could be lengthy since it may contain some variables, such as ComSpec, LOCALAPPDATA, HOMEDRIVE, HOMEPATH, ALLUSERSPROFILE, etc.
If you are fine with the lengthy list, you can use Windows PowerShell and enter this command:
dir env:
Like the Command Prompt method, you can open the standalone Windows PowerShell or the PowerShell instance in the Windows Terminal.
How do I view Environment Variables in Windows 11?
To view the Environment Variables in Windows 11, you can use any of the aforementioned methods. If you do not want to modify existing variables, you can use the Command Prompt method. For that, you can open the Command Prompt or the Command Prompt instance in Windows Terminal and enter this command: set. Then, it displays almost everything about the current user’s Environment Variables on your screen. Similarly, you can use the Windows PowerShell method to get the same thing done. In that case, you have to use this command: dir env:
How do I get a list of Environment Variables?
To get a list of Environment Variables, you have four techniques in your hands. However, using the Windows Settings method is probably the most fruitful method since you can view, add, or modify any Environment Variable without any issue. However, if you want to get a list only, you can use any of the other three methods. To choose one, you can open the Windows Terminal and enter this command in the PowerShell instance: dir env:. If you want to use the Command Prompt instance, you need to execute this command: set.
That’s all! Hope this guide helped.
Read: How to add or edit a PATH Environment Variable in Windows.
In Windows 11, the environment variables (env) can be easily set via the graphical user interface. The ENV on Windows or other operating-system needed by it to let it know exactly where the most important files are stored. And that can be a little different on every computer. For most Windows users, the system is located in the C:\Windows\ folder and programs in the C:\Program Files\folder. But it is not always the case.
Add or Display system variables Path in Windows 111. Open Edit system environment variables2. System Properties3. Add System Variables or User Variable on Windows 114. Create a New Variable and add the path in Windows 11
And this is the reason why the paths are important locations, they are not permanently programmed, but are stored in so-called environment variables.
There are also environment variables that do not lead to any folders. These are variables like Dirverdata, PATHEXT, and more…
Environment variables are an important element of every operating system, including Windows 11. But how do you actually get them?
Add or Display system variables Path in Windows 11
1. Open Edit system environment variables
For this, you simply use the Windows 11 search and search for “Edit system environment variables“. Then simply select the result and the following window with the system properties will open.

2. System Properties
You will see the “System Properties” there click on the “Environment Variables …” button, which is already focused on in the given screenshot.

3. Add System Variables or User Variable on Windows 11
On the Environment Variable windows you will have two choices:
- User variables for your account; the folder path added under it will only be accessible by that particular user
- System variables for the entire operating system, hence any user account will be able to access the executables or folder declared under it.
Added System variables are visible to all user accounts. If it is the case that only you use the PC, it is sufficient to set user variables. However, here we are going for “System Variables“. You can choose between as per your choice.
Select the Path and hit the Edit button.

4. Create a New Variable and add the path in Windows 11
As you click the Edit button in the above step, the corresponding window will open. After that add the path of the folder or executable that you want to add.


Alternatively, we can also browse the same.
For example, to integrate the Oracle VirtualBox, simply edit the “Path” variable under the system or user variables. So follow the below steps…
• Select the Path variable, click on Edit … and click on Browse
• A file explorer tree will open, go to the folder that you want to add, and hit the OK button.


Then confirm all windows with OK and restart the command line (Windows Terminal/PowerShell/Command Prompt) and start accessing your executable directly in it once. The old variables are still saved in the open instance.
In this way, we can add any path to our system on Windows 11 using the graphical user interface. the user can also remove any of the added paths in a similar way.
Environment variables are user variables or Windows system variables that describe the environment in which apps run. They can tell your apps things like the name of the computer, the name of the user account, the current working directory, etc. Do you want to know more about how to use environment user variables and Windows system variables? If you do, read this tutorial and learn how to create environment variables in Windows 11 and Windows 10. There are some situations when knowing how to do that can prove very useful.
Things you should know before creating environment variables in Windows
There are two things you should know before following any of the steps shown in this guide to create user and system variables pointing to a folder, file, or anything else. The first and the most important one is to understand what environment variables are. Secondly, you should know the differences in user variables vs. system variables in order to be able to decide what kind of variable you should create. For answers and explanations on these matters, I recommend you read this article before going ahead with the instructions below: What are environment variables in Windows?.
Environment user and system variables in Windows
Then, once you understand what environment variables are and once you know what type of variable you want to create, you’ll have to open the Environment Variables window. If you’ve read the tutorial I recommended in the previous paragraph, you already know how to do it. However, if you didn’t have time for that, know that an easy method of launching the Environment Variables is to use the search.
If you’re using Windows 11, click or tap the search box (or button) on your taskbar, type environment, and click or tap the “Edit the system environment variables” result.
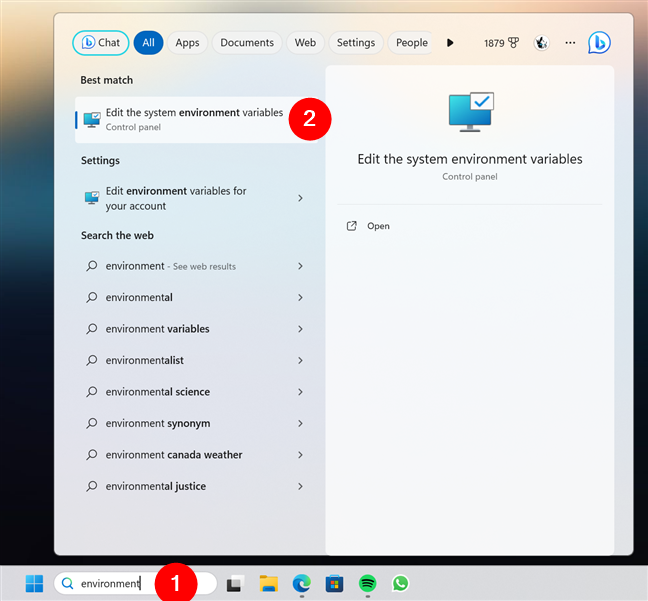
How to open the Environment Variables in Windows 11
The same applies to Windows 10. Click or tap on the search box on the taskbar, enter environment in the search box, and select “Edit the system environment variables” in the list of results.
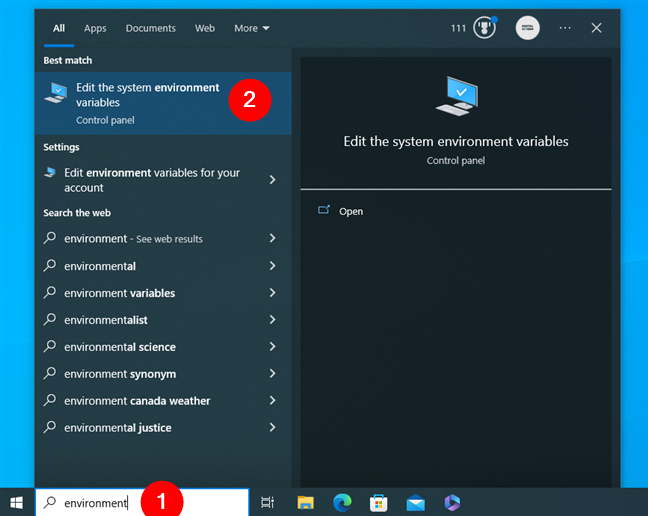
How to open the Environment Variables in Windows 10
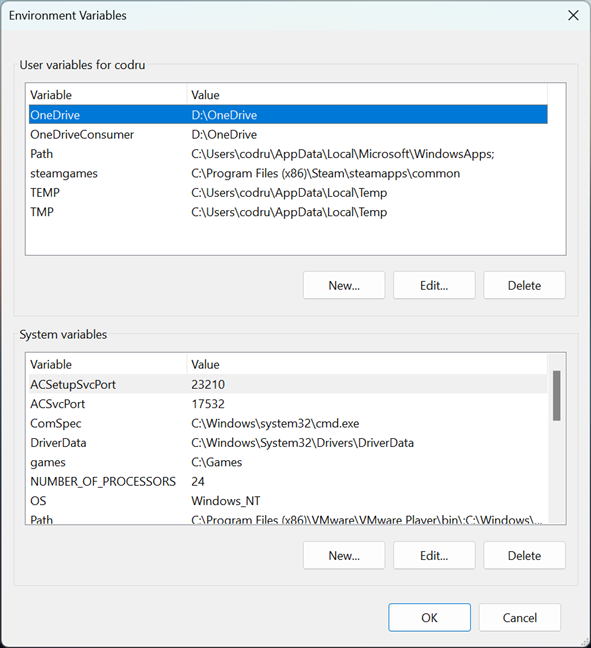
Then, the steps to create user variables or system variables are the same regardless of the operating system you’re using. As you can see in the next picture, even the Environment Variables window is identical in Windows 11 and Windows 10.
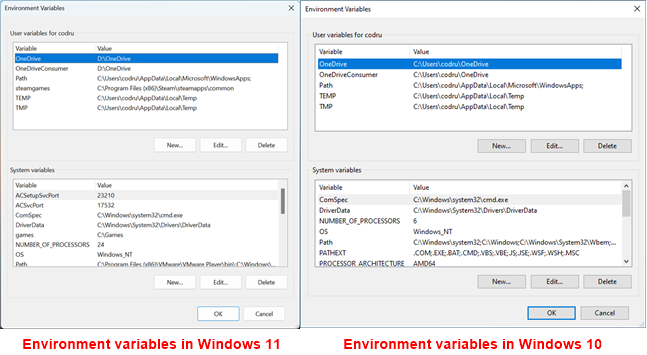
Environment Variables in Windows 11 vs Windows 10
Without further ado, here are the steps to create environment user variables and system variables in Windows:
How to create environment user variables in Windows
User environment variables are available only to your user account. When creating such variables, their values should include paths towards locations that are accessible to your user account. For example, you can’t have your user variable point to a personal folder of another user account (like Documents, Pictures, Music, etc.). In the “User variables for [user account]” section, click or tap New.
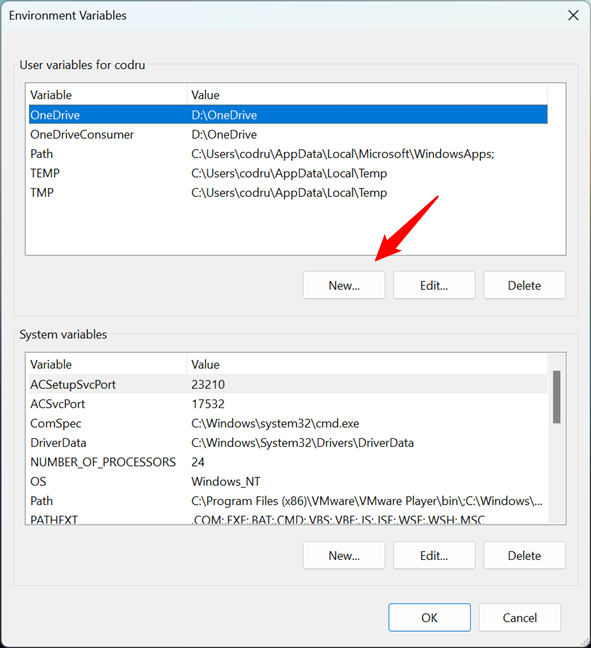
The Environment Variables window
The “New User Variable” window opens. Start by typing the name of the variable you want to create (1). Make it something suggestive to easily remember its purpose. Then, type its value (2). The value may include a path or more. A path can point to a folder or a file. You can also use other existing variables to build up the path you want. For example, if you want the variable to point to the folder used by Steam to save your games, you can set its value like this:
%programfiles(x86)%\Steam\steamapps\common
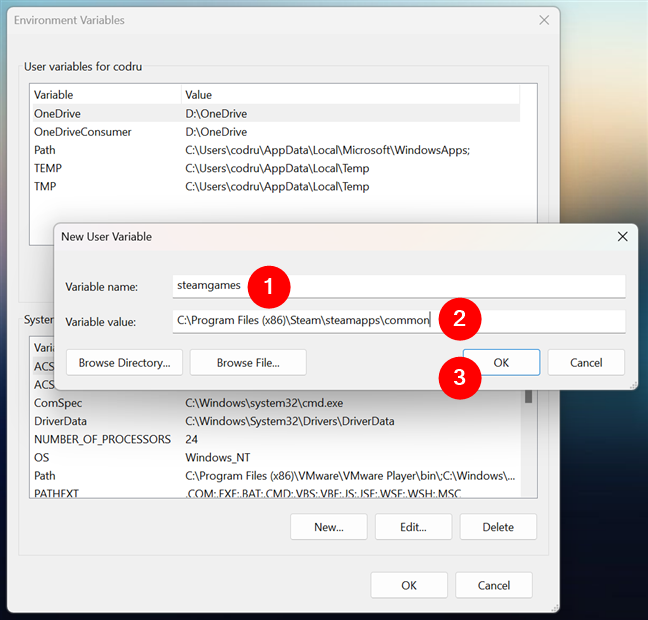
Entering the name and value of a new user variable
TIP: If you want your environment user variable to have more than one value, separate its values with semicolons (;) — for example, Path 1; Path 2; Path 3. Oh, and it’s not mandatory to use only paths to folders and files as values for user variables. Depending on what you want to do with the variable you create, you can also store strings (text) as its value.
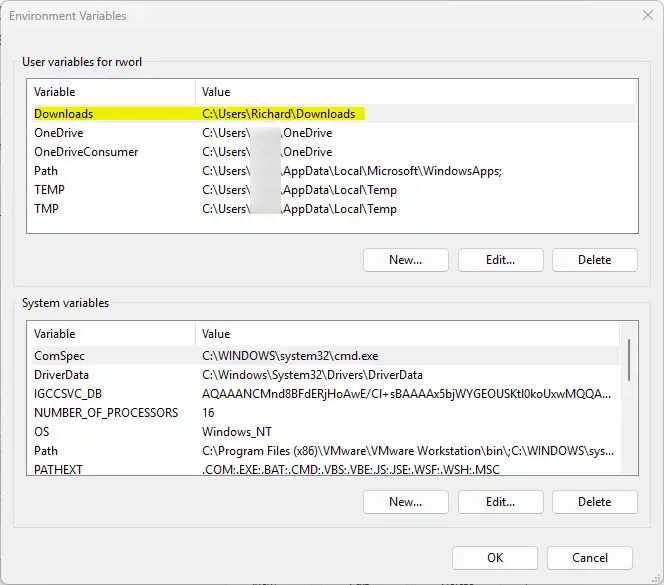
When you are done setting the user variable, click or tap OK. The new variable is added to the list of user variables, but it is not yet created, so you can’t use it at this time.
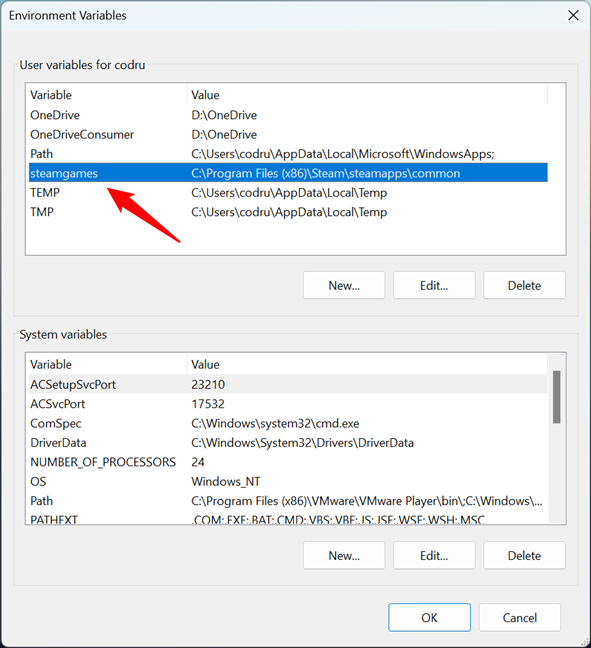
The new user variable has been added to the list
To create the new user variable, click or tap OK in the Environment Variables window.
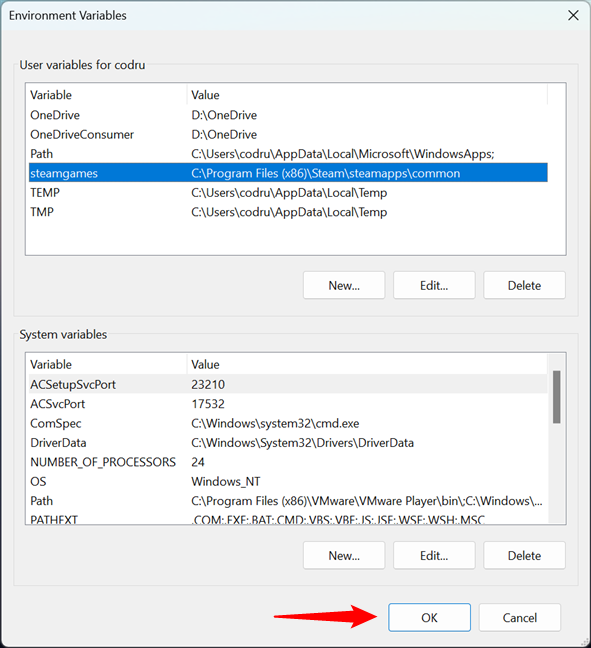
Saving the new user variable in Windows
To test if the user variable was created successfully and that it points to what you want, open a Run window (Windows + R). Type the name of the environment variable you just created between percent (%) signs. For example, to execute the steamgames variable that I just created, I have to type:
%steamgames%
Then, click or tap on OK. In my case, this action opens the folder that contains all the games I have downloaded and installed from my Steam account.
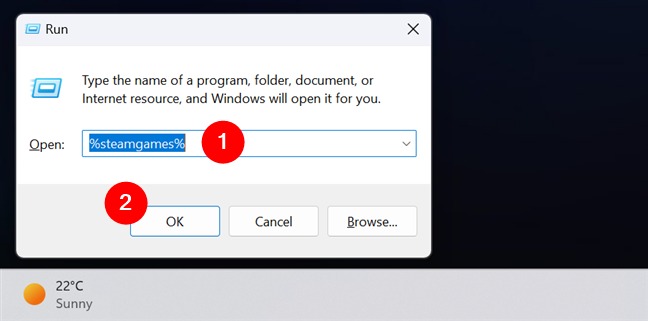
Checking a user variable in Windows
IMPORTANT: Any user can add, change, or delete user environment variables. User variables can be created by Windows 11 or Windows 10, apps, and users alike.
How to create Windows system variables
The process for creating system variables is the same as for creating user variables. To make sure you get it right, I’ll go through another quick example.
In the System variables section from the Environment Variables window, click or tap New.
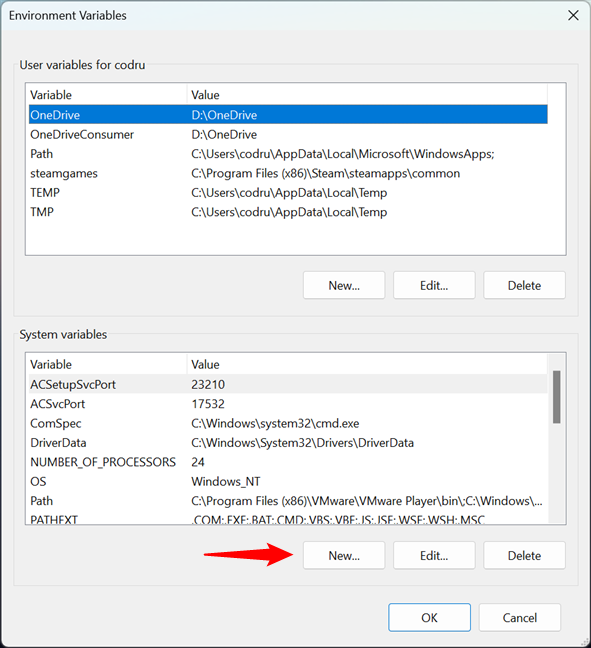
Starting the process of creating a new Windows system variable
The New System Variable window opens. Enter the variable’s name (1) and value (2). In the next screenshot, for instance, you can see that I chose to create a new system variable called games that points to a folder called Games on my C: drive.

Entering the name and value of a New System Variable
TIP: Note that you can add multiple values to a variable — all you need to do is separate them with semicolons (;). Also, keep in mind that if you specify a path as a value for a system variable, that path should be accessible to all user accounts. If that path points to a location where only one user account has access, you should create a user variable instead of a system variable.
When you are done customizing the new system variable, click or tap OK. The new variable is added to the list of system variables, but it is not yet created.
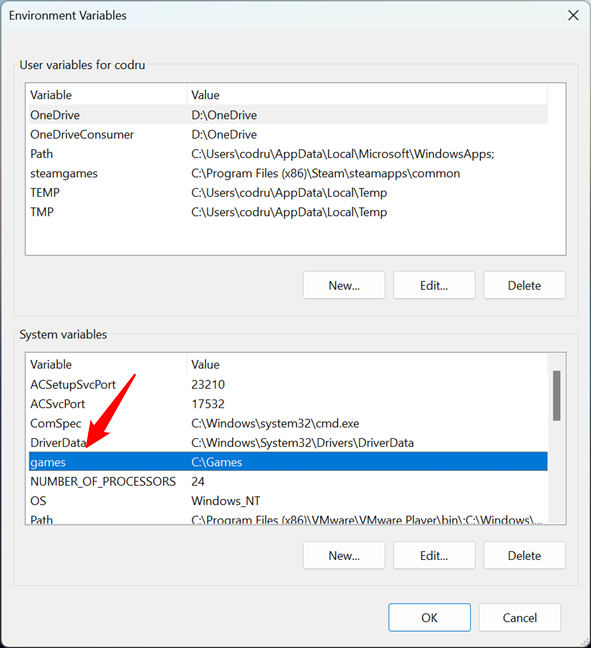
The Windows system variable has been added to the list
In the Environment Variables window, click or tap OK to create the new environment variable.
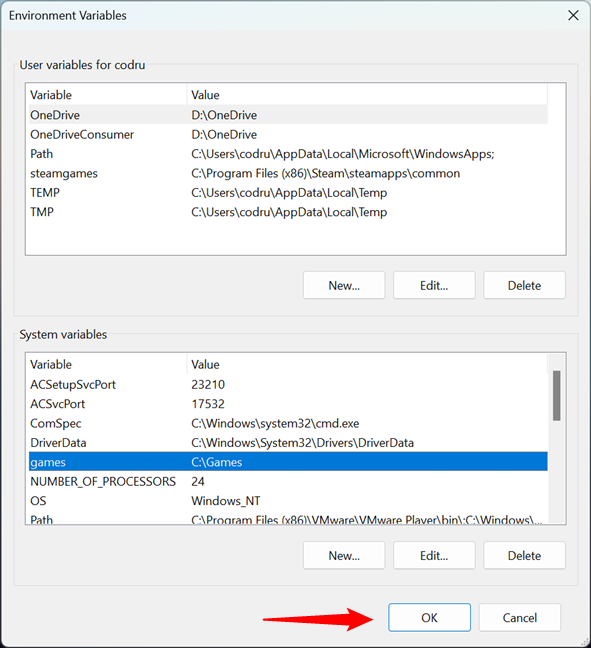
Saving a new Windows system variable
To test if the system variable was created successfully, open Run (Windows + R) and insert the name of the environment system variable you created between percent (%) signs. For example, to run the games variable that I created, I must type:
%games%
Then, press the OK button.
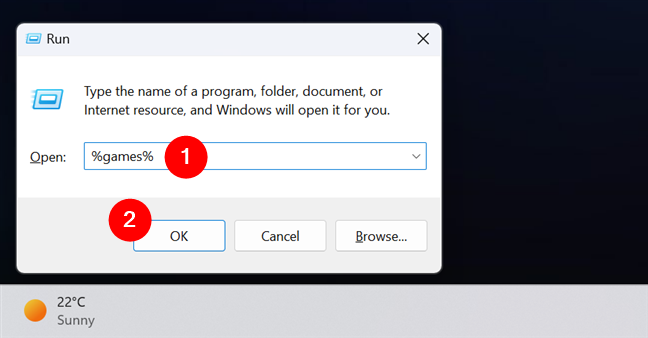
Verifying a Windows system variable
In my case, Windows opened the Games folder where I keep most of my games. All users have access to this folder, and they can use this variable to access those games quickly.
IMPORTANT: Are you wondering whether any user can add system environment variables or change existing ones’ values? The answer is NO! Only administrators can perform these actions. Standard users don’t have enough clearance to make or change Windows system variables because they affect every user and every app on the PC. If you’re using Windows 11, this tutorial provides more details about standard and administrator accounts: How to change the Administrator account on Windows 11. And, if you have Windows 10, read this guide instead: 6 ways to change an account to Administrator and back in Windows 10.
What user variables or Windows system variables did you create?
The process involved in creating environment variables in Windows is not that complicated. Furthermore, it’s the same in Windows 11 and Windows 10. However, before you get the hang of it, you should first experiment by making a couple of safe user variables that don’t negatively impact the system’s proper operation. If you have questions about environment variables or if you have something to add to this guide, don’t hesitate to leave me a comment. Also, if you want to receive news whenever we publish new articles, do subscribe to our newsletter using the form below.