
Голосовой помощник Cortana в последних версиях Windows так и не начал работать для русского языка, но само приложение присутствует в системе: пользы от него не много, а удаление стандартными средствами удаления приложений системы не предусмотрено.
В этой инструкции подробно о способах удалить Cortana в Windows 11 и Windows 10 как с помощью инструментов командной строки (PowerShell), так и с помощью сторонних бесплатных утилит. На близкую тему: Как убрать поиск с панели задач Windows 11.
Удаление Кортаны в PowerShell или Терминале Windows
Для удаления Cortana можно использовать команды Windows PowerShell и не прибегать к использованию сторонних утилит:
- Запустите Windows PowerShell от имени администратора, либо Терминал Windows от имени администратора, для этого можно использовать меню по правому клику по кнопке «Пуск» (или по сочетанию клавиш Win+X).
- Введите команду
Get-AppxPackage *Microsoft.549981C3F5F10* | Remove-AppxPackage
и нажмите Enter.

- Дождитесь выполнения команды.

Готово, Cortana будет удалена из Windows 11/10 (из текущей учетной записи пользователя) и исчезнет из списка установленных программ.
В случае, если требуется удалить Cortana для всех пользователей, используйте команду:
Get-AppxPackage -allusers *Microsoft.549981C3F5F10* | Remove-AppxPackage
Также, если ранее вы не отключали автозагрузку Кортаны, после удаления рекомендую проверить, нет ли пункта её автозагрузки в диспетчере задач и, при наличии, отключить его во избежание ошибок. Подробнее: Как убрать программы из автозагрузки Windows 11, Автозагрузка программ Windows 10.
С помощью сторонних приложений
Большинство приложений для удаления ненужных компонентов Windows 11 и Windows 10 позволяют, в том числе, удалить и Cortana.
Среди таких приложений — BC Uninstaller, бесплатное, с открытым исходным кодом и на русском языке. Сам процесс удаления должен быть ясным из следующего скриншота:

После выбора Cortana и пункта «Удалить» достаточно будет задать несколько параметров удаления (или оставить их значения по умолчанию) и подтвердить удаление. Подробная информация по использованию этого деинсталлятора и его официальный сайт — в обзоре Bulk Crap Uninstaller.
Ещё один пример отличного приложения для этих целей — O&O AppBuster.

Другие популярные деинсталляторы программ также, в большинстве своем, позволяют удалять встроенные приложения Windows 11/10. Пример удаления Cortana в бесплатной версии Revo Uninstaller:

Подробнее о таких программах в статье Лучшие деинсталляторы (программы для удаления программ) для Windows.
Если у вас остались вопросы, касающиеся удаления Cortana или иных встроенных приложений Windows, задавайте их в комментариях ниже — постараюсь подсказать варианты решения.
Шаг 1: Включение оболочки
Чтобы произвести удаление встроенного голосового ассистента в Windows 10, в первую очередь необходимо включить оболочку PowerShell через настройки меню «Пуск». Если вы сделали это заранее или соответствующие настройки установлены по умолчанию, можете сразу переходить к следующему этапу инструкции.
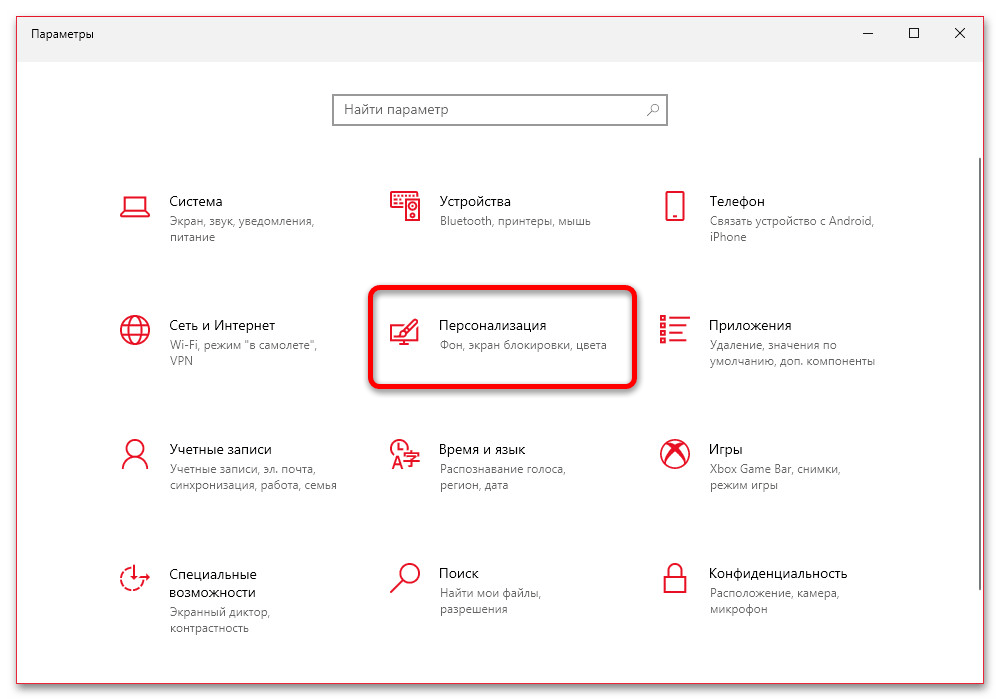
- Откройте меню «Пуск» с помощью значка на панели задач и перейдите в раздел «Параметры». Находясь на данной странице, необходимо перейти в категорию «Персонализация» и выбрать «Панель задач» в левой части экрана.
- В рамках основной области рабочего окна найдите и задействуйте опцию «Заменить командную строку оболочкой Windows PowerShell». Изменения вступят в силу моментально, и потому вручную сохранять настройки не требуется.
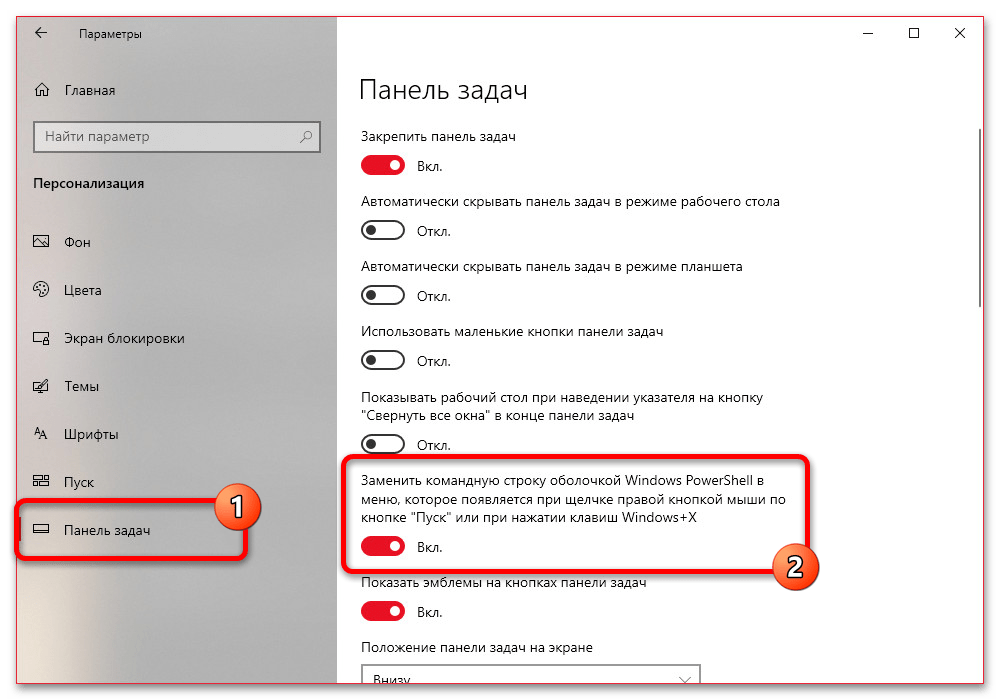
Убедиться в успешном включении оболочки можно путем нажатия правой кнопкой мыши по значку Windows на панели задач и поиска пунктов «Windows PowerShell». При этом помните, что данное действие призвано упростить вызов обновленной консоли, так как оболочка все равно будет доступна через меню «Пуск».
Шаг 2: Удаление приложения
Избавиться от Cortana в Windows 10 через рассматриваемую оболочку можно исключительно в последних выпусках операционной системы, начиная с версии «2004», когда ассистент был преобразован в отдельное приложение. Если вами используется более ранняя сборка, к сожалению, действия из инструкции не принесут никаких результатов.
Читайте также: Отключение Cortana в Windows 10
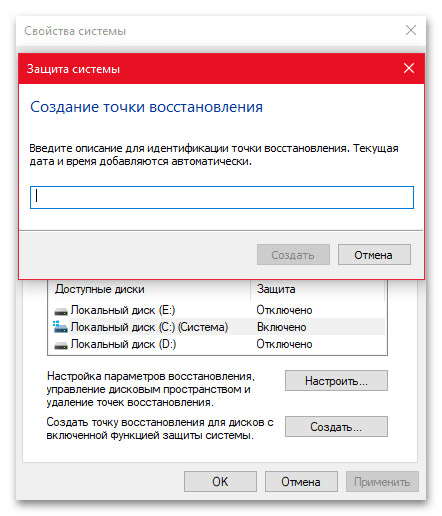
- Рекомендуем заранее перед ознакомлением с дальнейшими шагами настроить и создать точку восстановления. Это необходимо, если в процессе удаления возникнут какие-либо затруднения или потребуется вернуть ассистента.
Подробнее: Создание точек восстановление и способы восстановления Windows 10
- Если вами заранее был включен PowerShell в качестве стандартной оболочки, кликните правой кнопкой мыши по иконке «Пуск» и выберите «Windows PowerShell (Администратор)». В противном случае необходимо запустить соответствующую программу из общего списка в меню «Пуск» от имени администратора.
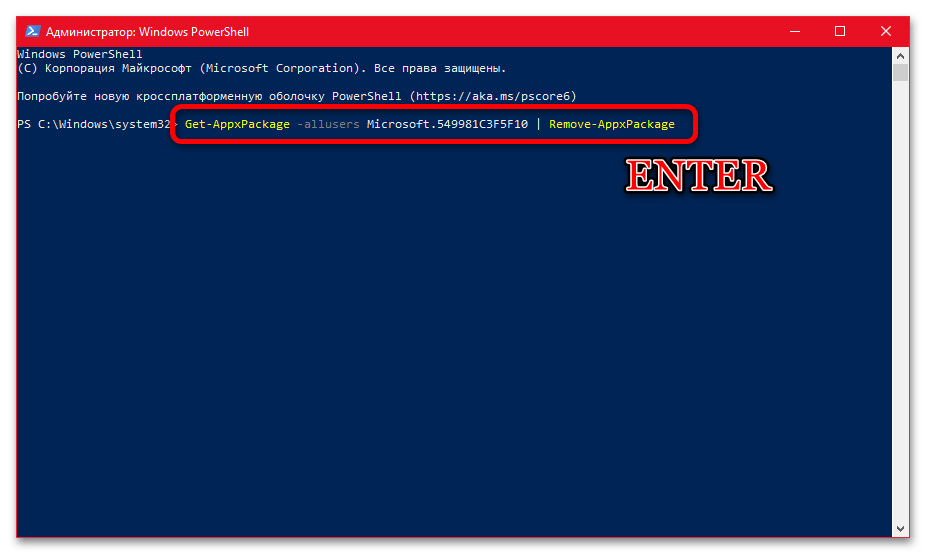
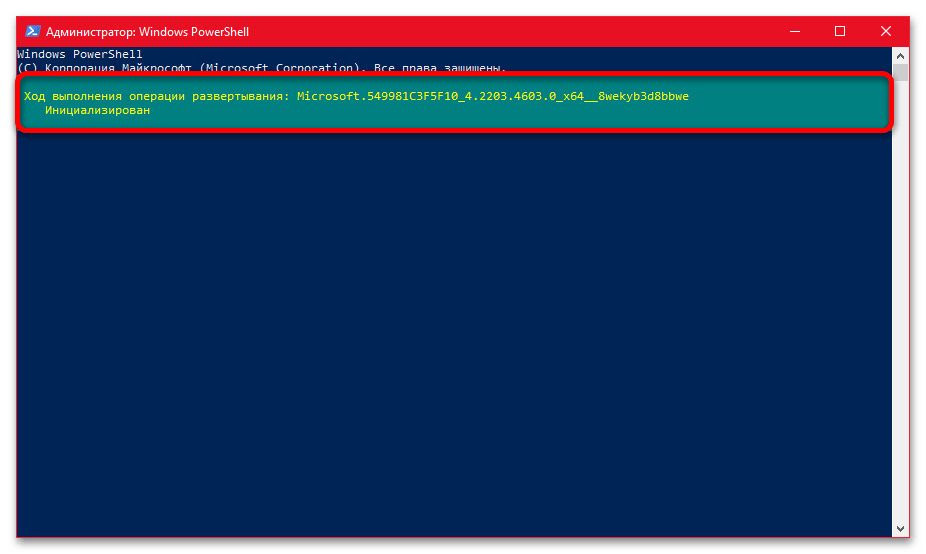
- Находясь в окне «Администратор: Windows PowerShell», введите без изменений представленную ниже команду и нажмите «ENTER», чтобы удалить голосового помощника для текущего пользователя. Для удобства можете выделить, скопировать и вставить текст через контекстное меню.
Get-AppxPackage -allusers Microsoft.549981C3F5F10 | Remove-AppxPackage - Чтобы полностью избавиться от Кортаны вне зависимости от активного пользователя, используйте немного измененную команду. Помните, что данное действие является необратимым, особенно если решили не создавать точку восстановления системы.
Get-AppxPackage -allusers *Microsoft.549981C3F5F10* | Remove-AppxPackage - Указанная команда приведет к деинсталляции приложения со связанным идентификатором, о чем будет сказано в основном окне консоли, как видно из примера. Если в процессе возникают какие-либо ошибки, вероятно Cortana была удалена ранее или вами используется более ранняя версия Windows 10.

Дополнительно можете посетить список установленных приложений в Windows 10 или попытаться вызвать голосового ассистента с целью проверки. При отсутствии Cortana в системе любое из этих действий приведет к негативным результатам.

Вернуть рассматриваемое приложение при желании в будущем можно путем установки соответствующего ПО со страницы в Microsoft Store или использования точки восстановления. При этом успешное восстановление гарантировано только в первом случае.
Наша группа в TelegramПолезные советы и помощь
-
Home
-
News
- How to Remove/Uninstall Cortana in Windows 10 – 3 Ways
By Alisa |
Last Updated
You can easily remove Cortana in Windows 10 if you want. Here is the detailed guide for how to completely remove/uninstall Cortana from Windows 10. FYI, MiniTool, not only provides useful solutions to various computer problems, but also provides a set of useful computer software like MiniTool Power Data Recovery, MiniTool Partition Wizard, MiniTool ShadowMaker, etc.
In the past, Cortana is a part of Windows 10 Search, and some of you may find it’s hard to remove Cortana. After Windows 10 May 2020 Update, Cortana is no longer a part of Windows 10, and it is a stand-alone app. You can update it from Microsoft Store or even uninstall Cortana in Windows 10.
If you don’t need Cortana and want to completely remove Cortana from your Windows 10 computer, you can try the 3 ways below.
How to Completely Remove Cortana in Windows 10 – 3 Ways
Way 1. Remove Cortana with PowerShell
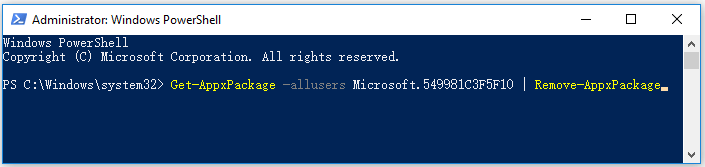
Step 1. Press Windows + X, and click Windows PowerShell (Admin) to open Windows PowerShell utility.
Step 2. Next you can copy and paste the following command line in PowerShell window, and press Enter to remove Cortana from Windows 10.
Get-AppxPackage -allusers Microsoft.549981C3F5F10 | Remove-AppxPackage
Way 2. Permanently Disable Cortana via Registry Editor
Since you can’t uninstall Cortana via Control Panel like uninstalling other programs, you can remove it from your Windows 10 computer by editing the Registry.
But it’s highly advised you backup Registry first before you do some edits, so that you can easily restore Registry after some wrong operation. (Related: Backup and restore Registry)
Alternatively, you can also create a system restore point for your Windows system in case something goes wrong. Check how to remove Cortana by editing Registry below.
Step 1. You can press Windows + R, type regedit in Run dialog, and press Enter to open Registry Editor in Windows 10.
Step 2. Next click as the following path: HKEY_LOCAL_MACHINE\SOFTWARE\Policies\Microsoft\Windows\Windows Search. If you don’t see a Windows Search folder, you can right-click Windows folder and click New -> Key, and create a new key named Windows Search.
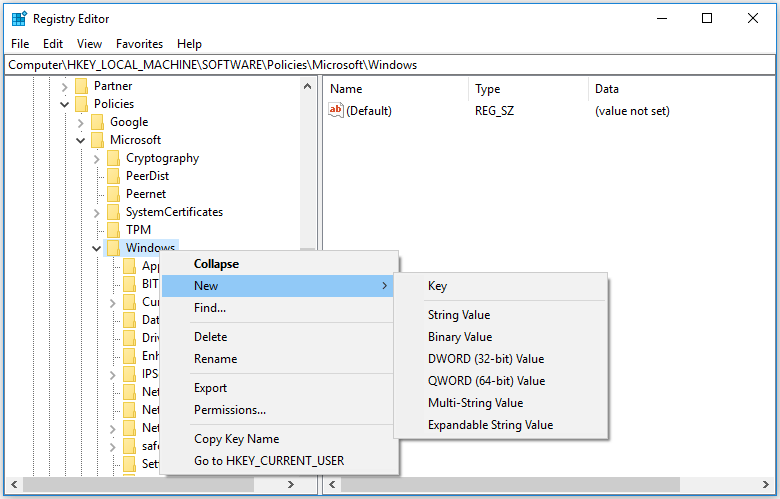
Step 3. Then right-click Windows Search key and click New -> DWORD (32-BIT) Value. Give the new value a name AllowCortana.
Step 4. Double-click AllowCortana key and change its Value data to 0. Click OK to save the editing. Restart your computer to make the changes take effect.
Then you will see a standard Windows Search box but not Cortana at Taskbar. If you want to enable Cortana again, you can go to the AllowCortana key in Registry Editor to delete it or change its value data to 1.
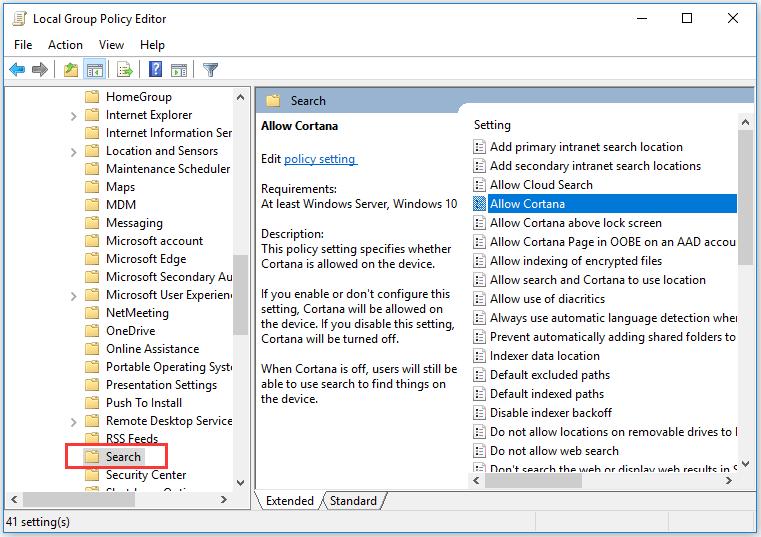
Way 3. Remove Cortana on Windows 10 with Group Policy
Step 1. Press Windows + R, type gpedit.msc in Run dialog, and press Enter to open Group Policy in Windows 10.
Step 2. Click as the following in Group Policy window: Computer Configuration > Administrative Templates > Windows Components > Search.
Step 3. Find Allow Cortana option in the right window, double-click it.
Step 4. Click Disabled option and click OK to save the changes. Reboot your computer to apply the changes.
Related: How to Reset Group Policy Settings to Default.
How to Remove Cortana from Taskbar on Windows 10
You can right-click the blank space at Windows 10 Taskbar, click Cortana and select Hidden.
To show Cortana icon at Taskbar again, you can right-click Taskbar, click Cortana and select Show Cortana icon.
How to Remove Cortana from Task Manager
- You can press Ctrl + Shift + ESC to open Task Manager on Windows 10.
- Click Startup tab in Task Manager, and right-click Cortana. Click Disable to remove Cortana from Windows 10 Task Manager.
Bottom Line
If you want to remove Cortana from Windows 10 computer, you may try the three ways. However, editing either Registry or Group Policy is a little dangerous. If you don’t like Cortana, it’s advised you just don’t use it.
About The Author
Position: Columnist
Alisa is a professional English editor with 4-year experience. She loves writing and focuses on sharing detailed solutions and thoughts for computer problems, data recovery & backup, digital gadgets, tech news, etc. Through her articles, users can always easily get related problems solved and find what they want. In spare time, she likes basketball, badminton, tennis, cycling, running, and singing. She is very funny and energetic in life, and always brings friends lots of laughs.
Environment variables are special settings that store information about the system and the programs installed on it. They can be used to customize the behavior of applications, scripts, and commands. But can environment variables be deleted? The answer is yes, and that’s a good thing, as sometimes, you may need to modify or remove an environment variable. For example, to change a configuration option or to fix a problem. In this article, I’ll show you how to edit or delete environment variables, as well as how to unset environment variables in Windows using different methods and tools, including Command Prompt and PowerShell.
NOTE: The instructions in this guide apply to both Windows 11 and Windows 10, as everything related to handling environment variables is the same in both operating systems.
Open the Environment Variables window
To make many of the edits shown in this article, you first need to open the Environment Variables window. This guide explains how to do that and shows you the basics about working with environment variables: What are environment variables in Windows?.
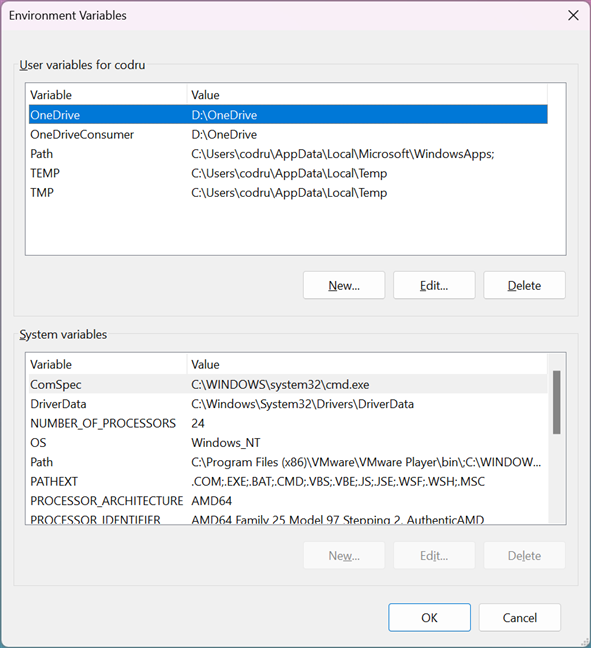
The Environment Variables window in Windows
If you want to skip reading it, one path that works the same in Windows 11 and Windows 10 is to open the Run window (Win + R) and execute the command:
rundll32.exe sysdm.cpl,EditEnvironmentVariables
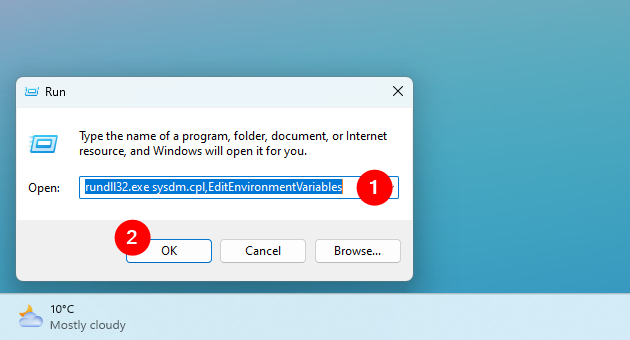
How to open the Environment Variables in Windows
TIP: You can run the command in Command Prompt, PowerShell, or Windows Terminal to the same end, too.
How to edit an environment variable in Windows
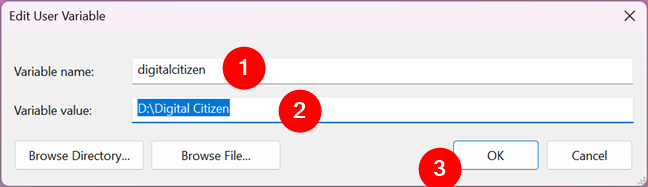
If you want to change the value of an existing environment variable, first select it in the Environment Variables window. Then, click or tap Edit.
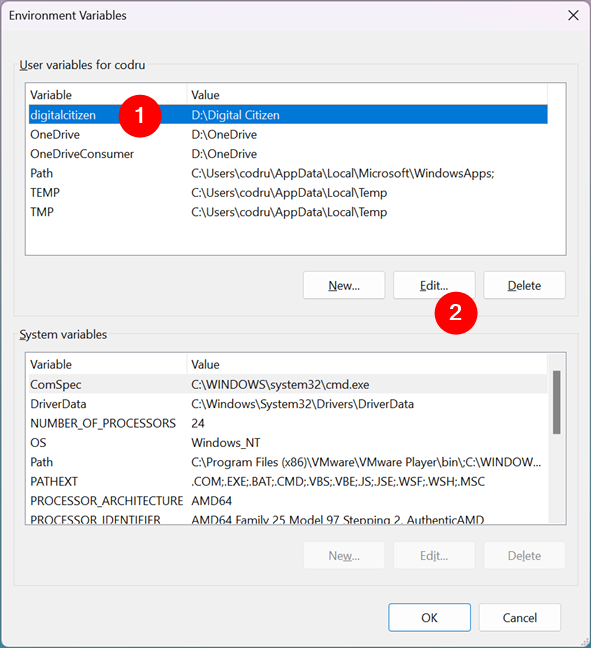
How to edit an environment variable in Windows
You are shown a window where you can edit both the name and the value of the variable. Make the modifications you want and press OK. Then, press OK one more time in the Environment Variables window.
Editing an environment variable
How to edit an environment variable from Command Prompt
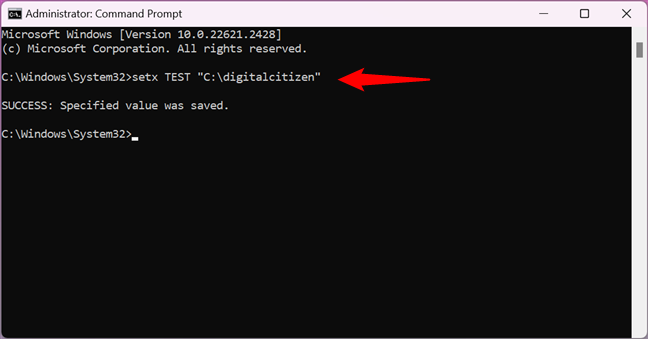
You can create a new environment variable or edit the value of an existing environment variable (but not its name) from the Command Prompt too. If you want to create a user environment variable, enter this command:
setx variable_name “value”
If you want to create a system environment variable, add the m argument to the command like this:
setx variable_name “value” /m
For example, I wanted to create a user variable named TEST with the value C:\digitalcitizen. To that end, I had to run this command:
setx TEST “C:\digitalcitizen”
How to set an environment variable using Command Prompt
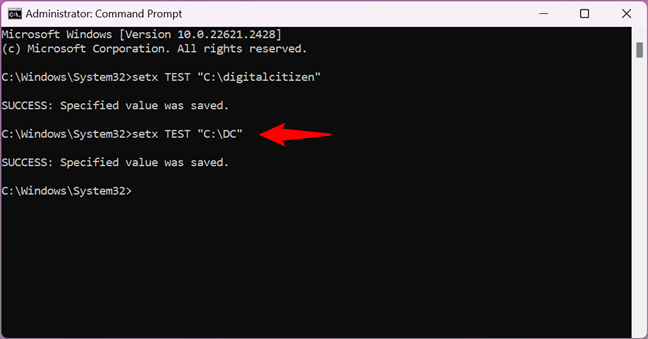
To change the value of an environment variable, run the same setx command but specify a new value for the variable. For instance, to change the value of my TEST environment variable to C:\DC, I have to execute this command:
setx TEST “C:\DC”
How to change the value of an environment variable in Command Prompt
That works because the setx command rewrites the existing value with the last one you type. Therefore, if you use this command multiple times on the same variable, the variable will keep the last value you typed.
If you want a variable to have multiple paths in its value, you must specify them all in a single setx command, like in the next screenshot. Make sure that each value you enter is separated from the previous one by a semicolon, without spaces.
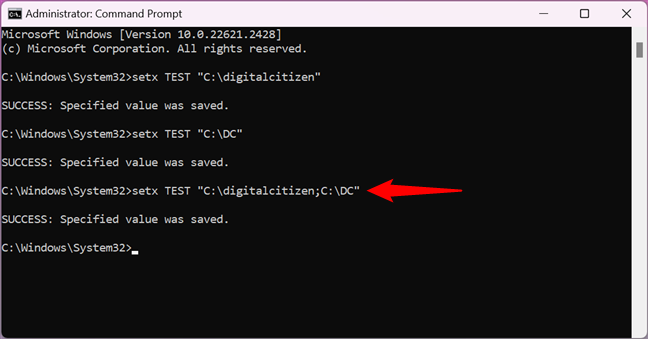
Add multiple values to an environment variable using CMD
TIP: You can get a list of all the environment variables available by running the command:
set
Note that the command is set, not setx, and there aren’t any parameters added to it. Moreover, if you just created or edited an environment variable, you must close and reopen Command Prompt for the changes to show up.
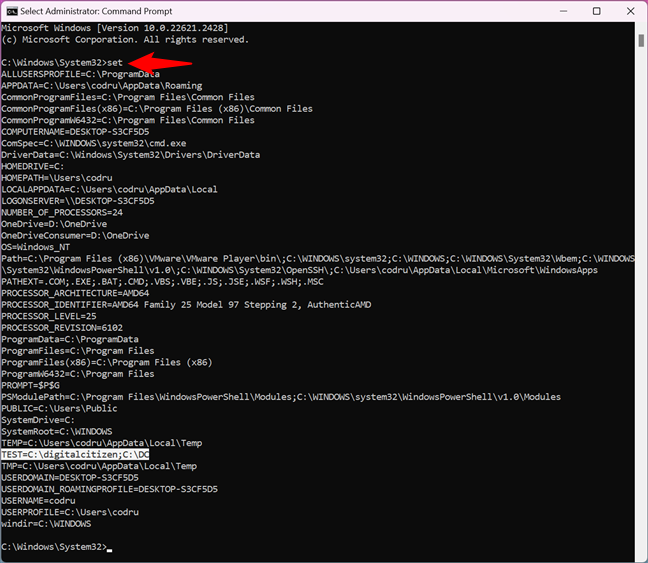
How to see all the environment variables in Command Prompt
How to edit an environment variable from PowerShell
You can also create or edit the value of an existing environment variable from PowerShell. If you want to create a user environment variable, the PowerShell command is:
[Environment]::SetEnvironmentVariable(«variable_name»,»variable_value»,»User»)
If you want to create a system environment variable, the command is this one:
[Environment]::SetEnvironmentVariable(«variable_name»,»variable_value»,»Machine»)
For instance, in order to create a user environment variable called TEST with the value digitalcitizen.life, I ran the command:
[Environment]::SetEnvironmentVariable(«TEST»,»digitalcitizen.life»,»User»)
To change the value of the variable later, you can run the same command using a different value. Just like setx in Command Prompt, this command rewrites the value of the specified variable each time you run it.
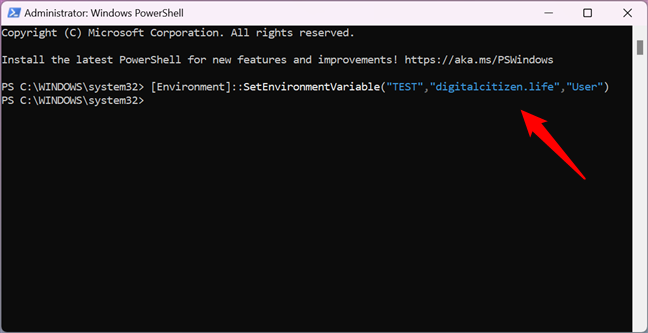
How to set an environment variable with PowerShell
If you want to assign multiple values to a variable, type all of them in the command, with semicolons between each value, as illustrated below.
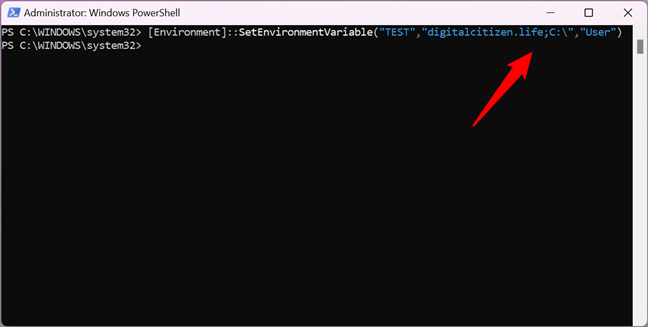
How to add multiple values to an environment variable in PowerShell
TIP: In PowerShell, you can get a list of all the environment variables by running the command:
Get-ChildItem Env:
However, if you just created or edited an environment variable, you must close and reopen PowerShell for the changes to show up.
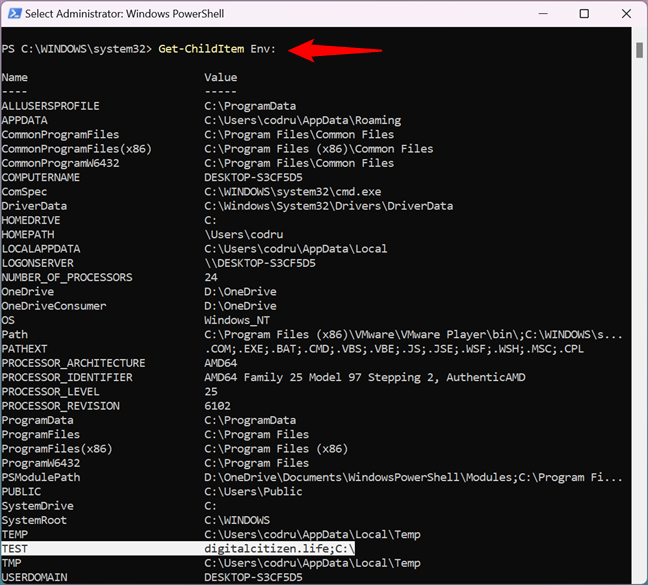
How to see all the environment variables in PowerShell
How to clear the value of an environment variable in Windows (from Command Prompt)
If you want to remove the value of an environment variable (while keeping its name), you can’t do it with the mouse and keyboard from the Environment Variables window. If you select a variable and press Edit, you can delete the value, but you cannot press OK, as this button gets grayed out. Therefore, you can’t save your changes.
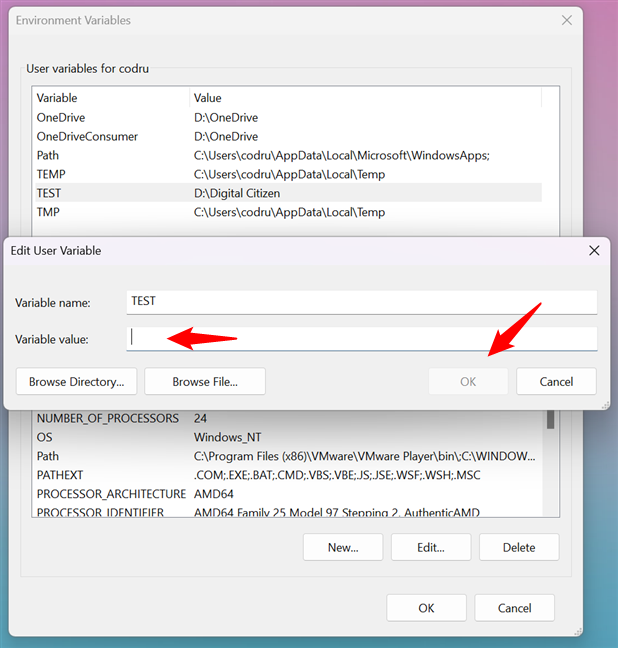
Attempt to clear an environment variable in Windows
However, you can clear the value of an environment variable using Command Prompt. To unset an environment variable from Command Prompt, type the command:
setx variable_name “”
For example, because I wanted to unset my TEST variable and give it an empty value, I ran this command:
setx TEST “”
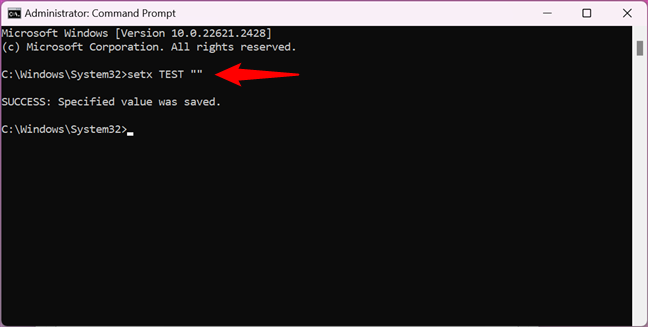
How to clear an environment variable with Command Prompt
Next, let’s see how to remove an environment variable.
How to delete an environment variable in Windows
If you no longer want to use a particular environment variable, select it in the Environment Variables window. Then, press Delete. Windows does not ask for any confirmation of this action.
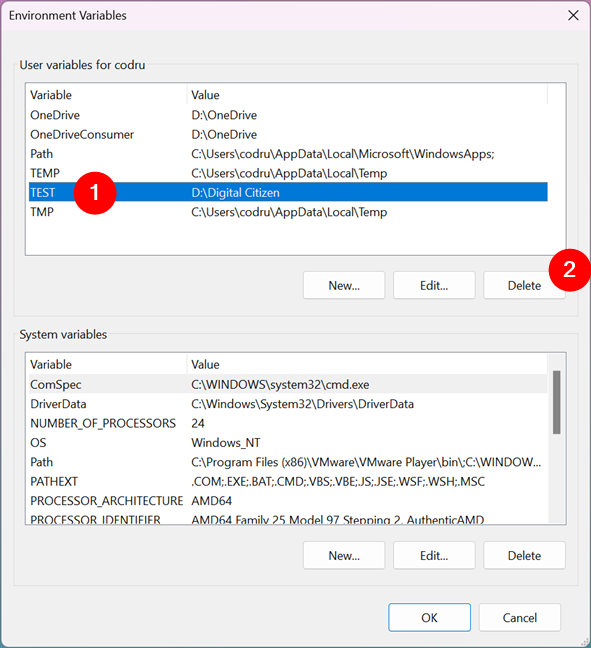
How to delete an environment variable in Windows
Therefore, if you’ve changed your mind, you must press Cancel to NOT apply the removal. If you want to proceed with the deletion, press OK.
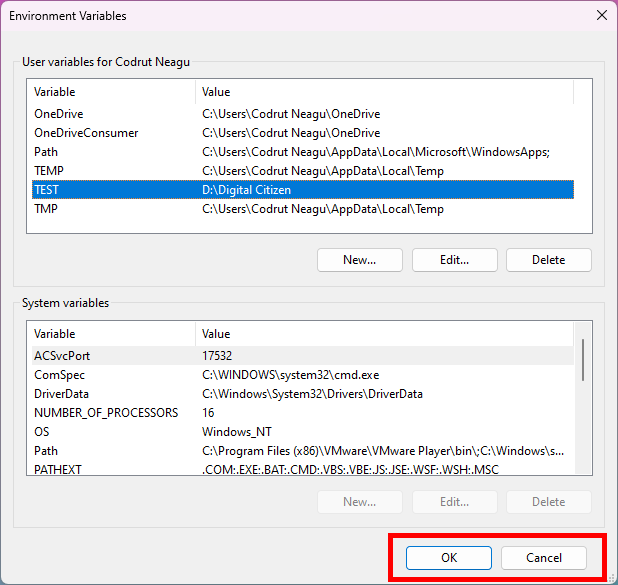
Press OK to delete the variable, or Cancel to keep it
How to use Command Prompt (CMD) to delete an environment variable
To delete an environment variable from Command Prompt, run this command:
REG delete “HKCU\Environment” /F /V “variable_name”
… if it’s a user environment variable, or run this command if it’s a system environment variable:
REG delete “HKLM\SYSTEM\CurrentControlSet\Control\Session Manager\Environment” /F /V “variable_name”
For example, to remove my TEST environment variable from my user’s profile, I ran:
REG delete “HKCU\Environment” /F /V “TEST”
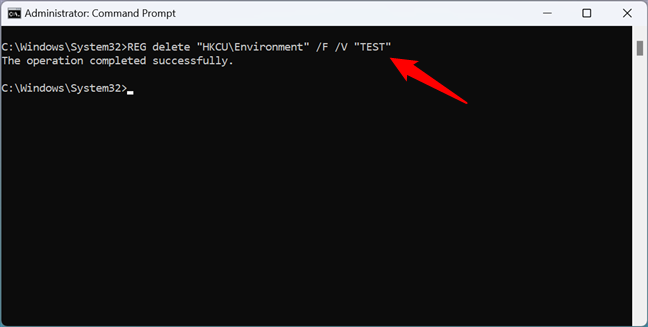
How to unset an environment variable in Windows using Command Prompt
How to use PowerShell to delete an environment variable
To unset and remove an environment variable with PowerShell, type the command:
[Environment]::SetEnvironmentVariable(«variable_name», $null, «User»)
…if it’s a user profile variable, or run this command if it’s a system-wide variable:
[Environment]::SetEnvironmentVariable(«variable_name», $null, «Machine»)
For example, to have PowerShell remove my TEST environment variable from my user profile, I had to run this command:
[Environment]::SetEnvironmentVariable(«TEST», $null, «User»)
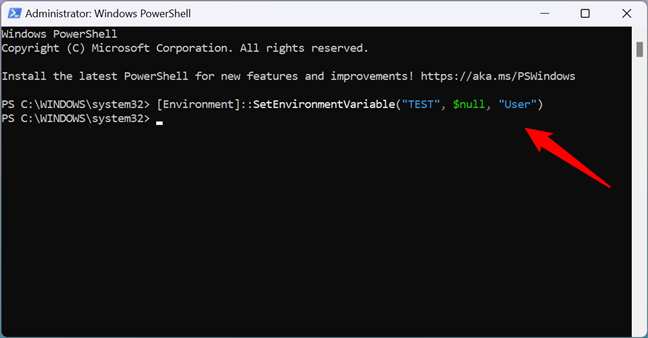
How to delete an environment variable from PowerShell
That’s it!
Why did you need to edit or delete environment variables in Windows?
You now know that Windows can unset environment variables. You’ve seen how to use PowerShell to delete environment variable values and how to use PowerShell to remove environment variables completely. Moreover, you also know how to use CMD to delete any environment variable. But why did you want to change or edit environment variables? Was it because there were leftover variables on your system from certain apps that you no longer used? Or was it because you have a special setup and you need to work with environment variables? Let me know in the comments section below.
In this article, we are going to see how to set, edit and delete environment variables in Windows 11 operating system along with step by step guide with the help of appropriate screenshots. Different-2 programs require different environment variable settings to be executed.
The environment is mainly used to store the information about the system environment running in the current machine.
Basically, The meaning of setting the environment variable is creating a shortcut to start a program instead of remembering the location of the program. By creating the environment you can start the program just by typing a single keyword.
That’s why it is one of the most important for windows users to know how to set environment variables in windows 11.
Headings of Contents
- 1 What is Environment Variable in Windows?
- 2 Why You Need to Environment Variable
- 3 How to Set Environment Variables in Windows 11?
- 4 How to Change the Environment Variable in Windows 11
- 5 How to Delete Environment Variable in windows 11
- 6 How to Set Environment Variable using Command Prompt
- 7 Changing environment variable using command prompt
- 8 Access Environment Variable using Command Prompt
- 9 Setting Environment Variable using Windows Powershell
- 10 How to Access Environment Variable using Powershell
- 11 Changing Environment Variable using Windows PowerShell
- 12 Deleting Environment Variable using Windows Powershell
- 13 Conclusion
What is Environment Variable in Windows?
The environment variable is the process of setting the dynamic variable value in the machine. In other words, the Environment variable is the way to store the global variable value that is used by all the processes and users that are running under the machine. Environment variables represent the new software installation directory location, Windows Operating system file location, etc. The value of the environment variable is used by the programs to determine where the files are stored actually.
These are some common environment variables available in the windows operating system.
- Path:- Path is one of the most popular environment variables in the windows operating system that is used to store the list of directories to search for executable programs and also it is one of the most frequently used environment variables.
- Username:- This is for the username of the system.
- OS:- The operating system name.
There are other environment variables available except all of the above.
Why You Need to Environment Variable
Windows Environment variables are used to store the data that are used by windows and other programs. For example, windir environment variable stores the location of the Windows installation directory. Programs can query the value of this variable to find where the files of the Windows operating system are located.
There are two types of environment variables available in windows machines first are system variables and the second is user variables that are logged in. Logged-in users can only change their own environment variable if they don’t have administration permission even another user can not change the environment variable.
Let’s take another example about environment variable so that you can get more clarity, Suppose you are going to install Python on your machine and then during the installation of the Python it will ask you, to add a python executable file to your environment variable if you do not check that setting and continue the installation. After successfully the installation of Python you are ready to execute any Python script but you have to remember one thing each time you have to specify the location of the Python executable to execute the Python script but if you check that setting during the installation then you don’t need to specify the location of the Python executable each time.
But after the installation of Python or any software you can manually set the environment variable.
Let’s see how can you set a new environment variable in your windows 11 machine.
Note:- All the variable names which I will set, edit and delete throughout this article will just be for testing. You can set your own required environment variable.
How to Set Environment Variables in Windows 11?
With the help of the following points you can set your environment variable in your windows machine.Here I will go with windows 11 machine.
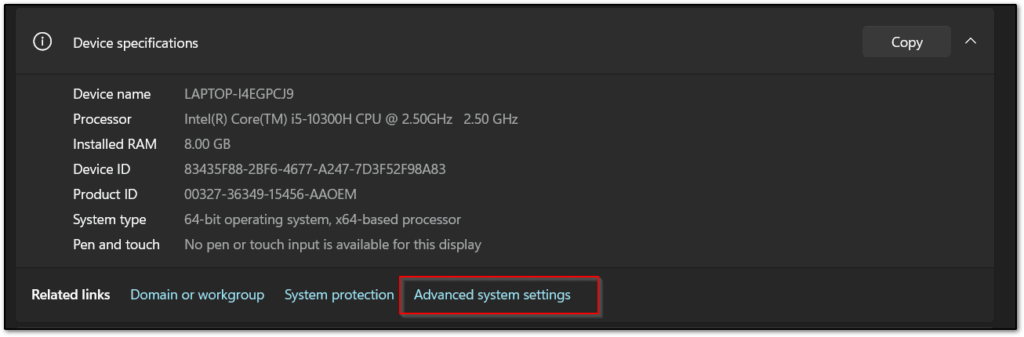
- To set the environment variable in Windows you have to right-click on
This PCicon and again click onProperties.
- Now you have to click on “Advanced system settings“.
- Click on “Environment Variables“.
- After clicking on Environment variables, you can see all your system environment variables ( User and System ) very clearly.
- User Variables:- User variable will contain environment variables about the current logged-in user, If you want to change the environment variable of the logged-in user then you have to change it inside this variables section.
- System Variables:- System variable contains variables and values system-wide.This variable will be available for all the users across the machine which means it is a system-wide change.
You can choose according to your need. Here I am going with User variables.
- After deciding your appropriate environment variables section, click on New.
- Now, It will ask you to provide the variable name and value of the variable. Here I am setting the Java executable environment variable and after that click OK until all the open environment variables windows are gone.
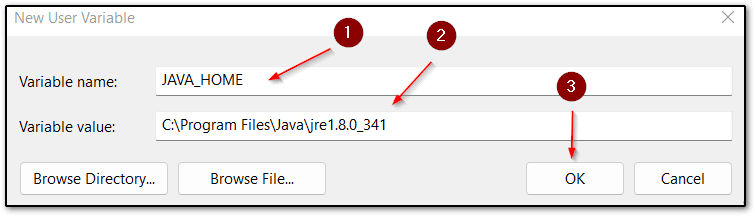
So finally we have seen the whole process to set new environment variables in the windows 11 machine.
How to Change the Environment Variable in Windows 11
Here I’m gonna show you, how you can change or edit the environment variable.
- To change the environment variable, press “Windows + R” and type “sysdm.cpl” and hit enter.
- Go to Advanced > Environment variables section
- Select the environment variable which you want to change and click edit
- Provide variable name and variable value as your wish and then click Ok
How to Delete Environment Variable in windows 11
Sometimes you require to delete existing environment variables. With the help of these steps, you can delete any existing environment variables.
- To delete the environment variable, press “Windows + R” and type “sysdm.cpl” and hit enter.
- Go to Advanced > Environment variables section.
- Select the environment variable which you want to delete and click delete.
- After clicking on delete, your environment variables will be deleted successfully.
How to Set Environment Variable using Command Prompt
Windows command prompt also provides us with some useful commands to work with windows environment variables. here I am going to show how to set environment variables using a command prompt.
- First, you need to open your command prompt, To open the command prompt press “Windows + R” and type “cmd“, and hit enter.
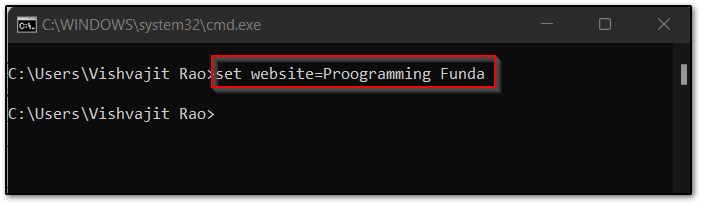
- Windows provide a useful command “set” to set the environment variable. The syntax for setting the new environment variable is that
set variable_name=variable_value. Here I am going to set an environment variable website=Proogramming Funda so my whole command would beset website=Proogramming Funda.
To verify whether the environment variable was created or not, you can execute the set command. This command shows all the environment variables with values.
Changing environment variable using command prompt
To change the existing environment variable, you have re-assign the value of the existing environment variable by using the following command.
set variable_name=variable_valueNote:- Make sure you are not going to change the variable name.
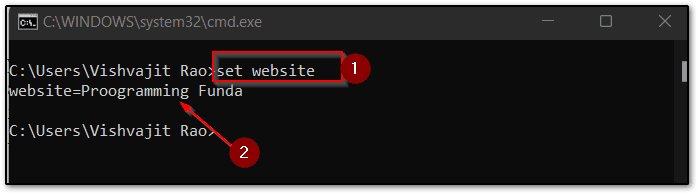
Access Environment Variable using Command Prompt
To access the existing environment variable in the windows machine, Open the command prompt and issue the set variable_name statement.
Here variable_name represents the name of the variable which you want to access.
As you can see from below the screenshot, I am accessing the website environment variable.
Setting Environment Variable using Windows Powershell
Here I’m gonna show you can set, edit and delete the environment variable using Windows PowerShell.
- To open Powershell, Press “Windows + R” type “PowerShell” and hit enter.
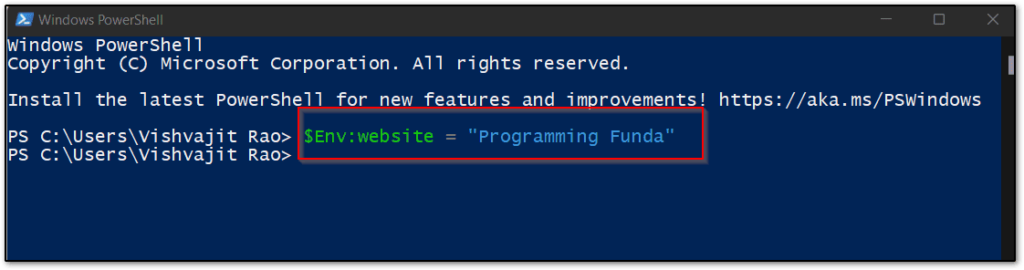
- The following is the syntax of the setting new environment variable in windows with help of the windows PowerShell.
$Env:<variable-name> = valueIn the above syntax, variable-name represents the name of the variable which you want to keep, and the value represents the value of a variable.
So here I am going to set a variable name website along with the value “Programming Funda“.
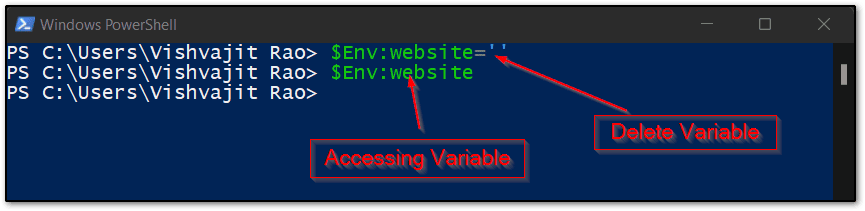
How to Access Environment Variable using Powershell
- To access the existing environment variable using Windows Powershell, Search “Powershell” in the search bar and open windows power shell.
- The syntax for accessing the environment variable is “$Env:variable_name“. Here I am going to see the value of an environment variable named website.
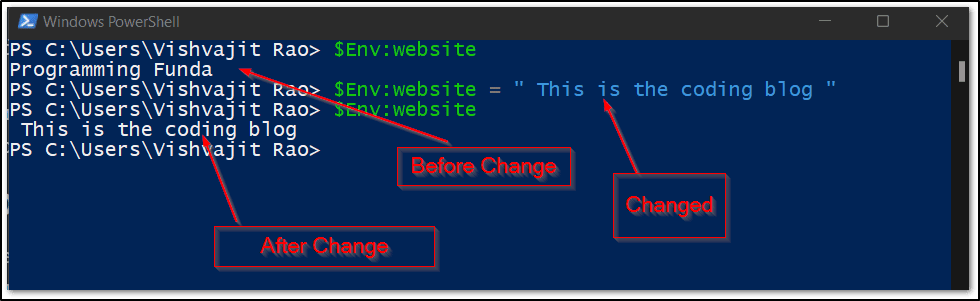
Changing Environment Variable using Windows PowerShell
If you want to change the value of the existing environment variable using windows PowerShell, Then you have to re-assign the value of the environment variable. As you can see below the image.
Deleting Environment Variable using Windows Powershell
To delete the environment variable in a windows machine using PowerShell you have to assign the blank string to that variable. As you can see below screenshot.
Conclusion
So in this article, we have seen all about how to set, edit, and delete environment variables in windows 11. Here I have more than one method to set, delete and edit windows environment variables as per your choice.
Environment variables is basically a process of storing variables and their values globally in the system so that programs, processes, and users determine where the configuration files, installation directory, drivers, and executable
are stored.
I hope this article is very useful for you. If you like this article please share and keep visiting for further interesting tutorials.
Ref:- Click Here
Thanks for your valuable time …