
Если на вашем компьютере установлено более одной ОС Windows 11, Windows 10 или других версий этой ОС, по умолчанию при загрузке будет появляться меню «Выберите операционной систему». В некоторых случаях отображаемые пункты могут быть одинаковыми, а их порядок — не тот, который удобен вам.
В этой простой инструкции подробно о том, как переименовать пункты для установленных операционных систем в меню выбора ОС при загрузке, а также изменить их очередность. Речь пойдет лишь о стандартном меню и загрузчике Windows.
Изменение имени пункта в меню выбора операционной системы при загрузке

Если вам требуется переименовать какой-то из пунктов в меню загрузки, достаточно выполнить следующие простые шаги:
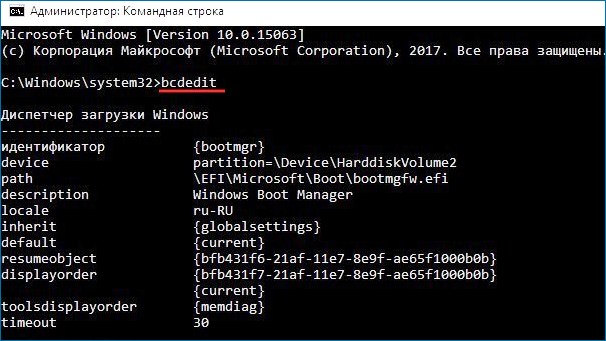
- Запустите командную строку от имени администратора. Для этого можно использовать поиск в панели задач по «командная строка», а затем выбрать пункт «Запуск от имени администратора».
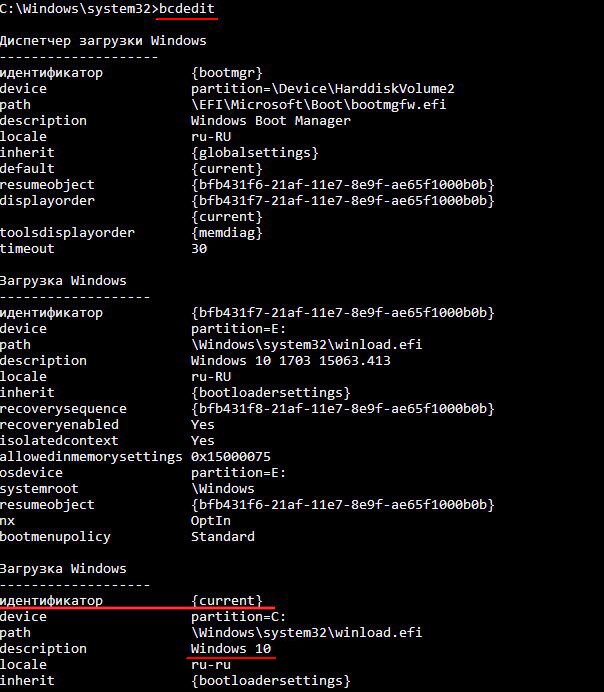
- Введите команду bcdedit и нажмите Enter — это отобразит различные элементы загрузки, в нашем случае интересны пункты «Загрузка Windows». Для изменения имени пункта меню нам потребуется его идентификатор. Загрузка Windows с идентификатором {current} — это текущая запущенная ОС, другие будут иметь более сложный идентификатор.

- Введите команду
bcdedit /set {идентификатор} description "новое имя"и нажмите Enter.
- Результат изменения имени будет виден при первой же перезагрузке компьютера или ноутбука:


Тем же способом вы можете поменять имена для других пунктов в меню загрузки Windows.
Иногда может быть полезным и создание собственных пунктов меню с другими вариантами загрузки единственной ОС на компьютере, например, вы можете добавить безопасный режим в меню загрузки, что описано в последней части этой инструкции.
Изменение порядка пунктов в меню при загрузке Windows
Для того, чтобы поменять порядок пунктов в меню выбора ОС при загрузке, также потребуется использовать идентификаторы этих записей:
- Запустите командную строку от имени администратора, введите bcdedit и нажмите Enter. В результатах вас будут интересовать значения поля «идентификатор» для пунктов «Загрузка Windows».
- Введите команду (количество идентификаторов может быть разным):
bcdedit /displayorder {ИД первой системы} {ИД второй системы} {ИД тертьтей системы}и нажмите Enter.

- В результате порядок пунктов будет изменен на заданный вами.
- Ещё одна возможность — установить пункт с нужным идентификатором первым в порядке загрузки и загружаемым по умолчанию с помощью команды
bcdedit /displayorder {идентификатор} /addfirst

На этом всё. Если остаются вопросы на тему меню выбора ОС при загрузке Windows — задавайте их в комментариях, я постараюсь подсказать решение.
Привет друзья! Если на вашем компьютере или ноутбуке установлены две операционные системы Windows 10, то при включении ПК у вас должно выходить специальное меню загрузки, в котором вы можете выбрать для работы любую ОС. Многих пользователей смущает то, что названия операционных систем в этом меню выглядят практически одинаково, разница лишь в указании тома, с находящейся на нём Win 10. Изменить название операционной системы в меню загрузки Windows 10 очень просто и в сегодняшней статье я покажу, как это сделать с помощью редактирования Диспетчера загрузки инструментом bcdedit.exe.
Как изменить название операционной системы в меню загрузки Windows 10
Интересный факт. Подобный вопрос на сайте задают часто, но всегда по разному
, например:
Как изменить надпись в загрузчике Windows 10?
Как поменять название Windows 10 при загрузке?
Как изменить название системы в Диспетчере загрузки Windows 10?
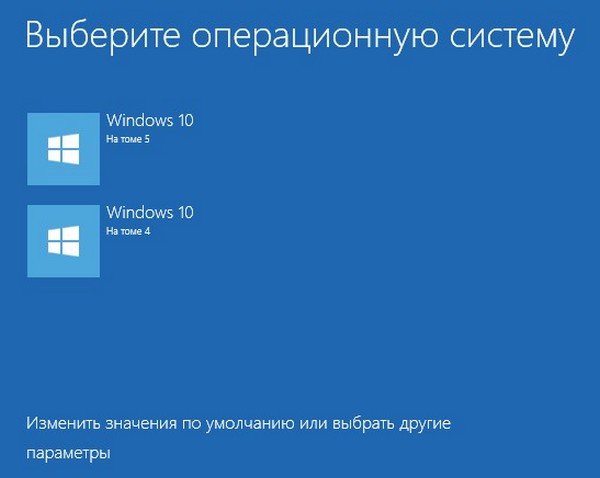
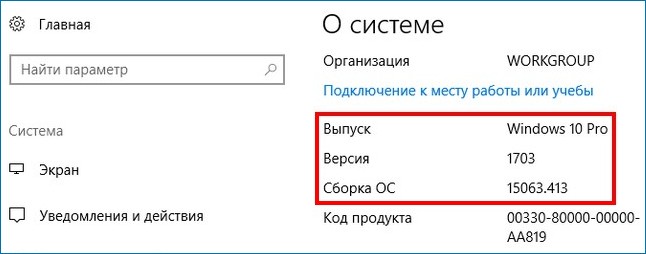
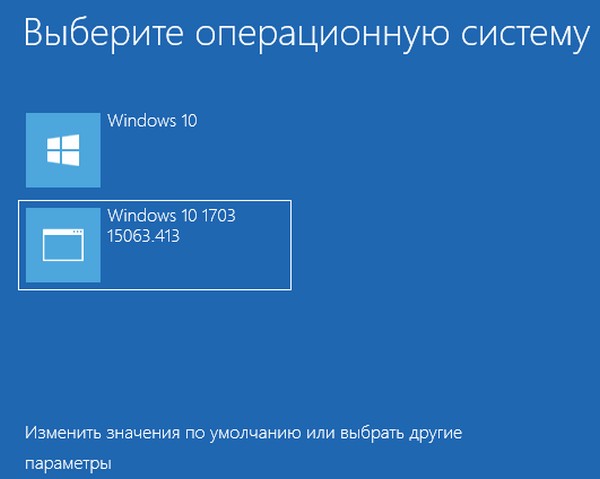
Итак, возьмём для примера компьютер с двумя установленными Windows 10 версии 1703 (Сборка ОС 15063.413).
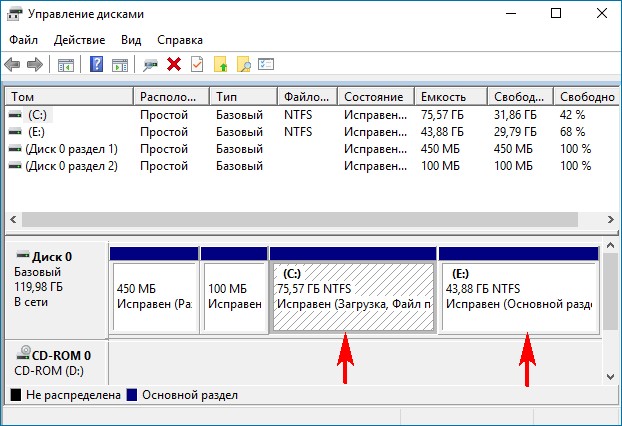
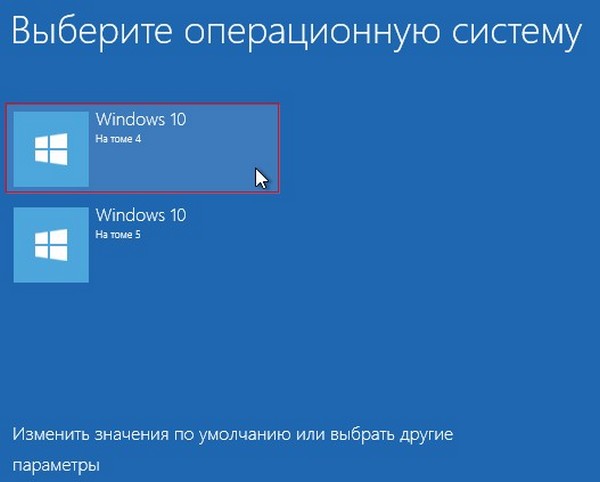
В Управлении дисками видно, что первая Win 10 находится на диске (C:), а вторая на диске (E:). По умолчанию загружается Windows 10, расположенная на томе 4 (на скриншоте диск (C:)).
Примечание: Третий том скрыт (служебный раздел MSR) и не отображается в Управлении дисками.
При включении ПК выходит меню загрузки OS.
Теперь откроем Диспетчер загрузки с помощью инструмента bcdedit.exe
Запускаем командную строку от имени администратора и вводим команду: bcdedit
За название операционной системы в Диспетчере загрузки отвечает параметр description.
Как видим, названия обоих операционных систем в Диспетчере одинаковые: — Windows 10.
С помощью инструмента bcdedit можно изменить название ОС, отображаемое в меню загрузки. Делается это командой:
bcdedit /set {ID} description «Название системы»,
где {ID} — идентификатор системы, а новое название ОС берём обязательно в кавычки.
Давайте для начала изменим название Windows 10, которая загружается с раздела (E:) на другое, к примеру — «Windows 10 1703 15063.413″.
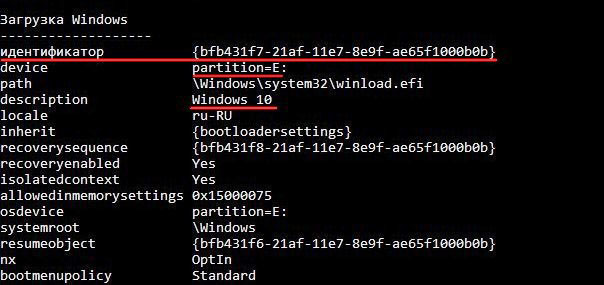
Так как идентификатор Win 10, загружающейся с раздела (E:) — {bfb431f7-21af-11e7-8e9f-ae65f1000b0b}, то команда в нашем случае будет такой:
bcdedit /set {bfb431f7-21af-11e7-8e9f-ae65f1000b0b} description «Windows 10 1703 15063.413»

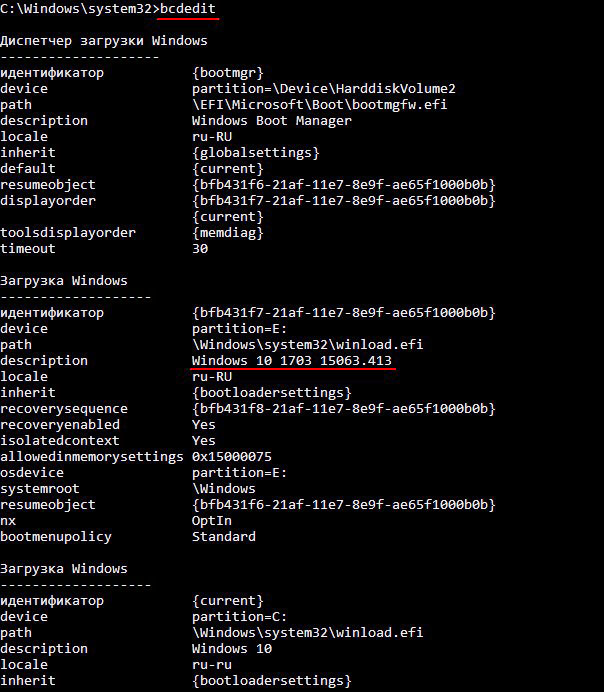
Запускаем bcdedit и видим, что название системы в Диспетчере загрузки изменилось.
Меню загрузки.
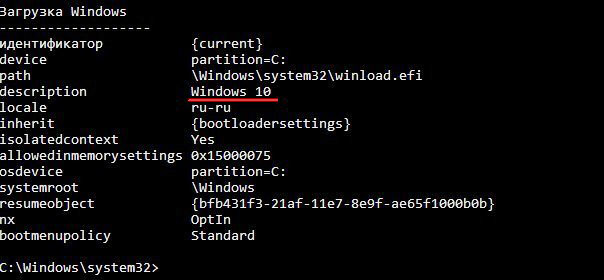
Если вы хотите изменить название Windows 10, которая загружается с раздела (C:), то сделать это можно точно также.
Идентификатор Win 10, загружающейся с раздела (C:) — {current}, а название будем менять на такое «Working Windows 10 1703 15063.413″,
значит команда будет:
bcdedit /set {current} description «Working Windows 10 1703 15063.413″

Запускаем bcdedit и видим, что название Win 10, расположенной на диске (C:) и загружаемой по умолчанию, изменилось.


On Windows 11, if you have a device with a dual-boot configuration, you can change the name of the operating system, and in this guide, you will learn how. If you have a computer with multiple installations of Windows 11, 10, or Linux, every time you start the computer, the “Windows Boot Manager” will appear, allowing you to choose the operating system you want to start. However, you may need to change the name of the menu entries to identify better the operating system you want to start.
This is usually necessary if you are setting a dual-boot system with one installation of Windows 11 and another setup you use to install and test builds from the Windows Insider Program.
Regardless of the reason, Windows 11 (and 10) allows you to use the bcdedit (Boot Configuration Data Edit) tool to change the operating system name from the menu from Command Prompt.
This guide will teach you the steps to change the operating system name that appears in the boot manager menu on Windows 11 or 10.
Change operating system name in boot menu on Windows 11
To change the operating system name in the boot manager menu, use these steps:
-
Open Start on Windows 11.
-
Search for Command Prompt, right-click the top result, and select the Run as administrator option.
-
Type the following command to check the operating system identifier and description and press Enter:
bcdedit

-
Type the following command to change the operating system name in the boot menu and press Enter:
bcdedit /set {IDENTIFIER} description "NEW-NAME"
In the command, replace “IDENTIFIER” with the identifier information. For example, “current” would be the identifier for the current installation. Also, change “NEW-NAME” with the actual name you want to see in the boot loader – for example, Windows 11 Insider. If the name has spaces, you have to use quotation marks. This example changes the current installation to “Windows 11 Dev:”
bcdedit /set {current} description "Windows 11 Dev"


Once you complete the steps, the next time you start the computer, the boot manager will display the operating systems with the new name. You may need to repeat the instructions to rename other installations of Windows or another operating system.
Mauro Huculak is a
Windows How-To Expert and founder of
Pureinfotech
(est. 2010). With over 21 years as a technology writer and IT Specialist,
Mauro specializes in Windows, software, and cross-platform systems such as Linux, Android, and macOS.
Certifications:
Microsoft Certified Solutions Associate (MCSA),
Cisco Certified Network Professional (CCNP),
VMware Certified Professional (VCP),
and
CompTIA A+ and Network+.
Mauro is a recognized Microsoft MVP and has also been a long-time contributor to Windows Central.
You can follow him on
YouTube,
Threads,
BlueSky,
X (Twitter),
LinkedIn and
About.me.
Email him at [email protected].
Skip to content
With Windows 8, Microsoft made changes to the boot experience. The simple text-based boot loader is now disabled by default and in its place, there is a touch friendly graphical user interface with icons and text. Windows 10 has this as well.
In a dual boot configuration, it shows the operating system names. If you need to rename this OS entry in a dual boot configuration, it is not made easier by Microsoft. Let’s see how it should be done.
There is a console utility, bcdedit.exe, which is bundled with Windows 10 by default. It is intended to manage all the options of the modern boot loader. It should be used to rename the operating system name that you see in the list at startup.
Follow these steps to rename the OS entry:
- Open an elevated command prompt instance.
- Type or copy-paste the following:
bcdedit
This will list all your operating systems which are shown in the Windows 10 boot menu:

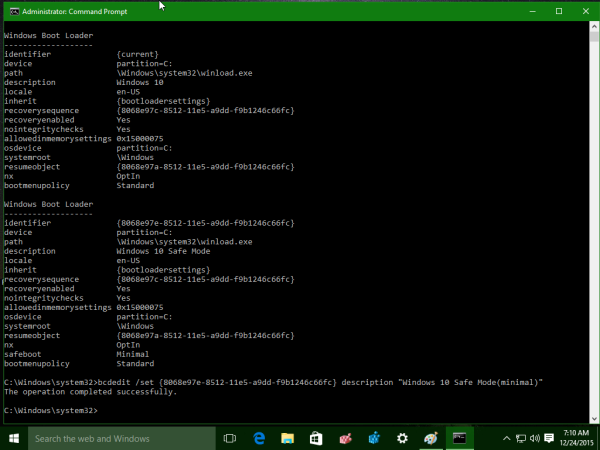
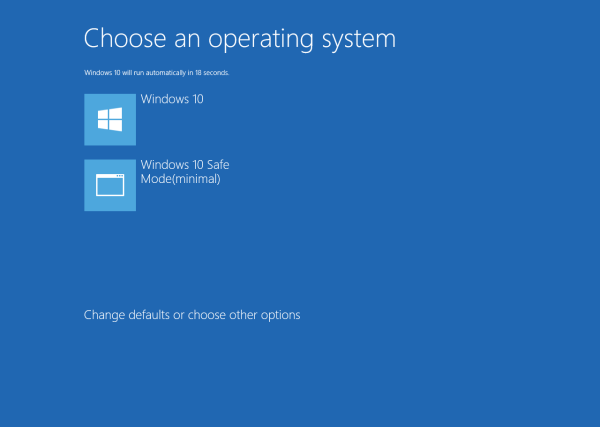
There, note/copy the «identifier» GUID value of the item which you want to rename. For example, let’s rename my «Windows 10 Safe Mode» item. Its identifier is «{8068e97e-8512-11e5-a9dd-f9b1246c66fc}».
- Next, type the following command:
bcdedit /set {guid} description "New name"Replace {guid} with the identifier you copied in the command above. The «New name» is the desired name which you want to see in the boot menu. Let’s say, I want to rename my «Windows 10 Safe Mode» item to «Windows 10 Safe Mode (Minimal)». The command will be as follows:
bcdedit /set {8068e97e-8512-11e5-a9dd-f9b1246c66fc} description "Windows 10 Safe Mode (Minimal)"See the following screenshot:
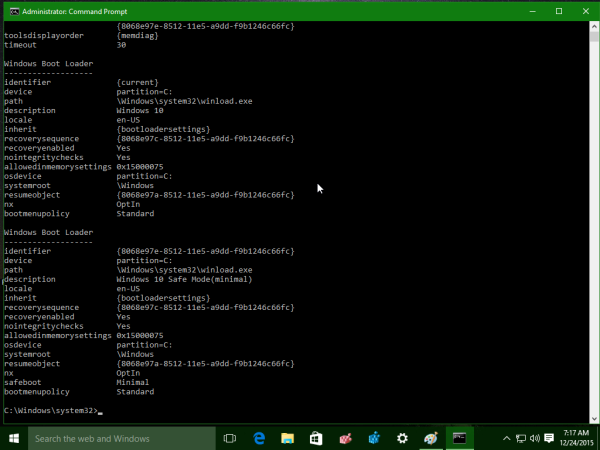
- To verify your changes, you can run bcdedit without parameters once again or reboot Windows 10 to see the boot menu in action. Your changes will be applied:


Tip: Winaero Tweaker allows you to manage the secret hidden parameters of the Windows 10 bootloader, which are not listed bcdedit’s help:
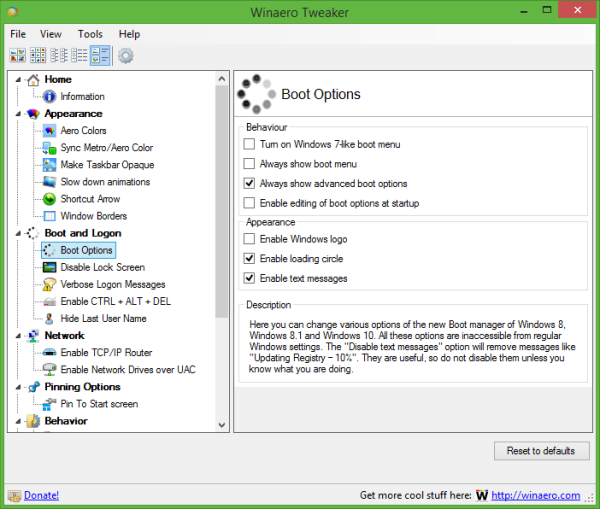
It allows you to:
- enable advanced options of the boot menu — such as safe mode, debugging and so on.
- enable editing of the boot options — this allows you to specify addition parameters for the kernel. They are similar to the older boot.ini kernel switches;
- disable the blue Windows logo during boot;
- disable the spinning circle during boot;
- disable text messages during boot — messages like «Please wait», «Updating registry – 10%» and so on;
- disable the modern graphical boot UI and turn it into the text-based boot loader;
- enable or disable verbose sign in messages.
Get Winaero Tweaker here: Download Winaero Tweaker.
That’s it.
Support us
Winaero greatly relies on your support. You can help the site keep bringing you interesting and useful content and software by using these options:
If you like this article, please share it using the buttons below. It won’t take a lot from you, but it will help us grow. Thanks for your support!