
Calling your computer with a nickname does sound cool, and what makes it even more fun is giving it a name officially. You must have seen your computer appear with a weird name (like LAPTOP-AE12A1) on your home or office network. That’s your computer or device name and your user account is different. Have you tried changing your PC’s name recently and got the ‘computer name is invalid’ error recently? Don’t worry for we too went through something similar and figured out working solutions.

Changing your computer name to an easily identifiable one makes it easy for other people and devices to pick it up on the network. Note that the user account will continue to function as normal even if you can’t change the name. Your day to day work/personal life won’t be affected by it. So when you can’t change your computer name, and Windows thinks it’s invalid, we shall help you sort that out.
Let’s begin.
1. Update and Reboot
This golden trick worked for me from the get-go. I saved all my work and restarted my computer. Then I tried renaming my PC again and it worked. You should try this out first and we hope that it should mostly fix things to let you rename your computer.

In case you’ve been delaying any pending updates for Windows, you should install them first and restart your computer. You can do it under Settings > Update & Security.
Note: Even if the computer name change was successful, you would still need to restart your computer once for the new name to take effect.
2. Character Limits
Your computer name cannot exceed 15 characters. Unfortunately, you can’t even include special characters except for hyphens, alphabets (a to z), and numbers (0 to 9). You can try to use an alphanumeric name instead of using simpler names or just numbers. You can’t leave the name field blank either. Microsoft doesn’t allow that since a computer name is necessary to identify it.
3. Turn Off Sync
One of the benefits of using a Microsoft account is that it will sync your settings across devices. It can also prevent renaming your device.
Step 1: Press Windows key+I to open Settings and go to Accounts > Sync your settings.
Step 2: Toggle off Sync settings. Wait for a few moments before turning it back on. You can also try renaming your PC when the sync is turned off.

4. Command Prompt
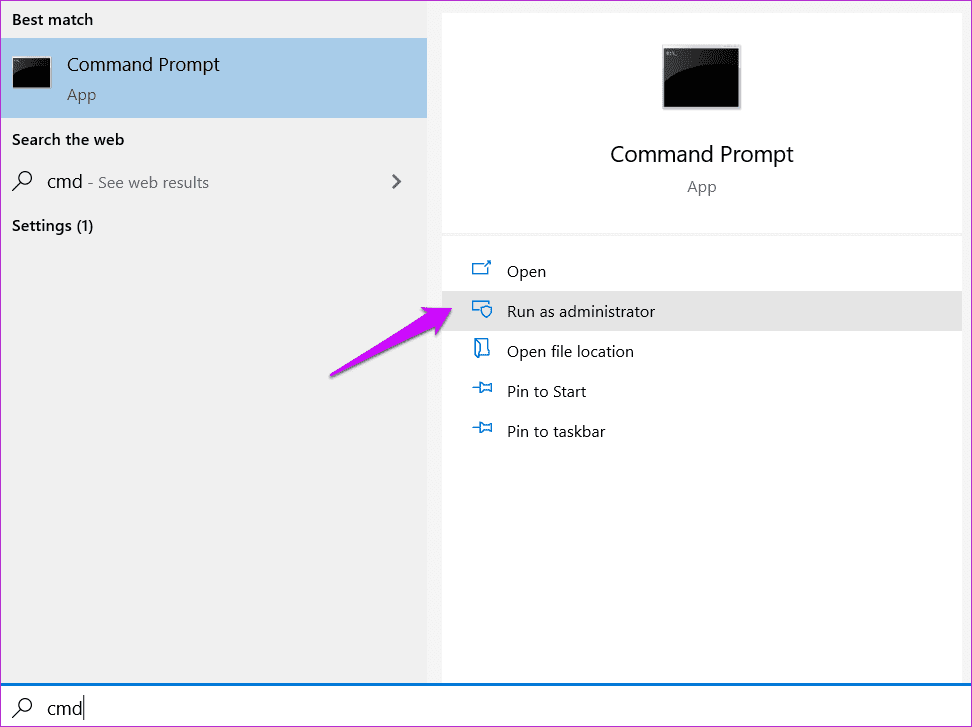
Step 1: Hit Windows Key+S to launch Windows Search and type Command Prompt. Open it with admin rights by selecting Run as administrator option.
Step 2: Type in the command below and wait for it to run its course. In this command, you should replace ‘New-PC-Name’ text with the name you want to assign.
wmic computersystem where name=”%computername%” call rename name=”New-PC-Name”
PowerShell users should try this command instead.
Rename-Computer -NewName “New-PC-Name”
5. Remove Device from Microsoft Account
As surprising as this sounds, this trick worked for a couple of users.
Step 1: Sign in to your Microsoft account to find a list of all connected devices. Select the one you are trying to rename.
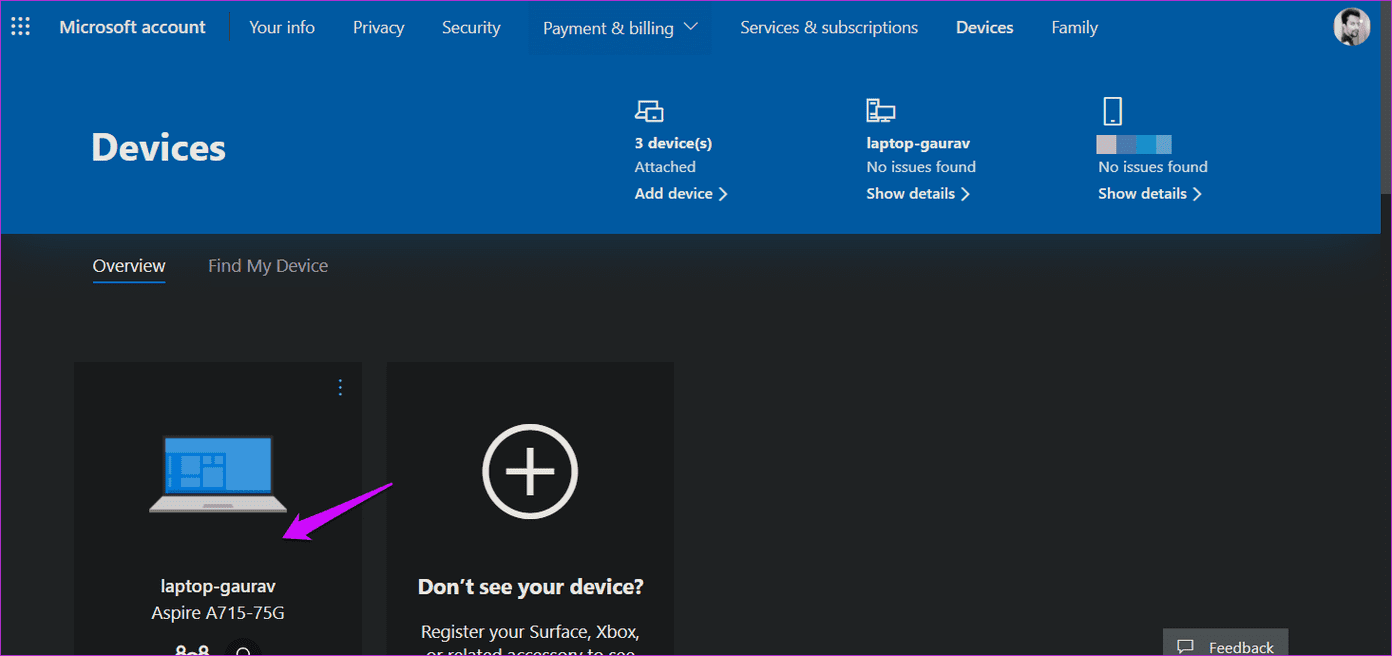
Step 2: Click on Manage and select Remove laptop/computer from the list to delete it from your Microsoft account.

The change will take a maximum of 24 hours to take effect. Give it a day or two and then change your PC name. Adding your device is easy and works the same way, on the same page. Go back to Microsoft account and click on Add device to begin the process.
6. Local User Account
Switching to a local user account and back again also helps. You can also try creating a new admin account if this doesn’t work. The below method will work whether you have a local account or not.
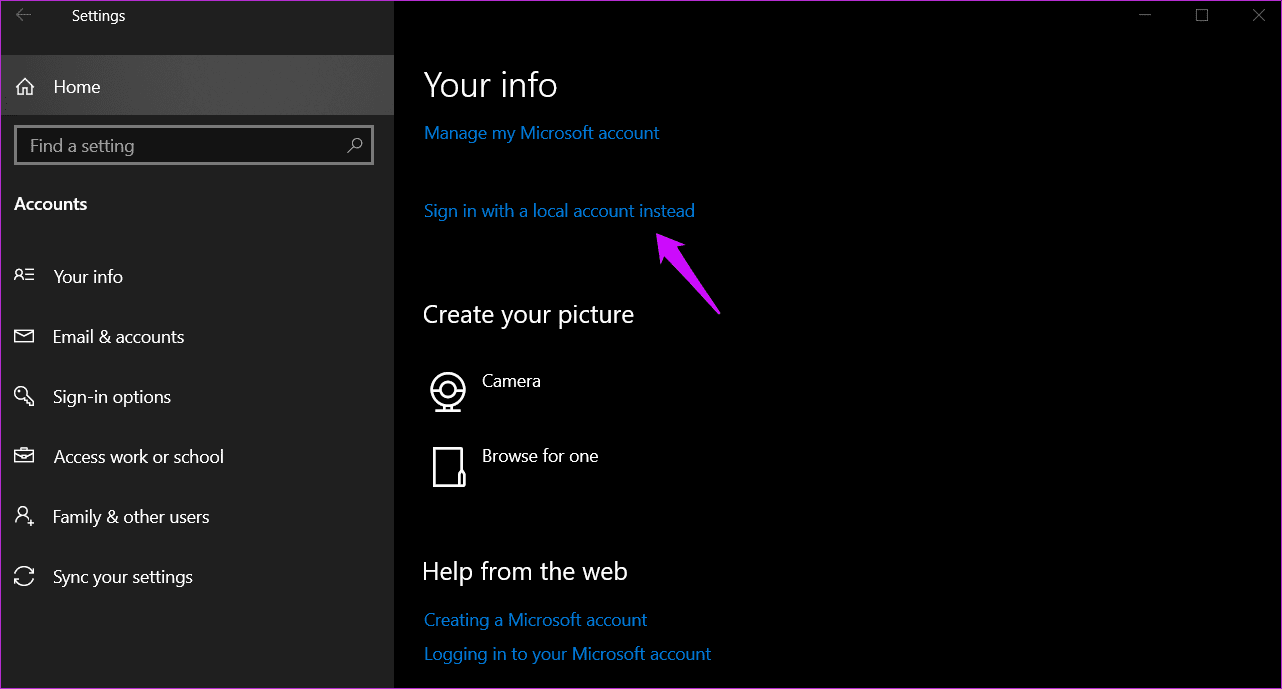
Step 1: Open Settings again and go to Accounts. Click on Sign in with a local account instead link.
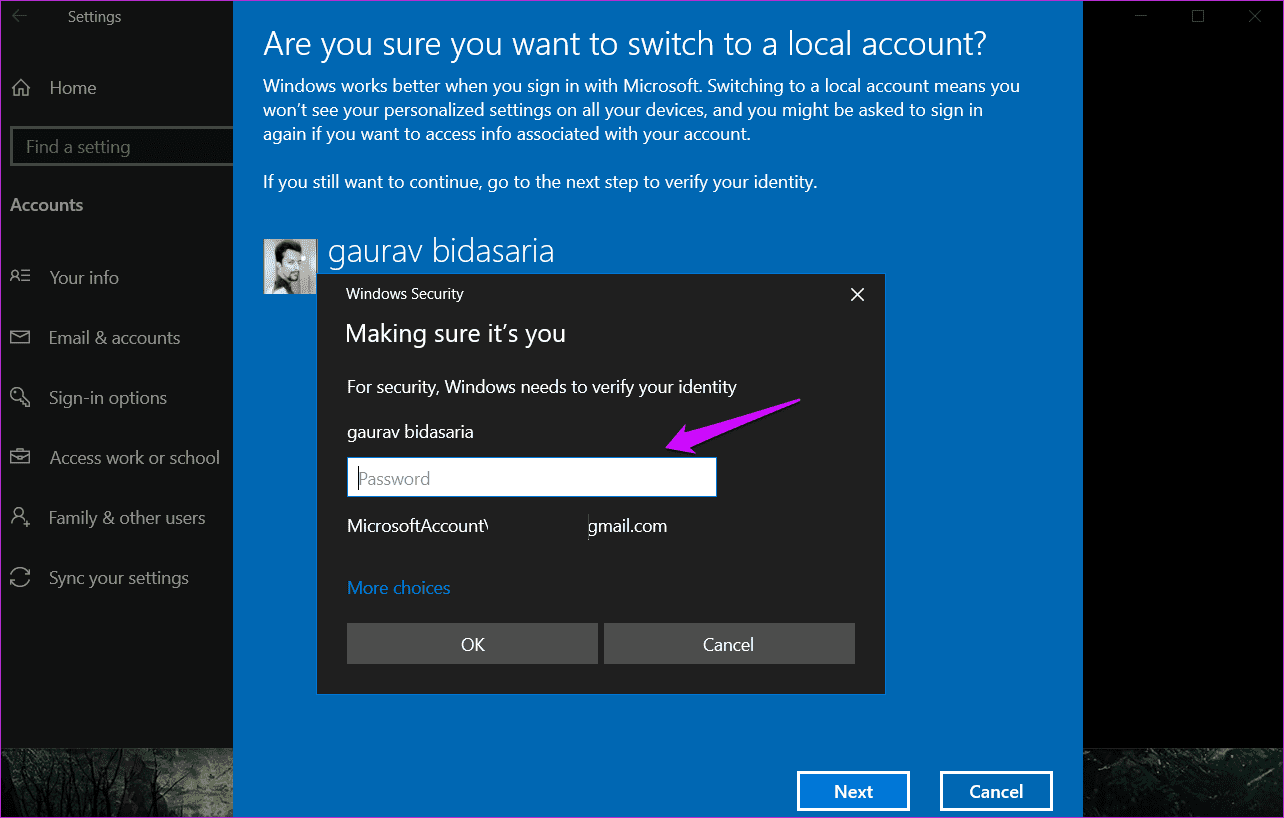
Step 2: You will be asked to enter the current admin account password first. Then you will view a list of all available local accounts. Choose one if you have or you will be presented with an option to create one first. Just follow on-screen instructions from here.
7. Built-In Admin Account
Most Windows users never find out but every Windows installation comes with a built-in but hidden admin account. There is one that is created and is visible to you when you install Windows. Not that one. There is another but often it is disabled by default. Enable this admin account and then try renaming your PC. Make sure you disable or delete this account after you are done. It can be used by hackers to take over your computer otherwise.
What’s in the Name
Now that you know how to give your computer a name, you won’t see the dreadful ‘computer name is invalid’ error again. Renaming devices makes it easier to identify and connect to them over the network or with Bluetooth devices. You might have to wait for a day if you use Microsoft Account to log into your PC and let the changes take effect as solution #5. Also, it could be the reason why you might be facing trouble. Let us know if you have figured another easy trick to rename your computer in the comments section below.
Next up: Would you like to install Windows apps without setting Microsoft as your default Windows account? Click on the link below to learn how to do that.
Was this helpful?
Thanks for your feedback!
The article above may contain affiliate links which help support Guiding Tech. The content remains unbiased and authentic and will never affect our editorial integrity.
Applies ToMicrosoft Edge Windows 11 Windows 10 Windows 8.1 Windows 7 Edge for Mac
Вот несколько решений распространенных проблем, которые могут возникать с новый Microsoft Edge .
Если Microsoft Edge продолжает сбой
Если вам не удается открыть Microsoft Edge, или если он открывается кратко, а затем закрывается, или если вы не можете открыть определенные веб-страницы, попробуйте сделать следующее.
Возможно, на вашем компьютере не хватает памяти и не удается загрузить сайт при выполнении приложений, расширений и программ.
Чтобы освободить память:
-
Закройте все вкладки, кроме тех, на которых отображается сообщение об ошибке.
-
Закройте другие запущенные приложения или программы.
-
Приостановите все загрузки.
-
Удалите ненужные расширения.
Попробуйте перезагрузить вкладки с ошибками.
Выберите Параметры и прочее > Параметры > О Microsoft Edge . Если обновление доступно, вы можете применить его отсюда.
Перезагрузите компьютер и повторите попытку открыть страницу в Microsoft Edge.
Если вы используете программное обеспечение безопасности сторонних производителей, например Norton или McAfee, откройте приложение и проверьте наличие обновлений для системы безопасности или посетите веб-сайт компании, чтобы убедиться в актуальности своего программного обеспечения.
-
Убедитесь, что браузер закрыт и что у вас есть права администратора на устройство. Если на устройстве вошли несколько пользователей, убедитесь, что Microsoft Edge закрыт для всех пользователей.
-
Перейдите в раздел Пуск > Параметры > Приложения > Установленные приложения.
-
В списке приложений выберите Microsoft Edge, а затем — Изменить. Если команда Изменить недоступна, скорее всего, ваша организация установила Microsoft Edge и управляет ею за вас. Обратитесь за помощью к системному администратору.
-
При появлении вопроса Разрешаете ли вы этому приложению вносить изменения в ваше устройство? выберите Да.
-
Убедитесь, что у вас есть подключение к Интернету. Выберите Восстановление. Восстановление не должно повлиять на данные и настройки браузера.
Если Microsoft Edge открывается, но перестает работать
Выберите Параметры и прочее > Параметры > О Microsoft Edge . Если обновление доступно, вы можете применить его отсюда.
Перезагрузите компьютер и повторите попытку открыть страницу в Microsoft Edge.
Если вы используете программное обеспечение безопасности сторонних производителей, например Norton или McAfee, откройте приложение и проверьте наличие обновлений для системы безопасности или посетите веб-сайт компании, чтобы убедиться в актуальности своего программного обеспечения.
Браузер автоматически сохраняет временные интернет-файлы для более быстрой загрузки страниц. Очистка кэша может в некоторых случаях устранить проблемы с отображением страницы.
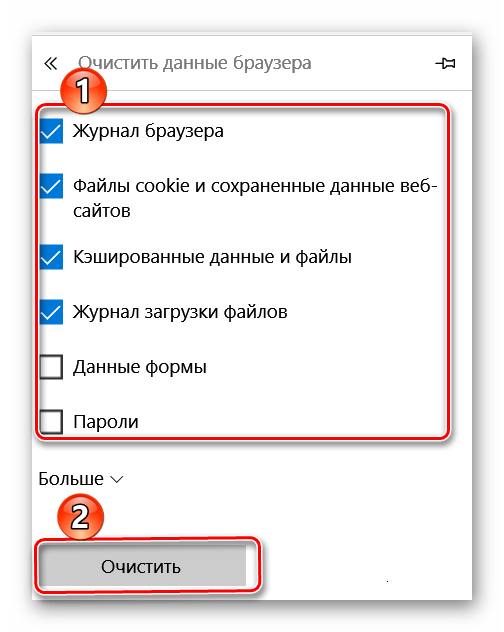
Если вы можете открыть Microsoft Edge, выберите Параметры и more > Журнал > Открыть страницу журнала и выберите Удалить данные браузера. Выберите Все время в разделе Диапазон времени; Выберите Журнал браузера и Кэшированные изображения и файлы, а затем нажмите кнопку Очистить.
Выберите Параметры и другие > Журнал > страница Открыть журнал. Выберите Удалить данные браузера и Все время в разделе Диапазон времени; выберите все поля и нажмите кнопку Очистить сейчас.
Если проблема возникнет снова, сообщите о ней и найдите решение. Выберите Параметры и другое > Справка и отзывы , а затем — Отправить отзыв .
Попробуйте открыть страницу в другом браузере. Если это не помогло, возможно, проблема связана с сетью или самим сайтом.
Сначала попробуйте перезапустить модем и маршрутизатор.
Если это не сработает, обратитесь к владельцу веб-сайта и сообщите о проблемах с загрузкой веб-страницы.
-
Убедитесь, что браузер закрыт и что у вас есть права администратора на устройство. Если на устройстве вошли несколько пользователей, убедитесь, что Microsoft Edge закрыт для всех пользователей.
-
Перейдите в раздел Пуск > Параметры > Приложения > Установленные приложения.
-
В списке приложений выберите Microsoft Edge, а затем — Изменить. Если команда Изменить недоступна, скорее всего, ваша организация установила Microsoft Edge и управляет ею за вас. Обратитесь за помощью к системному администратору.
-
При появлении вопроса Разрешаете ли вы этому приложению вносить изменения в ваше устройство? выберите Да.
-
Убедитесь, что у вас есть подключение к Интернету. Выберите Восстановление. Восстановление не должно повлиять на данные и настройки браузера.
Если Microsoft Edge не открывается
Программа или процесс, запущенный на компьютере, могут вызвать проблемы с Microsoft Edge. Вы можете перезагрузить компьютер и проверить, удалось ли решить проблему.
Если вы используете программное обеспечение безопасности сторонних производителей, например Norton или McAfee, откройте приложение и проверьте наличие обновлений для системы безопасности или посетите веб-сайт компании, чтобы убедиться в актуальности своего программного обеспечения.
-
Убедитесь, что браузер закрыт и что у вас есть права администратора на устройство. Если на устройстве вошли несколько пользователей, убедитесь, что Microsoft Edge закрыт для всех пользователей.
-
Перейдите в раздел Пуск > Параметры > Приложения > Установленные приложения.
-
В списке приложений выберите Microsoft Edge, а затем — Изменить. Если команда Изменить недоступна, скорее всего, ваша организация установила Microsoft Edge и управляет ею за вас. Обратитесь за помощью к системному администратору.
-
При появлении вопроса Разрешаете ли вы этому приложению вносить изменения в ваше устройство? выберите Да.
-
Убедитесь, что у вас есть подключение к Интернету. Выберите Восстановление. Восстановление не должно повлиять на данные и настройки браузера.
Нужна дополнительная помощь?
Нужны дополнительные параметры?
Изучите преимущества подписки, просмотрите учебные курсы, узнайте, как защитить свое устройство и т. д.
Readers help support Windows Report. We may get a commission if you buy through our links.
Read our disclosure page to find out how can you help Windows Report sustain the editorial team. Read more
Sometimes it’s necessary to change your PC name, but many users reported Sorry your PC name can’t be changed message. This can be a problem, and today we’re going to show you how to fix this issue.
In case you’re not familiar with this process, we have a great guide on how to rename your Windows PC, so be sure to check it out.
In today’s guide, we will show you what to do if Windows 10 can’t change your computer name, so let’s get started.
Why can’t I rename my PC?
- Your PC might be having some glitches due to missing updates.
- Settings on your PC aren’t syncing properly with the cloud.
- Issues with your Microsoft account.
- You have a damaged user profile on your PC.
How can I fix Sorry your PC name can’t be changed message?
1. Install the missing updates
- Open the Settings app. You can do that by pressing the Windows key + I. When the Settings app opens, go to the Update & Security section.

- Click the Check for updates button in the right pane. Available updates will now be downloaded automatically in the background.

If you keep getting Sorry your PC name can’t be changed message, the issue might be a glitch on your system. Bugs and glitches can sometimes occur, and the best way to deal with them is to keep Windows up to date.
2. Rename the device and remove it from your Microsoft account
- Rename your PC name.
- Now open your web browser and access your Microsoft account.
- In there, you should see a device with your PC name on it. Delete that device.
After doing that, you’ll need to wait 24 hours or more for the changes to take effect. After 24 hours have passed, the issue should be completely resolved.
3. Turn off Sync settings
- Open the Settings app and navigate to the Account section.

- Select Sync your settings from the left pane. In the right pane, turn off Sync settings feature.
- Wait for a couple of minutes and then turn Sync settings feature back on again.

Your PC will now be synced, and the list of devices will show a different name for your PC. Keep in mind that it might take 24 hours or more for the changes to take effect, so be patient.
This is a simple solution, but it can help with Sorry your PC name can’t be changed error.
4. Switch to the local account and then back to the Microsoft account
- Open the Settings app and navigate to the Accounts section.
- Select Sign in with a local account instead in the right pane.

- Now you’ll be asked to enter your current password. Enter it and click Next.

- Now enter the desired username and password and click Next.
- Once you’re done, click on Sign out and finish.


After switching to the local account, sign back in again. Now you need to convert the local account to the Microsoft account. To do that, follow these steps:
- Open the Settings app and navigate to the Accounts section.
- Click the Sign in with a Microsoft account option in the right pane instead.
- Now enter your email and password. You’ll need to enter your security code if you’re using two-step verification.
After doing that, you should have your Microsoft account working again, and the PC name should be updated in 24-48 hours.
After the specified period has passed, check if Sorry your PC name can’t be changed error is gone.
5. Try using the Safe Mode
- Open the Settings app and go to the Update & Security section.
- Select Recovery in the left pane. Click the Restart now button.

- Now go to Troubleshoot > Advanced options > Startup Settings and click the Restart button.
- After your PC restarts, you should see a list of options. Select the desired version of Safe Mode by pressing the corresponding key.

6. Try using the hidden administrator account
- Open Command Prompt as administrator. The quickest way to do that is to press Windows key + X and then choose Command Prompt (Admin) or PowerShell (Admin) from the list.
- When Command Prompt opens, run the following command:
net user administrator /active:yes - Now log out of your current account and switch back to the administrative account.
- Once you access the administrator account, try to change your PC name.
If this method works for you, be sure to disable the administrator account after you’re done. To do that, start Command Prompt as administrator and run the following command: net user administrator /active:no
7. Try renaming your PC in Command Prompt
- Start Command Prompt as an administrator.
- When Command Prompt opens, run the following command:
wmic computersystem where name="%computername%" call rename name="New-PC-Name" - Be sure to replace New-PC-Name with the actual name that you want to use for your PC.
After doing that, check if the name is changed. This method is perfect if you’re an advanced user or if you simply want to change your PC name quickly without too much hassle.
- Fix: PRIMARY_TRANSPORT_CONNECT_FAILED Error
- ERROR_IO_PRIVILEGE_FAILED: How to Fix
8. Rename your PC using PowerShell
- Press Windows key + S and enter powershell. Locate Windows PowerShell from the list of results, right-click it and choose Run as administrator.
- When PowerShell starts, run the following:
Rename-Computer -NewName "New-PC-Name" - Be sure to replace New-PC-Name with the desired name.
9. Perform a System Restore
- Type system restore in the search field. Now select Create a restore point from the list.
- Once the System Properties window appears, click the System Restore button.

- System Restore window will now open. Click Next to proceed.

- If available, check Show more restore points option. Select the desired restore point and click Next.
- Follow the instructions on the screen to complete the restoration process.


After your PC is restored, check if the problem is still there.
Sorry, your PC name can’t be changed message can be quite annoying. We hope you solved this issue after using one of our solutions.
In case the issue is still there, we have a great guide about Compname is not accessible that might give you more ways to fix this issue.
What method did you use to fix this problem? Let us know in the comments below.
Milan Stanojevic
Windows Toubleshooting Expert
Milan has been enthusiastic about technology ever since his childhood days, and this led him to take interest in all PC-related technologies. He’s a PC enthusiast and he spends most of his time learning about computers and technology.
Before joining WindowsReport, he worked as a front-end web developer. Now, he’s one of the Troubleshooting experts in our worldwide team, specializing in Windows errors & software issues.
Все способы:
- Способы решения проблемы с запуском Microsoft Edge
- Способ 1: Очистка от мусора
- Способ 2: Удаление директории с настройками
- Способ 3: Создание новой учётной записи
- Способ 4: Переустановка браузера через PowerShell
- Вопросы и ответы: 0
Microsoft Edge – это относительно новый продукт с хорошей производительностью и функционалом. Но и без проблем в его работе не обошлось. Примером являются случаи, когда обозреватель не запускается или его включение происходит очень медленно.
Скачать последнюю версию Microsoft Edge
Способы решения проблемы с запуском Microsoft Edge
В результате попыток вернуть работоспособность браузера на Windows 10 могут появиться новые неполадки. Поэтому нужно быть предельно внимательным при выполнении приведённых инструкций и на всякий случай создать точку восстановления Windows.
Способ 1: Очистка от мусора
В первую очередь, проблемы запуском Edge могут возникать из-за накопившегося мусора в виде истории посещений, кэша страниц и пр. От всего этого можно избавиться через сам браузер.
- Откройте меню и перейдите в «Настройки».
- Там нажмите кнопку «Выберите, что нужно очистить».
- Отметьте типы данных и нажмите «Очистить».


Если браузер не открывается, то на помощь придёт программа CCleaner. В разделе «Очистка» есть блок «Microsoft Edge», где тоже можно отметить нужные пункты, а затем запустить очистку.
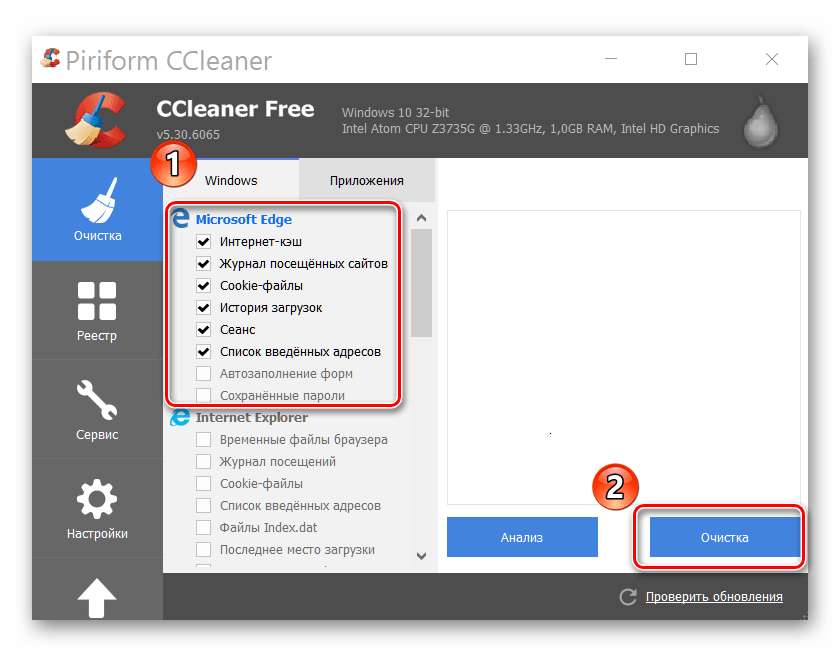
Обратите внимание, что очистке подвергнуться и другие приложения из перечня, если не снять галочки с их содержимого.
Способ 2: Удаление директории с настройками
Когда просто удаление мусора не помогает, можно попробовать очистить содержимое папки с настройками Edge.
- Включите отображение скрытых папок и файлов.
- Перейдите по следующему пути:
- Найдите и удалите папку «MicrosoftEdge_8wekyb3d8bbwe». Так как. на ней стоит системная защита, придётся воспользоваться утилитой Unlocker.
- Перезагрузите компьютер и не забудьте снова скрыть папки и файлы.
C:\Users\Имя пользователя\AppData\Local\Packages
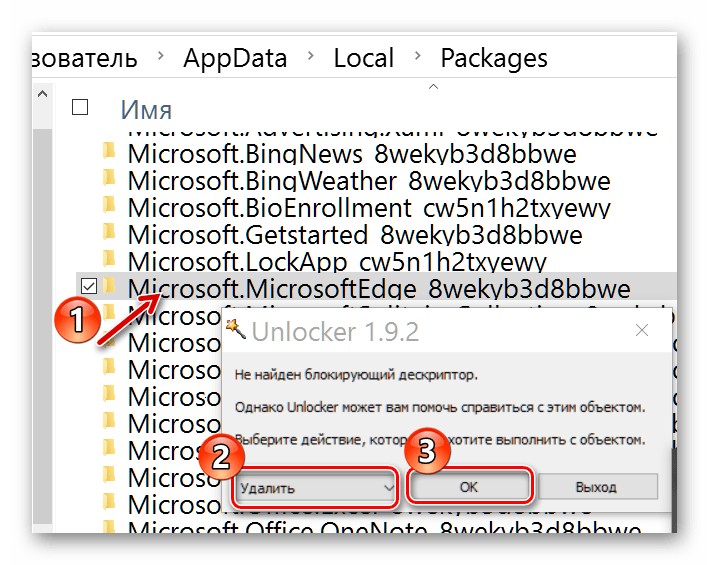
Внимание! В ходе этой процедуры будут удалены все закладки, очищен список для чтения, сброшены настройки и пр.
Способ 3: Создание новой учётной записи
Другое решение проблемы заключается в создании новой учётной записи в Windows 10, на которой будет Microsoft Edge с первоначальными настройками и без каких-либо лагов.
Подробнее: Создание нового пользователя на Windows 10
Правда, такой подход будет не для всех удобен, т.к. для использования обозревателя придётся заходить через другую учётку.
Способ 4: Переустановка браузера через PowerShell
Windows PowerShell позволяет управлять системными приложениями, коим является Microsoft Edge. Через эту утилиту можно полностью восстановить браузер.
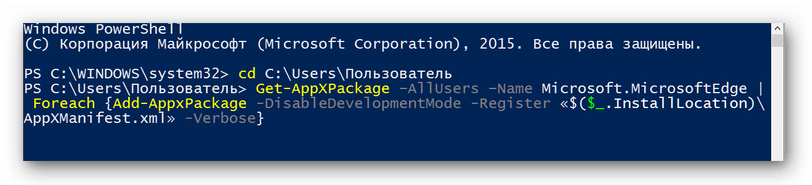
- Найдите PowerShell в перечне приложений и выполните запуск от имени администратора.
- Пропишите следующую команду:
cd C:\Users\ПользовательГде «Пользователь» – имя Вашей учётной записи. Нажмите «Ввод».
- Теперь вбейте следующую команду:


Get-AppXPackage -AllUsers -Name Microsoft.MicrosoftEdge | Foreach {Add-AppxPackage -DisableDevelopmentMode -Register «$($_.InstallLocation)\AppXManifest.xml» -Verbose}
После этого Microsoft Edge должен сброситься до первоначального состояния, как при первом запуске системы. А раз он работал тогда, значит, будет работать и сейчас.
Разработчики неустанно трудятся над исправлением проблем в работе браузера Edge, и с каждым обновлением стабильность его работы значительно повышается. Но если он почему-то перестал запускаться, то всегда можно почистить его от мусора, удалить папку с настройками, начать использовать его через другую учётную запись или полностью восстановить через PowerShell.
Наша группа в TelegramПолезные советы и помощь
If you’ve recently upgraded to Windows 10 Creators Update, and found that your Microsoft Edge browser not working properly, you’re not alone. Many Windows users are reporting it. The good news is, you can easily fix it by yourself. Here are 4 fixes for you to try.
- Clean Boot Your PC
- Reinstall through PowerShell
- Use Group Policy Editor
- Reinstall Windows 10
Note that you may not need to try them all. Just work your way down the list until you find the one works for you.
Step 1: Clean Boot Your PC
If it’s the first time you had a problem with your Edge browser, one of the first things you should do is to restart your PC, better yet, do a clean boot. It allows you to run your PC with only a minimal set of drivers and programs:
1) On your keyboard, press the Windows logo key and R at the same time, type msconfig and press Enter.
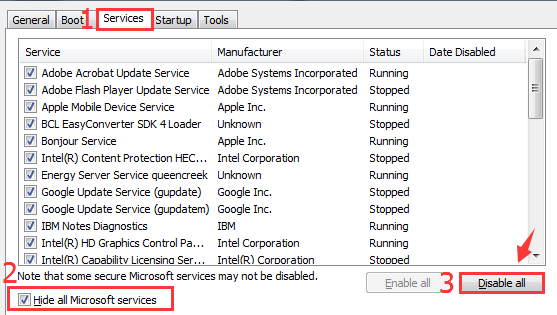
2) Go to Services tab, check the box for Hide all Microsoft services. Click the Disable all button.
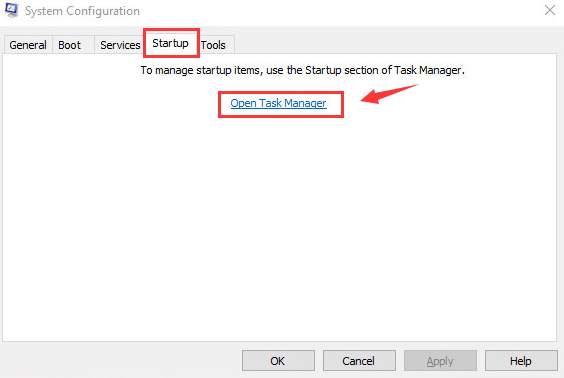
3) Go to Startup tab and click Open Task Manager.
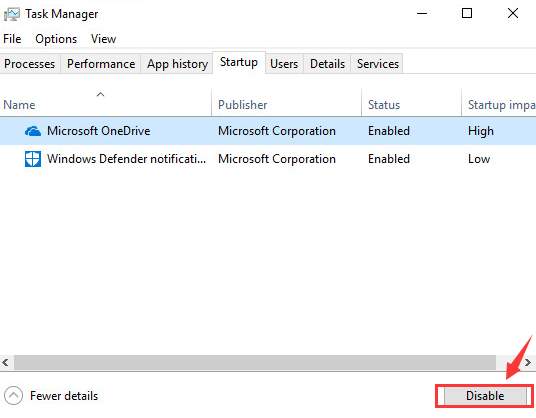
4) Select each item on the list and click Disable.
5) Close your Task Manager and restart your computer.
6) If Edge still opens and closes unexpectedly in a few seconds, move on to see if the steps below help.
Step 2: Reinstall through PowerShell
If your Edge browser isn’t installed correctly, not working or opening problem like this could happen. To fix it, you can reinstall Microsoft Edge:
1) On your keyboard, press the Windows key and S at the same time, then type powershell. Right-click Windows PowerShell and select Run as administrator.
When prompted with the administrator permission, click Yes to continue.
2) In the PowerShell window, copy and paste in the following command:
Get-AppXPackage -AllUsers | Foreach {Add-AppxPackage -DisableDevelopmentMode -Register “$($_.InstallLocation)\AppXManifest.xml”}

3) You will see a Deployment Operation Progress pop up. Wait for the process to finish. Then try your Edge again.
Step 3: Use Group Policy Editor
1) On your keyboard, press the Windows key and S at the same time, type group policy and click Edit group policy.
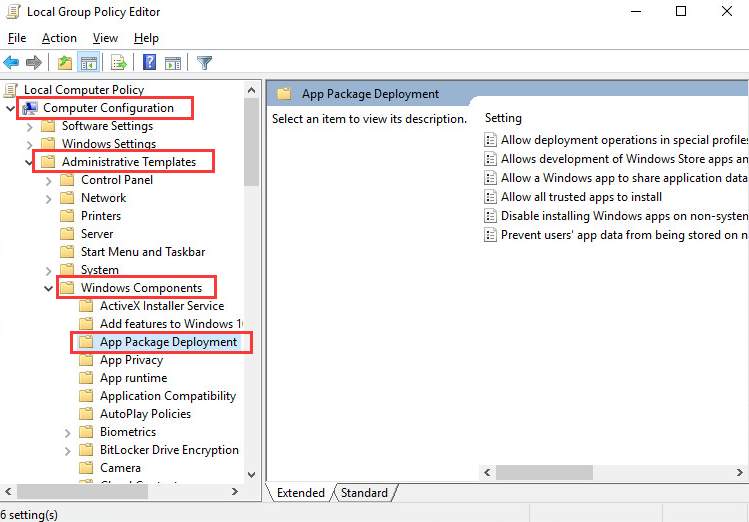
2) On the left side of the pane, go to Computer Configuration > Administrative Templates > Windows Components. Under Windows Components category, click App package Deployment.
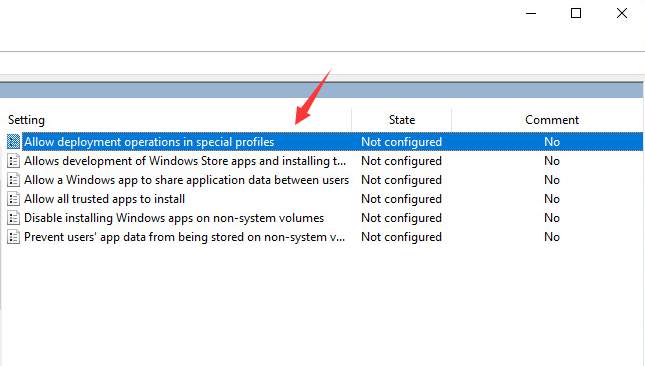
3) On the right side of the pane, double-click Allow deployment operations in special profiles.
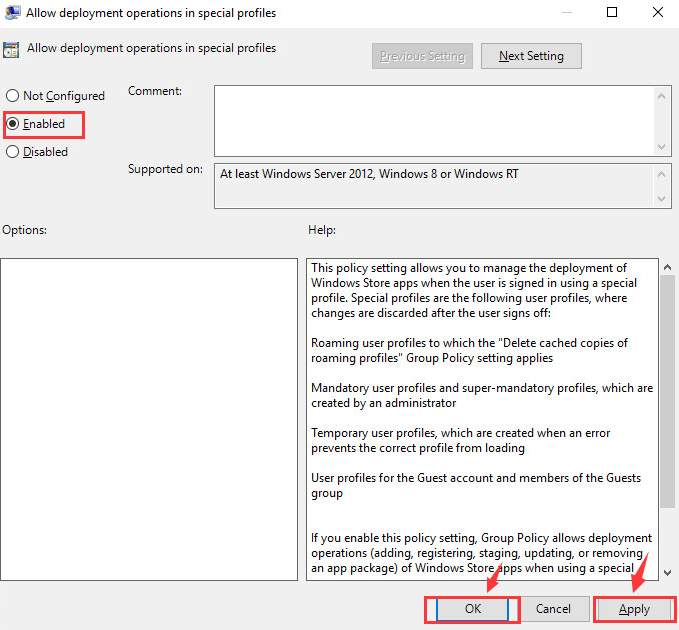
4) Click Enabled. Click Apply and OK.
Step 4: Reinstall Windows 10
If you’ve tried all the above methods but still no avail, you may need to consider reinstalling or refreshing your Windows 10.
For more detailed instructions, you can refer to the posts below:
How to burn Windows 10 Setup Files to a USB flash drive?
How to download Windows 10?
How to reinstall Windows 10?
Pro Tip
It’s always suggested that you keep your device drivers up-to-date to eliminate such problems to the most.
If you don’t have the time, patience or computer skills to update your drivers manually, you can do it automatically with Driver Easy.
Driver Easy will automatically recognize your system and find the correct drivers for it. You don’t need to know exactly what system your computer is running, you don’t need to risk downloading and installing the wrong driver, and you don’t need to worry about making a mistake when installing.
You can update your drivers automatically with either the FREE or the Pro version of Driver Easy. But with the Pro version it takes just 2 clicks (and you get full support and a 30-day money back guarantee):
1) Download and install Driver Easy.
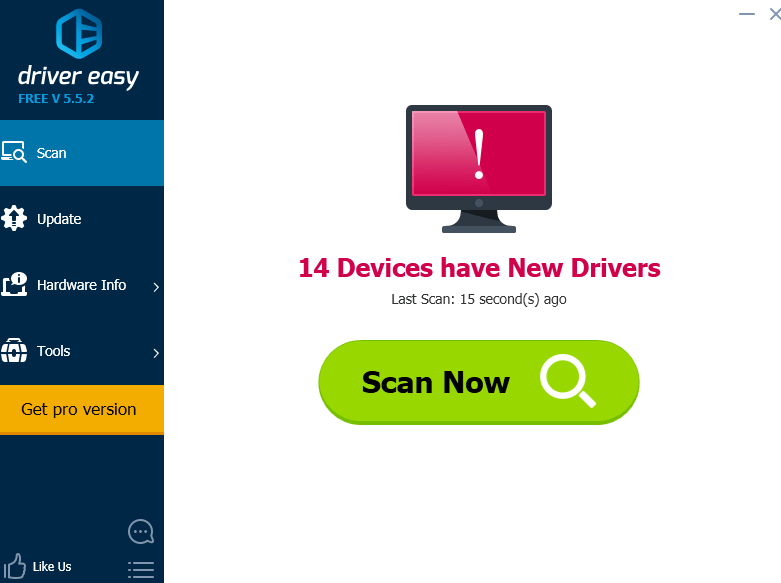
2) Run Driver Easy and click Scan Now button. Driver Easy will then scan your computer and detect any problem drivers.
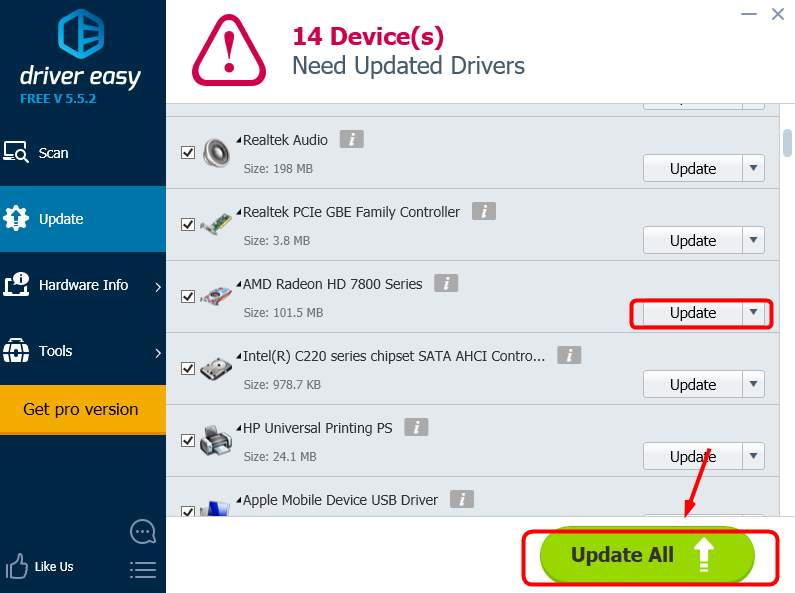
3) Click the Update button next to a flagged driver to automatically download and install the correct version of this driver (you can do this with the FREE version).
Or click Update All to automatically download and install the correct version of all the drivers that are missing or out of date on your system (this requires the Pro version – you’ll be prompted to upgrade when you click Update All).
15
15 people found this helpful