
Загрузить PDF
Загрузить PDF
При переходе с Windows на Ubuntu необходимо знать, как установить новую систему, какие программы использовать и как перенести нужные файлы в новую систему.
Советы
- Прежде всего убедитесь, что в Ubuntu вы сможете делать то, что вы обычно делаете в Windows. Для этого скачайте LiveCD Ubuntu, запишите скачанный образ (ISO файл) на компакт-диск, вставьте его в оптический привод и перезагрузитесь (в BIOS первым загрузочным устройством должен быть указан CD/DVD-ROM). Загрузив Ubuntu с диска (без установки системы), вы сможете протестировать новую систему (новый интерфейс и новое программное обеспечение). Попробуйте отредактировать документы, видео и аудио файлы, то есть поработайте в Ubuntu так, как вы обычно работаете в Windows.
- Если у вас нетбук (ноутбук без оптического привода), скачайте Wubi. Это установщик Ubuntu из-под Windows в виде EXE файла (для установки системы просто дважды щелкните по нему).
Реклама
-

Скачайте и установите Mozilla Thunderbird (в Windows), а затем скачайте и установите плагин ImportExportTools.
-
Если вы пользуетесь Outlook Express или Microsoft Outlook, запустите Mozilla Thunderbird и в панели меню нажмите «Tools» — «Import». В открывшемся окне выберите опции «Import everything», «Mail», «Address Books», «Settings», «Filters». Нажмите «Next» и выберите используемый вами почтовый клиент (Outlook Express, Microsoft Outlook или Seamonkey). Для импортирования информации с аккаунта почтового сервиса, создайте учетную запись, откройте настройки учетной записи и введите имя, почтовый адрес и пароль аккаунта почтового сервиса.
-
Щелкните правой кнопкой мыши по папке, которую вы импортировали (она, вероятно, называется «ххх import», где ххх — название почтового клиента, из которого вы импортировали данные) и нажмите «Import/export» — «Export all messages in the folder» — «EML format». Вам будет предложено выбрать носитель для копирования данных. Выберите съемный носитель, например, флешку. В качестве альтернативы нажмите «Import/export» — «Copy folder path on disk», вставьте путь к папке в приложении «Run» и скопируйте папку на съемный носитель.
-
Скачайте и установите Mozilla Thunderbird (в Ubuntu; этот почтовый клиент можно найти и установить через Ubuntu Software Center). Запустите Thunderbird и установите ImportExportTools. Подключите флешку с папками электронной почты, щелкните правой кнопкой мыши по пустому пространству окна почтового клиента и нажмите «Import/export» — «Import all eml files from directory» — «Also from its subdirectories».
Реклама


-
Если в Windows вы пользуетесь Mozilla Firefox, вы можете добавить в закладки нужные вам веб-сайты и экспортировать их в HTML файлы (для добавления сайта в закладки нажмите Ctrl + D). Нажмите «Bookmarks» — «Organize bookmarks». В открывшемся окне нажмите «Import and backup» — «Export HTML». Сохраните HTML файл на флешке (или внешнем жестком диске).
- Аналогично вы можете экспортировать историю посещенных страниц.
- Аналогично вы можете экспортировать историю посещенных страниц.
-
Реклама


-
- Совет: перед копированием файлов поместите их в папки по категориям, например, «Фильмы», «Музыка, «Документы» и т.п.
- Еще один совет: не всякий файл Windows можно открыть в Ubuntu. Поэтому начните перенос с мультимедийных файлов. Если у вас очень много музыки, фильмов и фотографий, сожмите эти файлы, отправив их в архив.
- Совет: перед копированием файлов поместите их в папки по категориям, например, «Фильмы», «Музыка, «Документы» и т.п.


-
Включите компьютер, откройте меню загрузки и выберите носитель с установщиком Ubuntu. Если вы не можете открыть меню загрузки, выполните следующие действия.
-
Включите компьютер и войдите в BIOS, нажав на соответствующую кнопку (см. руководство пользователя от материнской платы; как правило, это кнопка F1, F2, F10, DEL). Если вы устанавливаете систему с внешнего накопителя, убедитесь, что он подключен к компьютеру.
-
Установите CD/DVD-ROM или внешний USB накопитель первым загрузочным устройством.
-
Для этого нажмите F10 или откройте соответствующую опцию в главном меню.
-
Загрузите компьютер с установочного диска/флешки и установите систему. Это довольно легкий процесс — просто следуйте инструкциям на экране.
Реклама


Примечание: большинство описанных ниже программ можно найти и скачать через Ubuntu Software Center.
-
Составьте список необходимого программного обеспечения, которым вы пользуетесь в Windows.
-
Некоторые программы поддерживают несколько систем, например, VLC Media Player.
-
Для редактирования документов используйте офисный пакет OpenOffice/LibreOffice, который предустанавливается на все современные версии Ubuntu и может открывать документы Microsoft Office.
-
Для редактирования изображений используйте Shotwell, который предустановлен в Ubuntu. Также вы можете работать с Sumo Paint или GIMP (аналог Photoshop).
-
-
Для редактирования видео файлов используйте Pitivi (предустановлена), Lives, Kdenlive или Avidemux.
-
Если какие-либо программы вас не устраивают, установите в Ubuntu программу VirtualBox, создайте в ней виртуальную машину, установите в ней Windows и работайте в этой системе с нужными вам программами. (Для установки Windows в виртуальной машине понадобится образ установочного диска Windows, который можно сделать при помощи программы k3b или Brasero.)
-
С программами Windows также можно работать через приложение Wine, в котором создается виртуальный локальный диск C:, на который можно установить программы Windows. Тем не менее, в приложении Wine нельзя запускать мощные программы, например, Sony Vegas или CyberLink PowerDirector. В Wine диск с Ubuntu обозначается как Z:
Реклама


-
- Кнопка выключения компьютера расположена в верхнем правом углу экрана (на панели серого цвета вместе с другими кнопками). При нажатии на эту кнопку открывается меню с различными опциями (выключение, перезагрузка, спящий режим, настройка системы и т.д.).
- Кнопка выключения компьютера расположена в верхнем правом углу экрана (на панели серого цвета вместе с другими кнопками). При нажатии на эту кнопку открывается меню с различными опциями (выключение, перезагрузка, спящий режим, настройка системы и т.д.).
-
Вы не можете использовать программное обеспечение, с которым вы работали в Windows (за некоторым исключением). Поэтому вы должны либо найти аналогичные программы через Ubuntu Software Center, либо настроить виртуальную машину.
- В Ubuntu терминал — это аналог командной строки Windows. Новичку не обязательно работать с терминалом, но если вы научитесь это делать, вы будете управлять системой Ubuntu намного быстрее (и легче). Графический интерфейс пользователя Ubuntu отличается от такового в Windows 7/XP, но с ним легко работать.
Реклама
- В Ubuntu терминал — это аналог командной строки Windows. Новичку не обязательно работать с терминалом, но если вы научитесь это делать, вы будете управлять системой Ubuntu намного быстрее (и легче). Графический интерфейс пользователя Ubuntu отличается от такового в Windows 7/XP, но с ним легко работать.


Что вам понадобится
- USB-флеш-накопитель/внешний жесткий диск/перезаписываемый CD или DVD
- Компьютер с Windows и компьютер с Ubuntu (если вы не собираетесь менять Windows на Ubuntu).
Об этой статье
Эту страницу просматривали 7712 раз.
Была ли эта статья полезной?
Время на прочтение7 мин
Количество просмотров39K

Come back to school!
В Linux есть что-то неполноценное, и нет ничего лучше, чем Windows или, например, MacOS. Вы наверняка слышали такое мнение много раз. Я же считаю, что подобная оценка возникает из-за человеческих привычек.
Однажды научившись работать с одной операционной системой, тяжело перейти на новую, или просто не хочется, ведь изучение ОС — долгий процесс. Нельзя просто так лишь в порыве страсти или минутного желания перейти на новую систему полностью, по-настоящему, так чтобы не ставить свою прошлую операционную систему на виртуальную машину, или как вторую (запасную) систему на своем ПК.
Если вы готовы почувствовать себя студентом снова, я расскажу, что нужно сделать….
Linux, дает больше свободы в действиях…
10 лет назад я решил перейти на Linux. И это был осознанный шаг. Я не ставил перед собой задачу отказаться от Windows за один день или неделю, а растянул весь процесс на 1-2 года. Теперь даже представить не могу, как вернуться на Windows: иногда приходится с ней работать, но получается, что больше ругаюсь в сторону этой операционной системы, возможно так, как многие это бы стали делать впервые начав работать с Linux.
Наверное основным стимулом для меня было то, что крупные корпорации вынуждены регулярно выпускать все новые и новые версии своих операционных систем. Получается, так, что ты не можешь использовать свою отлаженную и наработанную операционную систему. Регулярно, может, раз в 3-5 лет, ты вынужден устанавливать себе какую-то новую версию операционной системы, и навязанные новые функции, возможности и т.д.
Причем, с каждой новой версией, операционная система становится все более «умной», и теперь уже не ты решаешь, когда обновлять свою операционную систему, перезагрузить компьютер, а компания-разработчик. Примеров таких «умных» функций можно привести множество.
Хочется, чтобы операционная система настраивалась индивидуально под пользователя, чтобы можно было контролировать больше функций.
Зачем это нужно было мне?
Сначала мне пришлось пережить переход с отлаженной Windows XP на Windows Vista и последующий переход на Windows 7. Но когда стало известно о том, что и Windows 7 снова предстоит переход на Windows 8, я окончательно убедился: дальше так продолжаться не может.
Почему стоит сделать и вам?
Получается, так или иначе каждый из нас будет вынужден мириться раз в несколько лет с какими-то новыми функциями, версиями и заново переходить на новую операционную систему, тратить время, теряя производительность и эффективность. Причём, в этом процессе вы будете марионеткой, т.е. вам придется принять те функции и интерфейсы, что вам навязывают, и отказаться от них вы не сможете. Это касается не только операционной системы, но и используемого вами приложений. Если вас это хоть как-то беспокоит, стоит задуматься о смене операционной системы на Linux.
На самом деле Linux — самая распространенная операционная система в мире. На текущий момент установлена практически везде: на серверах, в телекоммуникационном оборудовании\роутерах, в различных устройствах умного дома, в компактных мини-платах, и роботах-пылесосах.
Android построено на ядре Linux, MacOS использует ядро *NIX. Ваши знания в работе на операционной системе Linux могут вам пригодиться во многих других областях деятельности сейчас и в будущем.
Я работаю в IT-компании Lad, и у нас есть целый департамент, который занимается переводом организаций на отечественный софт. Я же хочу подчеркнуть, что стоит переходить на свободное ПО не из-за популярных веяний, а из-за реальной пользы от его использования.
Пошаговый план перехода, или как привыкнуть к новому софту
Шаг первый: Откажитесь от пиратского софта, и софта, который не работает под Linux
При подборе программ нужно учитывать, сможем ли мы использовать их на Linux. Поэтому первым делом я составил список программ, которыми я пользовался на тот момент и отобрал те, что смогу использовать под Linux. В приоритет взял кроссплатформенные: подходящие под Linux и Windows. И их оказалось много!
Первым делом я установил программы, которыми я бы пользовался на операционной системе Linux. Но начал я не с установки операционной системы Linux, а именно с установки программ, работающих как под Windows, так и под Linux, на свою тогда действующую операционную систему Windows.
Мой список выглядел примерно так:
Таблица аналогов по Windows и Linux
|
ПО Windows |
ПО Linux работающие и под Windows |
Комментарий |
|
Файловые менеджеры |
||
|
Far |
Far2l, Midnight Commander |
|
|
Total Commander |
Double Commander |
|
|
Архиваторы |
||
|
WinRAR |
7-zip, unrar |
|
|
Графика |
||
|
3D Studio Max, Maya |
Blender |
|
|
ACDSee, IrfanView, Picasa |
XnView Mp, XnConvert |
|
|
Adobe Photoshop |
Krita GIMP |
Krita — очень хороший графический редактор Но я пользуюсь и Krita и GIMP в зависимости от задачи |
|
SolidWorks |
FreeCAD |
|
|
Мультимедиа |
||
|
Adobe Audition |
Audacity |
|
|
Apple iTunes, WinAmp |
Audacious |
|
|
Adobe Premier Pro |
Shotcut |
|
|
VirtualDub, конвертация видео |
WinFF, ffmpeg |
Конвертация видео |
|
Видеотрансляции |
OBS Studio |
|
|
Microsoft Windows Media Player |
SMPlayer, VLC, MPV |
|
|
Офисные пакеты |
||
|
Microsoft Office |
Libre Office, и облачные офисные пакеты |
Libre Office — отличные редактор, если изучить основы работы с текстами (стили, заголовками), и научиться в нем работать. |
|
Evernote |
Typora, CherryTree |
|
|
Microsoft Outlook |
Thunderbird, Облачные сервисы |
|
|
Microsoft Notepad, Notepad++ |
Geany |
|
|
Интернет |
||
|
BitTorrent, uTorrent |
qBittorrent, Transmission |
|
|
Google Chrome |
Яндекс Браузер |
|
|
Системные утилиты |
||
|
VmWare Workstation |
VirtualBox |
VirtualBox — Отличная бесплатная среда для создания виртуальных машин |
|
AnyDesk, Microsoft RDP |
Remmina, xrdp |
Remmina, xrdp не работает под Windows |
|
Paragon Partition Manager |
GParted |
Gparted не работает под Windows |
Этот список — далеко не исчерпывающий. Подобных можно найти множество в Интернете, и выбрать подходящее ПО себе по душе.
Программа которые имеют версии для Linux: Google Chrome, Яндекс Браузер, Skype, Slack, Telegram, Discord, Zoom, Opera, Viber, Dbeaver и многие другие, уже имеют версии под Linux которые можно скачать на сайте производителя.
Чтобы безопасно установить бесплатное ПО на ПК, необходимо найти описание этого ПО на Википедии, после чего перейти на официальный сайт программы и скачать с него версию для Windows. Это намного более безопасный способ нежели скачивать программы через софт-копилки, которые кишат разными встроенными Malware вредоносными инъекциями.
Сколько времени у вас уйдет на адаптацию к новому ПО зависит только от вас, но этот процесс будет максимально гладким, важно не отказываться от старого ПО сразу, сравнить способы использования функций на старом и новом ПО. Постепенно вы полностью адаптируетесь, и сможете отказаться от старых программ.
Шаг второй: выбор версии дистрибутива Linux
Одна из проблем и сложностей Linux: дистрибутивов много, у новичка может уйти много времени на выбор. Стоит выбирать наиболее популярные с крупным комьюнити, чтобы получить поддержку.
Я перепробовал большое количество дистрибутивов: Fedora, CentOS, Debian, Ubuntu и ряд других. Наиболее удобный с точки зрения комьюнити, стабильности, и поддержки — Ubuntu, а точнее — LTS версии дистрибутивов Ubuntu, обновления которых выходят раз в два года. На текущий момент актуальная версия Ubuntu 20.04 LTS. Скоро выйдет версия Ubuntu 22.04 LTS. Но я бы не спешил сразу ставить новую версию, если вы новичок, к этому времени большая часть энтузиастов еще не успеет испробовать данный дистрибутив, и комьюнити данной версии будет расширяться со временем.
Но даже с Ubuntu у вас остается выбор между разными версиями:
1) Ubuntu LTS — основной дистрибутив Ubuntu, он действительно хорош, и я рекомендую начать с него, если вы новичок, и вам нравится красивые мультимедийные эффекты.

2) Xubuntu LTS — это дистрибутив Ubuntu в котором в качестве оболочки используется Xfce, и эта оболочка наиболее легковесна и не перегружена различными мультимедийными функциями, интерфейс из 2000 годов, и больше похож на Windows XP. (это был мой выбор).

3) Kubuntu LTS — это дистрибутив Ubuntu на оболочке KDE. Наверное эта версия для тех, кто любит все настраивать и делать под себя, иметь миллион опций и настроек, но при этом интерфейс чем то схож с интерфейсом из Windows 7. В награду к этому дистрибутиву вы получите много специфичного KDE софта, в том числе свой браузер, свой офис и многое другое, к которому вам придётся либо привыкать, либо удалить его и установить свои программы из вышеуказанного списка, которые вы решите использовать на своей системе. Многим KDE очень нравится, но я все же считаю его излишне перегруженным, и некой своей особенной экосистемой.

Конечно стоит сказать, что Ubuntu тоже требуется обновлять, так как новые LTS версии выходят раз в два года. Обновление Ubuntu вы можете выполнять во первых не сразу, а когда вы сами к этому будете готовы, сроки поддержки каждой версии составляют 5 лет. Само обновление происходит без необходимости переустановки операционной системы с нуля. Изменения как правило не так масштабны, и в большинстве случае вы получите полностью аналогичную систему.
Шаг третий: ставим Linux на один из компьютеров
Итак, выбор дистрибутива сделан, ПО вас уже не раздражает, и вы к нему привыкли, значит вы можете установить Linux на один из компьютеров, которыми вы пользуетесь. На крайний случай можно установить Linux на виртуальную машину через VirtualBox. Если у вас остаются опасения, то на Linux вы всегда можете установить VirtualBox с установленной Windows внутри виртуальной машины на своем компьютере.
Многое в Linux необходимо делать с помощью командной строки. Придется изучать. Однако это вовсе не недостаток операционной системы. Например, на MacOS часть функций можно выполнить только через командную строку.
Шаг четвертый: полный переход на Linux
В какой то момент вы поймете, что вы достаточно овладели навыками работы с Linux, научились решать проблемы с помощью сообщества. Значит, пришло время, чтобы везде заменить операционную систему на Linux, как это сделал я.
На этом и предыдущем этапе я столкнулся с еще одной проблемой. Нужно обучить свою семью пользоваться новой ОС.
Все мои ПК дома и на работе, а также ноутбуки детей и жены переведены на Linux. Дети восприняли это наиболее спокойно, так как они другого никогда и не видели, либо даже не поняли, а что, собственно, глобально изменилось.
Linux — множество возможностей
Я использую свободную версию Linux, перестал пользоваться пиратским софтом и не испытываю проблем с необходимостью постоянно обновлять антивирусы. Я не качал кряки, патчи и прочие программы, которые неизвестно что запускают, выполняют, ломают на моем ПК.
Современная Linux ничем ни хуже, а, на мой взгляд, намного лучше других платных операционных систем. С поприоритерным программным обеспечением, дела обстоят несколько хуже. Количество компаний, разрабатывающие ПО для Linux, постоянно растет, и, может быть, ПО, которое вы используете, уже имеет версию под Linux. Бесплатное ПО для Linux покрывает 100% всех рядовых потребностей обычного пользователя ПК.
Эксперт по Машинному обучению в IT-компании Lad
Installing an operating system is not an easy task. For most people, this is something they will never have done. The vast majority of people buy computers with the operating system already installed, so they never have to manually run through the system setup. The process can be intimidating, but we will try to make it as simple as possible.
In this article, we’d like to continue the journey we started last week – how to successfully migrate from Windows 7 to Ubuntu. In the first article, we talked about the preparation steps – the differences between Windows and Ubuntu, software parity, hardware support, and data backup ahead of the change. Here, we will show you how to safely install Ubuntu. In the last tutorial of this series, we will tour the Ubuntu desktop, install popular applications, and learn how to use Ubuntu.
Terminology
Let’s start with the phrases we will use in this tutorial. Some of the terms can seem vague at this point, but they will make more sense as we go along.
The setup of a new operating system is broadly called installation. The installation has several stages:
- You need to download the installation media (think an exe file in Windows for an application setup). The installation media will usually come in the form of ISO files. For instance, if you download Ubuntu, then you will find a file called something like ubuntu-18.04.3-desktop-amd64.iso in your download folder location.
- You need to copy the contents of the installation media to an external device, DVD or thumb drive. This is done with a dedicated tool, which will correctly prepare the external device for use, and store the contents of the installation media on it.
- You need to boot (start) the external device on your computer. Typically, this means connecting the external media (placing a DVD into the tray or inserting a thumb drive into a USB port). Next, you need to instruct your computer to boot from the external media. Some computers are configured to do this automatically. In other cases, you will need to access your computer’s setup (usually by pressing F2 or Del keys early on when the computer is powered on or rebooted), and then change a setting called boot order. We will cover this in more detail later on.
- Once the computer correctly identifies the external media, it will boot the operating system on this media. What this means, Ubuntu will now start. Do not worry, the installation will not begin right away. If left with no user interaction, Ubuntu will launch into the live mode, which means your underlying hardware (disks) will not be touched, and you can safely test and experiment with Ubuntu before you decide to make any changes.
- In the live environment, you can play around to get the sense of how Ubuntu works, try applications, and verify your hardware is correctly initialized. Once you’re happy and confident with the overall look & feel, you can proceed to install the operating system.
- The actual installation is the next step. At this point, the operating system will warn you that changes are going to be written to your hard disk, so you can back out if you are unsure or do not want to proceed, for any reason. Once the installation completes, the next time you reboot your computer, it will start Ubuntu.
| Phrase | Windows | Linux |
|---|---|---|
| Installation media | ISO file | ISO file |
| Boot sequence | The startup of a computer | The startup of a computer |
| Live session | N/A | A session in which the operating system runs in memory only and does not touch the hard disks; it is great for non-destructive testing of the operating system and software |
| Installation | Copy of the installation media to hard drive and user setup | Copy of the installation media to hard drive and user setup |
| Partitioning | The installation sub-step during which the hard disk is configured | The installation sub-step during which the hard disk is configured |
| Partition | A logical slice of the hard disk. In Windows, these are identified by drive letters, like C:\, D:\ | Partitions in Linux use the following notation: /dev/sdXyX – letter (a, b, c, etc) that denotes which the hard disk number. If you have only one hard disk, it will be a.Y – number that denotes the partition on a particular hard disk. For instance, /dev/sda3 denotes the third partition on the first hard disk. |
| Filesystem | The logical structure used to store files on a drive. By default, Windows uses NTFS. | By default, Linux uses Ext4. Linux supports many other filesystems, and can also read/write Windows filesystems. |
| Mountpoint | The logical endpoint by which the filesystem on a particular partition is made accessible to the user. Synonymous with how partitions are shown to the user through Window Explorer (C:\, D:\, etc). | In Linux, there is a single tree that contains all mount points to all filesystems. The top-tree element is called root, and it is identified by the forward-slash character (/). Entries under the root will then point to different folders/files. For example: /usr – folder that contains application data. It can be mapped to any partition/filesystem (e.g.: /dev/sda5)/home – folder that contains user data, like application settings and documents. It can be mapped to any partition/filesystem (e.g.: /dev/sdb6) |
| Formatting | The process of initialization of a partition with a new filesystem. This is a destructive process. | The process of initialization of a partition with a new filesystem. This is a destructive process. |
Installation types
There are multiple ways operating systems can be configured – this is not unique to Ubuntu; this is true for all operating systems out there.
- A Single operating system on a computer – the most typical and common scenario. A hard disk contains a single operating system. It is relatively simple to configure and maintain. Most Windows 7 users will have PCs or laptops set up this way.
- Dual boot – This is a configuration where there are two operating systems installed on the same computer. Each operating system could reside on a separate hard disk, or they could both be installed on one hard disk, on different partitions. In a dual-boot setup, usually there will be a menu displayed early on in the boot sequence of the computer, allowing the user to choose which operating system they want to run. On physical systems, only one operating system can run at one time. A dual-boot setup could be Windows 7 and Ubuntu, side by side. You can then alternate between the two and use them as you see fit, with a reboot in between each use.
- Multi boot – Like dual-boot, but there are three or more operating systems.
- Virtualization – This is a concept that allows one to run an entire operating system on top of another operating system. This is done using a dedicated piece of software called hypervisor. The hypervisor software runs on your host operating system, and it allows you to create virtual machines that emulate hardware. You can then install a guest operating system on top of this emulated hardware, and use them side by side. Virtualization isn’t trivial, but it is a good way to test new operating systems without trying them on your physical hardware. This way, you can practice using Linux, get comfortable with the installation steps before you do anything on your actual PC or laptop.
If you decide to install Ubuntu, the sequence of steps will be slightly different based on your choice of the configuration (single boot, dual boot, etc).
If you want to replace Windows 7 with Ubuntu, you will need to:
- Format your C:\ drive (with the Linux Ext4 filesystem) as part of the Ubuntu setup. This will delete all your data on that particular hard disk or partition, so you must have a data backup in place first.
- Install Ubuntu on the newly formatted partition.
If you want to dual-boot Windows with Ubuntu – even as a transition step until you get accustomed to using Ubuntu, you will need to choose one of the two options below:
- Allow Ubuntu installer to configure things automatically – most likely, it will be able to set up the two operating systems side by side.
- Alternatively, you will need to change the hard disk and/or partition layout so there’s at least one new partition that can accommodate the installation of Ubuntu. This may require changing the size of existing partitions (shrinking) to create space for a new partition. In some cases, this may not be possible, or you may not have sufficient disk space. The management of partitions can be done in the Ubuntu live session using a tool called Gparted partition manager (available by default in Ubuntu). You will need to be comfortable with the Linux hard disk and partition notation to use this software. You also must be careful, because most operations are destructive, so if you delete or format partitions, you could lose your data or render your computer unbootable. Then, you can install Ubuntu on the newly created and formatted partition.
Practice: Ubuntu installation as a virtual machine
Please note: This scenario will not actually migrate you from Windows 7 to Ubuntu. However, it is a very useful exercise, as it will help you get familiar and comfortable with the new operating system, so you can then commit to a setup on physical hardware – and actually replace Windows 7.
Let’s start with the simplest and safest of scenarios – we will install VirtualBox, a free virtualization software, create an Ubuntu virtual machine template, and then run through the installation.
- Download Ubuntu ISO. You can either download the LTS image, which comes with five years of support, or one of the interim releases, which have a 9-month support timeframe and ship with some of the newer features and applications than what you get by default in an LTS version. It’s a trade-off between stability and support on one end and using the latest software on the other.
- Download VirtualBox and install it in Windows. You are not limited to where you install the software. This can be done in any version of Windows, or even other operating systems.
- Start VirtualBox, and create a new Ubuntu virtual machine.
- Create a virtual hard disk for Ubuntu.
- Create a virtual optical storage device (this will be the virtual DVD drive). We will “run” the ISO file from it. Effectively, when the virtual machine starts, it will treat the optical storage device with the ISO attached to it as though you had copied the ISO contents to a DVD or a USB thumb drive, and booted this on a physical computer.
- Follow the guided wizard to install Ubuntu. Pay attention to the hard disk setup.
VirtualBox configuration
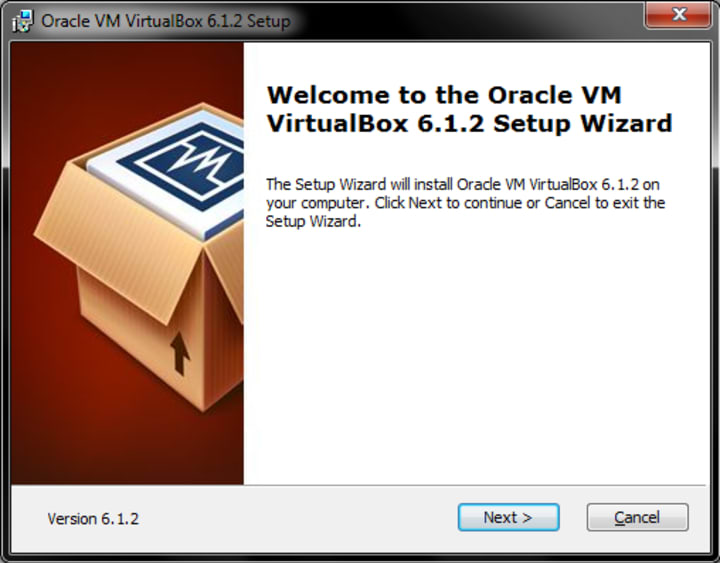
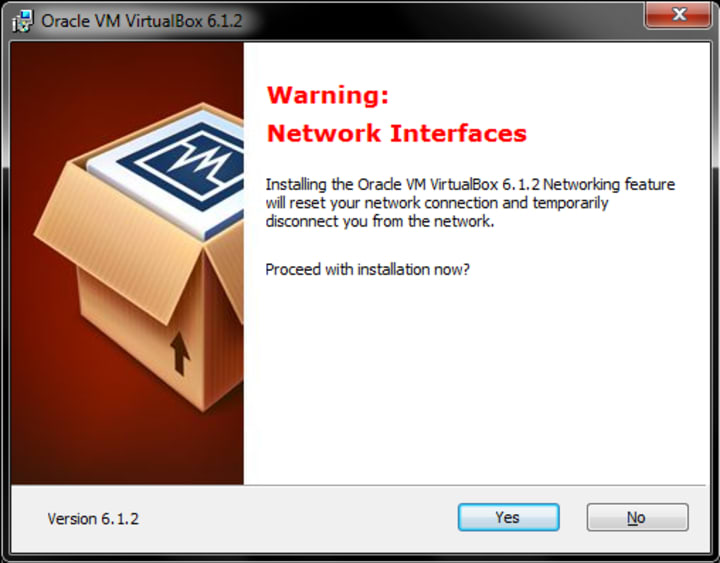
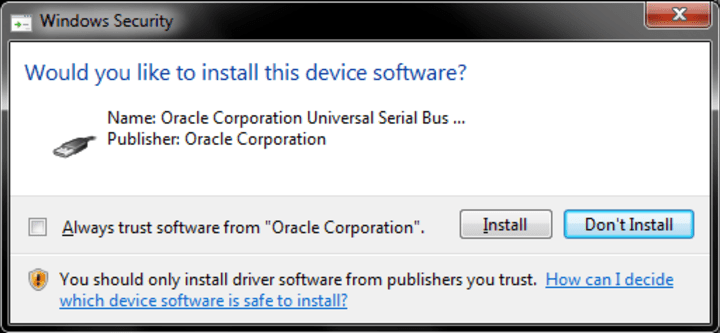
Run the downloaded VirtualBox setup exe, and follow the instructions. The one part where you need to pay attention is the configuration of network adapters. By design, virtualization products create virtual machines (computers), with their own virtual hardware, including network. You will need to approve the installation of VirtualBox network drivers (signed by Oracle).

New virtual machine setup
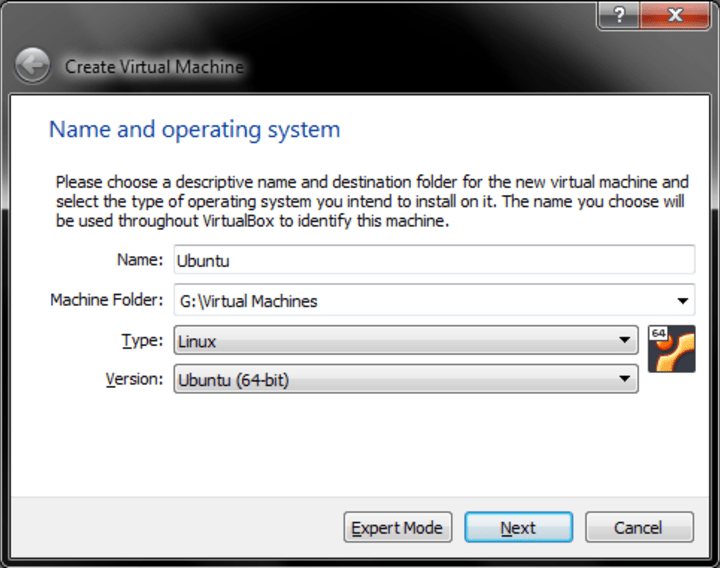
Once VirtualBox is installed and configured, start the application. Click on the New button. You will now be asked several questions. You will need to provide the name for your virtual machine (VM). You can use anything, like John or Jane, but it is best to use the exact operating system version. If you type in Ubuntu, VirtualBox will automatically detect what you’re trying to do.

The next step is decide how much RAM you want to give your VM. Then, you need to configure a virtual hard disk. Once these steps are complete, the VM is ready to start. However, we also need to attach the Ubuntu ISO to it.
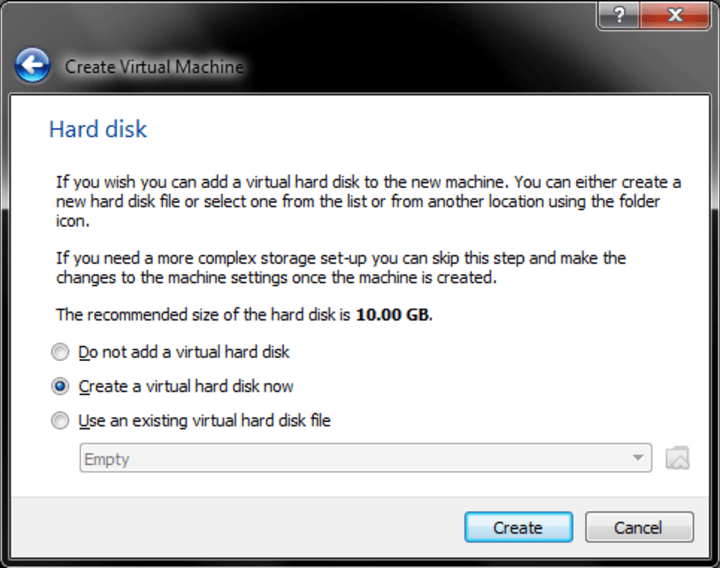
Click on Settings. In the new window, click on Storage. In the right panel, there will be multiple Storage Devices listed – think hard disks and DVD trays on a physical computer. You will have your hard disk there (in the .vdi format), and an empty IDE controller with a virtual optical drive attached to it. Select it, and then, from the drop down menu, select Choose a disk file… and navigate to where you downloaded the Ubuntu ISO (called something like ubuntu-18.04.3-desktop-amd64.iso). After you complete this step, you can start the VM, and it should boot from the “external” media (in this case the virtual DVD tray).
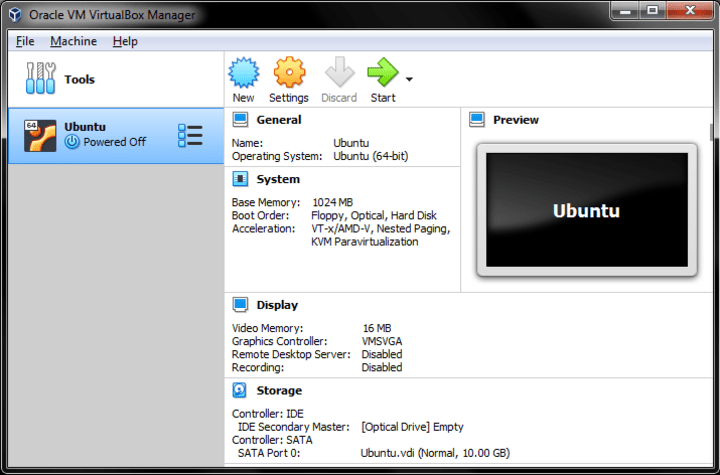

Once you start the virtual machine, you will see Ubuntu launch.

Ubuntu live session
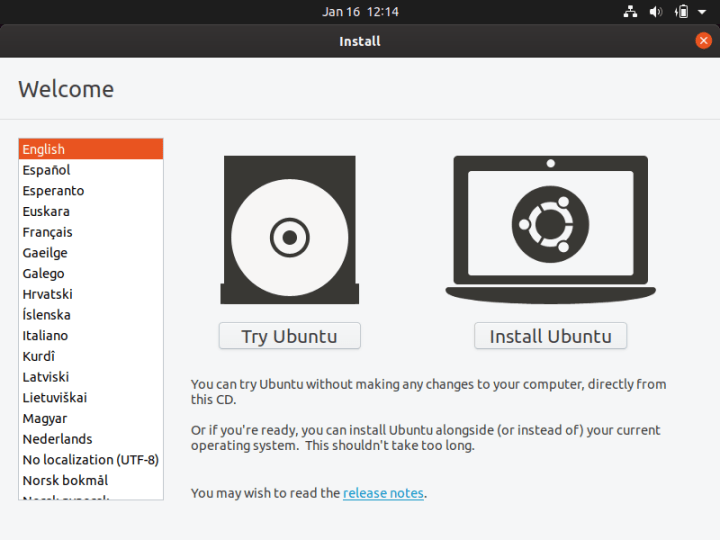
On startup, Ubuntu will ask you what you want to do – Try Ubuntu or Install Ubuntu.
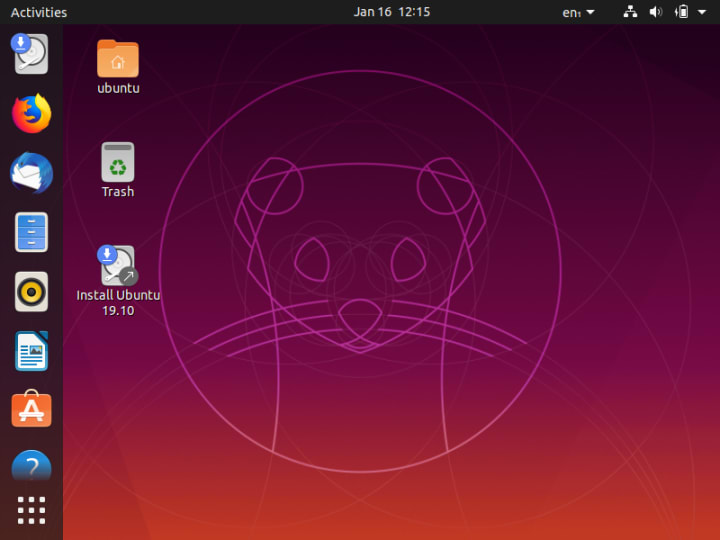
If you select Try Ubuntu, the operating system will launch into a live session, running from memory. Your disks are untouched at this stage. You can play around, get the feel for the operating system and its desktop layout, try network connectivity, test applications, and more. Once you’re ready to install Ubuntu, click on the desktop icon, or the installer shortcut in the vertical taskbar on the left.
Ubuntu installation wizard
The installation process is done with a step-by-step wizard. The first step is just a Welcome note and installer language selection.

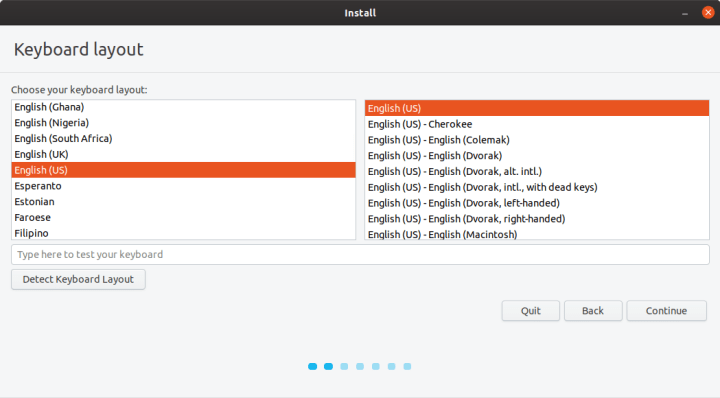
Keyboard layout
The second step is to choose your keyboard layout. You can always add more layouts (and languages) after the installation.
Connect to the Internet
The optional third step is network. If you’re using a desktop and have a wired connection, you probably won’t see this step in the installer. If you’re on a laptop with a wireless connection, the installer will ask you if you want to connect to an access point. This is not mandatory, but it does allow you to install updates before you get to the desktop. Alternatively, you can connect to the network from the top taskbar (panel), via a drop-down menu in the right corner.
Updates and other software
The fourth step is to decide what setup you like. Most people want the normal installation, which comes with a complete desktop and a set of productivity applications. You can also choose to install third-party software, graphics drivers and media codecs (last checkbox). This is recommended, as it will give you access to a wider range of applications and use cases.

Installation type
In the virtual machine, your hard disk will contain no data. This is why the installer will notify you that it cannot detect any operating systems. It also makes the first option – Erase disk and install Ubuntu – perfectly safe to run.

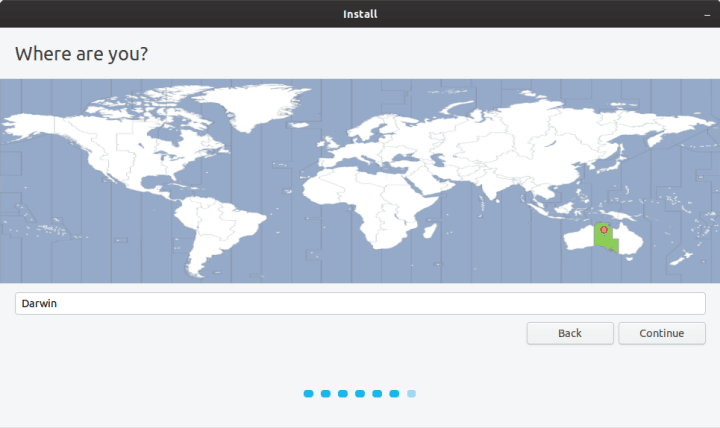
Timezone and user setup
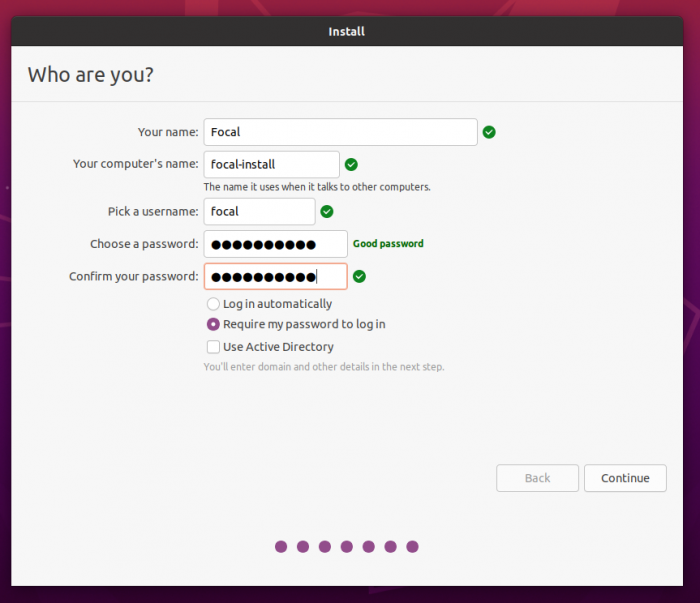
The installation will begin now in the background. You will be able to configure your timezone and your user. The choice of the timezone will determine your language locale. For instance, if you’ve selected English (US) as your keyboard layout and choose London, UK as your timezone, Ubuntu will be configured with British English as the desktop interface language. You will be able to change this after the installation if you like.
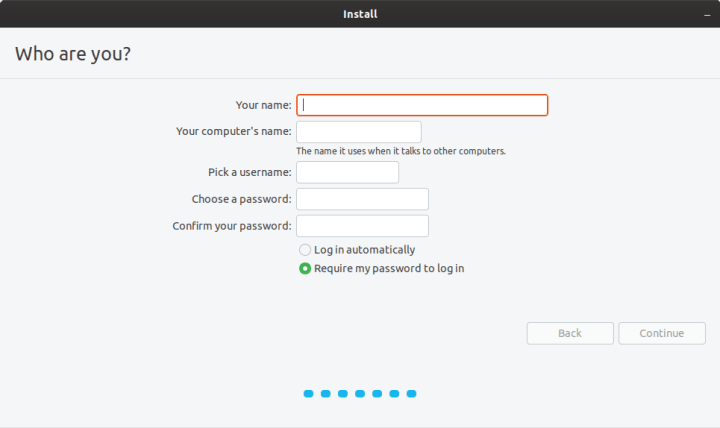
The user setup is self-explanatory – choose your name, computer name and your password. You can auto-login into the desktop, or have the system ask you for your credentials to allow you to login.
Ubuntu installation on a physical machine with an existing Windows 7 operating system
Here, we will configure a dual-boot setup. Once again, we are not getting rid of Windows 7 just yet. But this scenario allows us to test Ubuntu on physical hardware without altering the Windows 7 data. This way we will gain additional knowledge and practice ahead of the actual migration.
After you have mastered this step, you can then re-run the installation and replace Windows 7 with Ubuntu (on the same PC or a different computer, if you like). Alternatively, you can simply reuse the Windows 7 partition(s) inside Ubuntu as additional storage space.
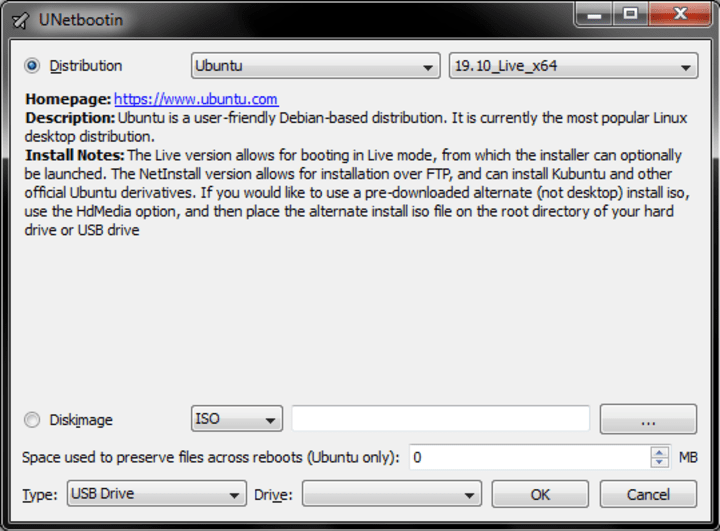
- Download Ubuntu ISO.
- Download UNetbootin and burn the Ubuntu ISO to a DVD, or download unetbootin and use it to copy the Ubuntu ISO to a USB thumb drive.
- Insert the installation media into the computer (DVD tray or USB port), access the BIOS of your computer, choose the installation media, and boot it. This will launch the Ubuntu live session.
Prepare external media
Launch the UNetbootin tool. You have two options available: 1) download Ubuntu from the tool directly and then copy it to the USB drive 2) load a previously downloaded ISO image. Either option will work fine. Since we’ve downloaded the ISO already, check the Diskimage button, locate the ISO file on your disk.
Boot Ubuntu
Once the USB drive is ready, insert it into your computer, and power it on. Some computers are automatically configured to boot from external media first. In that case, you won’t need to do anything. Other computers require a manual change to the startup order. This is done by editing the BIOS boot menu. Each hardware manufacturer uses its own BIOS implementation, so there is no uniform way to do this. Typically, you will need to press a key (F2 or Del or alike) to access BIOS, and then you will need to change the Boot order or Boot options so that your system starts from the external device containing the Ubuntu operating system.
Ubuntu installation wizard (physical hardware)
The first four steps in the installer are identical to the virtual machine. The real difference is whether there is any information stored on the hard disk(s). In a virtual machine, the hard disk was empty, and it did not contain any partitions (like a new computer). On a computer that has Windows 7 installed, the installer will show different options.
Installation type
Most likely, the installer will inform you it has found Windows 7 and will suggest installing Ubuntu alongside it. Effectively, the installer will try to find the most suitable partition, allow you to shrink it, create a new partition in the free space after the resizing, and install Ubuntu on it.
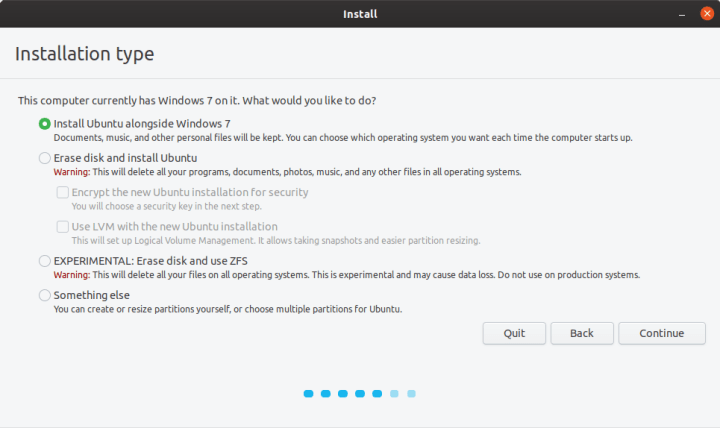
Alternatively, if you do not care about anything on your hard disk – or feel comfortable with completely removing Windows 7 – you can use the second option, erase everything, and setup Ubuntu as the only operating system. If you have safely backed up your data from Windows 7, you can use this option. If you’re not sure, the best way is to start with the dual-boot option, and then eventually fully replace Windows 7 once you’re confident with using Ubuntu.
If you select the first option (Ubuntu alongside Windows 7), the next step in the installer allows you to allocate drive space. You can drag the divider to decide how much you want to resize the Windows partition – Ubuntu will be installed in the remainder.
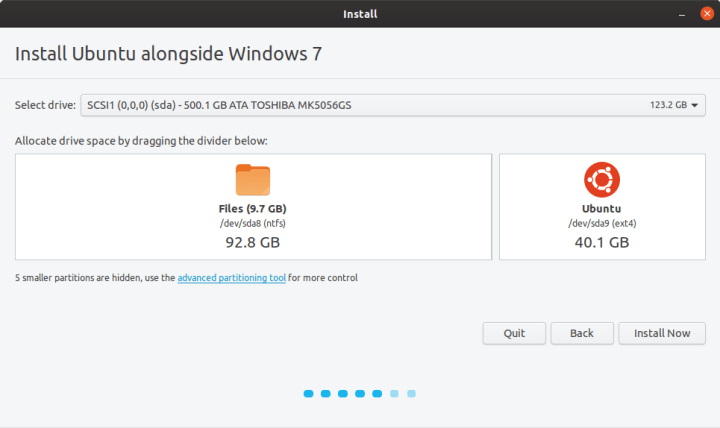
If you are familiar with the concepts of disk and partition management, you can also use the last option – Something else, where you can make changes manually to partitions as you see fit. These are non-trivial steps, and not recommended for new users.
Advanced: Manual partitioning
If you do not want to use the dual-boot option, or the installer cannot set it up automatically for you, you will need to manually configure the partitions. In the Ubuntu desktop, click on Activities, type Gparted in the search box, launch the application. It will scan your hard disks and show you a table of results.

The image above is from a laptop with a Windows 7 installation. It has a single 500GB hard disk, shown as /dev/sda (465.76 GiB). It has a total of eight partitions:
- /dev/sda1 is the Windows hidden system/boot partition.
- /dev/sda2 is the actual C:\ drive – this is not immediately obvious from this list, but you can deduce it from the rest of the information, and also by comparing size to what it should be in Windows 7.
- /dev/sda3 is a special type of partition. Without going into too many technical details, it is an extended partition – a special type of primary partition that can nest logical partitions. On computer systems that use the ms-dos type of partition table, there is a limitation of four (primary) partitions. To work around this limitation, you can create the extended one to span a large part of the hard disk space, and then create logical partitions inside it. Newer systems using the gpt type do not have this limitation.
- /dev/sda5 is the first logical partition. There is no /dev/sda4, and logical partitions will always be numbered 5 and above. This partition has NTFS filesystem and even carries a label – Games, so you know what type of data it contains. The label can help you prevent damage by trying to modify partitions that contain important data.
- /dev/sda6, /dev/sda7 and /dev/sda8 are logical partitions, with labels, containing additional user data.
From the data presented by GParted, we do not have sufficient free space, so we will need to change the partition layout. We can either delete one of the non-C:\ partitions, or resize them. The last partition, dev/sds8 (labeled Downloads) looks like a good candidate. It is a large partition, and most likely contains less critical data. Click on a partition and select Resize from the menu. Gparted will attempt to run this operating, and if successful, you will have free space available to set up Ubuntu.
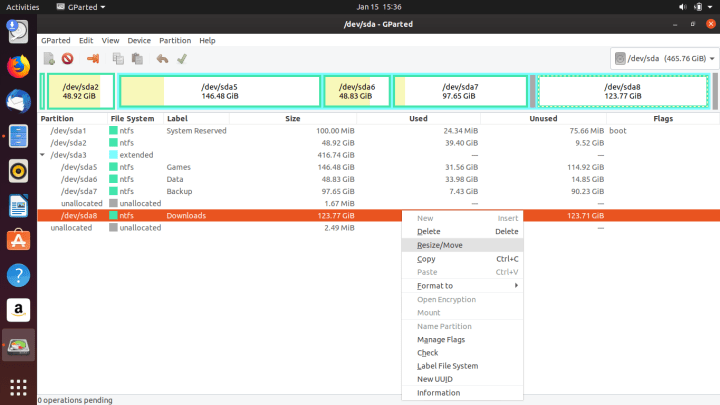
In the Ubuntu alongside Windows 7 option, the installer automatically selected/dev/sda8 as the candidate for the installation. If your computer only has one partition (essentially the C:\ drive), you will need to resize it. This means you do need sufficient free space, and you must safely back up your data, as hard disk operations can be risky.
User setup
The remaining steps in the installation are identical. After the setup completes, and you restart your computer, you will see a text menu on startup, and you can select which operating system to boot into – Ubuntu or Windows 7.
Our installation setup is now complete.
Summary
We have completed the most complex and difficult part of the journey. When you need to manage your storage, there is always some risk involved, but since we have safely backed up our data in the first article, the chances of data loss are low. The installation requires knowledge that most computer users won’t readily have, but hopefully, you have now gained the necessary skills and practice to do this with relative ease. The next step is to explore the Ubuntu desktop – and even have some fun. We will do this in the third installment of this series.
Photo by Jonatan Pie on Unsplash.
#статьи
-
0
Советы SRE-инженера про смену операционки и перенос данных: простая инструкция из 4 шагов без магии и лишних обещаний.
Иллюстрация: Wikimedia Commons / Polina Vari для Skillbox Media
Журналист, коммерческий автор и редактор. Пишет про IT, цифровой маркетинг и бизнес.
Сайт: darovska.com.

SRE-инженер. Работал системным администратором в Медицинском университете им. И. И. Мечникова. Увлекается медиафилософией, в том числе философией компьютерных игр, Unix и Open Source.
Я никогда не был фанатом Microsoft, но какое-то время чувствовал себя комфортно в рамках Windows. А полгода назад решил снова полностью перейти на Linux. Расскажу, как это было.
Первое, что я сделал, — стал читать, какие проблемы с Linux могут проявиться на моём ноутбуке. О чём речь? Например, macOS нельзя поставить никуда, кроме MacBook (хотя некоторые умудряются инсталлировать так называемый «Хакинтош»). Похожая ситуация и с Linux: его лучше ставить только на те ноутбуки, у которых нет проблем с драйверами, — и до сих пор существует железо, на котором с драйверами придётся повозиться. Если говорить о процессорах, то лучше всего Linux дружит с AMD.
Учтите: хороший ноутбук с полноценной поддержкой Linux порой стоит сопоставимо с MacBook.
Почитайте, что пишут про работу конкретной модели ноутбука с Linux на сайте производителя и профильных форумах. Если есть жалобы на то, что не получается завести звук, не работает веб-камера или тачпад, задумайтесь — а точно ли вам так нужен этот переход и сможете ли вы работать с этим конкретным ноутбуком в принципе.
И ещё одно предупреждение: обычно при установке Linux всегда чего-то не хватает — приходится это искать, качать и даже собирать из исходников. Например, если официальный драйвер работает некорректно, надо будет поискать его исходный код или даже написать драйвер самостоятельно.
Фотки, мемы, видео, документы — всё нужное, родное и близкое. Перед тем как начать перенос данных с Windows на Linux, нужно точно разобраться, где и что хранится.
Все файлики, приложения, проекты, созданные вами, рекомендую всегда держать в одном определённом месте — так вы точно ничего не забудете и не потеряете. Это та часть, которую всегда легко перенести и которая никак не зависит от типа операционной системы.
В идеале эти данные лучше хранить не на жёстком диске ноутбука или компьютера, а в облаке, отдельном хранилище или на внешнем диске. Ещё хорошая практика — объединить несколько пунктов этого списка. Такой подход к хранению позволит в принципе не бояться отказа операционной системы или выхода диска из строя.
Вкладки браузеров экспортировать довольно просто. Например, недавно я обновлял elementary OS (ну как обновлял — переустанавливал): чтобы перенести профиль Google Chrome, достаточно было скопировать папку с профилем пользователя. Большая часть моих конфигураций была доступна сразу после переустановки.
В Linux есть хорошая практика — при установке системы помещать на отдельный диск пользовательскую папку, которая называется Home. При переустановке системы директория Home не трогается, но в ней остаётся весь мусор, с прошлой установки. Сама система в корне другая, но все пользовательские файлы вашего профиля остаются в Home. Если вы используете KDE, при обновлении KDE не сильно меняется — какие-то базовые настройки сохранятся. Но всегда есть риски, что новая версия KDE работает не так и смотрит не на те переменные. Это базовый вариант, когда профиль сохраняется и подключается к новой системе. Вы устанавливаете PyCharm, а у вас уже есть все папки с проектами.
Данные так или иначе переносятся, а вот с файлами Word могут быть проблемы. То, что заточено под конкретную операционную систему, всегда будет болью для любого переезда на другую ОС. Макросы или разметка документов отличаются, потому что Microsoft пока не использует формат OpenDocument. Но это особенность экосистем: в рамках экосистемы всё неплохо работает и переносится — именно поэтому есть смысл, если телефон на Android, использовать Chromebook, ведь там есть интеграция с сервисами Google.
Данные приложений и сами приложения, настройки системы нельзя полностью перенести с одной ОС на другую — это будет сложно и точно не на 100%. Ведь даже при переходе между двумя устройствами с одной операционкой на борту абсолютно все настройки не перенести — что-то придётся заново конфигурировать вручную. Скорее всего, вам удастся перенести только данные и конфигурацию отдельных приложений — да и то не всех, потому что логика работы некоторых программ сильно зависит от ОС.
При переходе с Windows на Linux надо проверять, насколько ваши приложения в принципе поддерживаются в новой ОС — и есть ли у них вообще версии для Linux. Даже если вместо Photoshop и Corel вы уже использовали кросс-платформенные GIMP с Inkscape, части настроек вы лишитесь. А у того же Lightworks переменные окружения в Windows и Linux могут сильно отличаться — то есть настройки придётся делать заново. В LibreOffice можно перенести готовые шаблоны и макросы.
Некоторые программы вообще не портированы под Linux (те же Sony Vegas или Adobe Premiere) — хотя вы всегда можете попробовать запустить их с помощью эмулятора Wine. Правда, для этого понадобится немало свободного времени.
Когда несколько лет назад я переходил с Linux на Windows, то сразу решил использовать кросс-платформенные приложения типа Lightworks. Потому что знал: если надо будет работать под Linux, я просто перенесу все свои проекты.
Например, вместо популярного Lightroom можно поставить кросс-платформенный Darkroom. Он тоже позволяет работать с фотографиями в RAW-формате — хотя, конечно, он не настолько удобный и приятный в работе, как продукт Adobe. В общем, если есть вероятность, что придётся переходить на Linux — лучше сразу поставить кросс-платформенное ПО.
Важно: не забудьте перенести ключи SSH для всех своих виртуалок и приложений (если они у вас есть). И первое время не стоит форматировать раздел с Windows — вдруг вы что-то забыли и вам это вдруг понадобится.
Просмотрщик фотографий точно не перенесётся, потому что пути сменятся. Базу нужно закэшировать заново — это не большая проблема, но она есть. Нужно также посмотреть основные приложения, в которых вы работаете, посмотреть переносимость. После этого нужно сделать перечень приложений, которые в теории могут быть портированы на другую систему, но для них тоже надо будет менять пути.
Нужно перенести важные для работы приложения. Например, для разработчика это могут быть VS Code, GoLand, IntelliJ IDEA, PyCharm. У JetBrains много продуктов, и все они — кросс-платформенные, их несложно перенести с Windows на Linux, а на официальном сайте VS Code есть гайд для установки под Linux.
В Linux и Windows разные файловые пути, поэтому если конфигурация текстовая и в ней можно поменять пути к модулям, файлам, библиотекам — значит, можно подправить конфигурацию и сохранить настройки. Если нет — тогда нужно посмотреть, какие варианты есть, как их переносить.
С фреймворками тоже обычно больших проблем не возникает: даже .NET и PowerShell поднимаются под Linux. Однако некоторые неудобства будут — не все функции .NET и PowerShell в Linux и Windows реализованы одинаково. Я тестировал их на прошлой работе — в целом работает нормально, хотя команды немного отличаются: например, где-то будет меньше доступных параметров, потому что это всё-таки не родной для Linux язык. Как по мне, ставить PowerShell на Linux — это несколько порнографично. Правда, иногда без этого не обойтись.
Сколько я телефонов ни менял, переход на новую модель — это всего одно действие, когда ты совмещаешь два телефона, и у тебя всё подтягивается, вплоть до приложений и известных Wi-Fi-сетей. Но попробуйте так сделать с Android и iPhone — ничего не получится.

Научитесь: Старт в DevOps: системное администрирование для начинающих
Узнать больше
Computer users today are more concerned about privacy, work efficiency, and desktop customization. More and more people are realizing that Windows isn’t very private, efficient, or customizable. Add this to the fact that a genuine copy of Windows comes with a pretty hefty price tag, and in the end, you’ll be tired of running the same old operating system.
That is why more desktop users are looking for alternatives like Ubuntu.
Ubuntu is a free and open-source distribution or operating system based on Linux. Linux itself is a kernel base for many free and open-source operating systems. The majority of server computers worldwide use Linux, while the number of Linux desktop users is on a steady rise. Many new Linux users are flocking to Ubuntu as their distribution of choice.
Ubuntu has dominated the Linux desktop space for years. Because of this, the distribution is home to a large community of users and developers. Now on version 22.04, Ubuntu still brings a stable Linux experience, long-term support from its developers, and ease of use for beginners. It is as easy to use as it is to install, especially for those who want to make the switch from Windows to Ubuntu.
This guide will help you make the switch to free and open-source software an easier task.
- Pre-installation
To prepare for installing Ubuntu, you will need these devices:
- A USB drive with at least 8 GB of storage. This USB drive will serve as your installer device for the Ubuntu operating system. Make sure that your drive is empty beforehand! All data on the USB drive will be lost when you install the Ubuntu image on it.
- A laptop or desktop PC with the following minimum hardware specifications:
- 2 GHz processor
- 4 GB of RAM
- At least 25 GB of hard drive storage space
- Internet access is also recommended when installing Ubuntu. Besides your computer’s Wifi connection, you may need to prepare a wired Ethernet connection to your computer. You can also share your phone’s internet connection to your computer with a USB cable.
You will also need to backup the data on your Windows system. Installing Ubuntu on your hard drive will erase your entire Windows system, along with all the files in it! Making a backup beforehand will allow you to move your files to your Ubuntu system once it’s installed.
Backing up your personal files can be done manually. You can transfer the necessary files to a separate USB drive or external hard drive. You may also transfer your personal data to a separate hard drive within your computer.
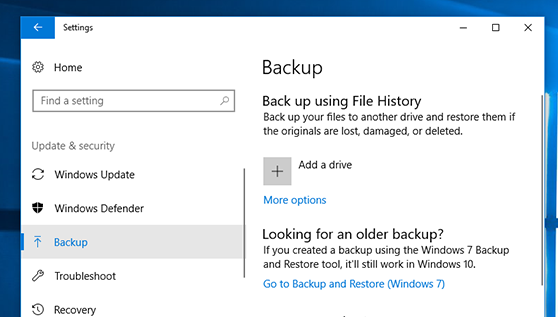
Windows 10 also has a file backup utility to make backing up your files simpler. All you need to do is:
- Open Settings on Windows 10.
- Search for “Backup” under Update and Security.
- Click “Add a drive“, then choose your external USB or hard drive for your backup.
2. Creating a bootable Ubuntu USB drive
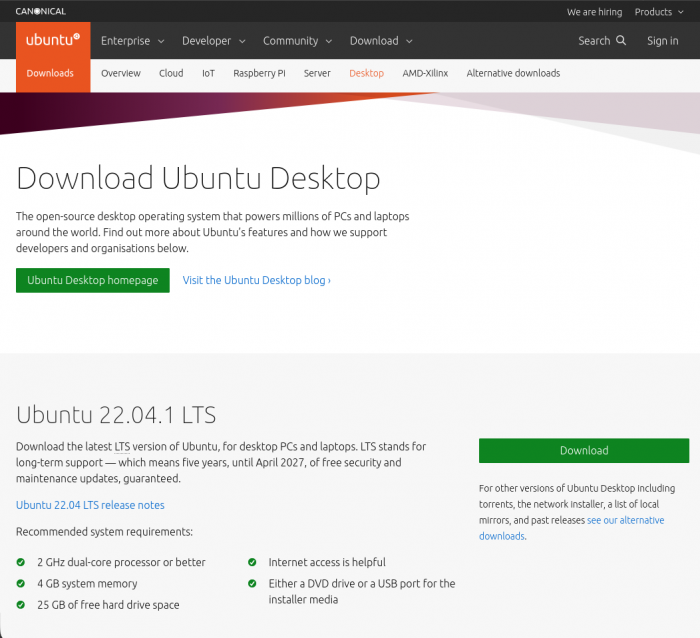
First, you will need to download an Ubuntu Desktop image. All you need to do is open Ubuntu’s download page and download Ubuntu 22.04.1 LTS.
There are many image-flashing apps that you can use to install Ubuntu on your
USB drive. For this tutorial, we will be using balenaEtcher. balenaEtcher is a free and open-source program that is very user-friendly. Just open balenaEtcher’s download page and download Etcher for Windows.
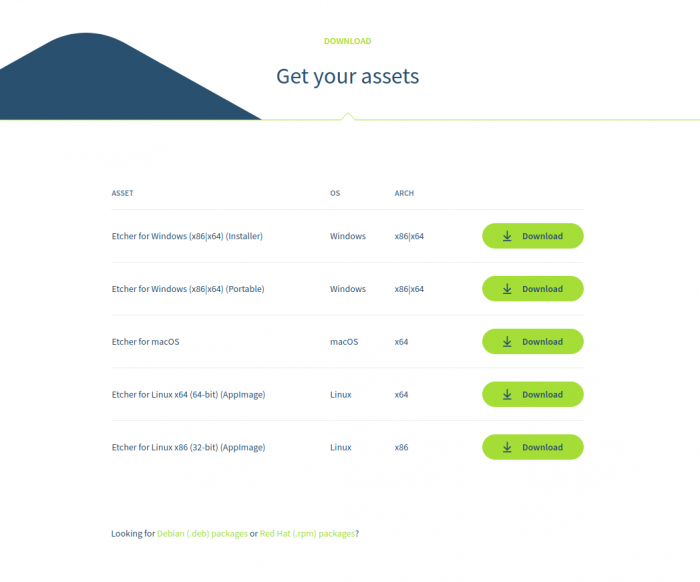
With your Ubuntu image downloaded and balenaEtcher installed, it’s time to flash Ubuntu onto your USB. Plug in your USB drive and follow these instructions:
- Open balenaEtcher.
- Select your downloaded Ubuntu image.
- Select your USB drive for installing Ubuntu.
- Click Flash!
You now have a bootable Ubuntu USB drive that is ready to use for installation.
3. Booting Ubuntu from the USB drive
Option 1: Booting Ubuntu through Windows
To begin booting your Ubuntu USB drive through Windows, unplug and plug in the drive and follow these steps:
- Click on the Start button.
- Press and hold the Shift key while you click Power > Restart on your Start Menu.
Once your computer has rebooted, you should see a blue screen with options to choose from.
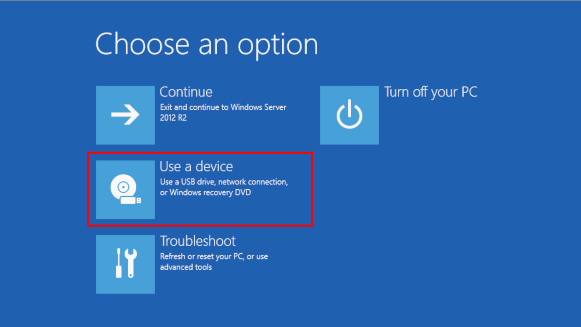
In the Choose an option screen, follow these instructions:
- Click Use a device.
- In the Use a device screen, choose Boot Menu.
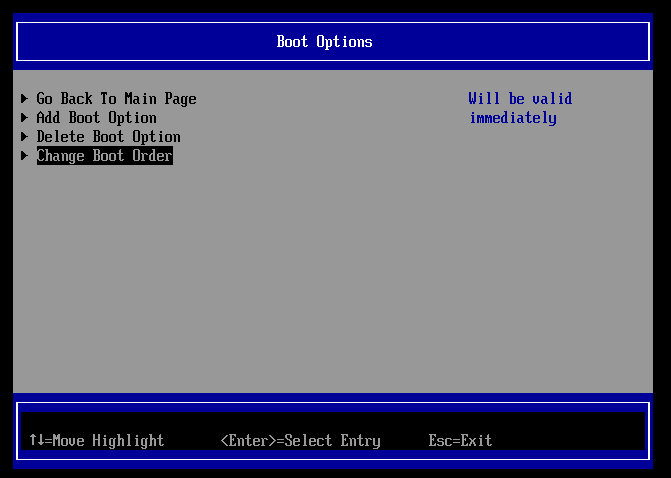
Windows will shut down. Your computer will restart and show a Boot Menu. The Boot Menu is a list of possible drive devices to start from. Select your Ubuntu USB stick and press Enter. This will start your computer through your Ubuntu USB drive.
If your Boot Menu is a full BIOS Menu with multiple options, navigate to the Boot Options and change your computer’s boot order. Set your USB drive as the first position on the booting order. Save and exit the Boot Menu. This will start your computer through your Ubuntu USB drive.
Option 2: Starting with the Boot Menu key to boot Ubuntu
Your machine may reboot straight to your regular Windows system instead of showing the Choose an option screen. In that case, you will need to manually access the Boot Menu. Follow these steps from your Windows system:
- Click on the Start button.
- Press and hold the Shift key while you click Power > Shutdown on your Start Menu.
- Unplug and plug in your Ubuntu USB drive.
- Start up your computer.
- Before your computer boots up Windows, immediately press your Boot Menu key several times.
F12 is the most common key for bringing up a computer’s Boot Menu. Escape, F2, and F10 are also common alternatives. Your computer’s Boot Menu key may also depend on the manufacturer. Identify your computer’s possible Boot Menu key in the following list:
Your computer should now show the Boot Menu. Follow the instructions on using the Boot Menu in Option 1, then start your computer through your Ubuntu USB drive.
4. Testing Ubuntu before installing
When your computer boots into your Ubuntu USB drive, you will enter the Ubuntu live environment and be greeted by a welcome screen. A live environment is a USB-based operating system that you can use without making changes to your computer until installed.
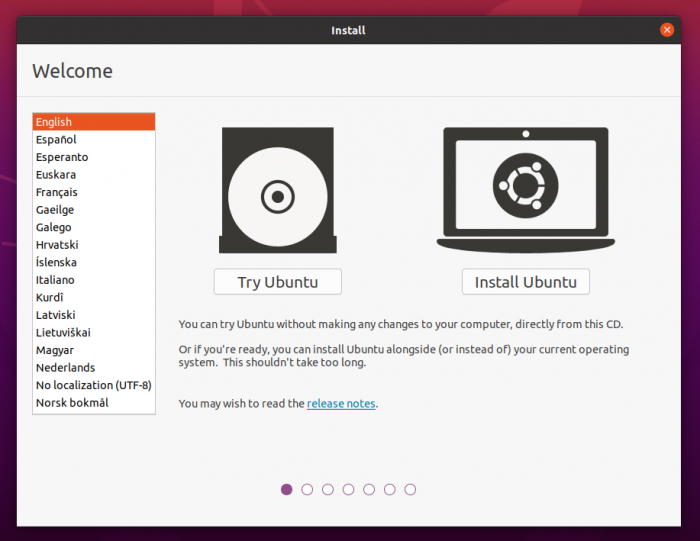
Before installing, click Try Ubuntu to preview Ubuntu through the live environment. You can proceed to install Ubuntu at any time by clicking the Install Ubuntu shortcut on the desktop. Get your very first look and feel of the operating system. Take Ubuntu’s default suite of applications for a test run.
This is also the time to test if your computer’s hardware functions are working properly. Check if your keyboard, mouse, sound, Wifi, Bluetooth, and graphics components are all functioning. Many new Ubuntu users will find their devices to be compatible with the operating system.
5. Installing Ubuntu on your hard drive
After testing Ubuntu on the live environment, you can begin the installation process. Click the Install Ubuntu 22.04 LTS shortcut on the desktop.
You will be asked to select a keyboard layout. You can manually select your computer’s keyboard layout. You can also click Detect Keyboard Layout to let Ubuntu find your keyboard layout for you. You can still add and change languages and keyboard layouts after installation. When you are ready, click Continue.

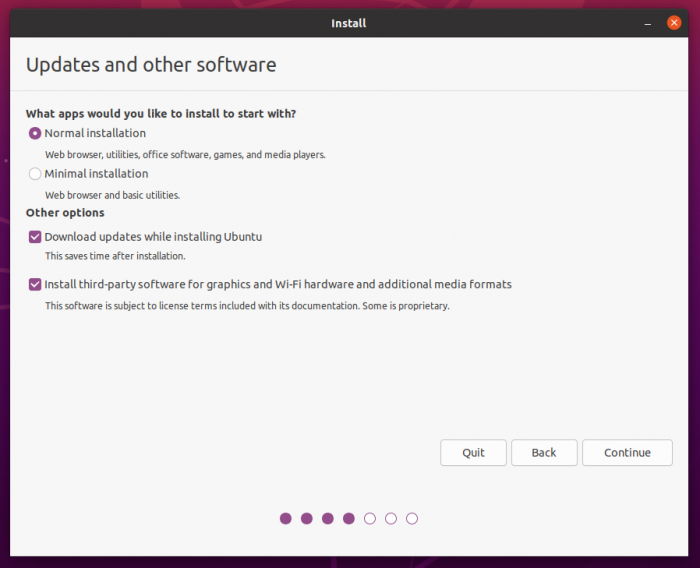
Next, you will be asked to choose your preferred type of installation. A Normal installation includes all the apps that a regular computer user will need. The Ubuntu live environment gives you the time to test out these apps for yourself.
A Minimal installation will only include a web browser and basic utilities. You may need to apply a minimal installation if you have less hard drive space. Either way, you are free to remove and install any Linux apps that you want after installing Ubuntu.
Other options are also present in this step. A stable internet connection is required if you choose to download updates while installing Ubuntu. Installing third-party software to improve device compatibility is also recommended.
On the next screen, you will choose the hard drive disk for your Ubuntu installation. For this tutorial, we will be erasing our old Windows install and completely switching to Ubuntu. Select Erase disk and install Ubuntu.
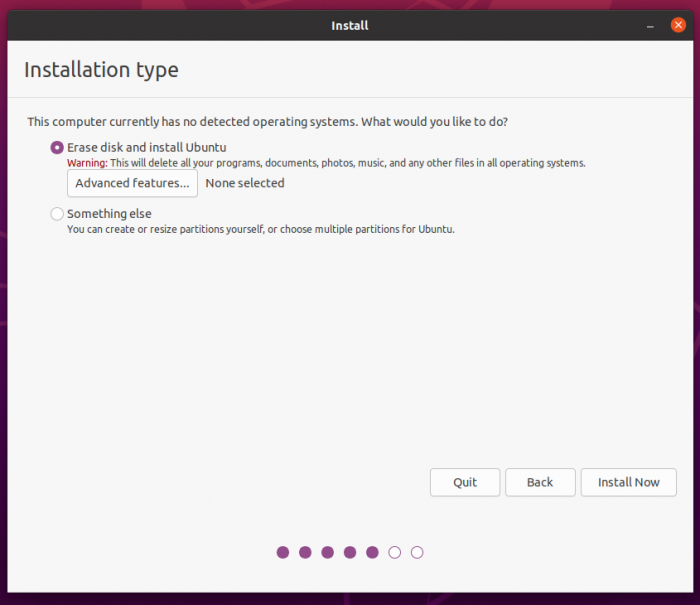
The Advanced features button gives you the option to encrypt your new Ubuntu install. Encrypting your Ubuntu system on your hard drive will make it more private and secure. This protects you from any malicious actors who might want to access and abuse your system.
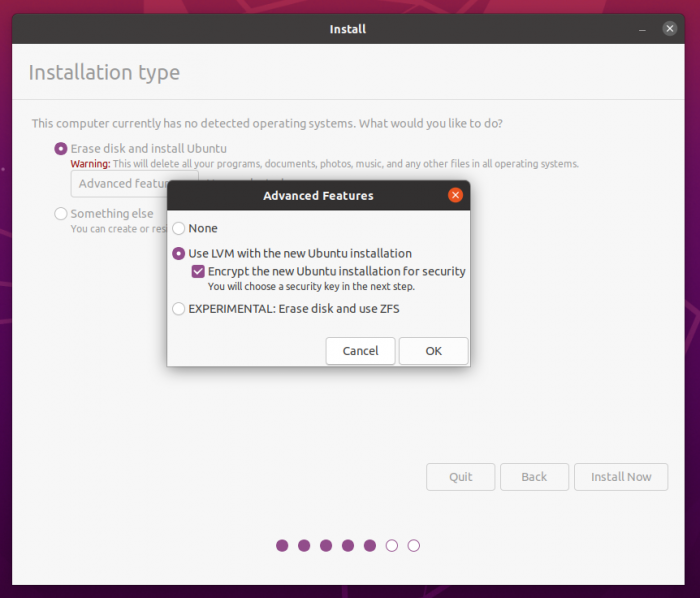
If you choose to encrypt your Ubuntu installation, you will be prompted to create a security key. You will have to enter this security key every time you open your computer so that you can decrypt and access your Ubuntu system.
Your security key should be strong, complicated, and memorable to you. It should contain lowercase uppercase letters, numbers, and symbols. Write your security key down and keep it in a safe place outside of your Ubuntu system. You will not be able to access and recover your data if you lose your security and recovery keys!
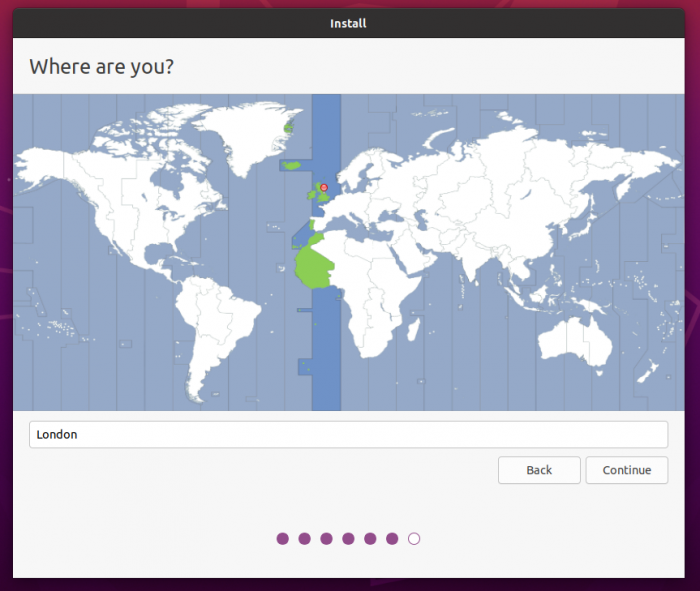
After choosing your installation drive, you will be prompted to select your location and timezone. It will be detected automatically if you are connected to the internet. Click Continue when you are done.
Finally, you will be asked to create your login details for Ubuntu. Enter your name, your computer’s name, and your username. Make sure to create a password that is strong, complicated, and memorable to you. If you chose to encrypt your Ubuntu install, your login password should differ from your security key.
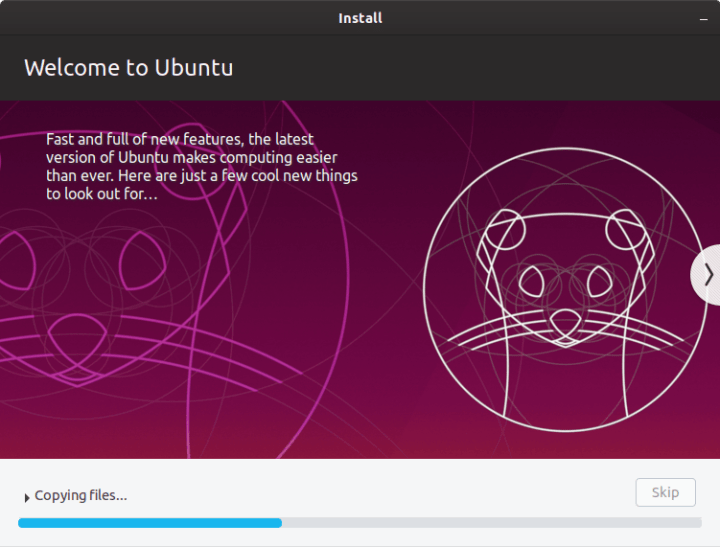
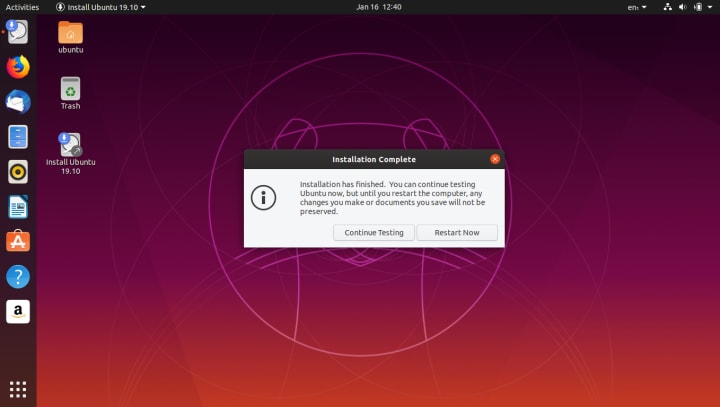
When you click Continue, the installation process will begin in the background. Get ready to sit back and relax, because the background installation will take some time.
Once the installation is complete, click Restart Now.
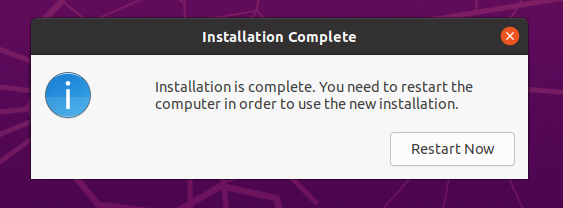
- Opening your Ubuntu install for the first time
Once you restart your device, unplug your USB install drive and press Enter.
Enter your password on the login screen and enjoy your new desktop operating system!