
В этой статье, мы покажем, как разрешить анонимный доступ к общем сетевым папкам и принтерам на компьютере в рабочей группе или в домене Active Directory. Анонимный доступ к сетевой папке подразумевают, что для доступа к сетевому ресурсу пользователи не нужно выполнять аутентификацию (вводить пароль) и для доступа используется гостевой аккаунт.
Содержание:
- Настройка локальных политик анонимного доступа в Windows
- Разрешить гостевой доступ к общей сетевой папке Windows
- Открыть анонимный доступ к общему сетевому принтеру
По умолчанию при доступе к сетевой папке на удаленном компьютере появляется запрос имени пользователя и пароля (кроме случаев, когда оба компьютера находятся в одном домене, или в одной рабочей группе и на них используются одинаковые аккаунты пользователей с одинаковыми паролями). Анонимный доступ подразумевает, что при подключи к удаленному компьютеру не запрашивается пароль и доступ к общим ресурсам возможет без авторизации.
В большинстве случае в целях безопасности не рекомендуется открывать анонимный доступ к сетевым папкам. Анонимный доступ позволяет любому неаутентифицированному пользователю прочитать, изменить или удалить данные в общей сетевой папке. Гостевой доступ рекомендуется использовать в исключительных случаях в защищенном периметре сети.

Настройка локальных политик анонимного доступа в Windows
Для анонимного доступа в Windows используется специальная встроенная учетная запись Гость (guest), которая отключена по-умолчанию.
Чтобы разрешить анонимный (без аутентификации) доступ к компьютеру, нужно включить учетную запись Guest и изменить некоторые параметры локальной политики безопасности Windows.
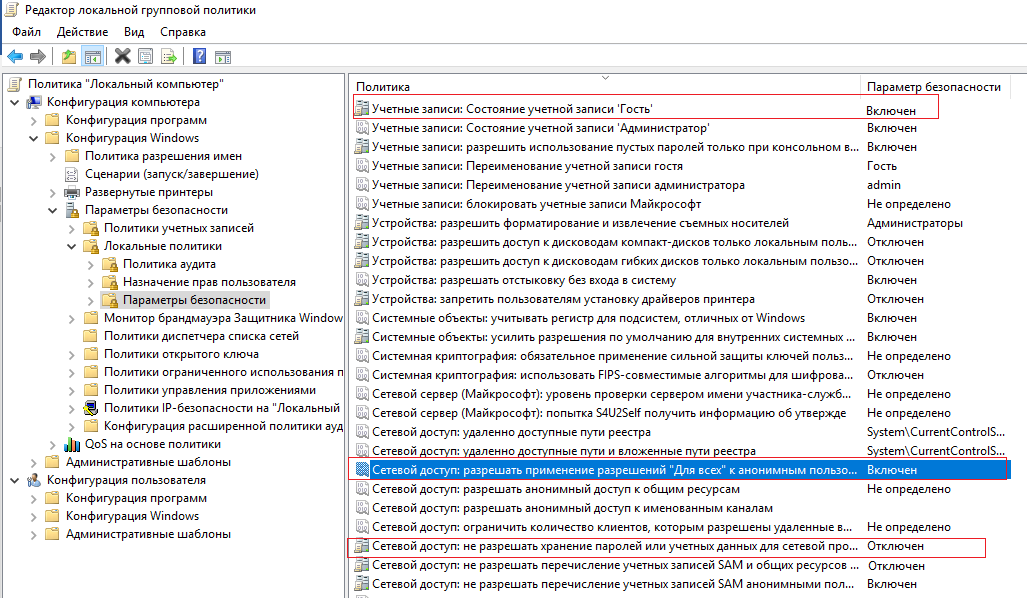
Откройте консоль редактора локальной GPO (gpedit.msc) и перейдите в раздел Конфигурация компьютера -> Конфигурация Windows -> Параметры безопасности -> Локальные политики -> Параметры безопасности (Computer Configuration -> Windows Settings -> Security Settings -> Local Policies -> Security Options)
Настройте следующие политики:
- Учетные записи: Состояние учётной записи ‘Гость’ (Accounts: Guest Account Status): Включен (Enabled);
- Сетевой доступ: разрешить применение разрешений “Для всех” к анонимным пользователям (Network access: Let Everyone permissions apply to anonymous users): Включен (Enabled);
- Сетевой доступ: Не разрешать перечисление учетных записей SAM и общих ресурсов (Network access: Do not allow anonymous enumeration of SAM accounts and shares): Отключен (Disabled).
В целях безопасности желательно также открыть политику “Запретить локальный вход” (Deny log on locally) в разделе Локальные политики -> Назначение прав пользователя и убедиться, что в политике указана учетная запись “Гость”.
Затем проверьте, что в этом же разделе в политике “Доступ к компьютеру из сети” (Access this computer from network) присутствует запись Гость или Everyone, а в политике “Отказать в доступе к этому компьютеру из сети” (Deny access to this computer from the network) учетка Гость не должна быть указана.
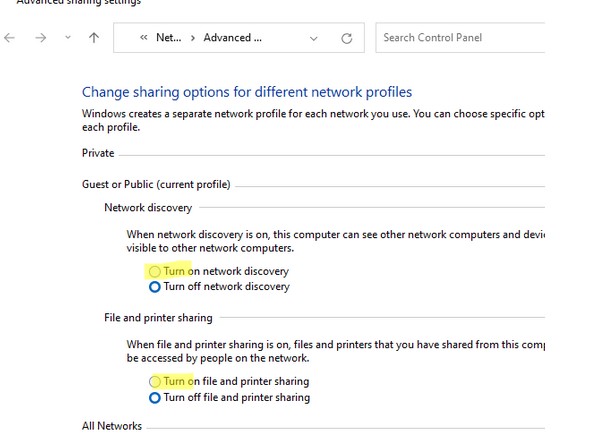
Также убедитесь, что включен общий доступ к сетевым папкам в разделе Параметры -> Сеть и Интернет -> Ваше_сетевое_подключение (Ethernet или Wi-Fi) -> Изменение расширенных параметров общего доступа (Settings -> Network & Internet -> Ethernet -> Change advanced sharing options). Проверьте что во всех секциях (Private, Public, All networks) включены опциы Turn on file and printer sharing, сетевое обнаружение (см. статью о проблемах обнаружения компьютеров в рабочих группах) и отключите защиту папок паролем Turn off password protected sharing.
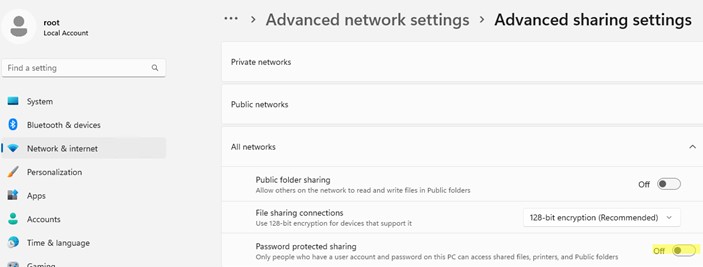
В Windows 11 эти опции находятся в разделе панели Settings -> Network and Internet -> Advanced network settings -> Advanced sharing settings.
Обновите настройки локальных групповых политик на компьютере командой:
gpupdate /force
Разрешить гостевой доступ к общей сетевой папке Windows
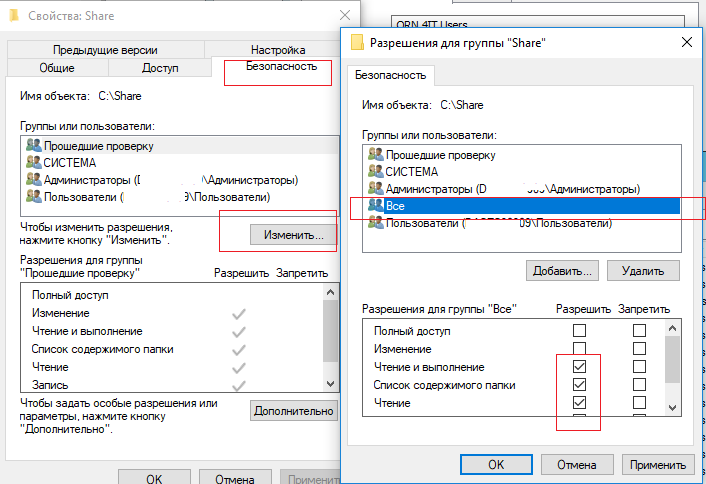
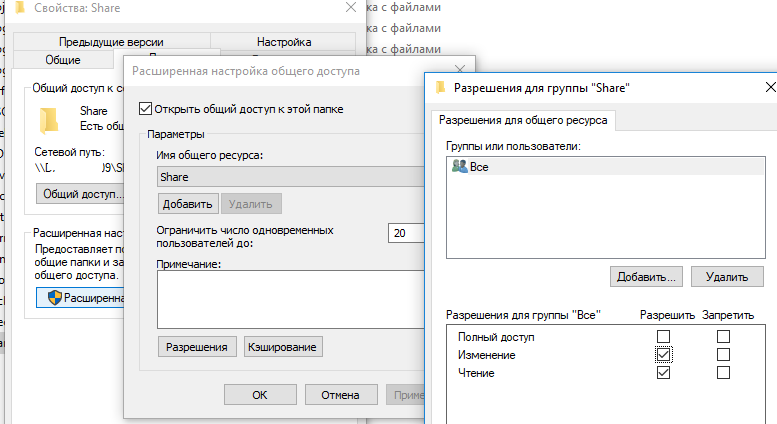
После того, как вы настроили политики гостевого доступа, нужно разрешить анонимный доступа к целевой сетевой папке на хосте Windows. Вам нужно изменить настройки безопасности сетевой папки Windows, к которой вы хотите предоставить общий анонимный доступ. Откройте свойства папки, перейдите на вкладку Безопасность (здесь настраиваются NTFS разрешений) предоставьте права чтения (и, если нужно, изменения) для локальной группы «Все» («Everyone»). Для этого нажмите кнопку Изменить -> Добавить -> Все и выберите необходимые привилегии анонимных пользователей. Я предоставил доступ только на чтение.
Также на вкладке Доступ (Sharing) нужно предоставить права доступа к сетевой шаре анонимным пользователям (Доступ -> Расширенная настройка -> Разрешения). Проверьте, что у группы Все есть право на Изменение и Чтение.
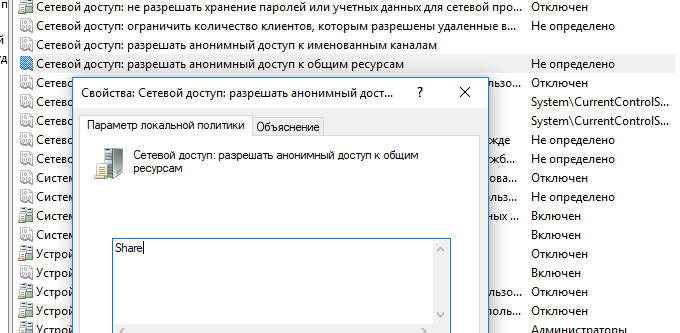
Теперь в локальной политике безопасности нужно указать имя сетевой папки, к которой разрешен анонимный доступ. Откройте консоль Local Security Policy (secpol.msc), перейдите в секцию Локальные политики -> Параметры безопасности. Затем в политике “Сетевой доступ: разрешать анонимный доступ к общим ресурсам” (Network access: Shares that can be accessed anonymous) укажите имя сетевой папки, к которой вы хотите предоставить анонимный доступ (в моем примере имя сетевой папки – Share).
Теперь вы можете анонимно подключиться к этому компьютеру с удаленного компьютера.
Нажмите клавишы Win+R и в окне укажите UNC (формат \\IPадрес\ИмяПапки, или \\NetBIOSимякомпьютера\ИмяПапки) путь к сетевой папке, которую вы хотите открыть.
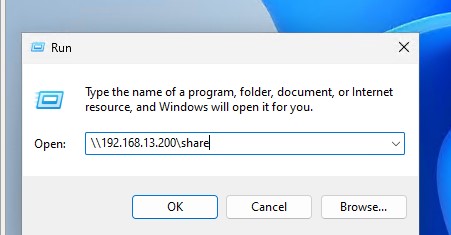
Если вы все настроили правильно, перед вами появится список файлов в сетевой папке на удаленном компьютере.
Такой способ предоставления анонимного доступа работал до Windows 10 2004/Windows Server. В актуальных версиях Windows при доступе к общей папке все равно появляется запрос пароля. Чтобы подключиться к удаленной папке под анонимным пользователем нужно указать имя пользователя guest (пароль указывать не нужно).
Но это все равно не очень удобно.
В этом случае нужно дополнительно включить следующие локальные политики:
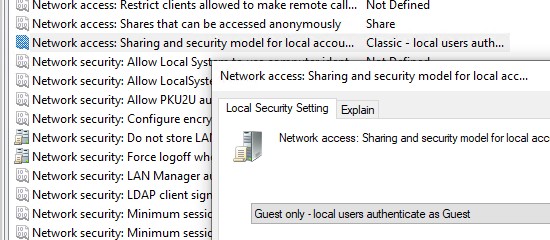
- Перейдите в раздел Computer Configuration -> Windows Settings -> Security Settings -> Local Policies -> Security Options. В параметре Network access: Sharing and security model for local accounts измените значение с Classic на Guest Only. Эта политика автоматически использует аккаунт Guest при сетевом доступе к компьютеру под локальной учетной записью (подразумевается что вы вошли в Windows под локальной учетной записью);

- Перейдите в раздел Computer Configuration ->Administrative templates -> Network (Сеть) -> Lanman Workstation. Включите политику Enable insecure guest logons (Включить небезопасные гостевые входы). Эта политика разрешит сетевой доступ к общим папкам по протоколу SMBv2 под гостевой учетной записью. Если не включать этот параметр, то при подключении под Guest появится ошибка “Вы не можете получить доступ к удаленному компьютеру из-за того, что политики безопасности вашей организации могут блокировать доступ без проверки подлинности” (cм. статью).
Затем нужно указать, что аккаунт Guest нужно всегда использовать для доступа к сетевым ресурсам на указанно компьютере. Для этого нужно добавить в диспетчер учетных записей Windows имя (IP адрес компьютера) и имя пользователя, которое нужно использовать для подключения. Откройте командую строку и выполните команду:
cmdkey /add:192.168.13.200 /user:guest

Теперь при доступе к указанному IP, Windows всегда будет выполнять автоматический входа под сохраненной учетной записью (Guest в нашем случае)
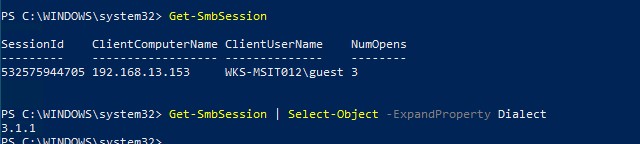
Теперь вы можете проверить на удаленном компьютере, что клиент подключился к сетевой папке под записью guest (анонимно):
Get-SmbSession
Открыть анонимный доступ к общему сетевому принтеру
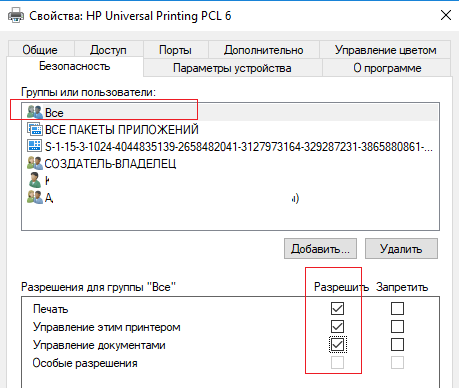
Чтобы разрешить анонимный доступ к сетевому принтеру на компьютере, нужно открыть свойства общего принтера в Панели управления (Панель управления\Оборудование и звук\Устройства и принтеры). На вкладке доступа отметьте опцию “Прорисовка задания печати на клиентских компьютерах” (Render print jobs on client computers).
Затем на вкладке безопасность для группы “Все” отметить все галки.
Теперь вы сможете подключиться к общей папке (\\servername\share) и принтеру на доменном компьютере без ввода имени пользователя и пароля, т.е. анонимно.
With Folder Guard, you can not only password-protect folders on a local drive, but also password-protect shared folders, or shared drives, to be unlocked for access from other computers on the LAN. Note: in order to be able to password-protect shared folders, your copy of Folder Guard software must be installed with a professional or another business license.
To protect a shared folder or a shared drive with a password, first make sure you have installed Folder Guard on the computer where the folder is shared from. We refer to this computer as the server, to distinguish it from the clients, which are the computers accessing this shared folder over the network. (Note that the server does NOT need to run the server version of Windows, such as Windows Server 2022, 2019, or 2016, it can run any supported version of Windows, including Windows 11, 10, 8, and 7.)
Next, verify that the folder is shared and accessible from other computers. To share a folder, run File Explorer on the server, open its parent folder, right-click on the folder you want to share, and choose Share (or Share with) from the menu. Before you can share folders, you may need to adjust the security settings of the server, such as enable Network discovery, etc. Please refer to Windows Help for more information on sharing the folders. Make sure the shared folder is accessible from other computers on the same LAN before continuing.
After you have shared a folder, create a subfolder that you want to password-protect with Folder Guard. (The top level shared folders cannot be password protected, due to the way folder sharing is implemented in Windows.) For example, if you have shared the folder C:\Users\Public\Documents, create a subfolder named Private under it.
To password-protect a subfolder of a shared folder, run Folder Guard on the server, and use the usual steps involved in setting up a folder password. Note that you should set up the password protection using the local path of the shared folder that starts with a drive letter, such as C:\Users\Public\Documents\Private, not a network path or a network drive that is used to access this folder over the network from other computers.
To allow the shared folder to be unlocked from other computers on the same LAN, select the Any network user option on the Password properties screen:
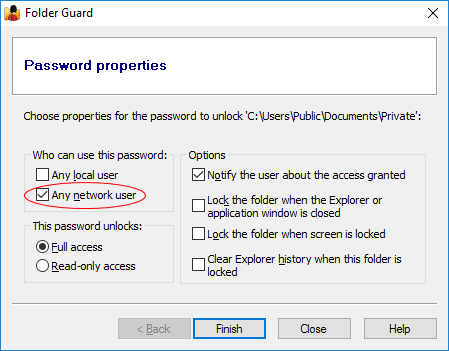
If the Any network user box is greyed out and not available for using, it means that you are running Folder Guard on one of the client computers rather than on the server or are not using a local path for the shared folder. Please see above for more information.
Apply the changes. Now, when a user connects to this shared folder from another computer with Explorer, they should see the following:
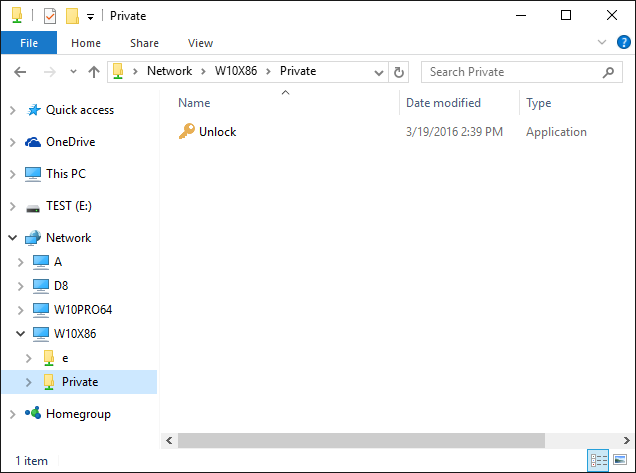
As you can see, the locked folder appears empty except for the application named Unlock. (If you see other files that are supposed to be hidden, don’t panic, it just probably means that your computer is displaying the results from its file cache. Wait a few seconds and refresh the folder. If the view remains the same, you may need to optimize your computer for faster network updates, as described below.)
As the Unlock name implies, the network user can run this application to unlock the folder. To see how it works, double-click Unlock to launch it. If Windows warns about running programs from a network location, allow the program to run, and it should prompt you to enter the password:
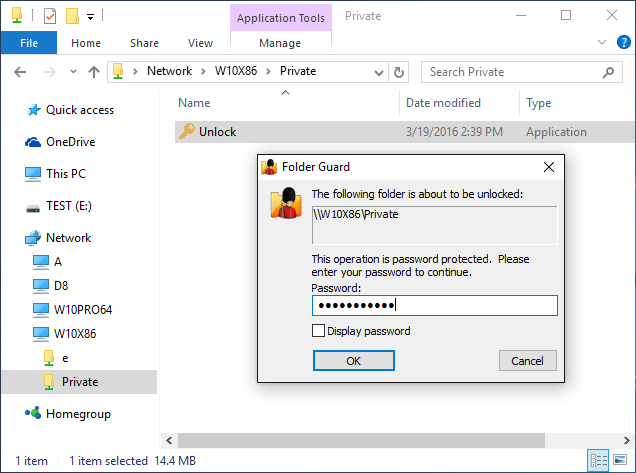
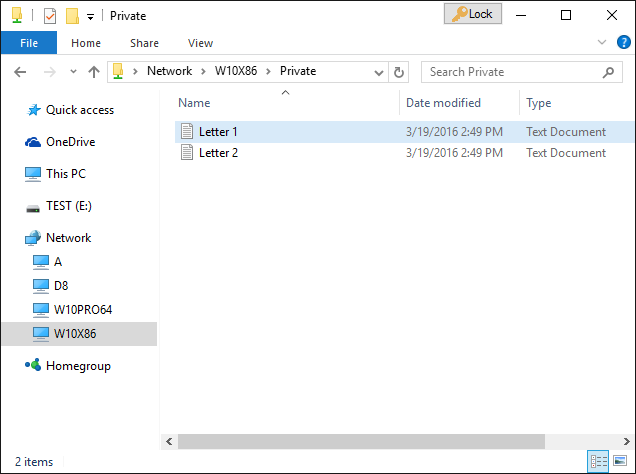
Enter the password and the folder should become unlocked. You should be able to see now the actual contents of the folder and open the files it contains:
Shared folder unlocked but its view is not updated?
If you don’t see the contents of the folder soon after it’s been unlocked, it could be because your computer is not optimized for the fast network updates. If Folder Guard detects this situation, it displays a message like this:
Optimizing the computer for faster updates of the network folders involves adding a value to the Registry. You can choose Yes, and Folder Guard will add this value for you. (Note that the administrator approval is still required for it to actually happen.) You can also update the registry manually, following these instructions .
If, however, you see the updated contents of the network folders fast enough, or if you don’t want to optimize your computer, check the Don’t show this message again box, press No, and Folder Guard will no longer bother you with this message.
How to lock the shared folder back?
When unlocking a shared folder from a computer that does not have Folder Guard software installed, to lock the folder back you could use one of the following methods:
-
Use the Lock button in the title bar of the Explorer window that you used to unlock the folder. However, the Lock button may not be available in some system configurations, such as when the File Explorer option Launch folder windows in a separate process is enabled. In such situations, use the second option:
-
Right-click on the Folder Guard notification icon and choose the Lock command from its menu. (Note that after all previously unlocked folders have been locked back, the notification icon is automatically removed from the taskbar.
Can I add several passwords to the same shared folder?
Yes, each folder can have several different passwords, and each such password can have different properties. For example, one password could unlock the full access to the folder, and another password could provide only the read-only access. This way, you could give the first password to people who you trust to make changes to the files in the protected folder, and give the second password to the users who could view the files and documents there, but not save the modifications back to the protected folder.
How to remove the password from the folder?
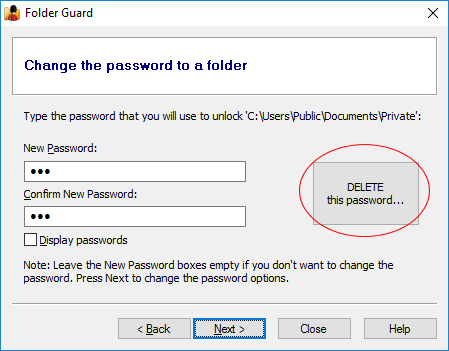
In the Folder Guard window, right-click on the folder in question and choose the Set passwords command from the menu. Select the password you want to remove, and press Next. This should open the screen that you can use to not only change the text of the password, but also to delete that specific password:
Or, if you’ve decided that you no longer want the folder to be protected by Folder Guard at all, right-click on the protected folder, and choose the Remove passwords command. This will remove all passwords from the selected folder and make it fully accessible. (Don’t forget to press the Apply button on the toolbar to make the changes effective.)
Is it necessary to install Folder Guard on a computer in order to be able to unlock access to a password-protected shared folder on another computer?
No, it is not necessary. If a computer does not have Folder Guard software installed, a user of such a computer can unlock a shared folder by running the Unlock utility directly from the shared folder, as described above.
Can a shared folder be unlocked from a computer that does not run Windows?
No, only computers that run a supported version of Windows can unlock the password-protected shared folders. If a computer has a different OS, such as Linux or OS X, such computer cannot run the Unlock utility (which is a Windows-only program) and therefore it would not be possible to unlock the password-protected folder from such a computer.
If you’re an IT professional looking to maximize the security of your Windows Server 2019, a password policy is your best bet. Password policy Windows Server 2019 is an important aspect of ensuring your infrastructure is protected from malicious actors who may try to gain access. Implementing a password policy for Windows Server 2019 allows you to control the strength and complexity of passwords used on your systems. Establishing strong guidelines for setting passwords can help deter hackers from accessing your network and prevents the risk of data breaches. By utilizing password policy Windows Server 2019, you can rest easy knowing that your information is secure.
1. Securing Your Network with a Password Policy for Windows Server 2019
Keeping the network safe and secure is a major priority for organizations. Fortunately, there are ways you can keep your Windows Server 2019 secure with a password policy. Here are some of the steps you should take:
- Create a Strong password: Ensure each user has their own unique password that is difficult to guess. The password should be longer than eight characters and include both letters and numbers.
- Require periodic changes: Enforce users to change their passwords at regular intervals in order to keep the system secure.
- Restrict access to specific user accounts: Only grant access to user accounts on a need to know basis. By restricting access to specific user accounts, the security of the network is strengthened.
In addition to creating a strong password policy, it is important to regularly audit user accounts. This allows administrators to look for suspicious activity and revoke access for user accounts that are no longer needed. Organizations should also take steps to protect their network from external threats such as malware, viruses, and hackers. This can be done by deploying antivirus software and a firewall to the network.
2. Step-by-Step Guide to Setting Up Password Policies for Windows Server 2019
Step 1: Access Group Policy Settings
To get started with password policies, you will need to access the Group Policy Settings on Windows Server 2019. To do this, open your server and press the Windows key to navigate to the start menu. At the start menu, type in “Edit Group Policy” to show the app you need. Once you have launched the application, you will be able to configure password policies for your server.
Step 2: Setting Up Password Properties
Once you are in the Group Policy Settings, you can now setup the password policies. The following properties need to be setup:
- Enforce password history
- Minimum password length
- Password must meet complexity requirements
- Store password using reversible encryption for all users in the domain
Each property has a different set of instructions that need to be followed to ensure the password policies are configured correctly. Make sure to follow each set of instructions carefully and save your changes when you’re done.
3. The Benefits of Configuring a Password Policy for Windows Server 2019
Windows Server 2019 brings a comprehensive solution for setting up a secure password policy that offers amazing benefits. With this secure password policy, a Windows server admin can strengthen their system’s security with robust password requirements for keeping those with malicious intent away from harm.
- Protection from Brute Force Attacks: By implementing a strong password policy, a Windows server admin can protect their system from brute force attacks. These attacks involve repeated attempts at guessing passwords. A strong password policy requires passwords with complex characters and can significantly reduce the chances of such an attack.
- Enhanced Data Security: A secure password policy helps to prevent any sort of data theft or unauthorized access. Requiring complicated passwords that regularly need to be updated, ensures that the chances of data falling into the wrong hands are low.
Apart from protection against malicious activities, configuring a secure password policy for Windows Server 2019 also helps to limit user errors. As long as the passwords meet the criteria set out by the admin, users do not need to remember multiple usernames and passwords. This also eases the need for technicians to help users with resetting forgotten passwords.
4. Protect Your Assets with the Right Password Policy for Windows Server 2019
Protecting your Windows Server 2019 assets is essential for keeping your data safe and secure. To ensure maximum security, it’s imperative to employ a strong password policy that meets industry-standard requirements. Here’s what to consider when creating your Windows Server 2019 password policy:
- Establish requirements for a minimum of 8 characters for passwords.
- Set password complexity rules like requiring non-alphabetic characters, uppercase and lowercase letters, and numbers.
- Require users to change their passwords regularly – every 90 days is best practice.
- Don’t allow users to re-use recent passwords.
- Disallow passwords based on common dictionary words.
- Enforce a 15-minute lockout period on incorrect login attempts.
User access controls are also an important component of a secure password policy. Limit user access to only those resources necessary to carry out their assigned tasks, and require users to log off or lock their machines when they are away from their workstation. Establish a clear set of rules for user access that employees must adhere to, and ensure that all users’ roles are well-defined in the system.
The password policy in Windows Server 2019 is a critical component of ensuring the security and integrity of a domain environment. The policy includes a variety of settings such as password expiration policies, complexity requirements, and password length limits that help to prevent unauthorized access to sensitive information. The default domain policy sets the baseline for these settings, but administrators can customize them for specific organizational units or user groups. Strong passwords, including 14-character passwords with a mix of uppercase letters, lowercase letters, numbers, and special characters, are essential for protecting against common password attacks like brute force and dictionary attacks.
Additionally, implementing a custom password filter can further enhance security by enforcing specific password requirements. Enforcing password policy requirements, such as minimum password length and complexity rules, helps to minimize security incidents and protect against credential stuffing attacks. By regularly auditing and enforcing password policies, organizations can mitigate potential risks and maintain a secure password security infrastructure. Sources: docs.microsoft.com
In Windows Server 2019, the Password Policy plays a crucial role in ensuring the security of Domain Controllers and server core installations. The policy includes settings such as password length, complexity requirements, and password expiration period to enhance the strength of passwords used for authentication. By enforcing complex password strength rules, including the use of uppercase characters, consecutive characters, Unicode characters, and limiting password dictionaries, the policy reduces the risk of brute-force attacks and unauthorized access.
Additionally, the policy enforces password history policies, preventing users from reusing their favorite passwords or creating weak passwords. The configuration of password complexity and policy settings can be customized through the SecurityPolicy/CFG to meet specific corporate password requirements and security considerations.
To enhance security measures, the policy also includes auditing capabilities, such as password length audit warnings and reporting on security events related to password enforcement. Furthermore, the policy covers the management of administrator passwords, device account passwords, and Database User Strong Passwords to ensure strict adherence to security standards and limit security breaches.
The implementation of fine-grained password policies and granular password settings allows for a more tailored approach to password management, addressing issues with applications and ensuring the integrity of password storage across different versions of Domain Controllers. The enforcement of password policy mechanisms and frequent password resets contribute to reducing the attack surface and making password-based authentication more secure in a Windows Server environment. (Source: Microsoft Documentation – Password Policy for Windows Server 2019)
Benefits of Password Policy for Windows Server 2019
| Password Policy Benefit | Description |
|---|---|
| Protection from Brute Force Attacks | Reduce chances of unauthorized access through repeated password guessing. |
| Enhanced Data Security | Prevention of data theft and unauthorized access with strong password requirements. |
| Limit User Errors | Reduce password-related mistakes and simplify user authentication processes. |
| Secure Assets | Ensure maximum security by enforcing industry-standard password policies. |
| Access Control | Limit user access to necessary resources and enforce logoff procedures. |
Q&A
Q: What is a password policy?
A: A password policy is a set of rules and guidelines that help protect data by creating a secure password for a computer or server.
Q: What is the difference between a Local Password Policy and a Domain Password Policy?
A: A local password policy is used to set restrictions for users on a single computer or server. A domain password policy applies to all the computers within a domain.
Q: What are the requirements for a Windows Server 2019 password policy?
A: The requirements for a Windows Server 2019 password policy include having a minimum password length of 8 characters, text complexity requirements, use of encryption, age requirements, lockout settings and account expiration.
Q: What is the default password policy in Windows Server 2019?
A: The default domain password policy in Windows Server 2019 includes settings for Minimum password age, Maximum password age, Minimum password length, Password complexity requirements, and Account lockout policy.
Q: Can the default domain password policy be modified in Windows Server 2019?
A: Yes, the default domain password policy can be modified to suit the specific security requirements of an organization. Administrators can adjust settings such as password length, complexity requirements, and expiration policies.
Q: What are the password complexity requirements in Windows Server 2019?
A: The password complexity requirements in Windows Server 2019 typically include rules such as using a combination of uppercase letters, lowercase letters, numbers, and special characters in passwords to enhance security.
Q: How can the password policy be enforced in Windows Server 2019?
A: The password policy in Windows Server 2019 can be enforced through Group Policy settings in Active Directory. Administrators can configure password settings objects to enforce stringent password requirements for users.
Q: What is the significance of auditing password lengths in Windows Server 2019?
A: Auditing of password lengths in Windows Server 2019 helps organizations monitor and track password security practices. It allows for the detection of weak or easily guessable passwords that may pose security risks.
Q: How can organizations enhance password security in Windows Server 2019?
A: Organizations can enhance password security in Windows Server 2019 by implementing strong password schemes, enforcing password complexity policies, regularly updating passwords, and conducting security audits to identify vulnerabilities.
Sources: Microsoft TechNet: Password Policy in Windows Server 2019
Conclusion
Your organization’s network security is best protected with a Password Policy Windows Server 2019 and a secure password manager like LogMeOnce. With advanced features like multifactor authentication, secure password sharing and automated password changing, LogMeOnce is the perfect combination of enterprise-grade security and convenience. LogMeOnce is the right choice for those who prioritize their online security, as it ensures that no data is ever sent in plain text and logs all user activity, so that your password policy windows server 2019 is never compromised. With LogMeOnce’s reliable and free subscription, you can have the peace of mind you need to focus on maintaining your network security.
Neha Kapoor is a versatile professional with expertise in content writing, SEO, and web development. With a BA and MA in Economics from Bangalore University, she brings a diverse skill set to the table. Currently, Neha excels as an Author and Content Writer at LogMeOnce, crafting engaging narratives and optimizing online content. Her dynamic approach to problem-solving and passion for innovation make her a valuable asset in any professional setting. Whether it’s writing captivating stories or tackling technical projects, Neha consistently makes impact with her multifaceted background and resourceful mindset.
Как использовать OAuth2 со Spring Security в Java
Javaican 14.05.2025
Протокол OAuth2 часто путают с механизмами аутентификации, хотя по сути это протокол авторизации. Представьте, что вместо передачи ключей от всего дома вашему другу, который пришёл полить цветы, вы. . .
Анализ текста на Python с NLTK и Spacy
AI_Generated 14.05.2025
NLTK, старожил в мире обработки естественного языка на Python, содержит богатейшую коллекцию алгоритмов и готовых моделей. Эта библиотека отлично подходит для образовательных целей и. . .
Реализация DI в PHP
Jason-Webb 13.05.2025
Когда я начинал писать свой первый крупный PHP-проект, моя архитектура напоминала запутаный клубок спагетти. Классы создавали другие классы внутри себя, зависимости жостко прописывались в коде, а о. . .
Обработка изображений в реальном времени на C# с OpenCV
stackOverflow 13.05.2025
Объединение библиотеки компьютерного зрения OpenCV с современным языком программирования C# создаёт симбиоз, который открывает доступ к впечатляющему набору возможностей. Ключевое преимущество этого. . .
POCO, ACE, Loki и другие продвинутые C++ библиотеки
NullReferenced 13.05.2025
В C++ разработки существует такое обилие библиотек, что порой кажется, будто ты заблудился в дремучем лесу. И среди этого многообразия POCO (Portable Components) – как маяк для тех, кто ищет. . .
Паттерны проектирования GoF на C#
UnmanagedCoder 13.05.2025
Вы наверняка сталкивались с ситуациями, когда код разрастается до неприличных размеров, а его поддержка становится настоящим испытанием. Именно в такие моменты на помощь приходят паттерны Gang of. . .
Создаем CLI приложение на Python с Prompt Toolkit
py-thonny 13.05.2025
Современные командные интерфейсы давно перестали быть черно-белыми текстовыми программами, которые многие помнят по старым операционным системам. CLI сегодня – это мощные, интуитивные и даже. . .
Конвейеры ETL с Apache Airflow и Python
AI_Generated 13.05.2025
ETL-конвейеры – это набор процессов, отвечающих за извлечение данных из различных источников (Extract), их преобразование в нужный формат (Transform) и загрузку в целевое хранилище (Load). . . .
Выполнение асинхронных задач в Python с asyncio
py-thonny 12.05.2025
Современный мир программирования похож на оживлённый мегаполис – тысячи процессов одновременно требуют внимания, ресурсов и времени. В этих джунглях операций возникают ситуации, когда программа. . .
Работа с gRPC сервисами на C#
UnmanagedCoder 12.05.2025
gRPC (Google Remote Procedure Call) — открытый высокопроизводительный RPC-фреймворк, изначально разработанный компанией Google. Он отличается от традиционых REST-сервисов как минимум тем, что. . .
Модераторы: SLEDopit, Модераторы разделов
-
technotrance
- Сообщения: 280
- ОС: Fedora, FreeBSD, CentOS, Debian
- Контактная информация:
Samba 4. Доступ в шару из Windows 2019 без пароля. [решено]
Всем здравствуйте!
Вроде задача совсем простая, но уже битый день бьюсь над ней.
Есть Самба сервер 4.5.16 на Дебиан 9 с простейшим конфигом:
Код: Выделить всё
[global]
        log file = /var/log/samba/log.%m
        netbios name = DEBIAN
        server string = Samba Server
        workgroup = WORKGROUP
        interfaces = enp5s0 lo
        hosts allow = 127.0.0.1 192.168.
        encrypt passwords = yes
        security = user
        max log size = 50

        server multi channel support = yes
        server min protocol = SMB3_00
        map to guest = Bad Password

[disk]
        path = /disk
        read only = no
        browseable = yes
        directory mask = 0770
        create mask = 0660
#        valid users = admo
        acl allow execute always = True

        guest ok = yes
        public = yes
        writeable = yes
Требуется, чтобы в шару был доступ без пароля. Захожу из-под Windows 8.1 — работает. Захожу из-под Windows srv 2019 — не работает. Обе винды имеют настройки «из коробки», т.е. установлены с нуля без всяких изменений в системе.
В 2019 пробовал поменять модель сетевого доступа на гостевую — не помогло.
Если закомментировать строчку:
То при подключении начинает запрашивать логин-пароль. Ну и после его ввода нормально заходит в шару. Но требуется заходить без логина и пароля.
Может кто настраивал такую задачу и поделится своим конфигом для Самбы?
Последний раз редактировалось technotrance 09.11.2021 10:52, всего редактировалось 1 раз.
-
Zer0
- Сообщения: 479
- ОС: Void, Slackware
Re: Samba 4. Доступ в шару из Windows 2019 без пароля.
Сообщение
Zer0 »
Взял из офицальной документации.
Код: Выделить всё
Creating a Basic guest only smb.conf File

The following is a minimal configuration for a Samba standalone server that only allows guest access:

[global]
        map to guest = Bad User
        log file = /var/log/samba/%m
        log level = 1
        server role = standalone server

[guest]
        # This share allows anonymous (guest) access
        # without authentication!
        path = /srv/samba/guest/
        read only = no
        guest ok = yes
        guest only = yes
Memento mori … сделай бэкап.
-
technotrance
- Сообщения: 280
- ОС: Fedora, FreeBSD, CentOS, Debian
- Контактная информация:
Re: Samba 4. Доступ в шару из Windows 2019 без пароля.
Сообщение
technotrance »
Нет. Так не работает. Из win srv 2019 не пускает. Конфиг максимально упростил:
Код: Выделить всё
[global]
        log file = /var/log/samba/log.%m
#        smb passwd file = /etc/samba/smbpasswd
#        netbios name = DEBIAN
        server string = Samba Server
#        workgroup = WORKGROUP
        interfaces = enp5s0 lo
        hosts allow = 127.0.0.1 192.168.
#        encrypt passwords = yes
#        security = user
        max log size = 50

        server multi channel support = yes
        server min protocol = SMB3_00
        map to guest = Bad User
        server role = standalone server

[disk]
        path = /disk
        read only = no
#        browseable = yes
#        directory mask = 0770
#        create mask = 0660
#        valid users = admo
#        acl allow execute always = True

        guest ok = yes
        guest only = yes
#        public = yes
#        writeable = yes
Есть даже подозрение, что дело не в самбе, а в самой винде, т.к. из той же win8.1 в шару заходит.
Добавлено (10:43):
А, ну понятно… Ответ лежал на поверхности в той же документации:
Начиная с Windows 10 1709, гостевой доступ в SMB2 и SMB3 отключен по умолчанию. Это означает, что гостевой доступ из Windows 10 к общему ресурсу Samba не будет работать
Венду надо копать значит…
Добавлено (10:51):
Всё, вопрос решён, ответ был тут:
https://docs.microsoft.com/en-us/troubleshoot/windows-server/networking/guest-access-in-smb2-is-disabled-by-default
В Windows 10 1709, Windows 10 1803, Windows 10 1903, Windows 10 1909 и Windows Server 2019 гостевая проверка подлинности отключена, если существует AllowInsecureGuestAuth со значением 0 в [HKEY_LOCAL_MACHINE\SYSTEM\CurrentControlSet\Services\LanmanWorkstation\Parameters] AllowInsecureGuestAuth.
Поменял этот параметр на 1.
-
Zer0
- Сообщения: 479
- ОС: Void, Slackware
Re: Samba 4. Доступ в шару из Windows 2019 без пароля.
Сообщение
Zer0 »
Я вот такой финт применяю:
Код: Выделить всё
 @Echo Off
 echo.
 net use z: \\IP.AD.DR.ES\share /user:vasya passwd
 REG ADD HKCU\Software\Microsoft\Windows\CurrentVersion\Explorer\MountPoints2\##IP.AD.DR.ES#share /v _LabelFromReg /t REG_SZ /d "SHARE_ON_IPADDRES" /f
 echo.
 echo Off
, где IP.AD.DR.ES — ip вашего сервера самбы, share — имя шары, vasya — логин, passwd — пароль.
Всё это в текстовый файл с расширением cmd — и в автозагрузку.
В результате работы скрипта, в винде появится диск Z с названием SHARE_ON_IPADDRES.
Memento mori … сделай бэкап.