
Windows Server 2012 supports several different processor architectures and several different disk partitioning styles. EFI was originally developed for Itanium-based computers. Computers with EFI use the GUID partition table (GPT) disk type for boot and system volumes. Computers based on x86 use BIOS and the master boot record (MBR) disk type for boot and system volumes. Computers based on x64 use UEFI wrapped around BIOS or EFI.
With the increasing acceptance and use of UEFI and the ability of Windows to use both MBR and GPT disks regardless of firmware type, the underlying chip architecture won’t necessarily determine which firmware type and disk type a computer uses for boot and startup. That said, generally, BIOS-based computers use MBR for booting or for data disks and GPT only for data disks. EFI-based computers can have both GPT and MBR disks, but you typically must have at least one GPT disk that contains the EFI system partition (ESP) and a primary partition or simple volume that contains the operating system for booting.
With early releases of the server operating system for Windows, BIOS-based computers use Ntldr and Boot.ini to boot into the operating system. Ntldr handles the task of loading the operating system, while Boot.ini contains the parameters that enable startup, including the identity of the boot partitions. Through Boot.ini parameters, you can add options that control the way the operating system starts, the way computer components are used, and the way operating system features are used.
On the other hand, with early releases of the server operating system for Windows, EFI-based computers use Ia64ldr.efi, Diskpart.efi, and Nvrboot.efi to boot into the operating system. Ia64ldr.efi handles the task of loading the operating system, while Diskpart.efi identifies the boot partitions. Through Nvrboot.efi, you set the parameters that enable startup.
Windows Server 2008 and later don’t use these boot facilities. Instead, they use a pre-operating system boot environment. Figure 1 provides a conceptual overview of how the boot environment fits into the overall computer architecture.

Figure 1. A conceptual view of how the boot environment works.
The boot environment is an extensible abstraction layer that allows the operating system to work with multiple types of firmware interfaces without requiring the operating system to be specifically written to work with these firmware interfaces. Within the boot environment, startup is controlled using the parameters in the BCD data store.
The BCD store is contained in a file called the BCD registry. The location of this registry depends on the computer’s firmware:
- On BIOS-based operating systems, the BCD registry file is stored in the \Boot\Bcd directory of the active partition.
- On EFI-based operating systems, the BCD registry file is stored on the EFI system partition.
Entries in the BCD data store identify the boot manager to use during startup and the specific boot applications available. The default boot manager is the Windows Boot Manager. Windows Boot Manager controls the boot experience, and you can use it to choose which boot application is run. Boot applications load a specific operating system or operating system version. For example, a Windows Boot Loader application loads Windows Server 2012. Because of this, you can boot BIOS-based and EFI-based computers in much the same way.
3. Managing startup and boot configuration
You can press F8 during startup of the operating system to access the Advanced Boot Options menu and then use this menu to select one of several advanced startup modes, including Safe Mode, Enable Boot Logging, and Disable Driver Signature Enforcement. Although these advanced modes temporarily modify the way the operating system starts to help you diagnose and resolve problems, they don’t make permanent changes to the boot configuration or to the BCD store. Other tools you can use to modify the boot configuration and manage the BCD store include the Startup And Recovery dialog box, the System Configuration utility, and BCD Editor. The sections that follow discuss how these tools are used.
Managing startup and recovery options
The Startup And Recovery dialog box controls the basic options for the operating system during startup. You can use these options to set the default operating system, the time to display the list of available operating systems, and the time to display recovery options when needed. Whether you start a computer to different operating systems or not, you’ll want to optimize these settings to reduce the wait time during startup and, in this way, speed up the startup process.
You can access the Startup And Recovery dialog box by completing the following steps:
- In Control Panel\System and Security, tap or click System to access the System window.
- In the System window, tap or click Advanced System Settings under Tasks in the left pane. This displays the System Properties dialog box.
- On the Advanced tab of the System Properties dialog box, tap or click Settings under Startup And Recovery. This displays the Startup And Recovery dialog box, as shown in Figure 2.
Note
Open the Advanced tab of the System Properties dialog box directly by typing SystemPropertiesAdvanced.exe in the Apps Search box and pressing Enter.
Figure 2. Configure system startup options.
- On a computer with multiple operating systems, use the Default Operating System list to specify the operating system you want to start by default.
- Set the timeout interval for the operating system list by selecting the Time To Display List Of Operating Systems check box and specifying a timeout in seconds in the field provided. To speed up the startup process, you might want to use a value of five seconds.
- Set the timeout interval for the recovery options list by selecting the Time To Display Recovery Options When Needed check box and specifying a timeout in seconds in the field provided. Again, to speed up the startup process, you might want to use a value of five seconds.
- Tap or click OK to save your settings.
Managing System Boot Configuration
You can use the System Configuration utility (Msconfig.exe) to fine-tune the way a computer starts. Typically, you use this utility during troubleshooting and diagnostics. For example, as part of troubleshooting, you can configure the computer to use a diagnostic startup where only basic devices and services are loaded.
The System Configuration utility is available on the Tools menu in Server Manager. You can also start the System Configuration utility by pressing the Windows key, typing msconfig.exe in the Apps Search box, and pressing Enter. As shown in Figure 3, this utility has a series of tabs with options.
Use the General tab options to configure the way startup works. This tab is where you should start your troubleshooting and diagnostics efforts. Using these options, you can choose to perform a normal startup, diagnostic startup, or selective startup. After you restart the computer and resolve any problems, access the System Configuration utility again, select Normal Startup on the General tab, and then tap or click OK.

Figure 3. Perform a diagnostic or selective startup as part of troubleshooting.
Use the Boot tab options, shown in Figure 4, to control the way the individual startup-related processes work. You can configure the computer to start in one of various Safe Boot modes and set additional options, such as No GUI Boot. If after troubleshooting you find that you want to keep these settings, you can select the Make All Boot Settings Permanent check box to save the settings to the boot configuration startup entry.

Figure 4. Fine-tune the boot options.
Tapping or clicking the Advanced Options button on the Boot tab displays the BOOT Advanced Options dialog box shown in Figure 5. In addition to being able to lock PCI, detect the correct HAL, and enable debugging, you can use the advanced options to do the following:
- Specify the number of processors the operating system should use. You should use this option when you suspect there is a problem with additional processors you installed in a server and you want to pinpoint which processors are possibly causing startup problems. Consider the following scenario: A server shipped with two processors, and you installed two additional processors. Later, you find that you cannot start the server. You could eliminate the new processors as the potential cause by limiting the computer to two processors.
- Specify the maximum amount of memory the operating system should use. You should use this option when you suspect there is a problem with additional memory you installed in a server. Consider the following scenario: A server shipped with 4 GB of RAM, and you installed 4 additional GB of RAM. Later, you find that you cannot start the server. You could eliminate the new RAM as the potential cause by limiting the computer to 4096 MB of memory.
Figure 5. Set advanced boot options as necessary to help troubleshoot specific types of problems.
If you suspect services installed on a computer are causing startup problems, you can quickly determine this by choosing a diagnostic or selective startup on the General tab. After you identify that services are indeed causing startup problems, you can temporarily disable services using the Services tab options and then reboot to see if the problem goes away. If the problem no longer appears, you might have pinpointed it. You can then permanently disable the service or check with the service vendor to see if an updated executable is available for the service. As shown in Figure 6, you disable a service by clearing the related check box on the Services tab.

Figure 6. Disable services to try to pinpoint the source of a problem.
Similarly, if you suspect applications that run at startup are causing problems, you can quickly determine this using the options on the Startup tab. You disable a startup application by clearing the related check box on the Startup tab. If the problem no longer appears, you might have pinpointed the cause of it. You can then permanently disable the startup application or check with the software vendor to see if an updated version is available.
Working with BCD Editor
The BCD store contains multiple entries. On a BIOS-based computer, you’ll see the following entries:
- One Windows Boot Manager entry. There is only one boot manager, so there is only one boot manager entry.
- One or more Windows Boot Loader application entries, with one for each Windows Server 2008 operating system, Windows Vista operating system, or later versions of Windows installed on the computer.
- One legacy operating system entry. The legacy entry is not for a boot application. This entry is used to initiate Ntldr and Boot.ini so that you can boot into Windows XP or an earlier release of Windows. If the computer has more than one Windows XP or earlier operating system, you’ll be able to select the operating system to start after selecting the legacy operating system entry.
Windows Boot Manager is itself a boot loader application. There are other boot loader applications, including
- Legacy OS Loader, identified as NTLDR
- Windows Vista or later operating system loader, identified as OSLOADER
- Windows Boot Sector Application, identified as BOOTSECTOR
- Firmware Boot Manager, identified as FWBOOTMGR
- Windows Resume Loader, identified as RESUME
You can directly view and manage the BCD data store using BCD Editor (BCDEdit.exe). BCD Editor is a command-line utility. You can use BCD Editor to view the entries in the BCD store by following these steps:
- Press and hold or right-click the lower-left corner of the Start screen or the desktop. This displays a shortcut menu.
- Select the Command Prompt (Admin) to open an elevated command prompt.
- Enter bcdedit at the elevated command prompt.
Table 2 summarizes commands you can use when you are working with the BCD data store. These commands allow you to
- Create, import, export, and identify the entire BCD data store.
- Create, delete, and copy individual entries in the BCD data store.
- Set or delete entry option values in the BCD data store.
- Control the boot sequence and the boot manager.
- Configure and control Emergency Management Services (EMS).
- Configure and control boot debugging as well as hypervisor debugging.
Table 2. Commands for BCD Editor
| Commands | Description |
| /bootdebug | Enables or disables boot debugging for a boot application. |
| /bootems | Enables or disables Emergency Management Services for a boot application. |
| /bootsequence | Sets the one-time boot sequence for the boot manager. |
| /copy | Makes copies of entries in the store. |
| /create | Creates new entries in the store. |
| /createstore | Creates a new (empty) boot configuration data store. |
| /dbgsettings | Sets the global debugger parameters. |
| /debug | Enables or disables kernel debugging for an operating system entry. |
| /default | Sets the default entry that the boot manager will use. |
| /delete | Deletes entries from the store. |
| /deletevalue | Deletes entry options from the store. |
| /displayorder | Sets the order in which the boot manager displays the multiboot menu. |
| /ems | Enables or disables Emergency Management Services for an operating system entry. |
| /emssettings | Sets the global Emergency Management Services parameters. |
| /enum | Lists entries in the store. |
| /export | Exports the contents of the system store to a file. This file can be used later to restore the state of the system store. |
| /hypervisorsettings | Sets the hypervisor parameters. |
| /import | Restores the state of the system store using a backup file created with the /export command. |
| /mirror | Duplicates a specified entry by mirroring it in the data store. |
| /set | Sets entry option values in the store. |
| /store | Sets the BCD store to use. If not specified, the system store is used. |
| /sysstore | Sets the system store device. Note that this affects only EFI systems. |
| /timeout | Sets the boot manager timeout value. |
| /toolsdisplayorder | Sets the order in which the boot manager displays the tools menu. |
| /v | Sets output to verbose mode. |
Windows Server 2012 Overview : Boot Configuration (part 1) – Boot from hardware and firmware
Windows Server 2012 Overview : Boot Configuration (part 3) – Managing the Boot Configuration Data store and its entries – Viewing BCD entries
Windows Server 2012 Overview : Boot Configuration (part 4) – Managing the Boot Configuration Data store and its entries – Setting BCD entry values
Windows Server 2012 Overview : Boot Configuration (part 5) – Managing the Boot Configuration Data store and its entries – Changing the operating system display order
July 24, 2016 updated by
Leave a reply »
How can I get into Safe Mode on the new Windows operating systems such as Windows 8, Windows 10 and Server 2012? Starting from Windows 8, the system boots very quickly and the time to press F8 key to access Safe Mode is smaller than 200 milliseconds, so it’s almost impossible to enter into the Safe Mode by pressing F8 during boot time.
In this tutorial we’ll show you 3 workable ways to boot Windows Server 2012 into Safe Mode. The methods should also work with Windows 10 and Windows 8/8.1.
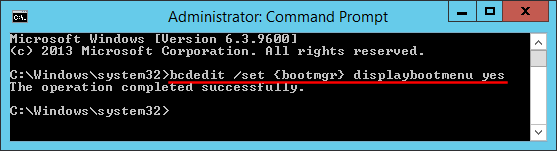
Method 1: Boot Windows Server 2012 into Safe Mode Using Command Prompt
- Press the Windows key + X to open the WinX menu, select “Command Prompt (Admin)” from the list.
- In order to make Windows display the Windows Boot Manager, type the following command at the Command Prompt and press Enter. You will get a confirmation stating that The operation completed successfully.
bcdedit /set {bootmgr} displaybootmenu yes
If you want to stop displaying the Windows Boot Manager later, run this command instead:
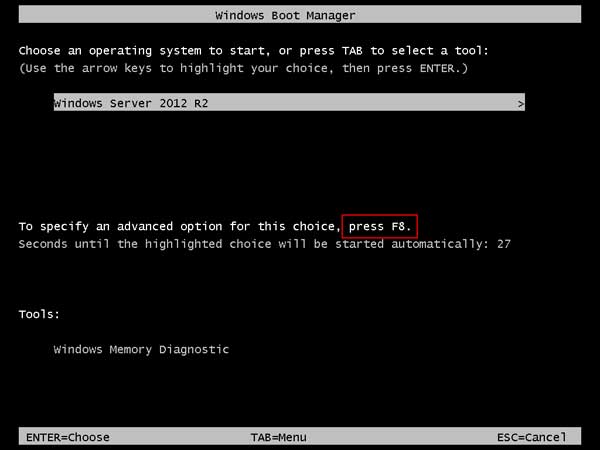
bcdedit /set {bootmgr} displaybootmenu no - Now restart your computer and you’ll see the Windows Boot Manager screen. Just press F8 to bring up the Advanced Boot Options.

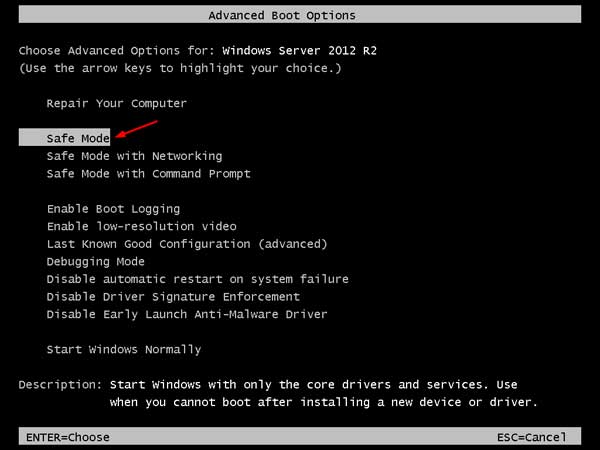
- Select Safe Mode and press Enter. This will open Windows Server 2012 in Safe Mode.
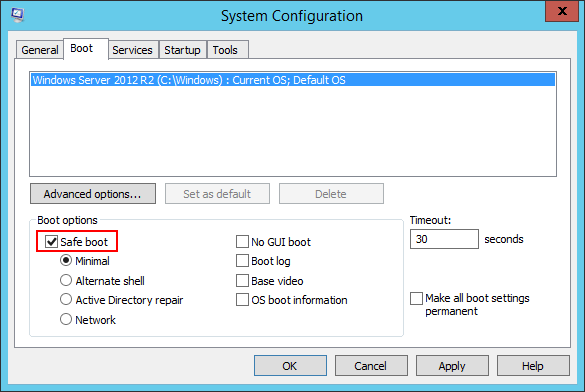
Method 2: Boot Windows Server 2012 into Safe Mode Using System Configuration
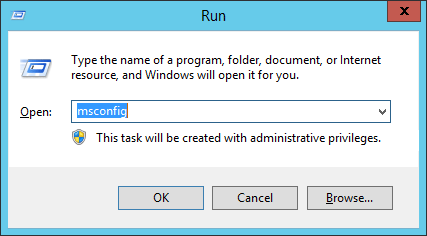
- Press the Windows key + R to open the Run box. Type msconfig and press Enter.

- Now the System Configuration dialog box will be opened. Under the Boot tab, check the Safe boot option and click OK.

- Reboot your computer and it will boot directly into Safe Mode automatically. If you wan to stop Windows from booting into Safe Mode next time, you need to open the System Configuration utility (msconfig) again and uncheck the Safe boot option.
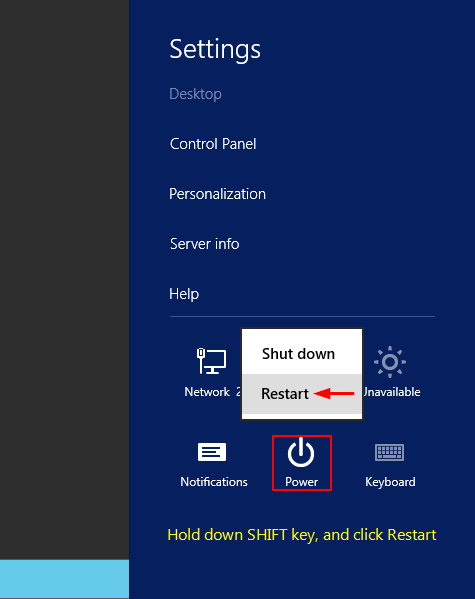
Method 3: Boot Windows Server 2012 into Safe Mode Using Settings App
- To get started, you need to open the Settings panel. This can be done by hovering your mouse to the top right-hand corner of the screen, or press the Windows key + I on your keyboard.
- Hold down the SHIFT key on your keyboard, and then click on Power icon and select Restart.

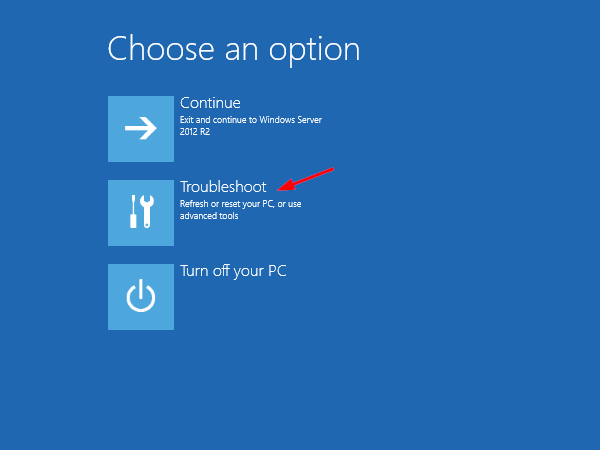
- You will need to click on the Troubleshoot option.
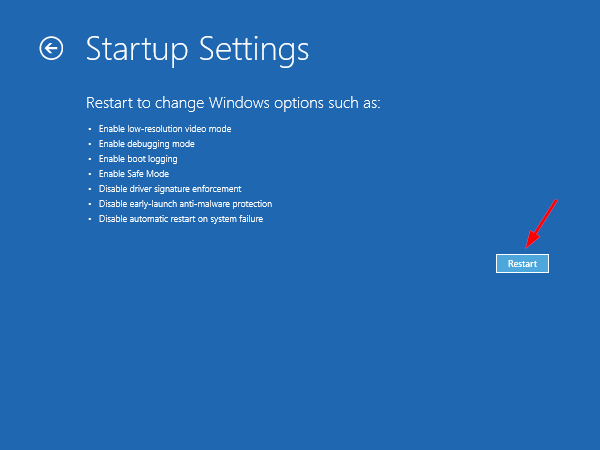
- Click Startup Settings.
- Click Restart.
- The computer will boot automatically to the Advanced Boot Options screen. From there you can select Safe Mode to start Windows Server 2012 in Safe Mode.

- Previous Post: How to Change Windows 10 Login Background to Solid Color
- Next Post: How to Fix “Task Manager is Disabled or Greyed out” in Windows 10
UPDATED: March 2018
If you have worked on Windows 8 or newer, you will know that Microsoft has removed the F8 boot functionality. They did this to decrease boot times. What is odd is that they applied this logic to servers; I would not have. Regardless the F8 Safe Mode functionality is not truly removed, it is just turned off.
To turn F8 boot on in Server 2012 you need to get to an elevated CMD prompt. If your server is functional that is easy. If your server won’t boot (hence the need for F8) then you can boot off of a Windows Server install DVD and select REPAIR YOUR COMPUTER option, the Troubleshooting, then Command Prompt.
Once you have a Command Prompt (as an administrator) open enter the following commands which are self explanatory:
- bcdedit /set {bootmgr} displaybootmenu yes
- bcdedit /set {bootmgr} timeout 10
Reboot your machine and enjoy pressing F8 and getting back into SAFE MODE or LAST KNOWN GOOD to work out your problem.
This will also work on Windows 8 and Windows 10.
Note that the BCDEDIT commands do NOT work from PowerShell. They NEED to be run from CMD.EXE :
Thanks to a number of blogs including THIS one.
Thanks
How to force Windows server 2012 R2 to boot/restart/start into Safe Mode after restart:
Go to Command Line, and type:
bcdedit /set {default} safeboot minimal
Reboot Windows and it will start in Safe Mode
To change Windows to boot normal from command line while in safe mode.
Go to Command Line, and type:
bcdedit /deletevalue safeboot
Reboot Windows and it will come up in Normal mode
https://bostonit.wpengine.com/wp-content/uploads/2013/04/boston-it-logo2-e1527557209239-300×82.png
0
0
Mike Khzouz
https://bostonit.wpengine.com/wp-content/uploads/2013/04/boston-it-logo2-e1527557209239-300×82.png
Mike Khzouz2017-05-29 22:24:092017-05-29 23:40:06Boot/Start Windows to Safe Mode from Command Line — Windows Server 2012 R2
-
Created
-
Category
Security, Windows OS
Safe Mode on Windows provides access to special features that can be used to fix various kinds of problems. To boot in safe mode, you will need to have regular access to your Windows server. There will be two ways to configure this, use any of them to boot the server in safe mode.
Method # 1. Using launch options
To enable safe mode using the graphical interface, you must press the key combination from: Windows + C to open “Settings”, then click on “Power”. After that, click on Shift and then “Restart”. Click Troubleshoot, then Launch Options. Click “Restart” after “Enable safe mode” is displayed in the displayed list.
Use the arrow keys to enter safe mode. After you press Enter, in safe mode, your Windows Server will boot into unopened mode.
After successful inclusion of safe mode, your background should be black, and in the upper right corner on your desktop will appear the inscription “Safe mode“
Method # 2. Using msconfig
In order to boot into safe mode using the system (msconfig), you must go to Run and run msconfig
On the Download tab, which is located in the Download Options, select Secure Download. Then click “OK”, and the server will automatically restart in safe mode. If you are prompted to “Restart,” click OK.
When loading in safe mode, the background of the desktop will be black, and in the upper right corner of the desktop will appear the inscription “Safe Mode“