
Предупреждаем, что любые изменения, вносящиеся в параметры адаптера, могут негативно сказаться на подключении к интернету. Существует вероятность отсутствия подключения или проблем с доступом к определенным веб-ресурсам. Изменяйте настройки только в том случае, если на сто процентов знаете, что делаете.
Настройка основных параметров адаптера
Сейчас в приложении «Параметры» Windows 11 появился раздел для настройки параметров адаптера. Можно выбрать любой из существующих, включая и неиспользуемые на текущий момент, затем изменить их основные настройки, необходимые для подключения. В следующей инструкции предлагаем разобраться с тем, как осуществляется подобная работа с сетевыми параметрами.
- Откройте «Пуск» и нажмите по значку с шестеренкой, чтобы перейти в «Параметры».
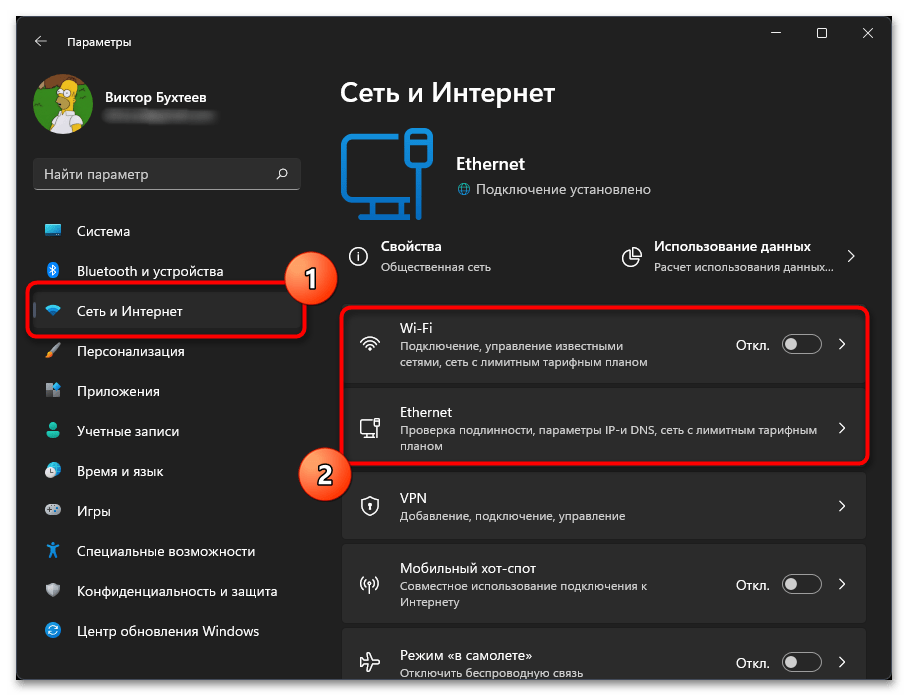
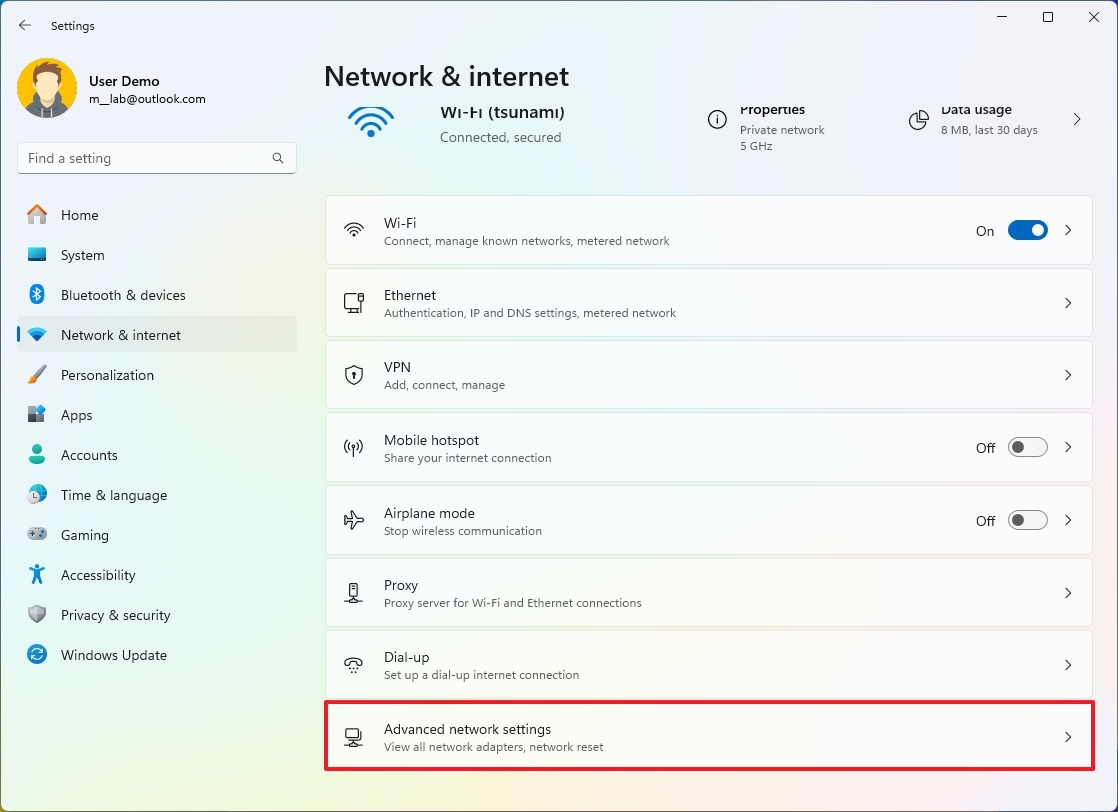
- На панели слева выберите «Сеть и Интернет», затем решите, какой из основных доступных адаптеров на вашем компьютере вы хотите настроить.
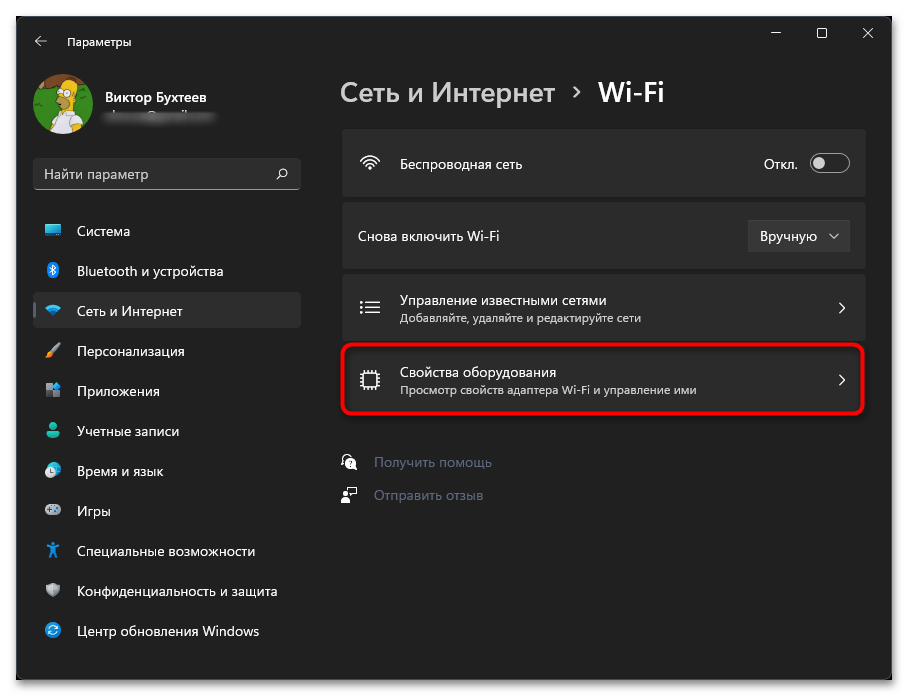
- Если речь идет о Wi-Fi, то дополнительно придется нажать по «Свойства оборудования», чтобы открыть раздел с настройками, которые будут описаны в следующих шагах инструкции.
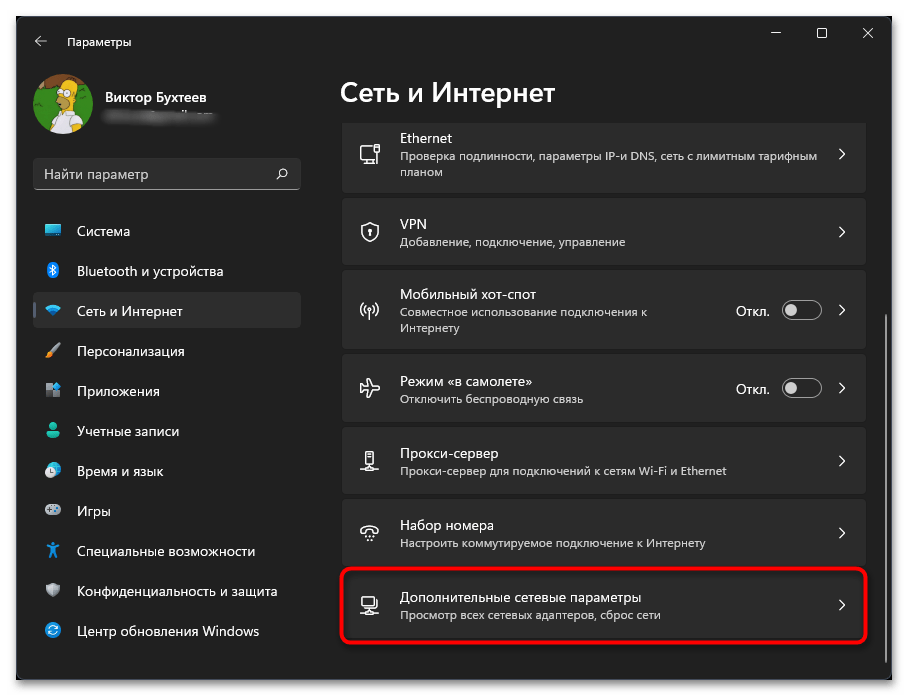
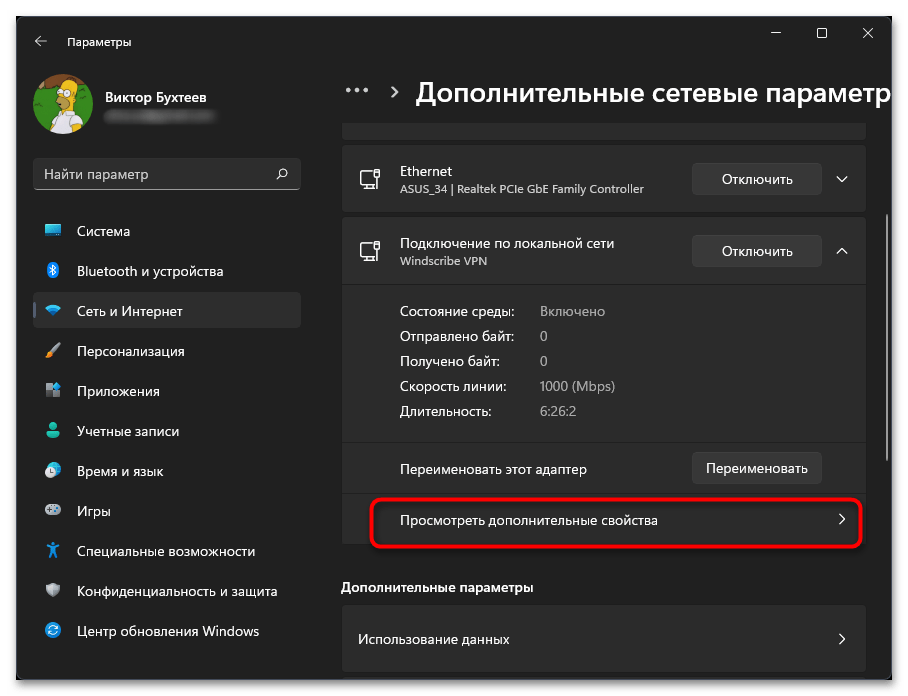
- Для отображения всех сетевых адаптеров в меню «Сеть и Интернет» нажмите по плитке «Дополнительные сетевые параметры».
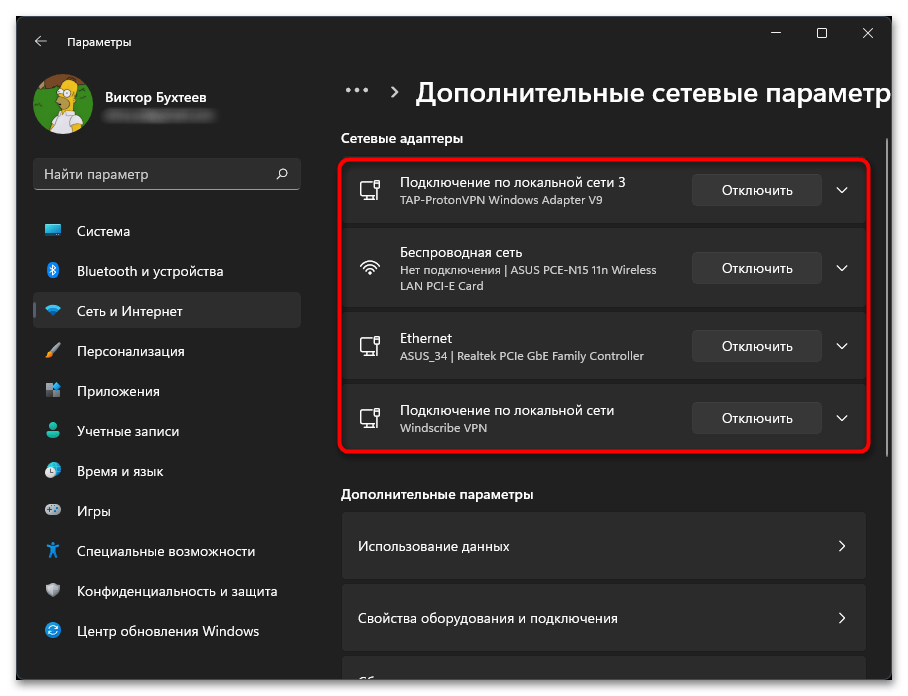
- Вы увидите все доступные устройства, сможете отключить или активировать любое из них. Нажатие по стрелке вниз открывает список с основной информацией, где можно узнать состояние сети, количество исходящего и входящего трафика, длительность подключения и скорость линии. Если нужно переименовать адаптер, используйте кнопку с соответствующим названием.
- В ней же находится кнопка «Просмотреть дополнительные свойства», перемещающая вас к необходимым сетевым настройкам, оказывающим непосредственное влияние на подключение к сети.
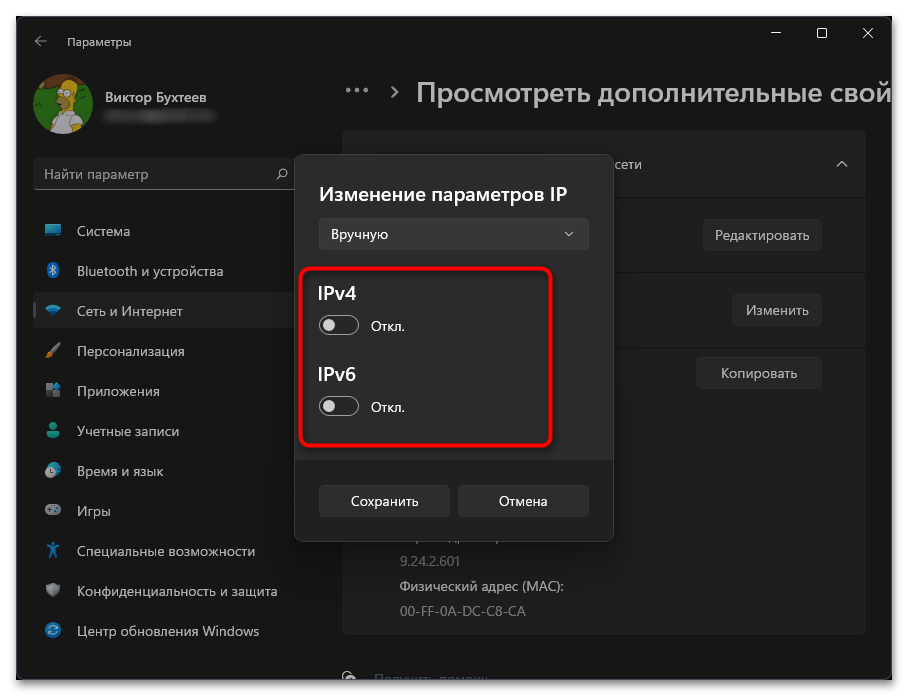
- В первую очередь будет предложено изменить IP-адрес или выбрать метод его назначения. Нажмите «Редактировать», чтобы перейти к соответствующему окну.
- Если установлено значение «Автоматически (DHCP)», значит, параметры для IP-адреса назначаются автоматически вашим провайдером или загружаются из настроек маршрутизатора. Не устанавливайте режим «Вручную», если ваш тип подключения изначально DHCP, поскольку в таком случае доступа к интернету не будет. Если вы используете статический IP или другие, менее распространенные типы подключения от провайдера, при выборе можете активировать протокол версии IPv4 или IPv6 в зависимости от того, какой предоставляет провайдер.
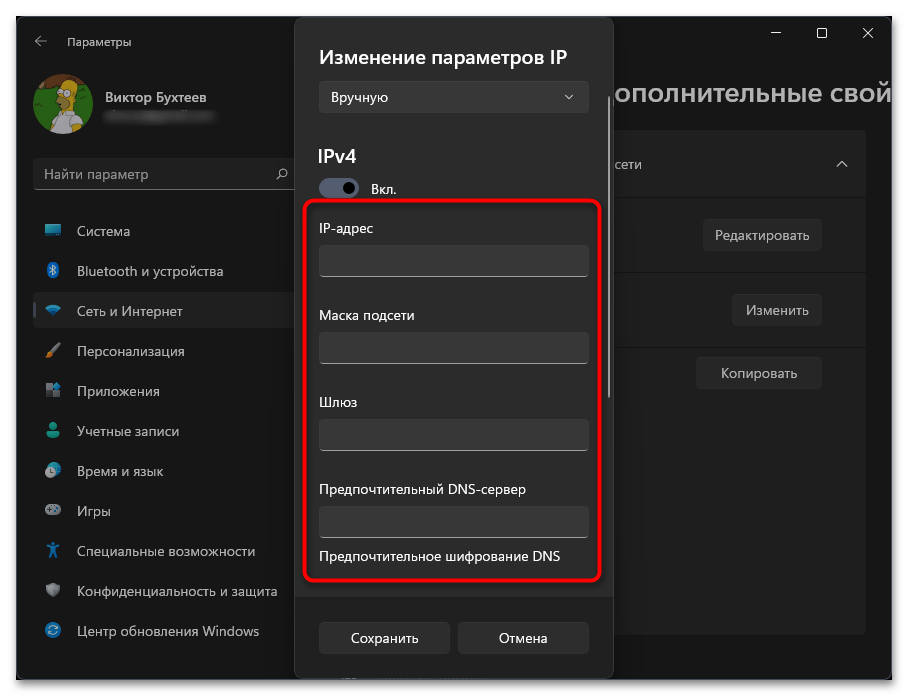
- Далее указывается сам IP-адрес, маска подсети, шлюз и предпочитаемый DNS-сервер. Как правило, никто не вводит здесь просто случайные значения. Вся информация должна поставляться непосредственно от вашего провайдера (если ваш тип подключения не DHCP).
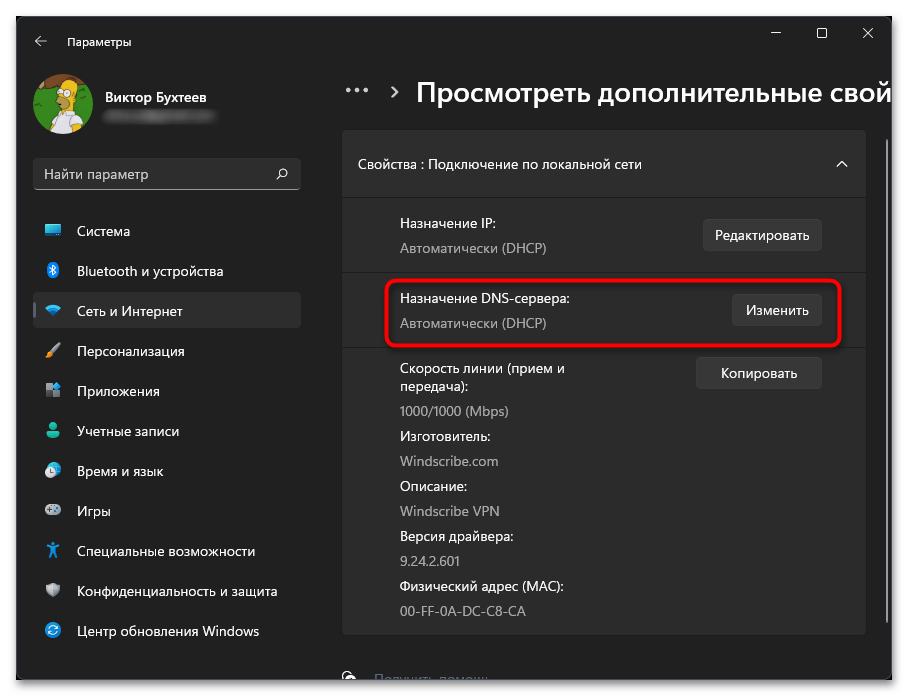
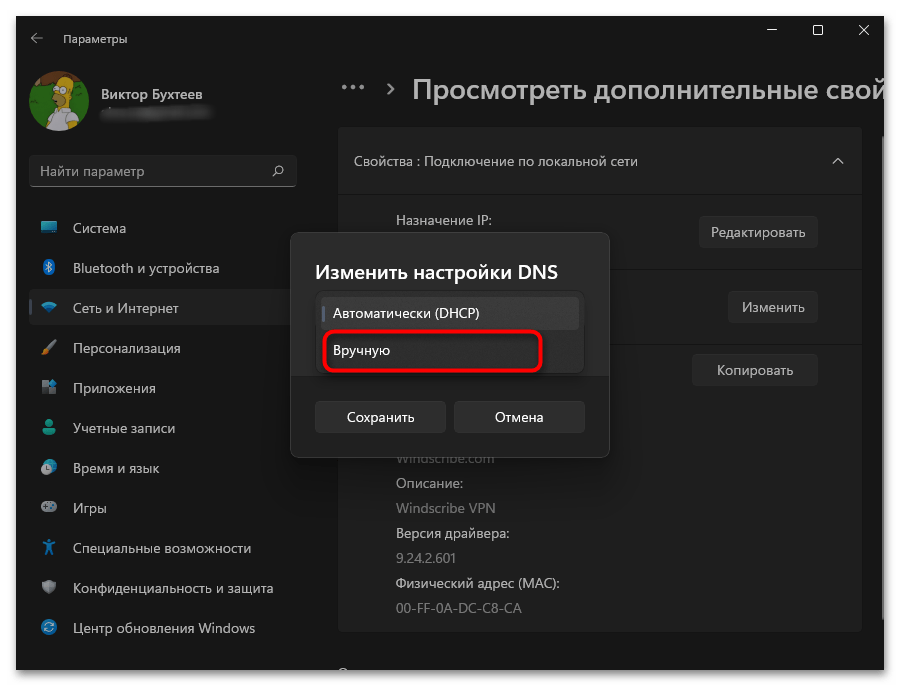
- Теперь можно рассмотреть следующую настройку, изменение которой уже чаще нужно пользователям, испытывающим трудности с доступом к определенным сайтам. Возможно, вам понадобится установить собственные DNS-сервера, чтобы обеспечить корректное открытие веб-ресурсов. Для этого напротив соответствующего пункта нажмите кнопку «Изменить».
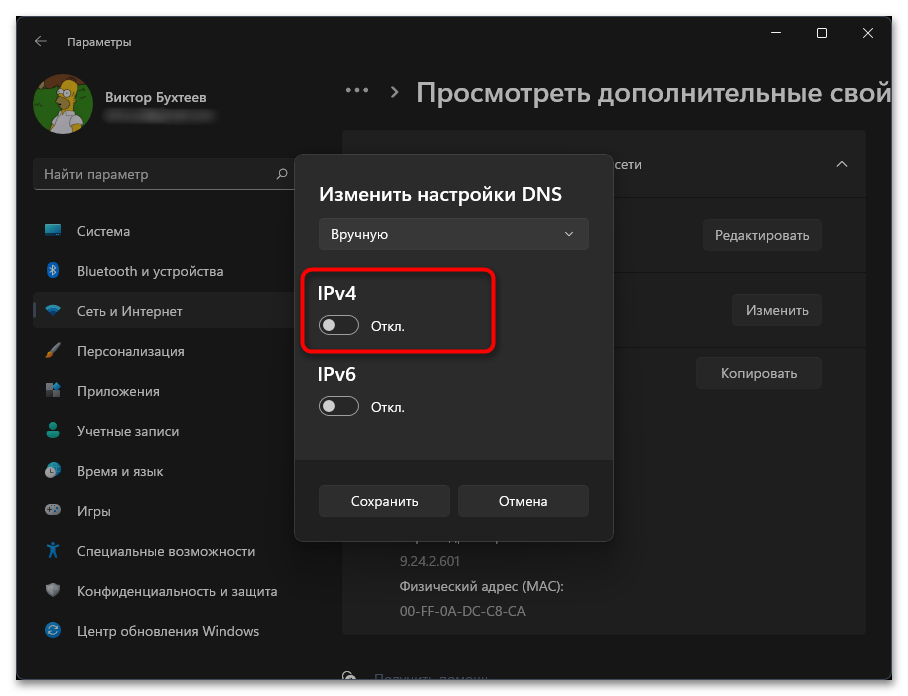
- Выберите тип получения DNS-серверов «Вручную», чтобы на экране появились доступные настройки.
- Точно так же активируйте тип протокола, для которого хотите указывать вручную настройки DNS-серверов.
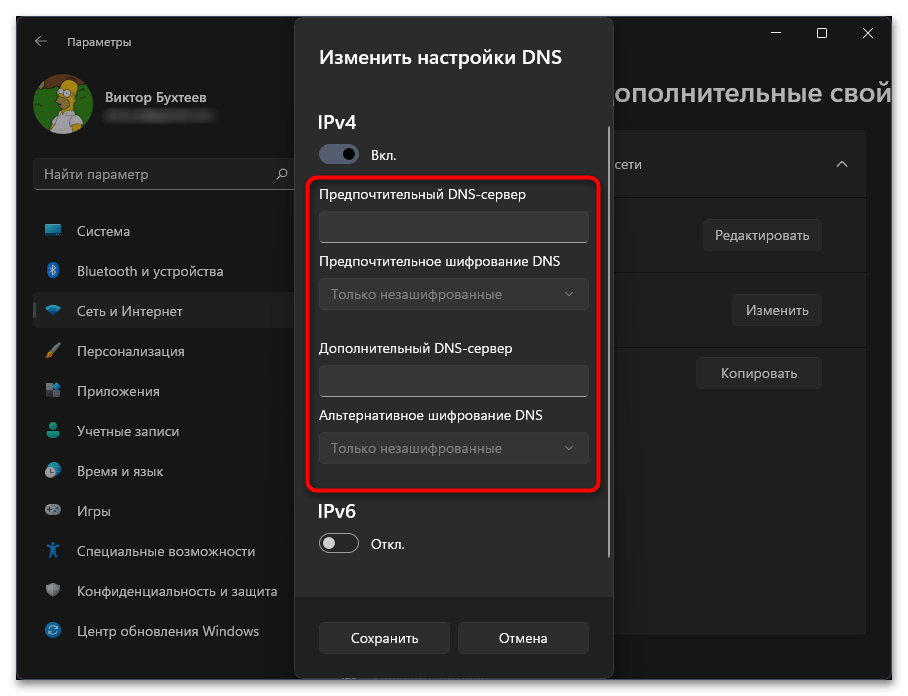
- Далее вам будет достаточно указать предпочтительный DNS-сервер и альтернативный. Шифрование обычно остается в состоянии по умолчанию, но иногда требуется дополнительное изменение.


Это были все основные настройки, доступные через «Параметры» в Windows 11. Все остальные пункты, отображаемые в окнах, в основном предназначены для просмотра состояния сети и получения общих сведений об используемых сетевых адаптерах. Там же осуществляется отключение, активация и переименование устройств, если их добавлено несколько.
Настройка дополнительных параметров адаптера
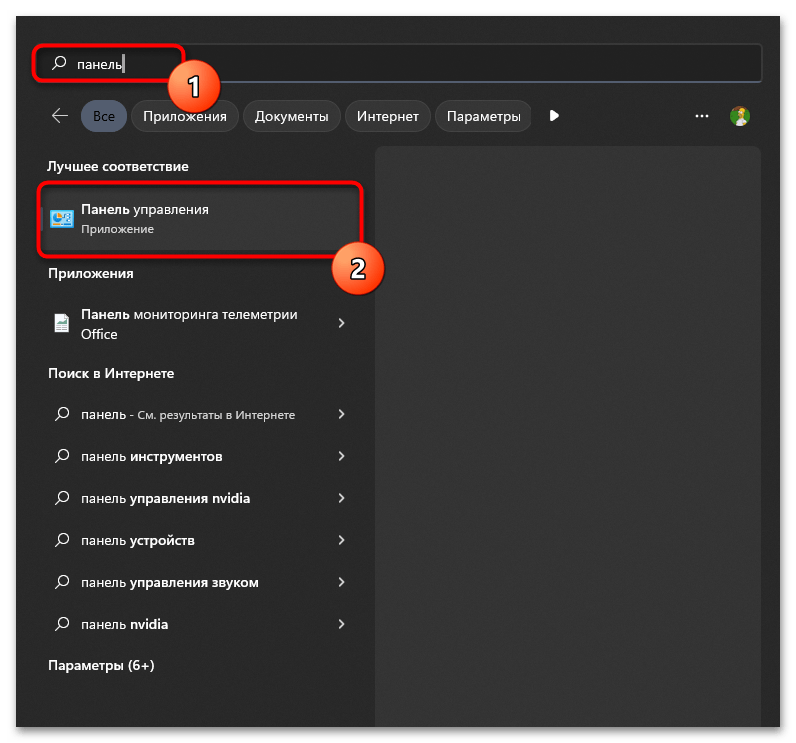
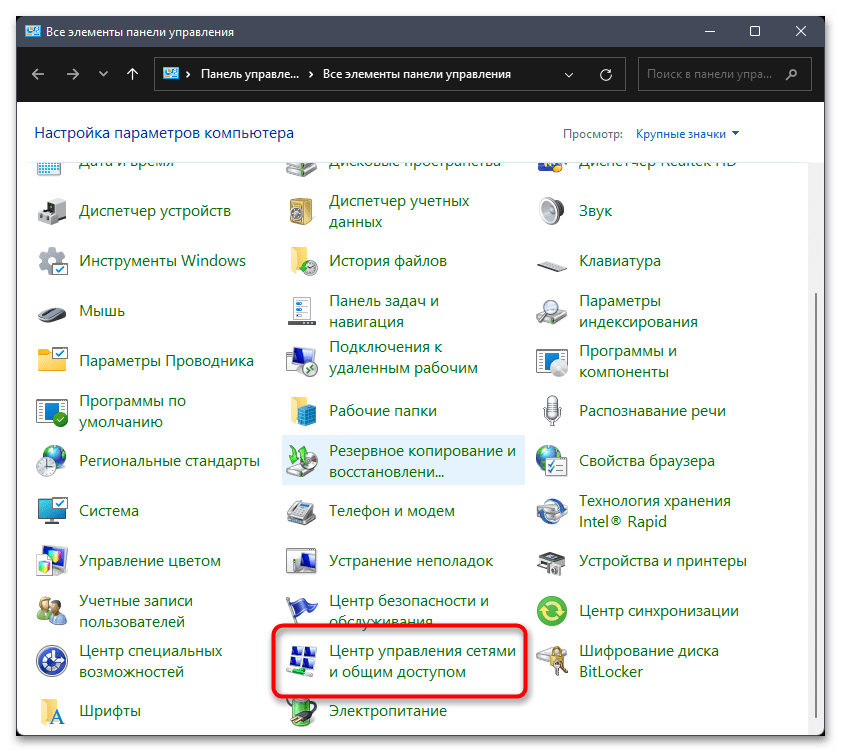
Теперь перейдем к просмотру дополнительных параметров через «Панель управления». Ранее было доступно только это окно с настройками адаптеров, поэтому оно и знакомо многим пользователям. Детально разбирать те же изменения, которые вносились в предыдущем разделе статьи, мы не будем. Остановимся исключительно на чем-то новом, куда преимущественно относятся технологии от Microsoft.
- Через «Пуск» отыщите «Панель управления» и запустите данное приложение.
- В нем найдите «Центр управления сетями и общим доступом», затем сделайте двойной щелчок левой кнопкой мыши по данному параметру.
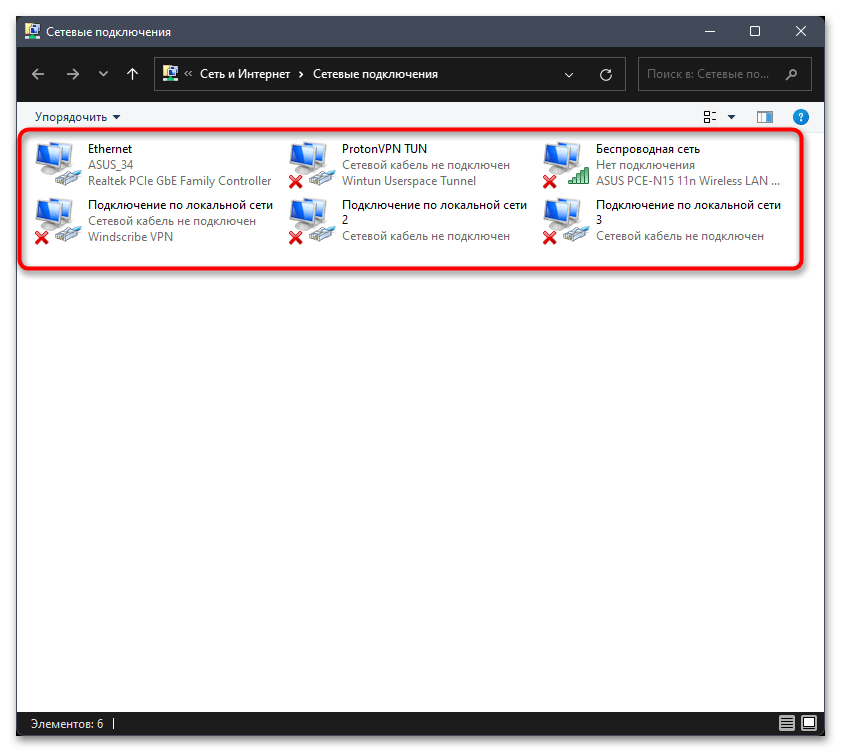
- В новом окне на левой панели кликните по ссылке «Изменение параметров адаптера».
- Вы увидите список из всех доступных сетевых адаптеров. Возле них будут обозначения, при помощи которых можно узнать, отключен ли сетевой адаптер и какой тип сети он представляет.
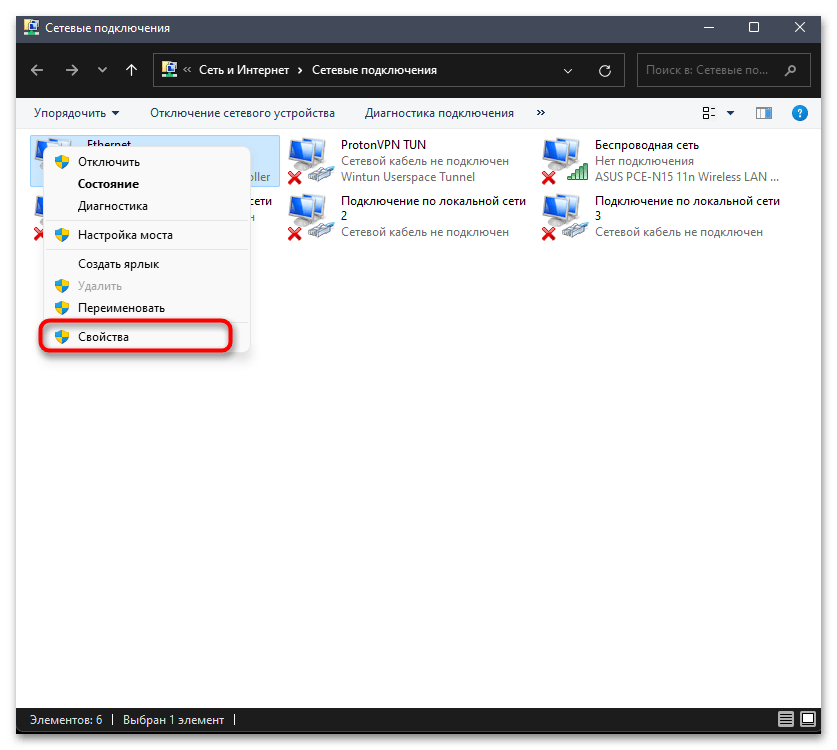
- Если вы выбрали какой-то из них для настройки, нажмите по значку правой кнопкой мыши из контекстного меню вызовите «Свойства».
- Дождитесь загрузки компонентов и начните изучение каждого из них, чтобы понимать, какие нужны для работы, а какие можно отключить. Первый называется «Клиент для сетей Microsoft». Если компонент включен, значит, компьютер будет получать к ресурсам в сети Майкрософт. Рекомендуем держать параметр включенным, чтобы получать обновления и иметь возможность загружать приложения из Microsoft Store.
- Далее идет «Общий доступ к файлам и принтерам для сетей Microsoft». Используется при организации общего доступа в Windows 11, поэтому не отключайте компонент, если несколько компьютеров подключены к одной локальной сети.
- «Планировщик пакетов QoS» не является обязательным компонентом, но он отвечает за управление сетевым трафиком. Поэтому если раньше вы наблюдали проблемы со скоростью скачивания или открытия сайтов, рекомендуем активировать данный компонент.
- Далее идут еще несколько настроек, относящихся к обнаружению компьютера и определения пропускной способности. По умолчанию компоненты включены, поэтому не стоит их деактивировать без надобности.
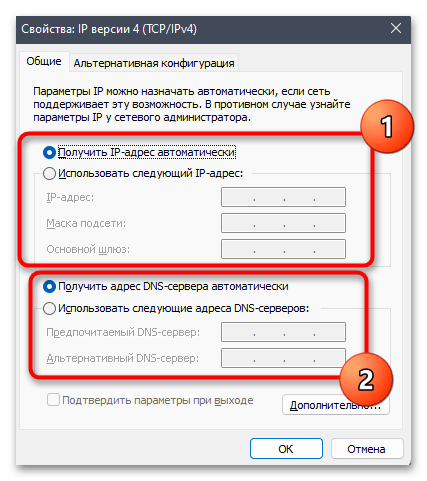
- Для «IP версии 4 (TCP/IPv4)» и «IP версии 6 (TCP/IPv6)» доступны дополнительные настройки, о которых мы уже рассказывали выше. Для их отображения выделите компонент и нажмите по «Свойства».
- Теперь в одном окне вы можете вручную задать IP-адрес и DNS-сервера, если не хотите получать эти данные автоматически.

Некоторые настройки сетевых адаптеров могут быть не согласованы с параметрами маршрутизатора, поэтому вам необходимо убедиться в том, что никаких конфликтов нет. Дополнительную информацию о настройке роутеров разных моделей вы можете найти на нашем сайте. Достаточно будет ввести в поиск модель вашего устройства, чтобы отыскать тематическую статью, в которой рассказано все до мельчайших деталей.
Наша группа в TelegramПолезные советы и помощь
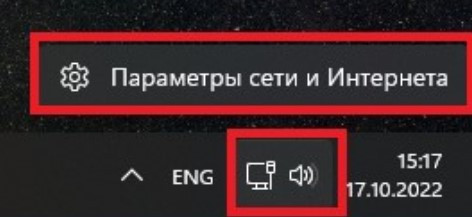
1. В меню около часов, справа внизу, нажмите на значок в виде компьютера, левой кнопкой мыши. Появится строка с «Параметры сети и Интернета». Выберите её.
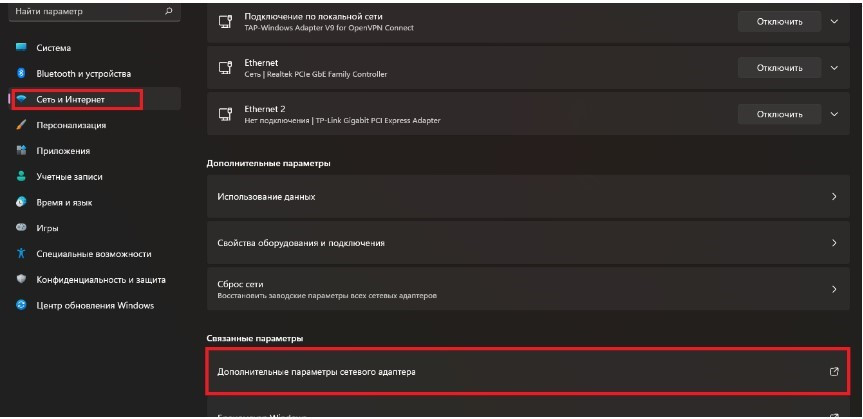
2. Откроется окно с настройками, в меню слева выберите пункт «Сеть и Интернет», нажав на него откроется выбор параметров сетевых настроек, выбираем «Дополнительные сетевые параметры».
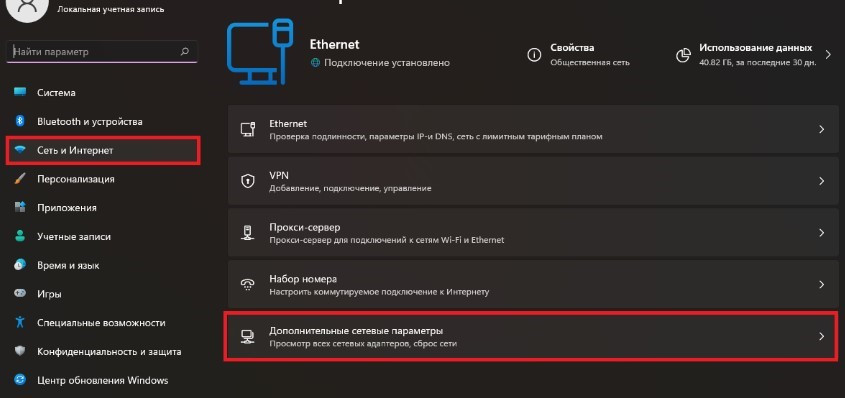
3. Откроется вкладка «Дополнительные сетевые параметры», в ней вас интересует пункт «Сетевые параметры», подпункт «Дополнительные параметры сетевого адаптера».
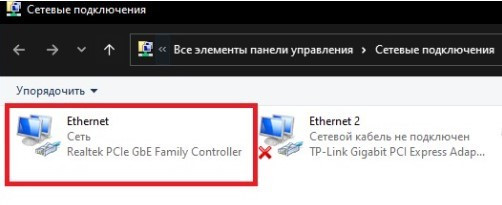
4. Выберите активную сетевую карту, для этого выделите её и дважды кликните левой клавишей мыши.
5. Откроется меню сетевой карты, выберите пункт «IP версии 4 (TCP/IPv4)» и нажмите на него дважды левой клавишей мыши.
6. В открывшемся окне выберите пункты «Получить IP-адрес автоматически» и «Получить адрес DNS-сервера автоматически». Примените настройки, нажав кнопку «ОК».
Проверка IP адреса и МАС устройства.
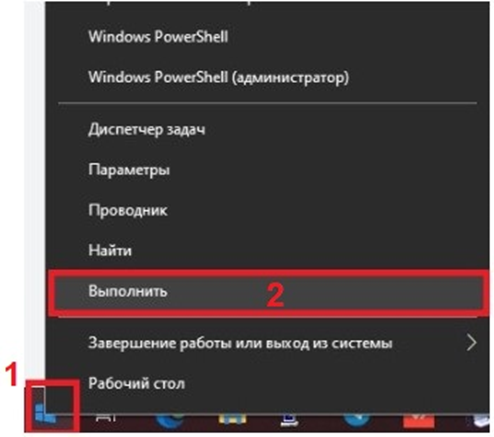
Наведите курсор на меню Windows, слева внизу, и нажмите правую кнопку мыши, у вас появиться меню, следует выбрать пункт «Выполнить».
Перед вами откроется окно, в которое нужно ввести команду cmd. (Так же данное меню можно вызвать комбинацией клавиши, WIN+R на клавиатуре, что гораздо быстрей и удобней).
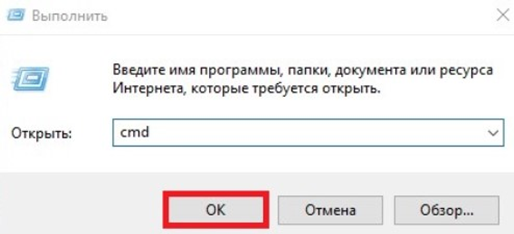
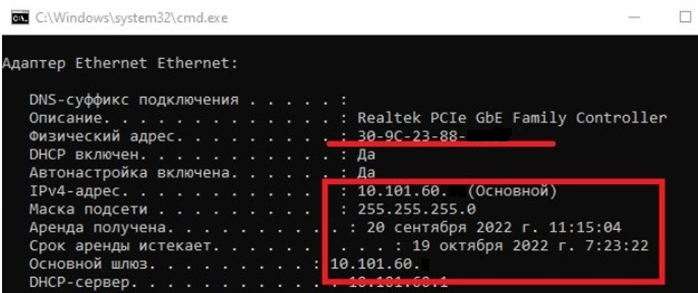
После нажатия на «ОК», откроется терминал, в который введите команду ipconfig/all, и нажимаем Enter, после чего отобразятся все ваши сетевые устройства с настройками и Mac адресами.
(Image credit: Mauro Huculak)
Although Windows 11 can detect and configure network adapters automatically, you may still need to perform additional steps to connect to a wireless network, enable specific features, review configurations, and troubleshoot problems.
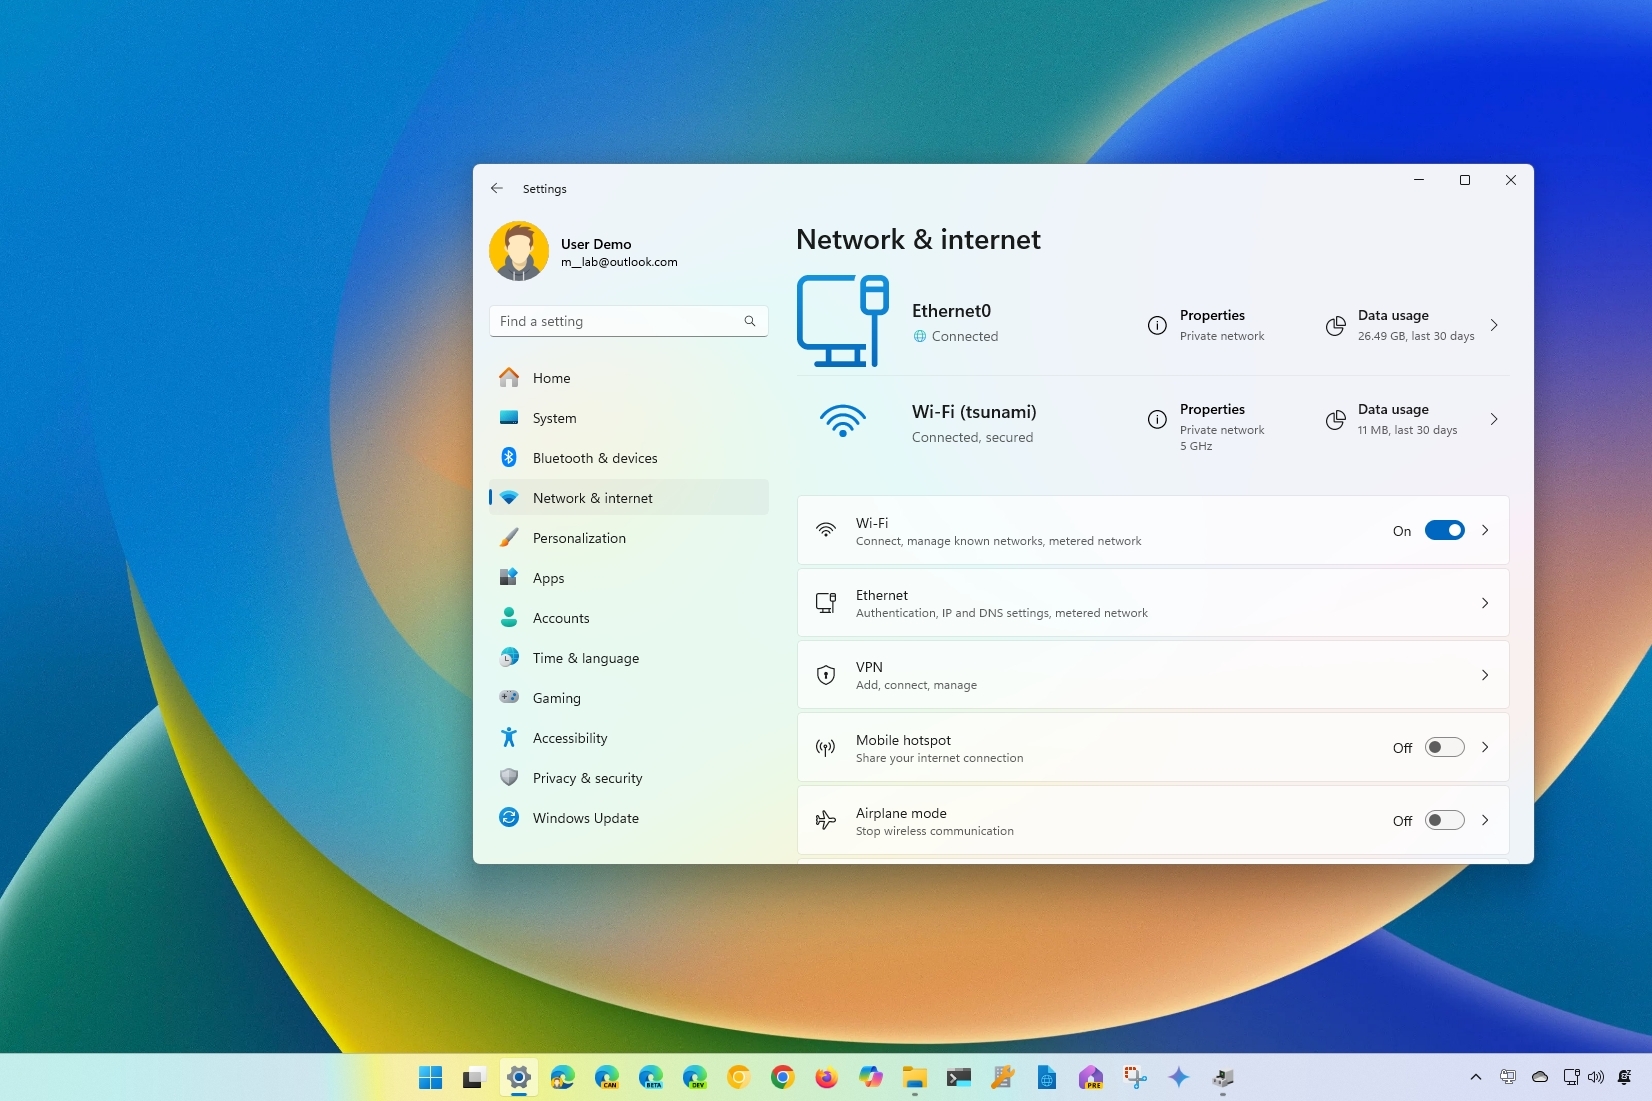
In previous versions, you needed to use Control Panel to manage most aspects of Wi-Fi and Ethernet adapters. However, on Windows 11, you can now configure the majority of the networking settings and features from the «Network & internet» section. For example, you can now enable or disable network adapters and configure DNS over HTTPS to improve security. It’s a lot easier to set a static or dynamic IP address, configure data limits, reset the adapters to fix most problems, and more.
In this how-to guide, you will learn the different ways to manage network adapter settings through the Settings app.
Recent updates
These instructions have been updated to reflect the changes in the latest version of Windows 11.
How to enable or disable network adapter on Windows 11
To enable or disable a network adapter, use these steps:
- Open Settings.
- Click on Network & internet.
- Click the Advanced network settings page on the right side.
- Click the Disable button to turn off the network adapter under the «Network adapters» section.
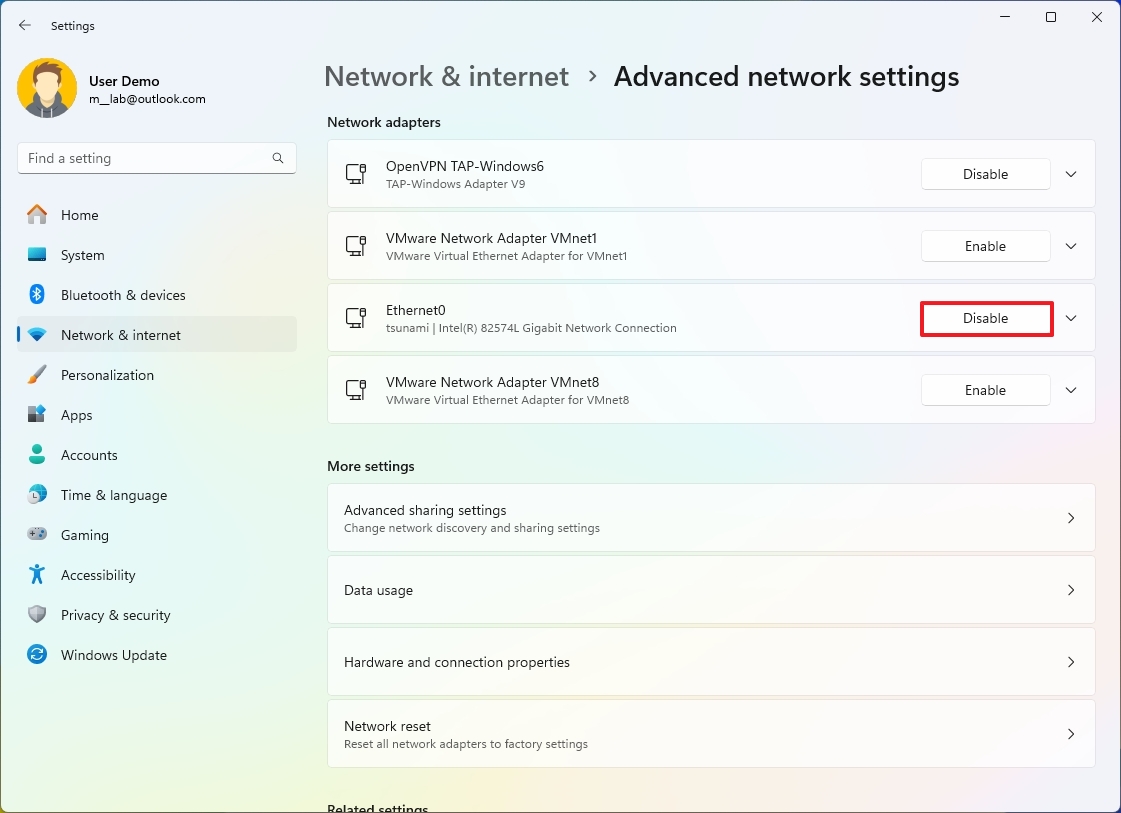
- Click the Enable button to turn on the network adapter under the «Network adapters» section.
Once you complete the steps, the adapter will disable and no longer be available for the system. The adapter will again be available to provide networking functionalities if you enable the option.
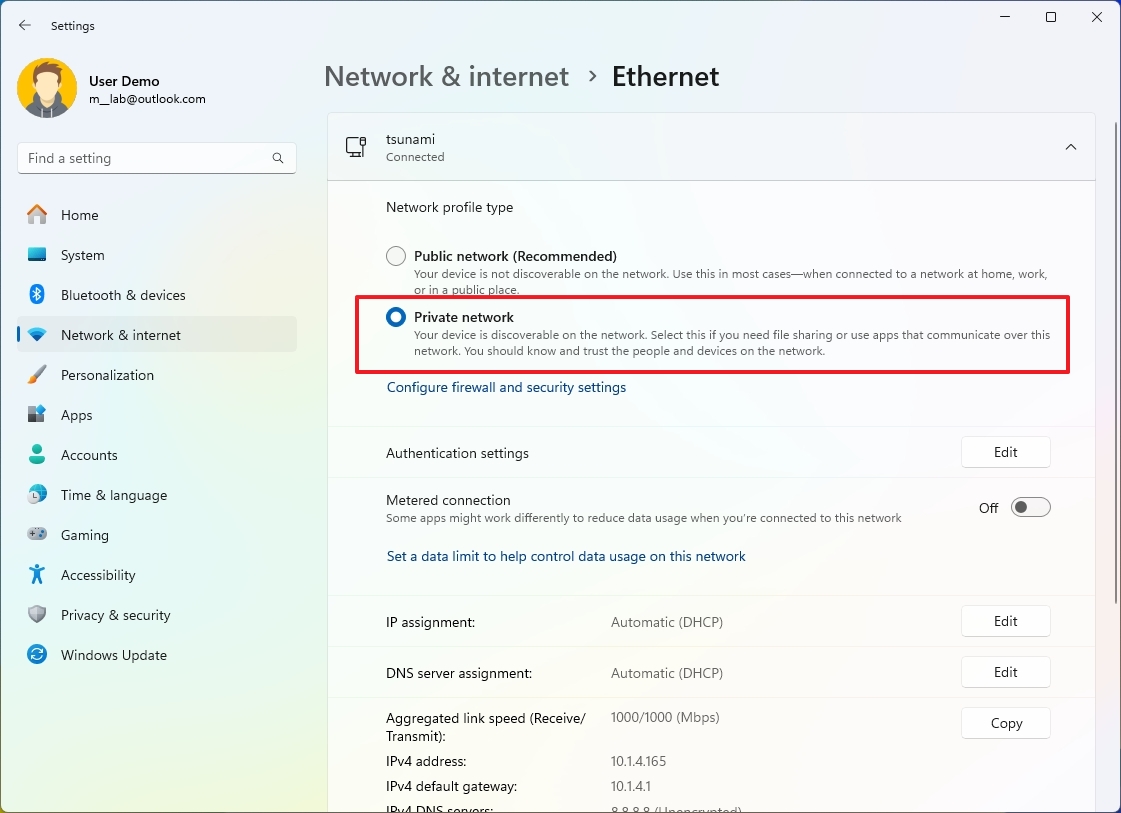
How to change network profiles on Windows 11
On Windows 11, changing the network profile type allows you to increase the networking security and make it easier to share files and other services with another computer in the network.
Ethernet connection
To make a network connection public or private, use these steps:
All the latest news, reviews, and guides for Windows and Xbox diehards.
- Open Settings.
- Click on Network & internet.
- Click the Ethernet page on the right side.
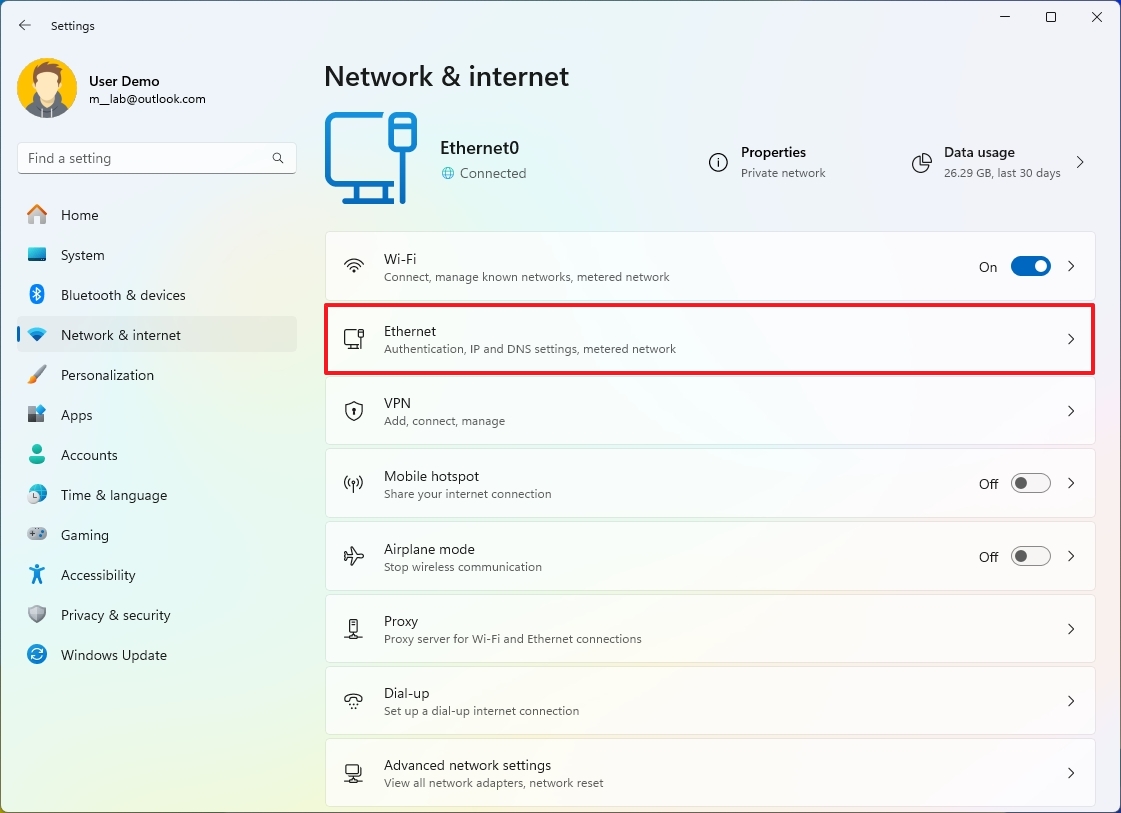
- Select the profile type under the «Network profile type» section:
Wi-Fi connection
To change the network profile type for a Wi-Fi connection, use these steps:
- Open Settings.
- Click on Network & internet.
- Click the Wi-Fi page on the right side.
- Click the connection properties setting.
- Quick note: The device must be already connected to the network to see the option
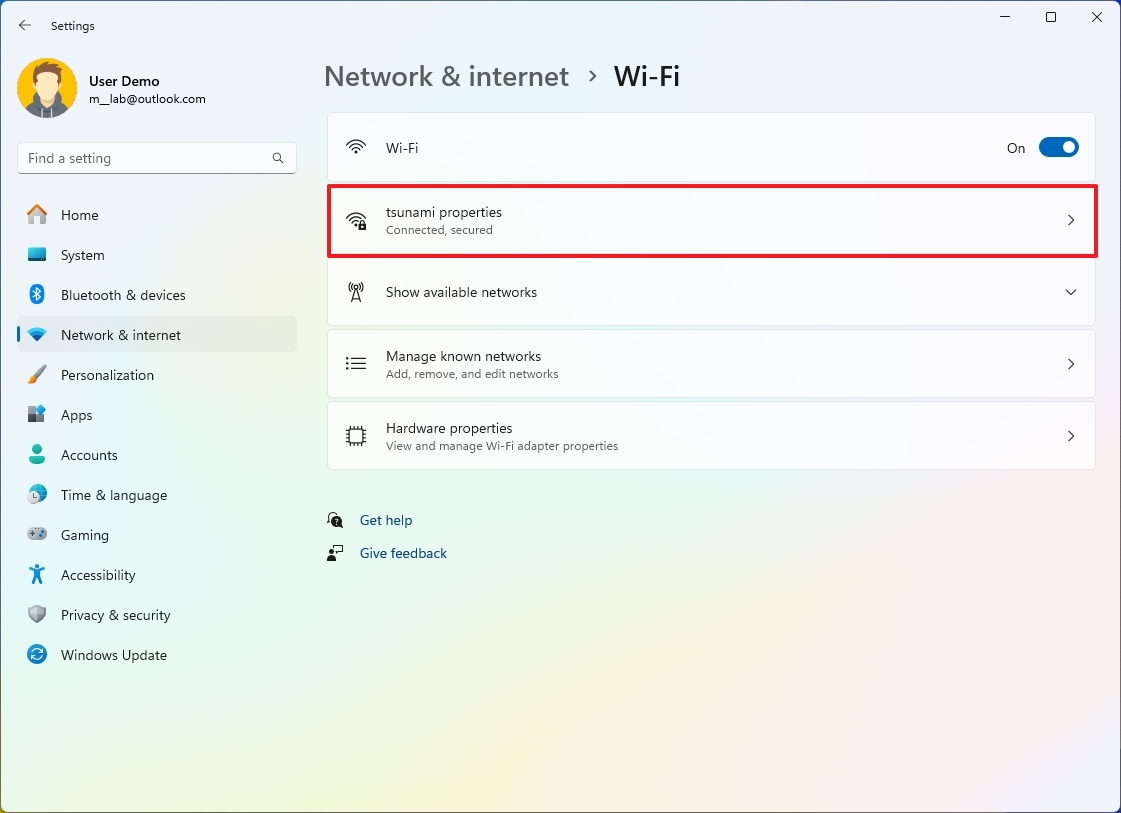
- Select the profile type under the «Network profile type» section:
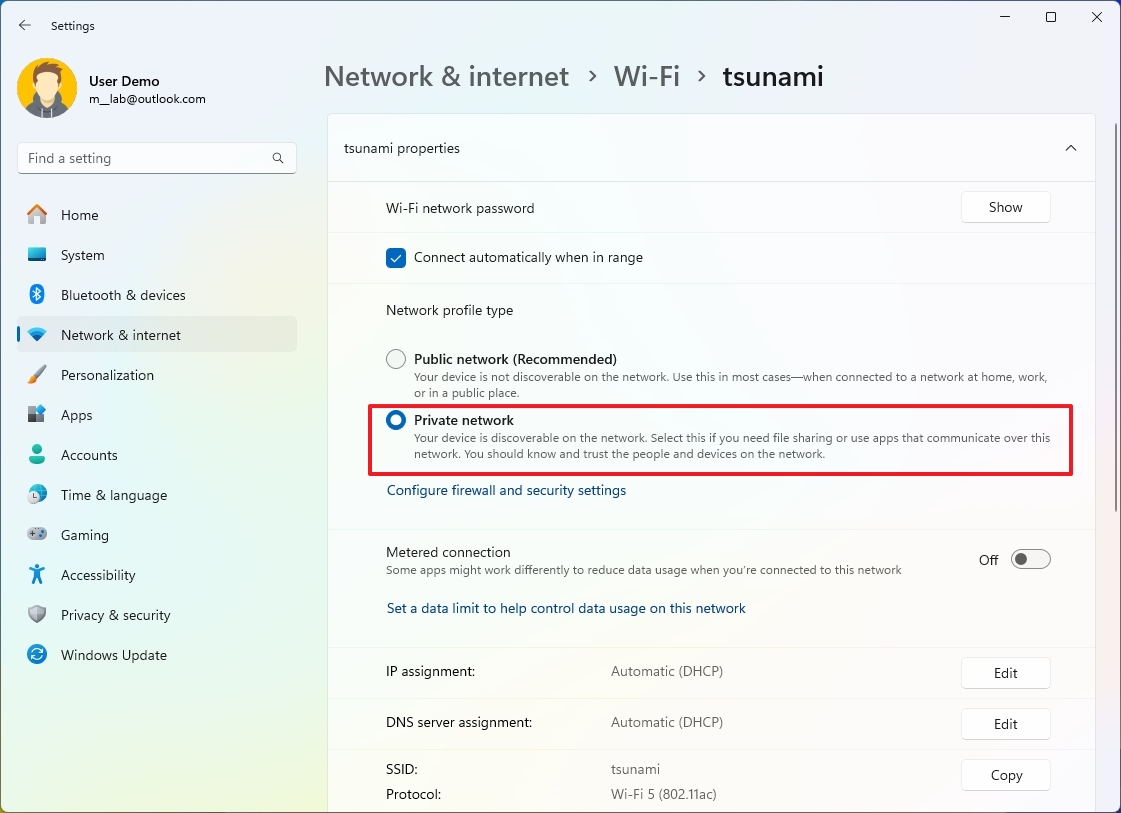
After you complete the steps, depending on the profile you selected, the device will not be discoverable or be visible to other devices to access files and other services.
How to make network connection metered on Windows 11
A metered connection reduces the background data usage of Windows 11 and apps to prevent going over a limited data plan, such as on mobile hotspot plans that only offer a few gigabytes of data.
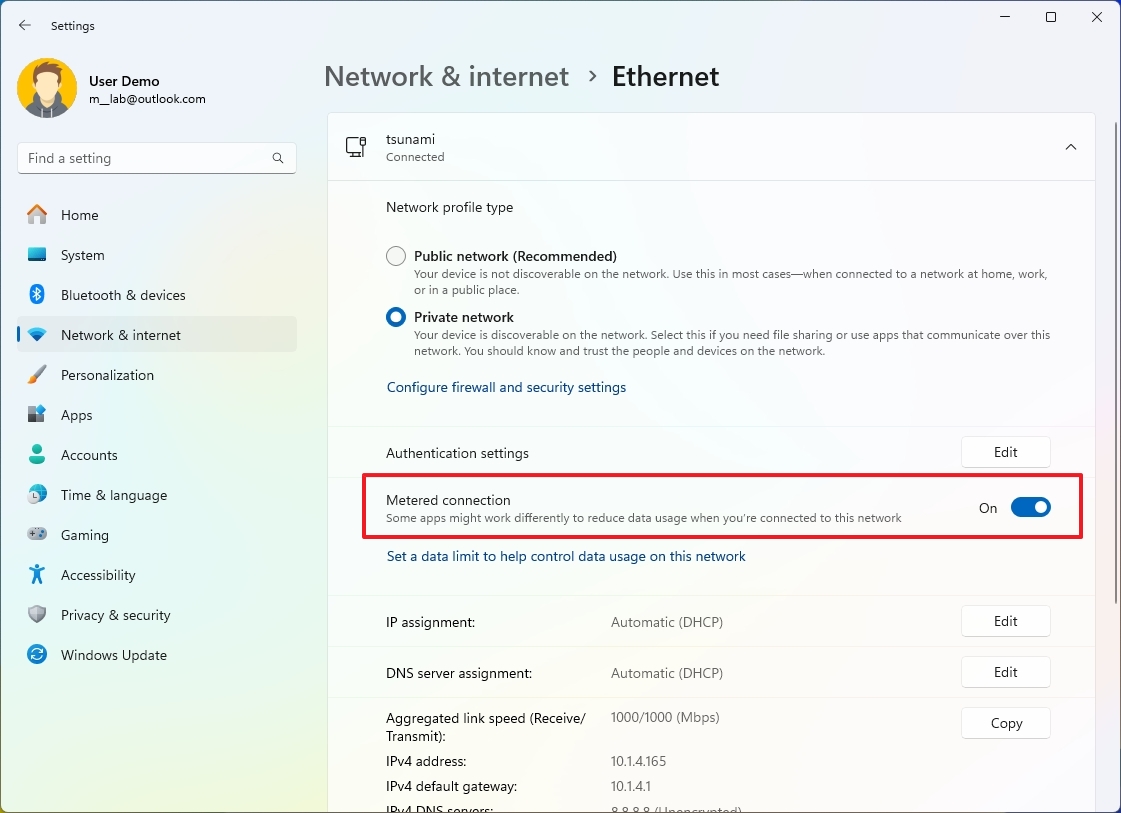
Ethernet connection
To make an Ethernet connection metered on Windows 11, use these steps:
- Open Settings.
- Click on Network & internet.
- Click the Ethernet page on the right side.
- Turn on the Metered connection toggle switch.
Wi-Fi connection
To make a Wi-Fi connection metered, use these steps:
- Open Settings.
- Click on Network & internet.
- Click the Wi-Fi page on the right side.
- Click the connection properties setting.
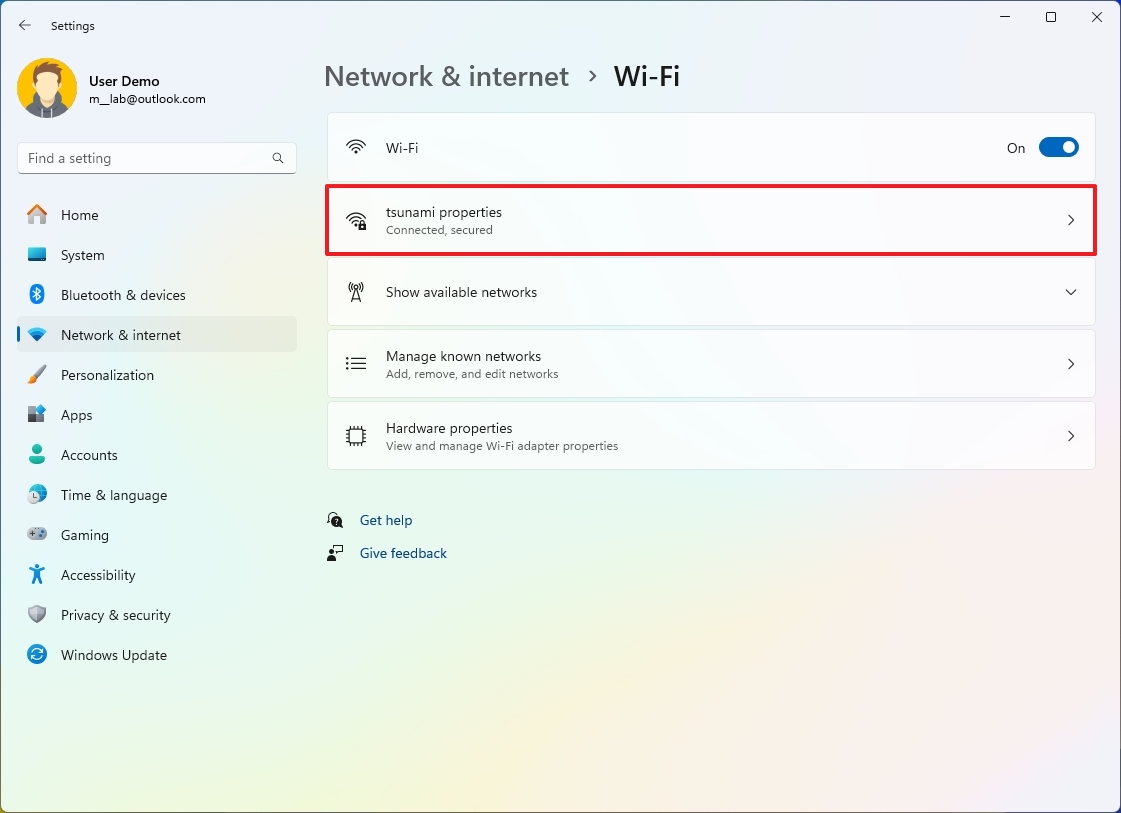
- Turn on the Metered connection toggle switch.
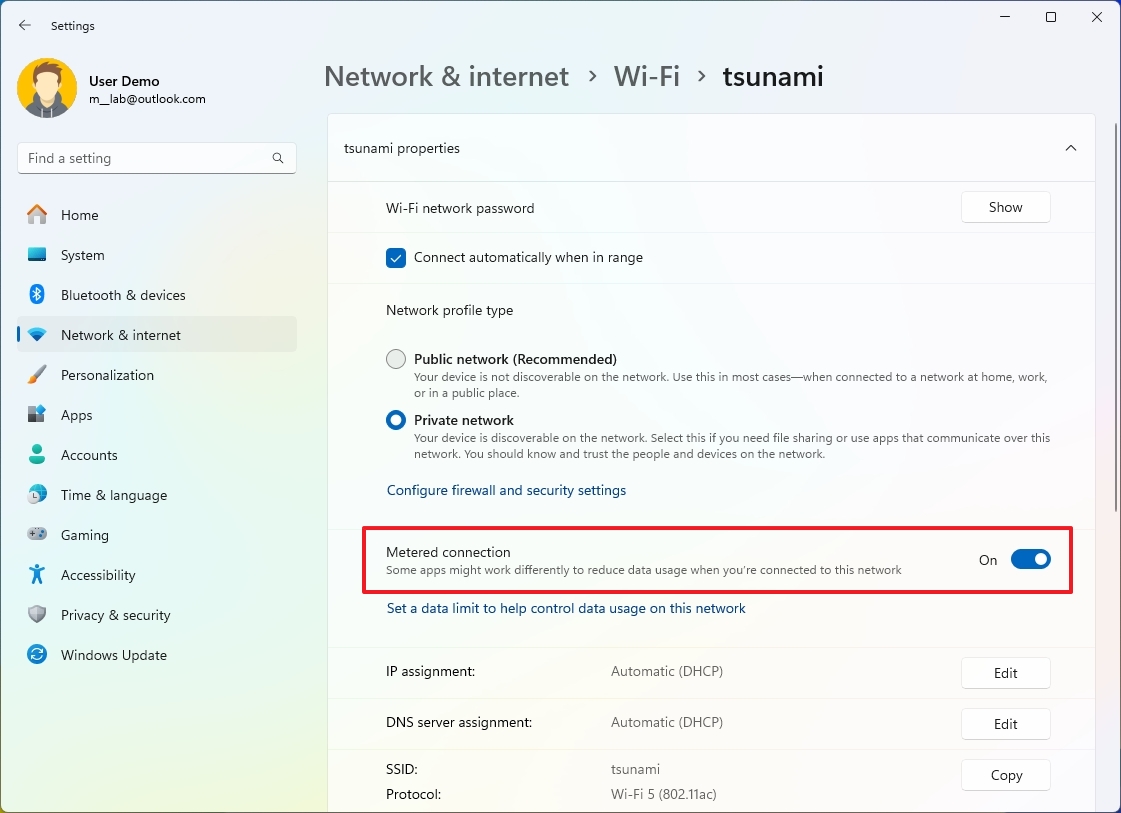
Once you complete the steps, the system and apps will use less data. For example, the operating system won’t download cumulative or feature updates, and some features like OneDrive won’t sync files to the cloud, and apps won’t download updates.
The settings will only apply to the current connection. If you connect to a different network, you must reconfigure the feature as needed.
If you want to disable the feature, you can follow the same steps, but in step 5, turn off the «Metering connection» option.
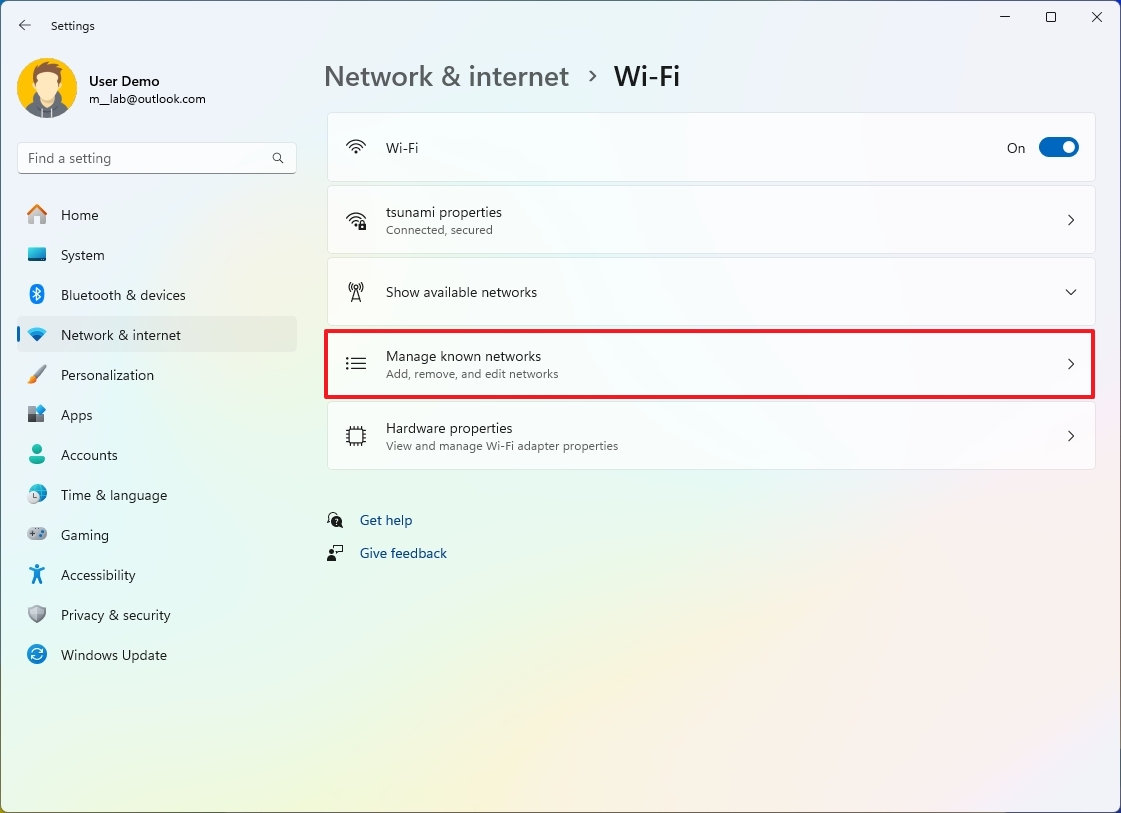
How to manage known wireless networks on Windows 11
On Windows 11, you can also provision Wi-Fi configurations to make connections easier. You can also delete those connections you no longer use for better management.
Add new Wi-Fi network
To provision a new wireless connection, use these steps:
- Open Settings.
- Click on Network & internet.
- Click the Wi-Fi page on the right side.
- Click the «Manage known networks» setting.
- Click the Add network button.
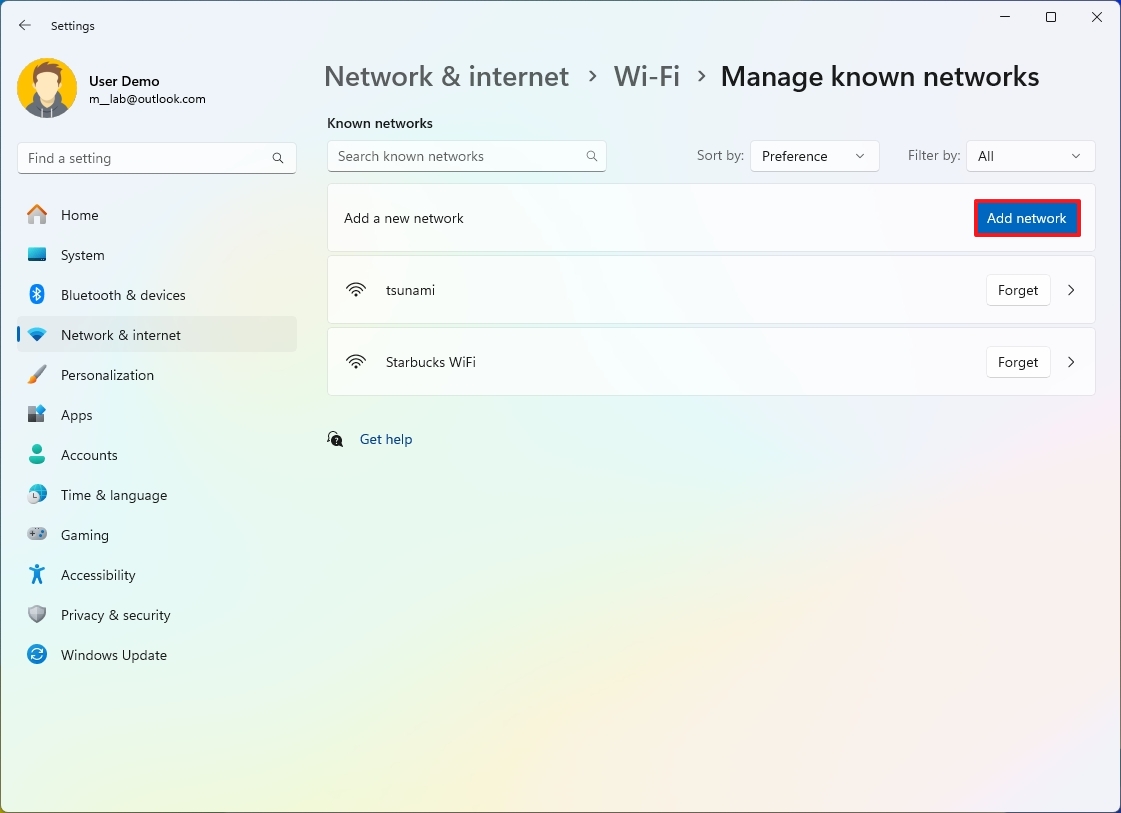
- Confirm the wireless network name.
- Use the «Security type» setting and select the security authentication method.
- Quick note: This security feature is usually configured on the router or access point. Typically, it would be the «WPA2-Personal AES» option.
- Use the Security key setting and confirm the security key (sometimes referred to as «Wi-Fi password»).
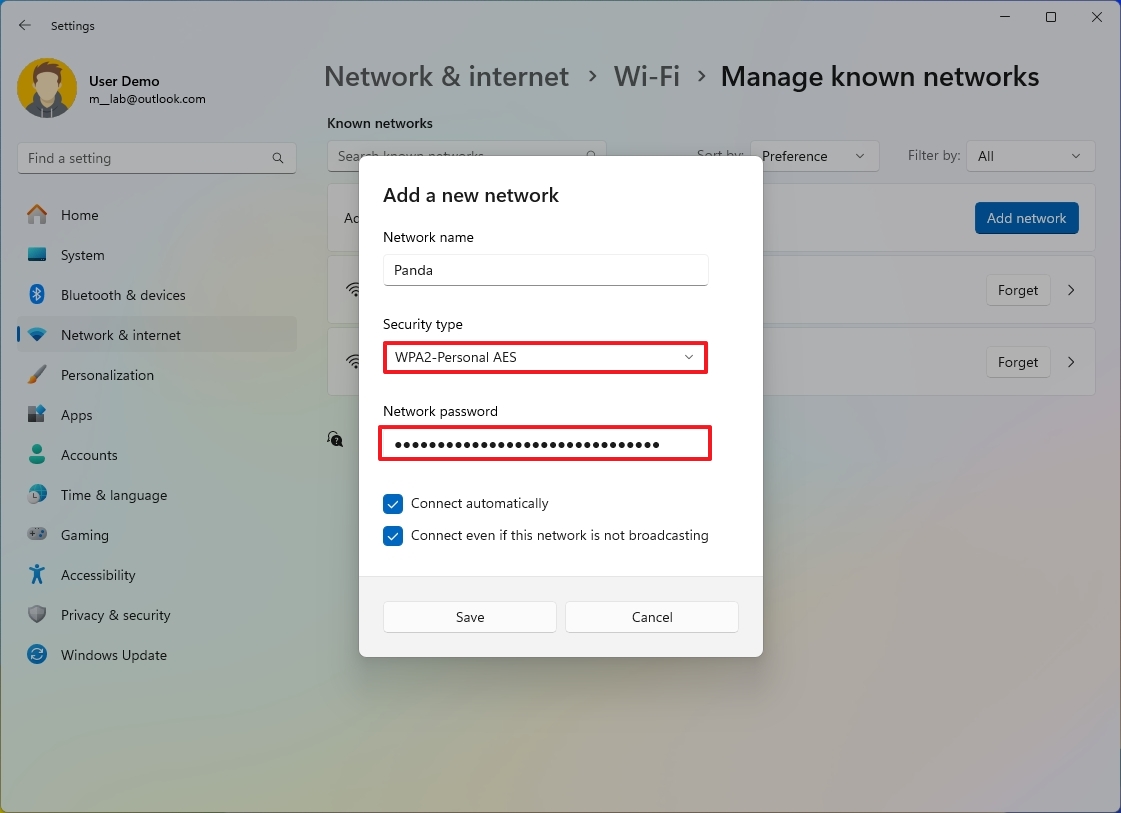
- (Optional) Check the Connect automatically option if you want to automatically connect to the wireless network when it is in range.
- (Optional) Check the «Connect even if this network is not broadcasting» option.
- Quick note: Usually, you can choose the network to connect because it’s broadcasting its presence to all devices. However, sometimes, administrators choose not to broadcast the network to remain hidden. This option will let you connect to the wireless network, whether it’s broadcasting or not.
- Click the Save button.
After you complete the steps, the network configuration will be applied to the device, and when the access point is within range, the computer will connect automatically without additional steps:
Remove existing Wi-Fi network
To delete a Wi-Fi connection from Windows 11, use these steps:
- Open Settings.
- Click on Network & internet.
- Click the Wi-Fi page on the right side.
- Click the «Manage known networks» setting.
- Click the Forget button for the network you want to remove.

Once you complete the steps, the network configuration will no longer be available on the device.
How to connect to wireless network on Windows 11
To connect a computer to a wireless access point, use these steps:
- Open Settings.
- Click on Network & internet.
- Click the Wi-Fi page on the right side.
- Click the «Show available networks» setting.
- Select the Wi-Fi network.
- (Optional) Check the Connect automatically option.
- Click the Connect button.
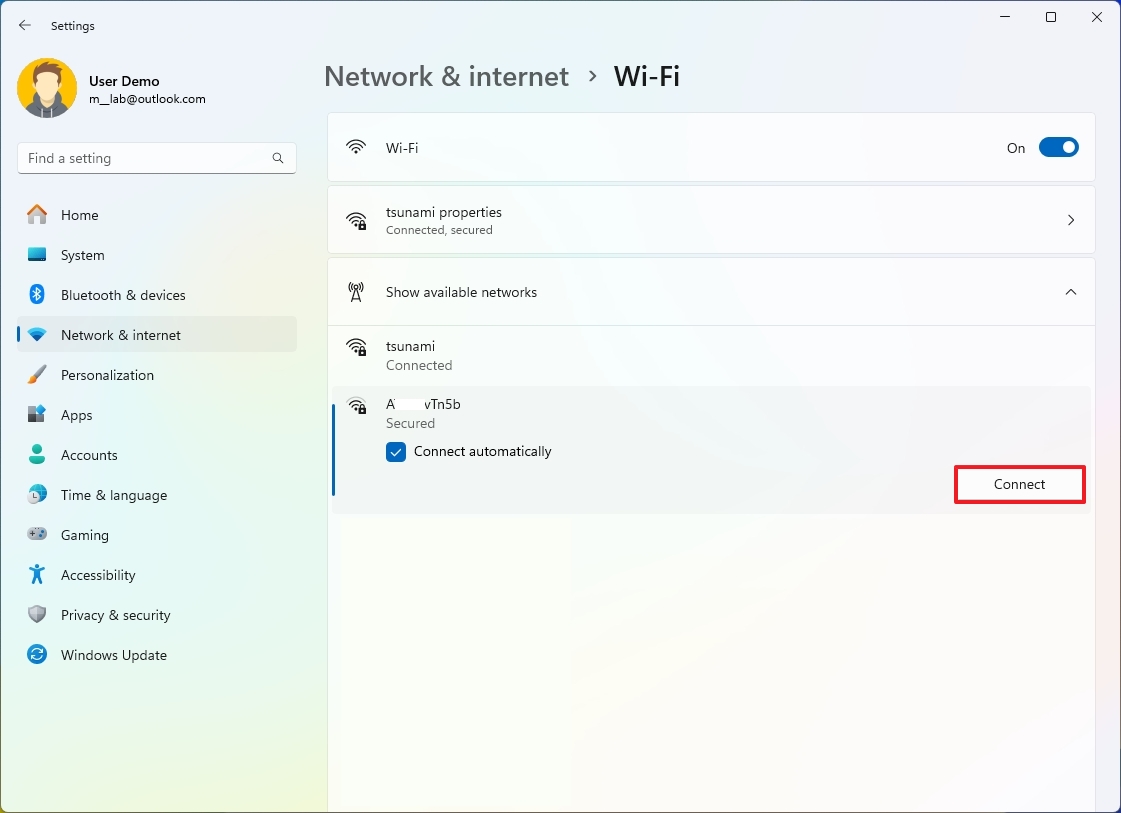
- Confirm the security key (Wi-Fi password).
- Click the Next button.
Alternatively, you can also connect to the wireless network through the network icon in the Taskbar.
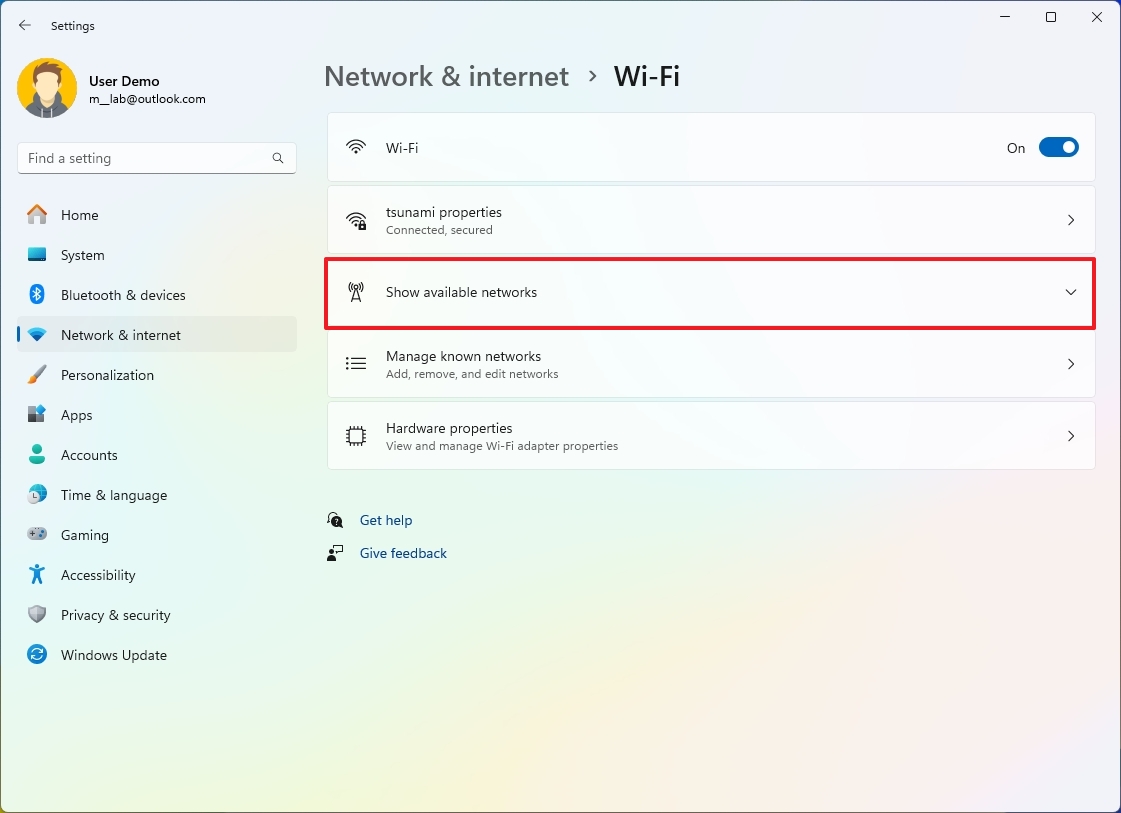
How to view wireless networks on Windows 11
To view the Wi-Fi networks in range, use these steps:
- Open Settings.
- Click on Network & internet.
- Click the Wi-Fi page on the right side.
- Click the «Show available networks» setting.
After you complete the steps, you will see a list of the access points within range.
On Windows 11 version 24H2 and higher releases, you can only view the password for an active wireless connection, but you can also share the credentials with other devices using a QR Code.
To share an active wireless connection password, use these steps:
- Open Settings.
- Click on Network & internet.
- Click the Wi-Fi page on the right side.
- Click the properties option for the network connection.
- Click the Show button in the «Wi-Fi network password» setting.
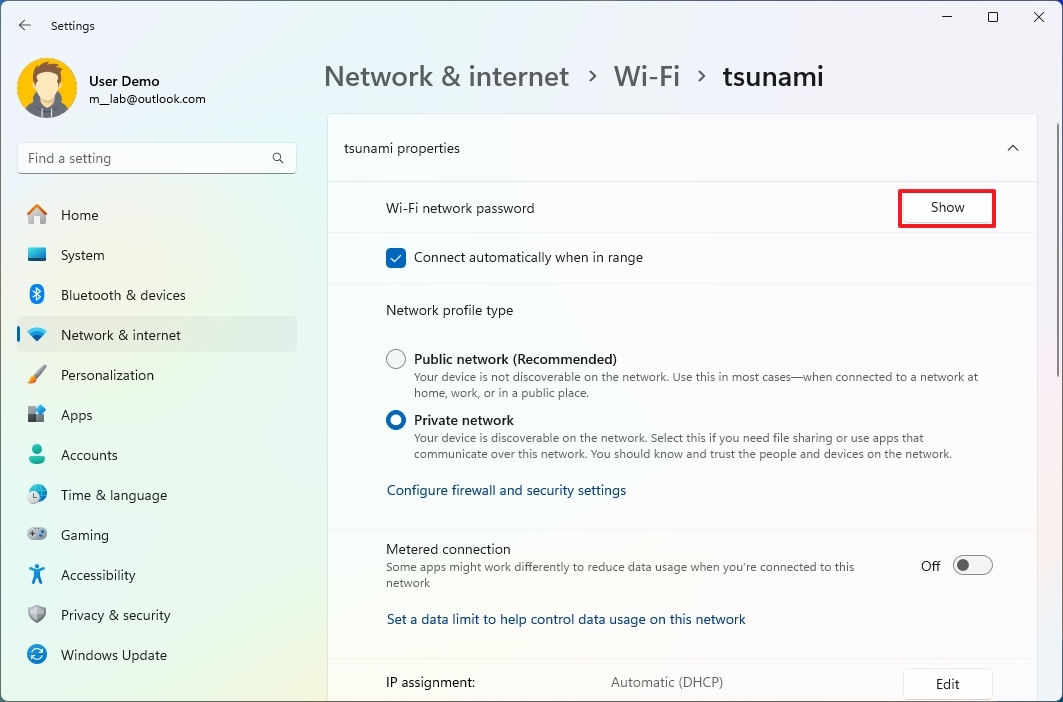
- Confirm the wireless connection password.
- Open the camera app on your phone or another Windows computer and scan the QR Code with the information.
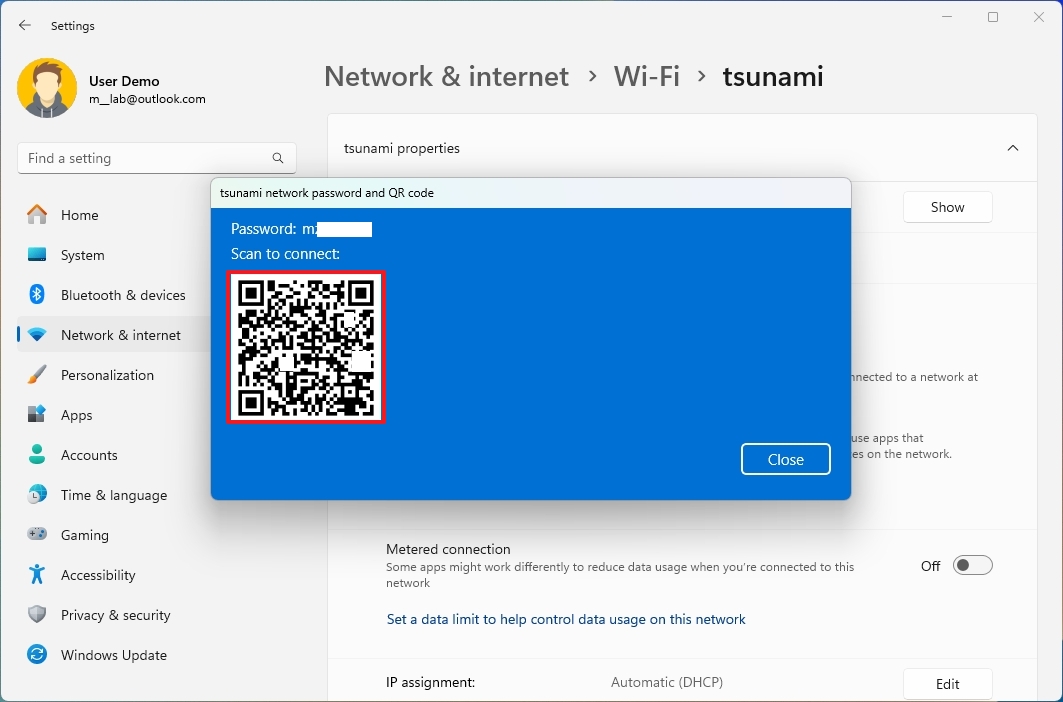
Once you complete the steps, the device will be able to connect without extra configuration.
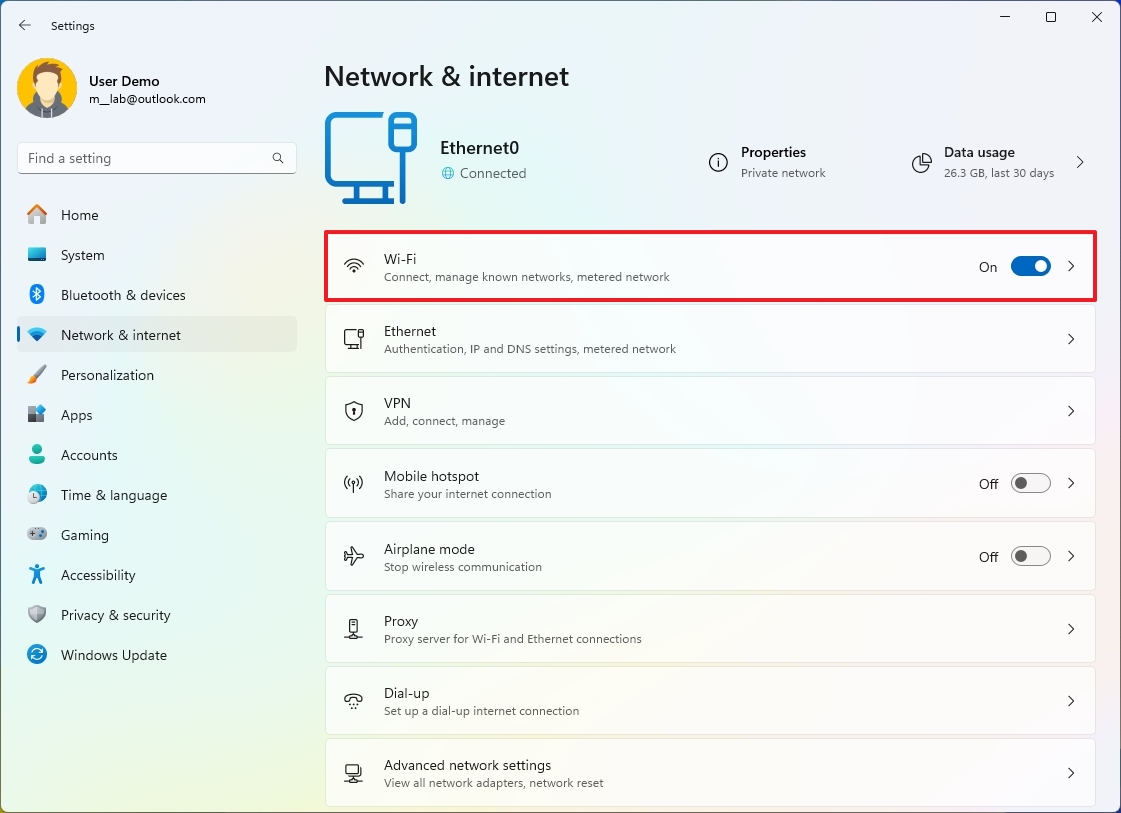
How to enable or disable wireless connection on Windows 11
To disable or enable wireless connectivity on Windows 11, use these steps:
- Open Settings.
- Click on Network & internet.
- Click the Wi-Fi page on the right side.
- Turn off the Wi-Fi toggle switch.
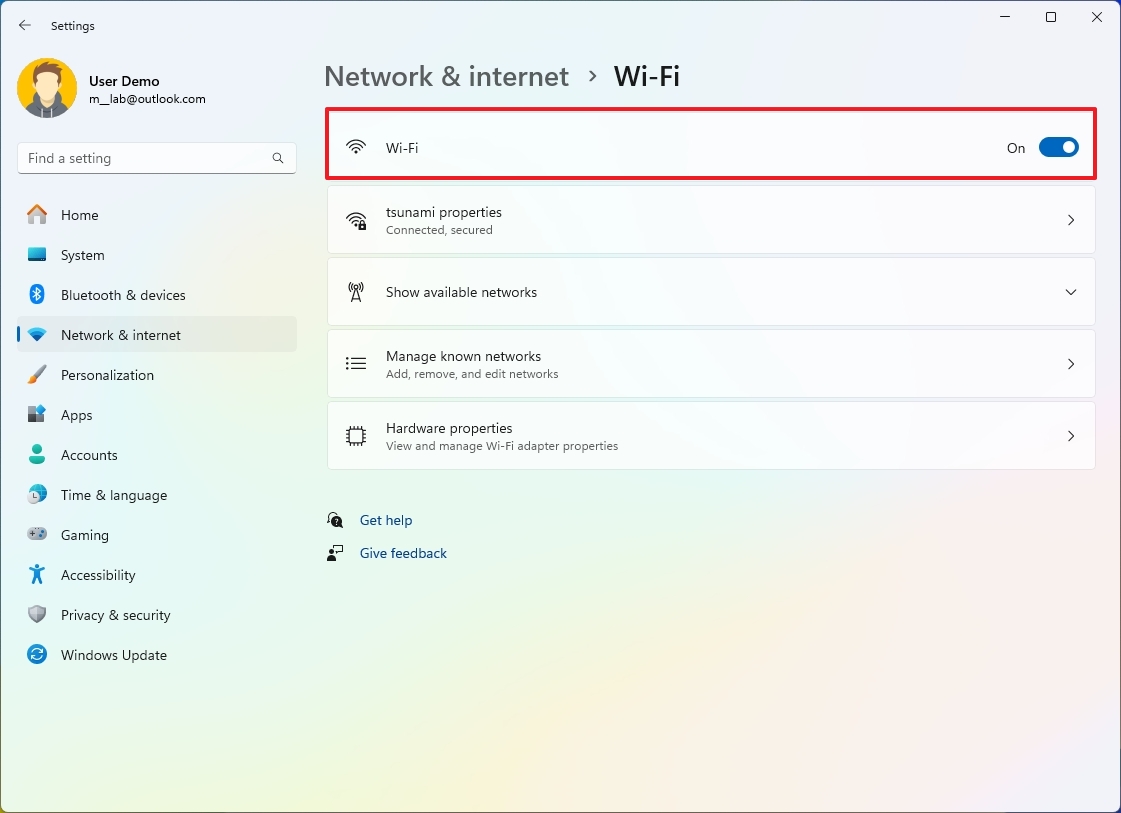
- (Optional) Use the «Turn Wi-Fi back on» setting and select the Manually option to keep the wireless off until you decide to turn it back on. Or use the times (1 or 4 hours or 1 day) to allow the system to reconnect automatically on schedule.
Once you complete the steps, the wireless radios will turn off and connections will not form, but the adapter will continue to be available in the adapter.
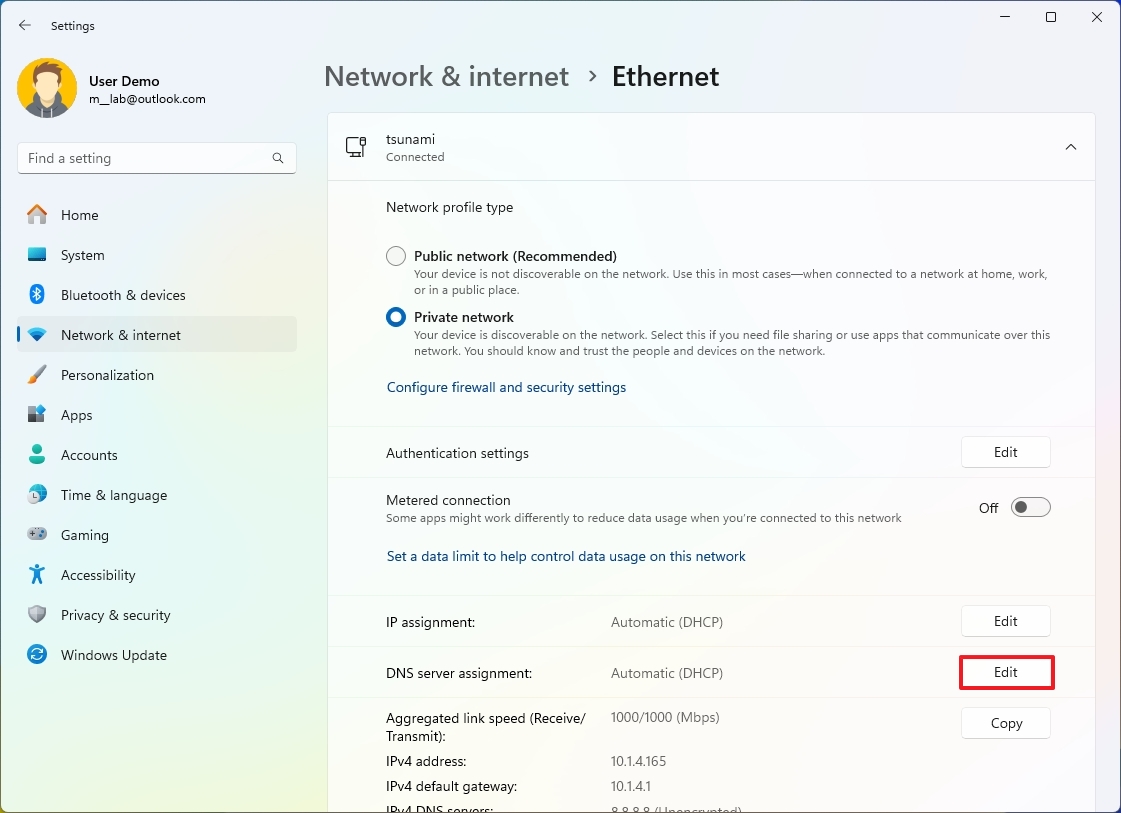
How to configure DNS over HTTPS on Windows 11
On Windows 11, DNS over HTTPS (DoH) is a network protocol to encrypt Domain Name System (DNS) queries using the standard Hypertext Transfer Protocol Secure (HTTPS) protocol to safeguard DNS queries, which results in improved security and privacy browsing the internet.
Ethernet connection with DOH
To enable DoH on Windows 11, use these steps:
- Open Settings.
- Click on Network & internet.
- Click the Ethernet page on the right side.
- Click the Edit button for the «DNS server assignment» setting.
- Select the Manual option.
- Turn on the IPv4 toggle switch.
- Specify the IP address of the server that supports DOH in the «Preferred DNS» setting.
- Choose the «On (automatic template)» option from the «DNS over HTTPS» setting.
- (Optional) Turn on the «Fallback to plaintext» toggle switch to continue sending DNS requests unencrypted if the encryption stops working.
- Quick note: You can learn more about this feature on this Microsoft support website.
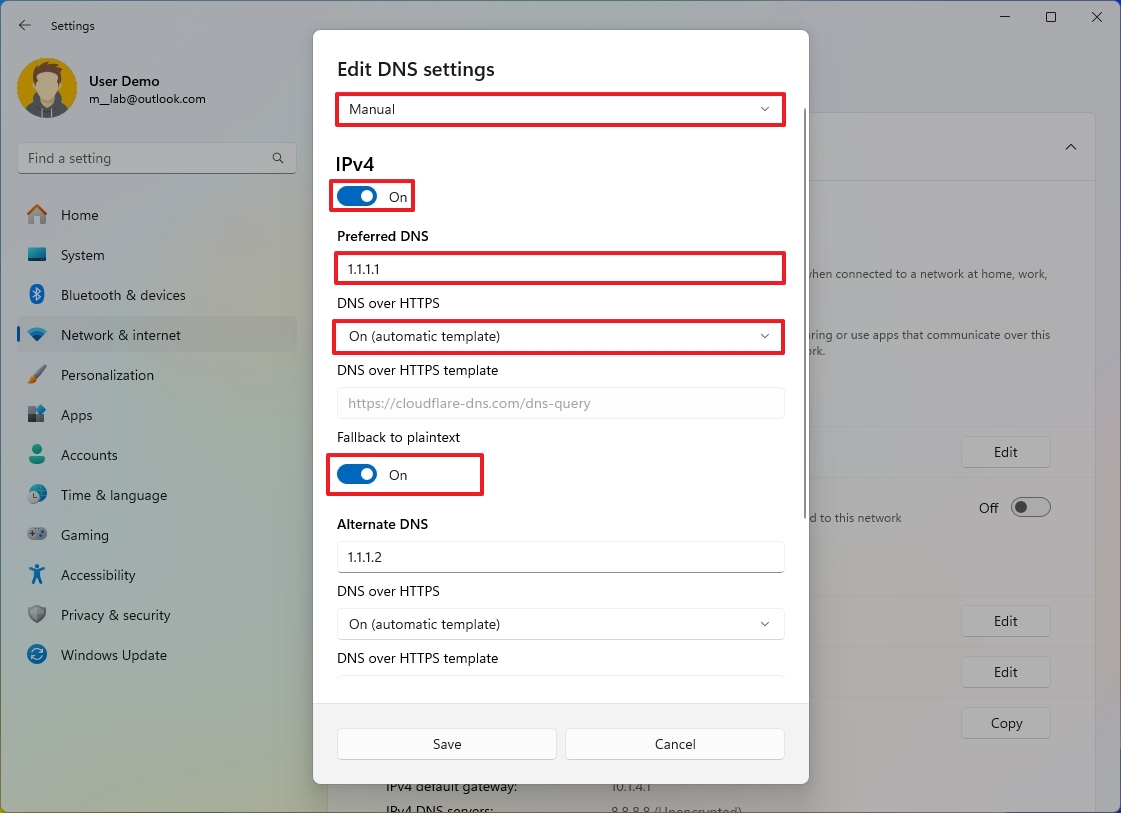
- (Optional) Specify the IP address of the secondary address to use with DNS over HTTPS in the «Alternate DNS» setting.
- Choose the «On (automatic template)» option from the «DNS over HTTPS» setting.
- (Optional) Turn on the «Fallback to plaintext» toggle switch to continue sending DNS requests unencrypted if the encryption stops working.
- (Optional) Turn on the IPv6 toggle switch.
- Specify the IP version 6 address of the server offering DNS over HTTPS in the «Preferred DNS» setting.
- Choose the «On (automatic template)» option from the «DNS over HTTPS» setting.
- (Optional) Turn on the «Fallback to plaintext» toggle switch to continue sending DNS requests unencrypted if the encryption stops working.
- (Optional) Specify the IP version 6 address of the secondary address to use with DNS encryption in the «Alternate DNS» setting.
- Choose the «On (automatic template)» option from the «DNS over HTTPS» setting.
- (Optional) Turn on the «Fallback to plaintext» toggle switch to continue sending DNS requests unencrypted if the encryption stops working.
- Click the Save option.
After you complete the steps, the DNS queries will be sent encrypted over the internet.
Confirm DNS encryption
To confirm if the connection is encrypted, use these steps:
- Open Settings.
- Click on Network & internet.
- Click the Ethernet page on the right side.
- In the IPv4 DNS servers property, you should now see the new address and the Encrypted status.
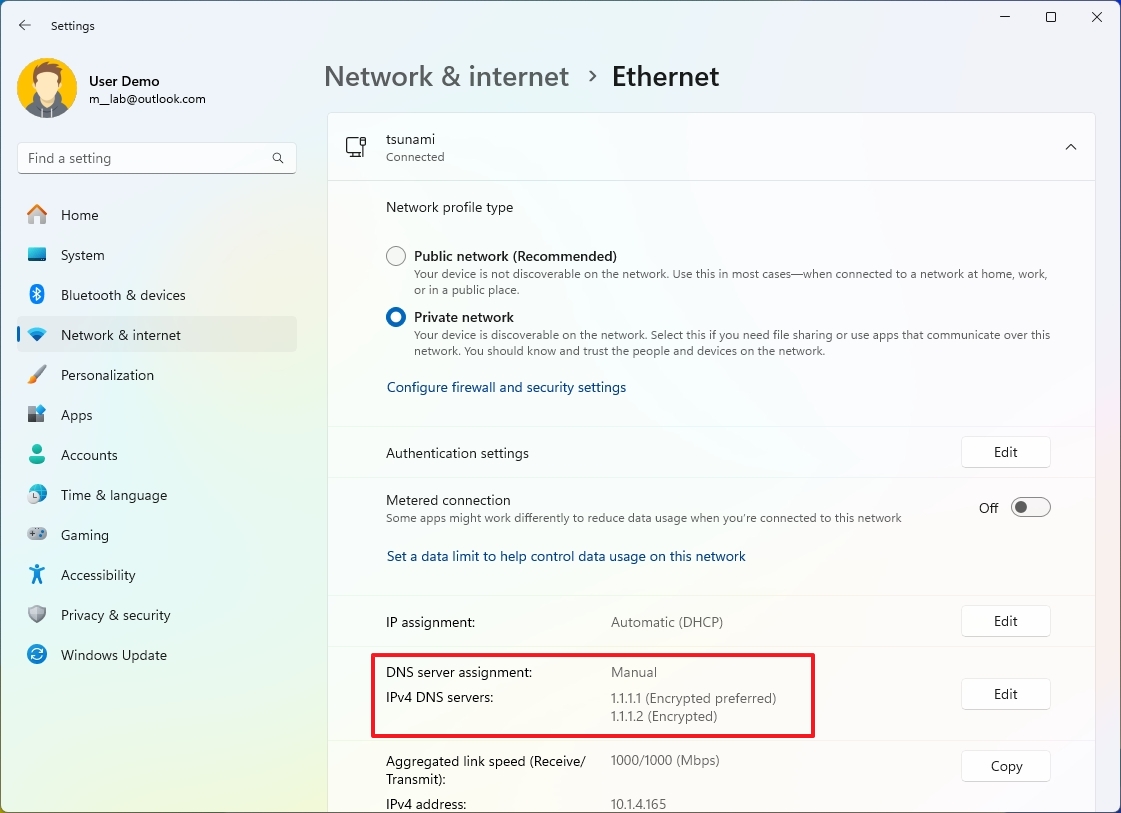
- In the IPv6 DNS servers property, you should now see the new address and the Encrypted status (if applicable).
Once you complete the steps, if you see the «Encrypted» (or «Encrypted preferred») status, DNS over HTTPS will work as expected.
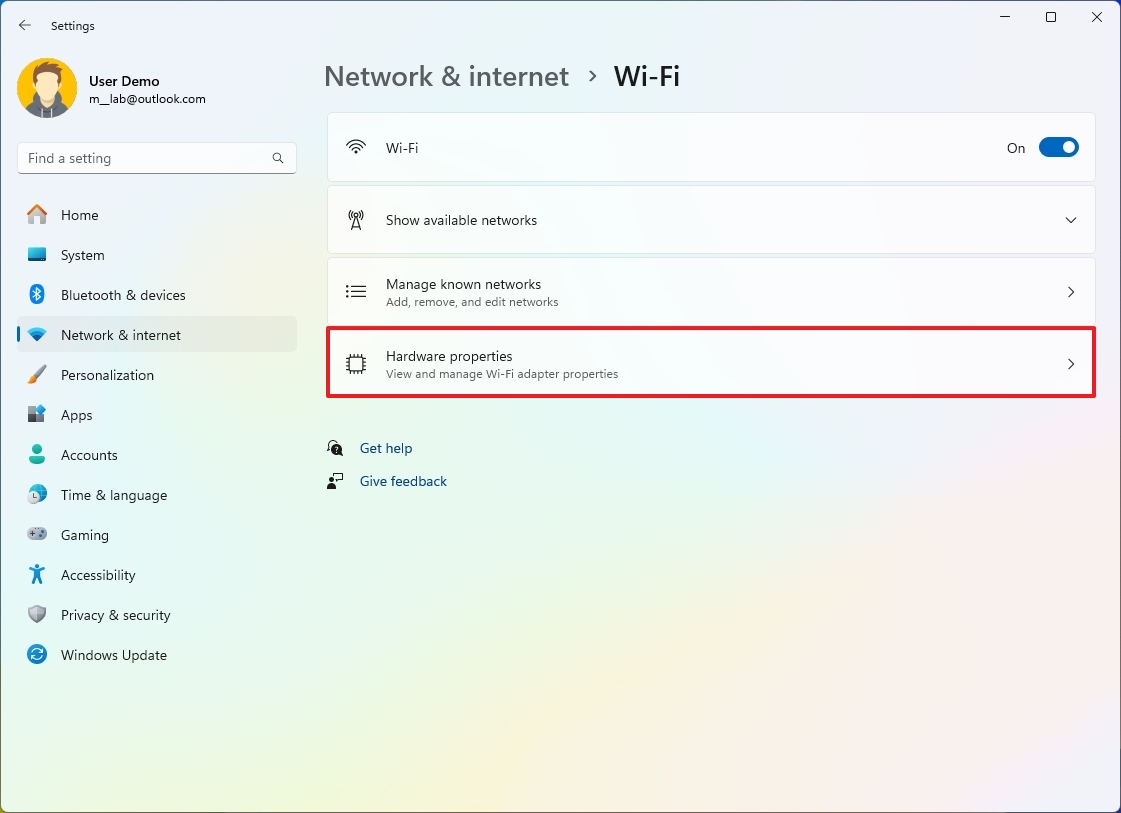
Wi-Fi connection with DOH
To configure DOH for a wireless connection, use these steps:
- Open Settings.
- Click on Network & internet.
- Click the Wi-Fi page on the right side.
- Click the Hardware properties setting.
- Click the Edit button for the «DNS server assignment» setting.
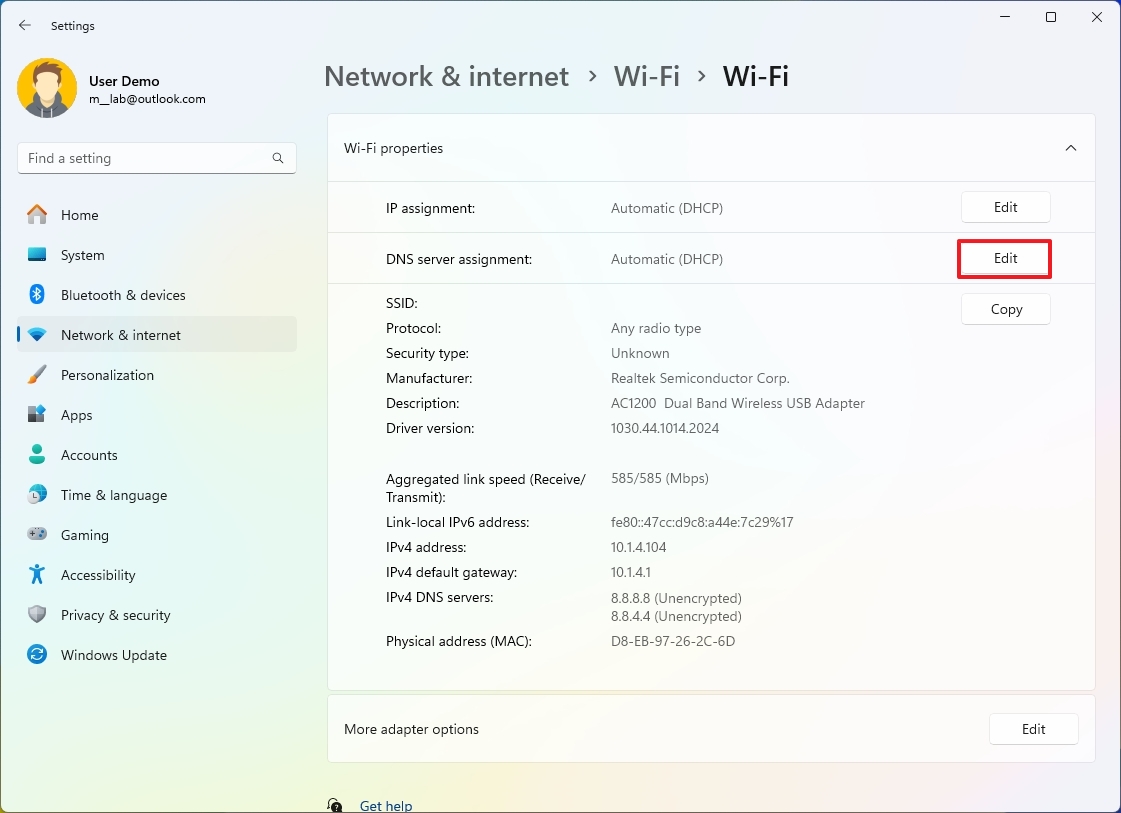
- Select the Manual option.
- Turn on the IPv4 toggle switch.
- Specify the IP address of the server that supports DOH in the «Preferred DNS» setting.
- Choose the «On (automatic template)» option from the «DNS over HTTPS» setting.
- (Optional) Turn on the «Fallback to plaintext» toggle switch to continue sending DNS requests unencrypted if the encryption stops working.
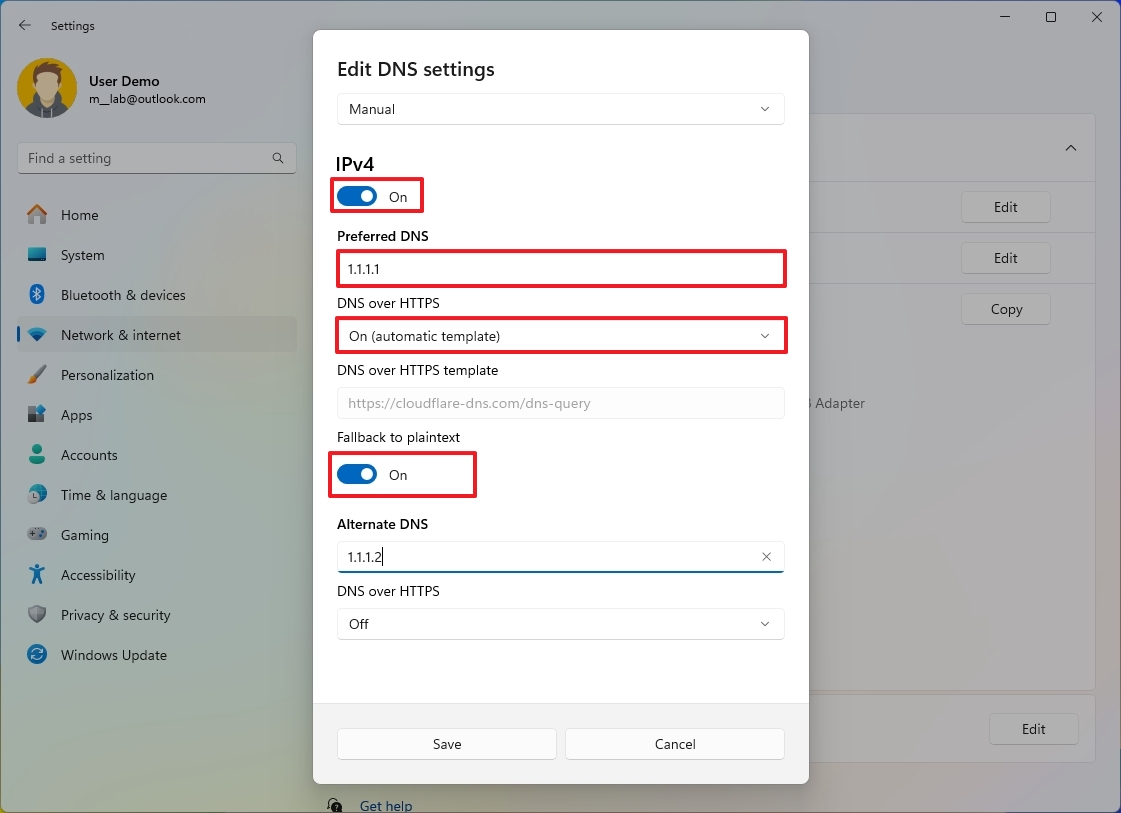
- (Optional) Specify the IP address of the secondary address to use with DNS over HTTPS in the «Alternate DNS» setting.
- Choose the «On (automatic template)» option from the «DNS over HTTPS» setting.
- (Optional) Turn on the «Fallback to plaintext» toggle switch to continue sending DNS requests unencrypted if the encryption stops working.
- (Optional) Turn on the IPv6 toggle switch.
- Specify the IP version 6 address of the server offering DNS over HTTPS in the «Preferred DNS» setting.
- Choose the «On (automatic template)» option from the «DNS over HTTPS» setting.
- (Optional) Turn on the «Fallback to plaintext» toggle switch to continue sending DNS requests unencrypted if the encryption stops working.
- (Optional) Specify the IP version 6 address of the secondary address to use with DNS encryption in the «Alternate DNS» setting.
- Choose the «On (automatic template)» option from the «DNS over HTTPS» setting.
- (Optional) Turn on the «Fallback to plaintext» toggle switch to continue sending DNS requests unencrypted if the encryption stops working.
- Click the Save option.
After you complete the steps, the wireless connection will transmit Domain Name System queries using the HTTPS protocol.
Confirm DNS encryption
- Open Settings.
- Click on Network & internet.
- Click the Wi-Fi page on the right side.
- Click the Hardware properties setting.
- In the IPv4 DNS servers property, you should now see the new address and the Encrypted status.
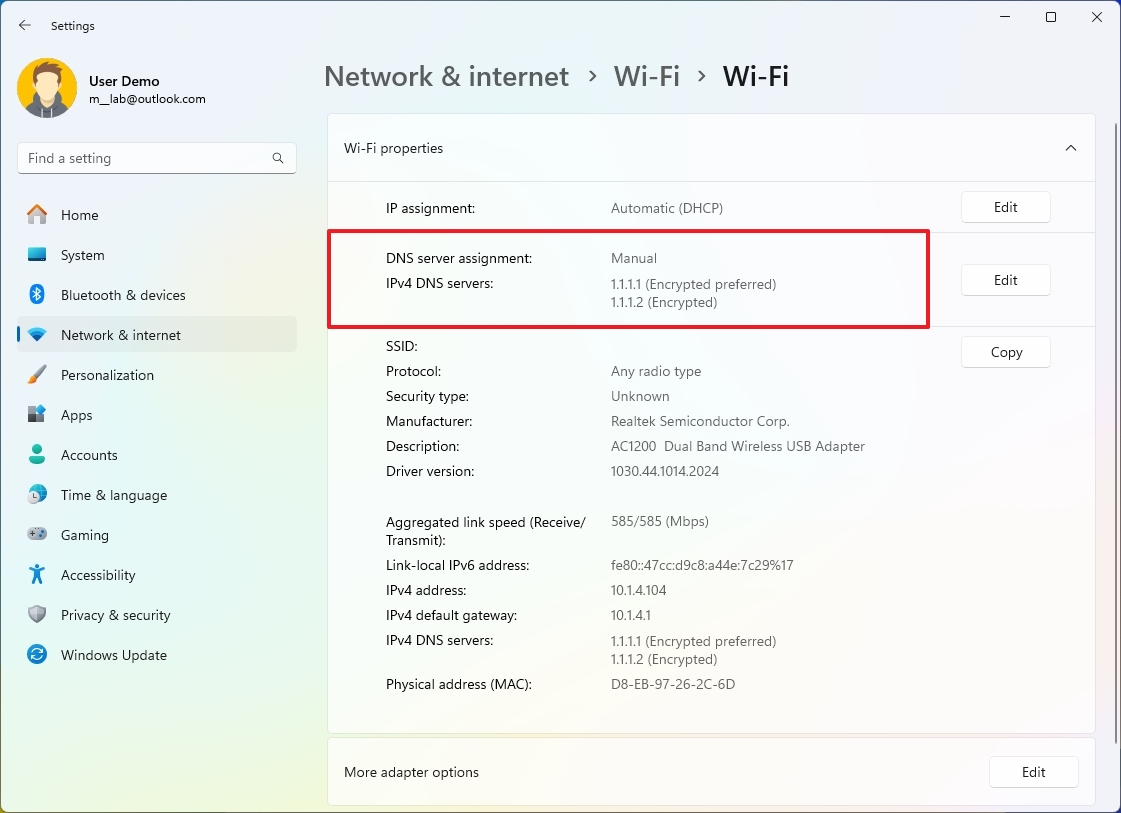
- In the IPv6 DNS servers property, you should now see the new address and the Encrypted status (if applicable).
Once you complete the steps, if you see the «Encrypted» (or «Encrypted preferred») status, then it means DoH is working on Windows 11.
How to configure static IP address on Windows 11
If a computer serves files, media content, and printers over the work, it should use a static Transfer Control Protocol Internet Protocol (TCP/IP) configuration instead of a dynamic configuration.
The reason is that a dynamic network configuration assigned by the Dynamic Host Configuration Protocol (DHCP) server can always change. When it does, other devices in the network won’t be able to access the network resources (if they use the IP address). On the other hand, a static IP configuration doesn’t change, allowing the service to always be reachable.
Ethernet static settings
To set a static IP address configuration to an Ethernet adapter, use these steps:
- Open Settings.
- Click on Network & internet.
- Click the Ethernet page on the right side.
- Click the Edit button for the «IP assignment» setting.
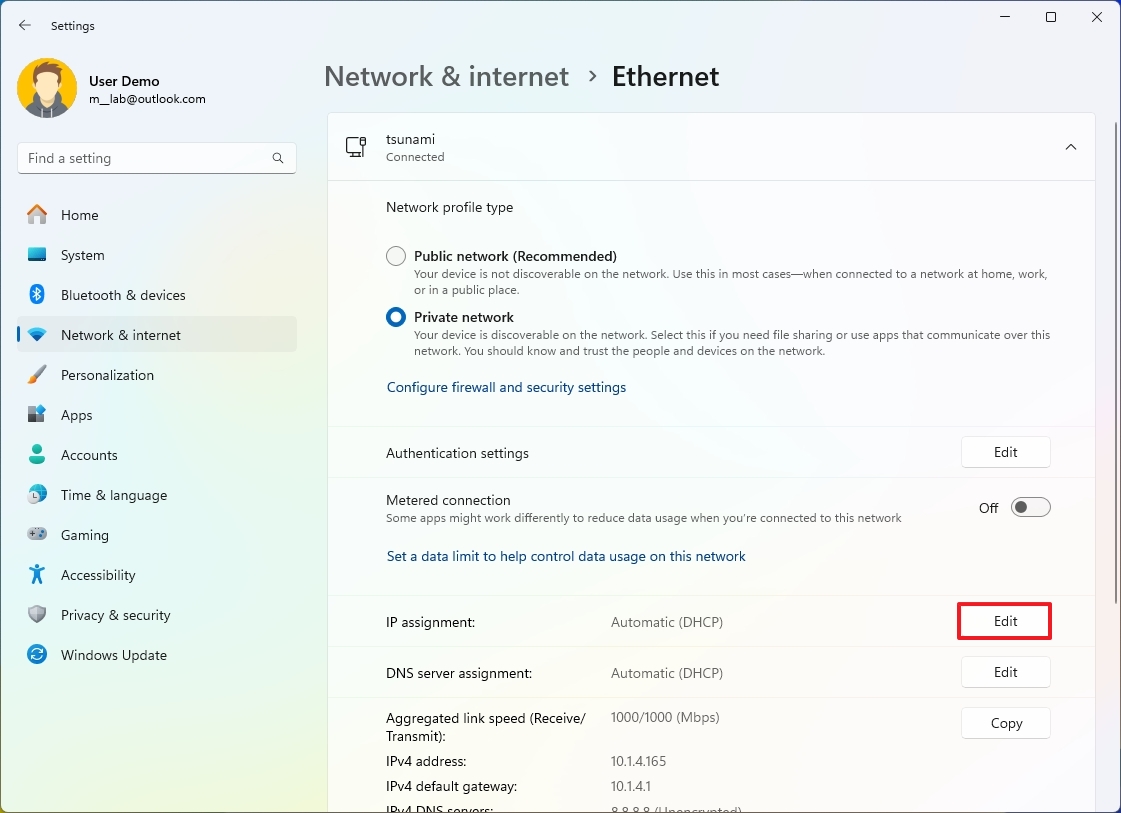
- Select the Manual option.
- Turn on the IPv4 toggle switch.
- Specify the IP version 4 to assign the computer in the «IP address» setting.
- Quick tip: The IP address should be within the network range, and it should be an address outside of the DHCP scope to avoid possible conflicts. For instance, if the network is in the 10.1.4.0 network and the DHCP assigns an address in the 10.1.4.10 through 10.1.4.100 range, a suitable static address could be 10.1.4.22.
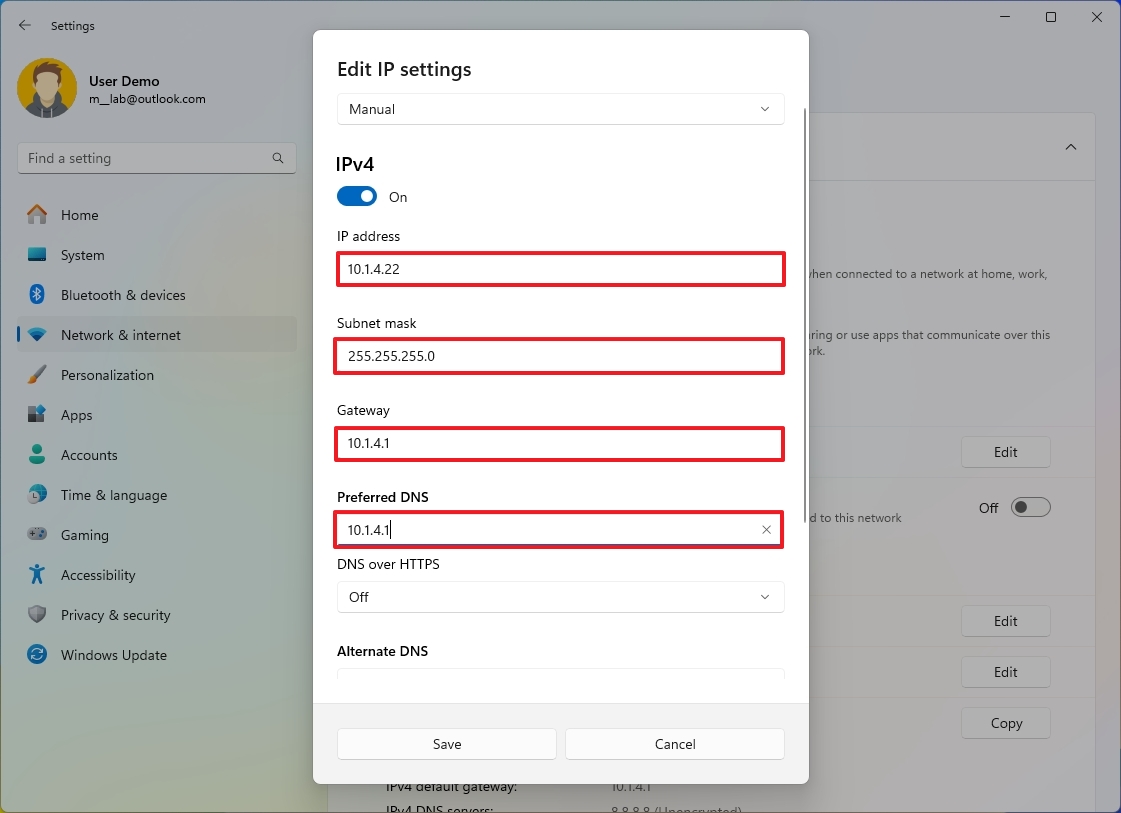
- In the «Subnet mask» setting, specify the network mask — for example, 255.255.255.0.
- Quick note: If you are configuring the settings on a home or office network, the subnet mask is typically 255.255.255.0. However, it might be different if you are in a business environment.
- In the «Gateway» setting, specify the gateway address (usually the router address) — for example, 10.1.4.1.
- In the «Preferred DNS» setting, specify the network DNS address (usually the router address in home and office networks) – for example, 10.1.4.1.
- In the «DNS over HTTPS» setting, select the Off option.
- (Optional) In the «Alternate DNS» setting, specify a secondary DNS address that will be used in case the system can’t find the correct route with the primary address.
- In the «DNS over HTTPS» setting, select the Off option.
- Click the Save button.
After you complete the steps, the computer will start using the new static network configuration.
Wi-Fi static settings
To configure a static TCP/IP configuration for a wireless adapter, use these steps:
- Open Settings.
- Click on Network & internet.
- Click the Wi-Fi page on the right side.
- Click the Hardware properties setting.
- Click the Edit button for the «IP assignment» setting.
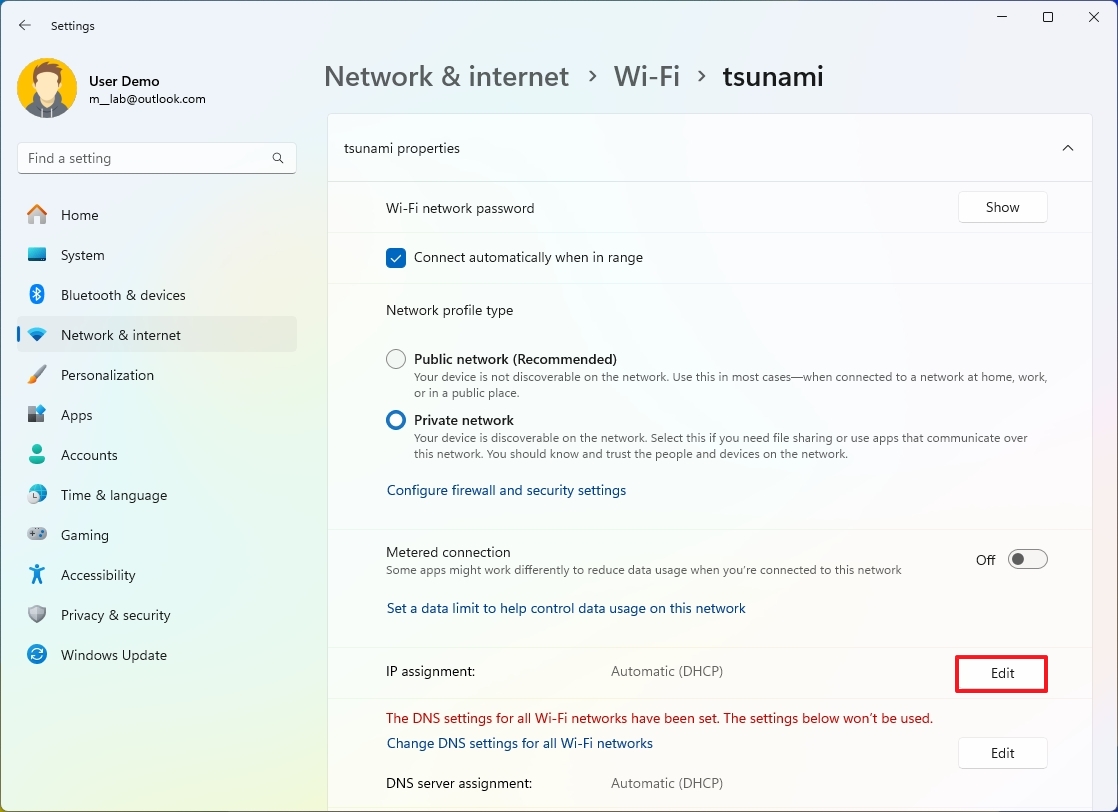
- Select the Manual option.
- Turn on the IPv4 toggle switch.
- In the «IP address» setting, specify the IP version 4 to assign the computer. For example, 10.1.4.23.
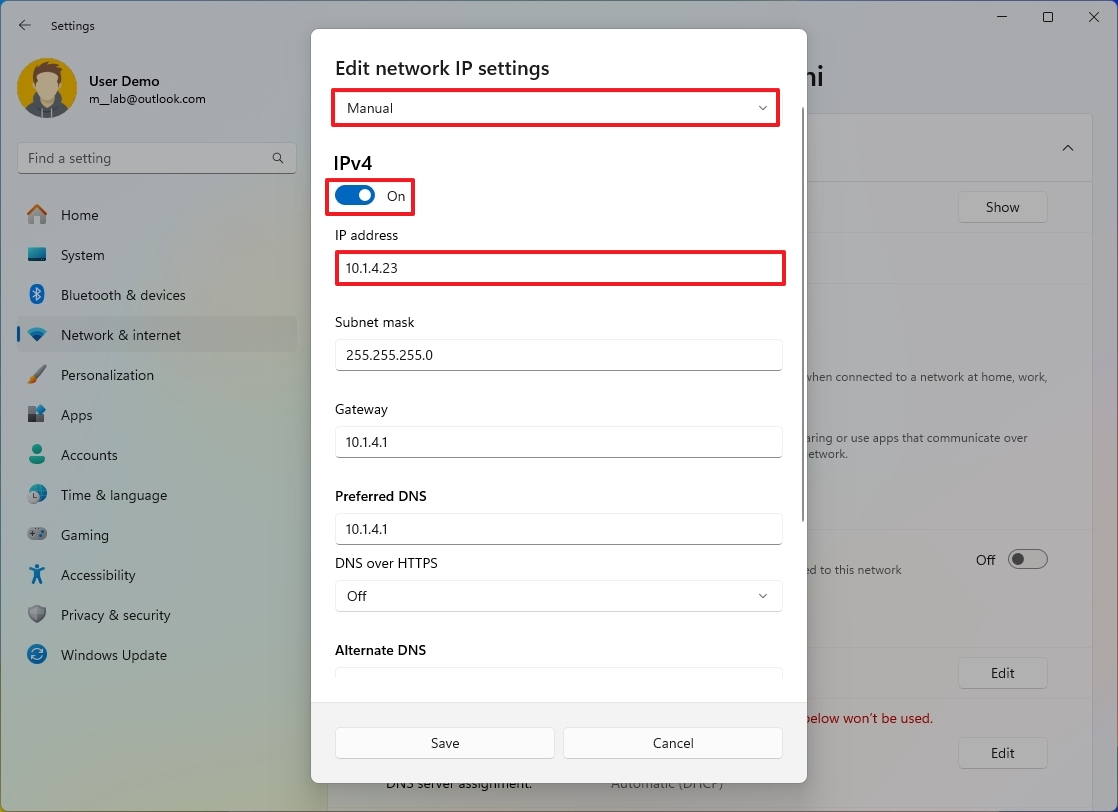
- In the «Subnet mask» setting, specify the network mask — for example, 255.255.255.0.
- In the «Gateway» setting, specify the gateway address (usually the router address) — for example, 10.1.4.1.
- In the «Preferred DNS» setting, specify the network DNS address (usually the router address in home and office networks) – for example, 10.1.4.1.
- In the «DNS over HTTPS» setting, select the Off option.
- (Optional) In the «Alternate DNS» setting, specify a secondary DNS address that will be used in case the system can’t find the correct route with the primary address.
- In the «DNS over HTTPS» setting, select the Off option.
- Click the Save button.
Once you complete the steps, the wireless adapter will start using the new static IP address configuration.
I’m focusing this guide on IP version 4, but you can also refer to these steps to set up an IP version 6 configuration if your network supports it. You only need to turn on the IPv6 option in step 7 and provide the IPv6 addresses according to your network configuration.
How to configure dynamic IP address on Windows 11
If you have a computer with a static IP address, you can also change its configuration to allow the device to receive the network settings through the local Dynamic Host Configuration Protocol (DHCP) server.
Ethernet dynamic settings
To change the IP address of an Ethernet adapter from static to dynamic, use these steps:
- Open Settings.
- Click on Network & internet.
- Click the Ethernet page on the right side.
- Click the Edit button for the «IP assignment» setting.
- Select the Automatic (DHCP) option.
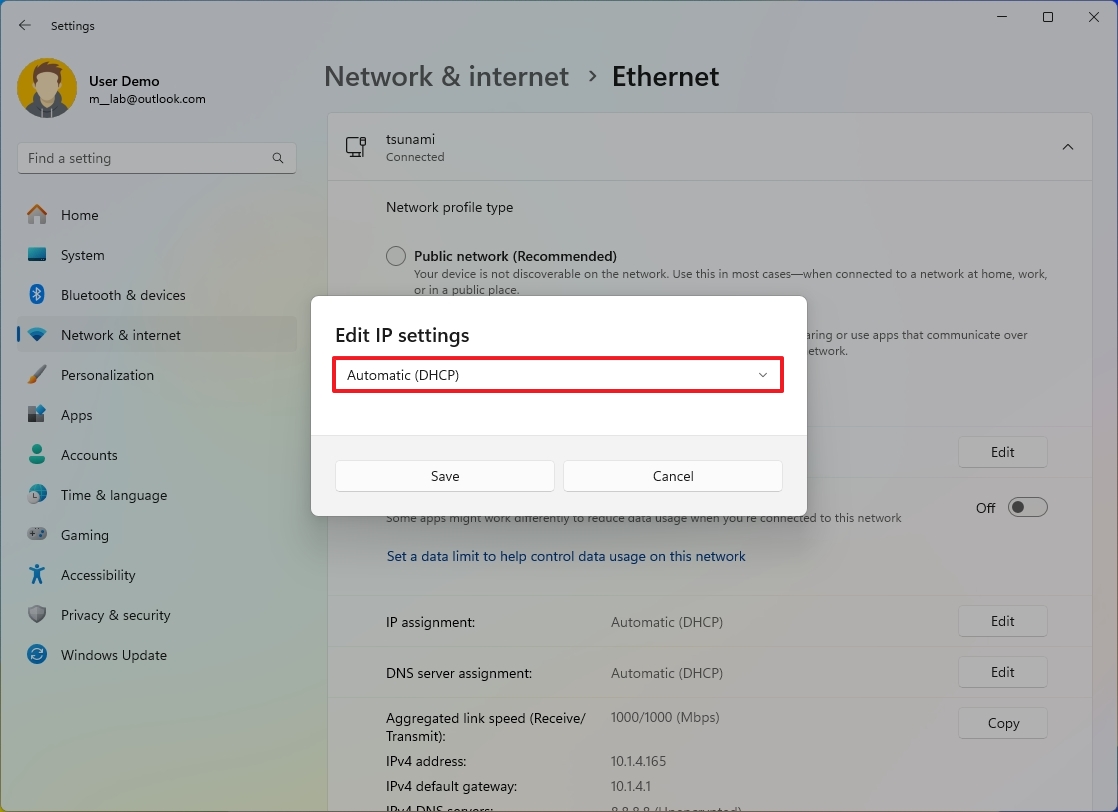
- Click the Save button.
Wi-Fi static settings
To set a dynamic IP address for a wireless adapter, use these steps:
- Open Settings.
- Click on Network & internet.
- Click the Wi-Fi page on the right side.
- Click the Hardware properties setting.
- Click the Edit button for the «IP assignment» setting.
- Select the Automatic (DHCP) option.
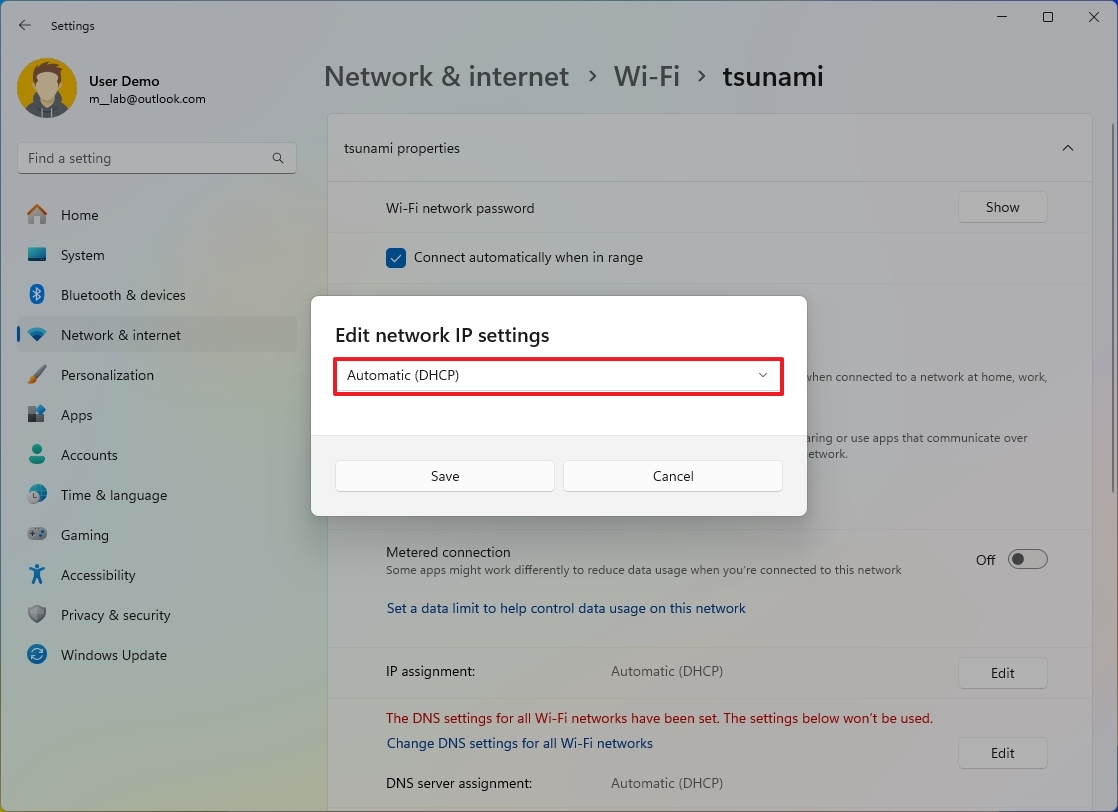
- Click the Save button.
After you complete the steps, the Ethernet or Wi-Fi adapter will configure its IP address automatically through its Dynamic Host Configuration Protocol (DHCP) server.
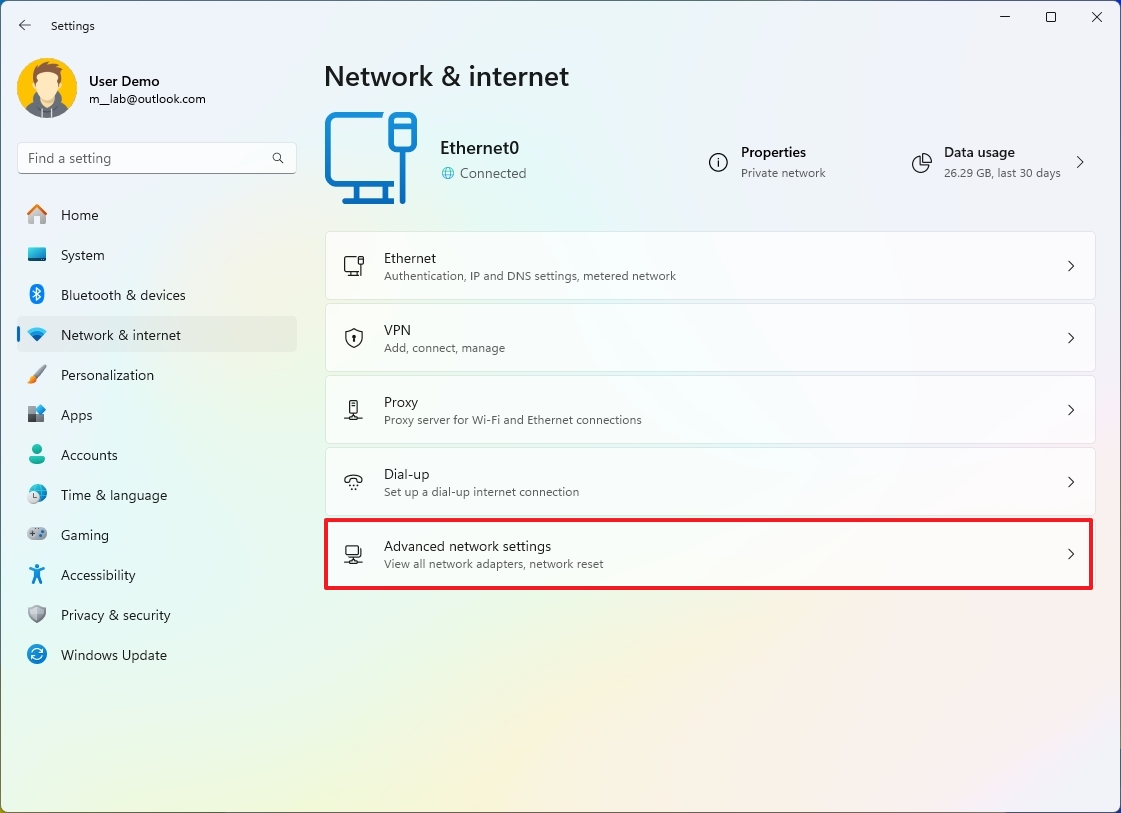
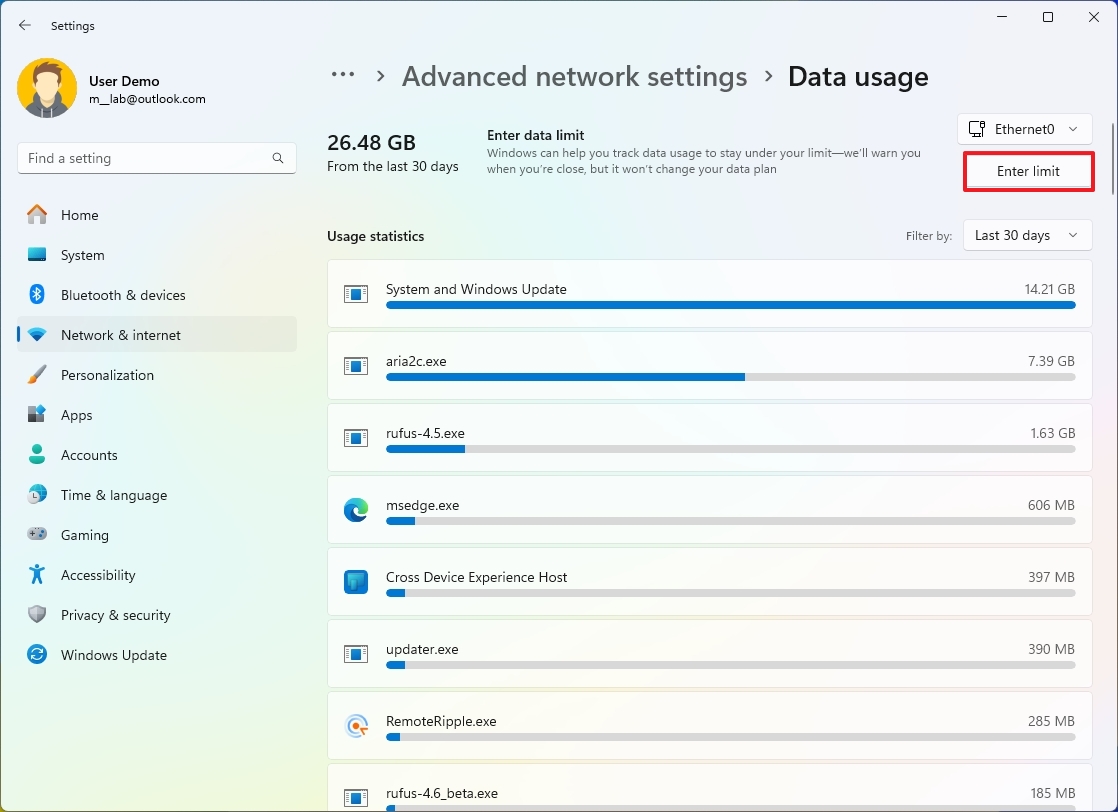
How to configure network data limits on Windows 11
Windows 11 also allows you to set data limits for a specific network adapter. As you approach the limit, the system will send you a warning to help you stay within it.
To configure the data limit on Windows 11, use these steps:
- Open Settings.
- Click on Network & internet.
- Click the Advanced network settings page on the right side.
- Click the Data usage setting under the «More settings» section.
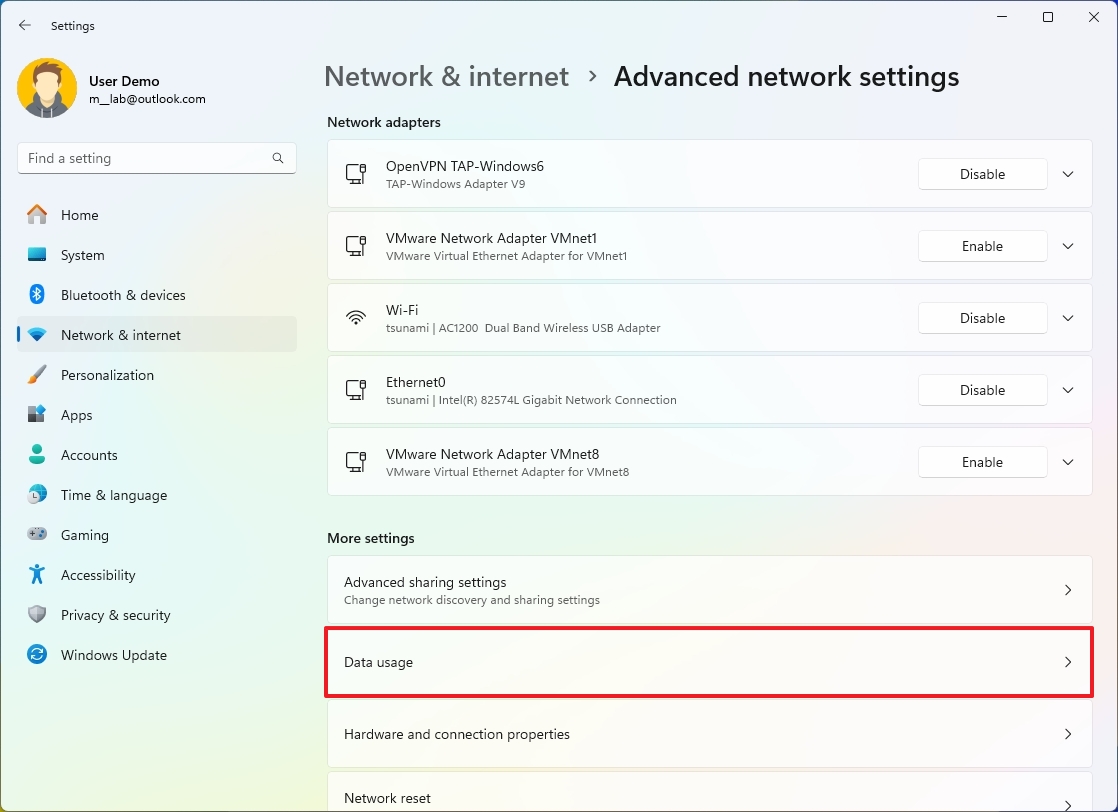
- Click the Enter limit button.
- Select the limit type, including «Daily,» «Weekly,» «One time,» or «Unlimited.»
- Specify the reset time, depending on your previous selection.
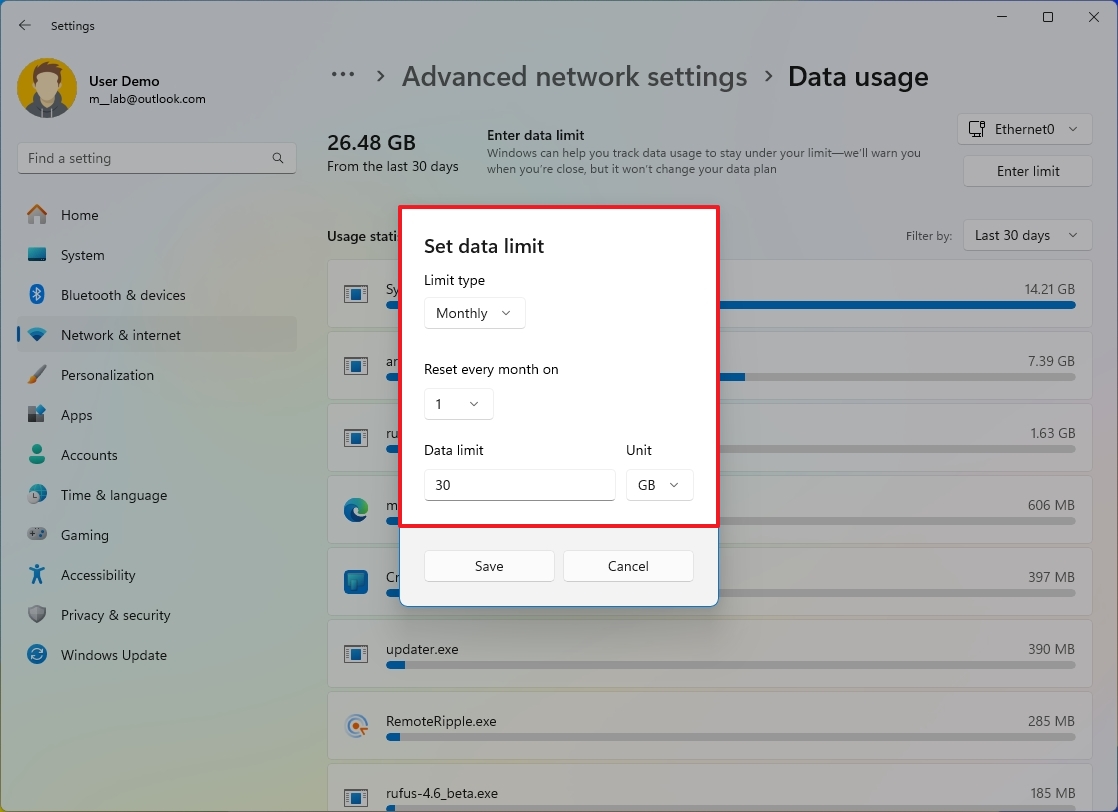
- In the «Data limit» setting, specify the data allowance.
- Confirm the data unit, including megabytes (MB) or gigabytes (GB).
- Click the Save button.
Once you complete the steps, Windows 11 will notify you when the limit is getting closer to help you stay under the data limit.
How to reset network adapter on Windows 11
When your laptop or desktop computer has connectivity issues, the reset feature will remove and install all the network adapters and reset all the configurations to their defaults to fix the most common problems.
To reset all the network adapter configurations, use these steps:
- Open Settings.
- Click on Network & internet.
- Click the Advanced network settings page on the right side.
- Click the Network reset setting.
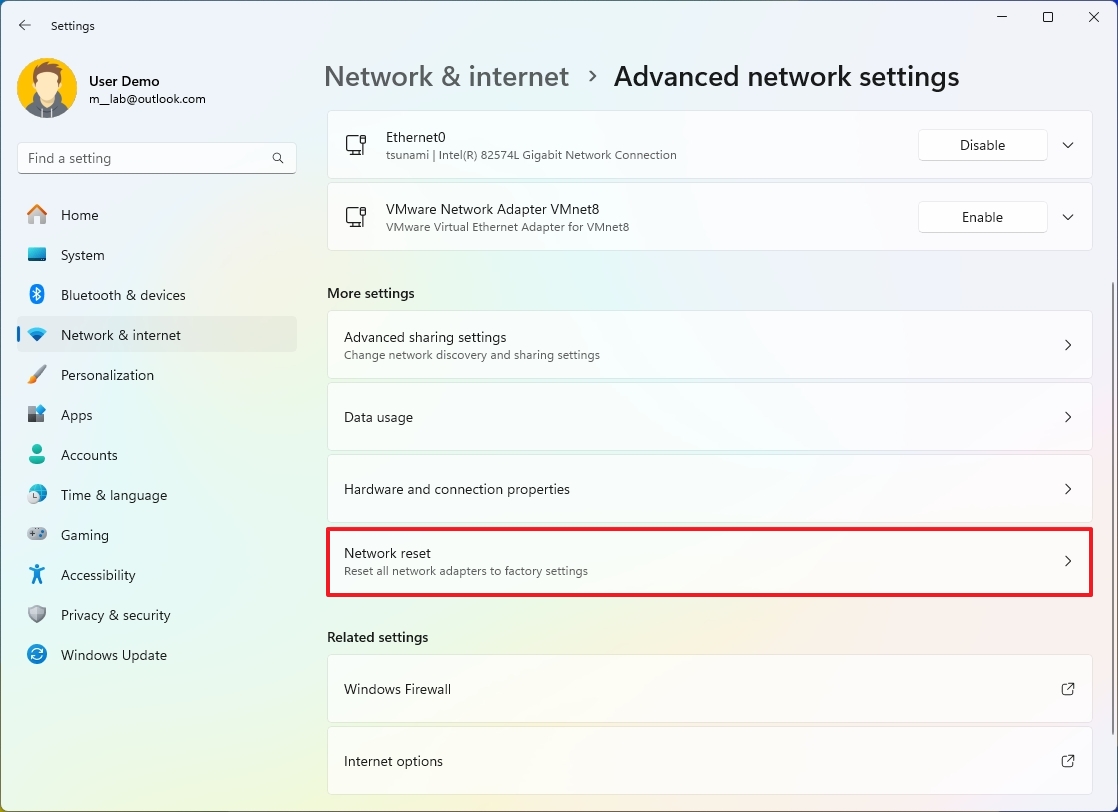
- Click the Reset now button.
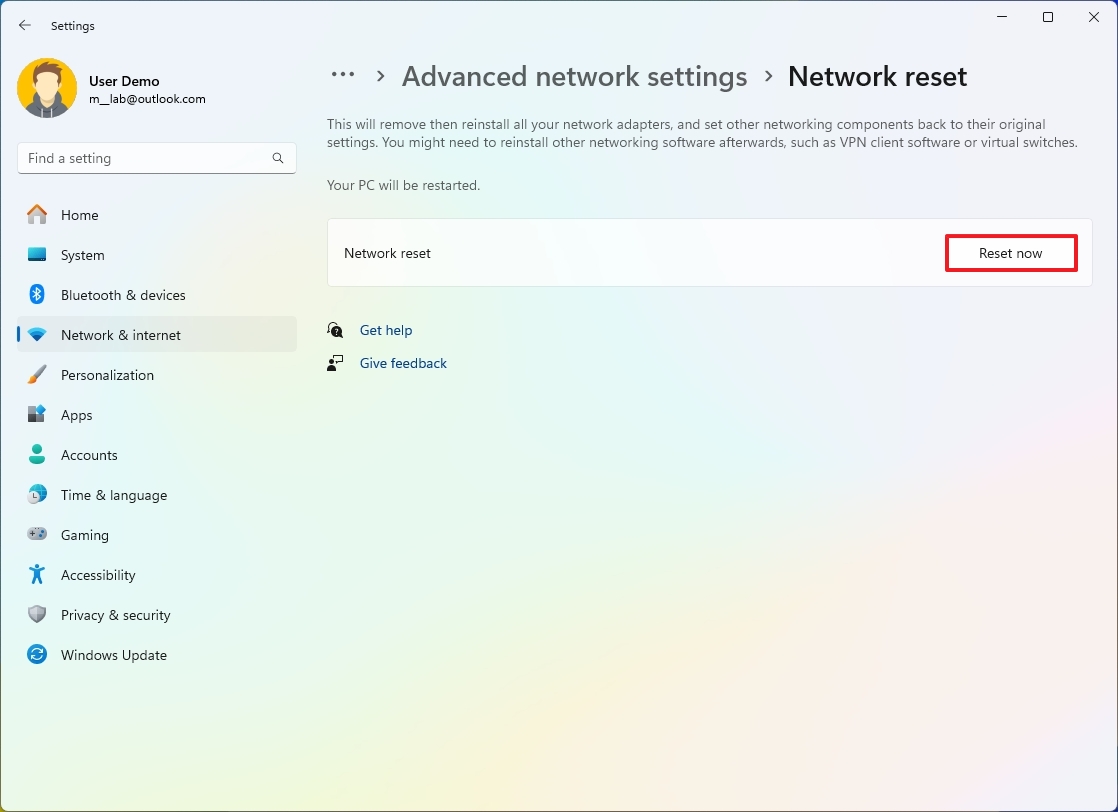
- Click the Yes button.
After you complete the steps, the feature will remove and reinstall all the network adapters and will reset all the configurations to their defaults to fix any problems. If you also had a wireless connection, you may need to re-enter the authentication to connect to the network.
How to view network data usage on Windows 11
To view data usage per network adapter and apps on Windows 11, use these steps:
- Open Settings.
- Click on Network & internet.
- Click the Advanced network settings page on the right side.
- Click the Data usage setting under the «More settings» section.
- Review the device data usage.
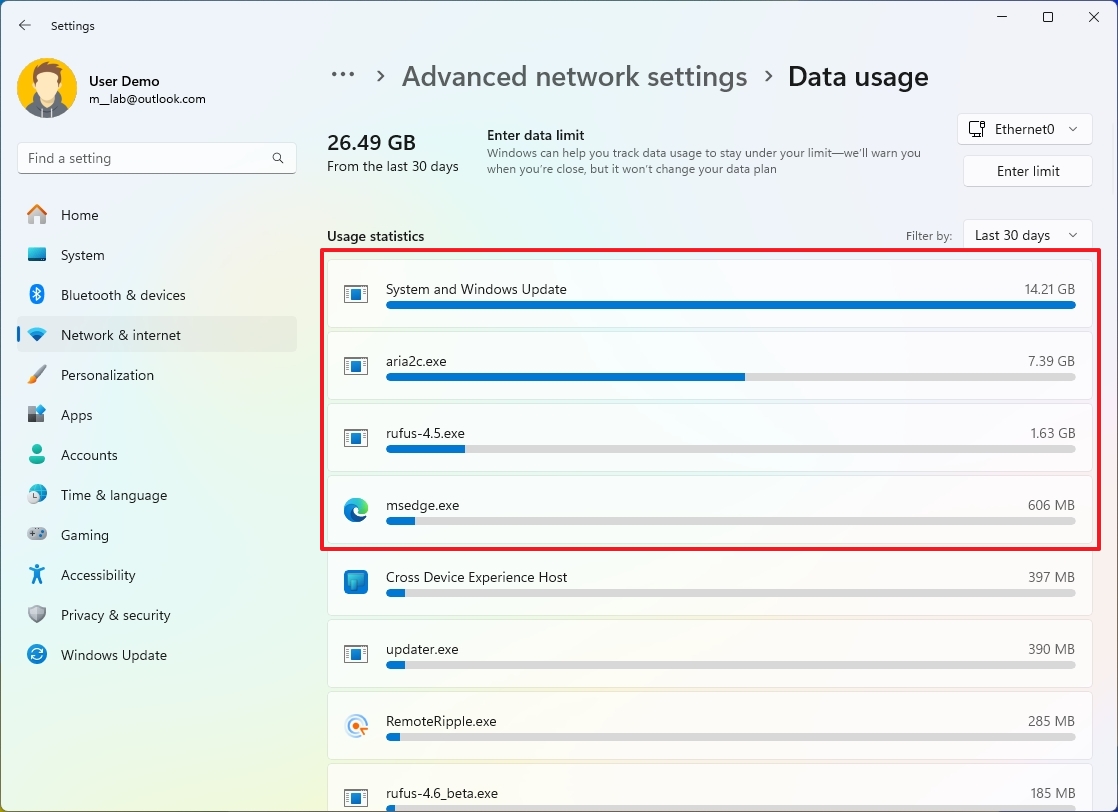
Once you complete the steps, you will better understand the network data usage on your device.
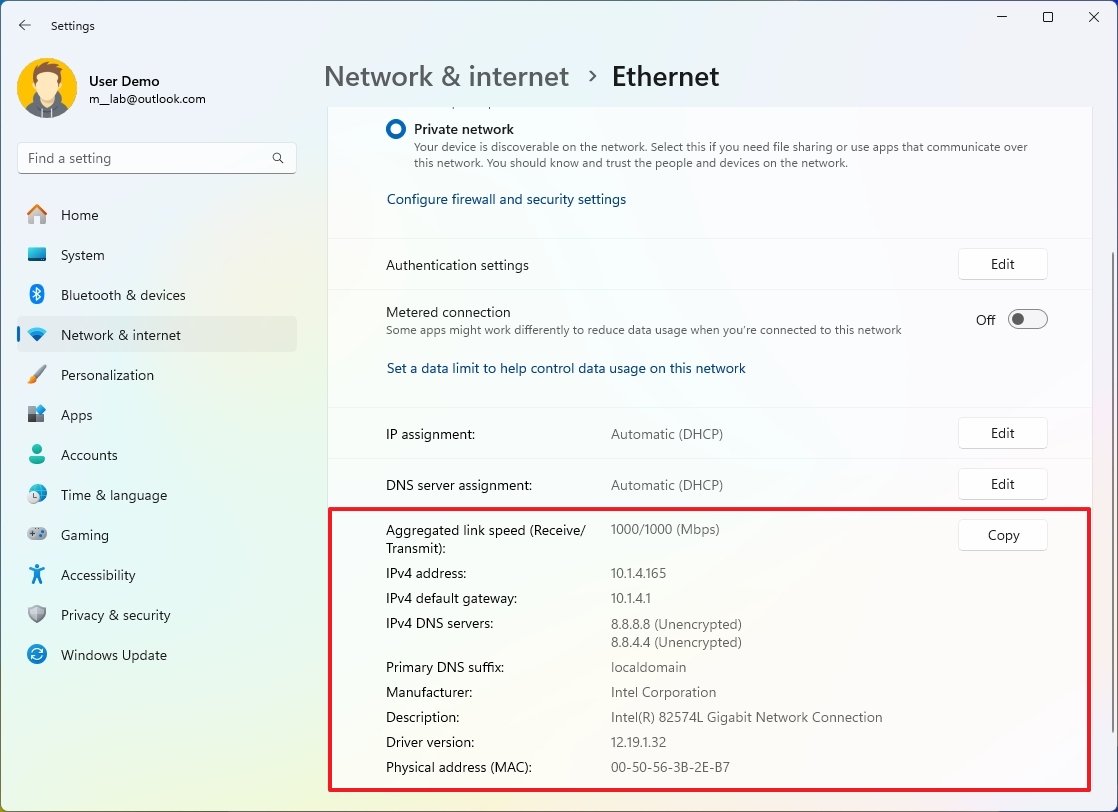
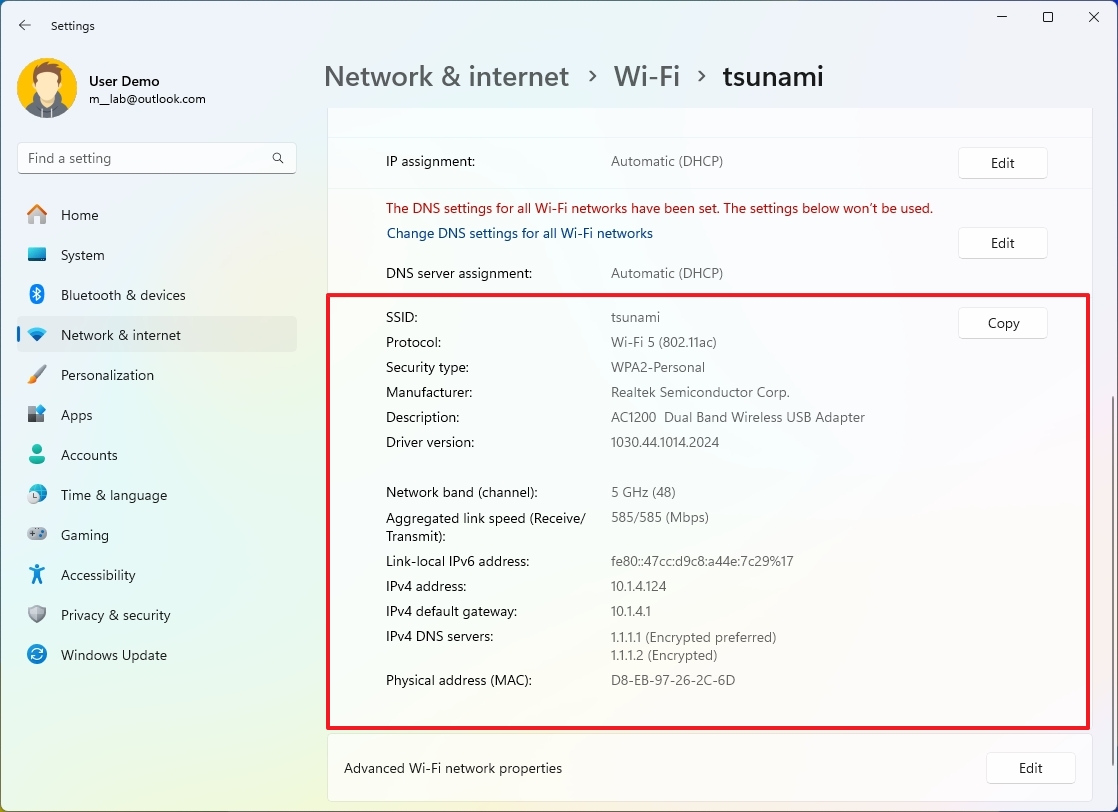
How to view network adapter properties on Windows 11
On Windows 11, you can find the network configuration information within the adapter’s properties or through the Advanced network settings page.
Ethernet properties
To find out the IP address and other network settings of the Ethernet adapter, use these steps:
- Open Settings.
- Click on Network & internet.
- Click the Ethernet page on the right side.
- Confirm the networking settings at the bottom of the page.
Wi-Fi properties
To determine the properties of the wireless adapter, use these steps:
- Open Settings.
- Click on Network & internet.
- Click the Wi-Fi page on the right side.
- Click the Hardware properties setting.
- Confirm the networking settings at the bottom of the page.
Ethernet and Wi-Fi properties
To view the network information for the adapters installed on Windows 11, use steps:
- Open Settings.
- Click on Network & internet.
- Click the Advanced network settings page on the right side.
- Click the «Hardware and connection properties» setting.
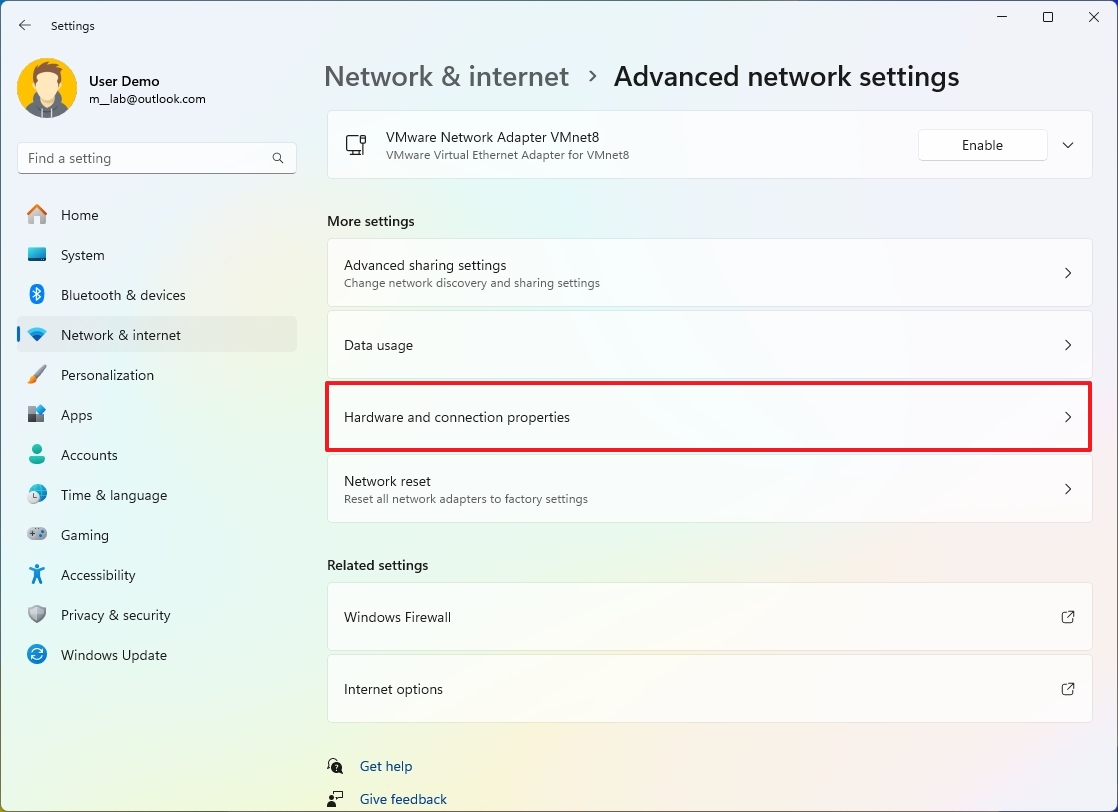
- Confirm the networking settings at the bottom of the page.
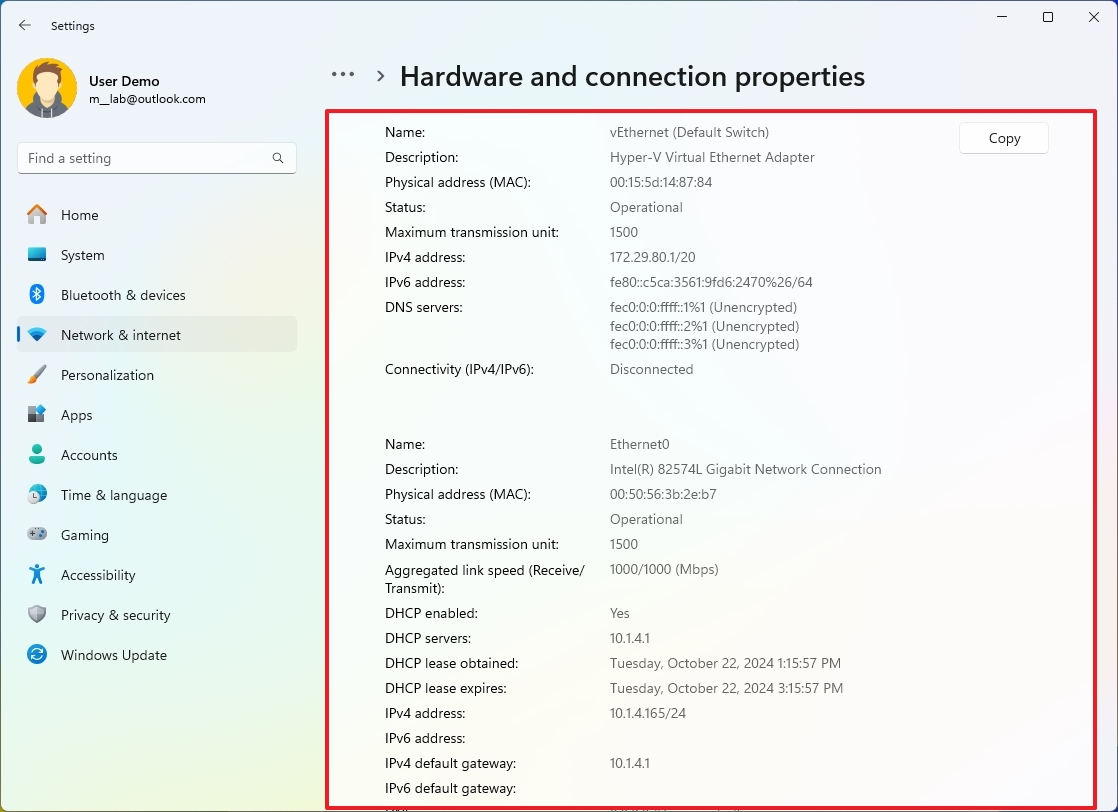
After you complete the steps, you will be able to determine many networking configurations, such as link speed, IPv4 and IPv6 addresses, DNS server, driver version and manufacturer, MAC address, and more.
How to access network advanced properties on Windows 11
Although the Settings app still doesn’t include elements to fully configure a network connection, it does have an option to access the advanced properties through Control Panel.
To access the advanced network properties through the Settings app, use these steps:
- Open Settings.
- Click on Network & internet.
- Click the Advanced network settings page on the right side.
- Select the Ethernet or Wi-Fi adapter from the «Network adapters» list.
- (Optional) Confirm networking information, such as media state, bytes sent and received, link speed, and uptime for the adapter.
- Click the Edit button in the «More adapter options» setting.
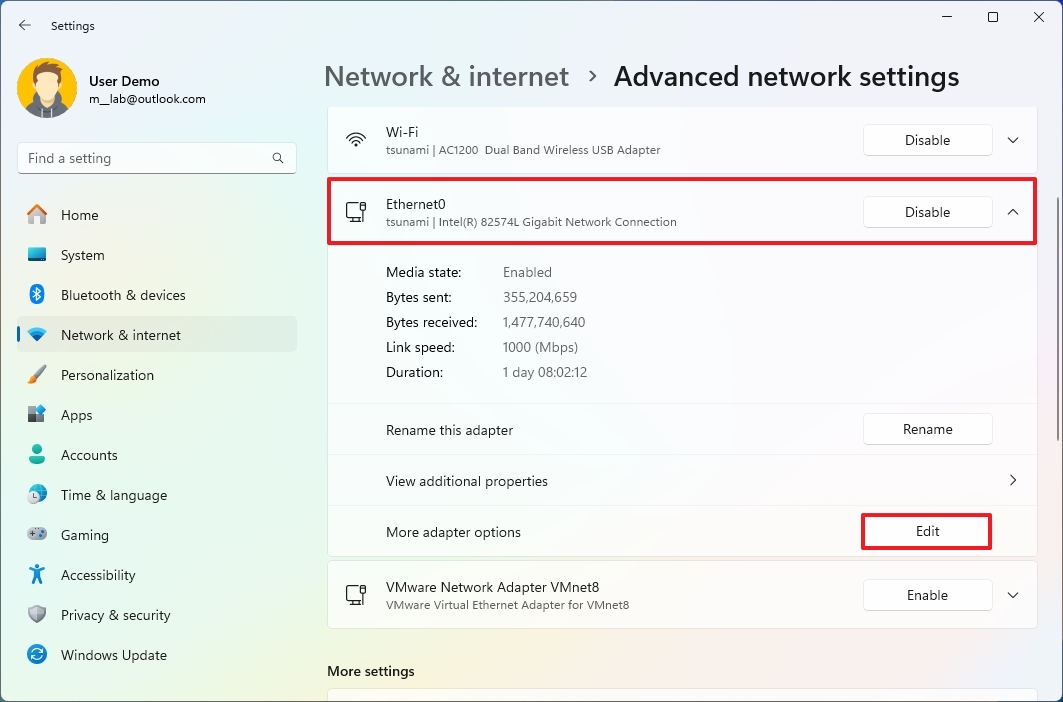
Once you complete the steps, you will have access to the legacy «Networking» and «Sharing» settings. In this experience, you can, among other things, turn protocols like IPv4 and IPv6 on or off, configure QoS, and other protocols. You can also also configure the internet sharing feature from the «Sharing» tab.
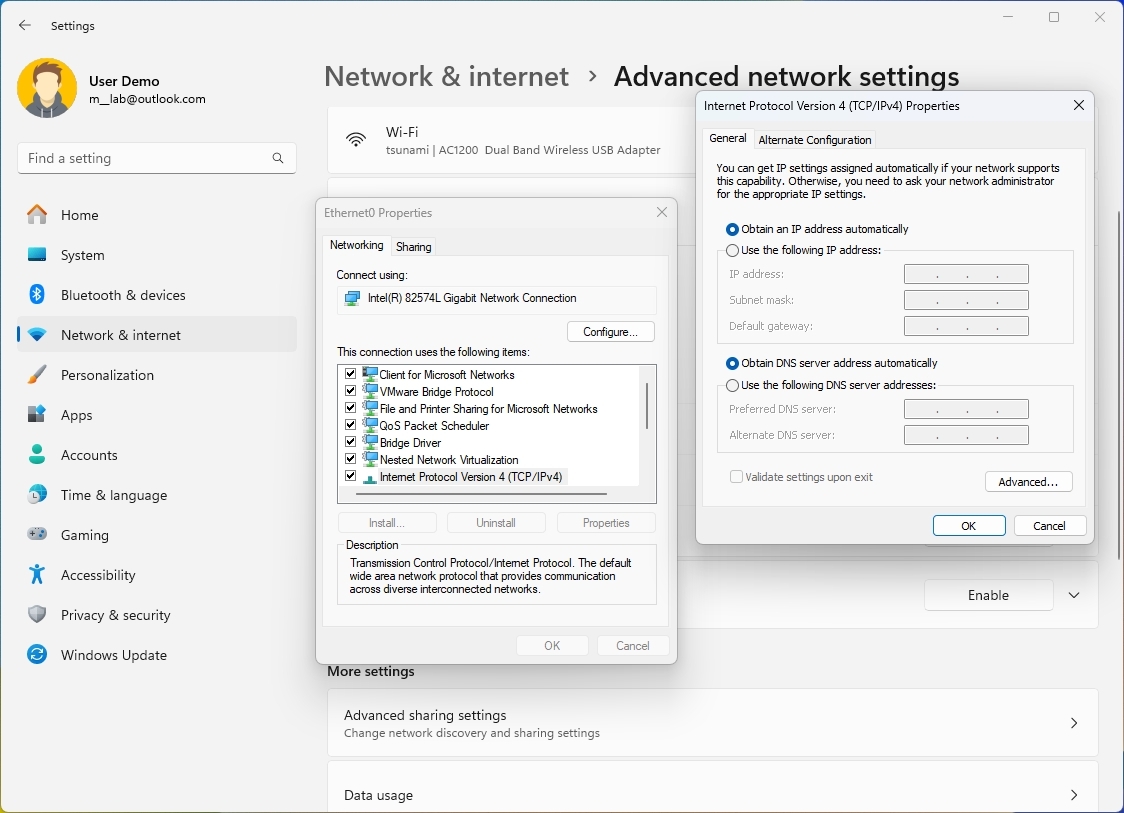
The «Configure» button will give you access to the hardware settings to configure specific advanced settings for the adapter, power management settings, and you can even manage various aspects of the driver.
How to rename a network adapters on Windows 11
If you want to change the network adapter name, you can do this directly from the networks settings.
To rename a network adapter, use these steps:
- Open Settings.
- Click on Network & internet.
- Click the Advanced network settings page on the right side.
- Select the Ethernet or Wi-Fi adapter from the «Network adapters» list.
- Click the Rename button.
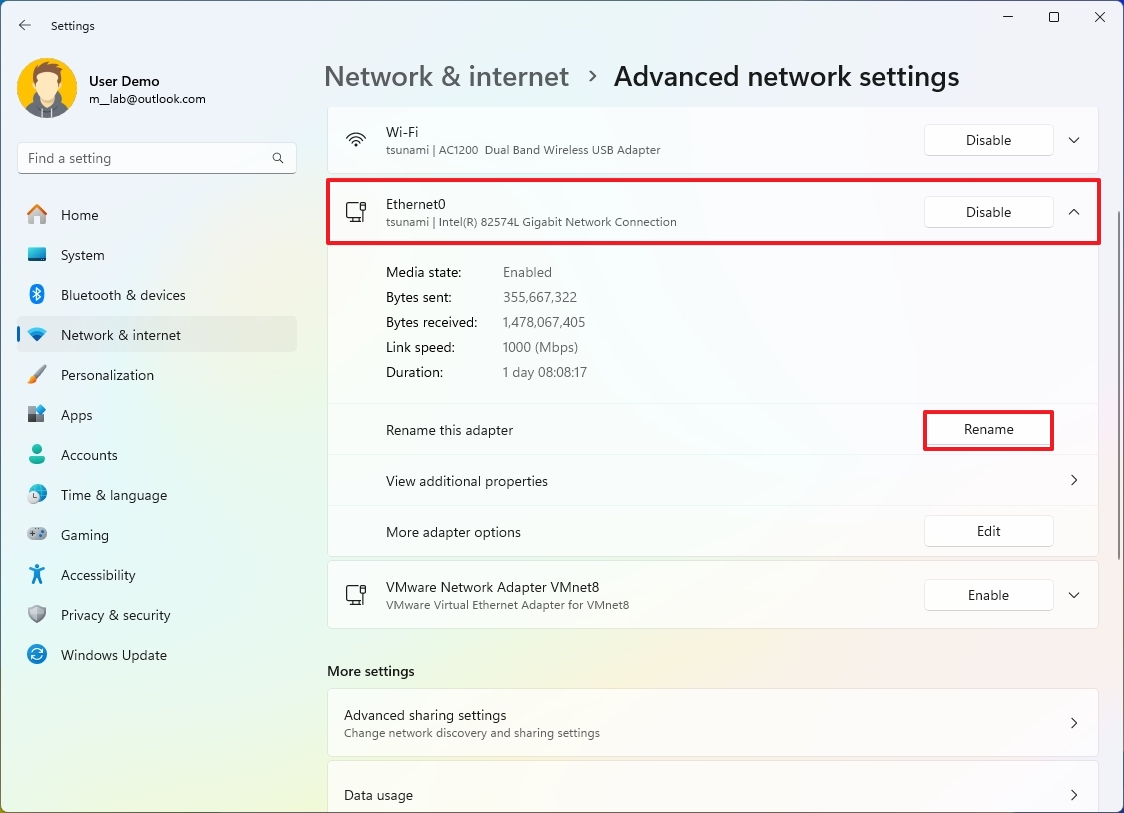
- Confirm the new name of the adapter.
- Click the Save button.
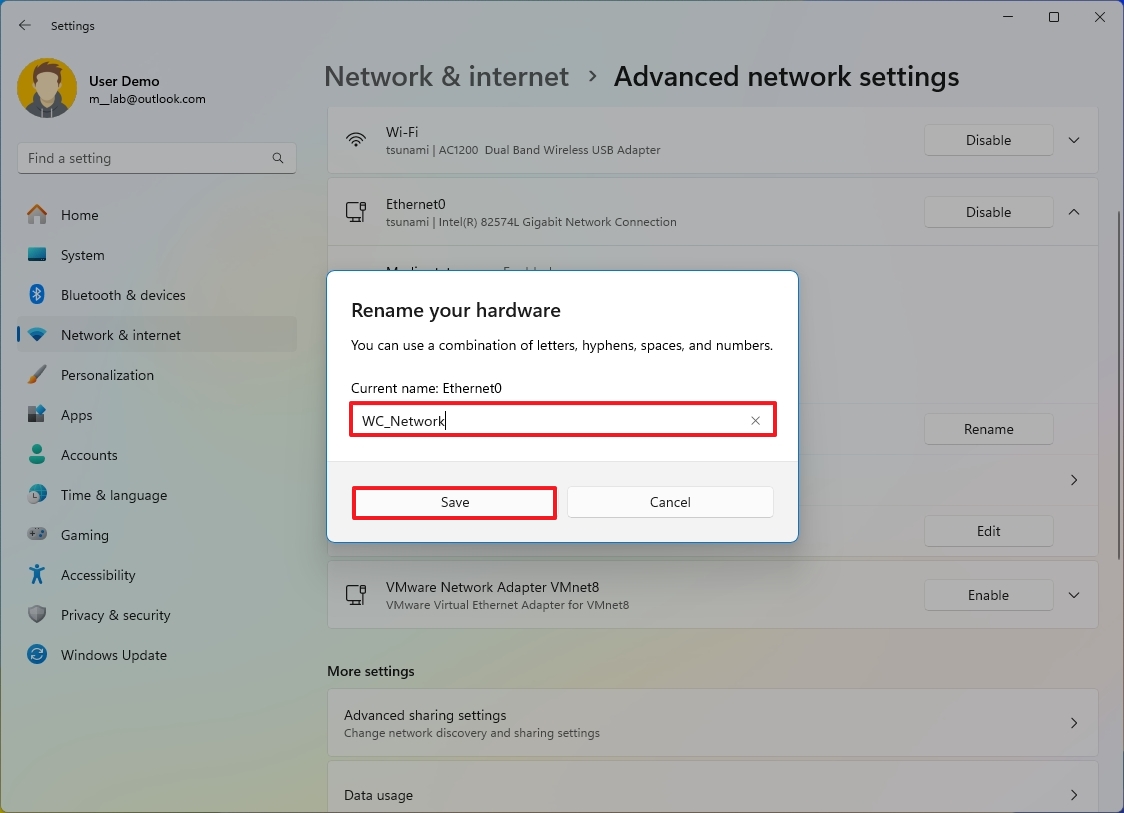
After you complete the steps, the network adapter will reflect the new name.
More resources
For more helpful articles, coverage, and answers to common questions about Windows 10 and Windows 11, visit the following resources:
- Windows 11 on Windows Central — All you need to know
- Windows 10 on Windows Central — All you need to know
Mauro Huculak has been a Windows How-To Expert contributor for WindowsCentral.com for nearly a decade and has over 15 years of experience writing comprehensive guides. He also has an IT background and has achieved different professional certifications from Microsoft, Cisco, VMware, and CompTIA. He has been recognized as a Microsoft MVP for many years.
Changing network adapter settings in Windows 11 is a straightforward process. Here’s how to do it: Open the Settings app, navigate to Network & Internet, and then click on Advanced network settings. From there, select the network adapter you want to change and click on its properties. Modify the settings as needed, and save your changes.
Sometimes, you need to tweak your network adapter settings to improve connectivity, troubleshoot issues, or optimize performance. Follow these steps to change your network adapter settings in Windows 11.
Step 1: Open Settings
Click on the Start button, then select Settings.
Opening the Settings app is your first stop. You can also press Windows + I to quickly open Settings.
Step 2: Go to Network & Internet
In Settings, click on Network & Internet.
This area is like the control center for all things network-related, where you can manage Wi-Fi, Ethernet, and other network connections.
Step 3: Click on Advanced Network Settings
Scroll down and click on Advanced network settings.
This section provides advanced options for your network adapters. Here you can see a list of all network adapters on your system.
Step 4: Select the Network Adapter
Find the network adapter you want to change and click on it.
Your computer might have multiple adapters, like Wi-Fi and Ethernet. Choose the one you need to adjust.
Step 5: Click on Properties
In the network adapter settings, click on Properties.
This is where you’ll find all the settings you can tweak. You can change IP settings, configure DNS servers, and more.
Step 6: Modify the Settings
Adjust the settings as needed and click Save.
Make sure you know what changes you’re making. Incorrect settings can cause connectivity issues.
After you complete these steps, your network adapter will use the new settings. You might need to restart your computer to see the changes take effect.
Tips for Changing Network Adapter Settings in Windows 11
- Backup Settings: Always note down or backup your current settings before making any changes.
- Know Your Network: Understand whether you’re using DHCP or a static IP, and make adjustments accordingly.
- Restart if Necessary: After making changes, restart your computer to ensure they take effect.
- Use Automatic Settings: If you’re unsure, using automatic settings for IP and DNS is often the best choice.
- Check for Updates: Ensure your network drivers are up-to-date to avoid issues.
Frequently Asked Questions
Why would I need to change my network adapter settings?
You might change your settings to improve internet speed, connect to a specific network, or troubleshoot connectivity issues.
How do I know which network adapter to select?
Identify the adapter by its type (Wi-Fi/Ethernet) and the network you are connected to.
Can incorrect settings harm my computer?
Incorrect settings can cause connectivity issues, but they won’t harm your hardware. You can always reset to default settings.
What are DNS settings?
DNS settings determine how your computer translates domain names (like google.com) into IP addresses.
How do I reset my network settings?
You can reset your network settings by going to Settings > Network & Internet > Advanced network settings > Network reset.
Summary
- Open Settings
- Go to Network & Internet
- Click on Advanced network settings
- Select the Network Adapter
- Click on Properties
- Modify the Settings
Conclusion
Changing network adapter settings in Windows 11 isn’t as daunting as it might seem. By following the steps outlined above, you can easily manage and adjust your network settings to suit your needs. Whether you’re looking to troubleshoot a connection issue or optimize your network performance, taking control of these settings can make a world of difference.
Understanding how to navigate these options is a crucial skill in today’s connected world. If you’re interested in further enhancing your tech skills, consider exploring more advanced networking topics or related troubleshooting guides.
Your journey in mastering Windows 11 network settings doesn’t have to end here. Keep experimenting, learning, and adapting. Who knows? You might become the go-to person for tech issues in your circle. If this guide helped you, don’t hesitate to share it with others who might benefit from it. Happy networking!
Matt Jacobs has been working as an IT consultant for small businesses since receiving his Master’s degree in 2003. While he still does some consulting work, his primary focus now is on creating technology support content for SupportYourTech.com.
His work can be found on many websites and focuses on topics such as Microsoft Office, Apple devices, Android devices, Photoshop, and more.
Changing adapter settings in Windows 11 is pretty straightforward once you know where to go. Essentially, you’re diving into your computer’s network settings to adjust how your device connects to the internet. Whether you’re looking to tweak your Wi-Fi, manage Ethernet connections, or play around with IP addresses, these instructions will guide you through the process step-by-step. Ready to dive in? Let’s make those changes happen!
In this section, we’ll walk through how to change adapter settings in Windows 11. This will help you manage network connections and troubleshoot any connectivity issues you might be facing.
Step 1: Open the Settings App
Press the Windows key on your keyboard, and then click on the “Settings” gear icon.
Opening the Settings app is your starting point. It’s like the control panel for modern Windows, and it’s where you’ll find all your network settings.
Step 2: Navigate to Network & Internet
Within the Settings app, click on “Network & Internet” from the left-hand menu.
This section is where you manage everything related to your internet connection. It’s the hub for all things network-related.
Step 3: Access Advanced Network Settings
Scroll down and click on “Advanced network settings.”
This option leads you to more detailed network options where you can customize how your device connects to networks.
Step 4: Click on Network Adapters
Under Advanced network settings, select “Network adapters.”
This is the section where all your network adapters—like your Wi-Fi and Ethernet connections—are listed. You can see which one you’re using.
Step 5: Modify the Adapter Settings
Choose the adapter you want to modify and click on “Properties.”
In the properties section, you can change settings such as IP address configurations, DNS settings, and more, depending on what you need to adjust.
Once you’ve completed these actions, your network adapter settings will be updated based on your selections. Any changes, such as new IP addresses or DNS settings, will take effect immediately and could improve your connectivity or tailor it to your specific needs.
Tips for How to Change Adapter Settings in Windows 11
- Always make note of your current settings before changing them in case you need to revert.
- If you’re unsure about specific settings, consult your internet service provider.
- Utilize the “Network reset” option if you’re experiencing ongoing connectivity issues.
- Regularly update your network adapter drivers for optimal performance.
- Restart your computer after significant changes to ensure they take full effect.
Frequently Asked Questions
How do I find my network adapter in Windows 11?
Open the Settings app, go to “Network & Internet,” and click on “Advanced network settings” to view your network adapters.
Can I disable a network adapter in Windows 11?
Yes, you can. Go to the “Network adapters” section in the Advanced network settings and you will find an option to disable any selected adapter.
What should I do if I lose internet connection after changing settings?
Re-enter the original settings you noted down before making changes, or use the “Network reset” option to return to default settings.
How do I change my IP address in Windows 11?
In the adapter’s properties, select “Internet Protocol Version 4 (TCP/IPv4)” and click on “Properties” to manually set a new IP address.
Is it safe to change adapter settings?
Yes, it is generally safe, but you should ensure you’re confident in the changes you’re making or consult a professional.
Summary
- Open Settings app.
- Navigate to Network & Internet.
- Access Advanced network settings.
- Click on Network adapters.
- Modify the adapter settings.
Conclusion
Now that you know how to change adapter settings in Windows 11, you’re equipped to take control of your network connectivity. Whether you’re optimizing your home Wi-Fi, managing multiple devices, or just tinkering to improve performance, these steps open the door to a world of networking possibilities.
Remember, making adjustments to your adapter settings can be like fine-tuning a musical instrument. It calls for a balance of knowledge and care to ensure everything works in harmony. If you ever feel like you’re in over your head, don’t hesitate to reach out for guidance. There are countless resources and professionals ready to help you.
In the world of technology, staying informed and adaptable is key. So why not explore and learn more about other features in Windows 11? The more you know, the more you can customize your computing experience to fit your needs. Happy networking!
Matthew Burleigh has been writing tech tutorials since 2008. His writing has appeared on dozens of different websites and been read over 50 million times.
After receiving his Bachelor’s and Master’s degrees in Computer Science he spent several years working in IT management for small businesses. However, he now works full time writing content online and creating websites.
His main writing topics include iPhones, Microsoft Office, Google Apps, Android, and Photoshop, but he has also written about many other tech topics as well.
Read his full bio here.