
Ночной режим или функция «Ночной свет» в Windows 10 предназначена для того, чтобы уменьшить количество голубого (синего) цвета на экране монитора, который, как пишут, может подавлять выработку мелатонина и мешать нормальному сну. То есть при включении ночного режима цвета на экране становятся более тёплыми.
Некоторые пользователи Windows 10 сталкиваются с тем, что включение и отключение ночного света не работает или срабатывает не всегда, не удается отключить ночной режим или же кнопка ночного режима в области уведомлений не активна. В инструкции подробно о том, как исправить все эти проблемы.
Как включить или отключить «Ночной свет» в Windows 10
Для начала о том, как включить или отключить «Ночной свет» в Windows 10 при отсутствии проблем, на случай если вы этого не знаете:
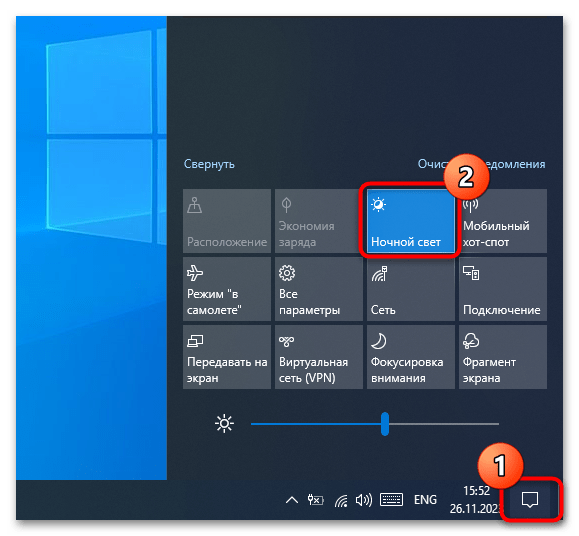
- Откройте область уведомлений Windows 10 (нажатие по крайней правой кнопке на панели задач) и нажмите по кнопке «Ночной свет» для включения или отключения ночного режима.
- Если кнопка отсутствует, можно попробовать нажать «Развернуть» (если такой пункт присутствует») или нажать по любой плитке действий правой кнопкой мыши, выбрать пункт «Редактировать быстрые действия» и добавить кнопку «Ночной свет» в список доступных действий.
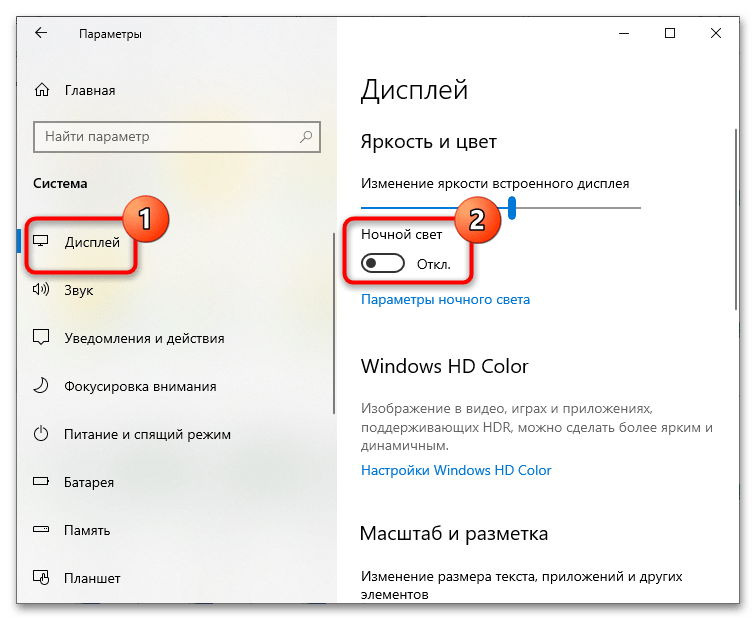
- Еще один метод включения «Ночного света» — зайти в Параметры (клавиши Win+I) — Система — Дисплей и включить или отключить соответствующий пункт вверху страницы параметров.

- Обратите внимание: если там же перейти по ссылке «Параметры ночного света», вы можете включить или отключить автоматическое включение ночного режима по графику, а также изменить интенсивность блокирования синего излучения.


Как правило, описанное работает без каких-либо проблем, но не всегда.
Что делать, если не работает Ночной свет (ночной режим) в Windows 10
Не работать «Ночной свет» может по-разному, среди распространенных вариантов:
- Кнопка включения «Ночной свет» в области уведомлений или включение ночного режима в параметрах не влияет на изображение на экране.
- Кнопка включения не активна.
- Ночной свет иногда работает, а иногда — нет.
Рассмотрим все варианты по порядку.
Ночной режим не включается при нажатии на кнопку
В первом случае ситуация чаще всего объясняется неправильно работающими или не установленными драйверами видеокарты, при этом здесь важно отметить: часто речь идёт не о дискретной видеокарте NVIDIA или AMD, а об интегрированном видео, обычно — Intel.
Решение: установить последние официальные драйвера для вашей видеокарты (скачав с официальных сайтов и установив вручную, а не используя «обновление драйвера» в диспетчере устройств), а при наличии интегрированного видео — и на него тоже (на интегрированное видео ноутбуков драйвер лучше взять с официального сайта производителя ноутбука). После установки перезагружаем компьютер и проверяем, была ли решена проблема.
Внимание:
- На всякий случай загляните в параметры ночного света, как это было описано в начале инструкции. Если параметр «Интенсивность» выставлен в крайнее левое значение, вы не увидите отличий между включенным и отключенным ночным режимом.
- Если на вашем компьютере или ноутбуке используется или использовался TeamViewer, обратите внимание на раздел, касающийся драйверов монитора, которые устанавливает эта программа в статье Что делать, если не работает яркость в Windows 10.
Кнопка включения «Ночной свет» не активна
В ситуации, когда кнопка включения ночного режима Windows 10 не активна, попробуйте создать reg-файл cо следующим содержимым:
Windows Registry Editor Version 5.00
[HKEY_CURRENT_USER\Software\Microsoft\Windows\CurrentVersion\CloudStore\Store\Cache\DefaultAccount\$$windows.data.bluelightreduction.bluelightreductionstate][HKEY_CURRENT_USER\Software\Microsoft\Windows\CurrentVersion\CloudStore\Store\Cache\DefaultAccount\$$windows.data.bluelightreduction.bluelightreductionstate\Current]
"Data"=hex:02,00,00,00,54,83,08,4a,03,ba,d2,01,00,00,00,00,43,42,01,00,10,00,\
d0,0a,02,c6,14,b8,8e,9d,d0,b4,c0,ae,e9,01,00
и импортировать его в реестр. Перезагрузите компьютер и проверьте, решило ли это проблему.
Ночной режим работает не всегда: иногда его можно включить и отключить, а иногда — нет
Если включение функции «Ночной свет» срабатывает через раз, проверьте: работает ли режим «Ночной свет» сразу после перезагрузки компьютера или ноутбука. Важная деталь здесь — требуется именно перезагрузка, а не завершение работы и последующее включение, поскольку эти два действия в Windows 10 работают по-разному.
Если после перезагрузки всё работает исправно, а после завершения работы с последующим включением — нет (или не всегда), попробуйте отключить функцию «быстрый запуск» Windows 10 и понаблюдать, решило ли это проблему.
И два дополнительных нюанса:
- если вы ранее устанавливали какие-либо сторонние программы, влияющие на то, как отображаются цвета на экране (альтернативные средства включения ночного режима, программное обеспечение монитора), то они, теоретически могут мешать работать системной функции «Ночной свет».
- Функция «Ночной свет» появилась в версии Windows 10 1809, в более ранних версиях системы вы её не найдёте.
Все способы:
- Вариант 1: Функция «Ночной свет»
- Способ 1: Панель уведомлений
- Способ 2: Приложение «Параметры»
- Вариант 2: Темная тема
- Способ 1: Приложение «Параметры»
- Способ 2: «Редактор реестра»
- Вопросы и ответы: 0
Под ночным режимом в Windows 10 можно понимать как «Ночной свет», так и «Темную тему» – обе эти настройки служат для снижения нагрузки на зрение в темное время суток. Ниже рассмотрены оба варианта.
Вариант 1: Функция «Ночной свет»
Функция «Ночной свет» в Windows 10 позволяет уменьшать яркость экрана в автоматическом режиме в указанное пользователем время. При этом фон «Проводника» и приложения «Параметры» остается неизменным.
Способ 1: Панель уведомлений
Самый быстрый и простой способ отключить опцию «Ночной свет» в Windows 10. Позволяющая это сделать настройка доступна на «Панели уведомлений».
- Нажмите кнопку «Уведомления», расположенную в правой части системного лотка.
- В нижней части открывшейся «Панели уведомлений» нажмите плитку «Ночной свет». Подсвеченная плитка изменит цвет на серый, что станет означать, что функция ночного света отключена.
Способ 2: Приложение «Параметры»
Как и многие другие настройки, «Ночной свет» может быть отключен в приложении «Параметры».
- Откройте приложение «Параметры» и перейдите в раздел «Система» → «Дисплей».
- Установите переключатель «Ночной свет» в положение «Откл.».
Вариант 2: Темная тема
В Windows 10 имеется встроенная темная тема, применяемая к «Проводнику» и приложению «Параметры», а также режим высокой контрастности – темный и светлый его варианты. Если они активны, отключите их.
Способ 1: Приложение «Параметры»
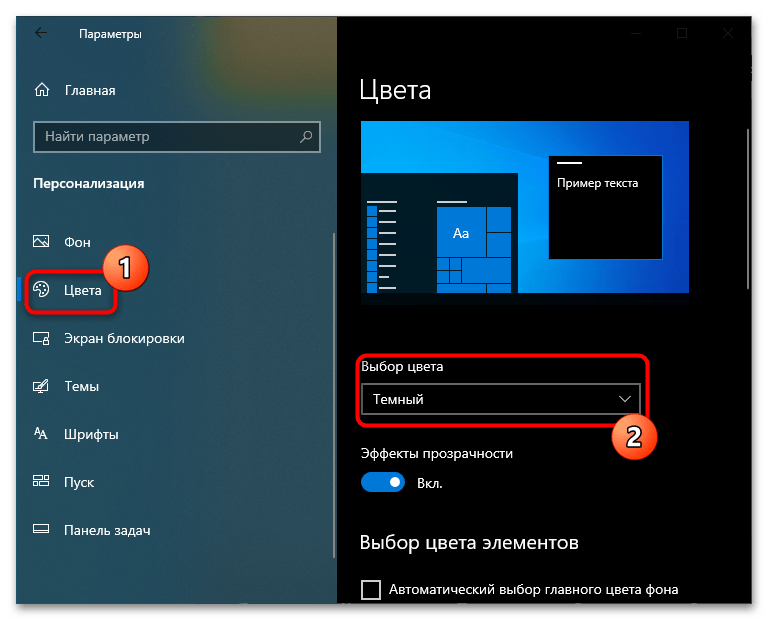
- Откройте приложение «Параметры», перейдите в раздел «Персонализация» → «Цвета» и откройте выпадающее меню «Выбор цвета».
- Выберите в списке режим «Светлый».
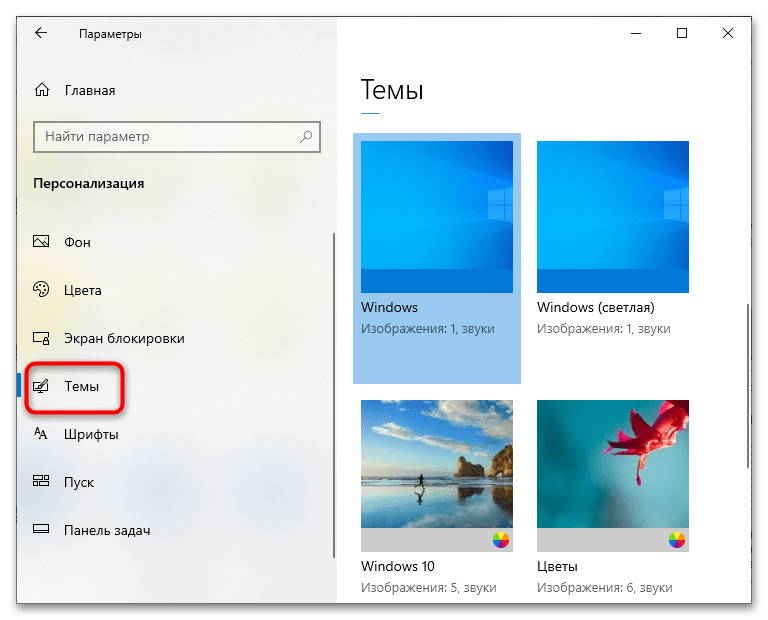
- Перейдите тут же в подраздел «Персонализация» и убедитесь, что используется нужная тема, поскольку в нем также могут присутствовать темные темы, скачанные из «Microsoft Store».

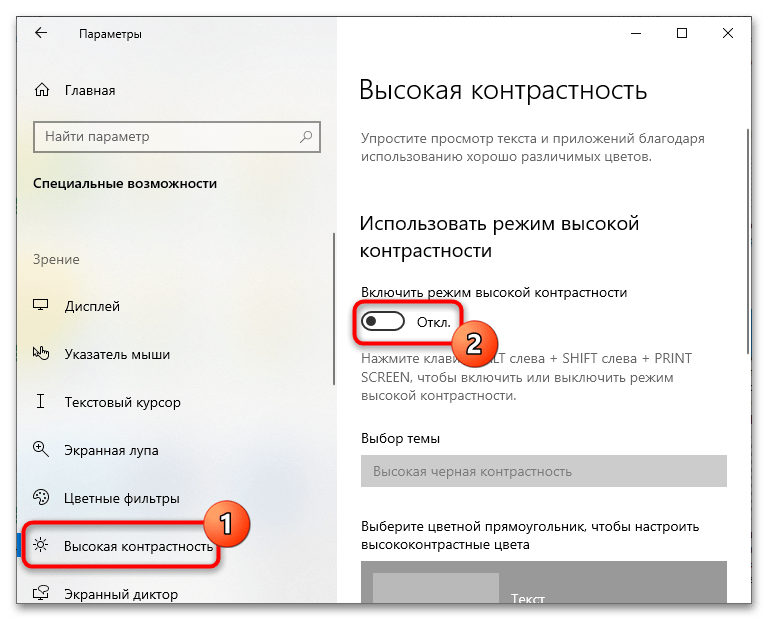
Если на компьютере используется темный вариант режима высокой контрастности, в приложении «Параметры» перейдите в раздел «Специальные возможности» → «Высокая контрастность» и установите переключатель «Включить режим высокой контрастности» в положение «Откл.».
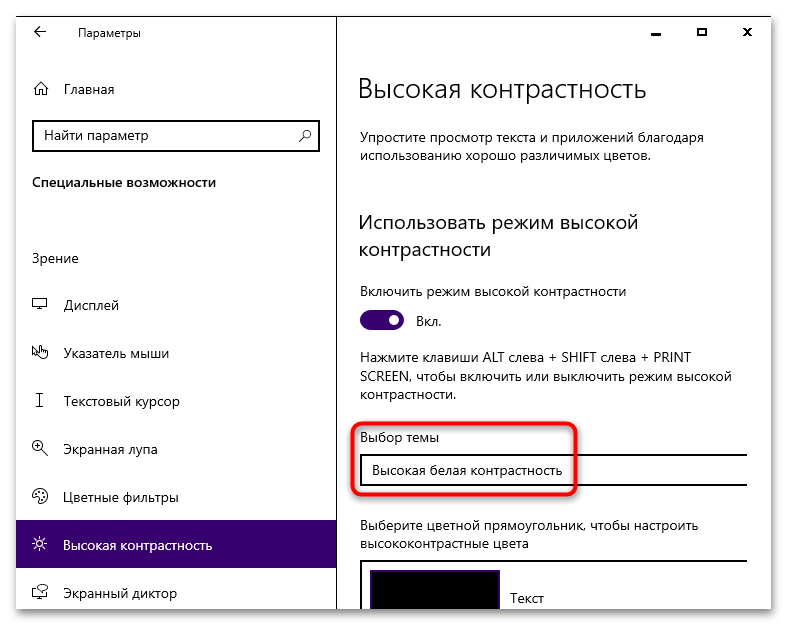
Когда режим контрастности нужен, из выпадающего списка «Выбор темы» выберите «Высокая белая контрастность».
Способ 2: «Редактор реестра»
Этот способ позволяет отключить темную тему оформления при недоступности соответствующих настроек в приложении «Параметры».
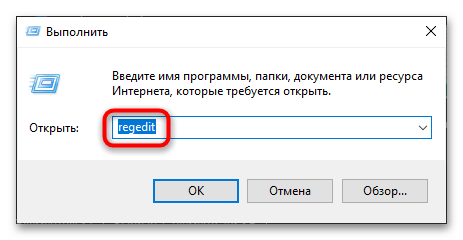
- Запустите «Редактор реестра», для чего вызовите нажатием клавиш Win + R диалоговое окошко «Выполнить», введите в него команду
regeditи нажмите клавишу Enter. - Разверните ключ
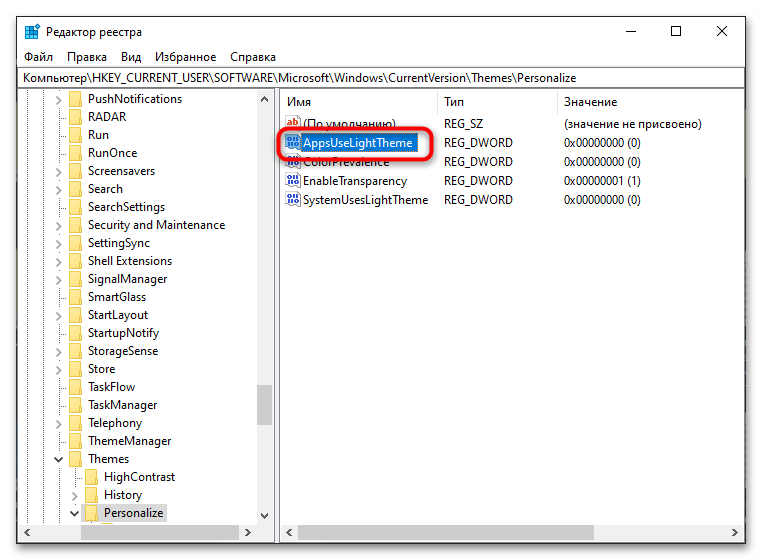
HKEY_CURRENT_USER\SOFTWARE\Microsoft\Windows\CurrentVersion\Themes\Personalize - Двойным кликом откройте окошко его редактирования и задайте в качестве его значения «1» вместо «0». Сохраните настройки.
и найдите в правой колонке параметр «AppsUseLightTheme».
Изменения вступят в силу сразу же, перезапуск «Проводника» не понадобится.
Наша группа в TelegramПолезные советы и помощь
Windows 10 Night light issue is more painful for the users addicted to work in the nighttime. This display setting allows the system to moderate the blue light on the PC screen in order to lessen the consequence that causes visual fatigue. Unfortunately, the feature sometimes doesn’t work when you log off for a period of time or wake the computer from sleep.
Night Light turning off after resuming from sleep in Windows 10 usually occur due to a bug that comes through a faulty update in most cases. Furthermore, an incompatible graphics driver can cause this display setting to be dysfunctional. Though the night light starts working after signing out and signing back in or restarting the device turning it on everyday is pretty annoying. See solutions to a similar kind of issue – Fix Screen Brightness Resets to minimum in Windows 10 Automatically.
Night Light Turning off after Resuming from sleep
Here is how to Fix Night Light Turning off after Resuming from sleep in Windows 10 –
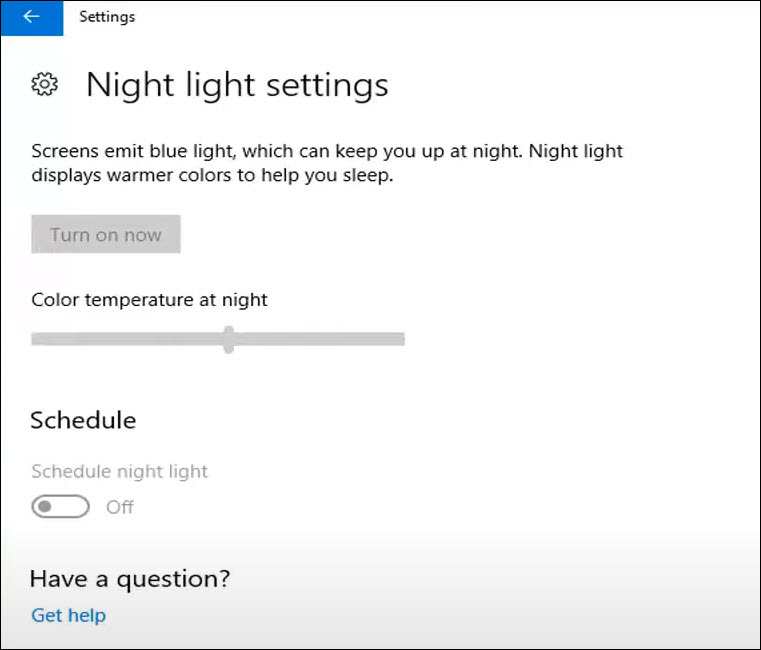
1] Make sure the setting is turned on
- Press – Windows + I.
- Click – System.
- Move to the right pane of appearing Display settings.
- Click – Night light settings.
- If this is turned off, hit the button – Turn on now.
- To set timeline, turn on the toggle button set beneath Schedule night light.
- Set the hours according to your need.
There might be an instance when you will find the Turn on now button greyed out while attempting to enable Night Light. In that situation, you need to fix that issue first by following the guidelines –
- Press – Windows key.
- Type in – notepad.
- Hit – Enter.
- Copy the following and paste it in the Notepad –
Windows Registry Editor Version 5.00

[HKEY_CURRENT_USER\Software\Microsoft\Windows\CurrentVersion\CloudStore\Store\Cache\DefaultAccount\$$windows.data.bluelightreduction.bluelightreductionstate]

[HKEY_CURRENT_USER\Software\Microsoft\Windows\CurrentVersion\CloudStore\Store\Cache\DefaultAccount\$$windows.data.bluelightreduction.bluelightreductionstate\Current]

"Data"=hex:02,00,00,00,54,83,08,4a,03,ba,d2,01,00,00,00,00,43,42,01,00,10,00,\

d0,0a,02,c6,14,b8,8e,9d,d0,b4,c0,ae,e9,01,00
- Press – Ctrl + Shift + S.
- Choose a location where you want to save the file.
- Provide a name for the file and also replace .txt with .reg.
- Click – Save.
- Double-click the file you created.
- Reboot the PC to implement changes you have made through the .reg file.
- After power-up, go to Windows settings and turn on Night light.
2] Turn off HDR
Oftentimes, Night Light Turning off after Resuming from sleep is found to happen when your system has enabled HDR. To disable the option –
- Open Windows Settings app.
- Click – System.
- Move to the right of the coming page.
- Turn off the toggle button set for HDR and advanced color.
3] Update Graphics driver if Night Light Turns off after Resuming from sleep
Since the graphics driver helps the Night light in reducing blue light, keeping the driver up-to-date is mandatory. If the application somehow becomes corrupted or incompatible that doesn’t support the Windows version, Night light won’t function correctly.
- Press – Windows + S.
- In the search bar, type in – devmgmt.msc.
- Hit – Enter.
- When Device Manager shows up, double-click – Display adapters.
- Right-click the graphics driver installed on your system and select – Update driver.
- From the next pop-up, pick – Search automatically for drivers.
Note – When you opt to update a driver, the system will search for available updates online, therefore, ensure working internet connectivity while deploying this workaround.
- If the system shows you already have the best version, visit the manufacturer’s website to download the driver manually.
4] Uninstall troublesome update
Many people noticed Night Light Turns off after Resume from sleep right after installing a Windows update. If the same happens to you, there is a chance that the update you have installed includes a bug or is broken. Uninstalling the build should work like a tweak in that case.
- Click the search icon from taskbar.
- Write down – view update history.
- Hit – Enter.
- Click the link – Uninstall updates.
- Scroll down to reach the Microsoft Windows section.
- Select the KB number that triggered Night Light issue.
- Click Uninstall from the top ribbon.
- Comply with on-screen instructions to complete the removal process.
- Reboot the PC to have the system without a Night light issue further.
In case, the Windows 10 Night Light error continues to occur due to unavoidable factors you can also try the following tools that have more or less similar functionalities –
- Use LightBulb, Adjust Screen Gamma, Avoid Eye Strain in Windows 10
- Provide Your Eyes Rest from PC with Pause4Relax
Methods list
1] Make sure the Setting is turned on
2] Turn off HDR
3] Update Graphics driver
4] Uninstall troublesome update
That’s all!!!
Night Light is one of the best features of Windows 10. It makes your computer easy on your eyes during nighttime. However, many users have had issues with Night Light staying always on in their Windows 10 PCs even after disabling the feature from the settings.
We have experienced this issue on one our machines as well. It’s quite annoying when you have to use your PC during daytime with that warmer tint that Night Light puts on the display.
For many people, toggling the Night Light setting On/Off from the toggle switch in ‘Notification center’ works, but that is not a permanent fix to the problem.
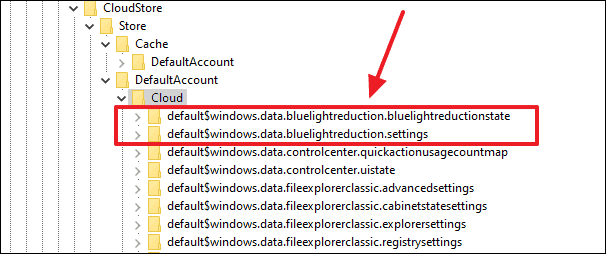
To really fix Night Light issues in Windows 10, you need to delete the default$windows.data.bluelightreduction.bluelightreductionstate and default$windows.data.bluelightreduction.settings folders in the Windows 10 Registry Editor. We’ll guide you through it.
Open Registry Editor on your PC. Press “Win + R” on your keyboard to open the Run command screen, then type “regedit” and hit enter to open the Registry Editor window.
On the Registry Editor window, click inside the address and press “Ctrl + A” to empty it. Then type/paste the following address and hit enter.
Computer\HKEY_CURRENT_USER\SOFTWARE\Microsoft\Windows\CurrentVersion\CloudStore\Store\DefaultAccount\Cloud💁♂️ In most of the guides on the internet, you’ll be instructed to go to the HKEY_CURRENT_USER\Software\Microsoft\Windows\CurrentVersion\CloudStore\Store\Cache\DefaultAccount folder. But that location is not relevant anymore for the Night Light registry folders. You’ve to go to the Store » DefaultAccount folder, instead of the Store » Cache » DefaultAccount folder in the Registry Editor.

Now look for the following two folders on the left panel of the Registry Editor window. These folders will be located inside the folder that we opened in the instructions above.
default$windows.data.bluelightreduction.bluelightreductionstatedefault$windows.data.bluelightreduction.settings
Right-click on both the folders one-by-one and select ‘Delete’ from the context menu to delete both the folders.
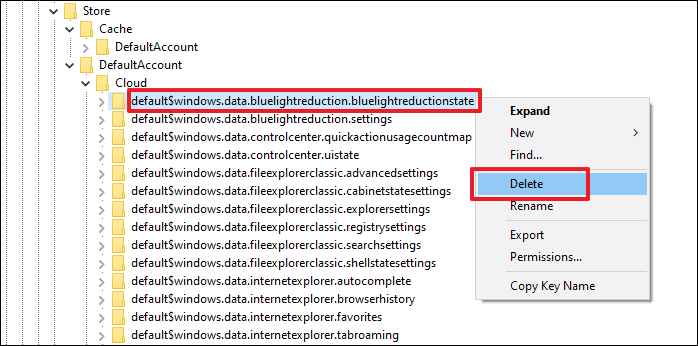
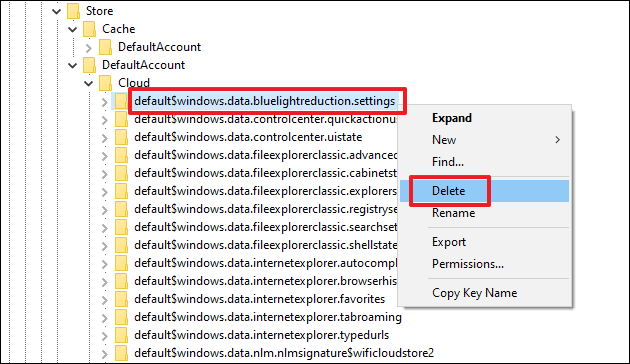
After deleting the above mentioned folders from Windows 10 Registry Editor, restart your PC.
Night Light should no longer stay always on after you restart the computer. You should be able to turn it off from the toggle switch in Notification Center or from Windows 10 Settings » System » Display.
Windows 10 and 11 have a built-in blue light filter, called Night Light. By enabling this feature, your display will show warmer colors at night to help you reduce eye strain and get to sleep. However, many users are experiencing problems with this feature. Some users reported that they couldn’t turn on the Night Light as this option is grayed out. Others said that the Night Light couldn’t turn off no matter what they did. If you happen to be one of them, don’t worry. Here are some working fixes you can try.
6 Fixes for Night Light not working
You might not need to try them all. Just work down the list until you find the one that does the trick.
- Sign out of your account and sign back in
- Update your display driver
- Reset Night Light settings manually
- Check date and time settings
- Turn on Location services
- Check for Windows updates
Fix 1: Sign out of your account and sign back in
Sometimes, the Night Light not working issue could be caused by a temporary glitch. If that’s the case, you can try to fix the problem by signing out of your account and then signing back in.
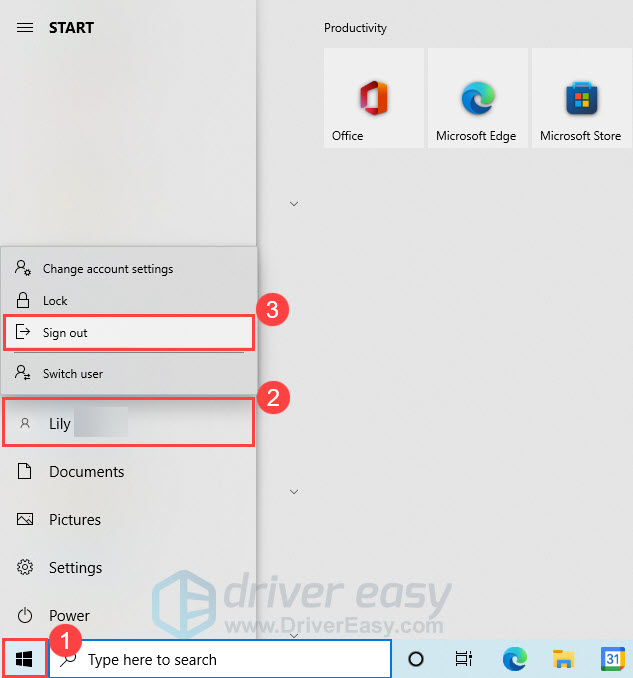
Check if the Night Light starts working again. If your issue persists, go ahead and try the next fix.
Fix 2: Update your display driver
One of the most common causes of the Night Light not working is that you’re using a faulty or outdated display driver. So you should update your display driver to see if it fixes your problem.
There are mainly two ways to update your display driver: manually or automatically.
Manual driver update – You can update your display drivers manually by going to the manufacturer’s website (NVIDIA, AMD or Intel), and searching for the most recent correct driver. Be sure to choose only drivers that are compatible with your Windows version.
Automatic driver update – If you don’t have the time, patience, or computer skills to update your display drivers manually, you can, instead, do it automatically with Driver Easy. Driver Easy will automatically recognize your system and find the correct drivers for your exact display adapter, and your Windows version, and it will download and install them correctly:
- Download and install Driver Easy.
- Run Driver Easy and click the Scan Now button. Driver Easy will then scan your computer and detect any problem drivers.

- Click Update All to automatically download and install the correct version of all the drivers that are missing or out of date on your system. (This requires the Pro version — you’ll be prompted to upgrade when you click Update All.)
Or click the Update button next to the flagged display driver to automatically download the correct version of that driver, then you can manually install it (you can do this with the FREE version).


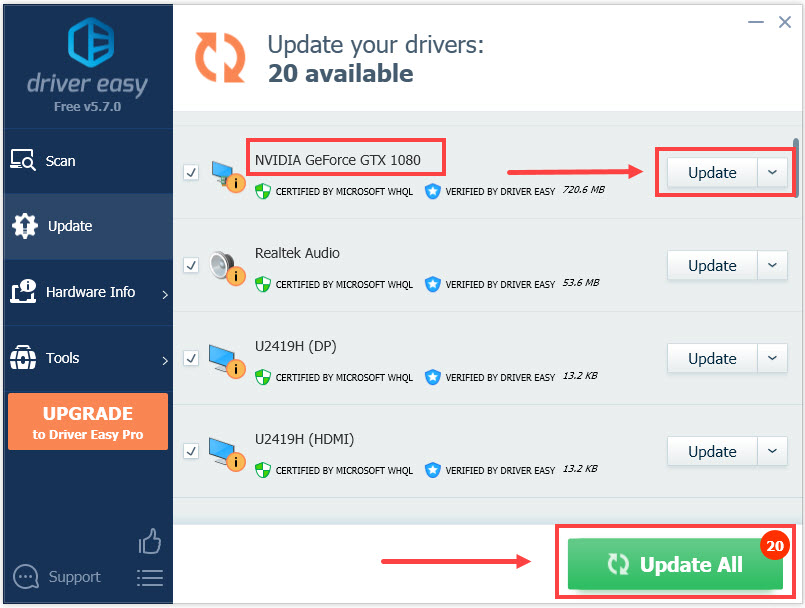
The Pro version of Driver Easy comes with full technical support. If you need assistance, please contact Driver Easy’s support team at support@drivereasy.com.
After updating your display driver, restart your computer and check if the Night Light works properly.
If your issue remains, check out the next fix.
Fix 3: Reset Night Light settings manually
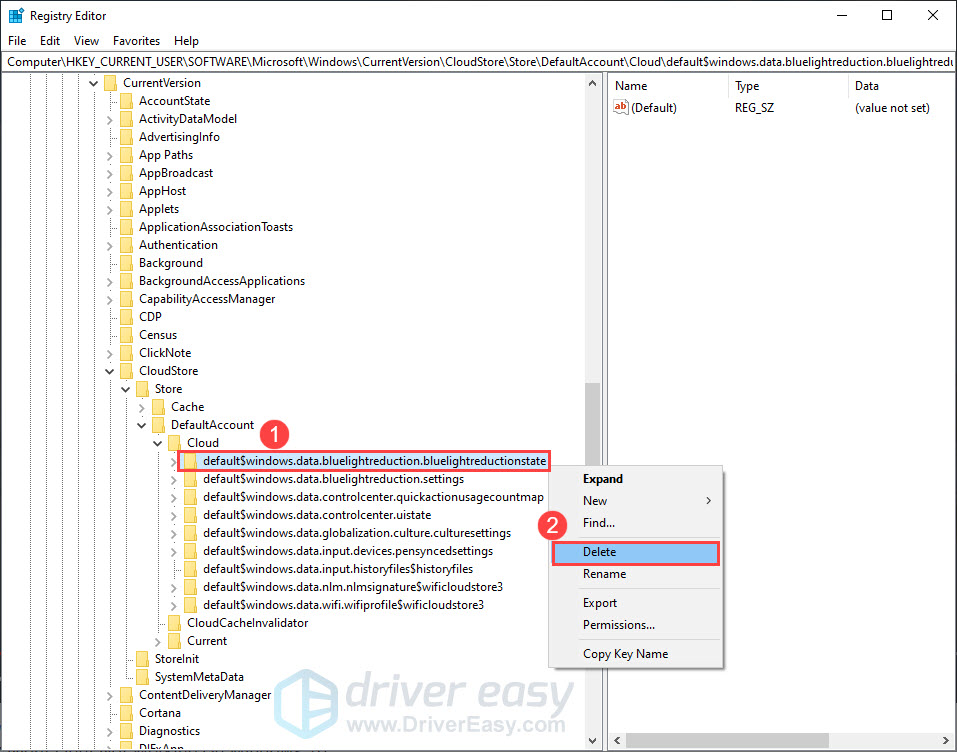
If the Night Light option on your PC is grayed out, you can try resetting this feature by editing the Windows registry. Here’s how to do it:
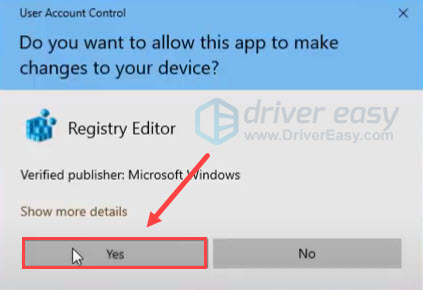
- On your keyboard, press the Windows logo key and R at the same time to invoke the Run dialog. Then type regedit and click OK to open Registry Editor.
- Click Yes if prompted by User Account Control.

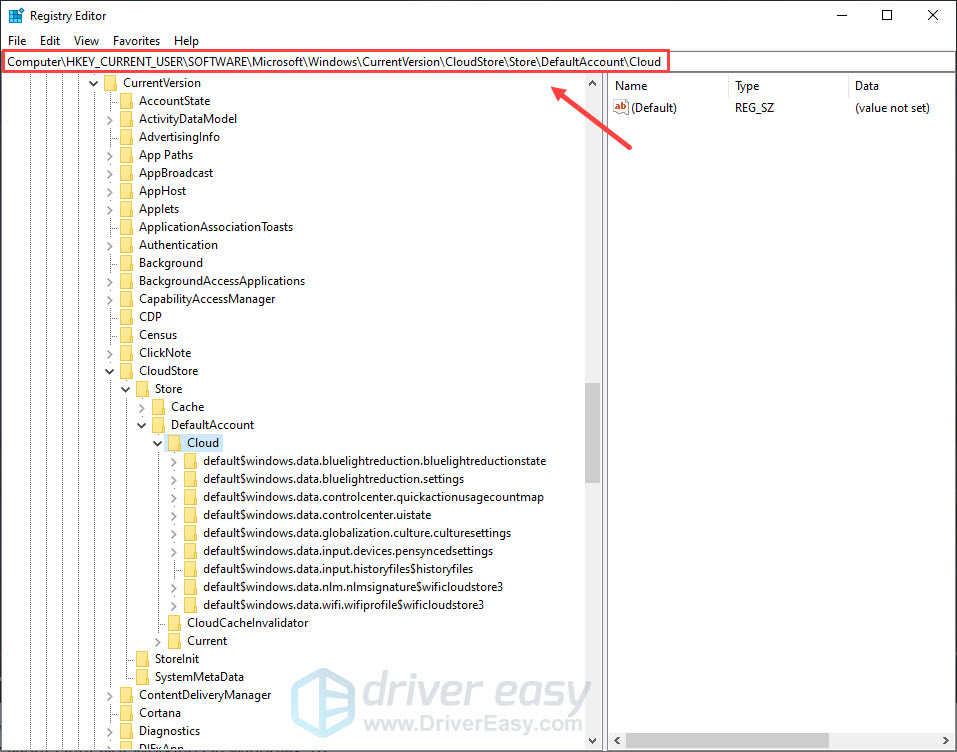
- In Registry Editor, paste the following path into the address bar and press Enter.
Computer\HKEY_CURRENT_USER\SOFTWARE\Microsoft\Windows\CurrentVersion\CloudStore\Store\DefaultAccount\Cloud
- Under the Cloud key, right-click and delete the first two registry keys one by one.
default$windows.data.bluelightreduction.bluelightreductionstatedefault$windows.data.bluelightreduction.settings
- Once done, close and exit Registry Editor.
- Restart your PC and check if your problem has been resolved.
If the Night Light still doesn’t work properly, continue with the next fix.
Fix 4: Check date and time settings
Windows allows you to set a schedule to turn on and turn off the Night Light feature. If the date and time settings on your PC are set incorrectly, you might be unable to use this feature properly. To check your PC’s date and time settings:
- On your taskbar, right-click the time and select Adjust date/time.
- In the pop-up window, make sure the date and time on your device are set correctly for your time zone. If not, you can click the Change button to change the date and time.

Note: the options for Set time automatically and Set time zone automatically must be set to Off to make this change.
- Change the date and time according to your need, then click Change.

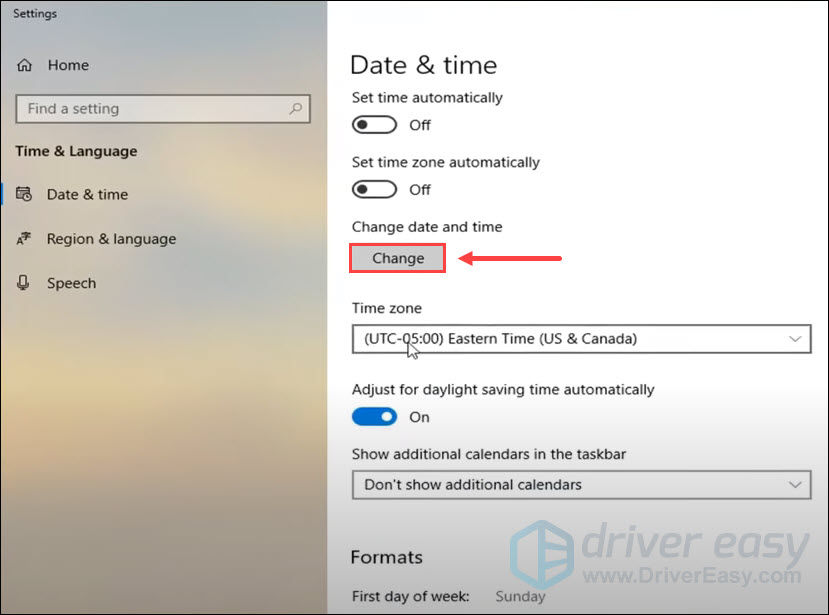
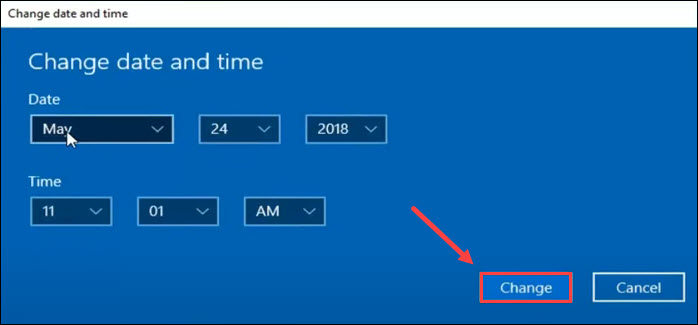
If the date and time are correct and you still encounter the Night Light not working issue, you may need to check Location services.
Fix 5: Turn on Location services
If you want to schedule the night light from sunset to sunrise, you need to turn on Location services, as the exact time of sunset and sunrise depends on your location and date. Here’s how to do it:
- On your keyboard, press the Windows logo key and I together to open Windows Settings. Then click Privacy.

- In the left panel, select Location.
- Make sure the Location for this device is On. If not, you can click the Change button to turn it on. Also, make sure that Allow apps to access your location is set to On.

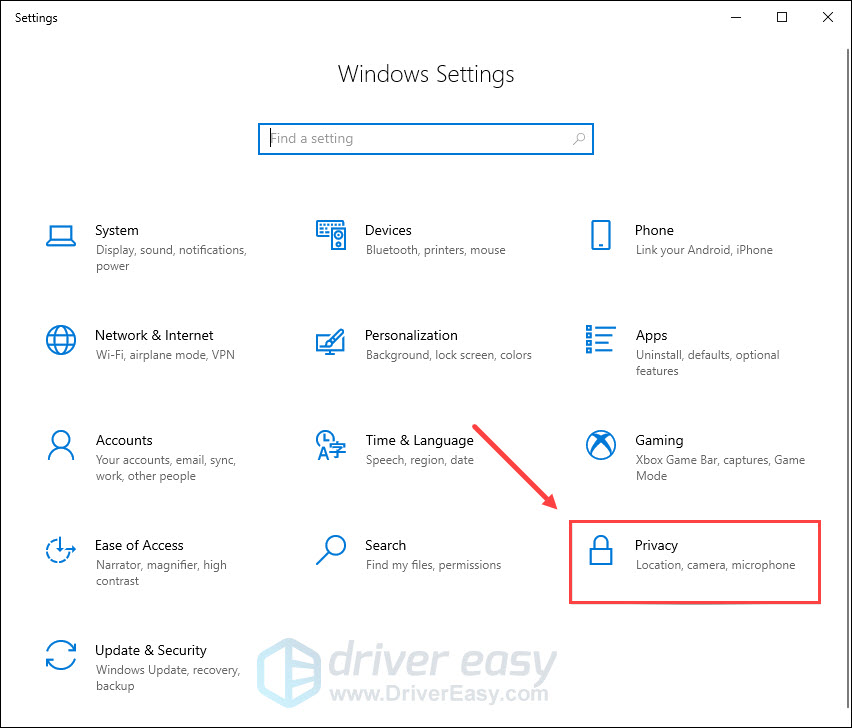
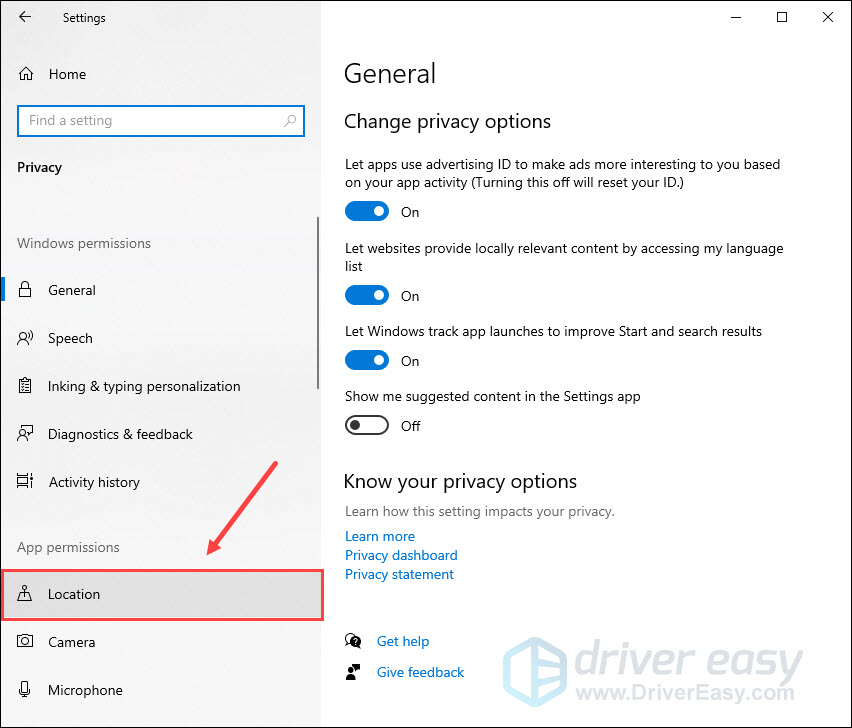

Now try to use the Night Light feature again and see if it works properly.
Fix 6: Check for Windows updates
Windows updates often include bug fixes, security patches, and some new features. So chances are that your problem can be solved by installing the new updates. To check for Windows updates:
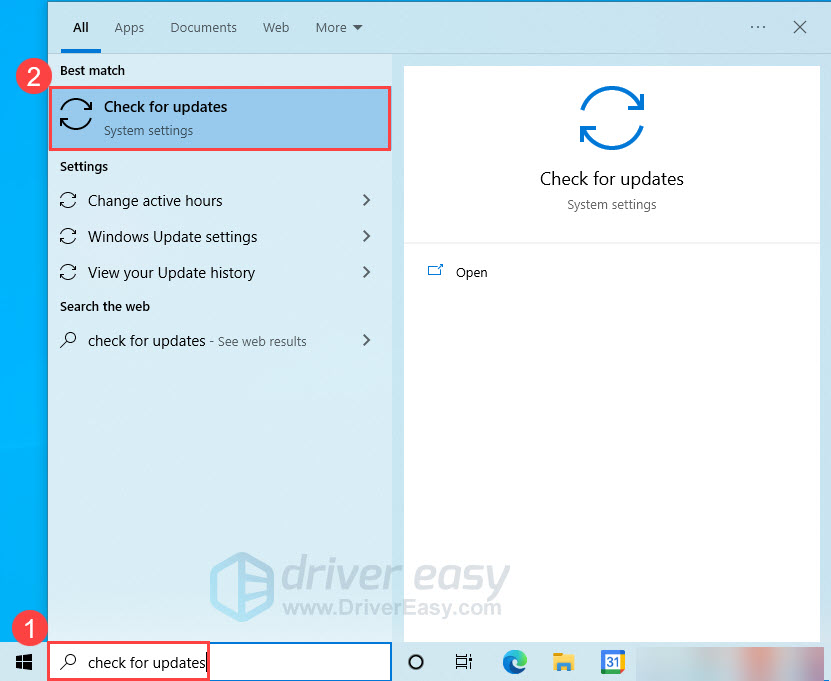
- In the search field on your taskbar, type check for updates. Then select it from the search results.

- In the new window, click Check for updates. Windows will automatically download and install all pending updates if available.

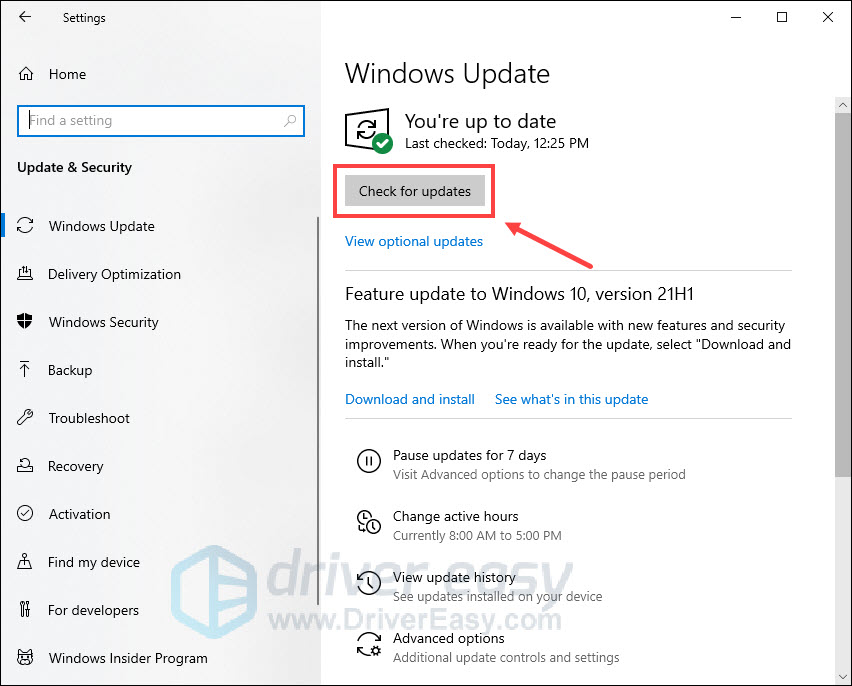
Once you’ve installed all updates, restart your PC and check if your issue has been resolved.
If you’ve tried all fixes listed above and still can’t get the Night Light to work, consider using a third-party app like f.lux to do the same work for you.
That’s all for now. Hopefully, this post helped. If you have any further questions or suggestions, feel free to leave us a comment below.
6
6 people found this helpful