
Standard Installer Command-Line Options
The executable program that interprets packages and installs products is Msiexec.exe.
Note Msiexec also sets an error level on return that corresponds to
System Error Codes.
The following table identifies the standard command-line options for this program. Command-line options are case insensitive.
Windows Installer 2.0: The command-line options that are identified in this topic are available beginning with Windows Installer 3.0. The Windows Installer Command-Line Options are available with Windows Installer 3.0 and earlier versions.
| Option | Parameters | Meaning |
|---|---|---|
| /help |
Help and quick reference option. Displays the correct usage of the setup command including a list of all switches and behavior. The description of usage can be displayed in the user interface. Example: msiexec /help Note The equivalent Windows Installer Command-Line Option is /?. |
|
| /quiet |
Quiet display option. The installer runs an installation without displaying a user interface. Examples: msiexec /package Application.msi /quiet Msiexec /uninstall Application.msi /quiet Msiexec /update msipatch.msp /quiet Msiexec /uninstall msipatch.msp /package Application.msi / quiet Note The equivalent Windows Installer Command-Line Option is /qn. |
|
| /passive |
Passive display option. The installer displays a progress bar to the user that indicates that an installation is in progress but no prompts or error messages are displayed to the user. Example: msiexec /package Application.msi /passive Note The equivalent Windows Installer Command-Line Option is /qb!- with REBOOTPROMPT=S set on the command line. |
|
| /norestart |
Never restart option. The installer never restarts the computer after the installation. Example: msiexec /package Application.msi /norestart Note The equivalent Windows Installer command line has REBOOT=ReallySuppress set on the command line. |
|
| /forcerestart |
Always restart option. The installer always restarts the computer after every installation. Example: msiexec /package Application.msi /forcerestart Note The equivalent Windows Installer command line has REBOOT=Force set on the command line. |
|
| /promptrestart |
Prompt before restarting option. Displays a message that a restart is required to complete the installation and asks the user whether to restart the system now. This option cannot be used together with the /quiet option. Note The equivalent Windows Installer command line has REBOOTPROMPT = «» set on the command line. |
|
| /uninstall | <Package.msi|ProductCode> |
Uninstall product option. Uninstalls a product. Note The equivalent Windows Installer Command-Line Option is /x. |
| /uninstall | /package <Package.msi | ProductCode> /uninstall <Update1.msp | PatchGUID1>[;Update2.msp | PatchGUID2] |
Uninstall update option. Uninstalls an update patch. Note The equivalent Windows Installer Command-Line Option is /I with MSIPATCHREMOVE=Update1.msp | PatchGUID1[;Update2.msp | PatchGUID2] |
| /log | <logfile> |
Log option. Writes logging information into a log file at the specified existing path. The path to the log file location must already exist. The installer does not create the directory structure for the logfile. The following information is entered into the log:
Note The equivalent Windows Installer Command-Line Option is /L*. Note For more information about all the methods that are available for setting the logging mode, see Normal Logging in the Windows Installer Logging section. |
| /package | <Package.msi|ProductCode> |
Install product option. Installs or configures a product. Note The equivalent Windows Installer Command-Line Option is /I. |
| /update | <Update1.msp>[;Update2.msp] |
Install patches option. Installs one or multiple patches. Note The equivalent Windows Installer command line has PATCH = [msipatch.msp]<;PatchGuid2> set on the command line. |
Send comments about this topic to Microsoft
Build date: 8/13/2009
© 2009 Microsoft Corporation. All rights reserved.
Стандартный установщик setup.exe в дистрибутивах Windows может использоваться для интерактивной установки операционной системы или обновлению версии ОС на компьютере. Кроме интерактивного режима, setup.exe поддерживает большое количество параметров командной строки, которые будут полезны системным администраторам. С помощью параметров
setup.exe
можно автоматизировать обновление билда (версии) Windows 10/11 на компьютерах пользователей с помощью SCCM, MDT или других средств автоматизации.
В этой статье мы покажем, как получить установочный ISO образ с последним билдом Windows 11 (в нашем примере это 24H2), с помощью параметров командной строки setup.exe выполнить проверку совместимости компьютера с новой версией Windows и выполнить обновление билда (in-place upgrade) в фоновом режиме.
Содержание:
- Параметры командной строки установщика Windows (setup.exe)
- Генерация актуального установочного ISO образа Windows 11
- Проверка совместимости системы с новым билдом Windows 11
- Автоматическое обновления билда Windows 11 из командной строки
Параметры командной строки установщика Windows (setup.exe)
При обычном запуске программы установки Windows (
setup.exe
) из установочного ISO запускается графический мастер установки/обновления. Однако у программы setup.exe есть большое количество параметров командной строки, позволяющих управлять процессом обновления версии ОС (вплоть до полностью автоматического обновления в фоновом режиме).
Общий синтаксис и доступные параметры утилиты Setup.exe перечислены ниже:
/1394Debug:<channel>
[BaudRate:<baudrate>]
/AddBootMgrLast
/Auto {Clean | DataOnly | Upgrade}
/BitLocker {AlwaysSuspend | TryKeepActive | ForceKeepActive}
/BusParams:<bus.device.function>
/CompactOS {Enable / Disable}
/Compat {IgnoreWarning / ScanOnly}
/CopyLogs<location>
/Debug:<port> [BaudRate:<baudrate>]
/DiagnosticPrompt {enable | disable}
/DynamicUpdate {enable | disable}
/EMSPort: {COM1 | COM2 | off} [/emsbaudrate:<baudrate>]
/InstallDrivers<location>
/InstallFrom<path>
/InstallLangPacks<location>
/m:<folder_name>
/MigNEO Disable
/MigrateDrivers {all | none}
/NetDebug:hostip=<w.x.y.z>,port=<n>,key= <q.r.s.t>[,nodhcp][,busparams=n.o.p]
/NoReboot
/PKey<product key>
/Priority Normal
/PostOOBE<location> [\setupcomplete.cmd]
/PostRollback<location> [\setuprollback.cmd] [/postrollbackcontext {system / user}]
/Quiet
/ReflectDrivers<location>
/ResizeRecoveryPartition {Enable / Disable}
/ShowOOBE {full / none}
/Telemetry {Enable / Disable}
/TempDrive <drive_letter>
/Unattend:<answer_file>
/Uninstall {enable / disable}
/USBDebug:<hostname>
/WDSDiscover
/WDSServer:<servername>
Список доступных параметров установки можно вывести так:
setup.exe /?
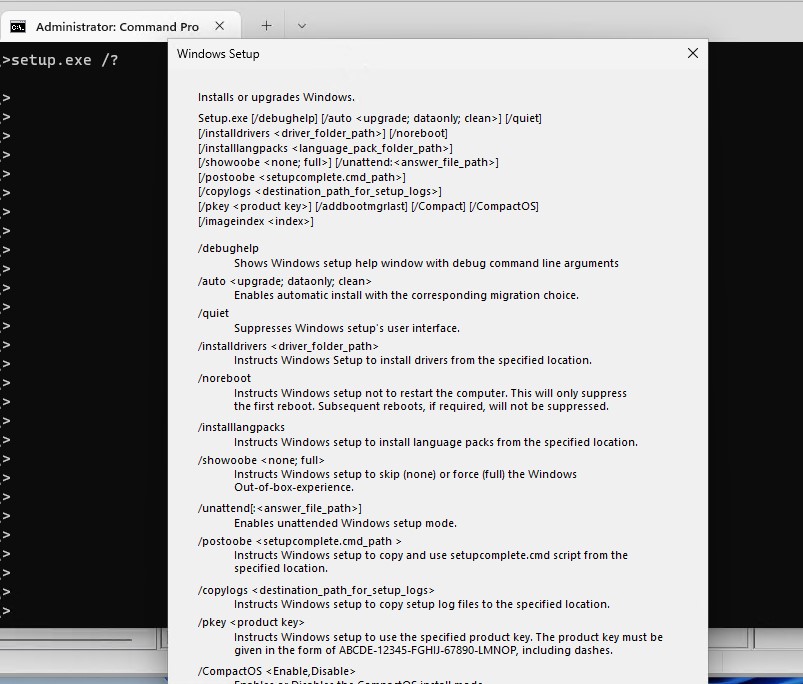
Подробную информацию об всех опциях setup.exe и возможных значениях можно получить на странице документации: https://learn.microsoft.com/en-us/windows-hardware/manufacture/desktop/windows-setup-command-line-options?view=windows-11
Генерация актуального установочного ISO образа Windows 11
Чтобы выполнить обновление, вам нужно получить установочный ISO образ с последней версией Windows (на данный момент это Windows 11 24H2).
Вы можете сгенерировать установочный ISO образ с помощью официальной утилиты Media Creation Tool или скачать актуальный Windows 11 multi-edition x64 ISO со страницы загрузки Microsoft (https://www.microsoft.com/en-us/software-download/windows11)
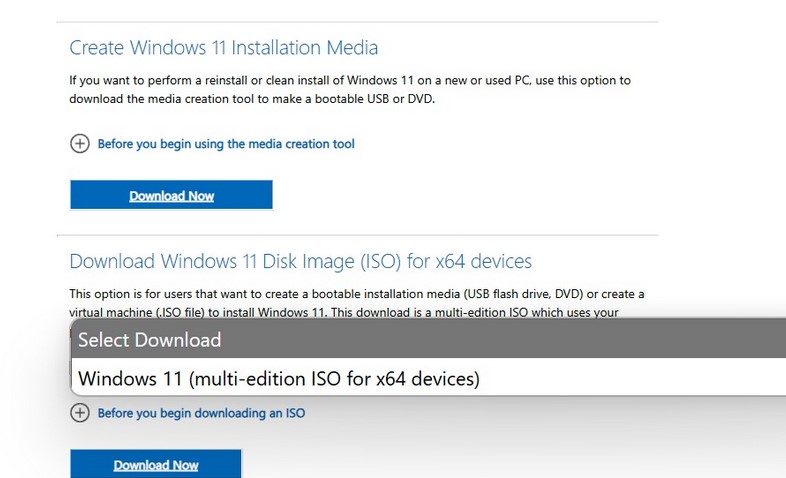
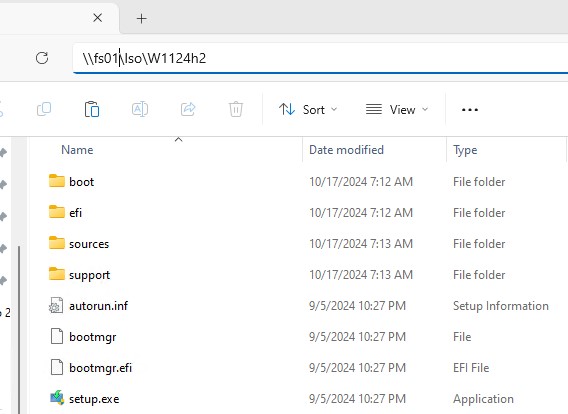
Смонтируйте полученный ISO образ в Windows и распакуйте содержимое образа на файловый сервер.
Проверка совместимости системы с новым билдом Windows 11
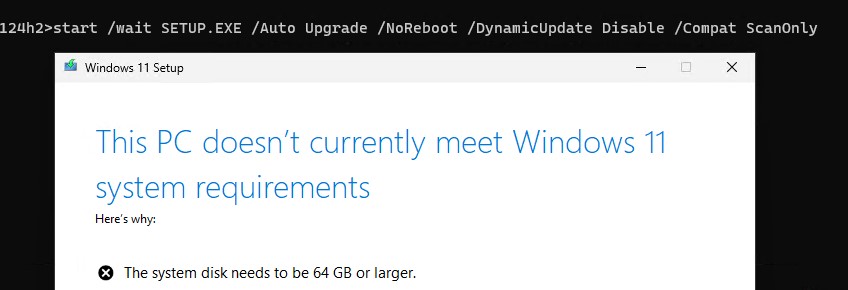
Прежде чем приступать к обновлению ОС, нужно проверить, совместим ли компьютер с новым билдом Windows 11, который находится в установочном образе. Откройте командную строку, перейдите в каталог с образом и выполните:
cd c:\Iso\W1124h2
start /wait SETUP.EXE /Auto Upgrade /NoReboot /DynamicUpdate Disable /Compat ScanOnly
Здесь используются такие параметры setup.exe:
- /Auto Upgrade – автоматический режим обновления;
- /NoReboot – запретить перезагрузку компьютера;
- /DynamicUpdate Disable —не нужно загружать последние обновления через Windows Update;
- /Compat ScanOnly – выполнить только проверку совместимости, без выполнения обновления.
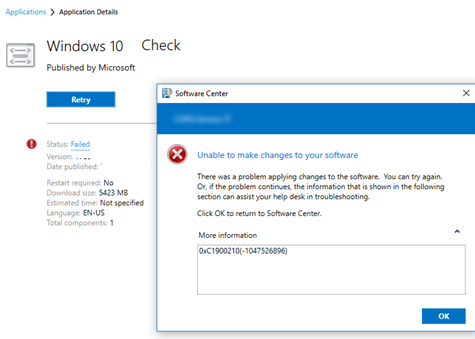
В данном случае мастер обновления вернул, что обновление невозможно, т.к. компьютер не совместим с требованиями из-за недостаточного размер системного диска.
Можно скрыть графическое окно мастера обновления Windows 11 Setup и вернуть от setup.exe только результат проверки, добавив параметр Quiet .
start /wait setup.exe /Auto Upgrade /Quiet /NoReboot /DynamicUpdate Disable /Compat ScanOnly
После выполнения этой команды, выведите содержимое переменной:
echo %errorlevel%
Здесь будет указан статус проверки на совместимость с новым билдом.

В нашем случае команда вернула значение
-1047526912
. Что означает это значение? (в скобках указан шестнадцатеричный код ошибки, его можно получить в калькуляторе преобразовав DEC в HEX значение)
-
-1047526896 (0xC1900210)
– ошибок совместимости не найдено -
-1047526912 (0xC1900200)
– компьютер не совместим с минимальными системными требованиями Windows 11 (см. как выполнить обновление Windows 11 на неподдерживаемом железе) -
-1047526904 (0xC1900208)
– несовместимое окружение (hard block) -
-1047526898 (0xC190020E)
– недостаточно свободного места на диске -
-1047526908 (0xC1900204)
– неверная редакция или архитектура образа
Подробнее изучить ошибки при проверки совместимости можно по лог файлам SETUPACT.LOG и SETUPERR.LOG в папке
C:\$Windows.~BT\Sources\Panther\
, которые генерирует setup.exe в процессе проверки.
Для получения более детальной информации о причине невозможности обновить версию Windows 11 используется утилита setupdiag.exe.
При наличии SCCM вы можете централизованно собрать значения статуса
errorlevel
с компьютеров пользователей простым пакетом с командой
setup.exe /Compat ScanOnly ….
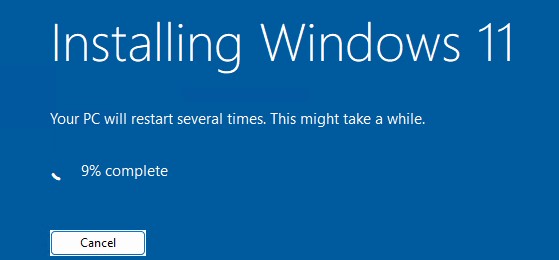
Автоматическое обновления билда Windows 11 из командной строки
Если вы не выявили проблем совместимости, которые мешают обновлению билда Windows, можете запустить автоматическое обновление версии ОС на компьютере с помощью простого скрипта. Создайте в сетевой папке с распакованным образом Windows 11 bat файл run_win_upgrade.bat со следующим кодом:
start /wait .\W1124h2\setup.exe /auto upgrade /DynamicUpdate disable /showoobe None /Telemetry Disable /Copylogs %SystemDrive%\temp /EULA Accept /compat IgnoreWarning /NoReboot
Мы использовали такие параметры обновления:
- /Auto:Upgrade сохранить все установленные приложения и данные пользователей.
- /ShowOOBENone – пропустить экран первоначальной настройки (OOBE)после обновления Windows
- Можно добавить параметр /migratedrivers all. Используется для принудительного переноса всех драйверов. Если параметр не задан, установщик сам принимает решения по каждому драйверу индивидуально.
- /Copylogs %SystemDrive%\temp – поместить логи обновления в указанный каталог
- /Telemetry Disable – отключить запись и отправку отчетов телеметрии при установке
- /EULA Accept – принять лицензионное соглашение
- /Unattend:unattend.xml – позволяет задать файл ответа для установки (не используется в нашем примере)
- /Quiet – выполнить обновление в фоновом режиме. Все графические окна Windows Setup не будут отображаться пользователю (автоматическая установка обновления).
- /Priority low|normal – увеличить или уменьшить приоритет процесса Windows Setup
- /CompactOS enable|disable – включить или отключить сжатие файлов с помощью функции Compact OS (позволяет сэкономить место на диске)
- /BitLocker AlwaysSuspend — приостановить шифрование BitLocker при обновлении
- /Compat IgnoreWarning – игнорировать все сообщения о несовместимости, которые можно пропустить
- /NoReboot – не перезагружать компьютер автоматически после выполнения обновления.
Начиная с Windows 10 1607 вы можете указывать параметры установки через файл Setupconfig.ini. Этот файл должен находится в каталоге с setup.exe и содержать примерно такой текст, аналогичный команде выше:
[SetupConfig]
NoRebootShowOobe=None
Telemetry=Disable
DynamicUpdate=Disable
Для запуска обновления Windows 11 с помощью файла параметров используется команда:
Setup.exe /ConfigFile setupconfig.ini
The Windows Installer technology uses Msiexec.exe for installing MSI and
MSP packages. But what is Msiexec.exe? Msiexec.exe is a process present on any modern Windows
operating system that is triggered whenever an MSI or MSP is executed.

Using the built in msiexec switches, you gain full control over the installation
process, giving you the ability to set:
- install options (install, uninstall, administrative install, advertise a product)
- display options (full, basic or no UI during the installation)
- restart options (if the machine will be restarted after the installation)
- logging options
- update options (apply or remove updates)
- repair options (only for an installed package)
- public properties which are used by the
installation
The usual form of the msiexec command line is this:
msiexec.exe <install_option> <path_to_package> [package_parameters]
Install Options
When launching an installation package, you can set the install type through
multiple msiexec.exe switches. Here you have the ability to enable a normal install or
uninstall. In addition, you can create an administrative install which helps you create an
image of the program on a defined share location which can later be used to actually trigger
the install. Also you can benefit of advertising the product to the user under which the
installation occurs.
These msiexec switches are:
msiexec.exe [/i][/a][/j{u|m|/g|/t}][/x] <path_to_package>
- /i — normal installation
- /a — administrative install
- /j — advertise the product
- u — advertise to the
current user - m — advertise to all users
- /g — the language identifier used by the advertised package
- /t — apply transform to advertise package
- u — advertise to the
- /x — uninstall the package
Sample command line:
msiexec.exe /i "C:\Example.msi"
Are you interested to Create, Update, and Upload your packages
directly in Intune or MECM? Try PacKit
FREE
Display Options
The user interface level of the installation can be configured according to the
target environment. For example, a package distributed to clients should have a full UI,
while a package deployed through Group Policy or Configuration Management tools such as
InTune, Endpoint Manager, MECM, SCCM, should have no user interface. In enterprise
environments where administrators handle the software deployment, a silent installation is
needed.
Msiexec.exe sets the UI level of the installation through these
switches:
msiexec.exe /i <path_to_package> [/quiet][/passive][/q{n|b|r|f}]
- /quiet — quiet mode (there is no user interaction)
- /passive — unattended mode (the installation shows only a progress
bar) - /q — set the UI level:
- n — no UI
- n+ — no UI except for a modal dialog box displayed at the end.
- b — basic UI
- b+ — basic UI with a modal dialog box displayed at the end. The modal
box is not displayed if the user cancels the installation. Use qb+! or qb!+ to hide the
[ Cancel ] button. - b- — basic UI with no modal dialog boxes. Please note that /qb+- is not
a supported UI level. Use qb-! or qb!- to hide the [ Cancel ]
button. - r — reduced UI
- f — full UI
Sample command line:
This command line executes a silent install with a progress bar display. The user
has no cancel button.
msiexec.exe /i "C:\Example.msi" /qb!
This command line gives no display. It executes a silent install in the
background.
msiexec.exe /i "C:\Example.msi" /qn
Restart Options
Sometimes an installation overwrites files which are in use or needs to reboot the
machine in order to finish it. The reboot policy used by the installation can be set through
these options:
msiexec.exe /i <path_to_package> [/norestart][/promptrestart][/forcerestart]
- /norestart — the machine will not be restarted after the installation is
complete - /promptrestart — the user will be prompted if a reboot is required
- /forcerestart — the machine will be restarted after the installation is
complete
Sample command line:
msiexec.exe /i "C:\Example.msi" /norestart
Logging Options
When debugging an installation package you can use multiple logging parameters in
order to create a log. Also, when deploying a package in an
enterprise environment via any configuration manager tool, it is best to always include the
log file switch. This log file will contain different information for each parameter you
use:
msiexec.exe [/i][/x] <path_to_package> [/L{i|w|e|a|r|u|c|m|o|p|v|x+|!|*}][/log]
<path_to_log>
- /L — enable logging
- i — include status messages
- w — include non-fatal warnings
- e — include all error messages
- a — mention when an action is started
- r — include action-specific records
- u — include user requests
- c — include the initial UI parameters
- m — include out-of-memory or fatal exit information
- o — include out-of-disk-space messages
- p — include terminal properties
- v — verbose output
- x — include extra debugging information
- + — append to an existing log file
- ! — flush each line to the log
- * — log all information, except for v and x
options
- /log — the equivalent of /l*
Sample command line:
msiexec.exe /i "C:\Example.msi" /L*V "C:\package.log"
Update Options
The Windows Installer command line can apply or remove updates (patches for
example) through these msiexec.exe switches:
msiexec.exe [/p][/update][/uninstall[/package<product_code_of_package>]]
<path_to_package>
- /p — install an MSP patch. When installing a patch silently, you need to
set REINSTALLMODE property to «ecmus» and REINSTALL to «ALL». Otherwise the patch will
simply update the MSI cached on the target machine. - /update — apply updates (if there are multiple updates, you can separate
them through the «;» character). - /uninstall — remove an update for a product (if there are multiple
updates, you can separate them through the «;» character)- /package — specifies the package for which the update is
removed.
- /package — specifies the package for which the update is
Sample command lines:
msiexec.exe /p "C:\MyPatch.msp"
msiexec.exe /p "C:\MyPatch.msp" /qb REINSTALLMODE="ecmus" REINSTALL="ALL"
msiexec.exe /update "C:\MyPatch.msp"
msiexec.exe /uninstall {1BCBF52C-CD1B-454D-AEF7-852F73967318}
  /package {AAD3D77A-7476-469F-ADF4-04424124E91D}
In the above command line the first GUID is the Patch identifier GUID and the second one
is the Product Code of the MSI for which the patch was applied.
To locate the ProductCode of any installed product, refer to our guide on How to find the Product Code
GUID of an installed MSI. For packages created with Advanced Installer, you can
easily find the ProductCode in the Product IDs Tab.
Repair Options
If you have an installed package, you can use the Windows Installer command line
for repairing it using the folowing msiexec.exe switches:
msiexec.exe [/f{p|o|e|d|c|a|u|m|s|v}] <product_code>
- /f — repair a package
- p — repair only if a file is
missing - o — repair if a file is missing or an older version is installed
- e — repair if file is missing or an equal or older version is
installed - d — repair if a file is missing or a different version is
installed - c — repair if a file is missing or the checksum does not match the
calculated value - a — forces all files to be reinstalled
- u — repair all the required user-specific registry entries
- m — repair all the required computer-specific registry entries
- s — repair all existing shortcuts
- v — run from source and recache the local package
- p — repair only if a file is
Sample command line:
msiexec.exe /fa {AAD3D77A-7476-469F-ADF4-04424124E91D}
In the above command line the GUID is the Product Code of the MSI which will be
repaired.
Set public properties
The name of a public property contains only uppercase letters (for example
PROPERTY). This type of properties can be set through the command
line like this: PROPERTY=»value».
Sample command line:
msiexec.exe /i "C:\Example.msi" MY_PROP="myValue"
Video tutorial — Msiexec.exe switches
- 13.02.2020
- 46 819
- 2
- 04.10.2021
- 20
- 18
- 2
- Содержание статьи
- Описание
- Установка и настройка продукта
- Синтаксис
- Параметры
- Примечания
- Примеры
- Использование режима административной установки
- Синтаксис
- Параметры
- Примечания
- Примеры
- Восстановление продукта
- Синтаксис
- Параметры
- Примечания
- Примеры
- Удаление продукта
- Синтаксис
- Параметры
- Примечания
- Примеры
- Объявление продукта
- Синтаксис
- Параметры
- Примечания
- Примеры
- Установка уровня ведения журнала
- Синтаксис
- Параметры
- Примечания
- Примеры
- Справочная информация
- Комментарии к статье ( 2 шт )
- Добавить комментарий
Описание
MSIEXEC — Средство установки, изменения и выполнения операций установщика Windows из командной строки.
Эта команда поддерживается в CMD.EXE и в PowerShell.
Установка и настройка продукта
Синтаксис
msiexec /i {пакет|код_продукта}Параметры
- /i — Установка или настройка продукта.
- пакет — Имя файла пакета установщика Windows.
- код_продукта — Глобальный уникальный идентификатор (GUID) пакета установщика Windows.
Примечания
- Регистр букв при вводе параметров командной строки установщика Windows не учитывается.
Примеры
Чтобы установить продукт из файла A:\Example.msi, введите:
msiexec /i A:\Example.msiИспользование режима административной установки
Синтаксис
msiexec /a пакетПараметры
- /a — Выбор режима административной установки.
- пакет — Имя файла пакета установщика Windows.
Примечания
- Регистр букв при вводе параметров командной строки установщика Windows не учитывается.
Примеры
Чтобы установить продукт из файла A:\Example.msi в режиме административной установки, введите:
msiexec /a A:\Example.msiВосстановление продукта
Синтаксис
msiexec /f [p][o][e][d][c][a][u][m][s][v]{пакет|код_продукта}Параметры
- /f — Включение одного или нескольких параметров командной строки, перечисленных в следующей таблице.
- пакет — Имя файла пакета установщика Windows.
- код_продукта — Глобальный уникальный идентификатор (GUID) пакета установщика Windows.
| Параметр | Описание |
|---|---|
| p | Переустановка только в случае отсутствия файла. |
| o | Переустановка при отсутствии файла или если установлена его старая версия. |
| e | Переустановка при отсутствии файла или если установлена его текущая либо старая версия. |
| d | Переустановка в случае отсутствия файла или если установлена другая его версия. |
| c | Переустановка в случае отсутствия файла или в случае, если контрольная сумма не совпадает с вычисленным значением. |
| a | Принудительная переустановка всех файлов. |
| u | Перезапись всех необходимых пользовательских записей реестра. |
| m | Перезапись всех необходимых записей реестра компьютера. |
| s | Перезапись всех имеющихся ярлыков. |
| v | Запуск файлов из источника и повторное кэширование локального пакета. |
Примечания
- Параметром по умолчанию для этой командной строки является параметр /fpecms.
- Регистр букв при вводе параметров командной строки установщика Windows не учитывается.
Примеры
Чтобы восстановить пакет установки, введите:
msiexec /fpecms Example.msiУдаление продукта
Синтаксис
msiexec /x {пакет|код_продукта}Параметры
- /x — Удаление продукта.
- пакет — Имя файла пакета установщика Windows.
- код_продукта — Глобальный уникальный идентификатор (GUID) пакета установщика Windows.
Примечания
- Регистр букв при вводе параметров командной строки установщика Windows не учитывается.
Примеры
Чтобы удалить или отменить установку пакета, введите:
msiexec /x Example.msiОбъявление продукта
Синтаксис
msiexec /j [{u|m}] пакетmsiexec {u|m} пакет /t список_преобразованийmsiexec {u|m} пакет /g код_языкаПараметры
- /j — Объявление продукта. u — Объявление для текущего пользователя. m — Объявление для всех пользователей компьютера.
- пакет — Файл пакета установщика Windows.
- /g код_языка — Служит для задания языка.
- /t список_преобразований — Применение преобразований к объявляемому пакету.
Примечания
- При необходимости установить приложение с повышенными привилегиями используйте параметр /jm.
- Регистр букв при вводе параметров командной строки установщика Windows не учитывается.
Примеры
Чтобы объявить пакет для всех пользователей этого компьютера, введите:
msiexec /jm Example.msiУстановка уровня ведения журнала
Синтаксис
msiexec /L [i][w][e][a][r][u][c][m][p][v][+][!]файл_журнала.txtПараметры
- /L — Путь к файлу журнала.
- i — Занесение в журнал сообщений о состоянии.
- w — Занесение в журнал некритических предупреждений.
- e — Занесение в журнал сообщений об ошибках.
- a — Занесение в журнал выполнения действий.
- r — Занесение в журнал записей со сведениями о действиях.
- u — Занесение в журнал запросов пользователей.
- c — Занесение в журнал исходных параметров пользовательского интерфейса.
- m — Занесение в журнал нехватки памяти.
- p — Занесение в журнал свойств терминала.
- v — Занесение в журнал подробных сведений. Для использования параметра v следует задавать /L*v.
- + — Добавление в существующий файл.
- ! — Сброс в журнал каждой строки.
- * — Занесение в журнал всех сведений, кроме параметра v. Это подстановочный знак.
- файл_журнала.txt — Имя и путь к текстовому файлу журнала.
Примечания
- Регистр букв при вводе параметров командной строки установщика Windows не учитывается.
- Чтобы включить в файл журнала параметр v при использовании подстановочного знака, введите в командной строке /L*v.
- Параметры файла журнала установщика Windows могут также использоваться для процессов удаления и восстановления.
Примеры
Чтобы установить пакет и создать файл журнала, включающий в себя сведения о состоянии, сообщения о нехватке памяти и все сообщения об ошибках, введите следующую команду:
msiexec /i Example.msi /L ime logfile.txtСправочная информация
msiexec /Option <обязательный параметр> [необязательный параметр]
Параметры установки
</package | /i> Установка или настройка продукта
/a Административная установка — установка продукта в сеть
/j<u|m> [/t <список преобразований>] [/g <код языка>]
Объявление о продукте: «m» — всем пользователям; «u» — текущему пользователю
</uninstall | /x> Удаление продукта
Параметры отображения
/quiet
Тихий режим, без взаимодействия с пользователем
/passive
Автоматический режим — только указатель хода выполнения
/q[n|b|r|f]
Выбор уровня интерфейса пользователя
n — Без интерфейса
b — Основной интерфейс
r — Сокращенный интерфейс
f — Полный интерфейс (по умолчанию)
/help
Вывод справки по использованию
Параметры перезапуска
/norestart
Не перезапускать после завершения установки
/promptrestart
Запрашивать перезапуск при необходимости
/forcerestart
Всегда перезапускать компьютер после завершения установки
Параметры ведения журнала
/l[i|w|e|a|r|u|c|m|o|p|v|x|+|!|*] <файл_журнала>
i — сообщения о состоянии
w — сообщения об устранимых ошибках
e — все сообщения об ошибках
a — запуски действий
r — записи, специфические для действий
u — запросы пользователя
c — начальные параметры интерфейса пользователя
m — сведения о выходе из-за недостатка памяти или неустранимой ошибки
o — сообщения о недостатке места на диске
p — свойства терминала
v — подробный вывод
x — дополнительные отладочные сведения
+ — добавление в существующий файл журнала
! — сбрасывание каждой строки в журнал
* — заносить в журнал все сведения, кроме параметров «v» и «x»
/log <файл_журнала>
Равнозначен /l* <файл_журнала>
Параметры обновления
/update [;Update2.msp]
Применение обновлений
/uninstall <Код_Guid_обновления>[;Update2.msp] /package Удаление обновлений продукта
Параметры восстановления
/f[p|e|c|m|s|o|d|a|u|v] Восстановление продукта
p — только при отсутствии файла
o — если файл отсутствует или установлена старая версия (по умолчанию)
e — если файл отсутствует или установлена такая же либо старая версия
d — если файл отсутствует или установлена другая версия
c — если файл отсутствует или контрольная сумма не совпадает с подсчитанным значением
a — принудительная переустановка всех файлов
u — все необходимые элементы реестра, специфические для пользователя (по умолчанию)
m — все необходимые элементы реестра, специфические для компьютера (по умолчанию)
s — все существующие ярлыки (по умолчанию)
v — запуск из источника с повторным кэшированием локальных пакетов
-
Home
-
News
- [Full Guide] How to Install Windows 10 from Command Prompt?
By Yamila | Follow |
Last Updated
In some cases, you may consider installing Windows 10 with Command Prompt. How can you do that? In this post, MiniTool Partition Wizard provides a step-by-step guide on how to install Windows 10 from Command Prompt. You can take a look.
For some reason, you may randomly want to install Windows 10 from Command Prompt. To help you complete this operation, there are two methods available. Just keep reading and pick one according to your needs.
Note:
Before you install Windows from Command Prompt, you should first click here to download the Windows 10 ISO file. Then right-click the file in File Explorer and select Mount.
Method 1: Install Windows 10 from CD/DVD Using Command Prompt
If you have a CD/DVD, you can easily learn how to install Windows 10 from Command Prompt with it by following the steps below.
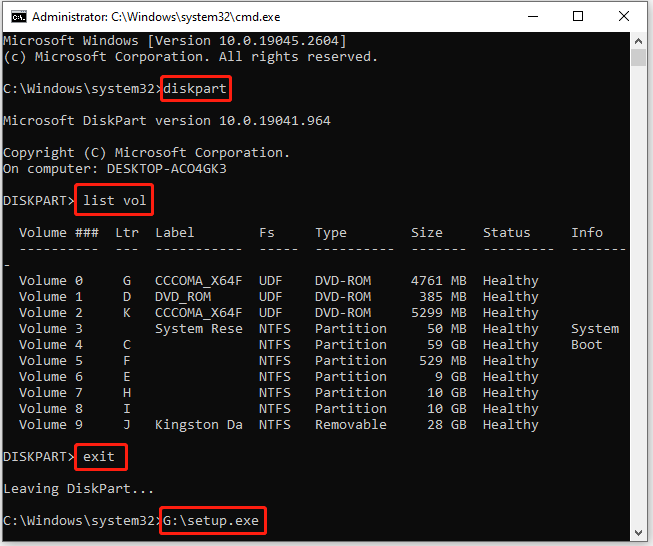
Step 1: Press Windows + R to open the Run dialog.
Step 2: Type cmd in the text box and then press Ctrl + Shift + Enter to open Command Prompt as an administrator.
Step 3: In the elevated Command Prompt, type diskpart and press Enter.
Step 4: After that, type list vol and press Enter to execute this command. It will list all the volumes in your system. You should figure out the correct volume containing the mounted Windows 10 ISO file.
Step 5: Type exit and press Enter to quit Diskpart. Then execute the G:\setup.exe command to open the Windows 10 Setup window.
Tips:
Replace G with the drive letter of your drive where the ISO file locates.
Step 6: Follow the on-screen instructions to install Windows 10 from Command Prompt.
Method 2: Install Windows 10 from USB Using Command Prompt
In addition to installing Windows 10 from CD/DVD, it’s also a great way to use a USB drive to install Windows 10. Here’s detailed information on how to install Windows 10 from USB using Command Prompt.
Note:
The USB drive you use to install Windows from Command Prompt should have at least 8GB of space. Besides, it’s necessary to make a backup if there are important files on the USB drive.
Step 1: Connect the prepared USB drive to your PC.
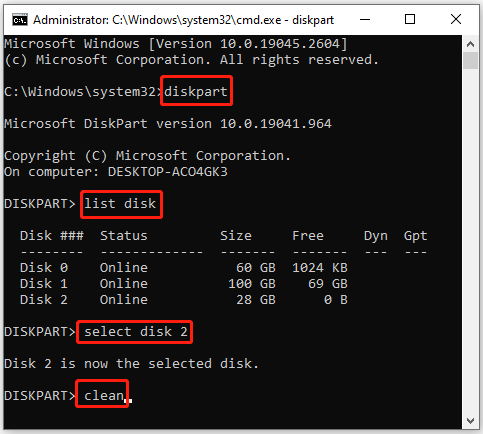
Step 2: Run Command Prompt as an administrator. Then type the following commands one by one and press Enter after each to erase the USB drive.
- diskpart
- list disk
- select disk N (N represents the number of your USB drive)
- clean
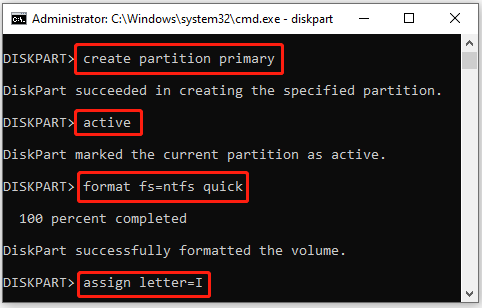
Step 3: After cleaning the USB drive, recreate a new partition by running the given commands.
- create partition primary
- select partition X (Replace X with the number of the newly created partition; you can use the list partition command to find the partition number if you are not sure which it is)
- active
- format fs=ntfs quick (You can also format the partition to FAT32 instead of NTFS)
- assign letter=I
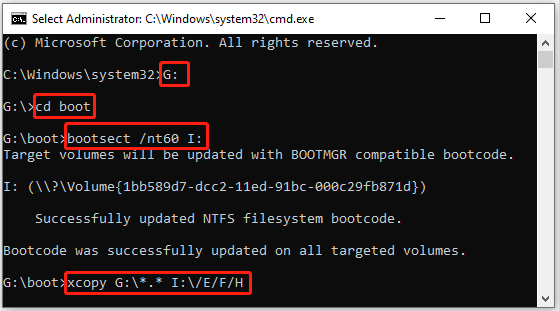
Step 4: Once done, exit Diskpart. Then execute these commands so that you can navigate to the mounted ISO image and copy it to the target USB drive.
- G: (G is the drive letter of the drive with the mounted Windows ISO image)
- cd boot
- bootsect /nt60 I: (I refers to your USB drive’s drive letter)
- xcopy G:\*.* I:\ /E /F /H (/E copies all subfolders, /H copies all hidden files, and /F displays all source and destination file names as it’s copying.)
Step 5: Set the USB drive as the first boot option with this guide: How To Change Boot Order Safely On Windows Device. Then reboot your PC from the USB drive and follow the on-screen instructions to install Windows 10.
That’s all about how to install Windows 10 from USB using Command Prompt. You can have a try.
Bonus Tip: Obtain Windows 10 Without Installing OS
From the above, you may learn how to install Windows 10 from Command Prompt. It’s a helpful but time-consuming way. And if you are not familiar with these command lines, you may sometimes feel confused while installing Windows 10 with Command Prompt.
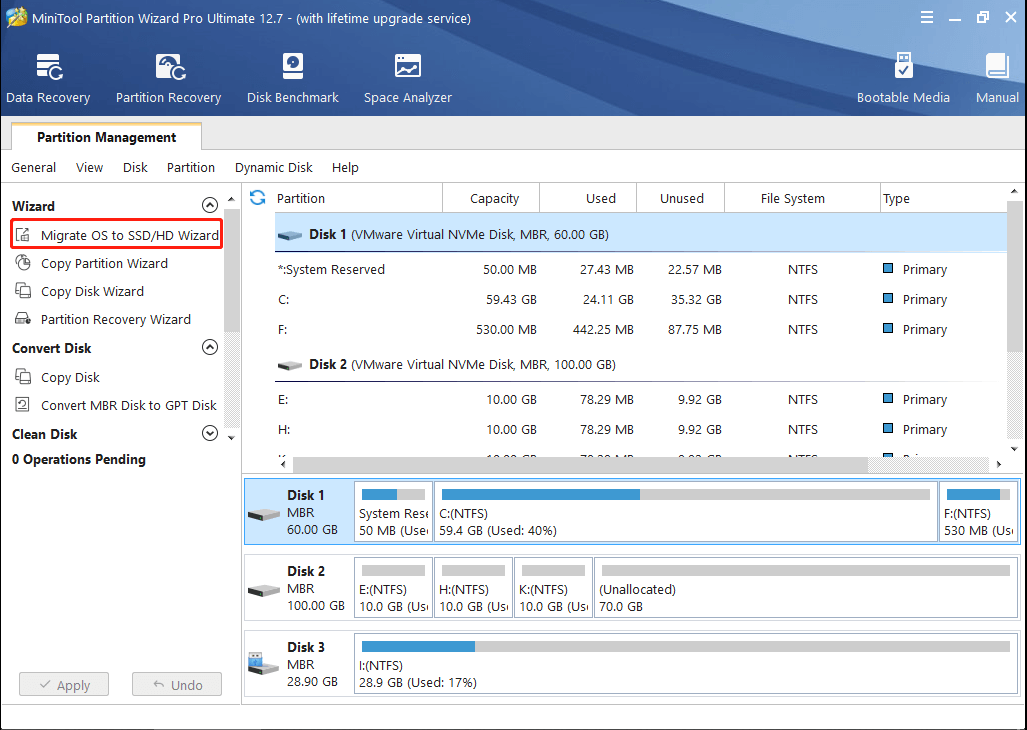
Is there an easier way to get Windows 10 on your computer? Well, to simplify the Windows installation, we’d like to recommend you take advantage of MiniTool Partition Wizard. It’s a professional disk partition software that enables you to migrate OS to SSD without installing the OS.
Therefore, if you have another computer that is running Windows 10 properly, you can try using an SSD drive to transfer the operating system to the target computer with MiniTool Partition Wizard. To do this, you need to get this program installed on the source computer to migrate Windows 10 to SSD. Then connect the SSD with Windows 10 to the target computer.
MiniTool Partition Wizard DemoClick to Download100%Clean & Safe
After reading this post, you may find ways to effectively install Windows 10 from Command Prompt. Besides, you can try getting Windows more quickly and easily with MiniTool Partition Wizard. If you have any problems with Windows installation, you can leave a message in the comment part below.
About The Author
Position: Columnist
Yamila is a fan of computer science. She can solve many common issues for computer users by writing articles with simple and clear words. The very aspect that she is good at is partition management including create partition, format partition, copy disk and so on.
When she is free, she enjoys reading, doing some excerpts, listening to music and playing games.