
Давайте для начала разберёмся – что это такое? Как вы, наверное, уже знаете, для общения в сети любое устройство: компьютер, ноутбук, телефон или даже телевизор использует систему IP адресов. Пока в широком использовании существует именно четвертая версия IPv4. Она кодирует путём 4 байтовых цифр. 1 байт может выражать цифру от 0 до 255. Грубо говоря, адресация находится в диапазоне от 0.0.0.0 до 255.255.255.255. В итоге «ай пи» могут получить 4 294 967 296 – чуть больше 4 миллиардов адресов.
Но в 21 веке, который знаменуется «веком интернета» – как говорит практика, свободных «ИП», уже становится мало. В свое время мой провайдер, спокойно выдавал статические IP. Сейчас же эта процедура платная, хотя прошло всего несколько лет.
IPv6 – в общем это новый стандарт, который пока используется очень редко. Адрес при этом имеет размер не 32 Бита как в IPv4, а в 4 раза больше – 128 Бит. Но в скором времени компьютерная и сетевая индустрия полностью перейдут на новый формат адреса. Теперь давайте расскажу, как включить IPv6.
Содержание
- Включение и выключение
- Как настроить на роутере
- Как узнать и посмотреть адрес?
- Задать вопрос автору статьи
Включение и выключение
ПРИМЕЧАНИЕ! Если подключение идёт к роутеру, при использовании вашего провайдера шестой версии – настройки нужно производить в самом роутере.
Настройки IPv6 уже по-умолчанию установлены на большинстве сетевых устройств. При этом использование протоколов адресов, зависит от вашего провайдера и какой именно версию айпи – он использует. Если провод от провайдера идёт напрямую к вам в компьютер, то настройка достаточна простая для всех версия Windows: 7, 8, 10 и даже XP.
- Одновременно нажмите на две клавиши и R.

- Пропишите команду, как на картинке выше и нажмите «ОК».
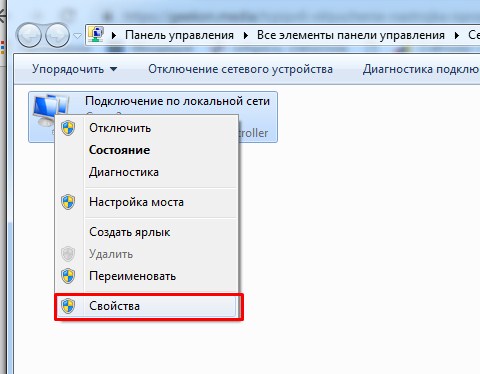
- Теперь очень важный момент. Нужно выбрать именно то подключение, через которое идёт интернет. В моём случае это проводной вариант. Нажимаем правой кнопкой и переходим в свойства.
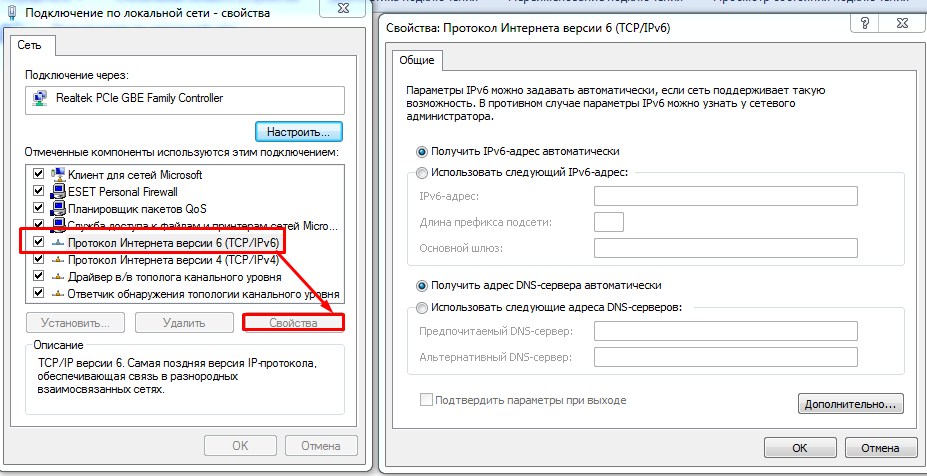
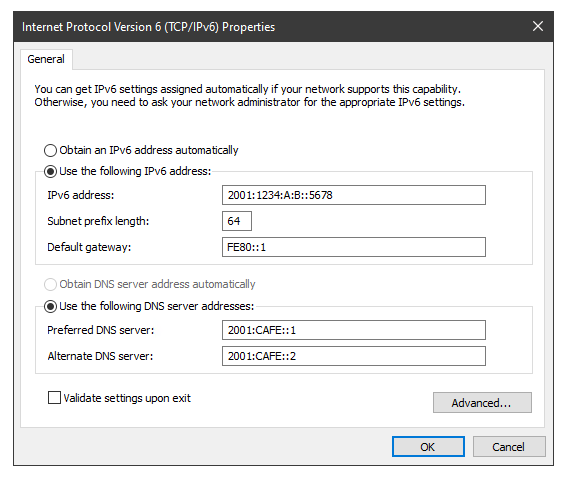
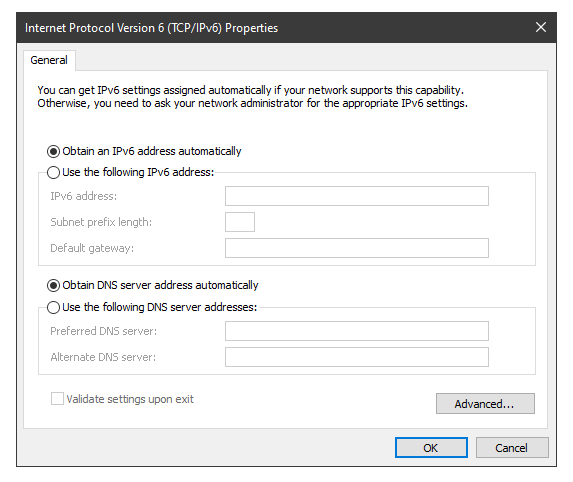
- Выбираем 6 версию TCP и заходим в свойства. По-умолчанию, стоит автономное получение IP от DHCP сервера. Если подключение идёт извне от провода провайдера, то по идее он должен автоматом получить эти данные. Но совсем недавно, некоторые провайдеры стали выдавать настройки статического адреса шестой версии.
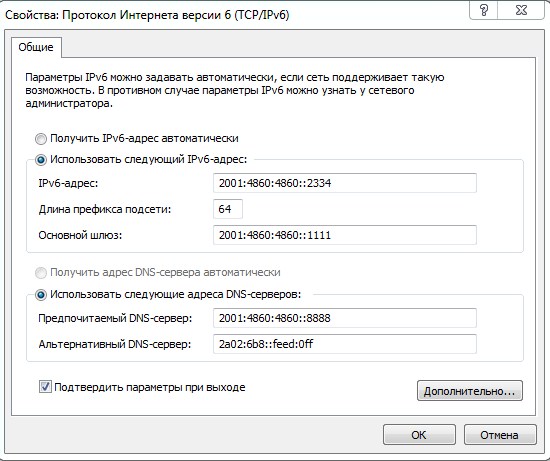
- Эти данные написаны в договоре. В таком случаи, просто переписываем все буковки и циферки как на листке. Для установки адресов вручную, указываем галочки ниже «Использовать следующие…» и прописываем. В самом конце ещё раз проверьте введенные данные и нажмите «ОК».
Если вы в автономном режиме получаете айпишник, то скорее всего у вас также в листе будут указаны DNS сервера вашего провайдера. Но можно указать проверенные ДНС от Google и Яндекс:
- 2001:4860:4860::8888 и 2001:4860:4860::8844;
- 2a02:6b8::feed:bad и 2a02:6b8:0:1::feed:bad.
Как настроить на роутере
Если интернет у вас подключен к роутеру, то прописывать все данные, в том числе DNS адреса стоит в настройках маршрутизатора. Чтобы зайти в Web-интерфейс роутера, вам нужно быть подключенным к его сети. Можно подключиться по Wi-Fi или по кабелю (вставьте его в свободный LAN разъём на передатчике).
- Открываем браузер и прописываем IP или DNS адрес роутера. Адрес указан на этикетке под корпусом.
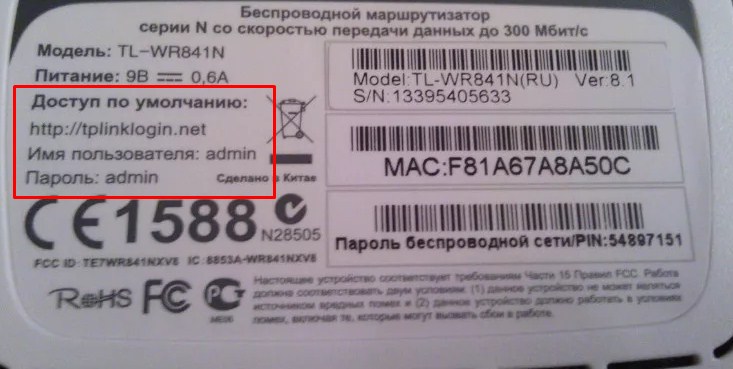
- После, вас попросят ввести логин и пароль – эта информация находится там же.
- Далее инструкции будут отличаться в зависимости от прошивки и компании, которая выпустила аппарат. Но сам принцип один и тот же. Покажу на примере TP-Link.
- Почти у всех, данный пункт меню будет отдельно. Ну и называется он соответствующее – «IPv6». Далее нас интересует именно WAN подключение.
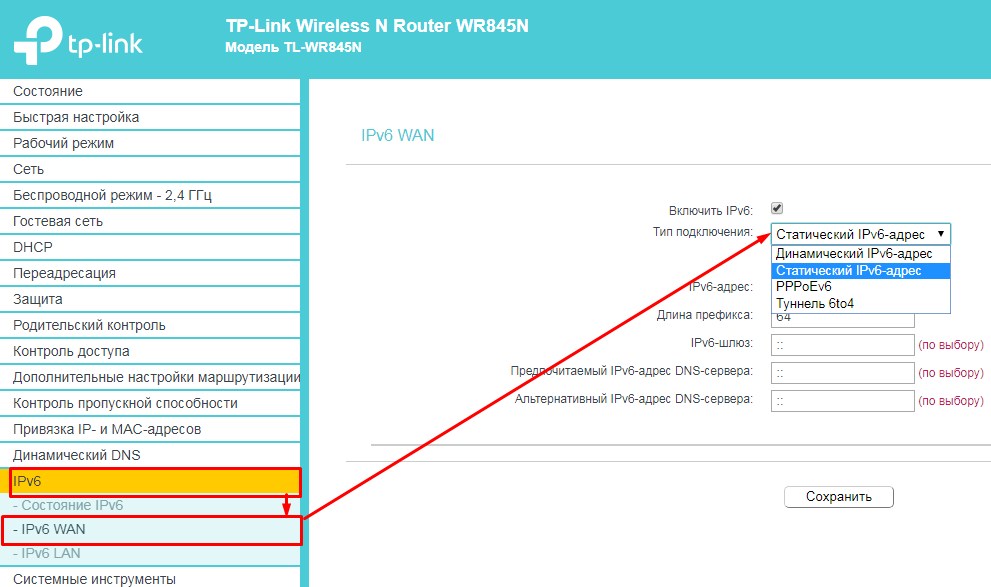
- Как видите тут принцип такой же как на IPv4. Есть динамическое подключение – его просто устанавливаешь и ничего вводить не нужно. Статическое – тут нужно как в прошлой главе вручную ввести: IP, Длину префикса, адрес шлюза и ДНС сервера. PPPoEv6 – использует при подключении логин и пароль. Выбираем наш вариант и просто вводим данные из договора от провайдера.
- Проверить включение режима можно на главной вкладке или в «Состояние». Там вы увидите ваш адрес.
Как узнать и посмотреть адрес?
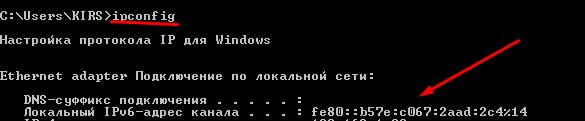
Если подключение идёт напрямую к компу или ноуту, то можно узнать через командную строку. Для этого жмём + R, прописываем «cmd». Далее на черном экране прописываем команду «ipconfig» и смотрим результат. Если вы подключаетесь через роутер, то адрес стоит смотреть в админке аппарата на главной. О том, как туда зайти – я писал в главе выше.
The Internet Protocol version 6 (IPv6) is the next-generation Internet protocol designed to replace the aging IPv4. With the rapid growth of connected devices, there’s an evident need for more IP addresses. IPv6 offers a virtually unlimited number of unique IP addresses, ensuring that every device can have a globally unique IP address.
What’s IPv6 in Windows?
IPv6 is a mandatory protocol in modern operating systems, including Windows 10 and 11. It is enabled by default and coexists with IPv4 to promote compatibility with older networks and applications. IPv6 provides several benefits over IPv4, such as improved security, better performance, and simplified network configuration.
One of the primary advantages you get when you enable IPv6 is its vast address space, which eliminates the need for complex address translation mechanisms like Network Address Translation (NAT) used in IPv4 networks. This simplifies network administration and improves end-to-end connectivity.
Configuring network adapter settings
To configure IPv6 in Windows, you need to access the network adapter properties. This section covers how to access and enable IPv6 settings for your network adapters.
Accessing network properties
To access network properties follow these steps:
- Open the Control Panel and navigate to the Network and Sharing Center.
- Click on “Change adapter settings” to view the list of network adapters.
- Right-click on the adapter you want to configure and select “Properties.”
- In the Properties window, scroll down and select “Internet Protocol Version 6 (TCP/IPv6).”
- Click on the “Properties” button to access the IPv6 configuration settings.
IPv6 address configuration options
After opening the “Properties” button as explained in the previous paragraph, you have several options to configure IPv6 in Windows settings:
- Obtain an IPv6 address automatically: This option allows your computer to automatically obtain an IPv6 address from a DHCP server or through stateless address autoconfiguration.
- Use the following IPv6 address: This option lets you manually enter a static IPv6 address and subnet prefix length. This is typically used in larger enterprise networks or when specific addressing requirements need to be met.
- Obtain DNS server address automatically: This option automatically obtains the DNS server address from the DHCP server or through stateless address autoconfiguration.
- Use the following DNS server addresses: This option allows you to manually specify the IPv6 addresses of DNS servers. This may be necessary in certain network environments or when using specific DNS servers for performance or security reasons.
How to disable IPv6?
In some cases, you may need to disable IPv6 on your Windows system, such as when troubleshooting network issues or working with legacy applications that do not support IPv6. Here’s how you can disable IPv6:
- Follow the steps to access the network adapter properties as described earlier.
- In the Properties window, uncheck the box next to “Internet Protocol Version 6 (TCP/IPv6).”
- Click “OK” to save the changes and close the Properties window.
After you disable IPv6, your system will only use the IPv4 protocol for network communication. However, it’s important to note that disabling IPv6 may affect the functionality of certain applications or services that rely on IPv6 connectivity.
Troubleshooting IPv6 connectivity
Despite the improvements in IPv6, you may still encounter connectivity issues or compatibility problems. This section covers some troubleshooting steps and common issues you may encounter when you configure IPv6 in Windows.
Network diagnostics
Windows includes built-in network diagnostic tools that can help identify and resolve IPv6 connectivity issues. You can use the Network Troubleshooter or the Command Prompt to run various diagnostic commands, such as ipconfig, ping and tracert. These tools can provide valuable information about your IPv6 configuration, connectivity status and potential issues.
Common configuration errors
Some common configuration errors that can cause IPv6 connectivity issues include:
- Incorrect subnet prefix or gateway settings
- Firewall rules blocking IPv6 traffic
- Misconfigured DNS server settings
- Compatibility issues with older applications or hardware
It’s important to carefully review your IPv6 configuration settings and make sure that they are correct and consistent across your network devices and systems.
Compatibility issues
While IPv6 is widely supported, there may still be compatibility issues with legacy applications or hardware that were designed solely for IPv4. In such cases, you may need to temporarily disable IPv6 or use compatibility modes to enforce proper functionality. However, it’s recommended to upgrade or replace legacy systems whenever possible to take advantage of the benefits and improved security features of IPv6.
IPv6 configuration best practices
While IPv6 is designed to be more straightforward than IPv4, there are still some IPv6 configuration best practices to follow for optimal performance and security.
Subnet prefix settings
When configuring static IPv6 addresses, it’s important to use the correct subnet prefix length. The prefix length determines the number of bits in the address that are used for the network portion and the remaining bits for the host portion. Consult your network administrator or follow industry standards for proper subnet prefix configuration.
Gateway configuration
If you’re using static IPv6 addresses, you’ll need to configure the IPv6 gateway address correctly. The gateway acts as the entry and exit point for network traffic and an incorrect gateway configuration can lead to connectivity issues. Check that the gateway address is reachable and correctly configured on your network devices.
Protocol preferences
In Windows, you can specify the order in which network protocols are used. It’s generally recommended to prioritize IPv6 over IPv4 to encourage the adoption of the newer protocol. However, you may need to adjust the protocol preferences based on your specific network requirements. For example, if you have legacy applications that only support IPv4, you may need to prioritize IPv4 for those applications.
Security
IPv6 includes several security enhancements over IPv4, such as mandatory IPsec support and better protection against address spoofing. However, it’s still important to follow best security practices, such as using firewalls, keeping your software up-to-date and implementing access controls.
Learn how IPConfig works and why it matters – click to watch!
Security considerations for IPv6
As with any network protocol, it’s important to consider security when configuring and using IPv6. Here are some security considerations to keep in mind:
- Implement firewalls: While IPv6 includes improved security features, it’s still important to use firewalls to control network traffic and protect against unauthorized access. Configure your firewalls to allow only necessary IPv6 traffic and block any suspicious or unwanted connections.
- Keep software updated: Regularly update your operating system, applications and network devices with the latest security patches and features. Software vulnerabilities can be exploited by attackers, so keeping your systems up-to-date is required for maintaining a secure network.
- Use access controls: Implement access controls, such as user authentication and authorization mechanisms, to restrict access to your network resources and sensitive data. This can help prevent unauthorized access and mitigate the risk of data breaches or cyberattacks.
- Monitor network traffic: Regularly monitor your network traffic for any suspicious activity or potential security threats. Use network monitoring tools and log analysis to detect and respond to security incidents in a timely manner.
Tools like NinjaOne can further enhance the experience by providing integrated network management and monitoring capabilities. When coupled with these IPv6 configuration best practices, IT professionals can guarantee a smooth and secure IPv6 transition. Start your free trial today.
Today, in this article, we will see the procedure on How to Configure IPV6 / Internet Protocol Version 6 on Windows 10 and 11. Loaded with many features, Internet Protocol Version 6 basically deals with many issues such as address depletion, extensibility, restoration of end-to-end conversation, and so on. Furthermore, it also expands the capabilities of the Internet that lets you enable new kinds of applications. However, the main reason for configuring IPV6 is, it provides a larger address space for us when compared to IPv4.
Another advantage of IPv6 is that it supports source as well as destination addresses of 128 bits (16 bytes) in length. This provides a better network layer security which makes the internet more secure. Moreover, Internet Provider 6 provides other features such as multi-casting and Mobility support. So, let us head towards the ways to enable and disable IPv6 and also its configuration details.
Ways to Configure IPV6 / Internet Protocol Version 6 in Windows 11 or 10
Through Network Adapter Properties
Step-1: Open Control Panel by typing ‘control’ in Taskbar search and pressing Enter key. Make the icons view into a small size, choose the applet Network and Sharing center (see snapshot).
Step-2: Proceeding forward, make a click on Change adapter settings that appear on the left pane of the following screen.
Step-3: In the “Network Connections” window, perform a right-click on your active network. From the list of options, click on Properties.
Step-4: This will launch the Properties dialog of the active network which displays a list of items that the connection is using. Here, locate and select “Internet Protocol Version 6 (TCP/IPv6)” and further click the Properties button as shown in the given picture.
Configure IPV6
Step-5: When the General tab of the “Internet Protocol Version 6 (TCP/IPv6)” comes up, you will see the underneath options to Configure IPV6 / Internet Protocol Version 6 in Windows 11 or 10.
Obtain an IPv6 address automatically: This option specifies that the Internet Protocol Version 6 addresses this particular connection or adapter are automatically determined stateful address autoconfiguration.
Use the Following IPv6 address: It allows you to specify an IPv6 moreover default gateway for the connection or adapter manually.
IPv6 Address: Provides you a space to input IPv6 unicast address.
Subnet prefix length: Lets you specify Subnet prefix length for the IPv6 address that you use above. Generally, the default value is always 64.
Default Gateway: Type in IPV6 unicast address of the default gateway in this field.
Obtain DNS Server Address Automatically: The IPv6 for DNS servers are automatically driven by “stateful address autoconfiguration” (DHCPv6).
“Use the following DNS Server Address“: Determines that the IP version 6 of the preferred, as well as alternate ‘DNS servers’ for your connection, can be manually addressed.
Preferred DNS server: This allows you to mention the IPV6 unicast address of the preferred DNS server in the respective field.
Alternate DNS server: You can specify Internet Protocol version 6 unicast address of the Alternate DNS server in this space.
Step-5: After choosing the preferred options, click OK to successfully Configure IPV6 / Internet Protocol Version 6 in Windows 10 or 11.
Use Windows PowerShell to Configure IPV6 / Internet Protocol Version 6 for Specific Network Adapter
This is another way which will help you in enabling or disabling IPv6. All you need is to execute certain commands in Windows PowerShell. However, ensure to hold admin rights before you advance with the steps.
Open elevated PowerShell and to do so, first conduct a right-click on Start icon. When the WinX menu shows up, locate and select Windows PowerShell (Admin).
Once, the window appears, copy/paste or type the command written below and hit Enter to run it.
Get-NetAdapterBinding -ComponentID ms_tcpip6
Executing the above command will immediately display the current status of your “IPv6”. In the result, ensure to note the adapter name.
Moving ahead, input the following command line in order to enable the IPv6.
Enable-NetAdapterBinding -Name "Adapter Name" -ComponentID ms_tcpip6
Now, to disable the IPv6 you need to execute the below-given command.
Disable-NetAdapterBinding -Name "Adapter Name" -ComponentID ms_tcpip6
Note: Ensure to replace “Adapter Name” with the name that you copied earlier.
Configure IPV6 in Windows 11 or 10 across All Adapters via Windows PowerShell
In this method, you need to follow the first two steps of the previous method but with different commands.
First of all, launch PowerShell with administrative privileges.
Copy and paste the below command in the blue window of PowerShell to enable all of your network adapters.
Enable-NetAdapterBinding -Name "*" -ComponentID ms_tcpip6
To disable the IPV6 across all of the adapters, you need to use given -below command.
Disable-NetAdapterBinding -Name "*" -ComponentID ms_tcpip6
Then hit enter. Voila! Everything is done. This is to Configure Internet Protocol Version 6 in Windows 11 or 10 across all adapters.
Hopefully, you will be able to Configure IPV6 / Internet Protocol Version 6 in Windows 10 and 11 pretty easily. However, along with Windows 10/11, you can also use them in Windows 8 and 7 respectively. In addition, advanced users can also deal with IP version 6 details using Registry Editor. For basic users, dealing with the registry may lead to misconfiguration. But with the above-mentioned ways, you can easily manage IPv6 on Windows 11 or 10.
Windows and EUI-64
Prior to Windows Vista and Windows Server 2008, Windows hosts used only MAC addresses to create Interface Identifiers (EUI-64). Globally unique addresses and Link-local ones were created using the segment’s prefix plus the EUI-64 identifier which is generated from the physical address of the host. With the rise of network security, this was found to be a security vulnerability because an IPv6 address can be easily tied to a MAC address, which uniquely identifies physical equipment.
For example, imagine a user with a laptop connecting to an IPv6 network with global prefix X:X:X:X::/64. Via SLAAC, the user’s laptop will generate a globally unique address X:X:X:X:EUI-64. Let’s say the user goes to another place and connects to another IPv6 network with a global prefix Y:Y:Y:Y::/64. Well, the user’s laptop will generate a global unicast address Y:Y:Y:Y:EUI-64, if the user connects to a network Z:Z:Z:Z::/64 it will get IPv6 address Z:Z:Z:Z::EUI-64 and so on. You can clearly see that this creates an opportunity to track the user, because wherever he goes and to whichever network he connects, the second half of the globally unique IPv6 address his laptop generates is always the same. The user can not connect anonymously to any network if someone knows the EUI-64 interface identifier of his laptop. This can be easily exploited in many different ways, for example, websites and apps associating different IPv6 addresses to a particular device or user.
Companies realized that and introduced two concepts that help to improve user’s privacy — Random Interface Identifiers and Temporary IPv6 addresses. Let’s start by looking at what the first term is.
Randomize Identifiers
Randomize Identifiers feature has been introduced as a part of the privacy extension for SLAAC (Stateless Address Auto-configuration). After Windows Vista, this feature is enabled by default, so wherever a Windows host generates an IPv6 address with SLAAC, it always uses a Random Interface ID.

Let’s look at part of the output of ipconfig /all command that displays the Physical address and the Link-local address of a Windows 10 host. You can see that the MAC address is 00-0A-12-34-56-78 and therefore if PC1 uses EUI-64 to generate a link-local address, it should have been fe80::20a:12ff:fe34:5678.
PS C:\Users\Administrator> ipconfig /all

Ethernet adapter Eth0:
   Description . . . . . . . . . . . : Intel(R) PRO/1000 MT Network Connection
   Physical Address. . . . . . . . . : 00-0A-12-34-56-78
   Link-local IPv6 Address . . . . . : fe80::ec94:3519:1f19:711f%8(Preferred)
Well, obviously the current link-local address is not created using the MAC address but rather a Random Interface Identifier. This is because the Randomize Identifiers feature is enabled by default. We can check this using the PowerShell command get-netipv6protocol or using netsh interface ipv6 show global in the Windows Command Prompt
PS C:\Users\Administrator> get-netipv6protocol

DefaultHopLimit               : 128
NeighborCacheLimit(Entries)   : 256
RouteCacheLimit(Entries)      : 4096
ReassemblyLimit(Bytes)        : 67105632
IcmpRedirects                 : Enabled
SourceRoutingBehavior         : DontForward
DhcpMediaSense                : Enabled
MediaSenseEventLog            : Disabled
MldLevel                      : All
MldVersion                    : Version2
MulticastForwarding           : Disabled
GroupForwardedFragments       : Disabled
RandomizeIdentifiers          : Enabled
AddressMaskReply              : Disabled
UseTemporaryAddresses         : Enabled
MaxTemporaryDadAttempts       : 3
MaxTemporaryValidLifetime     : 7.00:00:00
MaxTemporaryPreferredLifetime : 1.00:00:00
TemporaryRegenerateTime       : 00:00:05
MaxTemporaryDesyncTime        : 00:10:00
DeadGatewayDetection          : Enabled
We can use the following command in PowerShell to change the default behavior of a Windows host and disable the Randomize Identifiers. Disabling this feature forces Windows to use EUI-64 for Interface ID as you can see in the following example.
PS C:\Users\Administrator> set-netipv6protocol -RandomizeIdentifiers Disabled
PS C:\Users\Administrator>
PS C:\Users\Administrator> ipconfig /all

   Description . . . . . . . . . . . : Intel(R) PRO/1000 MT Network Connection
   Physical Address. . . . . . . . . : 00-0A-12-34-56-78
   Link-local IPv6 Address . . . . . : fe80::20a:12ff:fe34:5678%8(Preferred)
Note that now the link-local address is generated from the MAC address and is exactly the value we expected.
Temporary IPv6 addresses
Another important concept, part of the Privacy Extension for SLAAC, is the use of Temporary IPv6 addresses. The idea behind temporary addresses is to have a public randomized IPv6 address that has a relatively short lifetime and can be used for anonymous outgoing connections. At every reboot, or IPv6 stack on/off, or when the Preferred-Lifetime expires this temporary address is re-generated using a Random Interface Identifier. Therefore, different outgoing connections can be initiated from different Temporary IPv6 addresses which minimize the risk of someone tracking the user by associating the global IPv6 address to physical equipment/user.

Of course, the incoming connections are made to the real Public IPv6 address that doesn’t change. However, in a typical Internet user scenario, all connections are initiated by the user’s machine towards an Internet service (client-server communication).
PS C:\Users\Administrator> get-netipv6protocol

DefaultHopLimit               : 128
NeighborCacheLimit(Entries)   : 256
RouteCacheLimit(Entries)      : 4096
ReassemblyLimit(Bytes)        : 67105632
IcmpRedirects                 : Enabled
SourceRoutingBehavior         : DontForward
DhcpMediaSense                : Enabled
MediaSenseEventLog            : Disabled
MldLevel                      : All
MldVersion                    : Version2
MulticastForwarding           : Disabled
GroupForwardedFragments       : Disabled
RandomizeIdentifiers          : Enabled
AddressMaskReply              : Disabled
UseTemporaryAddresses         : Enabled
MaxTemporaryDadAttempts       : 3
MaxTemporaryValidLifetime     : 7.00:00:00
MaxTemporaryPreferredLifetime : 1.00:00:00
TemporaryRegenerateTime       : 00:00:05
MaxTemporaryDesyncTime        : 00:10:00
DeadGatewayDetection          : Enabled
You can verify that this feature is enabled by default using either PowerShell’s command get-netipv6protocol or Command Prompt netsh interface ipv6 show privacy command.
C:\Users\Administrator>netsh interface ipv6 show privacy
Querying active state...
Temporary Address Parameters
---------------------------------------------
Use Temporary Addresses : enabled
Duplicate Address Detection Attempts: 3
Maximum Valid Lifetime : 7d
Maximum Preferred Lifetime : 1d
Regenerate Time : 5s
Maximum Random Time : 10m
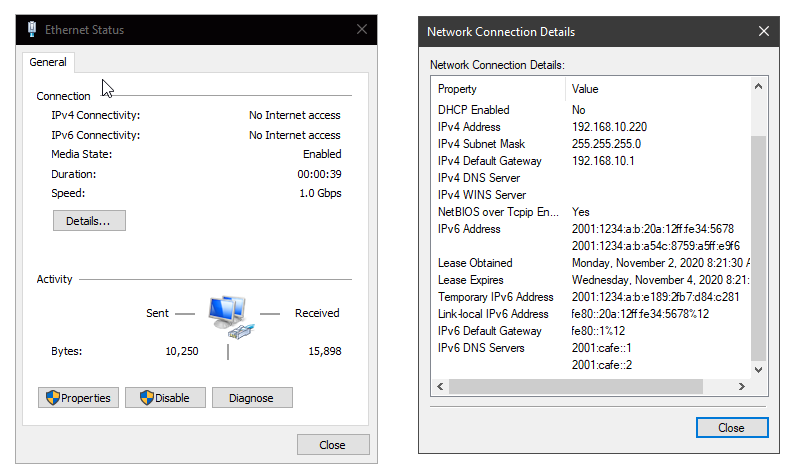
Random Time : 6sIn some cases, you will see multiple Temporary IPv6 Addresses at a time (could be hundreds). This happens when the Maximum Preferred Lifetime of an address expires but there is a connection still opened using this particular address. In this case, another Temporary IPv6 address is created but the old one is not deleted until all opened connections are closed. More information on what the different lifetimes means can be seen in figure 3.

Configuring Global IPv6 Address on Windows 10
There are three methods to configure a Windows 10 hosts with an IPv6 address:
- Method 1: Configure the host manually.
- Method 2: Using SLAAC and a Stateless DHCPv6 server.
- Method 3: Using a Stateful DHCPv6 server.
Manual Address Assignment
The manual configuration is pretty straightforward. We go to Network Adapters Setting and under Internet Protocol Version 6 Properties we configure everything as shown in Figure 4. This approach is applicable for SOHO networks but it is not a scalable solution for large network environments.
Dynamic Addressing
To enable Windows to automatically decide how to configure its IPv6 settings, we just leave it on default settings «Obtain an IPv6 address automatically«. When using this approach, the type of dynamic addressing is decided by the Router Advertisements sent by the Default Router on the segment. Depending on the Autoconfig Flags, the host knows whether to use SLAAC plus Stateless DHCPv6 or to use Stateful DHCPv6.
Keep in mind that, it is up to the network administrators and the company’s policy to decide which addressing method t use. From a Windows perspective, it can generate an IPv6 address using SLAAC and obtain another address using DHCPv6 at the same time. This means that the host will have at least to global unicast addresses. Such an example is shown in figure 6.
The first GUA address is generated via SLAAC and the second one has been obtained from a DHCPv6 server.
Enabling IPv6 on Windows 10 is a straightforward process that involves a few simple steps within the network settings on your computer. By enabling IPv6, you can improve your network performance and future-proof your system. All you need to do is access the Network and Sharing Center, navigate to your network properties, and activate IPv6. It’s a quick, easy task that will have you ready to embrace the next generation of internet protocol connectivity in no time.
To enable IPv6 on your Windows 10 machine, you will need to delve into the network settings and make a small adjustment. Let’s walk through the steps to get your system set up for IPv6.
Step 1: Open the Control Panel
First, click on the Start button and type “Control Panel,” then hit enter.
Opening the Control Panel gives you access to various system settings, including network configurations. It’s the hub for many adjustments you can make on your computer.
Step 2: Go to Network and Sharing Center
In the Control Panel, select “Network and Internet,” then click on “Network and Sharing Center.”
This section of the Control Panel allows you to view and manage your network connections. You’ll find all the tools you need to modify your network settings here.
Step 3: Access Change Adapter Settings
On the left-hand side, click on “Change adapter settings.”
Here, you can see all your network connections. This step is crucial as it leads you to where you can modify each network’s properties.
Step 4: Right-Click on Your Network Connection
Right-click on the connection you’re using, either “Wi-Fi” or “Ethernet,” then select “Properties.”
By looking at your network connection properties, you can change various settings, including enabling or disabling different protocols like IPv6.
Step 5: Enable IPv6
In the Properties window, check the box next to “Internet Protocol Version 6 (TCP/IPv6),” then click “OK.”
This action activates IPv6 on your system, allowing you to use this protocol for internet connections. It’s a simple yet significant step towards better connectivity.
Once you have completed these steps, your computer will start using IPv6 if your network supports it. You may notice improved connection speeds and better ability to connect with modern devices and services. You’ve now opened the door to a new world of networking potential.
Tips for Enabling IPv6 on Windows 10
- Ensure your router supports IPv6 to fully utilize the protocol.
- Check with your Internet Service Provider (ISP) to confirm they offer IPv6.
- If you encounter issues, restarting your computer and router can help.
- Keep your Windows 10 updated for the best compatibility with IPv6.
- Monitor network performance to ensure IPv6 improves your connection.
Frequently Asked Questions
What is IPv6?
IPv6 is the latest version of Internet Protocol, designed to replace IPv4 and provide a larger address space among other improvements.
Why should I enable IPv6?
Enabling IPv6 prepares your system for future internet advancements and can improve network performance.
Will enabling IPv6 slow down my internet?
No, enabling IPv6 should not slow down your internet. It may even enhance your connection speed.
How do I know if my ISP supports IPv6?
You can contact your ISP directly or check their website for details on IPv6 support.
Do I need to disable IPv4 when enabling IPv6?
No, you can keep both protocols enabled. Windows will choose the best one for each connection automatically.
Summary
- Open the Control Panel.
- Go to Network and Sharing Center.
- Access Change Adapter Settings.
- Right-click on your network connection.
- Enable IPv6.
Conclusion
Enabling IPv6 on Windows 10 is a simple yet impactful task. As the world moves towards more complex and connected systems, having IPv6 enabled ensures your system remains ahead of the curve. This protocol not only expands the number of IP addresses available but also brings improvements in security and efficiency, particularly as more devices connect to the internet.
By following the steps outlined above, you’ve taken a crucial step towards modernizing your internet connectivity. Understanding how to manage and optimize your network settings is a valuable skill in today’s digital world. If you haven’t already, consider upgrading your router or checking with your ISP about IPv6 support to fully leverage this technology.
Knowledge is power, and knowing how to enable IPv6 on Windows 10 empowers you to make the most of your digital experiences. Embrace the change, optimize your connectivity, and explore the vast possibilities that come with faster, more reliable internet access. Feel free to delve deeper into network management or share your newfound skills with others who might benefit from your expertise.
Matt Jacobs has been working as an IT consultant for small businesses since receiving his Master’s degree in 2003. While he still does some consulting work, his primary focus now is on creating technology support content for SupportYourTech.com.
His work can be found on many websites and focuses on topics such as Microsoft Office, Apple devices, Android devices, Photoshop, and more.