
Данная статья описывает процедуру установки и настройки DHCP сервера на базе Windows Server 2019. В статье описаны особенности установки и настройки DHCP роли, создания областей DHCP, настройки их параметров и резервации статических адресов. Мы рассмотрим как привычный способ настройки параметров DHCP сервера через графическую консоль, так и настройку DHCP из командной строки PowerShell.
Протокол DHCP (Dynamic Host Configuration Protocol) используется для автоматического назначения сетевых настроек (IP адрес, маска подсети, шлюз, DNS сервера и т.д.) устройствам в вашей сети (компьютеры, ноутбуки, сканеры, принтеры и т.д.). Также DHCP сервер позволяет более эффективно использовать адресное пространство, избегать конфликта IP адресов в сети и централизованно управлять сетевыми параметрами на клиентских устройствах.
Содержание:
- Установка роли DHCP сервера в Windows Server 2019/2016
- Настройка DHCP областей в Windows Server
- Резервация IP адресов на DHCP сервере
- Настройка и управление DHCP сервером с помощью PowerShell
Установка роли DHCP сервера в Windows Server 2019/2016
В этом примере мы установим DHCP сервер на хосте с Windows Server 2019 и IP адресом 192.168.13.4. Вы можете использовать как Server Core версию, так и Full GUI. В маленькой инфраструктуре допустимо устанавливать DHCP сервер на сервер с ролью контроллера домена Active Directory.
Обязательно назначьте статический IP адрес серверу с ролью DHCP сервер. При установке роли DHCP из консоли PowerShell на сервере с автоматическим получением IP адреса появляется предупреждение:
Configure at least one static IP address on your computer before installing DHCP.
WARNING: The following recommended condition is not met for DHCP: No static IP addresses were found on this computer. If the IP address changes, clients might not be able to contact this server. Please configure a static IP address before installing DHCP Server.
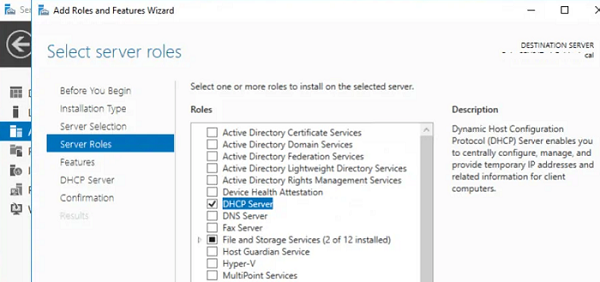
Установить роль DHCP Server можно из консоли Server Manager (Add Roles and Features -> Server Roles).
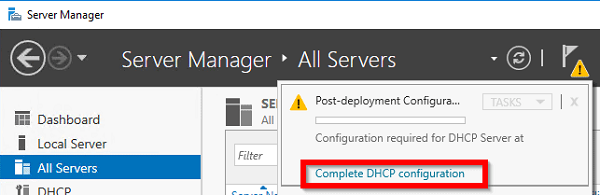
После установки роли DHCP роли нужно выполнить Post-Deployment Configuration. Для этого в консоли Server Manager щелкните по уведомлению и выберите Complete DHCP configuration.
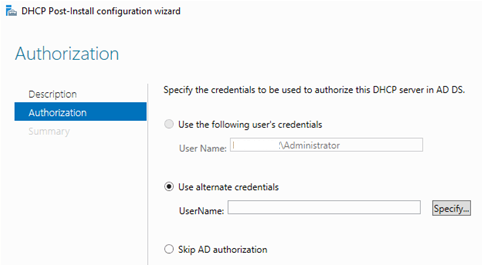
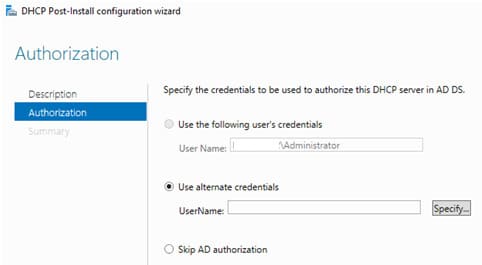
Вам будет предложено аутентифицировать новый DHCP сервер в Active Directory (экран Authorization). Для авторизации DHCP сервера в AD учетная запись должна состоять в доменной группе Enterprise Admins.
Если у вас нет прав на авторизацию DHCP в AD, вы можете указать, чтобы ваш DHCP сервер запускался без проверки авторизации в домене:
Set-ItemProperty -Path "HKLM:\SYSTEM\CurrentControlSet\Services\DHCPServer\Parameters" -Name DisableRogueDetection -Value 1 -Force
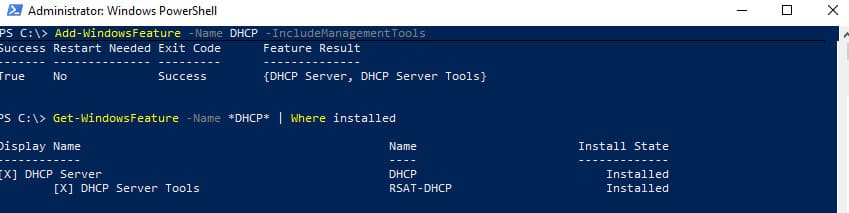
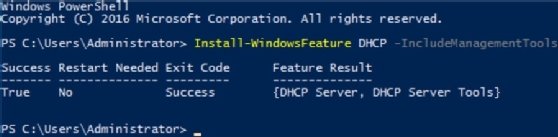
Также вы можете установить и настроить DHCP роль в Windows Server из консоли PowerShell.
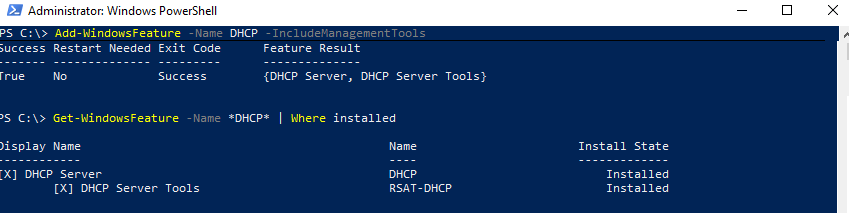
Установка роли DHCP:
Install-WindowsFeature DHCP –IncludeManagementTools
Проверьте, что роль и инструменты управления RSAT-DHCP установлены:
Get-WindowsFeature -Name *DHCP*| Where Installed
Авторизуйте DHCP сервер в Active Directory (укажите DNS имя сервера и IP адрес, который будет использоваться DHCP клиентами):
Add-DhcpServerInDC -DnsName hq-dc01.contoso.com -IPAddress 192.168.13.4
Создайте локальные группы безопасности DHCP сервера:
Add-DhcpServerSecurityGroup
Чтобы Server Manager перестал показывать уведомление о том, что DHCP роль требует настройки, выполните команду:
Set-ItemProperty -Path HKLM:\SOFTWARE\Microsoft\ServerManager\Roles\12 -Name ConfigurationState -Value 2
Перезапустите службу DHCPServer:
Restart-Service -Name DHCPServer -Force
База данных и логи DHCP сервера находятся в каталоге
%systemroot%\system32\dhcp
.
- dhcp.mdb — файл базы данных сервера DHCP’;
- j50.log – транзакционный журнал (используется при восстановлении конфигурации DHCP);
- j50.chk — файл контрольной точки;
- tmp.edb — временный рабочий файл DHCP-сервера.
Настройка DHCP областей в Windows Server
После установки роли DHCP вам нужно создать DHCP области (Scopes), которые описывают диапазоны IP адресов и другие настройки, выдающиеся сервером клиентам.
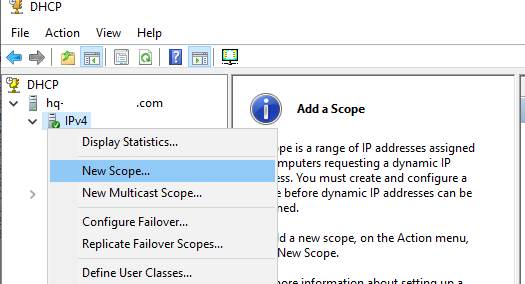
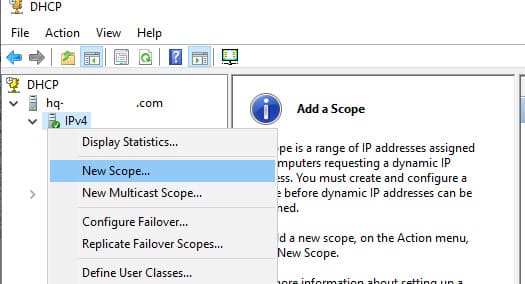
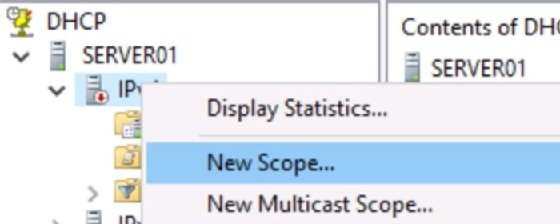
Для управления сервером DHCP используется консоль dhcpmgmt.msc (вы можете управлять DHCP сервером локально или с удаленного компьютера с установленным RSAT). Запустите консоль DHCP, разверните ваш сервер -> IPv4.
Чтобы создать новую область выберите New Scope.
Укажите название DHCP области.

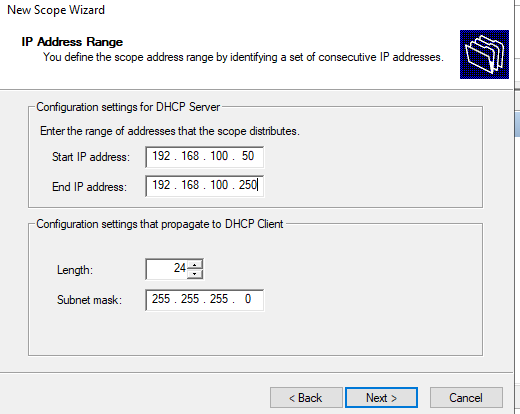
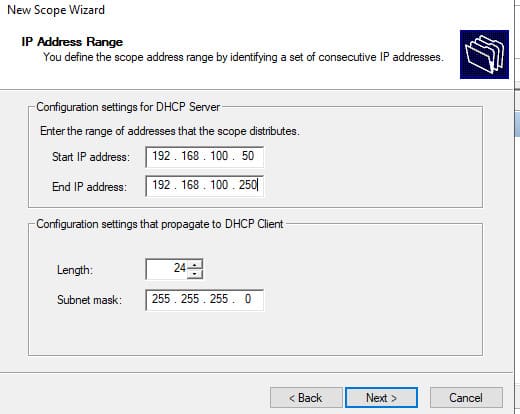
Укажите диапазон IP адресов, который будет выдаваться этой областью и маску сети. В этом примере я хочу использовать эту DHCP область для обслуживания подсети 192.168.100.0/24. В рамках этой сети DHCP сервером будет назначаться динамические IP адреса из диапазона 192.168.100.50 — 192.168.100.250. В следующем окне можно добавить исключения в этот диапазон (Add Exclusions and Delay).
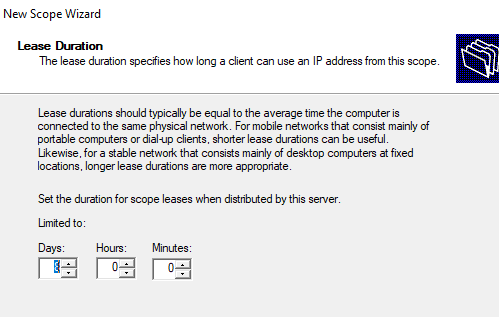
Далее нужно указать длительность аренды (Lease Duration) IP адреса DHCP клиентом (по умолчанию 8 дней, менять без особой необходимости не нужно).
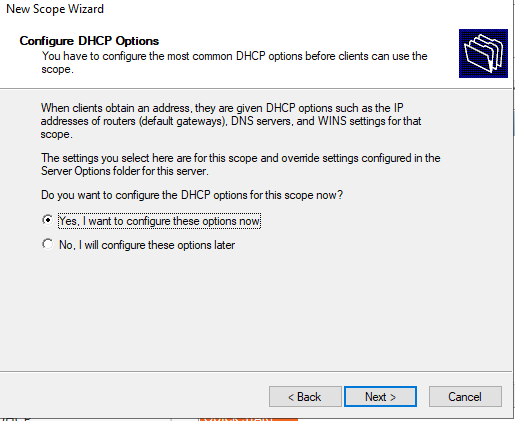
Укажите, что вы хотите настроить дополнительный параметры DHCP области.
.
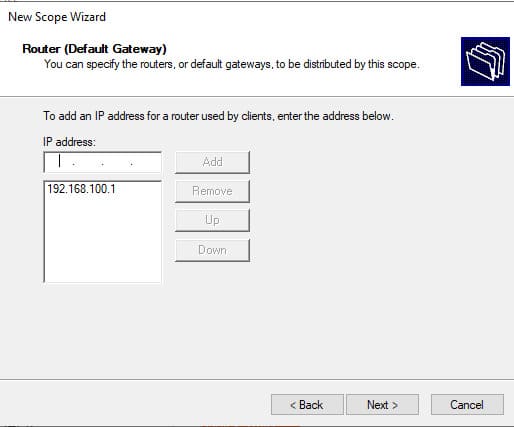
Укажите IP адрес шлюза в подсети, который должен назначаться клиентам (в нашем примере это 192.168.100.1).

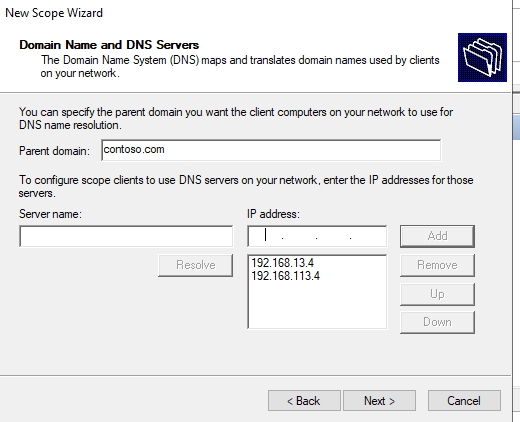
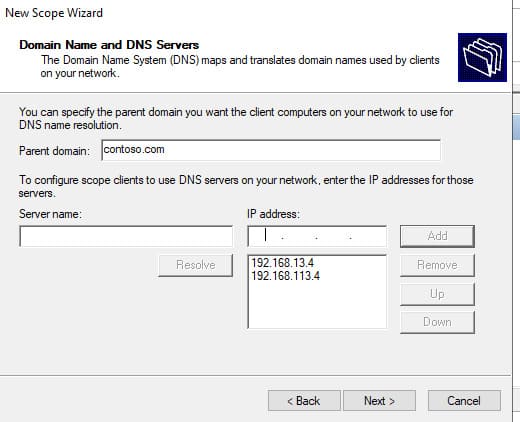
Затем укажите имя домена и адреса DNS серверов, которые будут назначены клиентам DHCP.
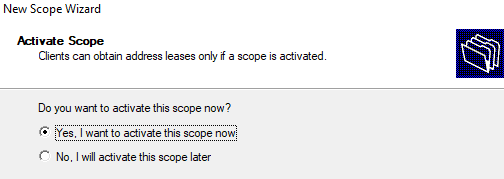
Осталось активировать DHCP область (разрешить ей обслуживать клиентов).
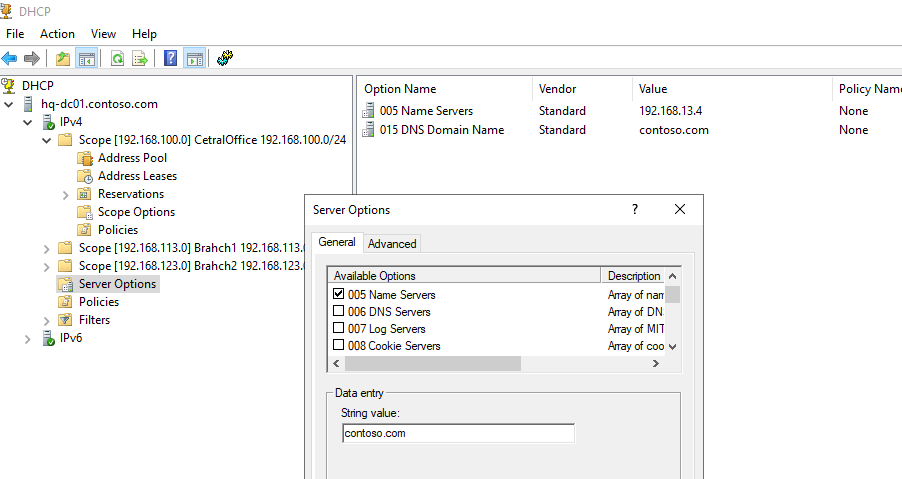
DHCP сервер может выдавать клиентам различный настройки (кроме IP адреса). Для этого используются Scope Options.
В Windows Server DHCP можно настроить глобальные настройки области или Scope Options для каждой области.

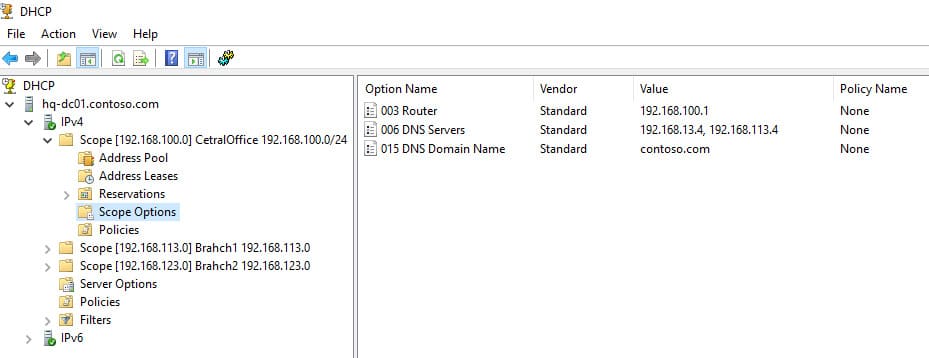
Ранее мы уже настроили три опции области:
-
003 Router -
006 DNS Server -
015 DNS Domain Name
Можно добавить и другие опции (NTP сервера, PXE и т.д.).
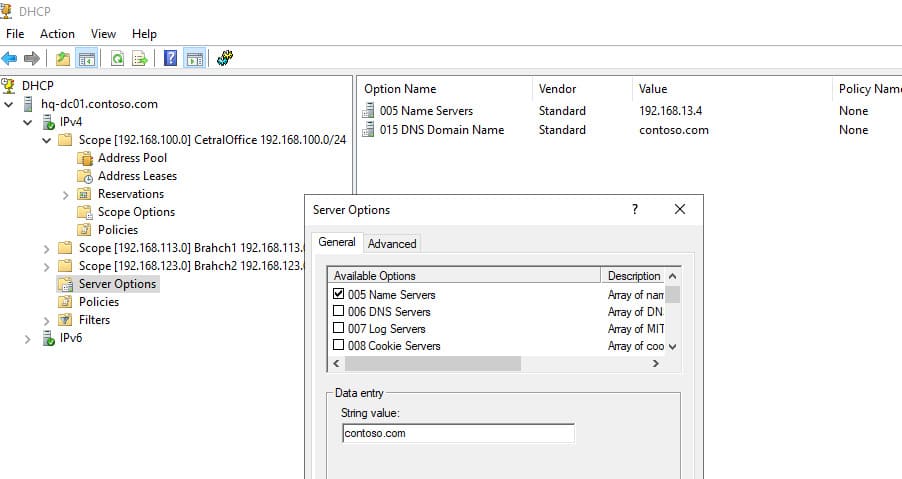
В разделе Server Options DHCP сервера можно настроить глобальные опции, которые будут наследуются всеми областями. Но вы можете переопределить глобальные настройки в настройках каждой области (опции области имеют приоритет над опциями сервера).
Один DHCP сервер может обслуживать сотни удаленных подсетей и VLAN. Поэтому вы можете создать на нем несколько областей. Главное, чтобы в каждой из подсетей был настроен ретранслятор (DHCP relay agent), который пересылает широковещательные DHCP-запросы на указанный DHCP сервер. В терминах Cisco DHCP ретранслятор называется ip helper. Вы можете настроить DHCP Relay даже на Windows Server.
Протокол DHCP в качестве транспорта использует протокол UDP. Пакеты от клиента к серверу передаются по порту 67 UDP, обратно через UDP 68
Резервация IP адресов на DHCP сервере
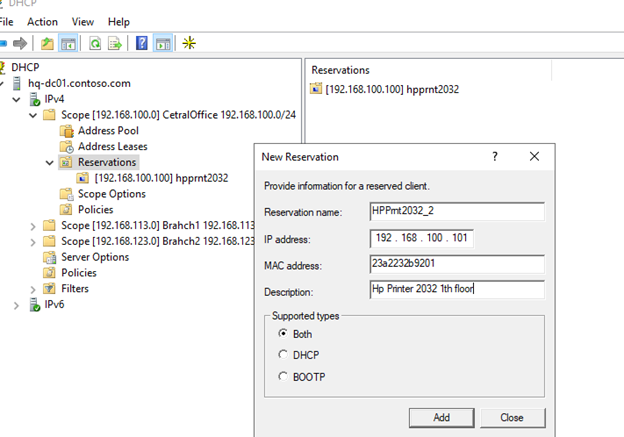
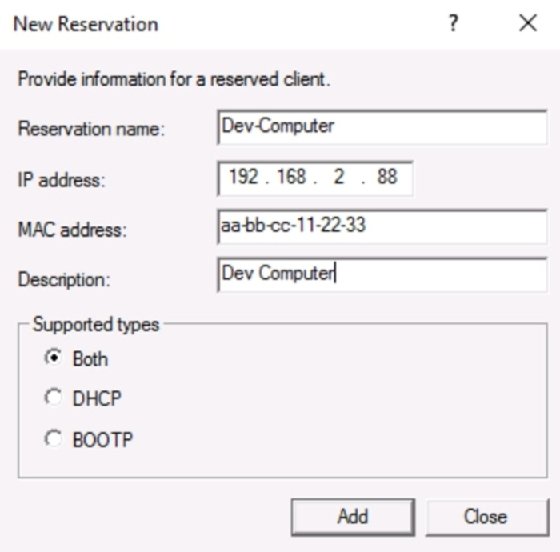
По умолчанию DCHP сервер выдает клиентам динамические адреса. Это означает что IP адрес у любого клиента может меняться. Если вы хотите, чтобы определенные устройства всегда получали от DHCP сервера один и тот же адрес, вы можете его зарезервировать (например, для сетевых принтеров, которые настроены у пользователей).
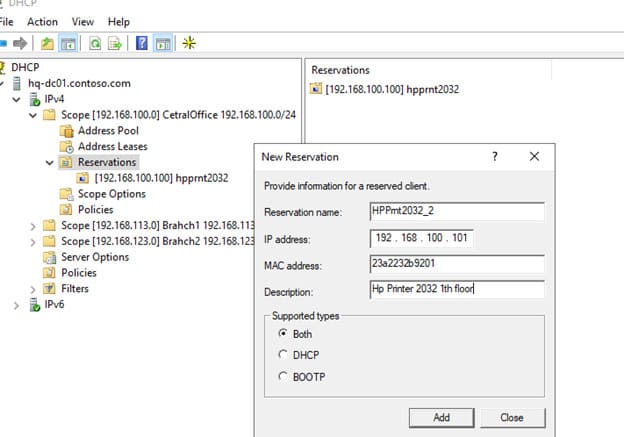
Для DHCP резервации выберите область и перейдите в секции Reservation. В меню выберите New Reservation.
При создании резервации нужно указать IP адрес, который нужно сохранить за клиентом и его MAC адрес (уникальное значение). MAC адрес в Windows можно получить из результатов команды
ipconfig /all
или с помощью PowerShell
get-netadapter|select name,macaddress
). Опционально можно указать имя и описание устройства.
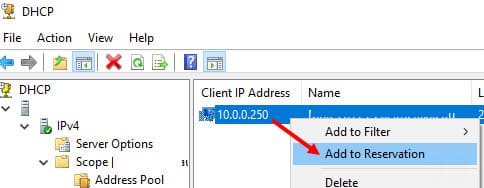
Также вы можете зарезервировать текущий динамический адрес за устройством, найдя его в разделе Address Leases. Щелкните по устройству и выберите Add to Reservation.

Настройка и управление DHCP сервером с помощью PowerShell
Все операции по настройке и управлению DHCP сервером на Windows Server 2019/2016 можно выполнять из консоли PowerShell. Рассмотрим основные команды управления DHCP. Для этого используется модуль DHCPServer. Импортируйте модуль в сессию:
Import-Module DHCPServer
Вывести полный список командлетов в моделе DHCP можно так:
Get-Command -Module DHCPServer

Следующая команда выведет список авторизованных DHCP серверов в Active Directory:
Get-DhcpServerInDC
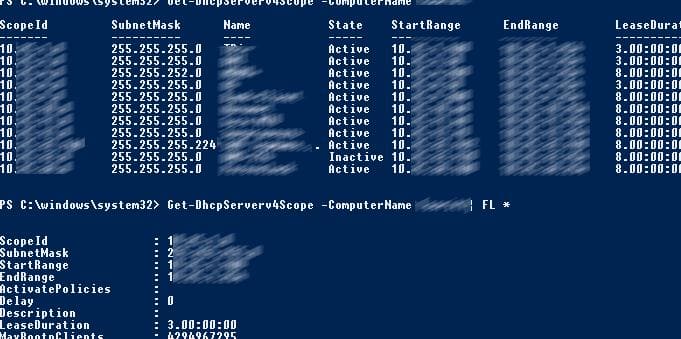
Вывести список DHCP областей на указанном сервере:
Get-DhcpServerv4Scope –ComputerName msk-dhcp1
Если нужно показать все параметры области (Delay, Description, Name и т.д.):
Get-DhcpServerv4Scope –ComputerName msk-dhcp1| FL *

Если нужно отобразить данные о IPv6 областях:
Get-DHCPServerv6Scope
Получить настройки для конкретной области:
Get-DhcpServerv4Scope –ComputerName msk-dhcp1 –ScopeID 10.10.1.0
Создадим новую (неактивную) область с диапазоном адресов с 192.168.113.50 до 192.168.113.250:
Add-DhcpServerv4Scope -Name “Brahch1 192.168.113.0” -StartRange 192.168.113.50 -EndRange 192.168.113.250 -SubnetMask 255.255.255.0 -State InActive
Настроить следующие параметры DHCP сервера: DNS сервер, домен и адрес шлюза по-умолчанию:
Set-DhcpServerv4OptionValue -ScopeID 192.168.113.0 -DnsDomain contoso.com -DnsServer 192.168.13.4 -Router 192.168.113.1
Добавить исключения в DHCP область:
Add-DhcpServerv4ExclusionRange -ScopeID 192.168.113.0 -StartRange 192.168.113.90 -EndRange 192.168.113.100
Активировать DHCP область:
Set-DhcpServerv4Scope -ScopeID 192.168.113.0 -State Active

Для удобства можно использовать такую команду PowerShell при создании новой области:
$HashArgs = @{
'Name' = 'EKB Office Scope';
'Description' = 'workstations';
'StartRange' = '192.168.140.10';
'EndRange' = '192.168.140.200';
'SubnetMask' = '255.255.255.0';
'State' = 'Active';
'LeaseDuration' = '1.00:00:00';
}
Add-DhcpServerv4Scope @HashArgs
Опции для DHCP сервера добавляется так (к примеру, WPAD):
Add-DhcpServerv4OptionDefinition -ComputerName msk-dhcp1 -Name WPAD -OptionId 252 -Type String
Вывести список настроенных опций DHCP сервера можно так:
Get-DHCPServerv4OptionValue -ComputerName msk-dhcp1 | Format-List
Выведем список настроенных параметров зоны:
Get-DHCPServerv4OptionValue -ComputerName msk-dhcp1 -ScopeId 10.10.1.0 | Format-List
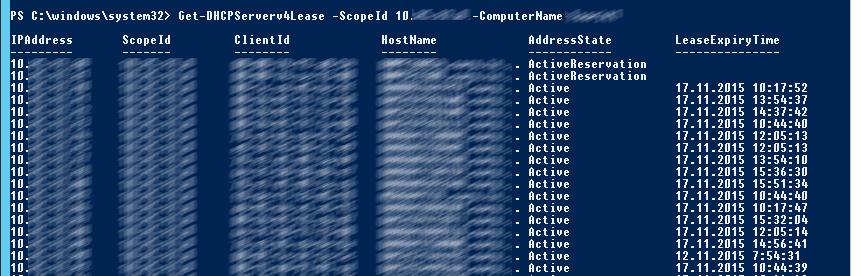
Показать текущий список арендованных адресов для области 10.10.1.0:
Get-DHCPServerv4Lease -ScopeId 10.10.1.0 -ComputerName msk-dhcp1
Создать DHCP резервацию для клиента, которому назначен динамический IP адрес 10.10.1.88 (конвертировать выданный адрес в зарезервированный):
Get-DhcpServerv4Lease -ComputerName msk-dhcp1 -IPAddress 10.10.1.88| Add-DhcpServerv4Reservation -ComputerName msk-dhcp1
Можно массово зарезервировать IP адреса для компьютеров по списку из csv файла. Для этого создайте текстовый файл в формате:
ScopeId,IPAddress,Name,ClientId,Description
10.10.1.0,10.10.1.88,Client1,ba-ab-5c-3d-4e-6f,Reservation PC-msk-s1
10.10.1.0,10.10.1.89,Client2,ba-ab-5c-5d-2e-3f,Reservation PC-msk-s2
Сохраните файл с именем
c:\dhcp\DHCPReservations.csv
и запустите следующую команду, которая импортирует данные из csv файла и создаст DHCP резервации для клиентов:
Import-Csv –Path c:\dhcp\DHCPReservations.csv | Add-DhcpServerv4Reservation -ComputerName msk-dhcp1
Отключить область на DHCP сервере:
Set-DhcpServerv4Scope -ComputerName msk-dhcp1-ScopeId 10.10.1.0-State InActive
Удалить область с DHCP сервера:
Remove-DHCPServerv4Scope -ComputerName msk-dhcp1-ScopeId 10.10.1.0 -Force
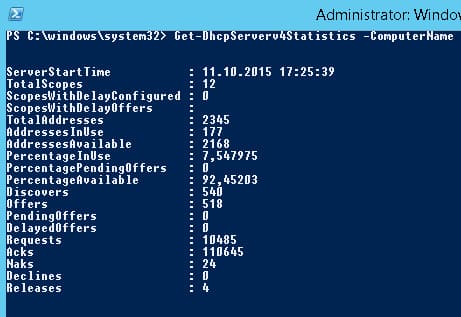
Возможно получить статистику DHCP сервера (количество областей, резерваций, процент использования адресов и пр.).
Get-DhcpServerv4Statistics -ComputerName msk-dhcp1

Аналогичная информация для конкретной области может быть получена с помощью командлета Get-DhcpServerv4ScopeStatistics.
Конфигурацию DHCP сервера можно экспортировать в указанный XML файл с помощью команды:
Export-DHCPServer -ComputerName msk-dhcp1 -File C:\dhcp\dhcp-export.xml
Совет. Заданием с такой командой в планировщике задач можно реализовать регулярное резервное копирование конфигурации DHCP сервера.
В дальнейшем эти настройки DHCP сервера можно импортировать (перенести) на другой DHCP сервер:
Import-DHCPServer -ComputerName msk-dhcp2 -File C:\dhcp\dhcp-export.xml -BackupPath C:\dhcpbackup\
Для установки и настройки роли DHCP-сервера имеем подготовленный сервер с операционной системой Windows Server 2019.
Установка роли DHCP-сервер
Шаг 1. На первом этапе установим роль DHCP-сервера, для этого в окне “Диспетчер серверов” выбираем “Добавить роли и компоненты”.

Рисунок 1 – Установка роли DHCP
Шаг 2. Обращаем внимание перед установкой роли на предупреждение, затем нажимаем “Далее”.
Шаг 3. Устанавливаем чекбокс “Установка ролей или компонентов”, затем нажимаем “Далее”.
Шаг 4. Выбираем сервер, на который будут установлены роли и компоненты – нажимаем “Далее”.

Рисунок 2 – Выбор сервера для установки роли
Шаг 5. Выбираем роль сервера, в нашем случае DHCP-сервер. Нажимаем “Далее”.
Шаг 6. Выбрав роль DHCP” появится “Мастер добавления ролей и компонентов” для выбранных ролей сервера. Нажимаем “Добавить компоненты”.

Рисунок 3 – Добавление необходимых компонентов
Шаг 7. Требуемая роль и компоненты были выбраны ранее, Нажимаем “Далее”.

Рисунок 4 – Выбор дополнительных компонентов
Шаг 8. Обращаем внимание на предупреждение DHCP-сервера, затем “Далее”.
Шаг 9. Ставим “чекбокс” напротив “Автоматический перезапуск конечного сервера, если требуется”, нажимаем “Установить”. В результате произойдет установка выбранных ролей сервера.
Шаг 10. Далее после установки компонента наживаем “Завершение настройки DHCP”.

Рисунок 5 – Завершение настройки DHCP
Шаг 11. Обращаем внимание на требования после завершения настройки DHCP-сервера, жмем “Далее”.
Шаг 12. На данном этапе нажимаем “Закрыть”.Установка роли завершена.
Настройка DHCP-сервера
На этом этапе приступим непосредственно к настройке роли DHCP.
Шаг 1. В диспетчере серверов нажимаем “Средства” – “DHCP”.

Рисунок 6 – Запуск консоли DHCP
Шаг 2. Правой клавишей мыши нажимаем на сервер, в появившемся окне выбираем “Добавить или удалить привязки…”.

Рисунок 7 – Добавление привязки
Шаг 3. Выбираем сетевой интерфейс, который будет использовать DHCP-сервер. Далее “ОК”.

Рисунок 8 – Выбор сетевого адаптера
Шаг 4. Далее правой клавишей нажимаем на IPv4 и выбираем “Создать область…”.

Рисунок 9 – Создание области
Шаг 5. Откроется окно для создания области IP-адресов. Нажимаем “Далее”.
Шаг 6. Вводим имя области и если требуется описание, затем “Далее”.
Шаг 7. Теперь введем диапазон адресов, который которые будет отдавать DHCP-сервер, а также маску подсети. Нажимаем “Далее”.

Рисунок 10 – Выбор диапазона адресов для DHCP-сервера
Шаг 8. Затем вводим один адрес или диапазон IP-адресов, необходимые исключить из области. Нажимаем “Добавить”, после нажимаем “Далее”.

Рисунок 11 – Выбор диапазона, необходимый исключить
Шаг 9. Выбираем срок действия аренды адресов области. Снова “Далее”.

Рисунок 12 – Срок действия аренды
Шаг 10. Для настройки других параметров DHCP выбираем “Да, настроить эти параметры сейчас”, мы же выполняем базовую настройку, следовательно выбираем “Нет, настроить эти параметры позже” затем “Далее”.
Шаг 11. В окне появится “Вы успешно завершили работу с мастером создания области”, нажимаем “Готово”.
Шаг 12. Правой кнопкой нажимаем на “Область” и выбираем “Активировать”.

Рисунок 13 – Активация области DHCP-сервера
Шаг 13. Открываем “Пул адресов” и видим наш диапазон адресов для аренды.На этом настройка DHCP сервера окончена.

Рисунок 14 – Диапазон адресов DHCP-сервера для аренды
Есть вопросы? Обращайтесь к нам!
В этой статье рассмотрим полный процесс установки и настройки DHCP сервера на Windows Server 2019. Мы подробно опишем процесс установки роли DHCP, создание и настройку областей, а также резервирование статических IP-адресов. Покажем настройку DHCP через графическую консоль и PowerShell. Протокол DHCP (Dynamic Host Configuration Protocol) используется для автоматического назначения сетевых параметров, таких как IP-адреса, маска подсети, шлюз и DNS сервера. DHCP помогает централизованно управлять настройками сетевых устройств и избегать конфликта IP-адресов в сети.
Данная инструкция подойдет для Windows Server 2012 R2, Windows Server 2016, Windows Server 2019 и Windows Server 2022.
Приобрести Windows Server можно у нас в магазине от 1190 ₽.
Скачать оригинальные дистрибутивы Windows Server можно в нашем каталоге.
Установка роли DHCP сервера
Для начала, установим роль DHCP на сервере Windows Server 2019. В данном примере сервер будет иметь статический IP-адрес 192.168.13.4. Важно использовать статический IP для сервера с ролью DHCP, чтобы избежать проблем при выдаче адресов клиентам.
Процесс установки можно выполнить как через графическую консоль, так и через PowerShell. Важно, чтобы сервер имел статический IP-адрес перед установкой роли DHCP, иначе появится предупреждение:
WARNING: The following recommended condition is not met for DHCP: No static IP addresses were found on this computer.
1. Откройте консоль Server Manager, перейдите в раздел Add Roles and Features, выберите DHCP Server в списке ролей.

2. После завершения установки выполните Post-Deployment Configuration — щелкните по уведомлению и выберите Complete DHCP configuration.

3. На экране авторизации необходимо предоставить права учетной записи для авторизации сервера в Active Directory.
Если у вас нет прав на авторизацию DHCP в AD, вы можете указать, чтобы ваш DHCP сервер запускался без проверки авторизации в домене:
Set-ItemProperty -Path "HKLM:\SYSTEM\CurrentControlSet\Services\DHCPServer\Parameters" -Name DisableRogueDetection -Value 1 -Force
4. Установка роли через PowerShell выполняется командой:
Install-WindowsFeature DHCP –IncludeManagementTools
5. Чтобы убедиться, что роль установлена корректно, используйте:
Get-WindowsFeature -Name *DHCP* | Where Installed
6. Авторизуйте DHCP сервер в Active Directory (укажите DNS имя сервера и IP адрес, который будет использоваться DHCP клиентами):
Add-DhcpServerInDC -DnsName hq-dc01.contoso.com -IPAddress 192.168.13.4
7. Создайте локальные групп безопасности DHCP:
Add-DhcpServerSecurityGroup
8. После этого можно завершить настройку роли, выполнив команду:
Set-ItemProperty -Path HKLM:\SOFTWARE\Microsoft\ServerManager\Roles\12 -Name ConfigurationState -Value 2
9. Перезапустите службу DHCP:
Restart-Service -Name DHCPServer -Force
База данных и логи DHCP сервера по умолчанию находятся в каталоге %systemroot%\system32\dhcp. Важные файлы:
— dhcp.mdb — файл базы данных DHCP;
— j50.log — транзакционный журнал;
— j50.chk — файл контрольной точки;
— tmp.edb — временный рабочий файл.
Создание и настройка DHCP областей
После установки роли DHCP необходимо создать одну или несколько областей (Scopes). Область определяет диапазон IP-адресов, которые сервер будет выдавать клиентам, а также другие сетевые настройки.
1. Откройте консоль dhcpmgmt.msc, разверните сервер и выберите IPv4.
2. Щелкните правой кнопкой мыши и выберите New Scope.
3. Укажите название области, например в нашем случае это CetralOffice.
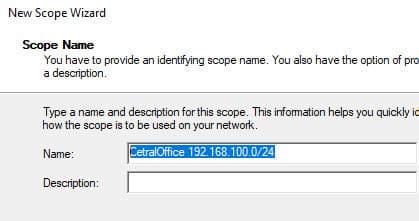
4. Установите диапазон IP-адресов. Например, для сети 192.168.100.0/24 можно указать диапазон 192.168.100.50 — 192.168.100.250.
5. Установите параметры исключений, если необходимо. Например, исключите диапазон 192.168.100.1 — 192.168.100.10, чтобы эти адреса не выдавались.
6. Укажите длительность аренды IP-адреса (по умолчанию 8 дней).

7. Укажите, что вы хотите настроить дополнительный параметры DHCP области.

8. Укажите IP-адрес шлюза, который должен назначаться клиентам (например, 192.168.100.1).
9. Затем укажите имя домена и адреса DNS серверов, которые будут назначены клиентам DHCP.
10. После завершения активируйте область.

DHCP сервер может выдавать различные параметры, такие как:
— 003 Router — шлюз;
— 006 DNS Server — DNS серверы;
— 015 DNS Domain Name — домен.
Эти параметры можно настроить как для каждой области (Scope Options), так и глобально для сервера (Server Options). Глобальные параметры будут применяться ко всем областям, но их можно переопределить для каждой области отдельно.
Резервация IP-адресов
По умолчанию DHCP сервер выдает динамические адреса, но для определенных устройств можно зарезервировать статические адреса. Это полезно для сетевых принтеров и других устройств, которым необходим постоянный IP-адрес.
1. Откройте консоль DHCP, перейдите в раздел Reservations.
2. Выберите New Reservation.
3. Укажите IP-адрес, MAC-адрес устройства и его имя.
MAC-адрес устройства можно узнать с помощью команды:
ipconfig /all
Или через PowerShell:
Get-NetAdapter | Select-Object Name, MacAddress
4. Чтобы зарезервировать текущий динамический адрес, найдите его в Address Leases и выберите Add to Reservation.
Настройка DHCP через PowerShell
Все настройки DHCP сервера можно выполнить через PowerShell с помощью модуля DHCPServer. Для начала необходимо импортировать модуль:
Import-Module DHCPServer
1. Для отображения списка доступных команд:
Get-Command -Module DHCPServer

— Следующая команда выведет список авторизованных DHCP серверов в Active Directory:
Get-DhcpServerInDC— Вывести список DHCP областей на указанном сервере:
Get-DhcpServerv4Scope –ComputerName msk-dhcp1— Если нужно показать все параметры области (Delay, Description, Name и т.д.):
Get-DhcpServerv4Scope –ComputerName msk-dhcp1| FL *
— Если нужно отобразить данные о IPv6 областях:
Get-DHCPServerv6Scope— Получить настройки для конкретной области:
Get-DhcpServerv4Scope –ComputerName msk-dhcp1 –ScopeID 10.10.1.0
2. Создание новой области:
Add-DhcpServerv4Scope -Name “Branch1 192.168.113.0” -StartRange 192.168.113.50 -EndRange 192.168.113.250 -SubnetMask 255.255.255.0 -State InActive
3. Настроить следующие параметры DHCP сервера: DNS сервер, домен и адрес шлюза по-умолчанию:
Set-DhcpServerv4OptionValue -ScopeID 192.168.113.0 -DnsDomain contoso.com -DnsServer 192.168.13.4 -Router 192.168.113.1
4. Добавление исключений:
Add-DhcpServerv4ExclusionRange -ScopeID 192.168.113.0 -StartRange 192.168.113.90 -EndRange 192.168.113.100
5. Активировать область можно с помощью команды:
Set-DhcpServerv4Scope -ScopeID 192.168.113.0 -State Active

Для удобства можно использовать хеш-таблицу аргументов:
$HashArgs = @{

'Name' = 'EKB Office Scope';

'Description' = 'workstations';

'StartRange' = '192.168.140.10';

'EndRange' = '192.168.140.200';

'SubnetMask' = '255.255.255.0';

'State' = 'Active';

'LeaseDuration' = '1.00:00:00';

}

Add-DhcpServerv4Scope @HashArgs
Опции для DHCP сервера добавляется так (к примеру, WPAD):
Add-DhcpServerv4OptionDefinition -ComputerName msk-dhcp1 -Name WPAD -OptionId 252 -Type StringВывести список настроенных опций DHCP сервера можно так:
Get-DHCPServerv4OptionValue -ComputerName msk-dhcp1 | Format-ListВыведем список настроенных параметров зоны:
Get-DHCPServerv4OptionValue -ComputerName msk-dhcp1 -ScopeId 10.10.1.0 | Format-ListПоказать текущий список арендованных адресов для области 10.10.1.0:
Get-DHCPServerv4Lease -ScopeId 10.10.1.0 -ComputerName msk-dhcp1
Создать DHCP резервацию для клиента, которому назначен динамический IP адрес 10.10.1.88 (конвертировать выданный адрес в зарезервированный):
Get-DhcpServerv4Lease -ComputerName msk-dhcp1 -IPAddress 10.10.1.88| Add-DhcpServerv4Reservation -ComputerName msk-dhcp1
Можно массово зарезервировать IP адреса для компьютеров по списку из csv файла. Для этого создайте текстовый файл в формате:
ScopeId,IPAddress,Name,ClientId,Description

10.10.1.0,10.10.1.88,Client1,ba-ab-5c-3d-4e-6f,Reservation PC-msk-s1

10.10.1.0,10.10.1.89,Client2,ba-ab-5c-5d-2e-3f,Reservation PC-msk-s2
Сохраните файл с именем c:\dhcp\DHCPReservations.csv и запустите следующую команду, которая импортирует данные из csv файла и создаст DHCP резервации для клиентов:
Import-Csv –Path c:\dhcp\DHCPReservations.csv | Add-DhcpServerv4Reservation -ComputerName msk-dhcp1Отключить область на DHCP сервере:
Set-DhcpServerv4Scope -ComputerName msk-dhcp1-ScopeId 10.10.1.0-State InActiveУдалить область с DHCP сервера:
Remove-DHCPServerv4Scope -ComputerName msk-dhcp1-ScopeId 10.10.1.0 -ForceВозможно получить статистику DHCP сервера (количество областей, резерваций, процент использования адресов и пр.):
Get-DhcpServerv4Statistics -ComputerName msk-dhcp1

Экспорт и импорт конфигурации DHCP
Для регулярного резервного копирования конфигурации DHCP в указанный XML файл, можно использовать следующую команду:
Export-DhcpServer -ComputerName msk-dhcp1 -File C:\dhcp\dhcp-export.xml
В дальнейшем эти настройки DHCP сервера можно импортировать (перенести) на другой DHCP сервер:
Import-DhcpServer -ComputerName msk-dhcp2 -File C:\dhcp\dhcp-export.xml -BackupPath C:\dhcpbackup\
Настройка DHCP сервера на Windows Server 2019 позволяет автоматизировать управление IP-адресами в сети и облегчает централизованное управление сетевыми устройствами. Мы рассмотрели как установку и настройку через графический интерфейс, так и работу с DHCP с помощью PowerShell, что позволяет более гибко управлять сервером.
Network nodes require an IP address configuration that usually comprises the IP address, subnet mask, default gateway IP for the router, name servers and other values.
Administrators can manually set this information, resulting in a static configuration. A Dynamic Host Configuration Protocol (DHCP) server can also dynamically provide the information.
Generally, servers, routers, network printers and other such devices have a static configuration. Workstations, laptops, phones, tablets and other end-user devices receive their configuration via DHCP.
Client devices lease their IP address configuration by using the following four-step DORA process:
- Discover. The client broadcasts an attempt to discover a DHCP server.
- Offer. DHCP servers that receive the client broadcast offer an IP address configuration.
- Request. The client formally requests the IP configuration from the first DHCP server to respond.
- Acknowledge. The DHCP server acknowledges the lease and doesn’t offer that same address to another client.
The lease must be renewed by the client periodically.
Now that we’ve briefly reviewed how IP addresses are allocated and the lease generation process, let’s delve into more detail about how to configure the Windows Server DHCP service.
1. Install DHCP on Windows Server 2019
The DHCP service is not automatically installed on Windows Server 2019. It is easy to add, however, using either Server Manager or Windows PowerShell.
To add DHCP using Server Manager, select Add Roles and Features, and then select DHCP in the Roles list.
To add the DHCP role using the command line, open Windows PowerShell (Admin), and type the following:
Install-WindowsFeature DHCP -IncludeManagementTools
The installation takes about one minute to complete.
Once admins install the DHCP service, they can manage it by selecting Tools > DHCP.
2. Authorize DHCP in Active Directory
Windows-based DHCP servers must be registered with Active Directory (AD) before they begin offering IP address configurations to clients.
Right-click on the server node in the DHCP console, and select Authorize to accomplish this authorization. You need Enterprise Admin privileges to authorize DHCP.
3. Create a scope
Before building the first pool of available IP addresses, it’s critical to plan the deployment. Devices, such as servers, routers and even printers, may have static IP address configuration. Make sure you have identified these addresses and that you allow for them in scope. Many administrators place all statically assigned IP addresses at the front of the scope.
Here is a simple example design:
- Scope address range: 192.168.2.0/24
- Static IP addresses: 192.168.2.1 through 192.168.2.25 (be sure to leave some room for additional devices)
- Dynamic IP addresses: 192.168.2.26 through 192.168.2.254
You also need to gather additional configuration details, including the following:
- Name and description. The scope name and an optional description.
- Default gateway value. The IP address of the network interface card in the router attached to this network.
- Name resolution servers. The IP address of one or more DNS servers.
- Reservations. Any IP addresses that are dynamically allocated to specific clients, enabling those clients to acquire a consistent IP configuration from DHCP.
- Lease time. The time the IP address lease is valid. It needs to be renewed at the halfway point of the lease. The Windows Server DHCP default is eight days.
4. Configure and activate the scope
Once you have documented the above values, you can configure the scope. Right-click the server node in the DHCP console, and then select New Scope. A wizard prompts you for the information you collected above. These settings can be changed later.
Once activated, the DHCP server begins responding to DHCP client discover messages by offering IP addresses. The scope can be deactivated, the DHCP service can be stopped or restarted, and the DHCP server can be deauthorized in AD.
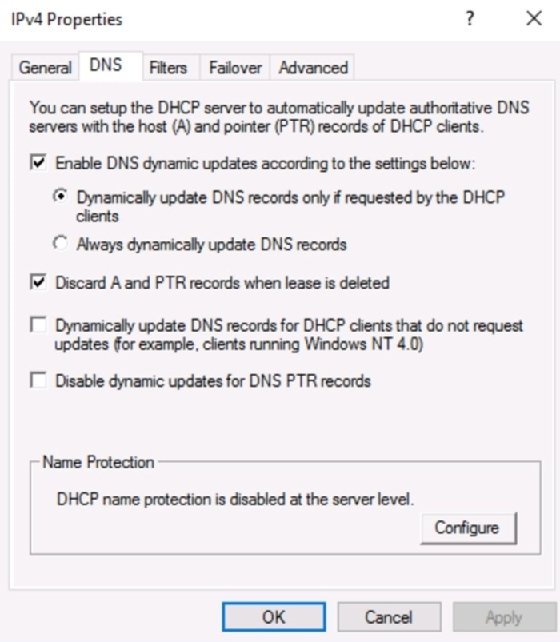
5. DNS registration
DNS relates easy-to-remember hostnames with difficult-to-remember IP addresses. This database can be populated in several ways.
One method is to configure the DHCP server to create resource records for the client. The DHCP server can be set to create A records (hostname to IP address), pointer (PTR) records (IP to hostname) or both.
The default is for DHCP to create the PTR record, while the client itself registers its record with DNS.
Administrative DHCP tasks
The DHCP service is simple to configure. But sys admins often find some additional settings to be useful.
Create reservation
In some cases, it’s useful to allow a client machine to maintain a consistent IP address. While you could set the IP address configuration statically, it’s often better to reserve the IP address for the client in DHCP. The client goes through the DORA process to receive its settings, so values, such as router and name resolution servers, can still be updated via DHCP.
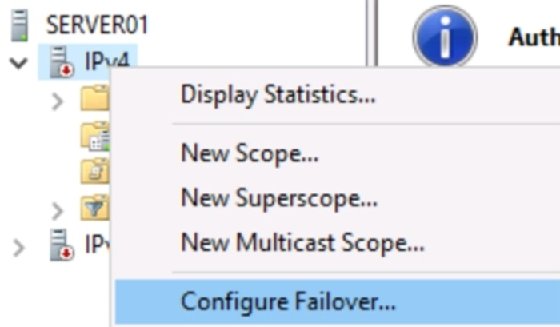
DHCP failover
With Windows Server 2012, Microsoft introduced DHCP failover. It seems many administrators are unaware of this capability. Configuration is straightforward and requires no special software.
To configure DHCP failover, use the following steps:
- Ensure the DHCP role is installed on both DHCP servers and that they have network connectivity with each other.
- Configure a DHCP scope on one of the servers.
- Right-click the scope, and select DHCP Failover from the context menu.
- Complete the wizard.
- Select the second DHCP server, and observe that the new scope appears.
Logs
Managing service log files is a standard function for sys admins. DHCP writes messages to Event Viewer and to text files.
Sys admins can check the system log for general DHCP and network messages. They can find DHCP entries by drilling down to Applications and Services > Microsoft > Windows > DHCP-Server > Microsoft-Windows-DHCP-Server-Events > Operational.
DHCP also generates text-based log files stored at C:\Windows\System32\dhcp. These logs are extremely useful for troubleshooting. They can display information for why the server was unable to lease configurations to clients.
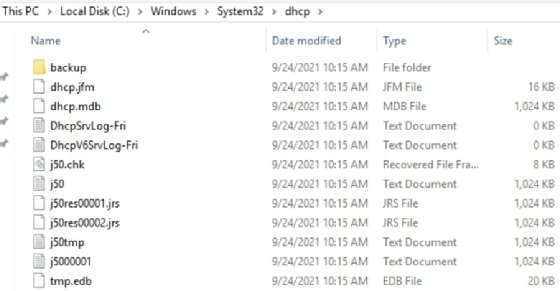
Note that the text file logs are named based on days of the week and are overwritten weekly. If you want to retain these logs, you must rename them before the upcoming day of the week can overwrite them.
The DHCP role is not installed by default, so the first step is to add it. From there, create a new scope based on your plan.
Be careful of conflicting scopes
As more subnets — and, therefore, more DHCP scopes — are added to the network, it’s imperative that sys admins accurately document the IP address ranges. Overlapping scopes, where two DHCP servers are offering the same IP addresses to clients, result in a variety of network communications issues.
This is part of the reason why Microsoft requires DHCP servers to be authorized in AD. That authorization can only be implemented by Enterprise Admins, who should have enough broad knowledge of network configuration to prevent conflicting scopes.
Avoid duplicate IP address offers
One of the most serious misconfigurations is a client computer configured with a static IP address that falls within the DHCP server’s scope. In that case, the server can offer the IP address to a client because it is unaware of the static IP. This results in an IP address conflict.
The Windows DHCP service can be configured to ping an IP address before offering it to a client. If the ping returns a response, the DHCP server knows the address is already in use and should not be offered. The server offers a different address to the client.
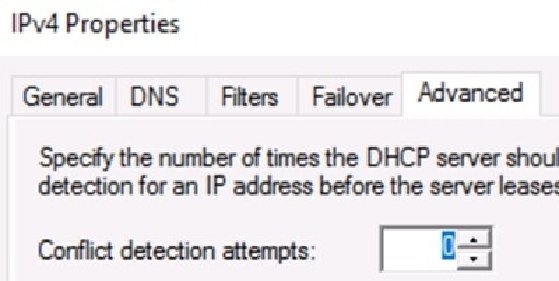
The ping request occurs between the Discover and Offer steps of the lease generation process. It introduces a significant delay, so only configure this setting if you have a real concern about undocumented static IP addresses on client devices.
Conclusion
Microsoft has made the configuration of a DHCP server straightforward. Make sure you have a solid understanding of the entire network’s IP address configurations before you begin and plan your scope around both dynamic and static IP address assignments.
The DHCP role is not installed by default, so the first step is to add it. From there, create a new scope based on your plan. Add any options, such as DNS and reserved addresses. Review log files regularly. DHCP is simple but critical for network communication.
A DHCP Server is a protocol server for TCP/IP networks that supplies IP addresses to other computers. DHCP Server for Windows also supports TFTP, DNS and HTTP protocol which makes a nice package for easy and simple to install networks e.g. for remote boot and other purposes. DHCP server runs on all Win32 capable Windows operating systems starting from Windows 95 to Windows 11.
The following describes how to run the DHCP Server for Windows. Since V2.9.3.1 there is also a Raspberry PI OS Version available. Please see instructions on how to install and run here.
Installation
The DHCP Server is a portable application and runs from anywhere on your computer. Extract the content of the zip file wherever you like, e.g. D:\dhcpsrv. You will now find the following files in there:
- dhcpsrv.exe
- dhcpwiz.exe
- readme.txt
- wwwroot
- dhcpstyle.xsl
- dhcppkgstyle.xsl
- favicon.ico
- index.html
- RJ45_5.jpg
- RJ45_52.jpg
Configuration with dhcpwiz.exe
If you are a first time user of DHCP server then the dhcpwiz.exe program gives you a good head start in setting up the ini file needed to run the DHCP server. The dhcpwiz.exe program is a wizard style configuration program for the DHCP server. It will guide you in 6 easy steps through the basic configuration of the software.
1. Welcome to the DHCP configuration wizard
There is not much more to do than to hit the next button.
2. Network interface cards
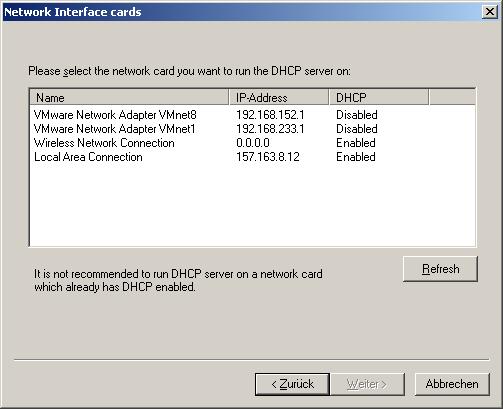
The DHCP configuration wizard lists all currently identified network interfaces on your computer. It is necessary to select one. This is going to be the interface that will be used by DHCP server. It is a good idea to choose a network interface with DHCP disabled that by itself is not getting it’s IP address from a DHCP server. This would probably cause conflicts. Hit next after interface has been selected.
3. Supported protocols
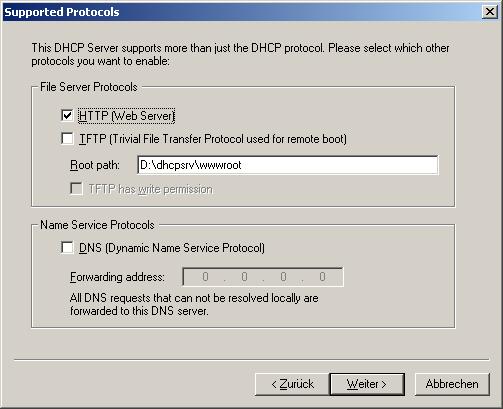
Now you can select which TCP/IP protocols should be activated. I’m suggesting to enable HTTP (Web Server) and hit next.
4. Configuring DHCP for interface
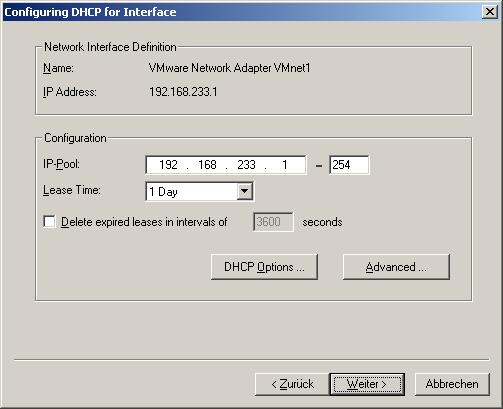
In this step you define the pool of IP addresses. A client will get an IP addresses assigned out of this pool. With the Advanced button, you get access to a dialog that allows you to define the subnet mask, the gateways and the DNS and WINS servers. DHCP wizard automatically takes the appropriate defaults based on the selected network interface card. The DHCP Options button opens a dialog that gives access to further DHCP options such as next (TFTP) server, bootfile, domain name and others including customized options. The default values should be good and lead you to the next step after hitting the next button.
5. Writing the INI file
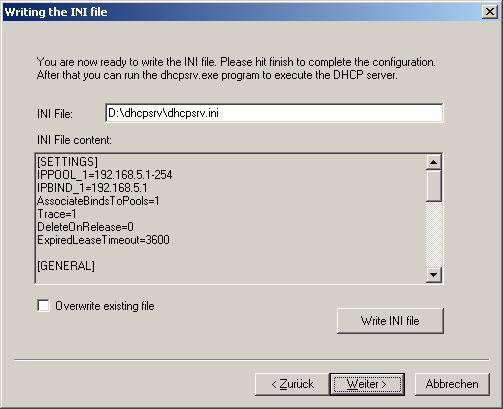
The final result of the DHCP configuration wizard is an INI file. This file will contain all the configuration options. The filename and path shown here should point to d:\dhcpsrv\dhcpsrv.ini, depending on where you’ve exctracted the zip file. It is important that the INI file is placed into the same folder as dhcpsrv.exe resides. If that is all ok, then hit the “Write INI file” button and then the next button to enter the final step of the configuration. Please note that DHCP wizard is not intended to reedit the INI file once it is written. Its purpose is the first time configuration. But of course nothing prevents you from using the wizard again. Just please make sure that you don’t overwrite your INI file unintended. That is the reason why the “Overwrite existing file” is by default unchecked.
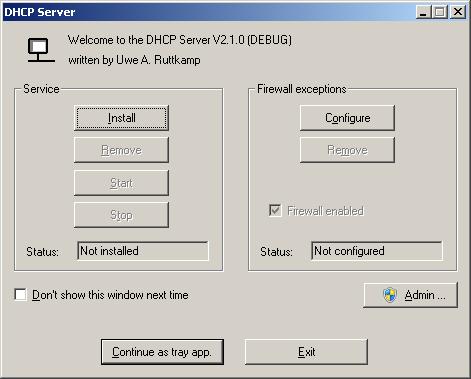
6. DHCP configuration completed

The windows firewall is a great thing to have. But it can be a pain also to get communication server programs working. That is the reason why the wizard gives you at this stage the option to add the dhcp server program to the exception list of the windows firewall. Please hit the configure button and wait for the status to change from “Not configured” to “configured”. If you are not running the DHCP configuration wizard with administrator privileges, then you need to do that after you have elevated your rights accordingly by hitting the “Admin…” button.
It is now time to start the DHCP server program. The DHCP server can run as a service or as an application. If you want to run it as a service then you can install and start the service here also. Again, non-administrators can do that only after elevation (the “Admin…” button). The status needs to change from “Not installed” to “Running”. If you decide not to install DHCP server as a service but wants to run DHCP server as an application, then you can tick the “Run DHCP server immediately” check box and click finish.
Running dhcpsrv.exe
Once the INI file has been created by the DHCP configuration wizard, it is now time to start the actual DHCP server program. If you have done that already as part of the DHCP configuration wizard step 6, then you are done and don’t need to read the rest.
If you have not already done so, start the dhcpsrv.exe. If you are running Windows NT or Windows 2000/XP/VISTA/7/8/10/11 then the DHCP server will show you the following dialog box:
On all older operating systems (Windows 98, etc..) the DHCP server will go straight into the tray as a tray icon application.
If you are running the windows firewall, then DHCP server can enter itself into the exception list. Please hit the configure button and wait for the status to change from “Not configured” to “configured”. If you are not running the DHCP server with administrator privileges, then you need to do that after you have elevated your rights accordingly by hitting the “Admin…” button.
It is now time to really start the DHCP server program. The DHCP server can run as a service or as an application. If you want to run it as a service then you can install and start the service here. Again, non-administrators can do that only after elevation (the “Admin…” button). The status needs to change from “Not installed” to “Running”. If you decide not to install DHCP server as a service, then you hit the “Continue as a tray app” button. If you tick the “Don’t show this window next time”, then DHCP server will not bother you again with this dialog and goes straight into the tray. If you forgot to configure the firewall or you didn’t trust DHCP server to handle your firewall configuration correctly, then Windows will ask you for permission to let DHCP server communicate through the firewall. Say yes to everything that might come up and you will see a little tray icon showing that DHCP server is running.
Once the DHCP configuration has been performed and DHCP server is started, you probably want to know whether it actually works. If you have activated the HTTP support as part of step 3 during the DHCP configuration wizard, then you can use your internet browser to open the DHCP status web site: http://127.0.0.1/dhcpstatus.xml. Also easily accessible through the tray icon, right mouse, Open status. This should show the configured and operating connections and also all currently active clients. I assume there aren’t any yet. Once a DHCP client is assigned an IP address it will show up after reloading the page.
Since V1.7 command line options are supported to better integrate the DHCP server into setups or to quickly install and remove the service. The command line options are:
| -install | installs the DHCP Server as a service |
| -remove | removes the service |
| -start | starts the service |
| -stop | stops the service |
| -control | opens the above dialog box to control the service |
| -help | shows a help message dialog box |
| -runapp | runs the DHCP Server in application mode (regardless of service installs) |
| -ini filename | sets the pathname of the ini file to be used by the DHCP Server (default is dhcpsrv.ini). This works only in application mode |
| -configfirewall | Configures firewall exceptions for dhcpsrv.exe |
| -removefirewall | Removes firewall exceptions for dhcpsrv.exe |
Command line options are interpreted from left to right and can be given in any order. Example
dhcpsrv -install -start installs and starts the DHCP server service with one command
Please be aware that you need to have administrator privileges to install the DHCP Server as a service.