
-
Home
-
News
- What Are Prefetch Files & Can You Delete Them on Windows
By Andrea | Follow |
Last Updated
What are prefetch files? Is it safe to delete prefetch files? Those questions arise when you discover the Prefetch folder on your computer. If you want to figure out things about prefetch files, this post from MiniTool can be the right place for you.
What Are Prefetch Files on Windows
You may have noticed a Prefetch folder on your computer. What are prefetch files? What are they used for? If you are curious about those files, let’s continue to the following content.
Prefetch files are created by the Windows operating system when you launch an application for the first time. The function, Prefecture, was introduced in Windows XP first and is then available in other Windows operating systems. The trace files of Prefecture are saved in the Prefetch folder in the Windows folder on the C drive.
Prefetch files include data that the computer requires when booting up the computer and launching applications. Therefore, with those files, you can run the computer and applications swiftly without a fresh load.
Apart from improving computer and application startup efficiency, prefetch files help to analyze malware on your device. For instance, when your computer is infected by malicious software, as long as the malware runs its process, there will be a prefetch file created to record it. Hence, analyzing the corresponding prefetch file works for malware investigation.
Can I Delete Prefetch Files
What are prefetch files? You can answer this after reading the above section. Then, you may have another question: Is it safe to delete prefetch files? Though prefetch files are created by the Windows operating system, it is harmless to delete prefetch files on your device.
Windows will create the corresponding prefetch files when you open the applications on your computer again. However, after deleting prefetch files, your computer may require a longer time to boot up, and the applications may need more time to load.
Bonus Tip – Improve Computer Performance
You can boost the computer performance with the assistance of professional software, like MiniTool System Booster. This computer tune-up software is able to speed up CPU and RAM, clear junk files, repair system issues, increase internet speed, etc. You can get this software and try it now.
MiniTool System Booster TrialClick to Download100%Clean & Safe
How to Delete Prefetch Files
If you attempt to remove the files on your computer, here are several easy ways. Let’s work through them together.
Way 1. Delete via Run Dialog
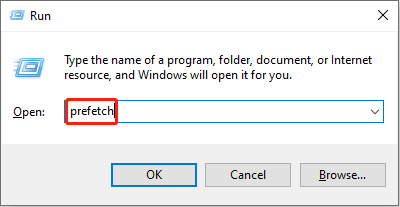
Step 1. Press Win + R to launch the Run dialog.
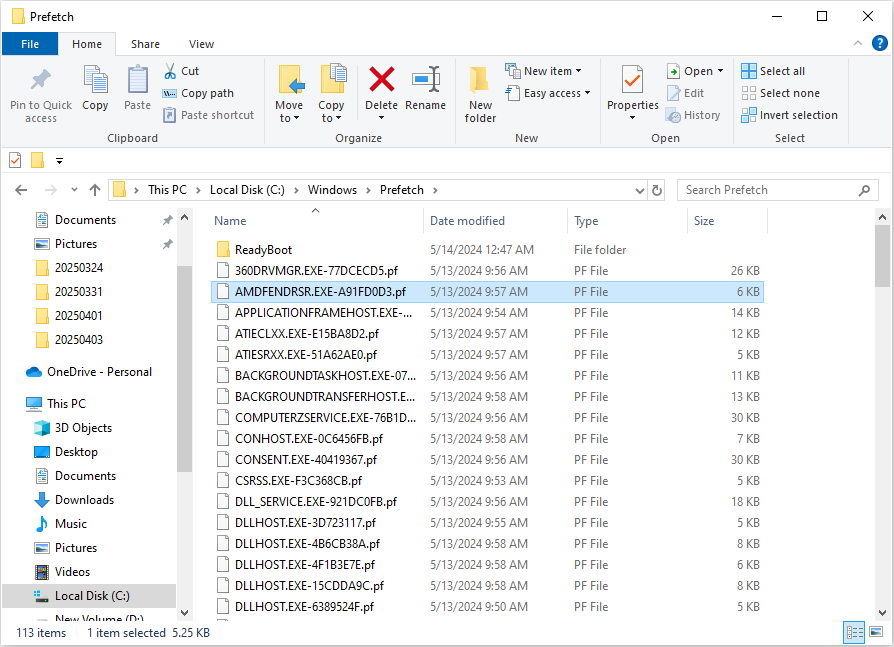
Step 2. Type Prefetch into the dialog and press Enter to open the folder directly.
Step 3. Press Ctrl + A to select all the files in the Prefetch folder, and hit the Delete key on your keyboard.
As the prefetch files are created for the quick load of applications, you may receive an error message indicating that a file is in use during the deletion process. You can either skip the file or end the program to complete deletion.
Way 2. Delete via Command Prompt
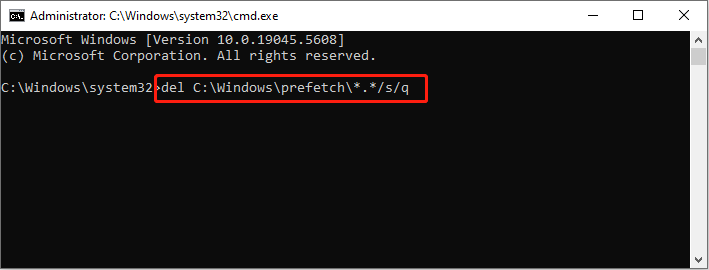
Step 1. Type Command Prompt into the Windows search bar and right-click on the best-matched item to choose Run as administrator.
Step 2. Type del C:\Windows\prefetch\*.*/s/q and press Enter to execute this command line.
How to Prevent the Creation of Prefetch Files
It is possible to disable the prefetcher configuration to stop the creation of these files. You can complete this operation by managing the Windows Registry.
Step 1. Press Win + R to open the Run window.
Step 2. Type regedit into the box and press Enter to launch Windows Registry Editor.
Step 3. You can copy and paste the following path into the address bar and press Enter to locate the target registry key.
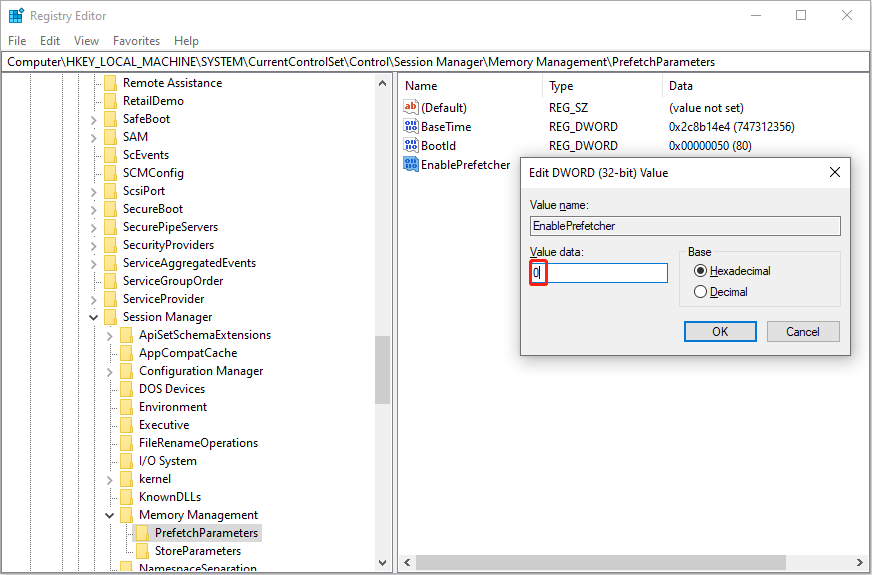
HKEY_LOCAL_MACHINE\SYSTEM\CurrentControlSet\Control\Session Manager\Memory Management\PrefetchParameters
Step 4. On the right pane, double-click on the EnablePrefetcher value and change the Value data to 0 to disable this feature.
Tips:
You can set the Value data to 1 to enable application prefetching only, 2 to enable boot prefetching only, or 3 to enable application and boot prefetching.
Step 5. Click OK to save and apply the change.
Final Words
What are prefetch files? Can you delete prefetch files? How can you delete them? After reading this post, you must have answers to those questions. Hope here is useful information to you.
About The Author
Position: Columnist
Andrea graduated in English and has a keen interest in the IT industry and questions that arise when computers are used. She is passionate about new things and challenging things and has a wide range of interests like playing guitar, gaming, and crafting.
Download Article
Remove prefetch and temporary files with this easy-to-follow guide
Download Article
- Deleting Temporary Files with Disk Cleanup
- Deleting Prefetch Files (Run Dialog)
- Deleting Prefetch Files (Command Prompt)
- Video
- Q&A
- Tips
|
|
|
|
|
This wikiHow teaches you how to safely delete temporary and prefetch files from Windows to free up disk space. Windows creates all sorts of temporary files on your hard drive. Although these files aren’t harmful, they may be hogging up precious hard drive space. You can also delete prefetch files, which are created by the operating system each time an app is launched for the first time. These files are designed to make apps open faster and don’t use too much disk space, but if you’re running low, you can delete them without causing any problems.
Is it safe to delete prefetch files?
Is it safe to delete prefetch files? Yes, it’s safe to delete prefetch files. To do so, open up the Run dialog (Win + R) and type in «prefetch.» In the following window, enable the option that shows any hidden files and folders. Select all the files by hitting Ctrl + A, and then hit the Delete key to remove them.
-

The quickest way to do this is to type disk cleanup in the Windows search bar and then click Disk Cleanup in the search results.[1]
-

It’s near the bottom-left corner of the dialog window. After Windows scans your primary hard drive (which is where your temp files are stored), a new window will appear.[2]
- When prompted, click Yes to continue.
Advertisement
-

Windows creates many types of temporary files. Click each type to see a description before selecting or deselecting an option. The amount of hard drive space consumed by each file type appears alongside it.[3]
- Make sure to remove the checkmarks next to any type of file you do not want to delete. For example, if you download files from the internet to your Downloads folder and keep them there, you’ll definitely want to remove the checkmark from «Downloads.»
- One folder that takes up a lot of space is «Windows Update Cleanup,» which contains a compressed version of the last few Windows Updates you installed, just in case you need to roll back an update. If you don’t think you’ll need to uninstall an update, selecting this option (if available) is a good way to gain hard drive space.
-

This part might take a while if you’re deleting several GB of files. Once the files are deleted, you’ll have regained all the space they once consumed.[4]


Advertisement
-

Another way to open the Run dialog is to type run into the Windows search bar and click Run in the results.
- Prefetch files are automatically created to speed up the launch of certain applications and don’t usually take up much space on your drive. There’s no real reason to delete these files unless you need to free up a small amount of space.
- Not all computers save prefetch files. If you’re using a newer version of Windows and have an SSD, prefetch is likely disabled, and there may not be prefetch files to delete.
-
This opens the Prefetch folder in the File Explorer.
- Depending on your security settings, you may need to click Continue to access this read-only folder.
- If nothing happens when you run this command, open File Explorer manually by pressing Windows key + E (or by selecting File Explorer from the Windows menu), then navigate to C:\Windows\Prefetch.
-

If you see a list of files in the Prefetch folder, skip to the next step. If the folder appears empty or you get an error that says you can’t open it, follow these steps:
- On Windows 11, click the View tab at the top of File Explorer and select Show > Hidden items.
- On Windows 10 and 8, click the View menu in File Explorer, select Options, then click Change folder and search options. On the View tab, select «Show hidden files, folders, and drives,» and click OK.[5]
- On Windows 7 and earlier, click Organize in File Explorer, select Folder and search options, click the View tab, and select «Show hidden files, folders, and drives.» Click OK to close the window.
-
This should highlight all files in the folder in the right panel. If not, click a blank area of the folder first to activate the panel.
-

This deletes the selected files from the folder.
- If any of the files you try to delete are in use, you’ll see an error that tells you it can’t be deleted. Just click Skip on such messages—you won’t be able to delete these files until you close whichever apps are using them.
- The files will not be permanently deleted until you empty your Recycle Bin. You can do this by opening Recycle Bin and clicking Empty Recycle Bin at the top.


Advertisement
-
An easy way to do this is to type cmd into the Windows Search bar, right-click Command Prompt, and select Run as administrator.
-
At the prompt, type del C:\Windows\prefetch\*.*/s/q and press Enter. This deletes everything in the Windows Prefetch folder.


Advertisement
Add New Question
-
Question
Deleting Prefetch files was easy in XP; it was removed using the «search» function only. Why has it become complicated in Windows 7?
Press the home button+r, or type «run» in search and open it. Then type «prefetch» and press enter; a dialogue box will pop up. Simply press «continue» and delete all the files from the folder.
-
Question
Does this deletion work for Windows 10?
Yes, these steps will work in Windows 10.
-
Question
Is there any other way of making your computer fast?
Without modifying the internal components of your PC, the most you can do is to shut down unimportant processes from Task Manager and defragment your hard drive (if it is an HDD). A technical solution would be to overclock your computer parts, but this is advanced and not recommended if you don’t know the parts in your computer.
Ask a Question
200 characters left
Include your email address to get a message when this question is answered.
Submit
Advertisement
Video
-
Deleting prefetch files is safe, but because prefetch files are created to speed up apps the next time you run them, it can, theoretically, slow down your computer.[6]
-
Empty the Recycle Bin when you are done to delete the files permanently.
Thanks for submitting a tip for review!
Advertisement
About This Article
Article SummaryX
1. Open Disk Cleanup.
2. Click Clean up system files.
3. Select which files to delete.
4. Click OK.
Did this summary help you?
Thanks to all authors for creating a page that has been read 556,186 times.
Is this article up to date?
Эта статья особенно пригодится обладателям ультрабуков с малым объёмом памяти.
1. Содержимое «Корзины»

Путь: shell:RecycleBinFolder
Собственно, окончательно стереть ранее удалённые файлы — самое простое, что можно придумать. Откройте «Проводник», введите в адресной строке «Корзина» и нажмите Enter. Затем щёлкните «Средства работы с корзиной» → «Очистить корзину». Нажмите «Да».
2. Временные файлы Windows

Путь: C:\Windows\Temp
Тут хранятся разные данные, которые Windows когда‑то использовала для ускорения своей работы, но потом они стали не нужны. В принципе, система сама периодически наполняет и очищает эту папку, так что обычно трогать её не надо. Но если у вас не хватает места и надо его срочно освободить, откройте Temp, выделите там все файлы нажатием комбинации Ctrl + A и удалите их.
3. Файл гибернации

Путь: C:\hiberfil.sys
В этот файл Windows сохраняет содержимое оперативной памяти компьютера, когда тот входит в режим глубокого сна — гибернации. Это полезно для ноутбуков и тех устройств, которые приходится часто включать и выключать.
Но если вы предпочитаете не отсоединять ПК от сети и подолгу не перезагружаете его, как делают многие владельцы десктопов, файл гибернации вам особо не нужен.
Удалить его можно так. Нажмите комбинацию Win + X и щёлкните в появившемся меню пункт «Windows PowerShell (администратор)». Введите команду:
powercfg.exe /hibernate off
После этого перезагрузитесь — и система удалит лишние файлы самостоятельно.
4. Папка Windows.old

Путь: C:\Windows.old
Всякий раз, когда вы устанавливаете большое обновление Windows, предыдущая версия системы сохраняется в папке Windows.old. Это нужно, чтобы вы смогли вернуть программы и параметры в то состояние, что было до апдейта. Но если вы всем довольны и не хотите откатывать обновление, можно удалить папку.
Нажмите комбинацию Win + X и щёлкните в появившемся меню пункт «Windows PowerShell (администратор)». Введите команду:
rd /s /q c:windows.old
Затем перезагрузитесь.
5. LiveKernelReports

Путь: C:\Windows\LiveKernelReports
Эта папка содержит журналы, в которые Windows записывает состояние своего ядра. Их анализ может помочь, если у вас на компьютере регулярно появляется так называемый синий экран смерти — BSoD. Но если ПК работает нормально и проблем с ним не возникает, записи можно и стереть.
Выделите в папке LiveKernelReports файлы в формате DMP (остальное не трогайте) и удалите их.
6. Downloaded Program Files

Путь: C:\Windows\Downloaded Program Files
Название этой папки может немного сбить с толку — нет, в ней не хранятся скачанные вами приложения. Вместо этого она содержит файлы, необходимые для работы ActiveX Internet Explorer и апплетов Java. Это абсолютно бесполезные данные, и их можно без зазрения совести удалить.
7. SoftwareDistribution

Путь: C:\Windows\SoftwareDistribution
В эту папку скачиваются все обновления Windows перед установкой. Обычно она заполняется и очищается без вашего участия. Но иногда бывает так, что обновления системы зависают и перестают толком устанавливаться. В результате прогресс обновления стопорится, а SoftwareDistribution распухает до нескольких гигабайтов.
Нажмите комбинацию Win + X и щёлкните в появившемся меню пункт «Windows PowerShell (администратор)». Введите команды одну за другой, нажимая после каждой Enter:
net stop wuauserv
net stop cryptSvc
net stop bits
net stop msiserver
Эти команды остановят службу обновления, чтобы она не мешала удалить папку. Затем откройте SoftwareDistribution, сотрите её содержимое и снова выполните в PowerShell команды:
net start wuauserv
net start cryptSvc
net start bits
net start msiserver
После этого обновление перестанет зависать.
Стоит очищать папку Prefetch или нет? Дайте хороший совет, ведь данные, находящиеся в ней, используются приложениями при загрузке Windows, а значит они напрямую могут влиять на скорость запуска операционной системы.
Папка Prefetch
В данной папке Windows сохраняет файлы данных, содержащих информацию о запускаемых приложениях. Естественно жизнь в нашей операционной системе на месте не стоит, многие программы удаляются и заменяются другими, значит и информацию в папке Prefetch нужно периодически обновлять, очищая её. Все загружающиеся программы, сразу внесут свои данные в эту папку заново, на этот момент, запуск Windows немного замедлится, зато все последующие загрузки операционной системы будут происходить некоторое время быстрее.
Затем папка Prefetch, опять будет переполнена ненужной информацией. Лично я удаляю данные из папки Prefetch один раз в месяц, наведываться чаще в эту папку не стоит, если и можно здесь выиграть в скорости запуска , то очень немного, лучше уделить больше времени очистке жёсткого диска от лишних файлов и дефрагментации и общему ускорению работы Windows 7.
Многие со мной поспорят и скажут что папка Prefetch содержит данные не только системных файлов, но и многих лишних приложений, чтение которых особенно замедляет запуск Windows, но можно производить запись информации в папку Prefetch о запуске только системных файлов, задаётся это всё в реестре.
Находим ключ
[HKEY_LOCAL_MACHINE\SYSTEM\CurrentControlSet\Control\Session Manager\Memory Management\PrefetchParameters]
По умолчанию он имеет значение «EnablePrefetcher«=dword:00000003.
Используем другие значения:
0 – Prefetch отключен.
1 – запуск только приложений
2 – запуск системных процессов
3 – запуск всего.


Метки к статье: Windows XP Windows 7
Многие из Вас замечали, что со временем компьютер начинает работать медленнее. Начиная от более длительного ожидания загрузки, до понижения FPS или значительно возросшего времени обработки файлов.
В этой статье мы пройдемся по способам поддержания быстродействия и чистоты вашего железного друга.
Самый главный враг в подобной ситуации это кэш, который Ваша система сохранила, чтобы в дальнейшем быстрее обрабатывать часто используемые приложения и т.д.
Большую часть кэша, но не весь, если он уже не нужен Windows удаляет сама, но некорректное завершение работы, сбои в системе и многое другое не дают это сделать в полном объеме. И он продолжает копиться замедляя тем самым скорость работы и отнимая ценные гигабайты памяти на диске.
Первым делом пройдемся автоматизированными функциями самой Windows, а уже после почистим то, что осталось.
В поиске Windows набираем “Очистка диска”.
Выбираем нужный диск, в открывшемся меню в первый раз рекомендую установить все галочки и удалить все, что Windows посчитает ненужным.
Переживать не стоит, все важные файлы операционная система даже не тронет. Но обращаю внимание, что при установки галочки на “Предыдущие инсталляции Windows”.
Будут удалены файлы, необходимые для резервного восстановления, которые могут занимать до 10 ГБ.
Если не интересует, то удаляете. В противном случае можно и сохранить.
Аналогичным способом нужно пройтись по всем дискам и также очистить их.
Следующим шагом нужно зайти в “Параметры” и открыть вкладку “Система”.
Здесь нужно зайти в подраздел “Память” и дождаться анализа данных.
После переходим во вкладку “Временные файлы” и также удаляем все ненужное.
Теперь переходим в папку, которая хранит в себе наибольший объем временных файлов системы и программ.
Для этого жмём сочетание клавиш Win+R, в открывшемся меню вводим %temp%.
В папке выделяем все файлы сочетанием клавиш Ctrl+A и жмем Delete.
Некоторые файлы удалить нельзя, потому что они используются в данный момент. Поэтому жмем пропустить для всех файлов и идем дальше.
Поступаем аналогичным способом, но теперь в строке “Выполнить” (Win+R) набираем temp без знаков процент. Также выбираем все и удаляем. Используемые в данный момент файлы мы пропускаем.
Следующим обязательным пунктом является удаление временных файлов после обновления Windows. Они хранятся по следующему пути: C:\Windows\SoftwareDistribution\Download
Смело выбираем все файлы и удаляем их.
Точно также поступаем и с файлами из папки “Prefetch”. Здесь хранятся файлы, которые система использует для ускорения загрузки ОС и некоторых приложений. После удаления этих файлов, первая перезагрузка системы будет длиться дольше, но в последующем вы заметите явное ускорение данного процесса. Находится эта папка также в папке Windows (C:\Windows\Prefetch).
Чтобы избавиться от истории поиска по файловой системе, открываем любую папку , нажимаем на “Файл” в правом верхнем углу и изменить параметры папок. В открывшемся меню нужен подраздел конфиденциальность, в котором просто нажимаем очистить.
Позволит удалить старые точки, которые также занимают немало места. Точки восстановления нужны для того, чтобы восстановить систему после критического сбоя сбросив настройки до стабильной версии. Но волноваться не стоит, после очистки мы создадим новую точку, которая будет занимать меньше места.
В поиске вводим “создание точки восстановления”.
Выбрать нужно тот диск, на котором включена защита системы. Жмем на кнопку “Настроить” и “Удалить”.
Теперь переходим к созданию новой точки. Ползунком выбираем меньший объем и жмем применить. Рекомендую установить объем в 15% от объема диска и через некоторое время проверить, на сколько использовано хранилище. А в дальнейшем уже отталкиваться от этого объема.
После нужно нажать “Применить”. Вас вернет в предыдущее меню, где нажимаете “Создать”, название можно указать любое.
После длительного использования системы с моменты её установки в ней накапливается DNS кэш со всех сайтов, на который Вы заходили. Из-за этого, загрузки страниц в браузере могут длиться больше, страница может загружаться с ошибкой или не загружаться вовсе.
Чтобы исправить сложившуюся ситуацию, нужно нажать комбинацию Win+R, в открывшемся меню набрать cmd и нажать Enter.
В командной строке набираем ipconfig/flushdns и нажать Enter.
Должна появится надпись: Кэш сопоставителя DNS успешно очищен.
Немаловажным также будет очистить остаточные данные браузера, которые копятся очень быстро. Ими являются “Cookie (куки) файлы”, история браузера, изображения и другие файлы, которые сохранены в кэше…
На моем примере будет Google Chrome.
Для этого переходим в историю браузера. Быстрее всего открыть историю сочетанием клавиш Ctrl+H и далее нажать “Очистить историю”.
Временной диапазон выбираем “Все время” и оставляем галочки на том, что желаете удалить.
Кэш видеокарты хранит в себе предыдущие версии драйверов, копии установочных файлов и т.д.
Чтобы также избавиться и от него, жмем Win+R и вводим %appdata%
Переходим в папку Local, далее NVIDIA.
C:\Users\Имя_пользователя\AppData\Local\NVIDIA\GLCache
Здесь нам нужна папка GLCache, из которой мы также удаляем все файлы.
Для владельцев карт от AMD все еще легче.
Открываем утилиту Adrenalin Edition.
На главной странице открываем настройки и вкладку “Графика”. Листаем в самый низ до расширенных настроек.
Ищем “Сброс кэша шейдеров” и собственно сбрасываем этот кэш.
По итогу всех проделанных действий я смог избавиться от ненужных и неиспользуемых данных и освободить целых 80 ГБ.
Делитесь своими показателями в комментариях. Уверен, что данная статья поможет вам эффективно оптимизировать хранилище на вашем компьютере.