
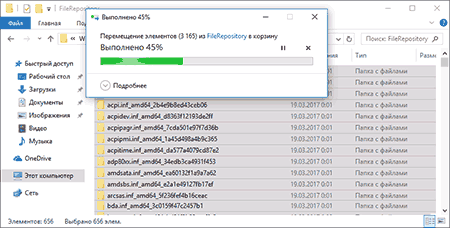
При очистке диска в Windows 11, Windows 10 и предыдущих версиях системы вы можете заметить (например, с помощью программ для анализа используемого места на диске), что папка DriverStore\FileRepository в System32 занимает гигабайты свободного пространства. При этом стандартные способы очистки не очищают содержимого этой папки.
В этой инструкции — пошагово о том, что содержится в папке DriverStore\FileRepository в Windows, можно ли удалить содержимое этой папки и как очистить ее безопасно для работы системы. Также может пригодиться: Как очистить диск C от ненужных файлов, Как узнать чем занято место на диске.
Содержимое FileRepository в Windows 11, 10 и предыдущих версиях ОС
Папка FileRepository содержит копии готовых к установке пакетов драйверов устройств. В терминологии Майкрософт — Staged Drivers, которые, находясь в хранилище DriverStore, могут быть установлены без прав администратора.
При этом, в большинстве своем — это не те драйверы, которые работают в настоящий момент времени, но они могут потребоваться: например, если вы когда-то подключали некое устройство, которое сейчас отключено и скачивали драйвер для него, после чего отключили устройство и удалили драйвер, при следующем подключении драйвер может быть установлен из DriverStore.
При обновлении драйверов оборудования системой или вручную, старые версии драйверов остаются в указанной папке, могут служить для отката драйвера и, одновременно, вызывают увеличение количества места на диске, которое требуется для хранения, которое не удается очистить способами, описанными в руководстве: Как удалить старые драйверы Windows.
Очистка папки FileRepository
Теоретически, можно удалить всё содержимое FileRepository в Windows 11/10/8.1/7, однако это все-таки не вполне безопасно, может вызывать проблемы и, более того, не требуется в целях очистки диска. На всякий случай создайте резервную копию драйверов Windows.
В большинстве случаев гигабайты и десятки гигабайт, занимаемые папкой DriveStore — результат многократных обновлений драйверов видеокарт NVIDIA и AMD, звуковых карт Realtek, и, реже, дополнительных регулярно обновляемых драйверов периферии. Удалив старые версии этих драйверов из FileRepository (даже если это только драйверы видеокарты), вы можете сократить объем папки в разы.
Как очистить папку DriverStore, удалив из нее ненужные драйверы:
- Запустите командную строку от имени администратора (начните набирать в поиске «Командная строка», когда найдется нужный элемент, нажмите по нему правой кнопкой мыши и выберите пункт контекстного меню «Запуск от имени администратора»).
- В командной строке введите команду
pnputil.exe /e > c:\drivers.txt
и нажмите Enter.

- Команда из пункта 2 создаст файл drivers.txt на диске C с перечислением тех пакетов драйверов, которые хранятся в FileRepository.

- Теперь вы можете удалить все ненужные драйверы с помощью команд
pnputil.exe /d oemNN.inf
(где NN — номер файла драйвера, как указано в файле drivers.txt, например oem10.inf). Если драйвер используется, вы увидите сообщение об ошибке удаления файлов.


Рекомендую в первую очередь удалить старые драйверы видеокарты, которые в поле класс будут иметь значение «Видеоадаптеры». Текущую версию драйверов и их дату вы можете увидеть в диспетчере устройств Windows.

Более старые можно смело удалять, а по завершении проверить размер папки DriverStore — с большой вероятностью, он придет в норму. Также можно удалить старые драйверы других периферийных устройств (но не рекомендую удалять драйверы неизвестных вам системных устройств Intel, AMD и подобных). На скриншоте ниже — пример изменения размера папки после удаления 4-х старых пакетов драйверов NVIDIA.

Driver Store Explorer
Выполнить описанную выше задачу в более удобном виде поможет утилита Driver Store Explorer (RAPR), доступная на сайте GitHub
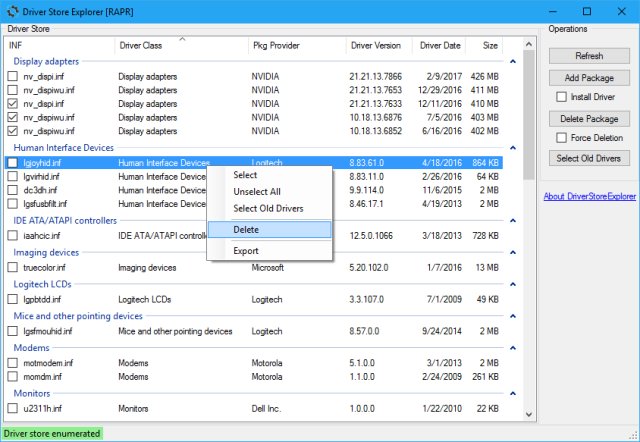
После запуска утилиты (запускайте от имени Администратора) нажмите «Enumerate» (или «Обновить», в последних версиях программы обновление происходит в автоматическом режиме, также появился русский язык).

Затем, в списке обнаруженных пакетов драйверов выберите ненужные и удалите их с помощью кнопки «Delete Package» (используемые драйверы удалены не будут, если не отметить «Force Deletion»). Вы можете отсортировать пакеты драйверов по размеру, нажав по заголовку столбца «Size» (Размер). Также можно автоматически выбрать старые драйверы, нажав кнопку «Select Old Drivers».
Как удалить содержимое папки вручную
И последняя возможность — удаление всего содержимого рассматриваемой папки вручную, использовать его я не рекомендую. Внимание: этот способ не стоит использовать, если вы не готовы к проблемам с работой Windows, которые могут возникнуть, некоторые пакеты драйверов (например, те, после установки которых ещё не производилась перезагрузка) могут не удалиться.
Также есть способ просто удалить папки из FileRepository вручную, хотя так лучше и не делать (это небезопасно):
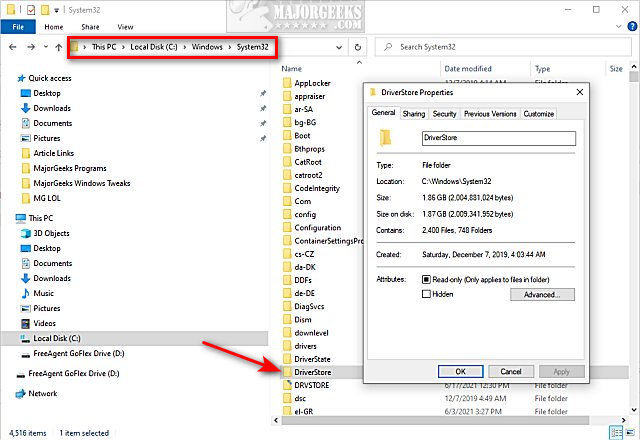
- Зайдите в папку
C:\Windows\System32\DriverStore
нажмите правой кнопкой мыши по папке FileRepository и нажмите «Свойства».
- На вкладке «Безопасность» нажмите «Дополнительно».
- В поле «Владелец» нажмите «Изменить».
- Введите свое имя пользователя (или нажмите «Дополнительно» — «Поиск» и выберите свое имя пользователя в списке). И нажмите «Ок».
- Отметьте пункты «Заменить владельца подконтейнеров и объектов» и «Заменить все записи разрешений дочернего объекта». Нажмите «Ок» и ответьте «Да» на предупреждение о небезопасности такой операции.
- Вы вернетесь на вкладку «Безопасность». Нажмите «Изменить» под списком пользователей.
- Нажмите «Добавить», добавьте свою учетную запись, а потом установите «Полный доступ». Нажмите «Ок» и подтвердите изменение разрешений. После завершения, нажмите «Ок» в окне свойств папки FileRepository.
- Теперь содержимое папки можно удалить вручную (не смогут быть удалены только отдельные файлы, используемые в настоящий момент времени в Windows, для них достаточно будет нажать «Пропустить».

На этом все на тему очистки неиспользуемых пакетов драйверов. Если остаются вопросы или есть, что добавить — это можно сделать в комментариях.
By Timothy Tibbetts |
Windows 10 & 11 contain a folder called DriverStore. This tutorial explains what the DriverStore folder is there for and if you can delete it.
Windows 10 & 11 will update your drivers as needed and, on a clean installation, already has generic drivers for most hardware. All of the files for the driver updates are stored in the DriverStore folder. The majority of file extensions include .INF, .SYS, and .LOC. The DriverStore folder is typically not a concern over disk usage, using about 500MB on a clean install and possibly over 2GB after a couple of years.
The DriverStore folder can be found in C:\Windows\System32\DriverStore.
Some people might consider deleting the DriverStore folder to free up disk space, but doing so could render your computer unbootable. You should not manually delete any of the files or folders in the DriverStore folder. A good drive cleaner can safely free up hard drive space.
That said, there are safe ways to clean up unneeded files from the DriverStore folder.
Video tutorial:
1: Use DriverStore Explorer
DriverStore Explorer is a free and Open Source utility that makes dealing with the Windows driver store more accessible. Supported operations include enumeration, adding a driver package, adding & installing, deleting, and forcing deletion.
DriverStore Explorer allows you to enumerate or list all the packages staged in the current driver store. You can export the list as CSV, add a driver package to the driver store (called staging), install & add a driver package to the store.
You can also delete a package from the store (force deletion supported), and full-fledged GUI supports grouping or sorting on any column and selecting specific columns.
2: Use Microsoft Disk Cleanup
The other safe method is to use Microsoft Disk Cleanup. Press the Windows Key + S and begin typing in, and click on Disk Cleanup. Usually, as mentioned earlier, you will see that you might be able to free 200MB of space roughly, hardly worth the effort.
Make sure you check the box next to Device driver packages. The only problem is some people see the Device driver packages option, and some don’t. I guess that if there aren’t any files to delete, then the option isn’t there.
We could use PowerShell or the Command Prompt and even generate a batch file to delete the folder contents, but that’s a really bad idea.
Most drive cleaners don’t offer an option to clean the DriveStore folder because they can free up drive space safely in other areas, including temporary files. As a final reminder, don’t delete the contents of the DriverStore folder manually.
Instead, you might consider a good drive cleaner like PrivaZer or deleting some well-known space-hogging folders following the similar links below.
Similar:
comments powered by Disqus
При установке или обновлении драйверов устройств в Windows, старые версии драйверов сохраняются в системе. Это позволяет пользователю откатиться к предыдущей версии драйвера, если новый драйвер работает нестабильно. Однако Windows автоматически не удаляет старые и неиспользуемые версии драйверов, поэтому со временем размер места, занимаемого драйверами на системном диске становится довольно большим. В этой статье мы рассмотрим несколько способов удаления старых версий драйверов (дубликатов) в Windows с помощью встроенных и сторонних средств.
Содержание:
- Поиск и удаление старых версий драйверов в Windows с помощью PowerShell
- Удаление старых драйверов в Windows с помощью утилиты очистки диска cleanmgr
- Удаляем неиспользуемые драйвера с помощью DevManView
Windows хранит все файлы в драйверов в своем репозитории драйверов (Driver Store), находящемся в каталоге
%WINDIR%\System32\DriverStore\FileRepository.
Размер каталога с драйверами можно получить с помощью PowerShell (
"{0:N2} GB" -f ((gci –force $Env:windir\System32\DriverStore\FileRepository –Recurse -ErrorAction SilentlyContinue| measure Length -s).sum / 1Gb)
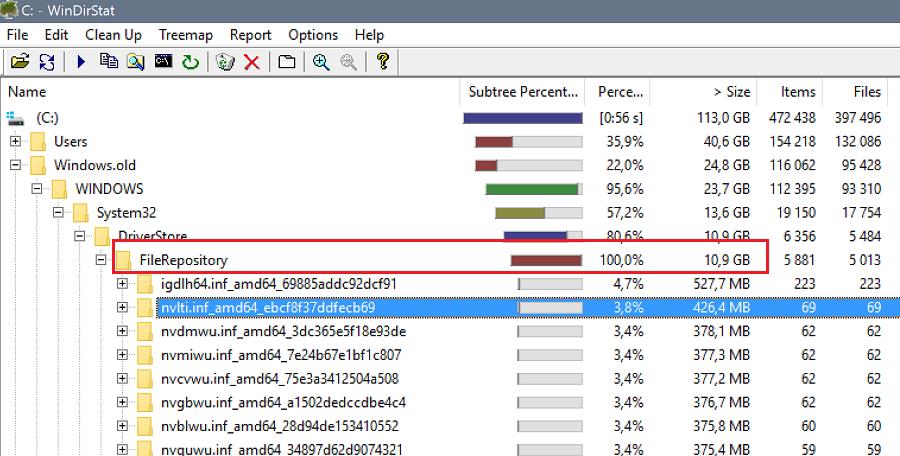
) или графических утилит. В моем случае на домашнем ноутбуке с Windows каталог FileRepository занимает на диске около 11 Гб и содержит >5000 файлов. В частности, в этом каталоге хранится более 20 различных версий видеодрайвера Nvidia.
Важно!
- Не удаляйте файлы и каталоги драйверов из папки DriverStore вручную;
- Перед очисткой драйверов настоятельно рекомендуется создать точку восстановления системы (
Checkpoint-Computer -Description "BeforeDriversDelete"
) или резервную копию образа системы; - При подключении новых устройств вам придется загружать и устанавливать драйвера заново.
Поиск и удаление старых версий драйверов в Windows с помощью PowerShell
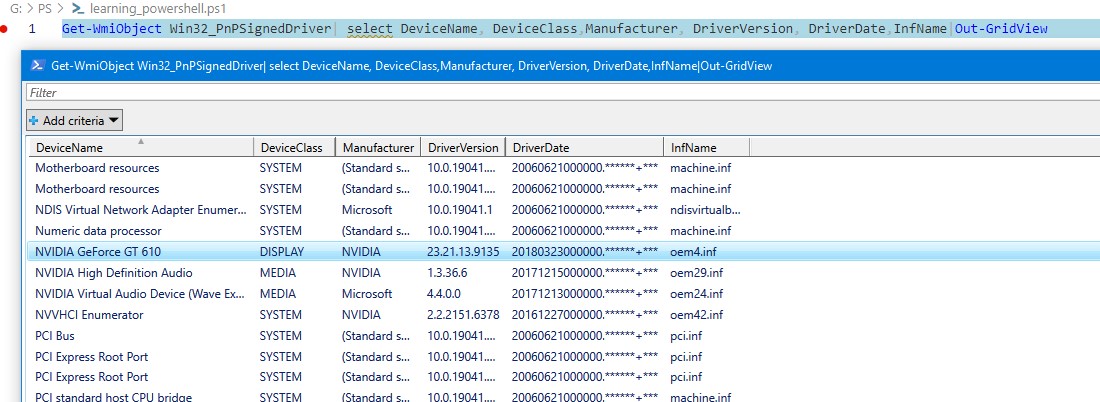
Рассмотрим способ поиска и удаления старых версий драйверов в Windows. Вы можете вывести полный список установленных драйверов с помощью PowerShell и WMI (CIM) класса Win32_PnPSignedDriver:
Get-WmiObject Win32_PnPSignedDriver| select DeviceName, DeviceClass,Manufacturer, DriverVersion, DriverDate,InfName|Out-GridView
В нашем примере мы получили таблицу Out-GridView со списком драйверов в репозитории Windows в формате: имя устройства, класс устройства, производитель, версия драйвера, дата установки, имя inf файла драйвера (oemXXX.inf).
Вы можете получить список сторонних драйверов, установленных в Windows с помощью командлета:
Get-WindowsDriver –Online| select Driver, ClassName, BootCritical, ProviderName, Date, Version, OriginalFileName|Out-GridView
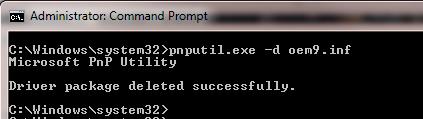
Вы можете удалить любой из установленный драйверов с помощью утилиты pnputil:
pnputil.exe /remove-device oemxxx.inf
Примечание. В некоторых случаях удалить драйвер можно только с ключом force (-f):
pnputil /remove-device oemxxx.inf /force
Найдите в таблице драйвера, для которых присутствуют несколько версий и удалите все старые версии драйвера (кроме самой последней) с помощью pnputil.
Будьте особо внимательными с драйверами, важными при загрузке Windows (
BootCritical=True
)
Также вы можете выгрузить список драйверов в текстовый файл и импортировать его в Excel:
dism /online /get-drivers /format:table > c:\tmp\drivers.txt
Удалите все лишние данные в таблице и оставьте только столбцы: файл драйвера в системе (oemXXX.inf), имя оригинального inf файла, класс устройства, производителя, даты установки и версии драйвера. Отсортируйте таблицу по столбцам B (содержит имя оригинального inf файл) и столбцу F (дата установки драйвера). Среди групп одноименных драйверов отметьте для удаления все версии драйверов, кроме последней. В моем случае видно, что большинство старых версий драйверов принадлежит NVIDIA.
Для удобства сформируйте в пустом столбце команду для удаления каждого драйвера с помощью формулы
=CONCATENATE("pnputil.exe -d ";A21)
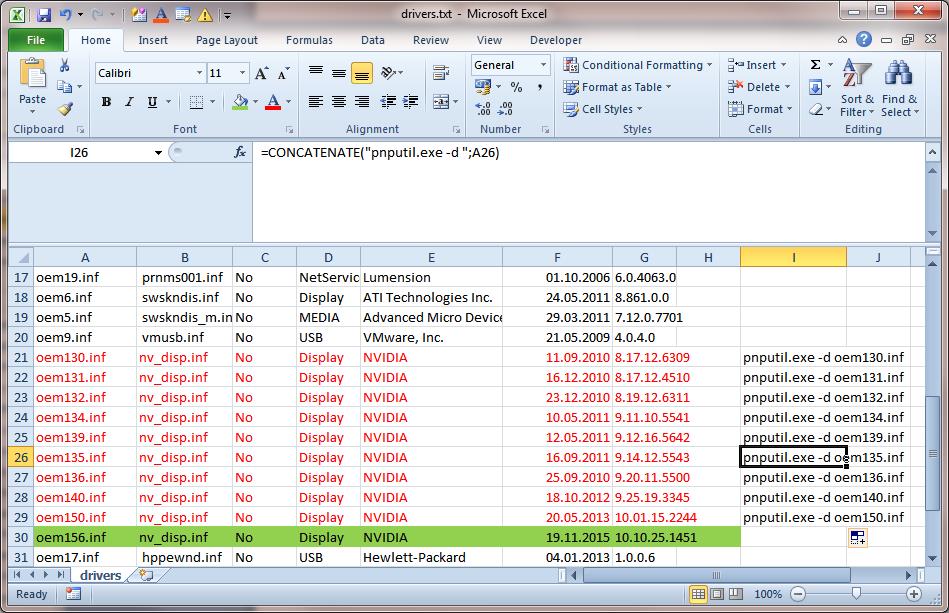
Осталось скопировать команды pnputil и выполнить их командной строке или bat файле.
В моем случае я удалил в Windows порядка 40 старых версий драйверов и освободил около 8 Гб места (в основном за счет драйверов видеокарты NVIDIA).
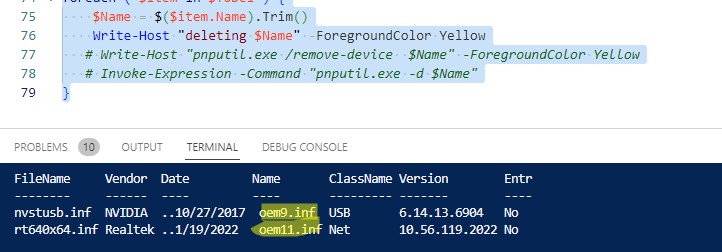
Для автоматического поиска драйверов устройств, для которых установлено несколько версий драйверов (дубликаты) можно использовать готовый PowerShell скрипт FindDriverDuplicates.ps1 (https://github.com/winadm/posh/blob/master/Desktop/FindDriverDuplicates.ps1).
Скрипт выведет список старых версий драйверов, которые можно удалить, т.к. для этих устройств установлены более новые версии. Строки с автоматическим удалением найденных драйверов по-умолчанию закомментированы в скрипте.
Удаление старых драйверов в Windows с помощью утилиты очистки диска cleanmgr
В современных версиях Windows 10 и 11 вы можете использовать утилиту очистки диска
cleanmgr.exe
для удаления старых версий драйверов (эта же утилита позволяет удалить устаревшие обновления).
- Запустите утилиту «Очистка диска»: Win+R -> cleanmgr
- Выберите системный диск
- Нажмите на кнопку Clean up system files
- Отметьте в списке Device driver packages (Пакеты драйверов устройств)
- Нажмите ОК;
- Данное задание очистки удалит все предыдущие версии драйверов, установленные через Windows Update или вручную. В Windows останется только последняя версия для каждого из драйверов. При этом устройств кнопка “Откатить драйвер” (RollBack Driver) в свойствах драйвера в диспетчере устройств станет неактивной.

Задание очистки cleanmgr удаляет только дубликаты (версии) драйверов. Неиспользуемые драйверы устройств вам придется удалить вручную.

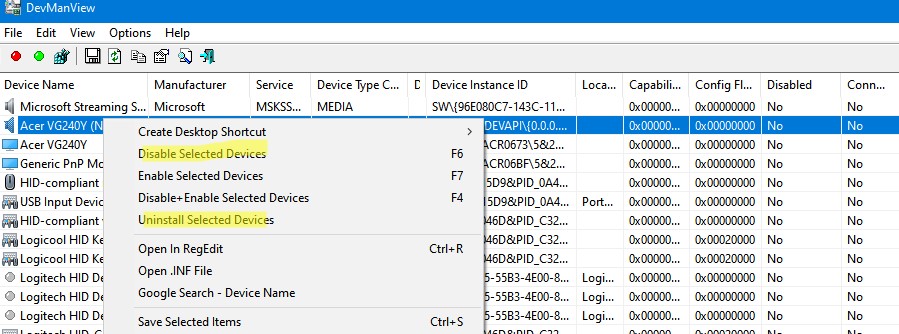
Удаляем неиспользуемые драйвера с помощью DevManView
Для просмотра списка установленных драйверов в Windows можно использовать небольшую бесплатную утилиту DevManView от NirSoft (https://www.nirsoft.net/utils/device_manager_view.html)
Утилита DevManView предоставляет собой альтернативу стандартному диспетчеру устройств Windows и позволяет представить список драйверов, установленных на компьютере, в виде плоского списка (таблицы).
- Скачайте и запустите утилиту DevManView;
- Включите следующие параметры в меню Options: Mark Connected Devices и Show Non Plug and Play Drivers;
- Отсортируйте таблицу по столбцу Connected. Это позволит понять какие устройства сейчас подключены, а какие нет;
- В целях стабильности рекомендуем сначала отключить выбранные драйвера (Disable Selected Devices –> F6) и только после перезагрузки удалять драйвера с помощью опции Uninstall Selected Devices.

FileRepository is a folder in Windows 10 and 11 to store the 3rd party and OEM driver packages. Before the drivers are installed they are injected here in this directory. The location of this folder is C:\Windows\System32\DriverStore\FileRepository where C:\ is the installation drive. Often this folder is filled up with old driver’s data and cache and sometimes you might see the volume more than 50+ GB.
But you can easily Clean up DriverStore FileRepository in Windows 11 and 10 using a cmd command. You can free up tons of space using this method because the old updates from NVIDIA, AMD, Intel, and others create a huge amount of data in this folder.
Clean up DriverStore FileRepository in Windows 10 or 11
Here is How to Clean up DriverStore FileRepository in Windows 11/10 –
1] Using Cmd command
- Click the – Search on the Taskbar.
- Type – cmd.
- Right-click the – Command Prompt.
- Select the – Run as administrator.
- Once User account control appears, select – Yes.
- Paste the following command in the command prompt –
TAKEOWN /F “C:\Windows\System32\DriverStore\FileRepository” /R
ICACLS “C:\Windows\System32\DriverStore\FileRepository” /T /L /GRANT *S-1-1-0:F
RD /s /Q “C:\Windows\System32\DriverStore\FileRepository\”
- Press the – Enter.
- During the process you might need to hit the Enter key one or more times, so do the same and wait until finishing.
2] Through Driver Store Explorer
This app access windows 11 or 10 driver store location and allows to clean up the store liberate a multiple GBs.
- Download the tool using this link.
- Extract the zip file and double click Rapr.exe to open the app.
- Once Driver Store Explorer appears and loads drivers, click – Select Old Driver(s).
- Hit the – “Delete drivers”.
- Alternatively, right-click on the selected one and choose – Delete.
This way you can clear driver cache windows 11 or 10 from filerepository folder.
See more –
1] How to Delete Recent files in Windows 10
2] How to Clear Cache on Windows 10 – All Type
3] Cleanmgr+ to Run Disk Cleanup plus Clean Browsers Cache
Methods list
1] Using Cmd command
2] Through Driver Store Explorer
That’s all!!
Ah, the joys of modern computing: endless performance, sleek designs, and a folder on your system called DriverStore that sits quietly, hogging space, and leaving you wondering, “Can I delete that?” It’s a fair question—after all, most of us aren’t in the habit of leaving mysterious folders with cryptic names lying around on our PCs. If you’ve stumbled upon the DriverStore folder and felt the itch to free up some space, let’s dig into what it is, why it exists, and whether you should really hit that delete button.
So, What Exactly is the DriverStore Folder?
The DriverStore folder is like the ultimate library for all the drivers installed on your Windows system. Located deep within the System32 directory (for those of you brave enough to wander into the depths of your C: drive), the DriverStore keeps a copy of every driver package Windows deems necessary for your hardware.
Think of it as your computer’s warehouse for all the little bits of software that tell your hardware components how to work—kind of like instructions for assembling an IKEA desk, but for your mouse, keyboard, graphics card, and everything in between. Instead of flipping through a manual, Windows just grabs the driver it needs from this folder, and your device is good to go.
In Windows 10 and 11, you’ll find it here:
C:\Windows\System32\DriverStore
And no, this isn’t some random folder that Windows will forget about. It plays a crucial role in making sure your hardware and software can communicate, which, if you think about it, is pretty important unless you enjoy your PC staring at you blankly when you try to use your printer.
Why Does the DriverStore Folder Exist?
Microsoft introduced the DriverStore as a way to improve how drivers are managed on Windows systems. Previously, drivers could be scattered across different directories, leading to a cluttered and confusing situation when you tried to update, uninstall, or reinstall them. It was the digital equivalent of finding socks in random places around the house—inefficient and, frankly, a little chaotic.
The DriverStore centralizes everything. Whenever you install a new driver, a copy is placed in this folder. When you update or uninstall a driver, Windows refers back to the DriverStore to make sure everything is handled properly. If you plug in a new device that requires a driver, Windows checks here first to see if the driver’s already available before going off to hunt one down on the internet.
This system helps prevent issues like driver conflicts, missing files, or incorrect installations. It’s like having a well-organized toolbox: you know exactly where everything is when you need it. So, while it might seem like a bit of an invisible helper, the DriverStore folder is key to keeping your computer’s hardware running smoothly.
Can You Delete the DriverStore Folder?
Let’s cut straight to the chase: no, you should not delete the DriverStore folder. It’s tempting to reclaim the space—it can balloon to a sizable chunk over time—but deleting it is a bad idea. Think of it like removing the instruction manual from every piece of furniture in your house and then trying to put them back together later. Sure, you might figure it out, but more likely, you’ll be sitting on the floor in a mess of bolts, nuts, and frustration.
Here’s why deleting the DriverStore folder is risky:
- Loss of Critical Drivers: Without those stored drivers, your hardware might not function correctly. Deleting drivers could leave you without a working keyboard, mouse, network adapter, or other key components. Imagine going to use your computer, only to find out you can’t click, type, or even connect to the internet. Yikes.
- Automatic Driver Installation Fails: Windows uses the DriverStore to reinstall drivers when necessary, such as after an update or if a driver goes missing. Without it, Windows might struggle to find the drivers it needs, and that means headaches for you.
- System Instability: Removing driver packages can cause all sorts of instability issues. The drivers in the DriverStore are vetted and stored there to avoid conflicts, errors, and crashes. If you wipe them out, you could end up with hardware that malfunctions, crashes your system, or worse—requires a complete reinstall of Windows to fix.
But… Can You Clean It Up?
Now, just because you shouldn’t delete the DriverStore folder doesn’t mean you’re out of options. You can clean it up safely using built-in Windows tools. Over time, the DriverStore accumulates old or unused drivers, and clearing these out can free up some space without causing any harm.
Here’s how to safely manage the drivers in DriverStore:
- Use Disk Cleanup: Windows’ Disk Cleanup tool is like your car’s built-in vacuum—it won’t deep clean the entire car, but it can make the dashboard and seats look a lot better.
- Open Disk Cleanup by searching for it in the Start Menu.
- Select your C: drive.
- In the Disk Cleanup window, click Clean up system files.
- Look for the option to clean up Device Driver Packages and select it.
This will remove any old driver versions that are no longer needed. Your computer will retain the most recent drivers, so you won’t accidentally break anything by doing this.
- Use the
pnputilCommand: If you’re feeling brave and want to take a more hands-on approach, thepnputilcommand can be used to list and remove unused drivers from the DriverStore.- Open Command Prompt as an administrator.
- Run the following command to list all third-party drivers:bashCopy code
pnputil /enum-drivers - To remove an unused driver, you can use:bashCopy code
pnputil /delete-driver oemXX.inf /uninstall /forceReplaceoemXX.infwith the actual file name of the driver you want to remove.
This process is a bit more involved, so make sure you’re not removing any drivers your system still needs. But it’s a great way to take control of your system without the risk of accidentally wiping out everything.
How Much Space Can You Actually Reclaim?
Alright, let’s talk about the elephant in the room—space. The DriverStore folder can get big, especially if you’ve had your system for a while or frequently install and update drivers. While the size varies depending on your hardware and driver usage, it’s not uncommon for this folder to grow to several gigabytes. If you’re working with limited disk space, that might feel like a lot of wasted room.
However, by using Disk Cleanup or manually removing outdated drivers, you can typically free up a chunk of that space without risking your system’s stability. You won’t make it disappear entirely (and honestly, you wouldn’t want to), but you can certainly keep it in check.
Conclusion
The DriverStore folder might seem like an unnecessary space-hogging mystery at first glance, but it plays a crucial role in keeping your system’s hardware drivers organized and functional. While it’s not safe to delete the folder outright, you can safely clean it up to free some space by removing old or unused drivers.
So, resist the urge to delete it—it’s doing a lot of behind-the-scenes work to ensure your hardware plays nicely with your software. After all, when your computer’s hardware works flawlessly, life’s just a little bit easier, and you can save the real mystery-solving for where your missing socks go after doing laundry.