
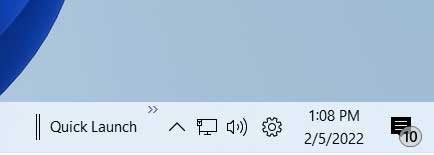
Панель быстрого доступа или панель быстрых настроек, открывающаяся по нажатию на значках сетевого подключения, громкости или батареи в области уведомлений — удобный и часто используемый элемент, однако далеко не все кнопки в нём нужны большинству пользователей.
Вы можете настроить эту панель, используя соответствующую кнопку редактирования на ней, а можете использовать описанный далее способ включения упрощенного вида панели быстрого доступа в Windows 11.
Включение упрощенной панели быстрого доступа в реестре

Для того, чтобы включить упрощенный вариант панели, достаточно выполнить следующие шаги:
- Нажмите клавиши Win+R на клавиатуре, либо нажмите правой кнопкой мыши по кнопке «Пуск» и выберите пункт «Выполнить», введите regedit и нажмите Enter.
- Перейдите к разделу реестра
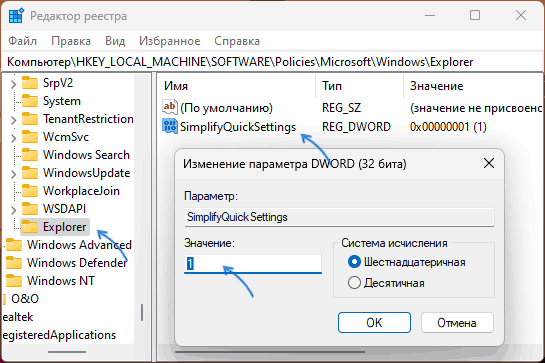
HKEY_LOCAL_MACHINE\SOFTWARE\Policies\Microsoft\Windows\
Если в этом разделе есть подраздел с именем Explorer, выберите его. Если он отсутствует — сначала создайте его: нажмите правой кнопкой мыши по «папке» Windows, выберите «Создать» — «Раздел» и укажите нужное имя.
- В подразделе «Explorer» нажмите правой кнопкой мыши в пустой области правой панели редактора реестра, выберите «Создать» — «Параметр DWORD (32-бита)» и укажите имя SimplifyQuickSettings для параметра.
- Дважды нажмите по вновь созданному параметру и задайте значение 1 для него.

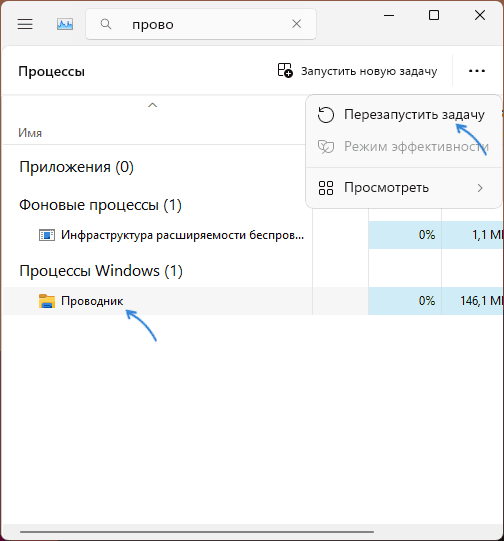
- Закройте редактор реестра и либо перезагрузите компьютер, либо просто перезапустите «Проводник», сделать это можно в диспетчере задач:

В результате при следующем открытии панели быстрых действий вы увидите её в упрощенном варианте.
Также вы можете создать .reg файл со следующим кодом и импортировать его в реестр вместо выполнения описанных действий вручную:
Windows Registry Editor Version 5.00

[HKEY_LOCAL_MACHINE\SOFTWARE\Policies\Microsoft\Windows\Explorer]
"SimplifyQuickSettings"=dword:00000001
Либо запустить командную строку от имени администратора и ввести команду:
REG ADD HKLM\\SOFTWARE\Policies\Microsoft\Windows\Explorer /v SimplifyQuickSettings /t REG_DWORD /d 1
В обоих случаях потребуется перезапуск проводника или перезагрузка компьютера.
В упрощенном представлении панели быстрого доступа остаются следующие элементы:
- Переключатели Wi-Fi и Bluetooth
- Специальные возможности
- Регулировка яркости и громкости
- Индикатор заряда батареи
- Кнопка перехода в «Параметры»
При этом кнопка настройки кнопок отсутствует, в отличие от полного варианта. Если в будущем вам потребуется вернуть исходный вид панели, достаточно либо удалить созданный параметр из реестра, либо изменить его значение на 0.
**Disclosure: This post contains affiliate links. If you make a purchase through these links, we may earn a small commission at no extra cost to you.
As Windows progresses with newer versions, Microsoft tends to add and remove features as they see fit in an effort to keep things fresh. But for many Windows power users, these changes often leave us asking why a certain feature was removed. In Windows 7, we had the Quick Launch Toolbar and were able to add it to Windows 10 as well. But when Windows 11 came out we found this was not an easy thing to do. In this article, we will be showing you how to add the Quick Launch Toolbar in Windows 11.
In order to get the Quick Launch Toolbar back in Windows 11, you are going to need to install some additional software first. Fortunately, this software is free and easy to install. And unfortunately, you need to install this software in the first place!
Installing the Explorer Patcher for Windows 11 Software
The first step in getting the Quick Launch Toolbar back is to install the ExplorerPatcher software that you can download here. When you are on the Github website, look for a line that says Download the latest version of the setup program under the How to section. You will then download a file named ep_setup.exe
Now you will run the executable file that you have downloaded to install the ExplorerPatcher software. You won’t be prompted with any questions about installation paths etc. and the software will simply install itself silently.
You will know its complete when you see your start button and other taskbar icons on the left side of the taskbar. You will also see a different looking Start button.
Before taking the next step, you will need to make sure your taskbar is not locked by right clicking on it and unchecking Lock the taskbar if it is in fact checked.
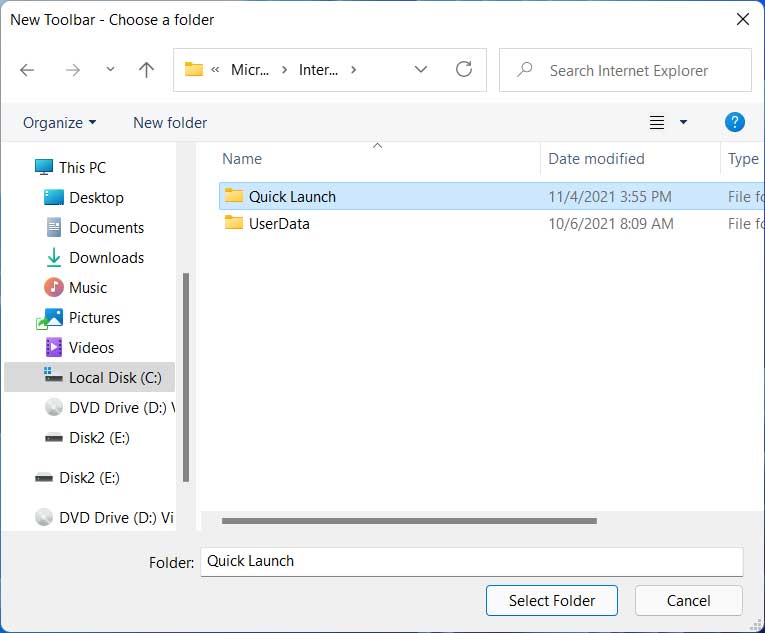
The next step is to right click the taskbar again and then go to Toolbars > New toolbar and paste the following text into the address bar and press enter on the keyboard.
%SystemDrive%\Users\%username%\AppData\Roaming\Microsoft\Internet Explorer
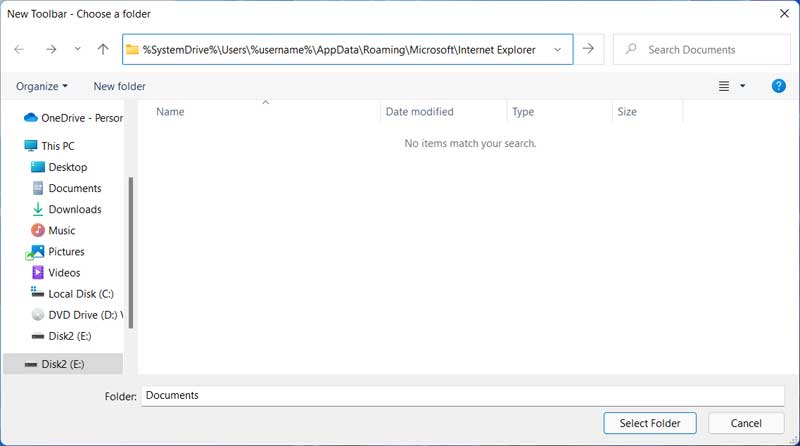
Now you will see a folder named Quick Launch which you will then select and click on the Select Folder button.
You will then see a Quick Launch section on the right side of your toolbar.
You can then right click on the word Quick Launch and uncheck Show Text and Show Title since they just get in the way.
The next step involves clicking on the double vertical bars and drag them to the left side of the toolbar. You might need to play with this a little to get things in the right place. After that you will end up with your small Quick Launch icons with your larger original icons next to them.
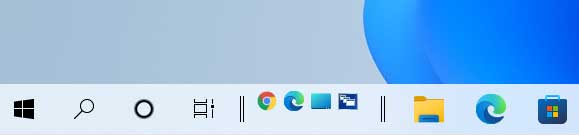
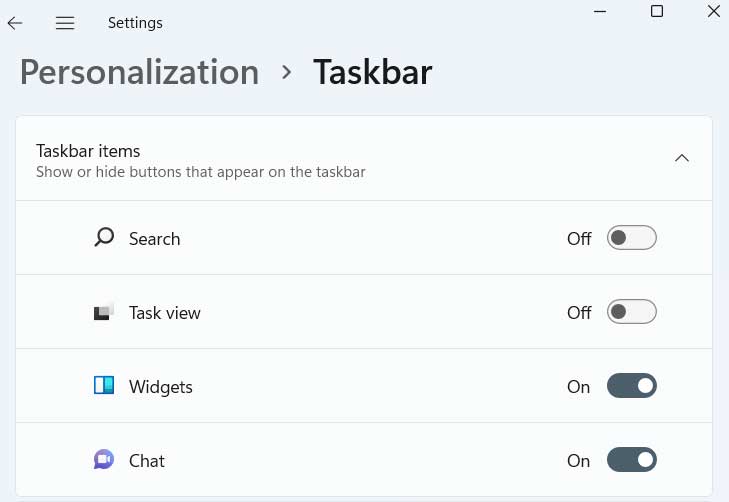
For the larger icons, you can right click them and choose Unpin from taskbar to remove them. For the Task view and Search icons, you can go to the Windows settings and then to Personalization > Taskbar to turn them off.
For the Cortana search icon, you can right click the taskbar again and uncheck Show Cortana button.
Once you have made all of these changes, your taskbar should look like the image below.
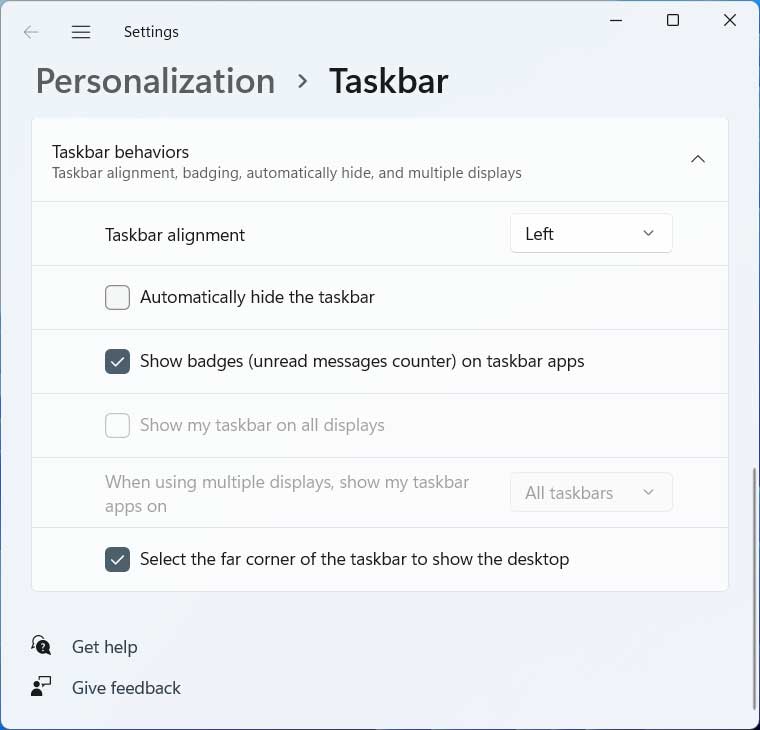
One thing you will notice though is that when you click on the Start button, your Start menu will appear in the middle of the screen.
This can be changed by setting the taskbar alignment to the left from the Personalization > Taskbar settings from the Taskbar behaviors settings.
Another thing you can do is install Classic Shell to get a Windows 7 style Start menu for your Windows 11 (or Windows 10) computer. So as you can see, it only takes a few steps to add the Quick Launch Toolbar to the taskbar in Windows 11.
If you want to revert back to the default Windows 11 taskbar without the Quick Launch toolbar, you can go to Programs and Features in Control Panel or Apps and Features in the Windows settings app and uninstall ExplorerPatcher. After doing so, everything will be back to the way it was before you started.
For additional training resources, check out our online IT training courses.
Check out our extensive IT book series.
The quick access toolbar is overlooked by most of the users in Windows 11. This is not good as the feature is subtle, practical, and easy to use. The best thing is that it is simple and can be customized to include buttons and options that can access favorite tools and manage the file explorer items quite easily. Learn how to show it, remove it or even fix it if it is not showing for you. We have your back!
If you are not a big fan of keyboard shortcuts or mostly rely on your mouse, this is quite an impressive tool in Microsoft Windows 11. With this, you can replace the ribbon thus providing more space on the screen and also saving a lot of time that is spent going through all the tabs and menus to access commands.
You can find this in the extreme left of the file explorer title bar. Just open this up and have a look.
Please don’t confuse this with the quick access location from its navigation pane.
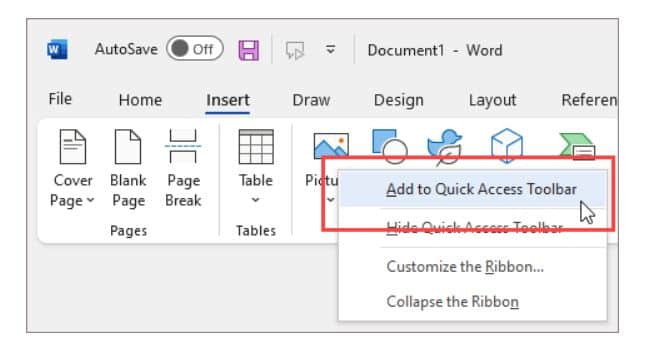
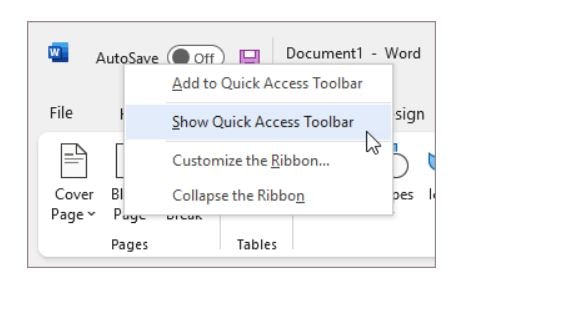
Show and Customize Quick Access Toolbar With Your Buttons
We can configure this to have many options and commands that we want from File Explorer’s tab. Anything added shall be shown all the time no matter which tab is displayed on the ribbon we can click on the button to use the corresponding action from the toolbar easily. By default, it carries only two buttons and an arrow that opens the drop-down menu.
The “Customize Quick Access Toolbar” shows all default commands. You can see the checked commands while others are hidden. Clicking on commands from the list can check or uncheck it and selected options can be seen in the toolbar. It has the following 6 default commands available:
- Undo: Goes back to the last change made to the active window.
- Redo: Redoes the last undone action.
- Delete: It sends items to the recycle bin.
- Properties: This opens up files or folder property windows, enabled by default and first displayed on this.
- New Folder: It makes a new folder inactive file explorer window. This by default is the second option available.
- Rename: It is used to highlight the name of the selected option thus allowing us to replace it.
The best thing about this one is that we can add anything from the file explorers tab to this easily and have fast access to certain commands which are used regularly. As users need to make selections on different files on Windows we can use the select-all option to see how this works. You need to click right or press and hold the “select all” button from its ribbon to open a contextual menu. After this, you need to click on “Add to Quick Access Toolbar”.
ALSO CHECK: Step by Step Guide on Creating a Bootable Flash Drive with WoeUSB.
The button is added last to it. Moreover, you can click on this anytime to select the contents of your active File Explorer window immediately.
Use this method to add anything we want even a special button from certain tabs such as the “open settings” button from the “computer tab” available when you access this system.
Now, you can also open the “Recycle Bin” and click right or press and hold the “empty recycle bin” option. Once done, you need to click “Add to Quick Access Toolbar” and see the button attached to the toolbar immediately.
Do you need to switch between different views for your folders in File Explorer? Well, you don’t need to worry go ahead and add in the whole views gallery by clicking right or pressing and holding on it and then clicking on “Add gallery to Quick Access Toolbar”.
The best thing is that customization options are endless and whole sections of tabs can be added similarly. But this means more clicks to reach the button we want. If you wish to boost your productivity with it, we suggest you add certain commands you want.
Now, if the option to add command is greyed out, the corresponding button is added to it already.
RECOMMENDED: How To Check and Verify MD5 Checksums on Windows 11.
The button can be removed in two different ways; for the default set of commands mentioned earlier access the “Customize Quick Access Toolbar” menu and uncheck all the options, you wish to eliminate. Moreover, you can also remove any command you want by clicking right or pressing and holding on its icon in and then clicking the “Remove from Quick Access Toolbar” option.
We suggest you take your time and experiment on it, add and remove buttons unless and until the commands used are shown to make sense. Now you can add as many options as you want but they cannot be displayed on different lines. If there is no more option then this shall show a double arrow. To access the last buttons, click on them.
You can also maximize the File Explorer Window to get more space on its bar if you wish to fit in more options. A better way is to move this
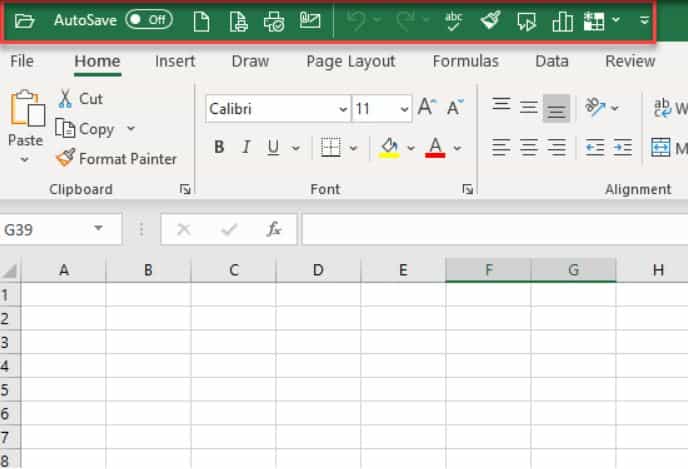
Change the position of the quick-access toolbar
Well, it does not carry that much flexibility as to the position of this toolbar and you can only select one of two possible locations. As by default it is present in the top left corner this can be moved below the ribbon. You can use the down menu arrow on it and then select “show below ribbon”.
As an alternate, you can also click right or press and hold any button on the ribbon or toolbar to access the “Show Quick Access Toolbar below the Ribbon” button.
The new position places it under the ribbon on the left side of the window thus providing more room for the buttons. The lower position however makes sense if you are using the mouse and wish to bar close to files to minimize the movement needed between clicks.
Now, if you wish to place it above the ribbon, you can configure it to display in its original position similarly. In one way, you can open the “Customize Quick Access Toolbar” menu and then hit “Show above the Ribbon”. As an alternate, you can click right or press and hold any button there from the toolbar or the ribbon in order to “show the Quick Access Toolbar above the Ribbon”.
FEATURED: Fix Windows 11 Snipping Tool Not Working.
Quick Access Toolbar Not Showing in Windows 11 (Reliable Fix)
Now, using this might make the File Explorer’s ribbon obsolete therefore you might wish to get rid of it as it takes a lot of space. This can be done from the “Customize Quick Access Toolbar” menu. Just click the arrow on it followed by “Minimize the Ribbon”.
As an alternate in the last chapter, you may have noticed one thing this option is available there in the right-click menu of buttons on both ribbon and quick access toolbar.
The ribbon recedes in itself thus making room which is handy if you are working on a laptop or tablet despite the big screen.
Do not worry about completely losing the ribbon while it is minimized as still, you shall be able to access it. When you click the tab name the ribbon extends showing its options in File Explorer. However, if you click on the option you wish to use then the tab is once again minimized. Still, if you are not attracted to this and want the ribbon interface to be open you need to follow the steps mentioned in this chapter to have access to either menu. Once done, click the “Minimize the Ribbon” option to uncheck it and maximize the option.
ALSO CHECK: My Widgets are showing as blank in Windows 11, How to fix?
How To Delete Your Quick Access History in File Explorer
- Open “control panel”.
- As this opens, you need to look for a small drop list at the top right corner by the name “View By”. Select small icons from here. You need to find and click on “File Explorer Options” from the options listed below.
- A new window by the name “File Explorer Options” opens. Under the Privacy section, you shall see two checkboxes corresponding to options “show recently used files” and “Show frequently used folders”. After this, you need to uncheck both of these. As you are done, click “apply” at the bottom.
- Once done, check both the boxes and click the “apply” option.
You might want to remove certain files or folders from quick access history. In such a case you need to launch File Explorer and remove an item from the history. You need to click on the file you wish to remove and then hit the option “remove from quick access” and you are done.
ALSO CHECK: Disable Hibernation in Windows 11 via CMD or File.
Conclusion
The Quick Access Toolbar is a lifesaver and productivity hack every PC or Laptop user has. It makes it much quicker to access files and makes you do your work faster and also keeps track of your recently access files. However, because of the complexity and hidden nature of this feature, we have created a full guide and also showed how to fix the Quick Access Toolbar if it is not showing.
Все способы:
- Способ 1: Перезапуск «Проводника»
- Способ 2: Редактирование настроек «Проводника»
- Способ 3: Параметры «Пуска»
- Способ 4: Утилиты SFC и DISM
- Способ 5: Перерегистрация «Центра поддержки»
- Способ 6: Запуск службы
- Способ 7: Удаление данных из кеша панели
- Способ 8: Редактирование реестра
- Способ 9: Восстановление системы
- Вопросы и ответы: 0
Способ 1: Перезапуск «Проводника»
Сбои в работе стандартного файлового менеджера могут привести к неполадкам панели быстрого доступа в Windows 11, и первое, что нужно сделать, – перезапустить «Проводника»:
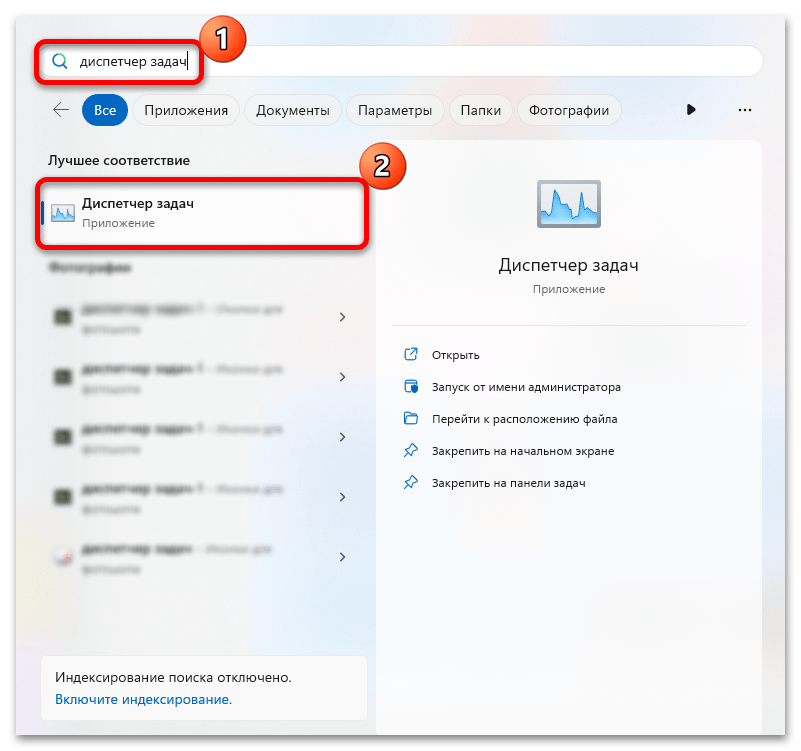
- Запустите встроенное средство «Диспетчер задач» — для этого можете воспользоваться строкой системного поиска или сочетанием клавиш «Ctrl + Shift + Esc».
- На вкладке «Процессы» в разделе «Процессы Windows» найдите «Проводник», кликните по строке правой кнопкой мыши и выберите пункт «Перезапустить».
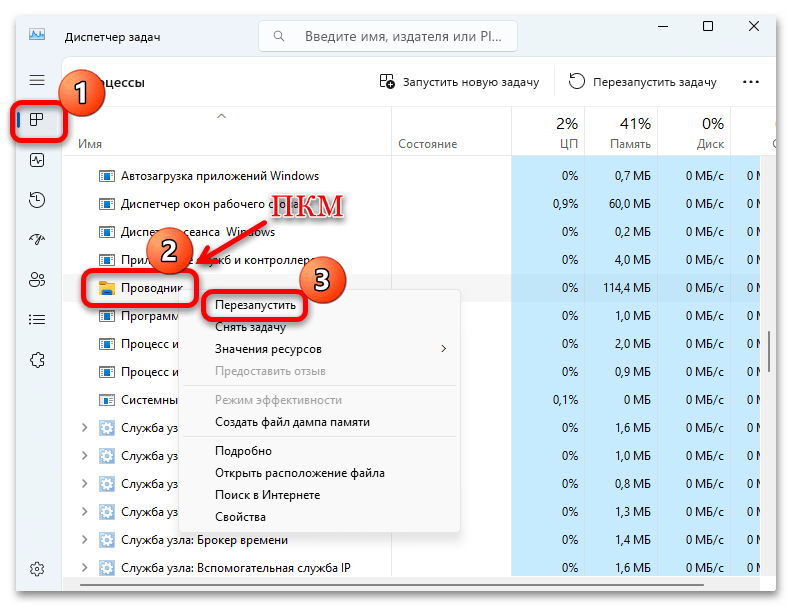
На некоторое время панель задач пропадет, а экран может моргнуть, а после этого работа ОС будет возобновлена. Если панель быстрого доступа все равно не открывается, переходите к следующим способам.
Способ 2: Редактирование настроек «Проводника»
Тем, кому перезапуск «Проводника» не помог, стоит проверить установленные для него параметры. Доступ к панели быстрого доступа может быть отключен именно в настройках, поэтому включите данную функцию, если это потребуется:
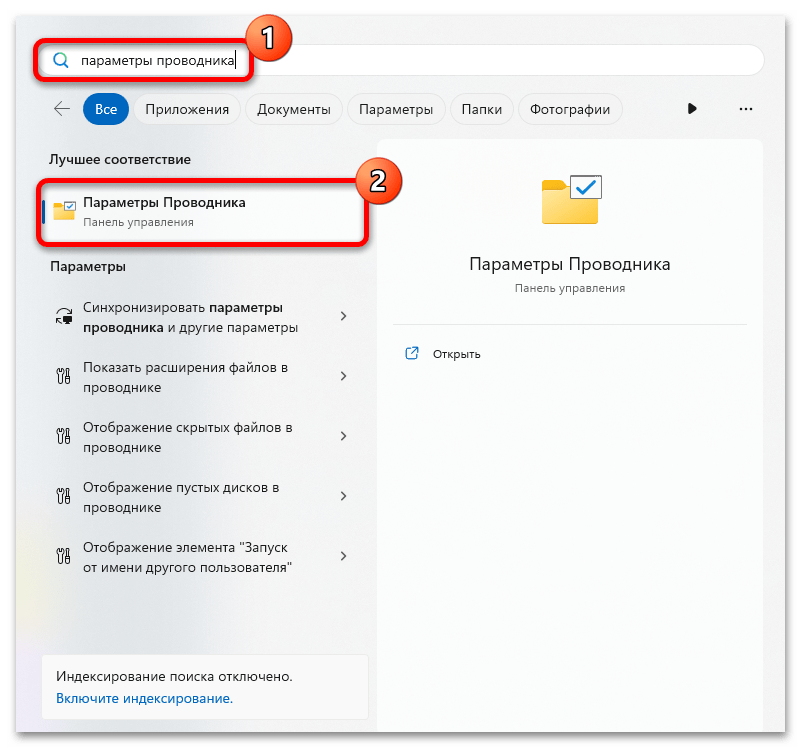
- Используя строку системного поиска, найдите элемент «Панели управления» под названием «Параметры Проводника», введя соответствующий запрос.
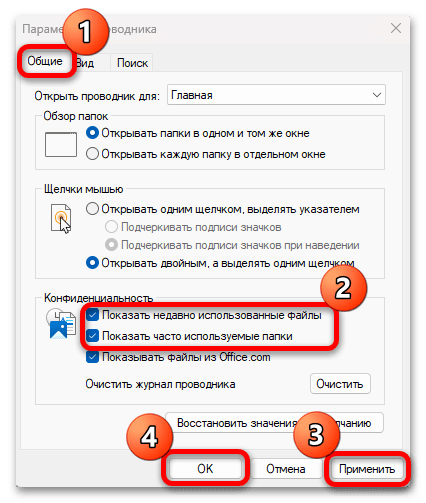
- В открывшемся окне, находясь на вкладке «Общие», в блоке «Конфиденциальность» активируйте два имеющихся там пункта: «Показать недавно использованные файлы» и «Показать часто используемые папки». Нажмите на кнопку «Применить», затем на «ОК».
Закройте окно с параметрами «Проводника» и проверьте, появилась ли панель быстрого доступа. Если все еще нет, то перезагрузите систему – возможно, новые настройки файлового менеджера по каким-то причинам не вступили в силу.
Способ 3: Параметры «Пуска»
Изменение настроек «Пуска» подойдет как для отображения панели быстрого доступа в «Проводнике», так и для решения проблем с быстрым переходом к недавним расположениям в главном меню.
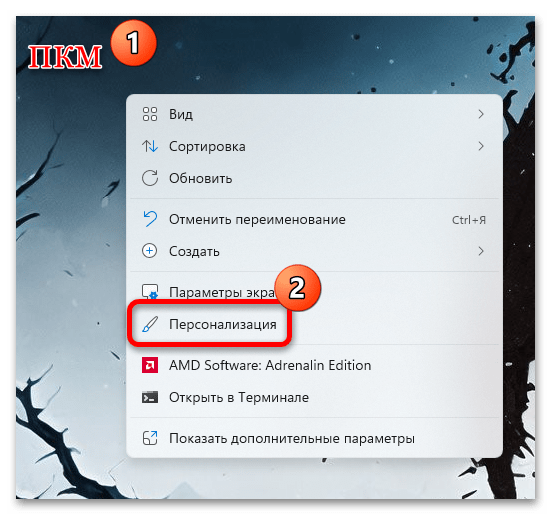
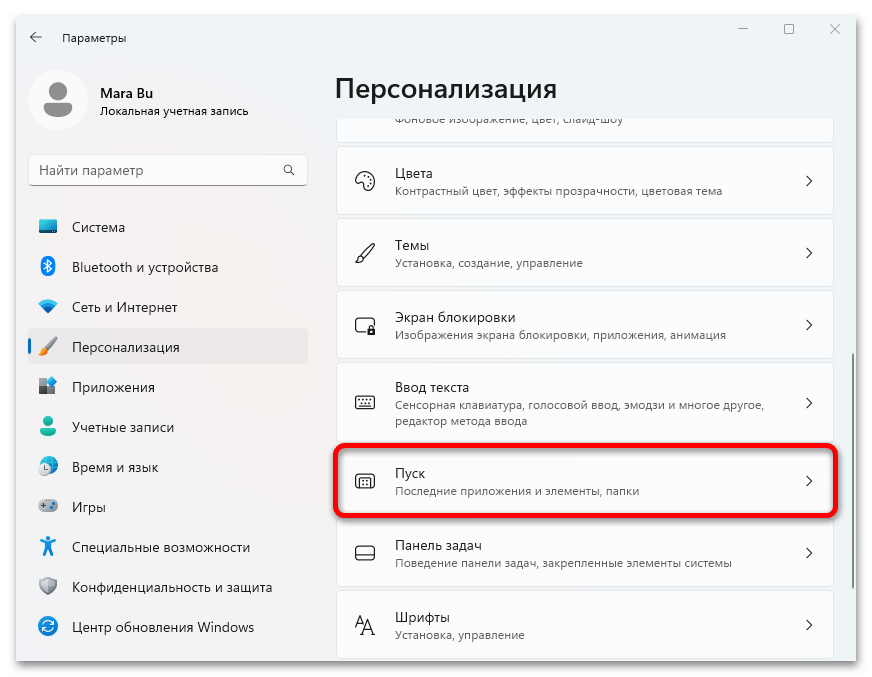
- Кликните по свободной области рабочего стола правой кнопкой мыши и выберите пункт «Персонализация».
- В основной части открывшего окна «Параметров» выберите строку «Пуск».
- Активируйте с помощью переключателя функцию «Показывать последние открытые элементы в меню «Пуск», в списках переходов и в проводнике».
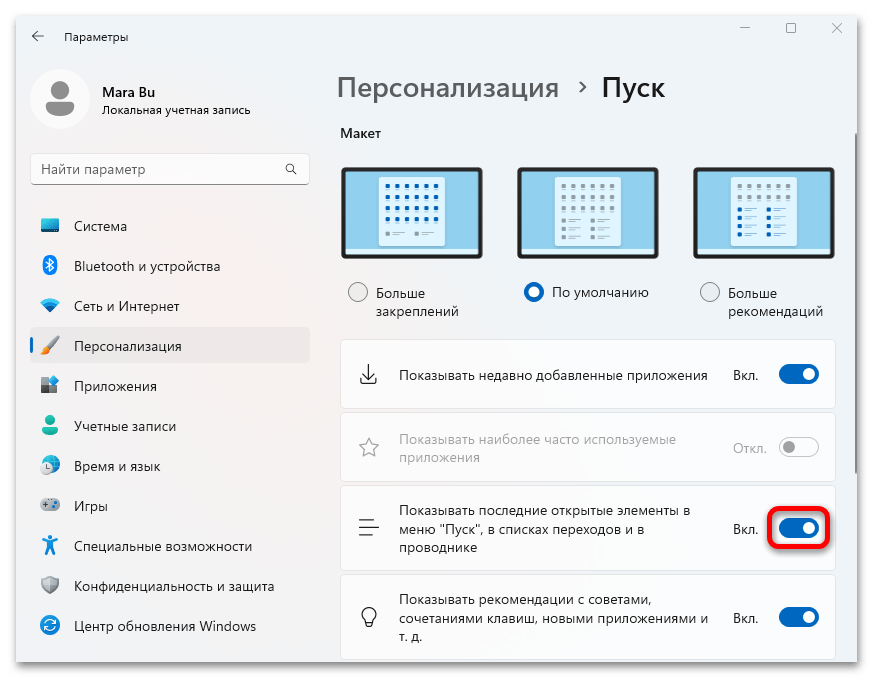
После включения функции можете закрыть окно «Параметров» и проверить, появилась ли панель быстрого доступа. Также можете попробовать выключить, затем снова включить ее при условии, что она изначально активна.
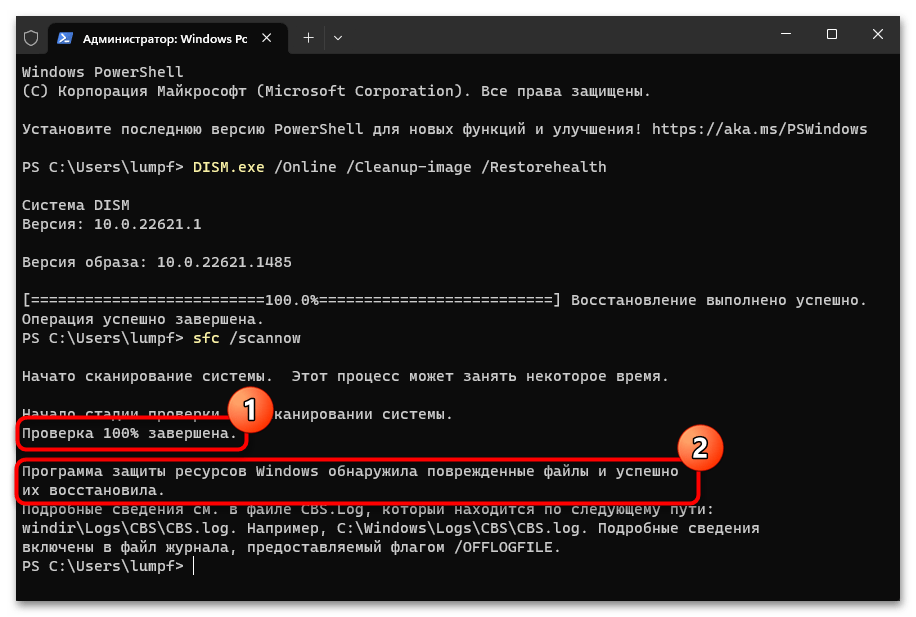
Способ 4: Утилиты SFC и DISM
К рассматриваемой проблеме могут привести повреждения системных файлов или вовсе их отсутствие вследствие каких-либо сбоев. В Windows 11 реализованы специальные утилиты, с помощью которых можно выполнить проверку всех важных системных файлов и их хранилищ, а также восстановить их при обнаружении ошибок. Средства запускаются с помощью специальных консольных команд – примените их по очереди, а как это сделать – описано в нашем отдельном материале более детально.
Подробнее: Восстановление системных файлов в Windows 11
Способ 5: Перерегистрация «Центра поддержки»
На панель быстрого доступа также могут влиять и проблемы с «Центром поддержки». Их можно исправить, перерегистрировав средство с помощью консольной команды:
- Запустите консоль «Терминал» или «Командную строку» от имени администратора, отыскав средство с помощью системной строки поиска и выбрав соответствующий тип запуска.
- Вставьте команду
Get-AppxPackage | % { Add-AppxPackage -DisableDevelopmentMode -Register «$($_.InstallLocation)AppxManifest.xml» -verbose }и нажмите на клавишу «Enter», чтобы ее выполнить.

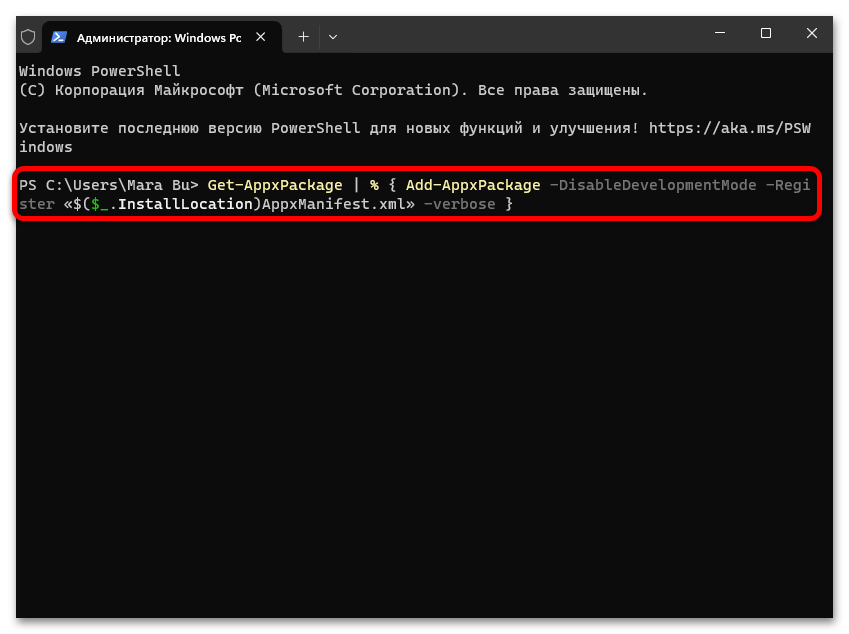
После того как команда будет успешно выполнена, перезагрузите компьютер и проверьте, открывается ли панель быстрого доступа.
Способ 6: Запуск службы
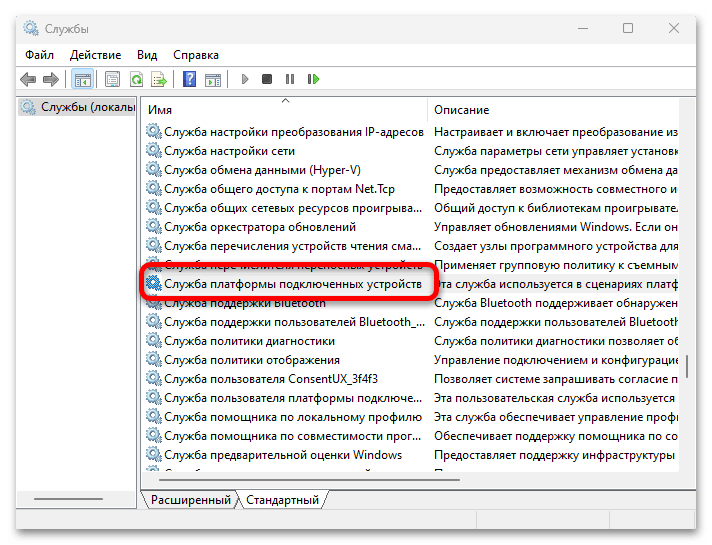
Службы Windows отвечают за корректное функционирование различных процессов в системе. Чтобы взаимодействовать с панелью быстрого доступа, одна из таких служб – «Платформа подключенных устройств» — должна быть включена. Проверьте в соответствующей оснастке активна ли она, и если нет, то включите ее вручную:
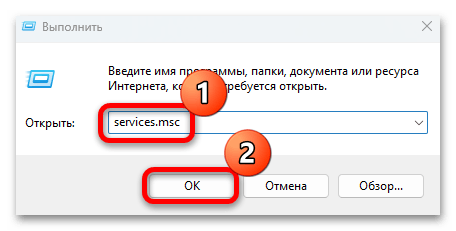
- Вызовите диалоговое окно «Выполнить» нажатием на клавиши «Win + R», затем введите
services.mscи кликните по кнопке «ОК». - В отображенном списке служб найдите «Служба платформы подключенных устройств» и дважды кликните по ее названию, чтобы открыть окно со «Свойствами». Отметим, что она может называться Служба платформы подключенных устройств, а по-английски — Connected Devices Platform Service.
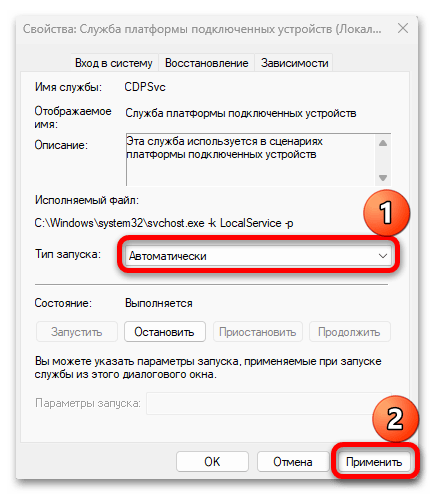
- Из выпадающего меню «Тип запуска» выберите пункт «Автоматически» и нажмите на «Применить».
- Если служба все еще отключена, выберите кнопку «Запустить» и сохраните настройки.
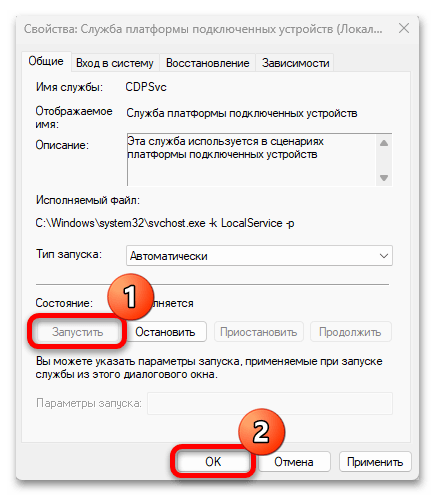
С правильно функционирующей службой проблем с панелью быстрого доступа возникнуть не должно.
Способ 7: Удаление данных из кеша панели
Для панели быстрого доступа предусматриваются каталоги с данными кеша, которые хранятся на системном диске. Такие файлы необходимы для того, чтобы содержимое панели корректно отображалось и можно было совершать переход по этим элементам непосредственно на самой панели. При повреждении данных и может возникнуть рассматриваемая проблема, но есть решение: потребуется вручную очистить кеш, после чего все файлы будут созданы по новой автоматически. Пользователю понадобится перейти к двум папкам:
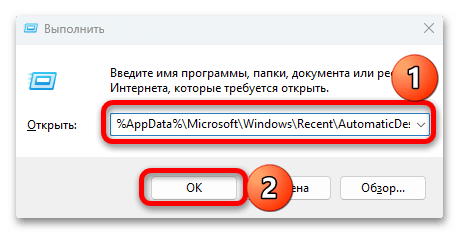
- Через окно «Выполнить» («Win + R») перейдите к содержимому первого каталога, выполнив команду
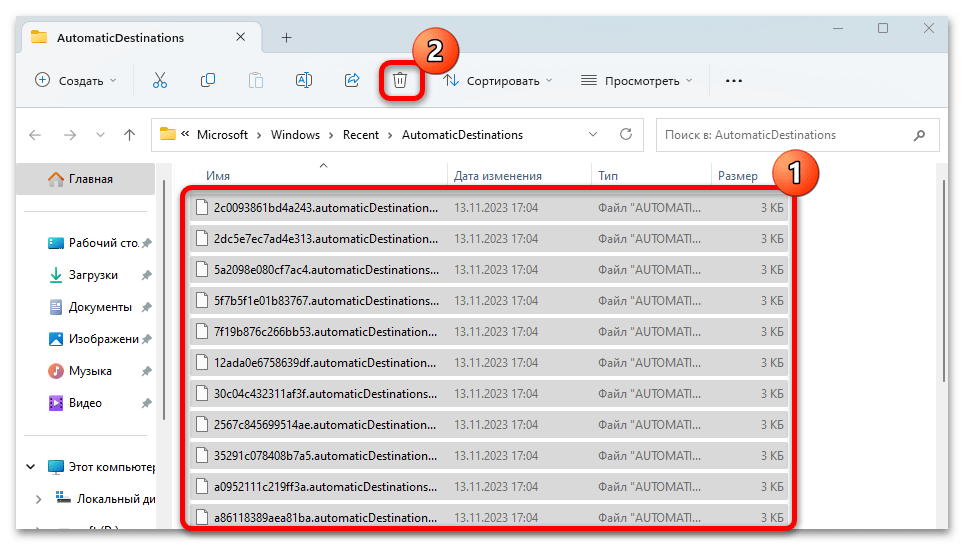
%AppData%\Microsoft\Windows\Recent\AutomaticDestinations. - Откроется штатный «Проводник» со списком файлов. Выделите все данные (можно использовать сочетание клавиш «Ctrl + A»), затем полностью удалите, используя контекстное меню (нажатие правой кнопкой мыши) или клавишу «Delete».
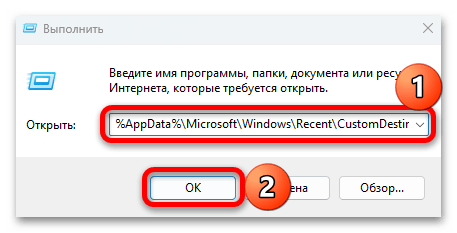
- Аналогичным образом (через окно «Выполнить») перейдите к следующему каталогу — примените команду
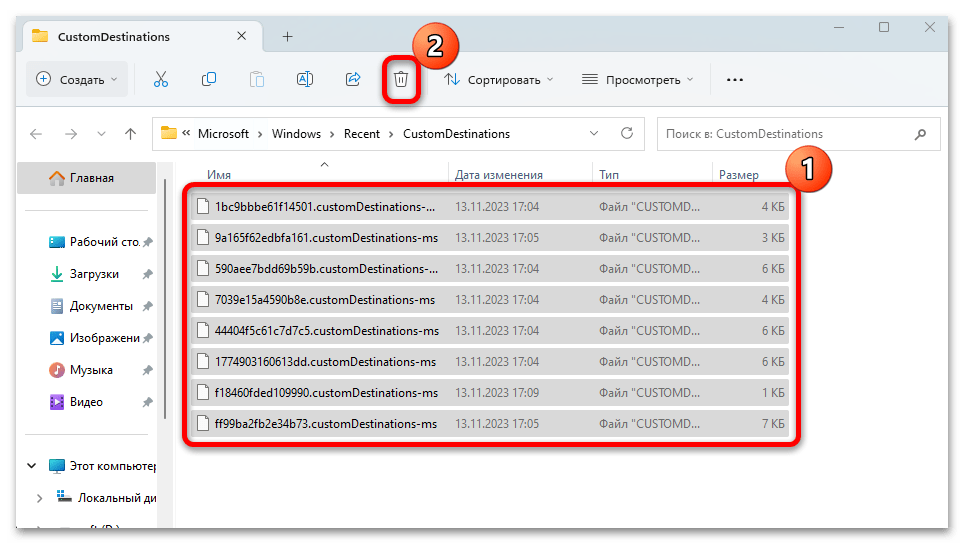
%AppData%\Microsoft\Windows\Recent\CustomDestinations. - Таким же способом сотрите все содержимое папки.
После удаления данных панели быстрого доступа из кеша останется перезагрузить компьютер и проверить, решена ли проблема.
Способ 8: Редактирование реестра
Исправить проблему с панелью быстрого доступа, которая не открывается, можно и посредством редактирования системного реестра. Правки подразумевают создание нового параметра, отвечающего за запуск панели.
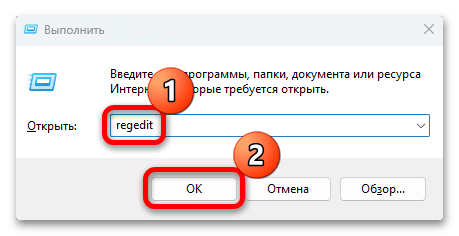
- Запустите «Редактор реестра», используя запрос
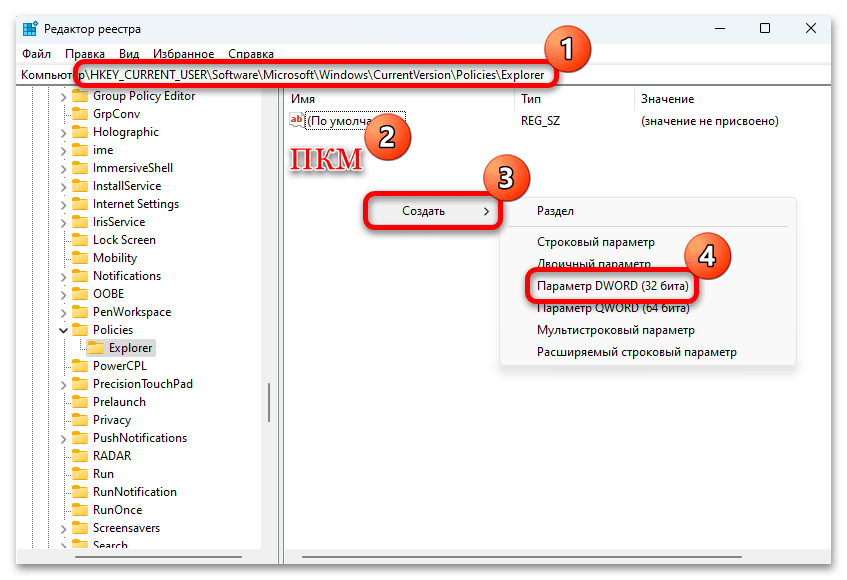
regeditв диалоговом окне «Выполнить» («Win + R»). - Разверните ветку
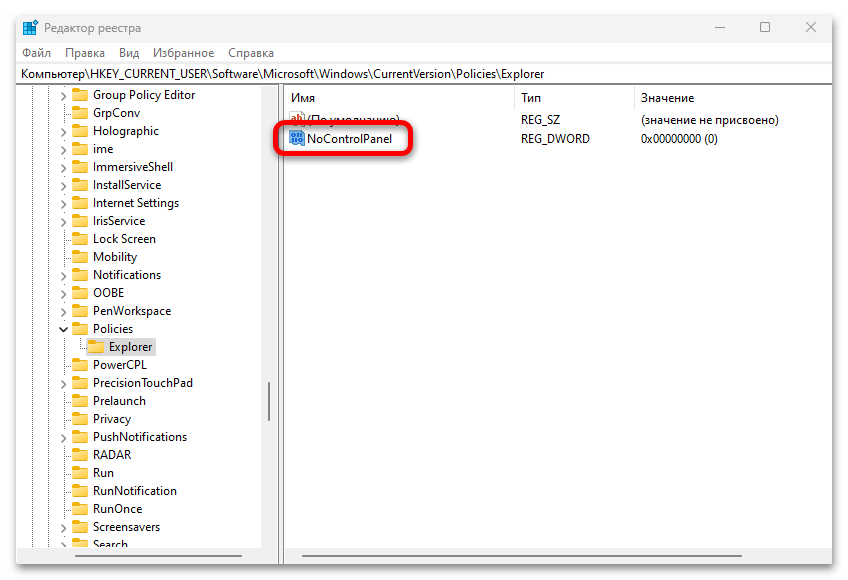
HKEY_CURRENT_USER\Software\Microsoft\Windows\CurrentVersion\Policies\Explorerна панели слева. Также можете вставить путь в адресную строку вверху и нажать на клавишу «Enter». Кликните правой кнопкой мыши по каталогу «Explorer» или свободной области центральной части окна при выбранном разделе, затем в контекстном меню наведите курсор на пункт «Создать» и выберите «Параметра DWORD (32 бита)». - Новому параметру задайте имя «NoControlPanel» и дважды щелкните по нему левой кнопкой мыши, чтобы открыть «Свойства».
- В поле «Значение» введите «0» и сохраните настройки, нажав на кнопку «ОК».
После перезагрузите компьютер, чтобы новый параметр начал свое функционирование в системе.
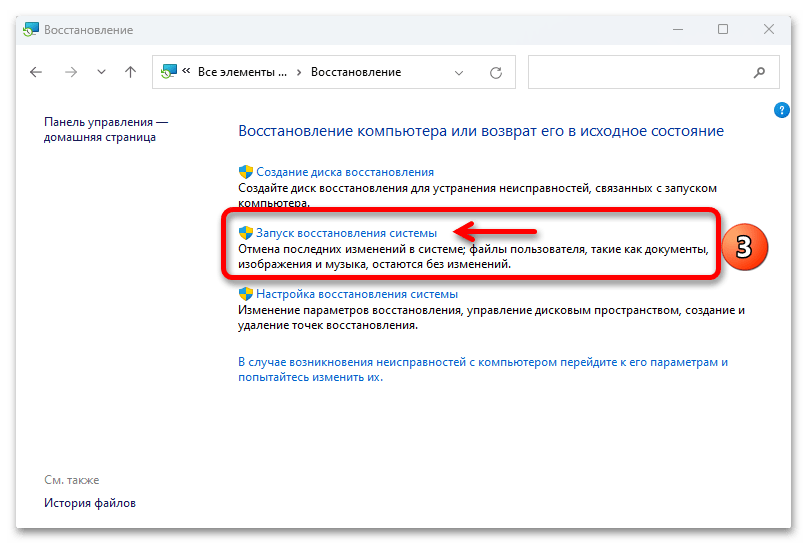
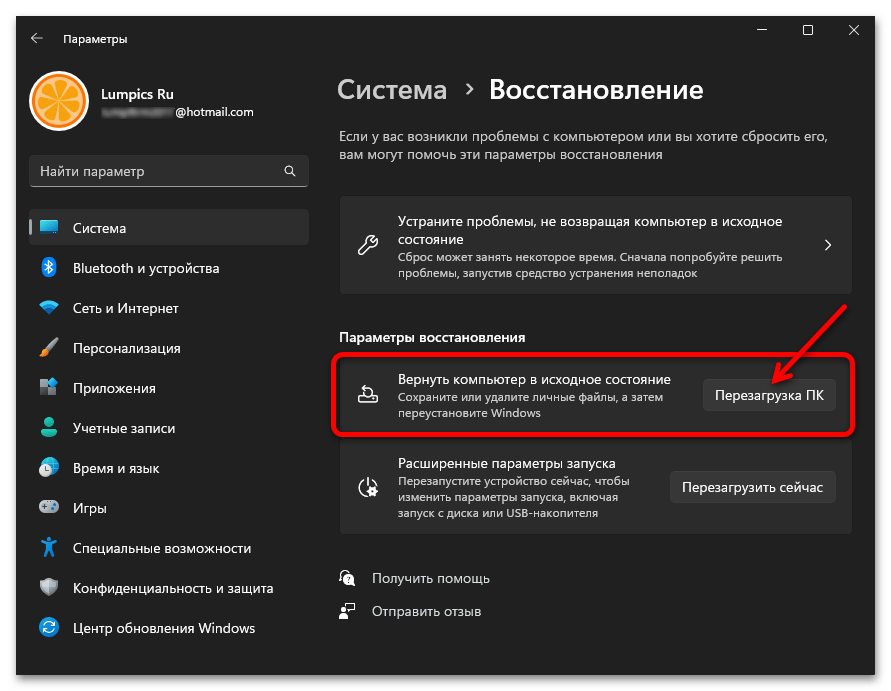
Способ 9: Восстановление системы
Когда ничего не помогает, попробуйте воспользоваться функцией восстановления системы. Если у вас активен инструмент создания точек доступа (они создаются автоматически или вручную), то есть смысл откатить состояние системы к тому моменту, когда подобной проблемы не наблюдалось. Дело в том, что причиной проблем с открытием панели быстрого доступа могут стать как ошибки в работе системы, так и вирусные атаки или влияние других установленных сторонних программ. Откат ОС позволит сбросить некоторые неполадки и вернуть работоспособность панели. О том, как восстановить Windows 11 к предыдущему состоянию, читайте в нашем отдельном руководстве.
Подробнее: Восстановление системы Windows 11 с помощью точек восстановления
Восстановить ОС можно и к исходному состоянию, выполнив сброс настроек до заводских. Таким образом будут исправлены все ошибки, даже критические, которые описанными в статье методами решить не удалось. Но, вместе с этим, к сожалению, вы потеряете все установленные приложения и выставленные настройки. Функция восстановления Windows при этом позволяет сохранить все пользовательские файлы (те, что внутри вашей папки из C:\Users). В качестве радикальной меры остается лишь использовать данный метод, более детально описанный по ссылке ниже.
Подробнее: Сброс Windows 11 к заводским настройкам
Наша группа в TelegramПолезные советы и помощь