
Windows 10 High Memory Usage : Don’t worry if your computer gets stuck and Windows Task Manager warns «High memory usage» as showing here.
Hello there, recently i’ve «upgraded» to windows 10 from windows 7, sadly i only have 4 gb of ram, but that wasn’t the problem on windows 7, i would have google, discord and a game open and it would take only about 20-30% of memory, but after i upgraded to windows 10 my memory would constantly be super high… — by Ognjen Milojevic from Microsoft

On this page, we will guide you to easily fix high memory usage issue on Windows 11/10/8/7 with the following resolutions:
| Workable Solutions | Step-by-step Troubleshooting |
|---|---|
| Fix 1. Close Unnecessary Programs | On Task Manager, find running programs that take high memory, click End Task…Full steps |
| Fix 2. Disable Programs from Startup | On Task Manager, go to Startup, right-click to disable big programs from Startup…Full steps |
| Fix 3. Defragment Hard Drive | Type dfrgui in Search, open Defragment and Optimize Drives, select drives to Optimize…Full steps |
| Fix 4. Fix File System Error | Run EaseUS Partition Master, and right-click drives to fix file system errors…Full steps |
| More Fixes… | Other 6 fixes are available here for you to follow and fix high RAM memory errors…Full steps |
What Is High Memory Usage?
High Memory Usage is a state where Windows computers’ RAM, ROM, or Cache usage grows to an extremely high level. Windows 10 high memory usage error is related to RAM and virtual memory.
When the PC has a high memory usage error, it will freeze while running a program and pops up an error message, warning that «Your computer is low on memory».
Follow to check if you are having this error and what caused high memory usage.
Define High Memory Usage Windows 11/10 Error:
Try the following steps to define if your computer is with high memory usage, high CPU, or high disk usage error:
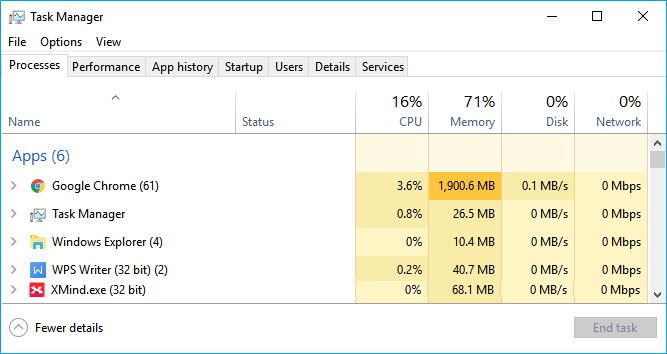
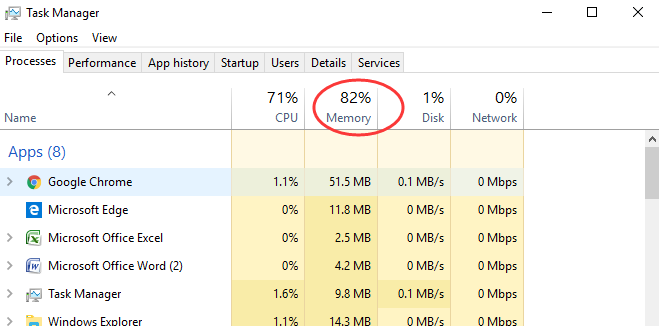
Step 1. Press Ctrl + Alt + Del keys and select «Task Manager».
Step 2. At the Process tab, check the usage state of CPU, Memory, and Disk.
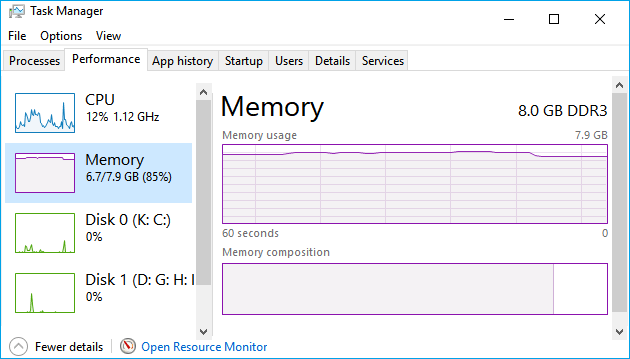
If the Memory column displays 70%, 80%, 90%, or 99% used as the two figures shown below, it’s a «High Memory Usage» issue.
High Memory Usage in Processes:
High Memory Usage in Performance:
Why Is My Memory Usage So High [Symptoms and Causes]
All computer memory is connect to the CPU and RAM. However, the high memory usage issue is mainly related to the overcrowding of many internal processes. So what will happen when your computer is caught with a high memory usage issue? And what causes this error? Check it out.
| Symptoms of High Memory Usage | Causes of High Memory Usage |
|---|---|
|
|
So how to fix «high memory usage» or «High RAM memory usage» issues? How do I reduce or fix the high memory usage in Windows 11/10?
Here is a list of all tested fixes, just follow to fix high memory usage Windows 11/10 issues immediately.
If you are having a similar problem in older Windows OS, like Windows 11/8/XP, you can either follow the video tutorial here or follow the step-by-step guide in each fix for a try:
1:18 — Using Registry Editor
3:00 — Service Settings
Is this part useful? If your answer is «Yes,» you can click the buttons below to share it with your friends.
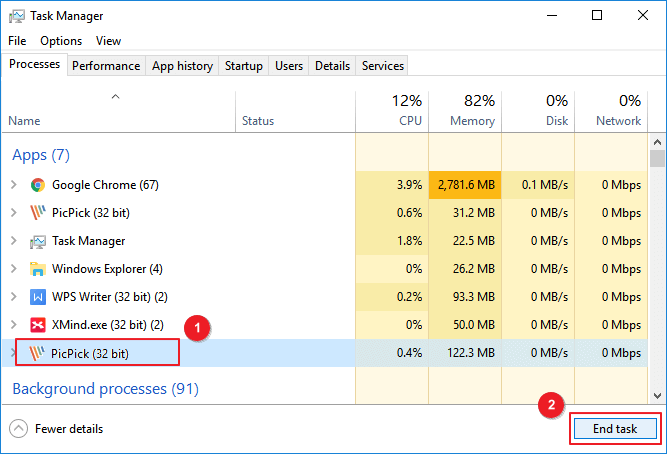
Method 1. Close Unnecessary Running Programs/Applications
When your computer is with high memory usage, you can try to close some unnecessary running programs and applications to fix this issue.
Step 1. Open the Task Manager by right-clicking on the Windows icon and select «Task Manager».
Step 2. Go to the process tab, check any extra programs that are taking high memory but you aren’t using at all.
Step 3. Click the unnecessary programs and select «End Task».
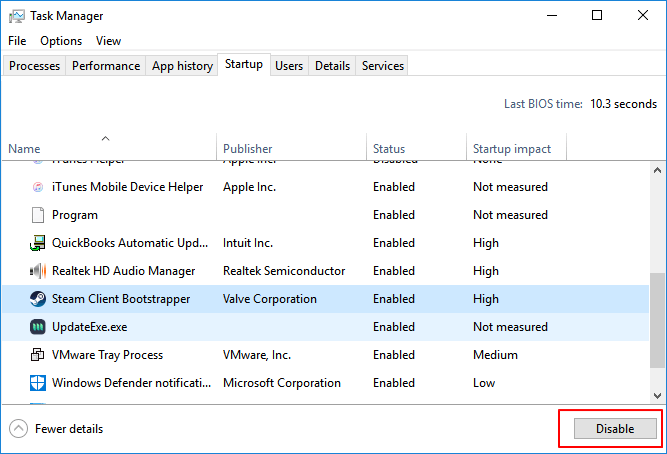
Method 2. Disable Programs Running from Startup
Disabling programs running from Startup will effectively decrease the system load and saving quite a lot of CPU memory space.
Step 1. Press Ctrl + Alt + Del keys, select «Task Manager».
Step 2. Click on «Startup» in Task Manager, right-click the applications that you don’t want to run from Startup, and select «Disable».
Method 3. Defragment Hard Drive & Adjust for Best Performance
It will also help to save quite a lot of memory space by defragmenting hard drives. You can also refer to a manual way to defrag and optimize the disk for its best performance.
Defragment hard drives:
Step 1. Press «Windows + R», type: dfrgui, click «Defragment and Optimize Drives» to open this app.
Step 2. Click on the hard drives (C: drive for example) you want to defragment and click «Optimize».
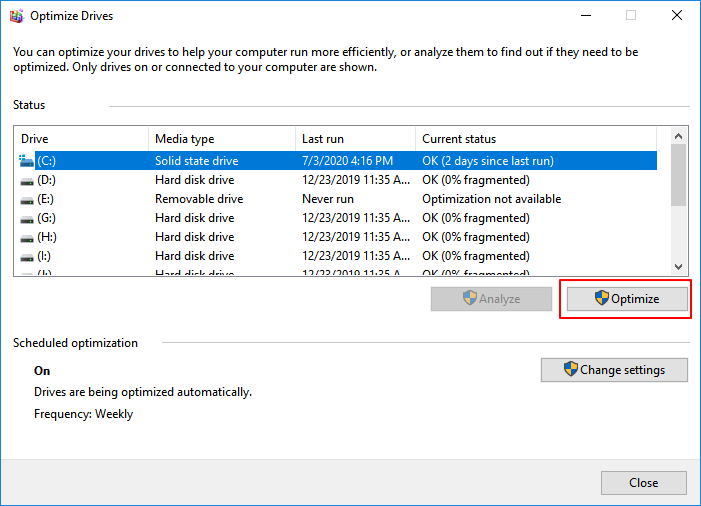
Wait for the process to finish the defragment process. Do remember to restart the computer when the process completes.
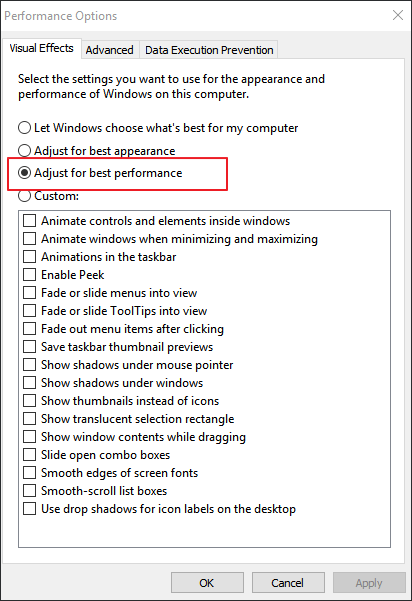
Adjust for the best performance:
Step 1. Right-click «This PC» and select «Properties».
Step 2. Click «Advanced system settings», click «Settings» under Performance.
Step 3. Check «Adjust for best performance», click «Apply» and «OK» to confirm.
Method 4. Fix Disk File System Error
File system error is a major reason that may cause high memory usage or high CPU usage on Windows 11/10/8/7 computers. Professional partition manager software — EaseUS Partition Master can easily fix the error and get rid of it from your PC. It’s easy for all levels of Windows users.
Check and Fix System Error
Method 5. Increase Virtual Memory
Virtual memory makes use of part of disk space to serve as memory so as to release computer memory stress. Therefore, when your computer is with high memory usage issue, you can try the following steps to increase virtual memory:
Step 1. Right-click on This PC, select «Properties».
Step 2. Click «Advanced system settings» in the pop-up window.
Step 3. Go to the Advanced tab, click «Settings…» under the Performance section.
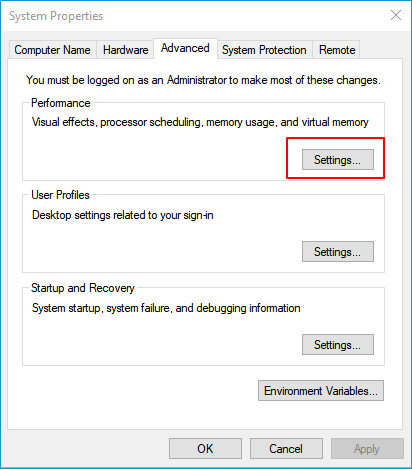
Step 4. Navigate to the Advanced tab, click «Change» under the Virtual memory section.
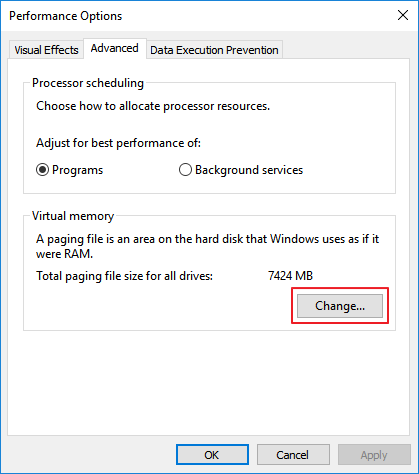
Step 5. Uncheck «Automatically manage paging file size for all drives».
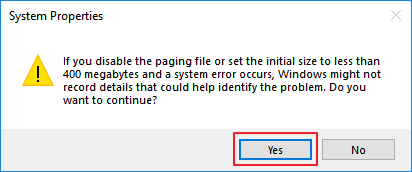
Step 6. Select C drive, check «No page file», and click «Set».
Step 7. Click «Yes» to continue.
Step 8. Select a non-system partition, check «Custom size», and set the same value in Initial Size and Maximum Size.
The value size is recommended to be twice big as the physical memory on your computer.
Step 9. Click «Set» and «OK» to save the changes.
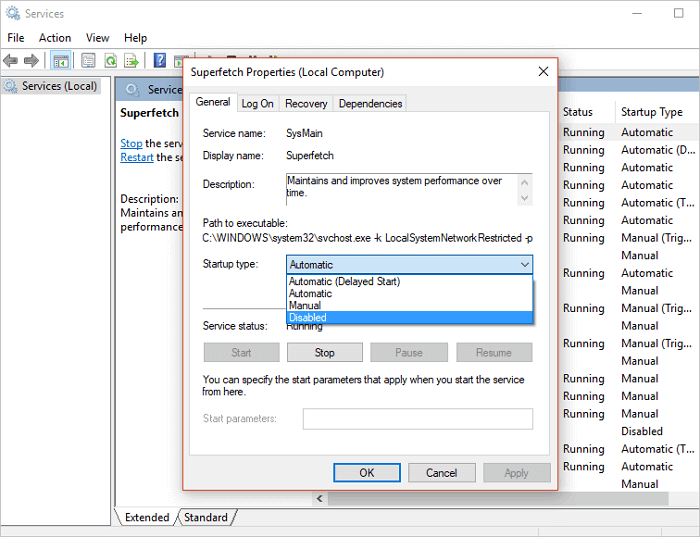
Method 6. Disable Superfetch Service
Step 1. Press Windows + R, type services.msc into the Run box and click «OK».
Step 2. Locate and right-click «Superfetch» > select «Properties» > click «Stop» on the pop-up windows.
Step 3. Click «Disabled» from the ‘startup type’ drop-down menu.
Method 7. Set Registry Hack
This method will release some virtual memory on your computer by deleting page files in the Registry. Here is how to do so:
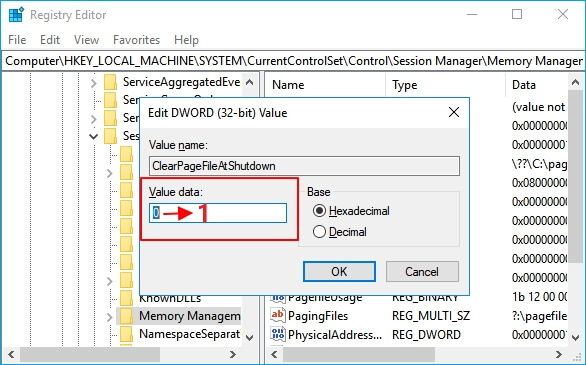
Step 1. Press Windows + R keys, type regedit to open the Registry Editor.
Step 2. Navigate to: HKEY_LOCAL_MACHINE/SYSTEM/CurrentControlSet/Control/Session Manager/Memory Management.
Step 3. Find and right-click ClearPageFileAtShutDown, select to modify its value to «1» and click «OK».
Method 8. Increase Physical Memory
Logically, when your computer is with a high memory usage issue, you can add a new memory card to your computer so to extend the physical memory.
You need to first check out the memory type by referring to the parameters of memory on your computer. Here is how to increase a physical memory on your PC:
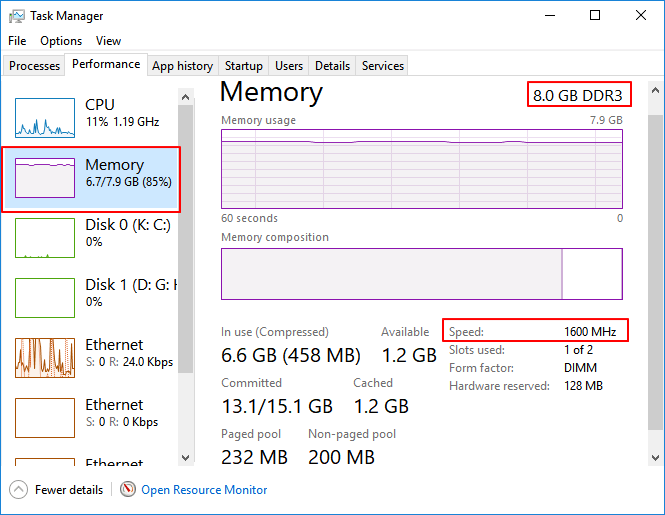
Step 1. Check the physical memory size: Right-click on This PC and select «Properties».
Step 2. Open Task Manager and go to the Performance tab, click «Memory».
Step 3. Check out the speed, size of the memory to decide which type you’ll need.
Step 4. Then purchase a new memory card, add it to your PC.
After adding the new memory to your computer, restart the PC and it will automatically detect the new memory.
Method 9. Disable NDU in Registry
Note: EaseUS technical support experts say this method may affect the usage of internet connection.
If you would like to try, here are the steps:
Step 1. Type regedit in Windows Search and click Registry Editor to open it.
Step 2. Go to: HKEY_LOCAL_MACHINE/SYSTEM/ControlSet001/Services/Ndu.
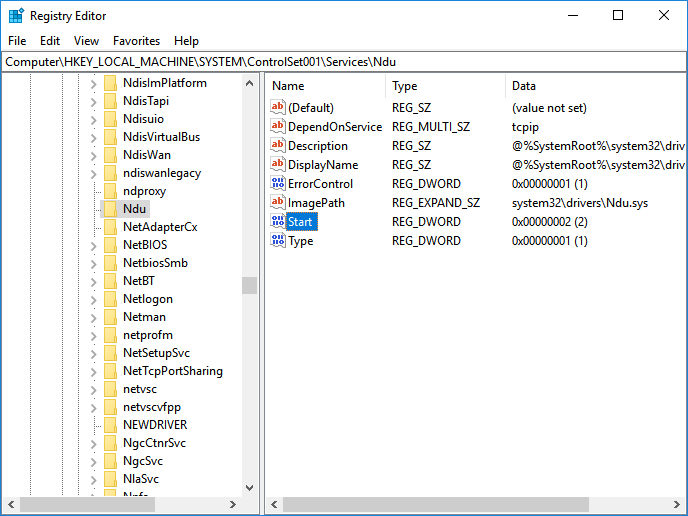
Step 3. Right-click on the Start DWORD and select «Modify».
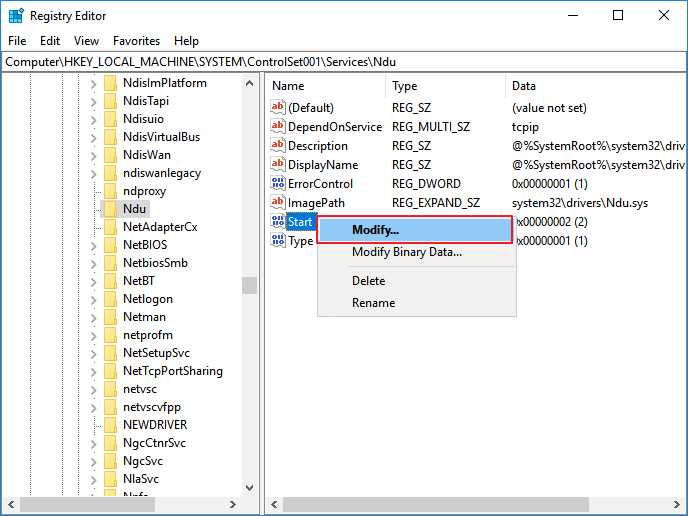
Step 4. Change its value to 4, click «OK» to save the changes.
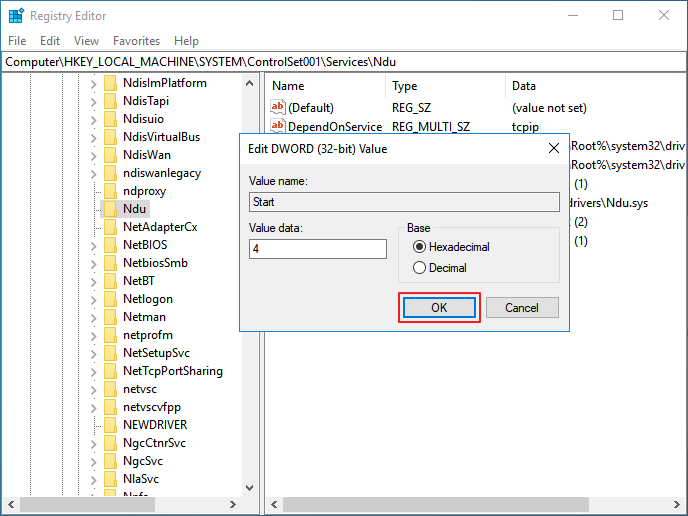
After this, restart your PC and the high memory usage issue should be resolved.
If your computer internet connection gets disabled, we suggest you repeat the steps and change the Start word value back to the previous number — 2.
Method 10. Clean Up Virus
Sometimes, virus infection or malware may also take up high usage of memory on your PC. The best way out is to run antivirus software on you PC to clean up all existing virus, and malware immediately:
Step 1. Download and install anti-virus software on your computer.
Step 2. Run the anti-virus software and choose to scan your whole computer drive.
Step 3. Select to clean up all found virus or virus-infected files or devices.
You May Also Like:
If you are having other types of high memory usage issues on your computer, click links below and follow to get rid of this error from your computer immediately.
Bonus Tips: How to Avoid High Memory Usage Issue on Windows 11/10
After you fixing Windows high memory usage on Windows 10/8/7, some of you may want to know how to prevent this issue from happening again.
Here, we’ll offer tips to protect your Windows 10 computer from this issue.
How to Avoid High Memory Usage in Windows 10 — Tips
Here are some tips that you can follow to avoid high memory usage issues in Windows 10/8/7. See how to set your computer with the best performance:
- #1. Add a big enough memory card to the PC
- #2. Run virus cleaner regularly
- #4. Disable unnecessary programs from Startup
- #5. Release virtual memory from hard drive
- #6. Fix file system error and defrag hard drive regularly
You May Also Interest In:
Some of you may also want to know how to define High CPU or High Disk Usage errors. Here are the steps»
Step 1. Hold Ctrl+Alt+Del keys, click «Task Manager».
Step 2. On the Processes tab, check the Memory or the Disk usage state:
- The CPU column reaches up to 99% or even 100%, it’s a «High CPU Usage» issue. Refer to Fix 99% or 100% High CPU Usage for help.

- The Disk column shows high usage or even displays 100%, it’s a «High Disk Usage» issue. Follow 100% Disk Usage to fix this problem.

Take Action, Keep Your Computer from High Memory Usage Issue
On this page, we provide tips to help you define whether your computer has high memory issues. And we also collected 10 practical fixes to resolve high memory usage Windows 10 errors, and listed tips to help you avoid this issue.
Besides managing RAM and virtual high memory usage issues, we also suggest you apply EaseUS disk management software to make your computer running smoothly again. EaseUS Partition Master helps to manage partitions, make full use of disk space and optimize disk performance to the best state.
Now it’s your turn. Take action and keep your computer from the high memory usage issue, making it running smoothly again.
FAQs About High Memory Usage
The following we’ll list some top concerned questions about high memory usage issue, and if you have the same question, follow and finnd the answer here.
1. Why is my memory usage so high in Windows 10?
- One reason could be a big program or game that takes high system RAM.
- The other reason could be malware that caused your device high memory usage.
2. How do I fix high memory usage?
Here is a list of all possible fixes that you can take to fix high memory usage on Windows:
- Close Unnecessary Running Programs/Applications
- Disable Startup Programs
- Defragment Hard Drive & Adjust Best Performance
- Fix Disk File System Error
- Increase Virtual Memory
- Disable Superfetch service
- Set Registry Hack
- Increase Physical Memory
- Disable NDU in Registry
- Clean Up Virus
For more details, you can rever to the above detailed steps to get rid of this issue immediately.
3. Does high memory usage affect performance?
Yes, high memory usage does affect the computer performance. Gemerally, the faster the RAM, the faster the processing speed will be on the computer. To obtain faster RAM, you’ll need to increase the speed at which memory transfers information to other computers. However, when the memory usage goes too high, taking too much resources, it’ll reversely affect the computer perforamce.
One of the toughest issues to resolve with Windows 11/10/8/7 is when you see a 100% Disk Usage message and your PC suddenly stops responding or responds slowly. While it could have many reasons, it’s usually caused when the Disk Usage is at 100% in the Task Manager. This post also helps you face constant high CPU, uyPower or high Memory usage issues.
Why is my CPU, memory, and disk so high?
When we run programs, they consume some amount of RAM. High CPU, memory, and disk can be caused due to many reasons. Most commonly, heavy graphics games and software consume more CPU, RAM, and disk. Moreover, running multiple programs at the same time also consumes a lot of RAM and shows high CPU usage sometimes. If a lot of apps are running in the background, you may see high CPU, memory, and disk usage in the Task Manager.
Disk, CPU, Memory, Power usage spikes
In this guide, we have covered a step-by-step procedure to troubleshoot the mentioned issue after studying and implementing methods discussed by others as well as our own experimentation. Many forums mention methods like disabling the Superfetch, Prefetch and the BITS services as well, but we would not recommend the same. I mean what and how much can you really disable to fix an issue!

If you are facing such an issue, here are a few troubleshooting steps that may help you resolve the issue. Create a system restore point first and then go through the entire list and decide which one or more of the suggestions you want to try.
- Uninstall 3rd-party browsers
- Run Chkdsk
- Disable Cloud-based protection in Windows Defender
- Disable Windows Search Indexer
- Disable Print Spooler Service
- Adjust the Visual Effects
- Update Device Drivers
- Run SFC & DISM
- Run the Performance Troubleshooter
- Upgrade your firmware or upgrade your RAM
- Use Refresh Windows Tool
- Examine System Health Report
- Troubleshoot using Process Tamer
- Is Message Signaled Interrupt enabled?
- Turn off Windows write-cache buffer flushing on the device
- Run Power Troubleshooter.
Since the reasons can be many, the solutions can be many – so go through the entire list first and see which may apply in your case.
1] Uninstall 3rd-party browsers
Using the Control Panel, uninstall all browsers – except Edge and Internet Explorer of course. This is to isolate the issue with the plugins. The other suggestion is to remove the plugins one by one from each browser and test. Adobe Flash and Shockwave Player are the usual culprits. But knowing the fact that the browsers could be re-installed in seconds, this option seems to be easier. After uninstalling the browsers, please delete the ‘Temp’, ‘%Temp%’ and ‘Prefetch’ files. Restart the system and check if it solves the issue. If it does, wait for 10-15 minutes to verify that it doesn’t reoccur. Then re-install the browsers.
Read: Why is my RAM usage so high when nothing is running?
2] Run Chkdsk
Run ChkDsk and see if that helps. Open an elevated CMD window, type the following command and hit Enter:
chkdsk.exe /f /r
The ChkDsk parameters do the following work:
- /f Fixes errors detected.
- /r Identifies Bad Sectors and attempts recovery of information.
3] Disable Cloud-based protection in Windows Defender
Open Windows Defender and disable Cloud-based protection and see.
4] Disable Windows Search Indexer
The Windows Search Indexer is one process that is known to cause this. If you do not use Windows Search, you can disable Windows Seach Indexer.
Read: What is Bottlenecking my PC?
5] Disable Print Spooler Service
If this doesn’t fix the issue, Run services.msc and disable the ‘Print Spooler’. Your printer will stop working after this. But at least it helps isolate the issue. Disabling the Print Spooler service has worked for many users.
Once the Services Manager is opened, scroll down to ‘Print Spooler’ and click on the option to stop the service. If it works, you could decide if your work actually needs a printer. If you need the service, a technician level repair would be needed.
6] Adjust the Visual Effects
Adjust the Visual Effects in Windows. This post will show you how to tweak Visual Effects to optimize Windows performance.
7] Update Device Drivers
Sometimes Device Drivers can be the culprit. So update your Drivers and see if that helps. You could use Windows Update, download it from the manufacturer’s website or use a free Driver Update software.
8] Run SFC & DISM
Run System File Checker as well as DISM to repair the system image.
9] Run the Performance Troubleshooter
Open an elevated Command Prompt, type the following and hit Enter to run the Performance Troubleshooter.
msdt.exe /id PerformanceDiagnostic
This troubleshooter helps the user adjust settings to improve operating system speed and performance. Here are more suggestions that can help you troubleshoot Performance issues.
10] Upgrade your firmware or upgrade your RAM
You may want to check if you need to upgrade your firmware or upgrade your RAM.
Read: High Disk & Memory Usage when playing PC Games
11] Use Refresh Windows Tool
Another option you have would be to use the Refresh Windows Tool to reset Windows 10 and see if that finally helps.
12] Examine System Health Report
The Performance Monitor is a good built-in tool that lets you monitor and study how applications you run affect your computer’s performance, both in real-time and by collecting log data for later analysis. It is quite useful in identifying and troubleshooting high resource utilization by processes and in generating a System Health Report of your Windows.
13] Troubleshoot using Process Tamer
Process Tamer is a tiny utility that runs in your system tray and constantly monitors the CPU usage of other processes. When it sees a process overloading your CPU, it reduces the priority of that process temporarily, until its CPU usage returns to a reasonable level.
TIP: You can use Windows Boot Performance Diagnostics to detect Windows Boot Performance problems.
14] Is Message Signaled Interrupt enabled?
In a special scenario, if your Task Manager shows 100% disk utilization on Windows 10 devices with Message Signaled Interrupt (MSI) mode enabled, then to solve this install Intel’s Chipset and Management Engine Interface driver and see.
This post will help you if you see Random Disk Usage Spikes.
15] Turn off Windows write-cache buffer flushing on the device
Pijal recommends in the comments below.
Go to Device Manager > Disk drives. Right-click on your HDD/SSD to shown Properties > Policies. Select “Turn off Windows write-cache buffer flushing on the device” and click OK. See if this helps some of you.
16] Run Power Troubleshooter
Run Power Troubleshooter and see if that helps you.
How do I know if my RAM is faulty in Windows 11?
There are some signs that tell a RAM is faulty. The first sign is decreasing performance. Your computer will find it difficult to run applications. You will also experience frequent Blue Screen of Death errors on your computer. There are many causes of BSOD errors. Hence, if you experience frequent BSOD errors, you cannot jump to the conclusion that your RAM is faulty. Use the Windows Memory Diagnostic tool to check the health of your RAM.
If you have any ideas that may help resolve this issue, please post them in the comments. Your suggestions may help others facing this problem.
Posts about processes using high resources:
- Explorer.exe High Memory & CPU usage
- Windows Modules Installer Worker consumes High CPU & Disk Usage
- Ntoskrnl.exe high CPU & Disk usage
- Windows Driver Foundation using high CPU
- Windows Shell Experience Host uses high CPU.
Hey, How to Fix RAM 100% Issue on Windows 10? I just updated my Sony laptop Windows 7 to Windows 10 three days ago. But after some use, I feel this new system is very sluggish, everything starts very slow, programs often get stuck and laptop frequently gets frozen or crashes down. I checked and know this problem is actually due to high memory usage. It is soon up to 100%. I did a restart, then everything came back to normal, total usage was just around 30% of 8GB of RAM. However, during few hours of usage memory builds up again to 80% and if not restarted it further goes to 100% and later on even freezes. I don’t know how to check what kind of process or program causes this high memory usage. Could you please help me solve this high memory usage problem?
What will be the Reasons Resulting in RAM 100% Issue?
Recently, many Windows 10 users complain that their PC slows down due to high usage of RAM, CPU or Disk. It even consumes 100% usage within few minutes even though PC user just open few program and perform one task on PC. How to Fix RAM 100% Issue on Windows 10 – More and more PC users are asking this query. RAM 100% Issue will freeze PC totally and it’s impossible to continue any tasks on problematic PC. Anyway, RAM 100% Issue slows down computer performance completely. So What will be the Reasons Resulting in RAM 100% Issue? Less RAM of your PC is not the main reason triggering this issue. Users having 4GB of RAM have less complaints, while users with 8GB and even 16GB of RAM have experienced high memory usage problems especially after updating their PCs to Windows 10. When you get Windows 10 full memory usage error or receive high disk usage warning, the RAM or memory in Windows 10 may not be really full. There are several key reasons why the memory usage runs out. Here below we will explain some main reasons in detail for PC users:
1. Windows 10 memory leak
Memory leak is a failure in a program to release discarded memory, causing impaired performance or failure. Besides, Windows 10 is experiencing driver incompatibility issues. A faulty or outdated driver can lead to a Memory leak. When a program needs to store some temporary information during execution, it can dynamically request a chunk of memory from the system. However, the system has a fixed amount of total memory available. If one application uses up all of the system’s free memory, then other applications will not be able to obtain the memory that they require. A memory leak reduces the performance of the computer by reducing the amount of available memory. Eventually, in the worst case, too much of the available memory may become allocated and all or part of the system or device stops working correctly, the application fails, or the system slows down vastly due to thrashing. Therefore, if applications stay in memory when not in use, system run–time is expected to be unlimited or systems typically have lower total available system memory, high Ram usage RAM 100% issue will happen to slow down computer performance.
2. Low space due to high usage by multiple apps or big installation patches
We usually will download many applications and program to access certain sites or finish our works. However, while we download the application we need, the other additional programs would be sneakingly installed into system at the same time. Or some add-on and extension is installed into web browser’s background. And then multiple useless applications or programs will take up too much memory. Besides failure of updating Windows patches is a big program to consume too much available RAM. Windows update usually can silently do its job in the background like downloading updates automatically, installing the ones it can and saving others to install when you restart or shut down the computer. However, in some cases the update installation gets stuck or freezes when it fixes patch even install service pack during shutdown or startup. Note that sometimes an update installation fails and that can prevent other updates from being installed properly too. In this case, these installation patches will soon occupy available RAM space. Then RAM 100% Issue happens and computer performance slows down immediately.
3. Memory got taken up by system error and large number of useless junk files
System error is a major reason that may cause the false information to the computer such as high RAM, CPU and Disk usage. And junk files in computer can really take a large amount of capacity and system resources and it’s quite necessary to clean up junk files in PC regularly. Optimizing Windows disk will surely improve system performance. Windows system can record of all the acts of your pc. Improperly shutting down, crashing or freezing and uninstalling programs, massive virus, Trojan virus, spyware and rogue programs and unnecessary files can cause registry errors. Junk files or temporary files will be created while you’re browsing online, running programs or performing tasks with some application even by massive Trojan horse, virus, worm or spyware. If you don’t regularly clean junk files for your computer and also computer is infected with threats, there will be no doubt that RAM memory gets taken up by system error and large number of useless junk files.
How to Fix RAM 100% Issue on Windows 10
If you know what exactly is the main reason to cause RAM 100% issue on your PC, you can figure out the correct solution to fix this issue accurately. However, fixing RAM 100% issue needs expertise and skills in dealing any parts of computer. If you haven’t sufficient expertise in dealing with program files, processes, .dllfiles and registry entries, it may lead to mistakes damaging your system and cause severely system problem. Here below we offer some step-by-step guides on how to fix RAM 100% issue for computer literate only. The guides can be applied to different brands of different Windows 10 laptop and desktop like Lenovo, Asus, Acer, Dell, HP, ThinkPad, Toshiba, IBM, Sony, Gateway, Samsung, IBM, etc. If you are not able to handle fixing RAM 100% issue by following the instructions on How to Fix RAM 100% Issue on Windows 10 below, you’re suggested to contact YooSecurity Online Tech Support Team by clicking ‘Live Chat’ button here for help, the technician will take care everything of your computer for you!
Here’s the detailed instruction on How to Fix RAM 100% Issue on Windows 10
1. Registry Hack:
Hit Win Key + R
Type in “Regedit” and then hit Enter.
Go to ‘HKEY_LOCAL_MACHINE\SYSTEM\CurrentControlSet\Control\Session Manager\Memory Management’
Find ‘ClearPageFileAtShutDown’ and change its value to 1
Restart the computer
2. Fix the driver issue:
Open ‘Device manager’ and ‘Scan for hardware changes’
3. Adjust your Windows 10 for the best performance
Right click on “Computer” icon and select “Properties”
Select “Advanced System settings”
Go to the “System properties”
Select “Settings”
Choose “Adjust for best performance” and “Apply”.
Click “OK” and Restart your computer.
4. Disable startup programs
Hit Win Key + R
Type ‘msconfig’ and press enter
The Task manager window will open. Click on the “Startup” tab and you will see a list of programs that run at startup.
Right click on the applications that you don’t want to run at startup and select “Disable”.
5. Defragment Hard DrivesHit Win Key + R
Hit Win Key + R
Type “dfrgui” and press enter
In the new window click on the hard drives you want to defragment (Prefer the drive in which Windows is installed)
Click “Optimize” and follow the instructions on the screen to finish the defragment process.
Restart your computer.
Conclusion (How to Fix RAM 100% Issue on Windows 10)
High memory usage on Windows computer is a common problem which usually slows down computer performance. It takes a long time to run the program you need even though you just open web browser. Once the memory space becomes less, PC will not be able to run many process, registry entries, files and programs at the same time. Computer will soon get stuck or frozen even crash down immediately, and you have to restart it even force to shut it down then turn it back on. This sluggish status must be fixed as soon as possible or you will not use computer properly. But How to Fix RAM 100% Issue on Windows 10? Before you fix it, you should know what leads to this RAM 100% Issue. Of course, there are various factors leading to this high RAM usage even RAM 100% Issue. but usually memory leak, Windows update installation patches, multiple applications and programs, junk files and computer virus like Trojan horse, worm or spyware etc will consume too much system RAM available usage even eat up RAM usage and system resources. system errors caused by some aggressive virus can give wrong system order and send false information about CPU, RAM or DISK usage. That means, in fact, your PC’s RAM usage is not so high. However, don’t worry, RAM 100% Issue on Windows 10 PC is fixable. Many effective and accurate fix solutions are figured out by computer technician who qualified with professional computer technique and skills. If you can do it by yourself, you can follow our instructions above on How to Fix RAM 100% Issue on Windows 10.
Warm Suggestion: If you want to check out what exactly the reason leading to your computer’s high RAM usage RAM 100% Issue on Windows 10 computer or get help on how to Fix RAM 100% Issue on Windows 10, you’re welcome to start a live chat below to consult with our YooSecurity Online Tech Expert.
Published by Tony Shepherd & last updated on February 13, 2017 6:05 am
Повышаем производительность системы и снижаем нагрузку на диск.
Одна из проблем, часто возникающая у пользователей Windows 10, — это 100-процентная загрузка диска. В Windows 10 есть неполадки, которые затрагивают как жёсткие диски, так и твердотельные накопители. При этом производительность системы резко падает. Вплоть до полного зависания.

Есть несколько способов исправить это. Попробуйте их один за другим, пока не увидите положительных результатов.
Отключите Windows Search

Служба индексирования Windows 10 позволяет быстро искать ваши файлы, но она же может создавать высокую нагрузку на жёсткий диск.
Чтобы остановить службу на время текущего сеанса (до перезагрузки), откройте командную строку. Для этого нажмите «Пуск» → «Все программы» → «Стандартные». Щёлкните пункт «Командная строка» правой кнопкой мыши и выберите «Запуск от имени администратора». Затем введите следующую команду:
net.exe stop “Windows search”
Чтобы окончательно выключить службу индексирования, нажмите Windows + R, введите services.msc и нажмите Enter. В открывшемся окне «Службы» найдите Windows Search и дважды щёлкните на неё. В разделе «Тип запуска» выберите «Отключено» и «Остановить», чтобы прервать работу службы. Нажмите «ОК», для сохрания изменений.
Через несколько секунд после отключения Windows Search производительность Windows 10 должна значительно улучшиться.
Отключите Windows Update
Обновление Windows тоже загружает диск на полную. Обычно это происходит при проблеме с загрузкой патчей. У вас есть несколько вариантов:
- Просто оставьте компьютер обновляться. Подождите, пока все файлы обновлений будут загружены, затем перезапустите Windows и позвольте ей установить их. Это может занять много времени.
- Перезапустите компьютер и дождитесь, пока Windows Update решит проблему.
- Отключите обновления Windows 10, чтобы убедиться, что именно Windows Update загружает диск на 100%.
Если после обновления диск всё ещё перегружен, попробуйте следующие способы.
Отключите телеметрию Windows
Отключить телеметрию можно не только для экономии системных ресурсов, но и для увеличения вашей приватности. Нажмите Windows + R и введите regedit, чтобы открыть «Редактор реестра». В реестре откройте HKEY_LOCAL_MACHINE/SOFTWARE/Policies/Microsoft/Windows/DataCollection.
Щёлкните на пункт DataCollection правой кнопкой и создайте новое значение DWORD (32-bit). Назовите его Allow Telemetry. Затем дважды щёлкните по нему и установите значение 0. Перезагрузите Windows.
Отключите диагностику
Ещё одна распространённая причина высокой загрузки диска — служба диагностики Windows 10. Вы можете отключить её.
Откройте командную строку с правами администратора и выполните:
sc config “DiagTrack” start= disabled
sc stop “DiagTrack”
Кроме того, вы также можете открыть «Параметры» → «Система» → «Уведомления и действия» и отключить функцию «Получить советы, рекомендации и предложения при использовании Windows». Это тоже может снизить нагрузку на диск.
Виртуальная память

Windows записывает в виртуальную память часть данных из RAM, чтобы уменьшить расход оперативной памяти. Разрастание файла виртуальной памяти также увеличивает нагрузку на диск.
Откройте «Панель управления» → «Параметры системы» и выберите «Расширенные системные параметры». В появившемся окне выберите вкладку «Дополнительно». Затем в разделе «Производительность» нажмите «Настройки».
Здесь вы найдёте другую вкладку «Дополнительно», в которой есть раздел с надписью «Виртуальная память». Нажмите «Изменить» и снимите флажок «Автоматически управлять размером файла подкачки для всех дисков».
Выберите свой диск Windows (C:) и укажите «Пользовательский размер». Лучше всего ввести значение в 1,5 раза больше вашей оперативной памяти. Затем нажмите «Установить» и «ОК».
Теперь вам нужно очистить временные файлы в виртуальной памяти. Нажмите Windows + R и введите temp. Когда откроется каталог temp, выберите все файлы (Ctrl + A) и удалите их.
Отключите SuperFetch
Служба SuperFetch в Windows 10 должна повышать производительность системы, оптимизируя запуск наиболее часто используемых вами приложений. На практике же она может провоцировать высокую нагрузку на диск.
Вы можете её отключить и посмотреть, как это повлияет на загрузку диска. Откройте командную строку и введите:
net.exe stop superfetch
Подождите несколько секунд, чтобы проверить, улучшилась ли производительность вашего диска. Затем запустите его проверку командой:
chkdsk.exe / f / r
Для завершения проверки диска ваш компьютер должен быть перезагружен.
Проблема с PCI-Express
100-процентная загрузка диска может быть связана и с некорректной работой драйвера PCI-Express. Откройте «Диспетчер устройств» и разверните список «Контроллеры IDE ATA / ATAPI». Дважды щёлкните на контроллер AHCI, откройте вкладку «Драйвер» и выберите «Сведения о драйвере».
Если путь к драйверу имеет вид C:/Windows/system32/DRIVERS/storahci.sys, значит, проблема может быть в нём.
Откройте вкладку «Сведения» и выберите «Путь экземпляра устройства» в раскрывающемся меню. Щёлкните правой кнопкой мыши и выберите «Копировать». Скопируйте путь к устройству, например, в «Блокнот».
Затем нажмите Windows + R и введите regedit. В «Редакторе реестра» отыщите адрес HKEY_LOCAL_MACHINE/System/CurrentControlSet/Enum/PCI/ваш_путь_экземпляра_устройства. В нём разверните Device Parameters/Interrupt Management/MessageSignaledInterruptProperties.
Вы увидите параметр MSISupported в правой панели. Дважды щёлкните и задайте ему значение 0. Нажмите «ОК» для подтверждения и перезапустите Windows.
Учтите, что перед внесением изменений в реестр неплохо бы сделать его копию.
Высокая производительность

Последняя попытка. Попробуйте изменить настройки питания Windows 10. При стандартном режиме питания диск часто бывает загруженным на 100%. Переход в режим высокой производительности может решить эту проблему. При этом ваш компьютер будет использовать больше энергии, отчего может снизиться время работы ноутбука от батареи.
Нажмите Windows + X, и откройте «Дополнительные параметры питания». Выберите «Высокая производительность». Через пару минут нагрузка на диск должна уменьшиться.
Надеемся, что одна из этих рекомендаций вам поможет. Если знаете другие способы решения проблемы, делитесь в комментариях.