
ownCloud — это Свободное и открытое веб-приложение для синхронизации данных, расшаривания файлов и удалённого хранения документов в «облаке». Возможности
- Хранение файлов с использованием обычных структур каталогов, или с использованием WebDAV
- Криптография
- Синхронизация между клиентами под управлением Windows (Windows XP, Vista, 7 и 8), Mac OS X (10.6 и новее) или Linux
- Календарь (также как CalDAV)
- Планировщик задач
- Адресная книга (также как CardDAV)
- Потоковое мультимедиа (используется Ampache)
- Администрирование пользователей и групп (с использованием OpenID или LDAP)
- Расшаривание контента между группами или используя публичные URL
- Онлайн текстовый редактор с подсветкой синтаксиса и сворачиванием
- Закладки
- Механизм сокращения URL
- Фотогалерея
- Просмотрщик PDF (используется PDF.js)
- Просмотрщик ODF файлов (.odt, .odp, .ods)
- Модуль логирования
Установка Установку ownCloud я решил сильно упростить, используя готовый дистрибутив от Bitnami, в который интегрированы Apache и PHP. Скачиваем и запускаем установочный файл.
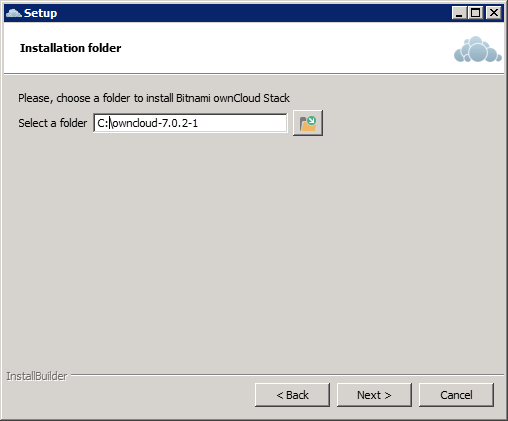
Выбираем папку для установки.
Создаем учетную запись администратора.

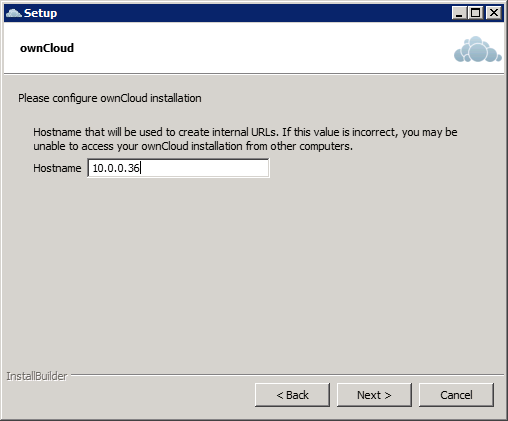
Указываем хост сервера. Я указал IP-адрес.
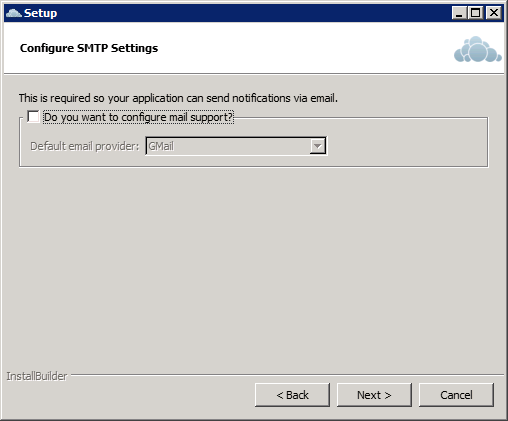
Настраиваем почту.Этот этап можно пропустить и настроить почту позже.
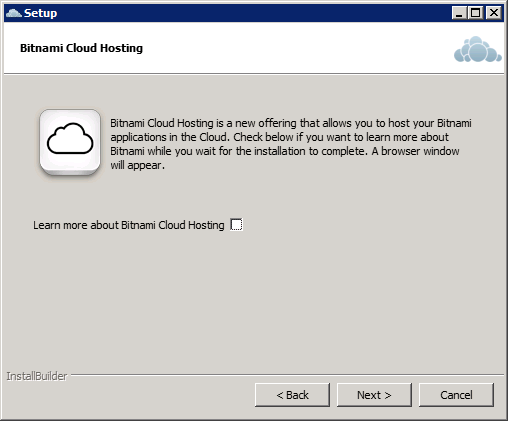
Пропускаем предложение посетить сайт Bitnami.
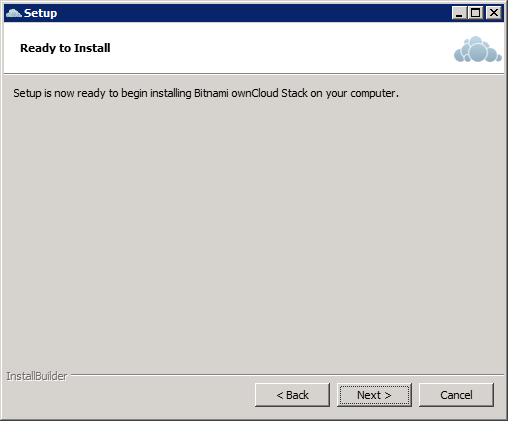
Все готово для установки, жмем Далее.
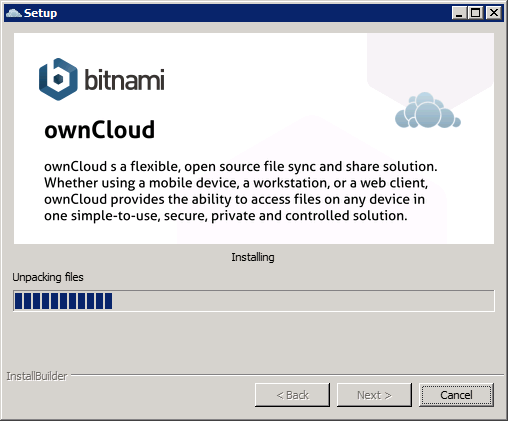
Ждем завершения установки.
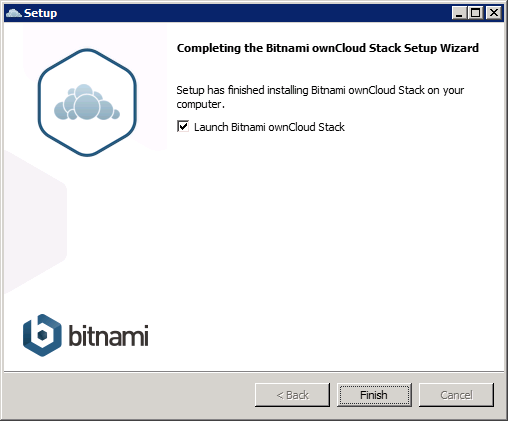
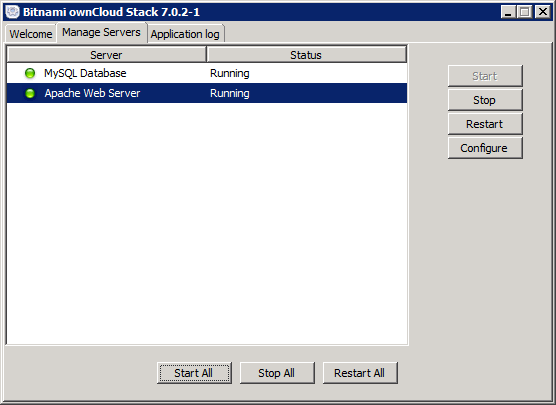
После завершения установки запускаем Bitnami ownCloud Stack.
Настройка ownCloud. В Bitnami ownCloud Stack нажимаем Go To Application, в браузере открывается приветственная страница. Жмем ссылку «Access Bitnami ownCloud Stack».

Открывается окно входа в ownCloud.

Вводим регистрационные данные, указанные на этапе установки. Получаем полнофункциональный облачный сервис!

В верхнем меню слева выбираем Приложения.

У меня список приложений загружался почему-то очень долго. В нем выбираем LDAP User and Group backend и включаем приложение.

Далее заходим в Администрирование.

Опускаемся до LDAP-секции и видим сообщение, что модуль LDAp для PHP не установлен. Включаем (раскомментируем) в php.ini строку extension=php_ldap.dll. Не забываем перезапустить серверы в Bitnami ownCloud Stack на вкладке Manage Servers, чтобы изменения вступили в силу.
Настройка интеграции ownCloud с LDAP. Заходим под администраторской учетной записью в меню Администрирование. Проматываем вниз и ставим галочку напротив Enable LDAP Backend.

Далее возвращаемся к LDAP-секции и заполняем ее. Предварительно я создал пользователя owncloudaduser в контейнере Users. Ему не нужно членство в каких-то группах корме Domain Users. Пароль сделаем ему бессрочным. Во второе поле пишем содержимое атрибута distinguishedName из влкадки Редактора атрибутов. Она станет доступна в свойствах учетной записи, если в оснастке Active Directory Users and Computers в меню Вид (View) включить Дополнительные компоненты (Advanced Features).

На вкладке Login устанавливаем атрибут для входа. У меня это имя пользователя LDAP.

Далее на вкладке Дополнительно устанавливаем параметры подключения. Делаем нашу конфигурацию активной.

Заполняем настройки каталога.

Затем Специальные атрибуты. Важно заполнить поле mail, если вы планируете использовать уведомления по почте.

Не забываем Сохранить настройки. Возвращаемся на вкладку Пользователи. В качестве объектов я указал User, и сразу нашлось 1483 пользователя.

Вот и все, интеграция ownCloud с LDAP завершена.
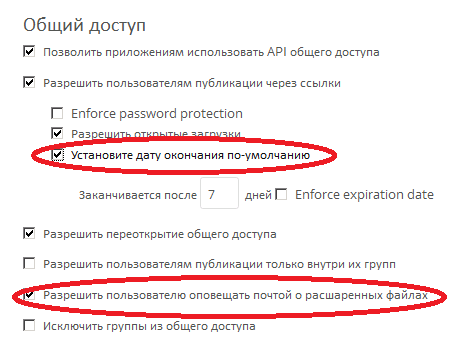
Настройка почтовых уведомлений. В меню Администрирование устанавливаем следующие параметры.
В личных настройках учетной записи администратора указываем почтовый адрес.

Настраиваем почтовый сервер. Если все правильно, то на адрес администратора придет тестовое сообщение.

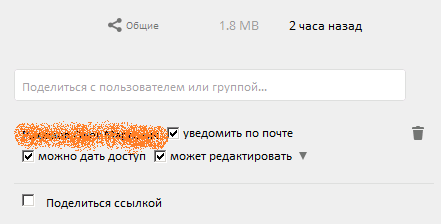
Выбираем пользователя, с которым хотим поделиться файлом, ставим галочку «уведомить по почте». Если все настроили верно, письмо уйдет пользователю от имени учетной записи человека, который делится файлом.
The OwnCloud server is an open-source cloud storage solution with multimedia playing and file-sharing capabilities. It can be installed on Linux platforms without any problem and has to be for proper performance and stability. However, users familiar with the Windows operating system install the Owncloud server using Windows’s IIS web server or third-party software like XAMMP or WAMP servers. But in this tutorial, we will not use any of them to install the Owncloud server on Windows 10 or any virtual machine software like Virtualbox/Vmware. Instead of the traditional method, we use the Windows Subsystem for Linux (WSL) for better stability and performance. The Linux environment app which we will use for it is Ubuntu. Let’s see how to do this. The latest version of the OwnCloud while this tutorial was Owncloud 10.1.0.
Install Owncloud Server on Windows 10 via UbuntuStep 1: Enable the Windows Subsystem for Linux (WSL)Step 2: Install Ubuntu 20.04/22.04 Linux AppStep 3: Install Apache, MySql/ MariaDB plus PHP on Windows 10Step 4: Check your Windows 10 Apache installationStep 5: Download the Owncloud server Step 6: Create an Owncloud configuration file for ApacheStep 7: Create a symlink for OwncloudStep 8: Additional modules installationStep 9: Create a MySQL or MariaDB database for OwncloudStep 4 –Install, Setup, and Configuring ownCloud server on Windows 10Step 5: Login Owncloud server
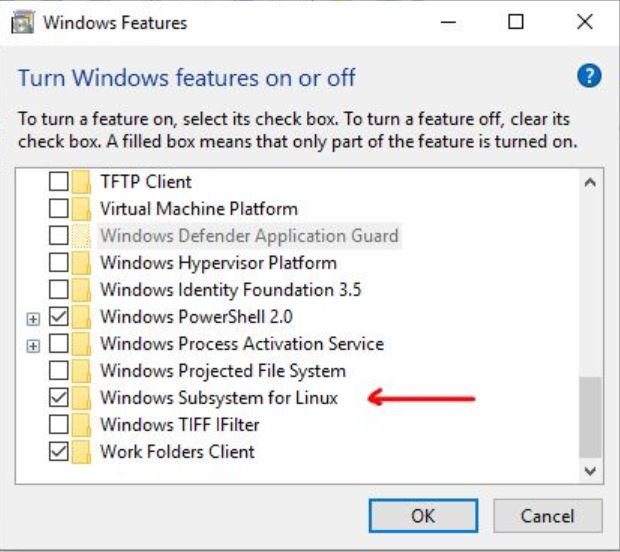
Step 1: Enable the Windows Subsystem for Linux (WSL)
To enable the Windows Subsystem for Linux feature on Windows 10, go to the Search box, type “Turn Windows feature on or off,” click on that as it appears, and enable the WSL (Windows Subsystem for Linux) feature: For more info on this, see: Enable the Windows Subsystem for Linux feature
Step 2: Install Ubuntu 20.04/22.04 Linux App
From Windows 10 search box or the program, list search for the Microsoft store. When the store opens, search for Ubuntu to download and install. After installing, click on the Launch button, which extends the Ubuntu bash or command screen from where we can use all Ubuntu commands except a few directly on Windows 10.
Step 3: Install Apache, MySql/ MariaDB plus PHP on Windows 10
Before installing the Owncloud 10.1.0. we need to set up a web server environment and a LAMP setup. Here is the command which we need to execute for installing Apache+PHP+MariaDB. Copy and paste the below one using the right mouse, click, and then hit the enter button.
sudo apt-get install apache2
sudo apt-get install mariadb-server
sudo apt-get install php libapache2-mod-php php-mysql php-gd php-json php-curl php-xml php-zip php.mb
sudo apt-get -y install libmcrypt-dev
Owncloud also needs one more PHP extension, i.e., the intl extension, so install that too.
sudo apt-get install php-intl
Step 4: Check your Windows 10 Apache installation
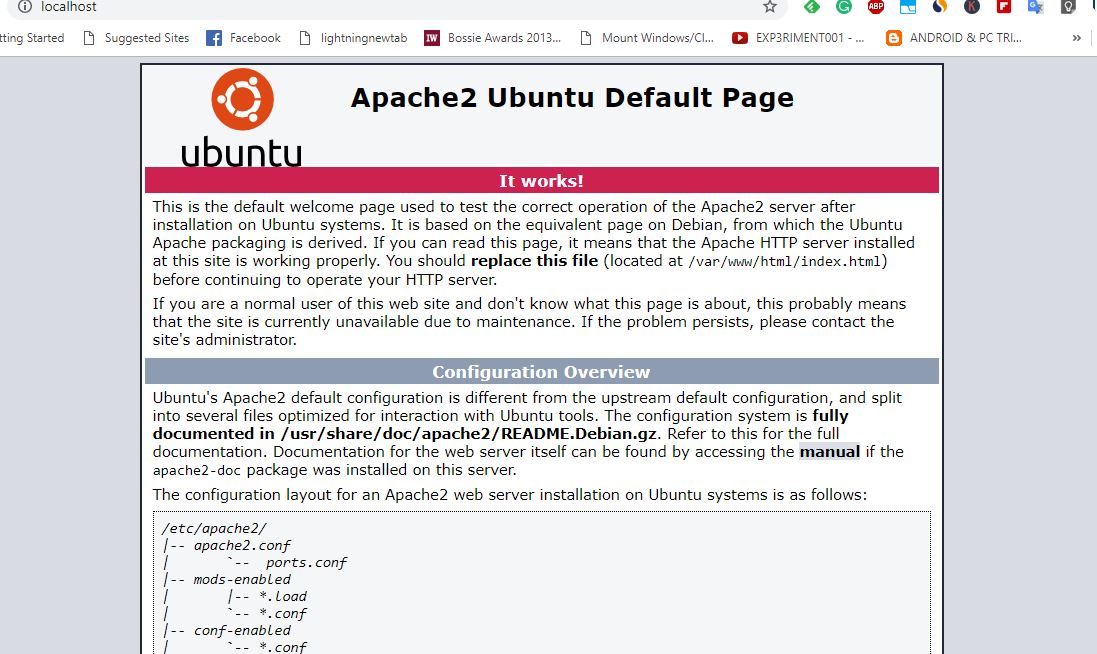
To check whether our Apache server is working, go to your Windows 10 browser and type http://localhost/ or http://127.0.0.1/ or the IP address of your Windows 10 local machine. You can find out the IP address by typing Ip a. As you enter the IP address, the Apache testing page will open, which means everything is fine and time to move to the next step.
Step 5: Download the Owncloud server
Here is the command to get the files required for setting up OwnCloud:
sudo apt install wget unzip
wget https://download.owncloud.com/server/stable/owncloud-complete-latest.zip
unzip owncloud-complete-latest.zip
sudo mv owncloud/ /var/www/
sudo chown -R www-data:www-data /var/www/owncloud/
The above commands automatically download and extract the Owncloud files under the Apache directory.
Step 6: Create an Owncloud configuration file for Apache
Now create an Owncloud configuration file using the below command:
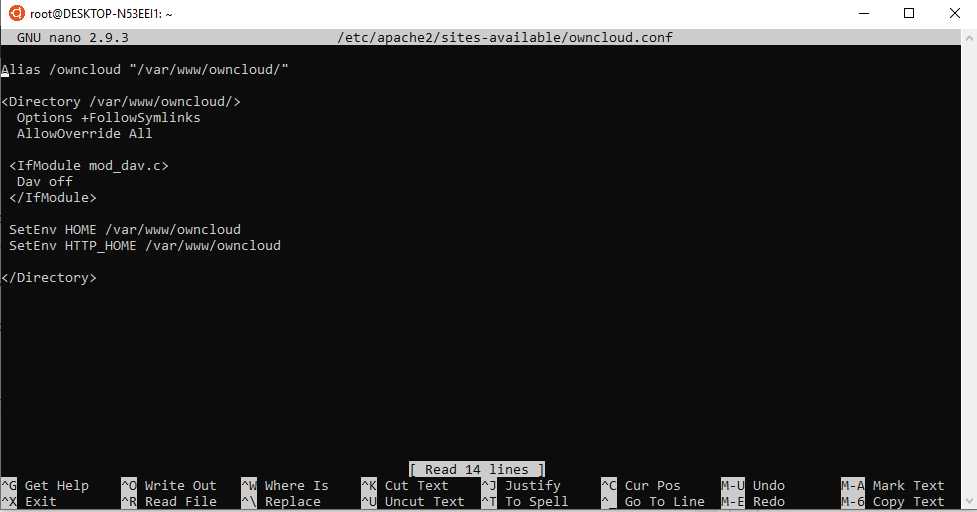
sudo nano /etc/apache2/sites-available/owncloud.conf
And then, add the following lines to point the Apache root directory toward the Owncloud.
Alias /owncloud "/var/www/owncloud/"

<Directory /var/www/owncloud/>
Options +FollowSymlinks
AllowOverride All

<IfModule mod_dav.c>
Dav off
</IfModule>

SetEnv HOME /var/www/owncloud
SetEnv HTTP_HOME /var/www/owncloud

</Directory>
After adding the above lines, press Crtl +O to write the files and CTRL+X to save and exit.
Step 7: Create a symlink for Owncloud
To tell the Apache about the Owncloud configuration, we will create a reference or symlink using the below command:
ln -s /etc/apache2/sites-available/owncloud.conf /etc/apache2/sites-enabled/owncloud.conf
Step 8: Additional modules installation
Add these additional modules for proper Owncloud working.
sudo a2enmod headers env dir mime unique_id
After adding the modules, restart the Apache server using the command:
sudo service apache2 restart
Step 9: Create a MySQL or MariaDB database for Owncloud
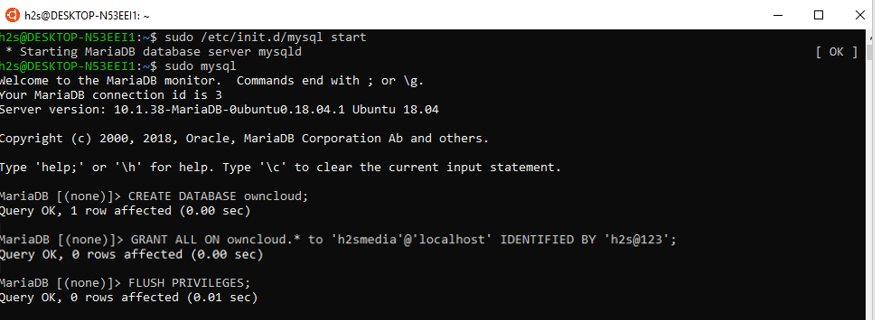
First of all, stop and restart the MySQL/MariaDB:
sudo /etc/init.d/mysql stop

sudo /etc/init.d/mysql start
Now let’s create a MySQL user and database for OwnCloud:
sudo mysql
We are building a database with the name owncloud you can use another name if you want.
CREATE DATABASE owncloud;
Now create a user with a password and, at the same time, assign all rights of the above-created database to that. Here we are creating a user with the name h2smedia and a password for the same. You can use your username and password:
CREATE USER 'h2smedia'@'localhost' IDENTIFIED WITH mysql_native_password BY 'my-strong-password-here';
GRANT SELECT, INSERT, UPDATE, DELETE, CREATE, INDEX, DROP, ALTER, CREATE TEMPORARY TABLES, LOCK TABLES ON owncloud.* TO 'h2smedia'@'localhost';
Flush privileges operations:
FLUSH PRIVILEGES;
Exit MySQL using the command:
exit
Step 4 –Install, Setup, and Configuring ownCloud server on Windows 10
After performing all the above steps again go to the browser and type http://localhost/owncloud/ or http://127.0.0.1/owncloud/ or the IP address of your Windows 10 local machine. Just like we did while checking whether the Apache works above in this article.
However, this time you will see the Owncloud server setup and configuration screen rather than the Apache one.
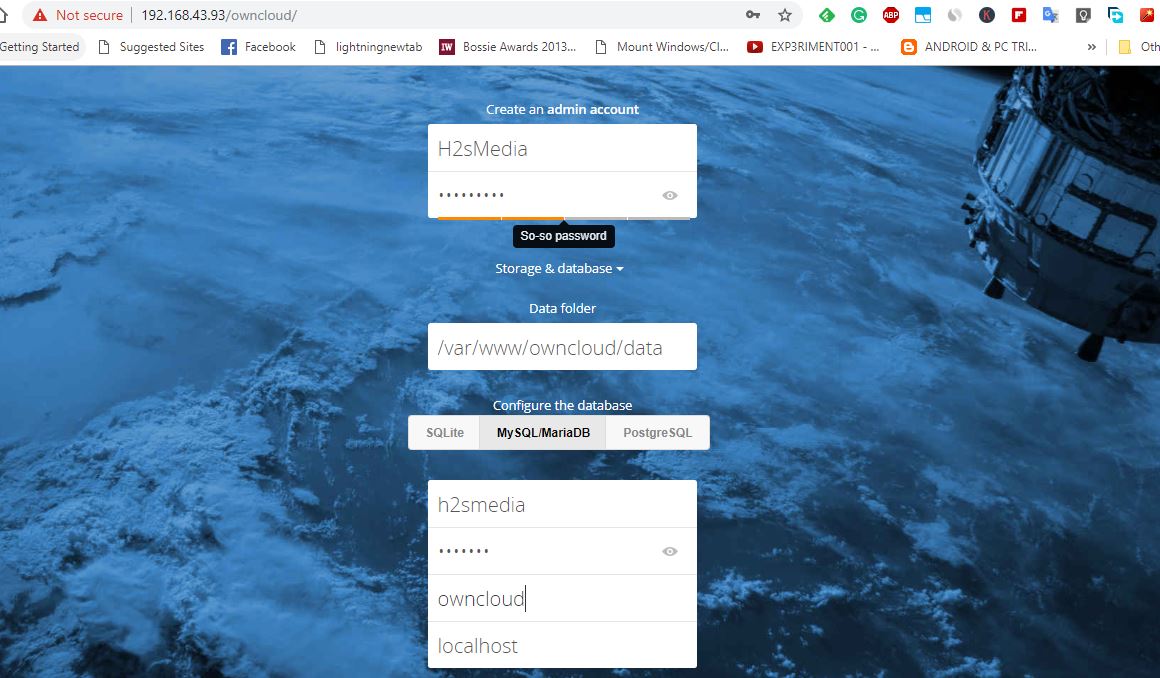
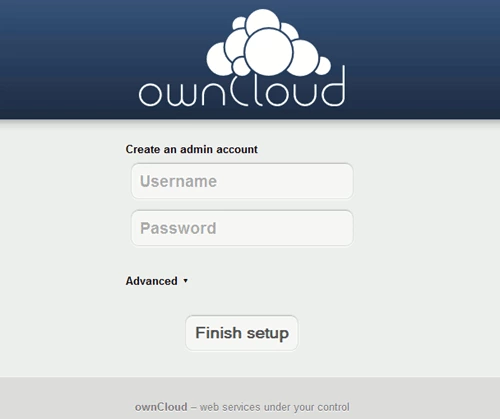
Create an admin account for Windows 10 installed Owncloud. Just enter whatever user name along with a password for the same you want to assign to the Admin account.
After the admin account, you will see a storage and database option; click on that and then MySQL/MariaDB tab. After that, add the MySQL database details we have created above, which means the database username, password, and database name, which is owncloud in our case.
Finally, once you have provided all the information to Owncloud, scroll down and click on the Finish Setup button.
Step 5: Login Owncloud server
When you click the Finish setup button, the Owncloud will take a few seconds to authenticate all provided details and then offer you a login page.
Login with the admin account you have created above.
As we know, Owncloud also offers a client application that one can use on different operating systems to sync the files between a PC/smartphone and the Owncloud server.
The first screen that appears to you is dedicated to the same. Click on the one OS platform you want to download the Owncloud client.

This way, we can easily install the Owncloud server on Windows 10 for high performance and stability without using any XAMMP or WAMP-like software.
If you have difficulty installing Windows 10 OwnCloud server, let us know, and we will try to solve the same as soon as possible.
Other useful resources:
- How to Install Ansible on Windows 10
- Use Virtualbox drag and drop from Windows 10 to Ubuntu 18 VM
- Install OBS Studio 23.0.1 on Ubuntu 18.04
- How to bridge WiFi to Ethernet adapter to share internet
- How to install Owncloud 10 on Ubuntu 16.0.4 Server
Setup was unable to create a new system partition: Fix for Windows
January 4, 2019
How to to Open Computer Management in Windows 10
March 26, 2019
ownCloud was developed with Linux and Unix based operating systems in mind so if you are looking to implement ownCloud in a production environment you probably should install it in a Linux server. But installing ownCloud in a Windows server is certainly possible now that PHP is supported in all Windows servers starting from Windows server 2008.In this tutorial we will install ownCloud in a Windows 2016 server.
Prerequisites
In order to finish this guide successfully you need the following:
- A Windows Server 2008 or later installed and fully updated
- IIS with CGI support enabled on the server
- MySQL
- PHP 5.4 or higher
Installing IIS
Login to your Windows server then click on Server Manager in your Start menu, and then click on Add roles and features:
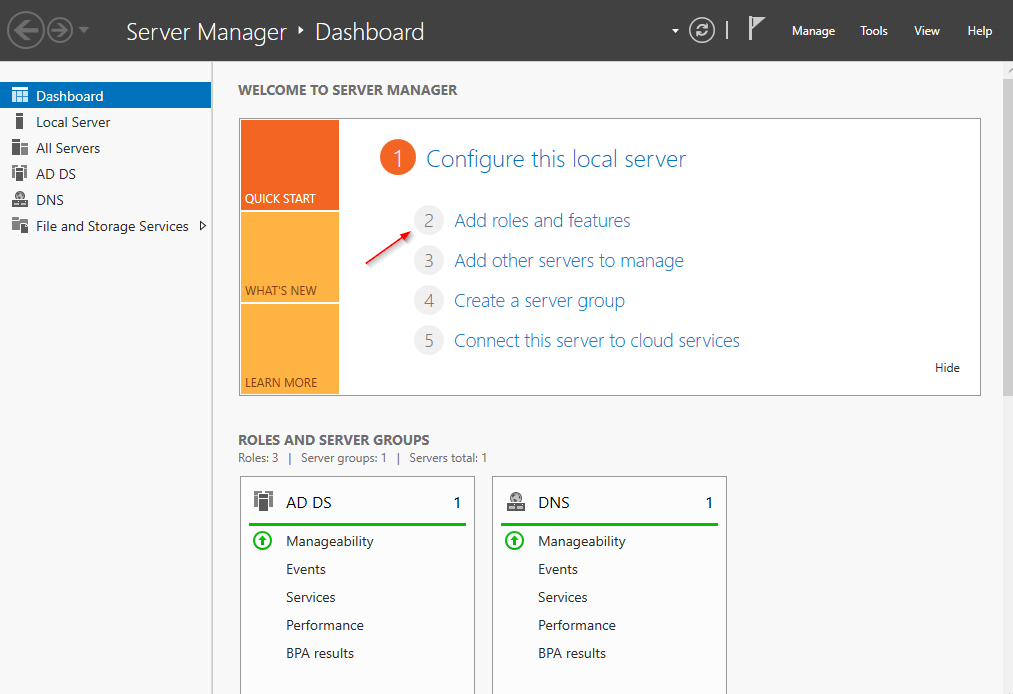
The Add roles and features wizard will come up. click on Next:

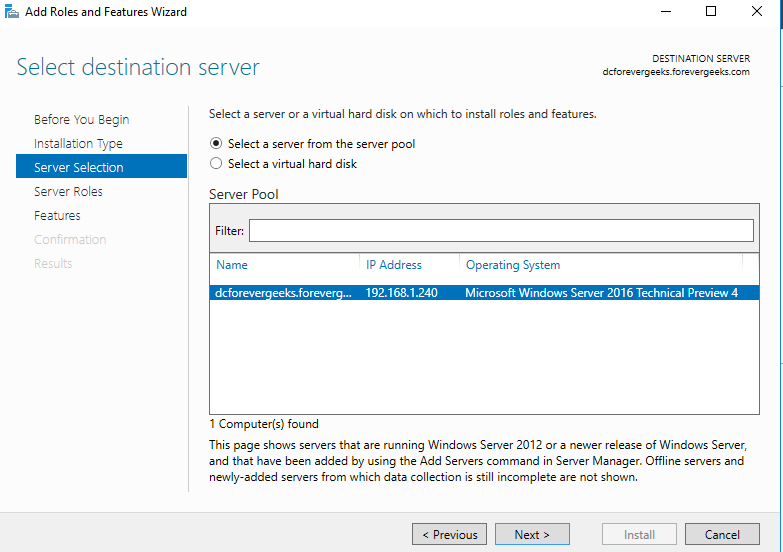
On the “Installation Type” Window choose “Role-based or feature-based installation:

Click on Next. on the “Server Selection” screen choose your server from the server pool:
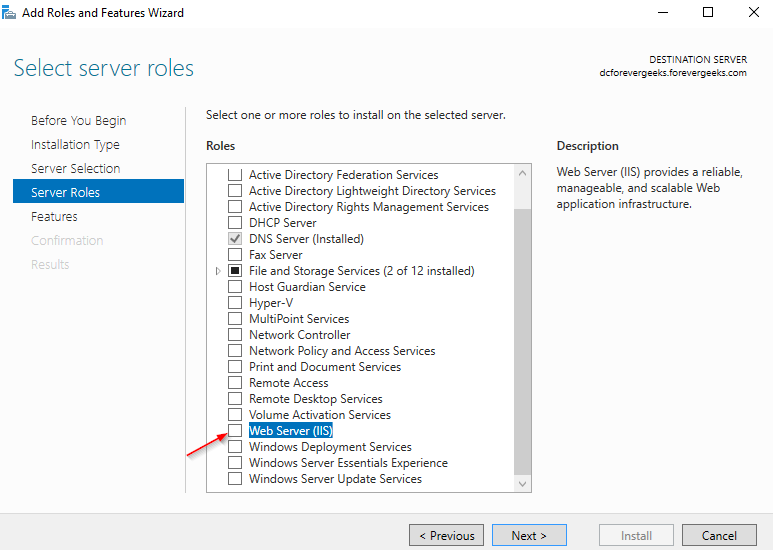
click on Next. on the “Select Server Role” window, check the Web Server (IIS ) role:
the Add roles and features window will pop-up:
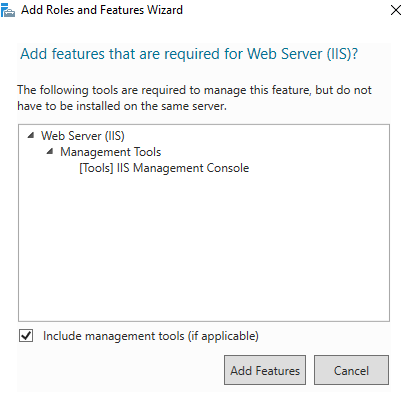
Click on Add Features then click Next.

Click Next .

click Next

On the “Role services” window make sure CGI is check under the Application Development group. after you do that, click Next.

Click on Install in the confirmation window.

IIS with CGI support should be now installed in your server.
Installing PHP and MySQL
The easiest way to install PHP and MySQL at once in your Windows server is using the Microsoft Web Platform installer found in this URL https://www.microsoft.com/web/downloads/platform.aspx download and execute the wpiluancher.exe file . select the default settings during the installation until you get to this window:

On that Window click on Products then Frameworks and choose the latest PHP version from the list. the latest PHP version at the time of this writing is version 7.0.

Click on Add then click on Database and add MySQL Windows as well:

Click on Install after you have added both.
Select a password for your MySQL server:

click on I Accept in the following window. and the installation will begin.

MySQL and PHP should be installed on your server now.
Note: if you get any error saying that PHP manager cannot be installed. make sure .NET 3.5 with HTTP Activation is installed on your server. somehow PHP manager needs that.
Create MySQL Database
Login to your MySQL server using CMD. open cmd on your server, and switch to this path cd “C:Program FilesMySQLMySQL Server 5.1bin” then login to your MySQL server
mysql -u root -p

To create the ownCloud database type this:
create database owncloud ;
then type exit. you can also create create a different user to use with your ownCloud database if you don’t want to use the root account. see this section Create new user in MySQL if you want to do that.
Installing ownCloud
From your server download the latest ownCloud zip package from this URL https://owncloud.org/install unzip it and then move it to your C:inetpubwwwroot web directory. type in the name of your site (e.g. localhost/nameofyoursite ) or the IP address of your server in the browser, and the ownCloud installation wizard should come up:

Enter the username, password, and the data folder location. click on Finish setup after you are done entering that information, and ownCloud should get installed on your Windows server!
Conclusion
Installing ownCloud in a Windows server is a lot more involved than installing it on a Linux server, but is not that hard. I hope you found this guide helpful, and please use the comments if you have any question.
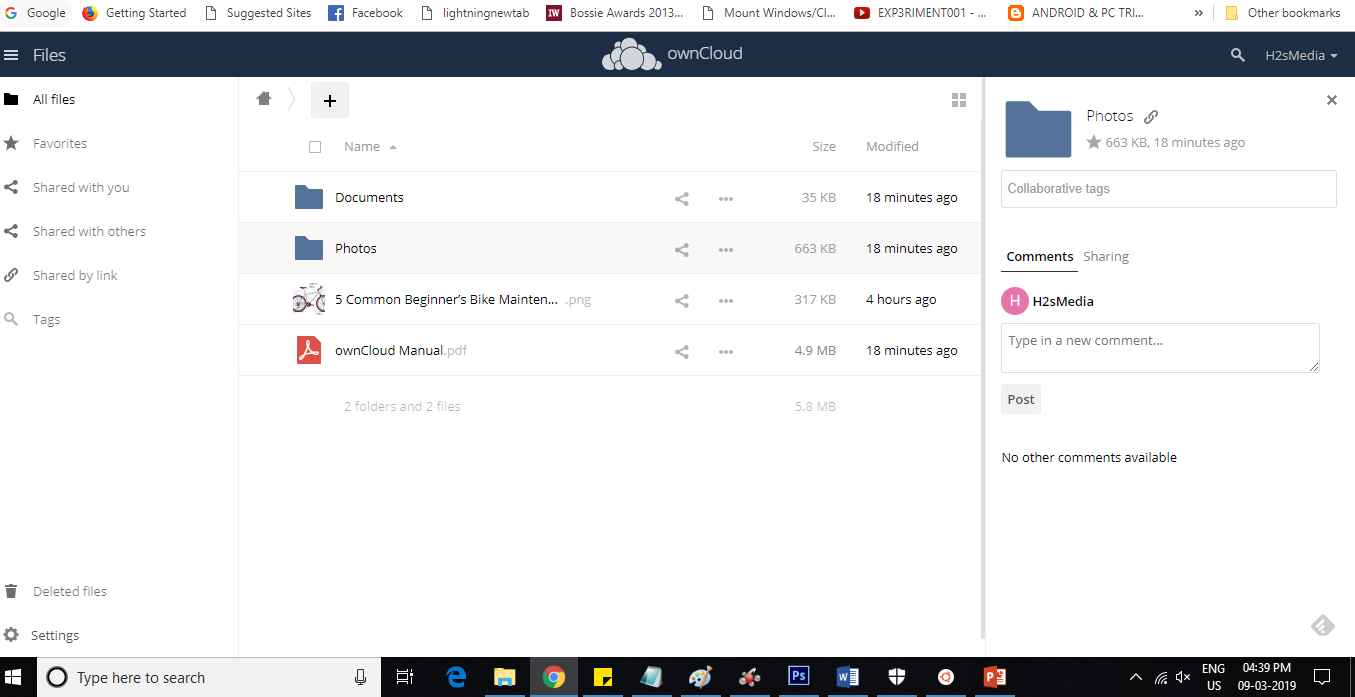
ownCloud – это бесплатное программное обеспечение с открытым исходным кодом, которое можно использовать для создания собственного облачного хранилища. Серверы ownCloud могут быть установлены как на платформах Windows, так и Linux. Клиентская часть поддерживает все платформы – от Windows до macOS, Android и iPhone. В данном руководстве рассматривается создание сервера облачного хранилища с помощью ownCloud в Windows.
1. Установка сервера ownCloud в Windows
Для начала использования сервиса необходимо разместить собственный сервер ownCloud в Windows. Существуют различные протоколы, поддерживающие это: XAMMP, WAMP и Internet Information Services (IIS). Последний рассматривается здесь.
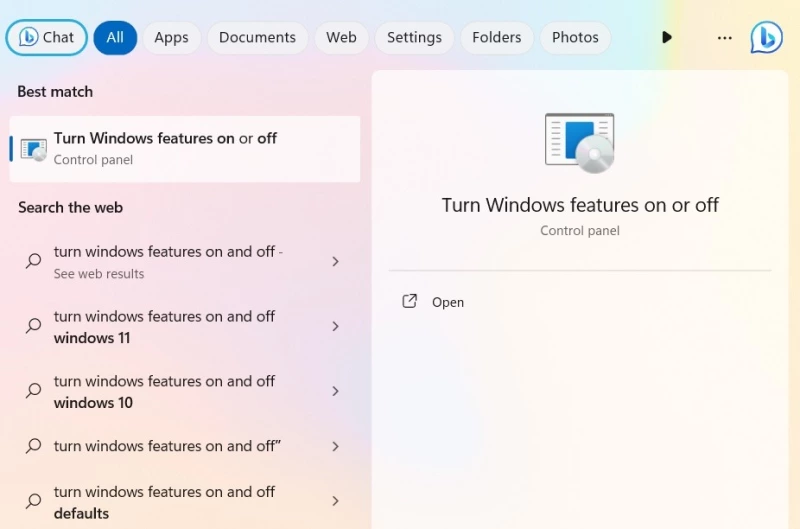
Для начала наберите в «Поиске Windows» — «Включить функции Windows» и выберите наиболее подходящий вариант. Или зайдите в Панель управления -> Программы и возможности -> Включить или выключить функции Windows.
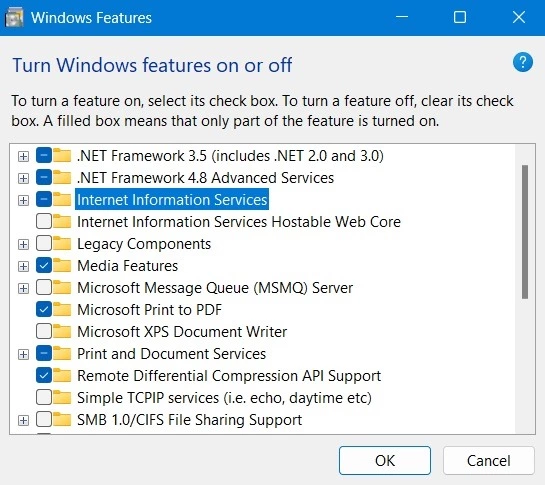
ownCloud требует установки сервера Internet Information Services (IIS) в операционной системе Windows. Сначала его необходимо активировать из окна Windows Features. Установите флажок Internet Information Services.
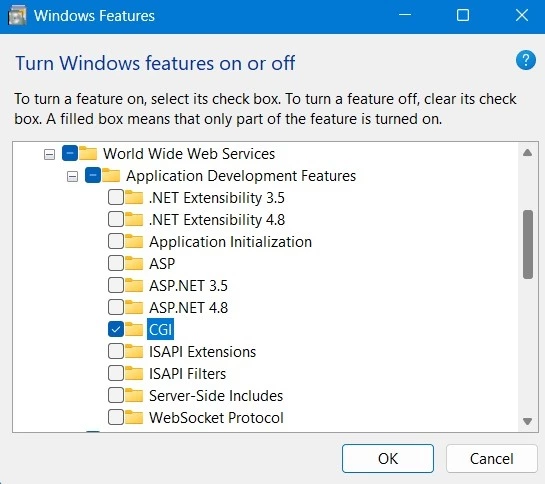
Вы также должны убедиться, что отмечен CGI в разделе Application Development Features из World Wide Web services.
Загрузить PHP для Windows.
Примечание: вы также можете загрузить WAMP Server и использовать PHP и MySQL сервер из этого источника, но убедитесь, что IIS и Apache не настроены на работу на одном порту; в противном случае они будут конфликтовать друг с другом и не будут работать правильно.
Если вы частный пользователь, ownCloud позволяет вам бесплатно попробовать версию для сообщества. Загрузите ZIP-файл.
После распаковки копируйте всю папку ownCloud и вставьте ее в C:\inetpub\wwwroot, которая появится только после включения IIS, как показано в предыдущих инструкциях.
Обратите внимание, что для копирования чего-либо в папку wwwroot могут потребоваться права администратора. Когда вы начнете копирование, Windows запросит права администратора.
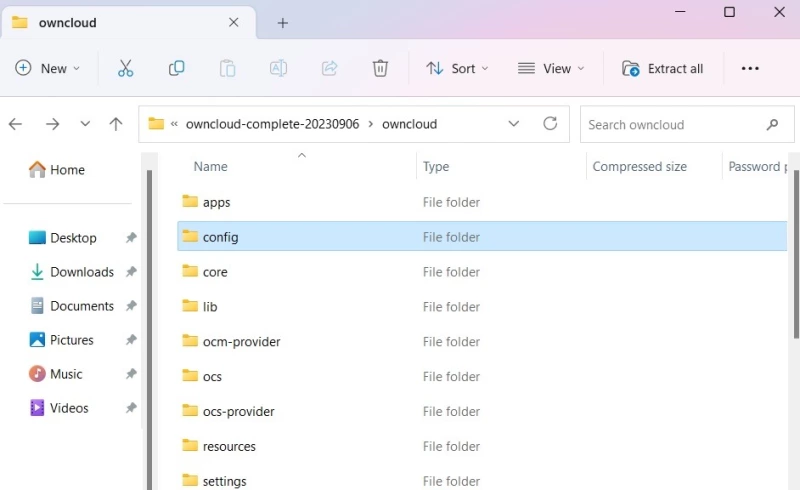
После завершения копирования перейдите в папку config в каталоге owncloud.
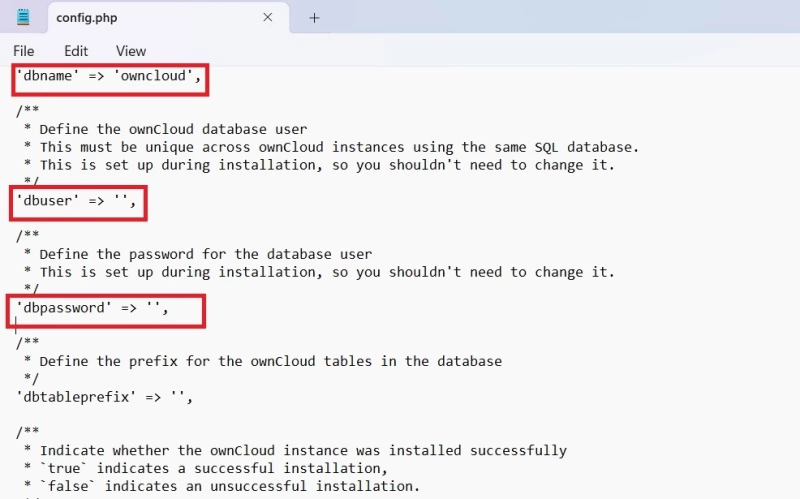
Далее переименуйте config.sample.php в config.php.

После переименования файла PHP, как указано выше, вам нужно будет открыть его с помощью текстового редактора. Мы используем Notepad.
Откройте только что переименованный config.php и отредактируйте значения dbname, dbuser и dbpassword, как показано на скриншоте ниже. Значение «dbname» относится к базе данных ownCloud, заданной при установке, и может не изменяться. Однако параметры «dbuser» и «dbpassword» при желании можно изменить.
Другие параметры можно оставить со значениями по умолчанию.
Откройте браузер и перейдите по адресу http://localhost/owncloud. Обратите внимание, что если вы скопировали все файлы непосредственно в папку «wwwroot», то вам нужно будет набрать только http://localhost/.
Заполните поля и нажмите на кнопку Создать учетную запись, чтобы создать страницу учетной записи администратора.
2. Установка приложения ownCloud Desktop App в Windows
После настройки сервера ownCloud необходимо установить приложение OwnCloud для рабочего стола, которое позволяет синхронизировать файлы с учетной записью OwnCloud и получать доступ к удаленным файлам, как если бы они хранились прямо на вашем компьютере.
Существует несколько способов установки приложения OwnCloud Desktop.
Загрузить приложение
Перейдите по ссылке Страница загрузки приложений для рабочего стола и загрузите клиент для Windows.

Следующий процесс установки очень прост. Вы должны использовать Windows 8 или более позднюю версию. Убедитесь, что клиент ownCloud установлен на компьютере, который вы будете использовать для синхронизации.
После завершения процесса установки перезагрузите компьютер, чтобы файлы конфигурации применились.
После перезагрузки можно открыть приложение ownCloud из меню Поиск.
Использование MSI-установщика
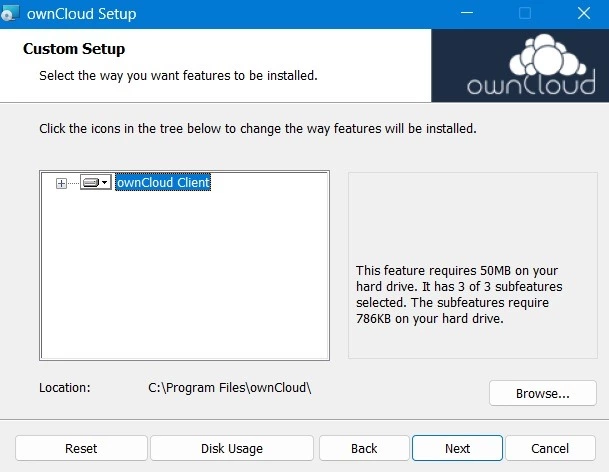
Для пользовательской установки ownCloud используйте метод командной строки в режиме администратора. Это поможет вам установить или удалить нужные функции.
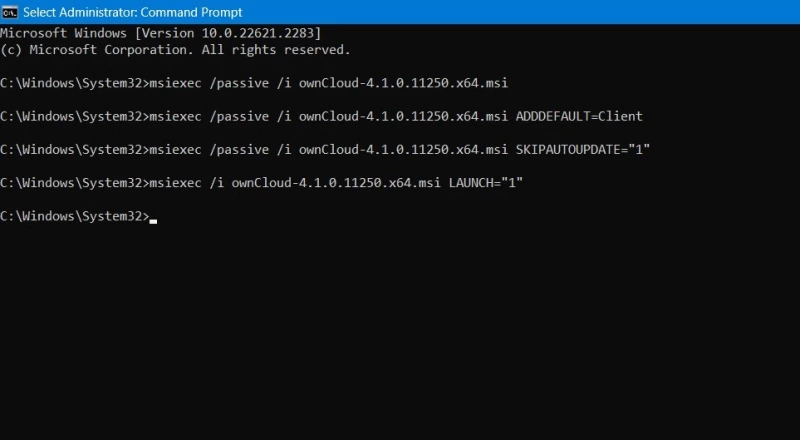
Для автоматической установки используйте следующее:
msiexec /passive /i ownCloud-4.1.0.11250.x64.msi
Чтобы добавить приложение для рабочего стола по умолчанию, используйте следующую команду. Чтобы удалить его, просто замените «ADDDEFAULT» на «REMOVE».
msiexec /passive /i ownCloud-4.1.0.11250.x64.msi ADDDEFAULT=Client
Если вы хотите пропустить автоматическое обновление программы ownCloud, введите:
msiexec /passive /i ownCloud-4.1.0.11250.x64.msi SKIPAUTOUPDATE="1"
Для прямого запуска программы используйте следующую команду:
msiexec /i ownCloud-4.1.0.11250.x64.msi LAUNCH="1"
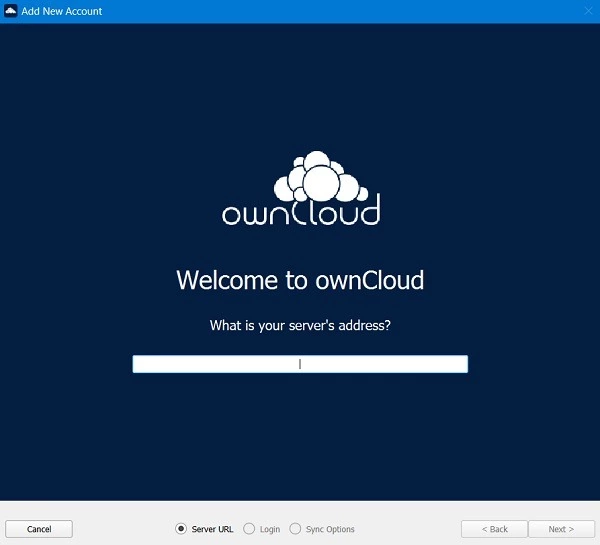
3. Использование мастера подключения ownCloud в Windows
Независимо от того, каким способом вы установили настольный клиент ownCloud, после запуска приложения откроется мастер подключения.
Нажмите кнопку Добавить учетную запись, чтобы начать процесс.
Для создания учетной записи ownCloud потребуется адрес сервера: URL-адрес экземпляра ownCloud, предоставленный сервером ownCloud. Это может быть общий URL-адрес настройки, используемый компанией или организацией.
Если вы используете community edition ownCloud для размещения собственного сервера, будет доступен URL-адрес, который можно использовать здесь. После ввода URL-адреса произойдет перенаправление на экран входа в систему. Обратитесь к документации для получения более подробной информации.
Если вы установили сервер community edition ownCloud, вы сможете бесплатно разместить собственное облако на своем устройстве. Однако можно также выбрать подписку на программное обеспечение как услугу (SaaS), которая предоставляется в виде 14-дневной бесплатной пробной версии.
Заключение
Выше описана базовая настройка ownCloud в Windows. Дополнительные параметры можно будет настроить после начала использования. С помощью ownCloud можно создавать виртуальные файловые системы, принудительно синхронизировать папки, обмениваться фотографиями и файлами из файлового менеджера рабочего стола. ownCloud лучше всего подходит для небольших компаний, которые не хотят использовать дорогостоящее облачное хранилище для каждого пользователя.
Единственным недостатком ownCloud является отсутствие возможности синхронизации по локальной сети, что означает увеличение пропускной способности канала.
To install ownCloud binaries, you have to download the required package. After doing so,
you can perform the following steps manually or use the provided scripts. These scripts are convenient
since they can also be used for upgrading which eases the process a lot.
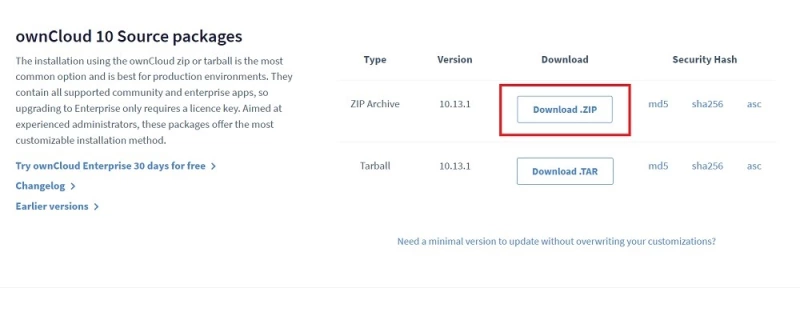
Download ownCloud
Before downloading ownCloud, change to a directory where you want to save
the file temporarily. This can be, for example /tmp. In further examples, we use tar archives or the complete ownCloud bundle. The name for the complete archive looks like this:
owncloud-complete-yyyymmdd.archive_type.
Download the archive of the latest ownCloud version:
-
Go to the ownCloud Download Page and select the package that fits your needs.
You can download either the.tar.bz2or.ziparchive. Based on the example below, copy the
link of the selected file and run the following command to download it:wget https://download.owncloud.com/server/stable/owncloud-complete-latest.tar.bz2 -
Download the corresponding checksum file like:
wget https://download.owncloud.com/server/stable/owncloud-complete-latest.tar.bz2.md5 or wget https://download.owncloud.com/server/stable/owncloud-complete-latest.tar.bz2.sha256 -
Verify the MD5 or SHA256 sum:
sudo md5sum -c owncloud-complete-latest.tar.bz2.md5 < owncloud-complete-latest.tar.bz2 or sudo sha256sum -c owncloud-complete-latesttar.bz2.sha256 < owncloud-complete-latest.tar.bz2 -
You can also verify the PGP signature:
wget https://download.owncloud.com/server/stable/owncloud-complete-latest.tar.bz2.asc

gpg --verify owncloud-complete-latest.tar.bz2.asc owncloud-complete-latest.tar.bz2
Script-Guided Installation
Use the Script-Guided Installation
if you want to easily install or upgrade ownCloud or manage ownership and permissions. The page
contains detailed instructions about downloading and usage.
|
Using the Script Guided Installation, you can handle many useful installation and update options automatically. |
Command Line Installation
Use the following commands if you want to do the basic setup without any changes and physical installation options.
Consider using the Script-Guided Installation
if you plan to improve your setup from step one.
-
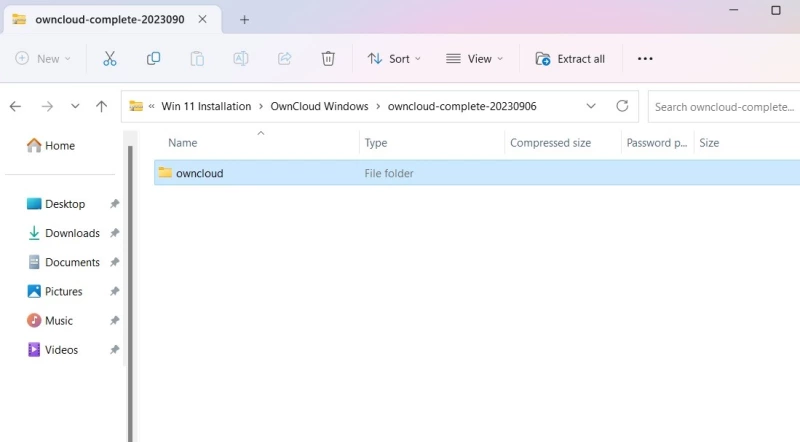
Extract the archive contents and run the unpacking command for your tar archive:
tar -xjf owncloud-complete-latest.tar.bz2 -
tar unpacks to a single
ownclouddirectory.
Copy the ownCloud directory to its final destination.
If you are running the Apache HTTP server, you may safely install ownCloud in your Apache document root.
Assuming your document root is in/var/www.
After the installation, set the correct ownership and permissions according to the needs of your environment. While you can do that manually, we suggest using the scripts from the
Script-Guided Installation which ease the process a lot.