The OwnCloud server is an open-source cloud storage solution with multimedia playing and file-sharing capabilities. It can be installed on Linux platforms without any problem and has to be for proper performance and stability. However, users familiar with the Windows operating system install the Owncloud server using Windows’s IIS web server or third-party software like XAMMP or WAMP servers. But in this tutorial, we will not use any of them to install the Owncloud server on Windows 10 or any virtual machine software like Virtualbox/Vmware. Instead of the traditional method, we use the Windows Subsystem for Linux (WSL) for better stability and performance. The Linux environment app which we will use for it is Ubuntu. Let’s see how to do this. The latest version of the OwnCloud while this tutorial was Owncloud 10.1.0.
Install Owncloud Server on Windows 10 via UbuntuStep 1: Enable the Windows Subsystem for Linux (WSL)Step 2: Install Ubuntu 20.04/22.04 Linux AppStep 3: Install Apache, MySql/ MariaDB plus PHP on Windows 10Step 4: Check your Windows 10 Apache installationStep 5: Download the Owncloud server Step 6: Create an Owncloud configuration file for ApacheStep 7: Create a symlink for OwncloudStep 8: Additional modules installationStep 9: Create a MySQL or MariaDB database for OwncloudStep 4 –Install, Setup, and Configuring ownCloud server on Windows 10Step 5: Login Owncloud server
Step 1: Enable the Windows Subsystem for Linux (WSL)
To enable the Windows Subsystem for Linux feature on Windows 10, go to the Search box, type “Turn Windows feature on or off,” click on that as it appears, and enable the WSL (Windows Subsystem for Linux) feature: For more info on this, see: Enable the Windows Subsystem for Linux feature
Step 2: Install Ubuntu 20.04/22.04 Linux App
From Windows 10 search box or the program, list search for the Microsoft store. When the store opens, search for Ubuntu to download and install. After installing, click on the Launch button, which extends the Ubuntu bash or command screen from where we can use all Ubuntu commands except a few directly on Windows 10.
Step 3: Install Apache, MySql/ MariaDB plus PHP on Windows 10
Before installing the Owncloud 10.1.0. we need to set up a web server environment and a LAMP setup. Here is the command which we need to execute for installing Apache+PHP+MariaDB. Copy and paste the below one using the right mouse, click, and then hit the enter button.
sudo apt-get install apache2
sudo apt-get install mariadb-server
sudo apt-get install php libapache2-mod-php php-mysql php-gd php-json php-curl php-xml php-zip php.mb
sudo apt-get -y install libmcrypt-dev
Owncloud also needs one more PHP extension, i.e., the intl extension, so install that too.
sudo apt-get install php-intl
Step 4: Check your Windows 10 Apache installation
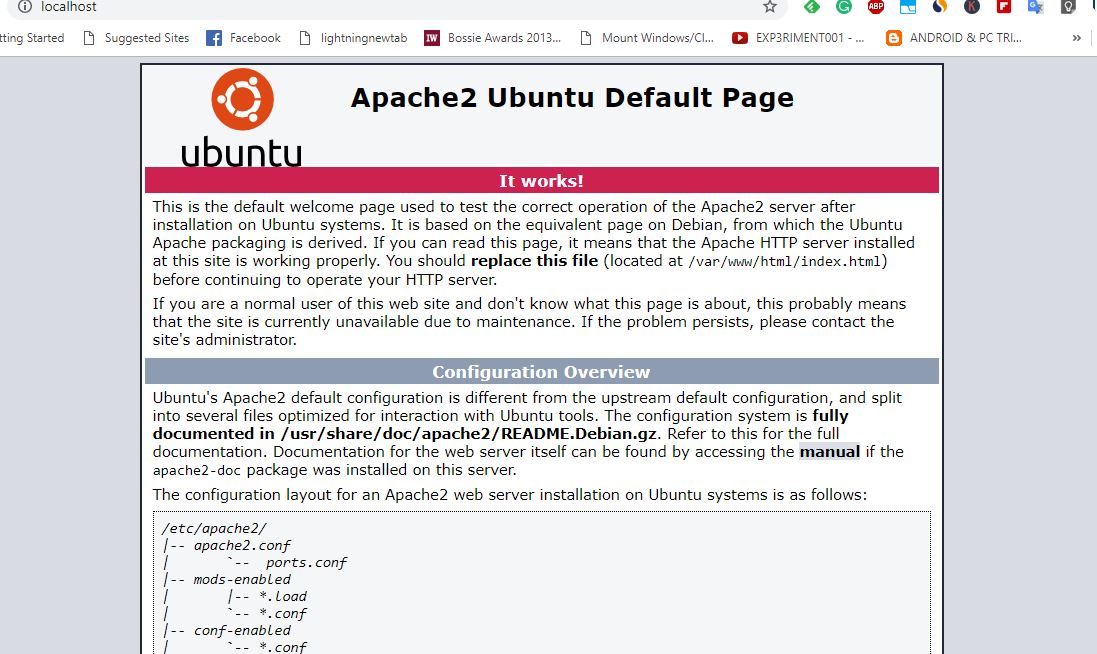
To check whether our Apache server is working, go to your Windows 10 browser and type http://localhost/ or http://127.0.0.1/ or the IP address of your Windows 10 local machine. You can find out the IP address by typing Ip a. As you enter the IP address, the Apache testing page will open, which means everything is fine and time to move to the next step.
Step 5: Download the Owncloud server
Here is the command to get the files required for setting up OwnCloud:
sudo apt install wget unzip
wget https://download.owncloud.com/server/stable/owncloud-complete-latest.zip
unzip owncloud-complete-latest.zip
sudo mv owncloud/ /var/www/
sudo chown -R www-data:www-data /var/www/owncloud/
The above commands automatically download and extract the Owncloud files under the Apache directory.
Step 6: Create an Owncloud configuration file for Apache
Now create an Owncloud configuration file using the below command:
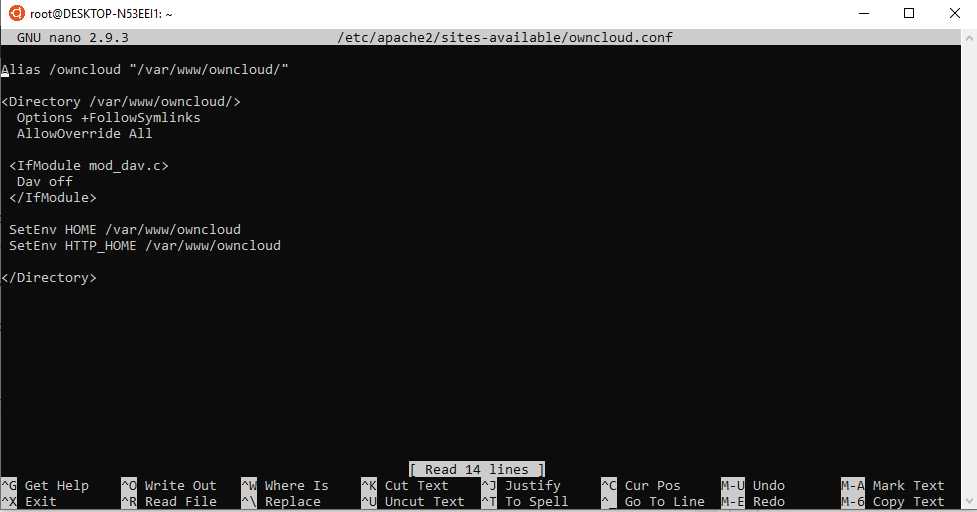
sudo nano /etc/apache2/sites-available/owncloud.conf
And then, add the following lines to point the Apache root directory toward the Owncloud.
Alias /owncloud "/var/www/owncloud/"

<Directory /var/www/owncloud/>
Options +FollowSymlinks
AllowOverride All

<IfModule mod_dav.c>
Dav off
</IfModule>

SetEnv HOME /var/www/owncloud
SetEnv HTTP_HOME /var/www/owncloud

</Directory>
After adding the above lines, press Crtl +O to write the files and CTRL+X to save and exit.
Step 7: Create a symlink for Owncloud
To tell the Apache about the Owncloud configuration, we will create a reference or symlink using the below command:
ln -s /etc/apache2/sites-available/owncloud.conf /etc/apache2/sites-enabled/owncloud.conf
Step 8: Additional modules installation
Add these additional modules for proper Owncloud working.
sudo a2enmod headers env dir mime unique_id
After adding the modules, restart the Apache server using the command:
sudo service apache2 restart
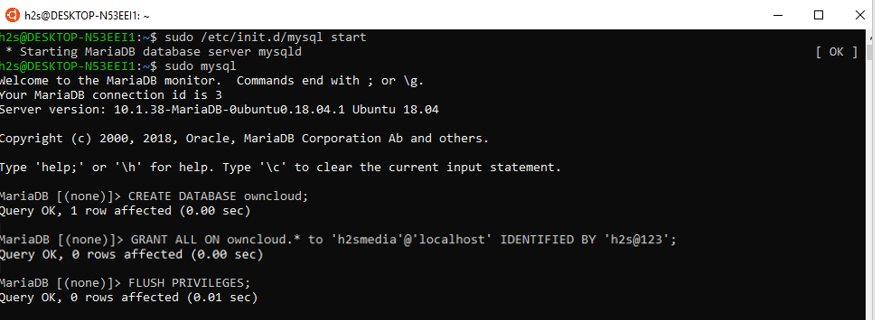
Step 9: Create a MySQL or MariaDB database for Owncloud
First of all, stop and restart the MySQL/MariaDB:
sudo /etc/init.d/mysql stop

sudo /etc/init.d/mysql start
Now let’s create a MySQL user and database for OwnCloud:
sudo mysql
We are building a database with the name owncloud you can use another name if you want.
CREATE DATABASE owncloud;
Now create a user with a password and, at the same time, assign all rights of the above-created database to that. Here we are creating a user with the name h2smedia and a password for the same. You can use your username and password:
CREATE USER 'h2smedia'@'localhost' IDENTIFIED WITH mysql_native_password BY 'my-strong-password-here';
GRANT SELECT, INSERT, UPDATE, DELETE, CREATE, INDEX, DROP, ALTER, CREATE TEMPORARY TABLES, LOCK TABLES ON owncloud.* TO 'h2smedia'@'localhost';
Flush privileges operations:
FLUSH PRIVILEGES;
Exit MySQL using the command:
exit
Step 4 –Install, Setup, and Configuring ownCloud server on Windows 10
After performing all the above steps again go to the browser and type http://localhost/owncloud/ or http://127.0.0.1/owncloud/ or the IP address of your Windows 10 local machine. Just like we did while checking whether the Apache works above in this article.
However, this time you will see the Owncloud server setup and configuration screen rather than the Apache one.
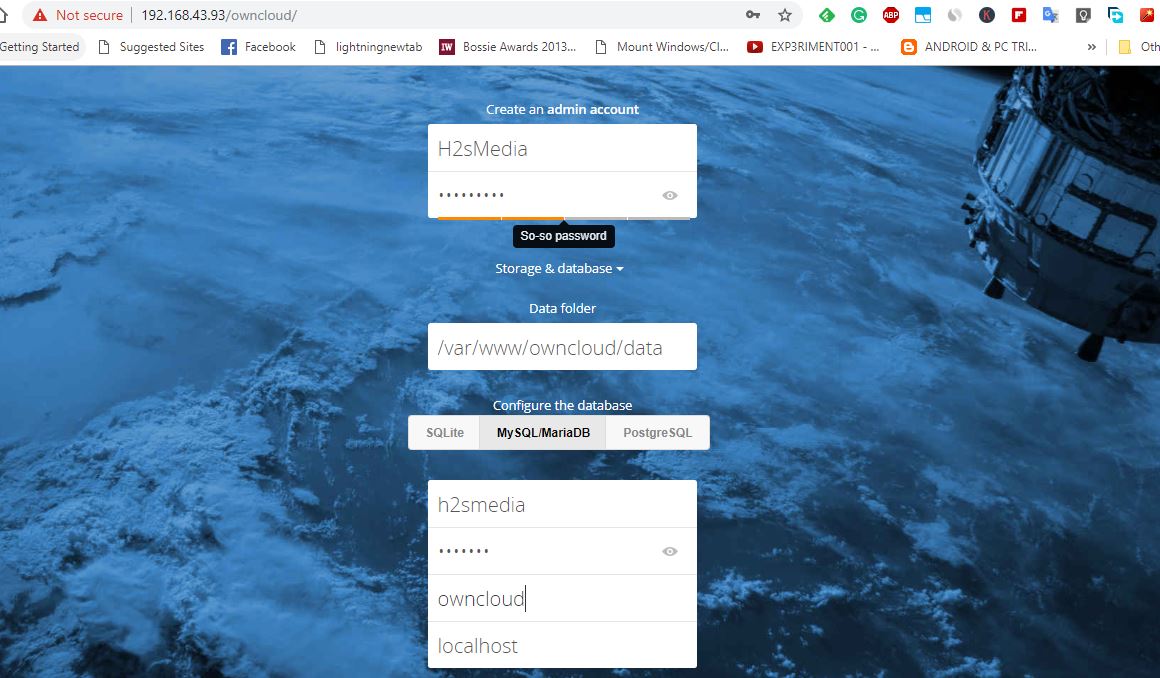
Create an admin account for Windows 10 installed Owncloud. Just enter whatever user name along with a password for the same you want to assign to the Admin account.
After the admin account, you will see a storage and database option; click on that and then MySQL/MariaDB tab. After that, add the MySQL database details we have created above, which means the database username, password, and database name, which is owncloud in our case.
Finally, once you have provided all the information to Owncloud, scroll down and click on the Finish Setup button.
Step 5: Login Owncloud server
When you click the Finish setup button, the Owncloud will take a few seconds to authenticate all provided details and then offer you a login page.
Login with the admin account you have created above.
As we know, Owncloud also offers a client application that one can use on different operating systems to sync the files between a PC/smartphone and the Owncloud server.
The first screen that appears to you is dedicated to the same. Click on the one OS platform you want to download the Owncloud client.

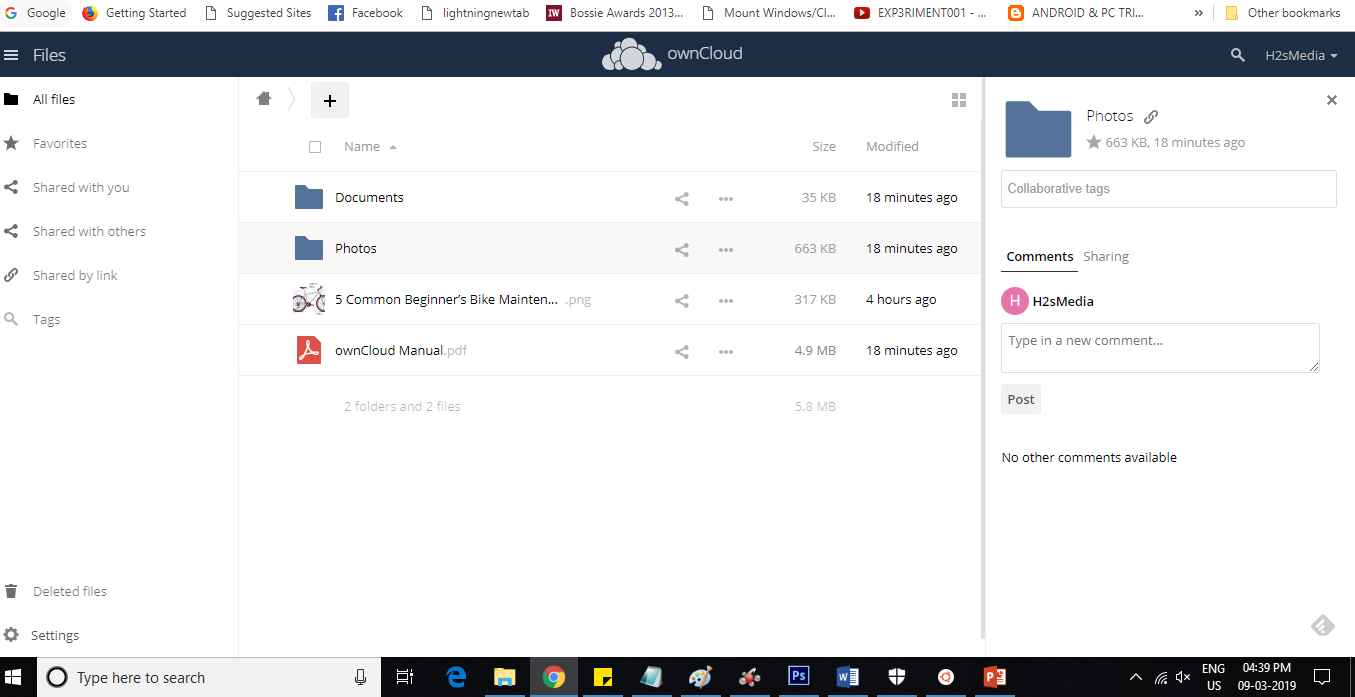
This way, we can easily install the Owncloud server on Windows 10 for high performance and stability without using any XAMMP or WAMP-like software.
If you have difficulty installing Windows 10 OwnCloud server, let us know, and we will try to solve the same as soon as possible.
Other useful resources:
- How to Install Ansible on Windows 10
- Use Virtualbox drag and drop from Windows 10 to Ubuntu 18 VM
- Install OBS Studio 23.0.1 on Ubuntu 18.04
- How to bridge WiFi to Ethernet adapter to share internet
- How to install Owncloud 10 on Ubuntu 16.0.4 Server
ownCloud is an open-source cloud platform that you can use to store your files. Like Google Drive and OneDrive, you can also integrate it into File Explorer by installing it on your system. In addition to this, you can also access your ownCloud server in your web browser. In this article, we will show you how to install and use ownCloud on your Windows PC.

Let’s talk about how to install and use ownCloud on a Windows PC. ownCloud is available in both free and paid plans. The basic and free plan of ownCloud is ideal for personal use. If you want some additional features in ownCloud, you can go with their pais plans.
You can install ownCloud on your Windows PC in different ways. Previously, users were able to install ownCloud on their Windows PC via the Xampp or WampServer application. But today, the ownCloud server does not support installation on Windows via the Xampp or WampServer application and they have mentioned this on their official website.
Unfortunately, for a variety of reasons, our Microsoft Windows Server support has always been less than ideal. After much deliberation with our team, an analysis of the pros and cons of this move – we have decided to stop support for Windows as an ownCloud application server.
Now, here I will show you the following two ways to install ownCloud on a Windows PC.
- By using the Docker desktop app for Windows
- By using the ownCloud VirtualBox appliance
Before proceeding, make sure that the Virtualization technology is enabled on your system.

To check this, open the Task Manager and navigate to the Performance tab. Select CPU and check the status of the Virtualization. If the Virtualization is disabled, you have to enable it in your system BIOS or UEFI.
Let’s start.
1] Installing ownCloud on a Windows PC by using the Docker desktop app
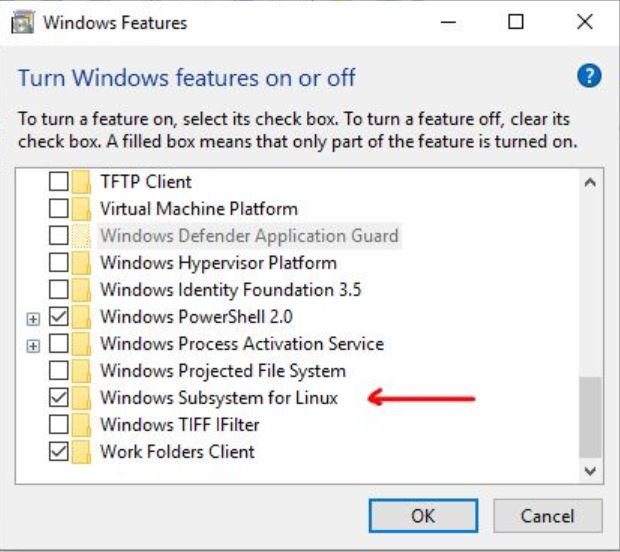
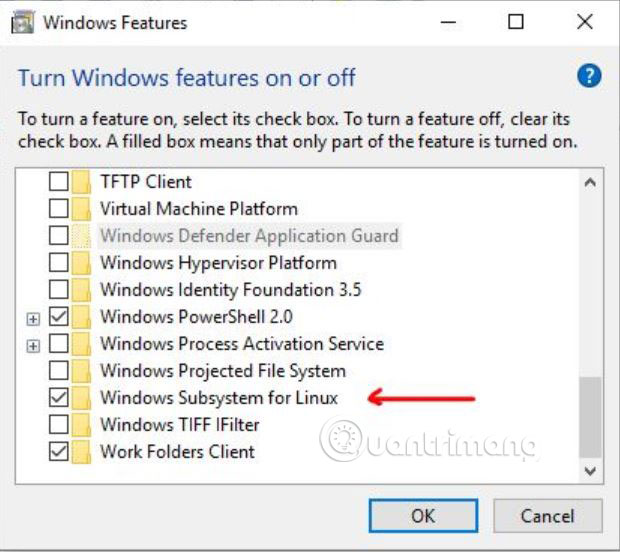
Before installing the Docker app, you have to enable Hyper-V and Windows Subsystem for Linux. Windows 11/10 Pro and Enterprise users can enable Hyper-V and Windows 11/10 Home users can enable WSL. If you have Windows 11/10 Pro or Enterprise Edition, I suggest you enable both Hyper-V and WSL. You can enable Hyper-V via Windows Features. Similarly, the option to enable WSL is also available in Windows Features. The following instructions will guide you on this:

- Open the Control Panel.
- Select Category in the View by mode.
- Select Programs > Programs and Features.
- Click on the Turn Windows features on or off link on the left side. This will open the Windows Features window.
- Now, scroll down and select the Windows Subsystem for Linux checkbox.
- Click OK.
After performing the above steps. Windows will start installing WSL on your system. This process will take some time. Do not interrupt the process.
Now, install the Docker desktop app. You can download it from the official website. Run the installer file to install the Docker desktop app on your Windows PC. You may be asked to log out after the installation is completed. If so, log out and log in again. Now, launch the Docker app.
Make sure that the Docker app is running in the background. Launch the Command prompt as an administrator.

Copy the following command and paste it into the elevated Command Prompt window. After that, hit Enter.
docker run --rm --name oc-eval -d -p8080:8080 owncloud/server

The above command will take time to execute. Wait till the command is completed successfully. After the execution of the above command, you will see a container with the name oc-eval running in the Docker desktop app. It is the ownCloud server. Now, click on the port number showing in the Docker app (refer to the above image).

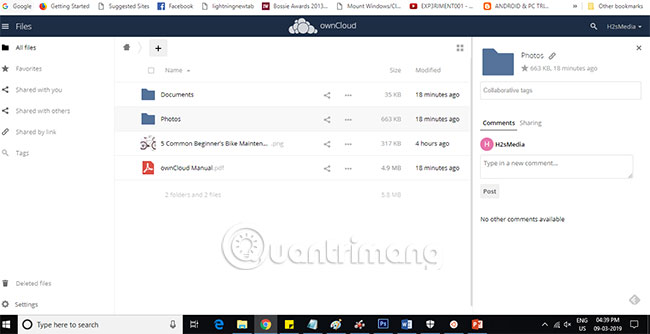
As you click on the port number in the Docker desktop app, you will be taken to the ownCloud server in your default web browser. Use admin as the default username and password to log in. Once you log in to the ownCloud server, you can change your password in settings.

After logging in to the ownCloud server, you will see the interface as shown in the above image. Now, you can add files to the ownCloud and create new folders. If you want to integrate the ownCloud in File Explorer, you have to download and install the ownCloud desktop app on your Windows computer.
After installing the ownCloud desktop app, launch ownCloud on your PC. You will see the welcome screen where you will be asked to enter the server address. If you have set up ownCloud via the Docker desktop app, use localhost:8080 as the server address. After that, click Next.

Now, you will be asked to enter the username and password. Enter the same username and password that you have used to log in to the ownCloud server in your web browser. After successfully setting up the ownCloud desktop app, you will see that ownCloud is integrated into your File Explorer.

Open the File Explorer and select ownCloud from the left pane. All the files that you save on your ownCloud in File Explorer will automatically be available to the cloud because of the syncing process.
To use the ownCloud desktop app and to access the ownCloud server in your web browser, the Docker app should be running in the background.
Installing and setting up ownCloud on Windows 11/10 with Docker has one disadvantage or limitation. All the files will be removed automatically the next time you sync ownCloud. Whenever you restart or turn on your computer, you have to start the Docker app and execute the same command in the elevated Command Prompt to sync the ownCloud desktop app to the ownCloud server or to access the ownCloud server in your web browser. But when the command executes successfully, ownCloud starts a new session and deletes all your previously saved files.
This nature of ownCloud may be due to the command executed in the Command Prompt. It is also mentioned on the official website of ownCloud.
The commands and links provided in the following descriptions are intended to showcase basic docker usage, but we cannot take responsibility for their proper functioning.
I searched but did not find a fix for this issue. Hence, I tried another method to install ownCloud on my Windows 11 laptop. Windows 11/10 users can try this method.
Read: Best free secure online file sharing and storage services.
2] Installing ownCloud on a Windows PC by using the ownCloud VirtualBox appliance
This method to install and set up ownCloud on a Windows PC is also easy. For this, you have to download and install Oracle VirtualBox on your computer. Also, visit the official website of ownCloud and download the ownCloud VirtualBox appliance.

Open VirtualBox and go to File > Import Appliance or press the Ctrl + I keys. Select the ownCloud appliance file from your computer and click Next. View all the Appliance settings on the next screen and click Finish. If you want to change any setting like RAM, you can do so before clicking Finish.

VirtualBox will take some time to add the ownCloud appliance. When the appliance is added, click Start. This will start the VirtualBox VM (Virtual Machine). Now, the ownCloud setup has begun. You have to follow the instructions in the Virtual Machine to install ownCloud properly. On the first screen, select your language and click Next.

On the next screen, select the time zone and click Next. On the third screen, you have to configure the IP address. By default, it is set to “Obtain IP address automatically.” Uncheck this checkbox and enter an IP address manually. The IP address should be the one that is not being used by any of your computers connected to your network. Alternatively, you can define a static IP address on your PC and enter that IP address here. When you are done, click Next.

On the next screen, select the required option for Domain setup. If you do not know which option to choose, select the recommended option. Click Next to move on to the next screen.

The next screen is the Account Information screen. Here, you have to enter your organization’s name. You can also use your own name in place of this. Enter your email ID. Your email address will be required at the time of ownCloud Appliance activation. Now, enter your password. Remember your password, as it will be required to log in to your ownCloud server. When you are done, click Next.
Read: Best Free Cloud-based Online Backup Services.

Now, the ownCloud server setup will begin. This process will take time. Therefore, you have to wait till the process gets completed. After the completion of the setup, you will see the screen shown in the above screenshot. On the last screen, you will see the steps to log in to the ownCloud server in your web browser.
- Open your web browser.
- Type https://<your IP Address>. Enter the same IP address that you used at the time of ownCloud setup on VirtualBox. This IP address is also displayed on the Virtual Machine.
- Hit Enter.

After performing the above steps, you will see the ownCloud Appliance activation screen in your web browser. Enter your email ID and click REQUEST ACTIVATION. Use the same email ID that you entered at the time of ownCloud installation in Virtual Machine.

The license key will be sent to your email ID. Open your email ID and download the activation license file from there. Now, click on the UPLOAD LICENSE FILE button and select the license file from your computer. After that, you will see the Activation Successful message. Click FINISH to exit the setup.

Now, you will be redirected to the login ownCloud Portal. Click ownCloud to open the ownCloud login screen. Type Administrator in the username field. Type your password in the password field. Click Login. After signing in, you will see the ownCloud interface (as shown in the above screenshot). Now, you can upload files to your ownCloud server, create new folders, upload files in folders, etc. You can also delete your files. All the deleted files will go to the Deleted files location from where you can restore them.
If you want to integrate ownCloud into your File Explorer, open the ownCloud desktop app and enter the IP address there. Click Next. But make sure that the Virtual Machine is running before integrating it into File Explorer.
You have to run the Virtual Machine every time you want to access your ownCloud server. One disadvantage that I found in this method is that this method does not work until you receive the license key on your email address.
ownCloud Invalid license key error
In my case, I received the following message after activating the ownCloud Appliance license:
Invalid license key!
Please contact your administrator or [email protected] for a new license key.
The sync between the ownCloud desktop app and the ownCloud server will also not work until the license is original. But as compared to the earlier method, your files will not be deleted automatically the next time you log in to your ownCloud server in your web browser. I am also not sure whether your files are safe or not on the ownCloud server with an invalid license key.
You can download the ownCloud desktop app from the official website of ownCloud.
That’s it. I hope this helps.
Can I install ownCloud on Windows?
Yes, you can install ownCloud on Windows. For this, you can either use the Docker desktop app or VirtualBox for Windows PC. You can also integrate ownCloud into File Explorer on your Windows PC.
Is ownCloud free to use?
It depends on your needs. Both free and paid versions of ownCloud are available. If you want additional features you have to purchase their paid plans. But if you want basic features you can go with the free plan. You can view the complete details in the Pricing section on their official website.
Read next: Best free Encrypted Cloud Storage Services.
Hi. How are you? There are currently a lot of services on the market that offer cloud storage. Some of them are very popular, like Drive, OneDrive and others. However, something that has always been criticized for these applications, is the possible violation of personal data. Moreover, there are also programs for synchronizing files between our computer and a server. Some of them are Nextcloud and Owncloud, and just about this last one we are going to talk about in this tutorial. Let’s explain how to install this server in Windows 10 step by step.
The first thing we need to know is that the owncloud server is only available for Linux operating systems. For that reason, there are no installers for our favorite operating system. However, this does not mean that we cannot install it via Xammp or Wampp. Or using a virtual machine with Hyper V. But this time we are going to install and configure it through the Windows subsystem for Linux (WSL) for better stability and performance. Specifically, the working environment to use will be Ubuntu 18.04 LTS, which we can download from the Windows store. So let’s go for it.
Prerequisites.
For stability effects, it is highly recommended to set the IP address as static. In the same way, we have to enable Windows Subsystem for Linux. If you do not know how to do that, please visit our article about it.
Once this is done, the system will ask to restart. Next, we go to the windows store and download Ubuntu 18.04 LTS
Once it has downloaded, we launch it and wait for the installation process to begin. We must assign a username and password. Now, let’s get to work!
Step 1. Install Apache.
From this moment on, the whole installation will be done by means of commands. Don’t worry if you don’t feel comfortable, you just have to copy textually the commands that we will indicate. In order to install Apache you just type in Ubuntu:
sudo apt-get install apache2
Enter your password and then yes, enter your password and then yes to start and confirm the installation. To ensure the effective functioning of Owncloud, we need to enable the following Apache modules.
sudo a2enmod rewrite
sudo a2enmod headers
sudo a2enmod env
sudo a2enmod dir
sudo a2enmod mime
After adding the modules restart the Apache server using the command:
sudo service apache2 restart
Once the service is restarted, a window with the firewall warning will appear. We need to allow access.
Now let’s test the functioning of apache. In addition, go to the address bar of the browser and type http://localhost/ or our IP address, in my case http://192.168.1.58/
Step 2. Install MySql.
Next, we will install the necessary software to create our database. To do this, type the following command
sudo apt-get install mysql-server mysql-client
Step 3. Create a MySql database for Owncloud.
First, let’s stop and restart MySql.
sudo /etc/init.d/mysql stop
sudo /etc/init.d/mysql start
In like manner, we will create a MySql database and give it a name.
sudo mysql
We will create a database and give it the name we want, in my case I will use googez.
CREATE DATABASE googez;
At this point, we will create a username and password for our database. In this case, I will use rogerjpm as a user, and yo160882 as a password. Remember that you can use the values you want.
GRANT ALL ON googez.* to 'rogerjpm'@'localhost' IDENTIFIED BY 'yo160882';
Immediately, assign flush privileges operations by typing the next command:
FLUSH PRIVILEGES;
Finally, exit the MySql by using the command:
exit
Step 4. Install PHP
Please note that Owncloud is compatible with PHP 7.1. Consequently, we are going to install this version, for that purpose, we will write the following commands:
sudo apt-get install software-properties-common
sudo add-apt-repository ppa:ondrej/php
sudo apt update
sudo apt install php7.1
Step 5. Download and install Owncloud on Windows 10
At this point, we must download and unzip the version of Owncloud that we are going to use. In this case 10.0.03. With this in mind, just run the commands below to download using the command line terminal. and extract Owncloud files into its root directory. Please note, if the unzip command is not installed, the system will ask you to install it.
cd /tmp && wget https://download.owncloud.org/community/owncloud-10.0.3.zip
unzip owncloud-10.0.3.zip
sudo mv owncloud /var/www/html/owncloud/
Once this is done, we have to assign the correct permissions for owncloud to work properly.
sudo chown -R www-data:www-data /var/www/html/owncloud/
sudo chmod -R 755 /var/www/html/owncloud/
Step 6. Configuring Apache by creating a file for Owncloud on Windows 10
Now let’s create a file in Apache that will control the operation of Owncloud. Now let’s create a file in Apache that will control the operation of Owncloud. For practical purposes, we will name it owncloud.conf
sudo nano /etc/apache2/sites-available/owncloud.conf
Add the following lines to the newly created file, place it in the root directory, press Crtl +O to write the files and then CTRL+X to save and exit
Alias /owncloud "/var/www/owncloud/"

<Directory /var/www/owncloud/>
Options +FollowSymlinks AllowOverride All
<IfModule mod_dav.c> Dav off </IfModule>

SetEnv HOME /var/www/owncloud
SetEnv HTTP_HOME /var/www/owncloud

</Directory>
Now, once we have all the services installed, we have to create a symbolic link between Apache and owncloud. To do this, we write:
ln -s /etc/apache2/sites-available/owncloud.conf /etc/apache2/sites-enabled/owncloud.conf
Step 7. Running Owncloud on Windows 10
To start the owncloud server, we write in the browser http://localhost/owncloud. It will open the first configuration, and we must enter our username and password for the site. Also, we must enter the username and password for the database.
Once we have completed the work, we will see a board with the files, and various configurations. And now we’re ready to share files safely.
So, now you know how to install Owncloud on Windows 10. Hope you like it.
— Advertisement —
Everything Linux, A.I, IT News, DataOps, Open Source and more delivered right to you.
Subscribe
«The best Linux newsletter on the web»
Owncloud server is an open source cloud storage solution with multimedia playback and file sharing capabilities. Owncloud server can be installed on the Linux platform without problems, providing consistent performance and stability for the system. However, users familiar with Windows operating systems will want to install Owncloud server with Windows’ IIS web server or third-party software such as XAMMP or WAMP server.
In this guide, TipsMake.com will not use any of them to install Owncloud server on Windows 10, as well as any kind of virtual machine software like Virtualbox or VMware. Instead of the traditional method, the article will use Windows subsystem for Linux (WSL) for better performance and stability. The Linux environment application that the article will use is Ubuntu. The latest version of Owncloud while this tutorial is Owncloud 10.1.0. Let’s learn how to do it!
Installing Owncloud server on Windows 10 via Ubuntu
- Step 1: Activate Windows subsystem for Linux (WSL)
- Step 2: Install Ubuntu 18.04 Linux application
- Step 3: Install Apache, MySql / MariaDB plus PHP on Windows 10
- Step 4: Check the installation of Windows 10 Apache
- Step 5: Download Owncloud server through the repository on the command line
- Step 6: Create Owncloud configuration file for Apache
- Step 7: Create symbolic link (symlink) for Owncloud
- Step 8: Install additional modules
- Step 9: Create MySQL or MariaDB database for Owncloud
- Step 10: Install, set up and configure Owncloud server on Windows 10
- Step 11: Login to Owncloud server
Step 1: Activate Windows subsystem for Linux (WSL)
To enable Windows subsystem for Linux on Windows 10, go to the Search box , enter Turn Windows feature on or off , click when it appears and turn on the WSL (Windows subsystem for Linux) feature: For more information about This, please refer to the article: Running Linux on Windows 10 without a virtual machine, here are 18 things you should know.
Step 2: Install Ubuntu 18.04 Linux application
From the Windows 10 search box or from the program list, look for Microsoft Store. When the Microsoft Store opens, search for Ubuntu 18 to download and install. After installation, click the Launch button , reopen the command screen or bash Ubuntu, from which you can use all Ubuntu commands, except for some direct commands on Windows 10.

Step 3: Install Apache, MySql / MariaDB plus PHP on Windows 10
Before installing Owncloud 10.1.0. We need to set up a web server environment that is basically LAMP setup. This is the command you need to execute to install Apache, PHP and MariaDB. Copy and paste the command below by right-clicking and then pressing Enter .
sudo apt-get install apache2 mariadb-server libapache2-mod-php7.2 sudo apt-get install php7.2-gd php7.2-json php7.2-mysql php7.2-curl php7.2-mbstring sudo apt-get install php7.2-intl php-imagick php7.2-xml php7.2-zip

Step 4: Check the installation of Windows 10 Apache
To check if the Apache server is working, visit the Windows 10 browser and enter http:/// localhost /, http://127.0.0.1/ or the IP address of your Windows 10 local computer. You can find the IP address by typing ifconfig. When you enter the IP address, the Apache test page will open. That means everything is fine and it’s time to move on to the next step.

Step 5: Download Owncloud server through the repository on the command line
You can download Owncloud archive directly from its website but here, for example, is using the command line, so it would be reasonable to use the command line tool to download the Owncloud server file.
sudo -i wget -nv https://download.owncloud.org/download/repositories/production/Ubuntu_18.04/ Release.key -O Release.key apt-key add - < Release.key echo 'deb http://download.owncloud.org/download/repositories /production/Ubuntu_18.04/ /' > /etc/apt/sources.list.d/owncloud.list apt-get update apt-get install owncloud-files
The above commands will automatically download and extract Owncloud files in the Apache directory .
Step 6: Create Owncloud configuration file for Apache
Now, create a configuration file Owncloud using the following command:
nano /etc/apache2/sites-available/owncloud.conf
And then add the following lines to the configuration file to point the Apache root directory to Owncloud.
Alias /owncloud "/var/www/owncloud/" Options +FollowSymlinks AllowOverride All Dav off SetEnv HOME /var/www/owncloud SetEnv HTTP_HOME /var/www/owncloud
After adding the above lines, press Ctrl + O to write the file, then press Ctrl + X to save and exit.

Step 7: Create symbolic link (symlink) for Owncloud
To ‘tell’ Apache about Owncloud configuration, we will create a reference or symbolic link with the following command:
ln -s /etc/apache2/sites-available/owncloud.conf /etc/apache2/sites-enabled/owncloud.conf
Step 8: Install additional modules
Adding these additional modules to Owncloud works better:
a2enmod headers a2enmod env a2enmod dir a2enmod mime a2enmod unique_id
After adding modules, restart the Apache server with the command:
sudo service apache2 restart
Step 9: Create MySQL or MariaDB database for Owncloud
First of all, stop and restart MySQL / MariaDB:
sudo /etc/init.d/mysql stop sudo /etc/init.d/mysql start
Now, create a MySQL user and database for Owncloud:
sudo mysql
The example is creating a database with the name ‘owncloud’. You can use some other names if you want.
CREATE DATABASE owncloud;
Now, create a user with a password and also assign all the rights of the database created above to that user. Here, the example is creating a user whose name and password is h2smedia. You can use your own username and password:
GRANT ALL ON owncloud.* to 'h2smedia'@'localhost' IDENTIFIED BY 'enter_your_password';
Flush privilege activity:
FLUSH PRIVILEGES;
Exit MySQL with the command:
exit

Step 10: Install, set up and configure Owncloud server on Windows 10
After repeating all the above steps, visit the browser and enter http:/// localhost /, http://127.0.0.1/ or the IP address of your Windows 10 local computer. Like what you did while checking whether Apache worked or not in this article.
However, this time you will see the configuration and setup screen of Owncloud server instead of the Apache screen.
Create an admin account for Windows 10 to install Owncloud. Just enter any user name and password for the same account you want to specify as an admin account.
Immediately after the admin account, you will see the storage option and the database. Click on it and select the MySQL / MariaDB tab . Then add the MySQL database details created above, ie the username and password for the database is owncloud in this case.
Finally, when you have provided all information to Owncloud, scroll down and click the Finish Setup button.

Step 11: Login to Owncloud server
After you click the Finish Setup button, Owncloud will take a few seconds to authenticate all the details provided and then give you a login page.
Log in to Owncloud server using the admin account you created above.
As you know, Owncloud also provides a client application that can be used on different operating systems to synchronize files between PC / smartphone and Owncloud server.
In the first screen that appears, click an operating system where you want to download the Owncloud client application.

In this way, readers can easily install Owncloud server on Windows 10 to achieve high performance and stability, without using any XAMMP or WAMP software.
Hope you are succesful.
ownCloud — это Свободное и открытое веб-приложение для синхронизации данных, расшаривания файлов и удалённого хранения документов в «облаке». Возможности
- Хранение файлов с использованием обычных структур каталогов, или с использованием WebDAV
- Криптография
- Синхронизация между клиентами под управлением Windows (Windows XP, Vista, 7 и 8), Mac OS X (10.6 и новее) или Linux
- Календарь (также как CalDAV)
- Планировщик задач
- Адресная книга (также как CardDAV)
- Потоковое мультимедиа (используется Ampache)
- Администрирование пользователей и групп (с использованием OpenID или LDAP)
- Расшаривание контента между группами или используя публичные URL
- Онлайн текстовый редактор с подсветкой синтаксиса и сворачиванием
- Закладки
- Механизм сокращения URL
- Фотогалерея
- Просмотрщик PDF (используется PDF.js)
- Просмотрщик ODF файлов (.odt, .odp, .ods)
- Модуль логирования
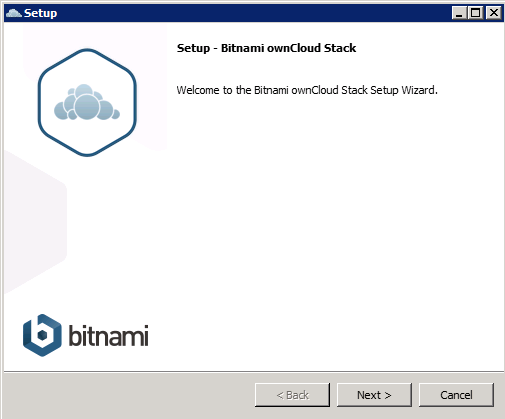
Установка Установку ownCloud я решил сильно упростить, используя готовый дистрибутив от Bitnami, в который интегрированы Apache и PHP. Скачиваем и запускаем установочный файл.
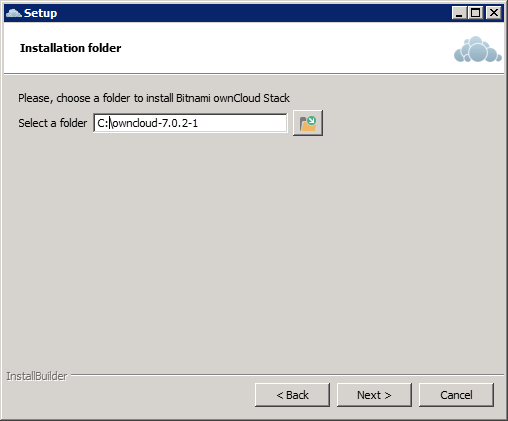
Выбираем папку для установки.
Создаем учетную запись администратора.

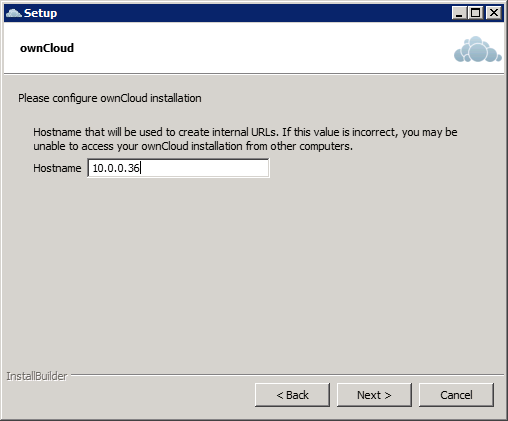
Указываем хост сервера. Я указал IP-адрес.
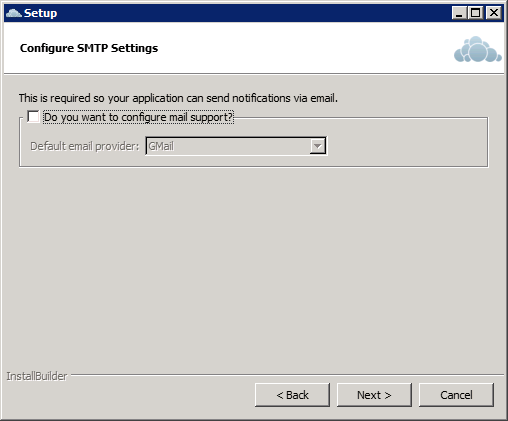
Настраиваем почту.Этот этап можно пропустить и настроить почту позже.
Пропускаем предложение посетить сайт Bitnami.
Все готово для установки, жмем Далее.
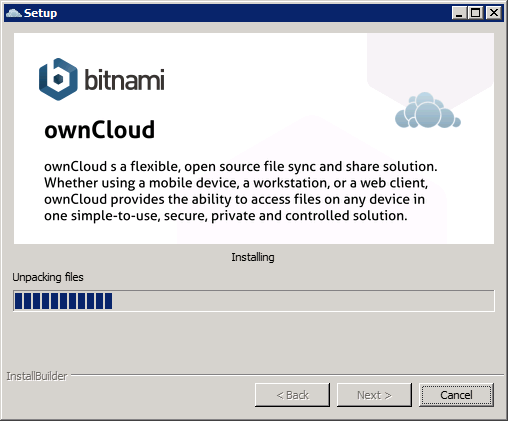
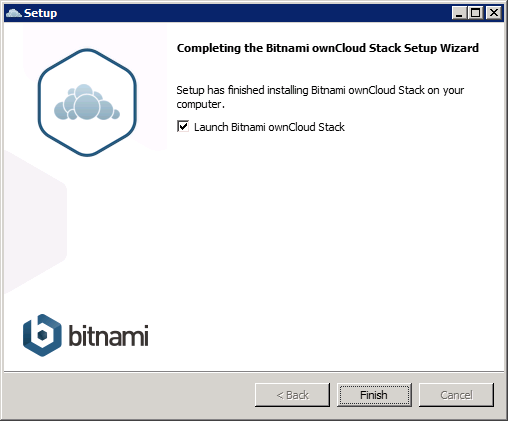
Ждем завершения установки.
После завершения установки запускаем Bitnami ownCloud Stack.
Настройка ownCloud. В Bitnami ownCloud Stack нажимаем Go To Application, в браузере открывается приветственная страница. Жмем ссылку «Access Bitnami ownCloud Stack».

Открывается окно входа в ownCloud.

Вводим регистрационные данные, указанные на этапе установки. Получаем полнофункциональный облачный сервис!

В верхнем меню слева выбираем Приложения.

У меня список приложений загружался почему-то очень долго. В нем выбираем LDAP User and Group backend и включаем приложение.

Далее заходим в Администрирование.

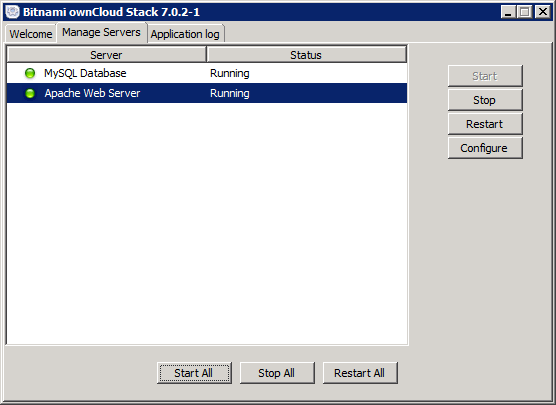
Опускаемся до LDAP-секции и видим сообщение, что модуль LDAp для PHP не установлен. Включаем (раскомментируем) в php.ini строку extension=php_ldap.dll. Не забываем перезапустить серверы в Bitnami ownCloud Stack на вкладке Manage Servers, чтобы изменения вступили в силу.
Настройка интеграции ownCloud с LDAP. Заходим под администраторской учетной записью в меню Администрирование. Проматываем вниз и ставим галочку напротив Enable LDAP Backend.

Далее возвращаемся к LDAP-секции и заполняем ее. Предварительно я создал пользователя owncloudaduser в контейнере Users. Ему не нужно членство в каких-то группах корме Domain Users. Пароль сделаем ему бессрочным. Во второе поле пишем содержимое атрибута distinguishedName из влкадки Редактора атрибутов. Она станет доступна в свойствах учетной записи, если в оснастке Active Directory Users and Computers в меню Вид (View) включить Дополнительные компоненты (Advanced Features).

На вкладке Login устанавливаем атрибут для входа. У меня это имя пользователя LDAP.

Далее на вкладке Дополнительно устанавливаем параметры подключения. Делаем нашу конфигурацию активной.

Заполняем настройки каталога.

Затем Специальные атрибуты. Важно заполнить поле mail, если вы планируете использовать уведомления по почте.

Не забываем Сохранить настройки. Возвращаемся на вкладку Пользователи. В качестве объектов я указал User, и сразу нашлось 1483 пользователя.

Вот и все, интеграция ownCloud с LDAP завершена.
Настройка почтовых уведомлений. В меню Администрирование устанавливаем следующие параметры.
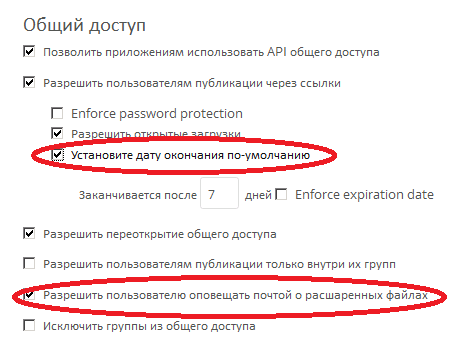
В личных настройках учетной записи администратора указываем почтовый адрес.

Настраиваем почтовый сервер. Если все правильно, то на адрес администратора придет тестовое сообщение.

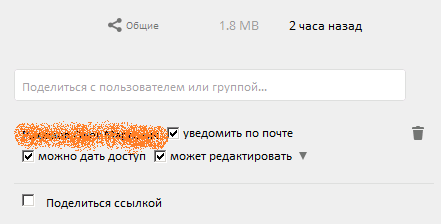
Выбираем пользователя, с которым хотим поделиться файлом, ставим галочку «уведомить по почте». Если все настроили верно, письмо уйдет пользователю от имени учетной записи человека, который делится файлом.