
- Windows
- MacOS
- Linux
- Android
- iOS
- ChromeOS
Connect to any compatible server
Connect to Access Server, CloudConnexa or any OpenVPN protocol-compatible server or service.
Superior Authentication
Supports 2FA and SAML authentication. Authenticate prior to profile download and connection.
Instant Connection
Easily import connection configuration by just opening a URL.
Frequently asked questions
How do I connect to OpenVPN?
In order to connect to the VPN server or service, you need to obtain a file that contains the specifics needed for the connection. Such a configuration file is called a profile and has an .ovpn file extension.
If your business is using Access Server or CloudConnexa and your IT department has provided you a URL, you can directly import the profile by entering the URL.
However, if you have received the profile as a file from your IT department or from some other OpenVPN compatible service, you can import the profile by selecting the file.
How do I connect if the OpenVPN client is integrated into my router?
In order to connect to the VPN server or service, you need to obtain a file that contains the specifics needed for the connection. Such a configuration file is called a profile and has an .ovpn file extension.
After receiving the .ovpn file from you IT department, you need to follow instructions specific to the router to extract specific information from the file and use it for configuration. We have made guides for some of the common firmware used in hardware routers and for pfSense:
pfSense
OpenWrt
DD-WRT
Our easy and secure VPN client is the best and fastest way to ensure your security online. The VPN client works on Windows 7 and newer.
Quick and simple installation
WireGuard & OpenVPN
Prevents DNS leaks
Optimizes your connectivity
Killswitch to prevent data leaks
Hassle-free 10-day money-back guarantee
Version 2.15.0 |
File size: 104.3 MB |
Released 2024-06-14
Requires Windows 7 SP2 or later |
Changelog
SHA256 (64-bit): 7cf8c191b8a4a1840856cd177007af76726652565ee924983af48fd393ad5e80
SHA256 (32-bit): 8a67aa98085f8fb9c1514f522960692207f8be47ffc0b705b82833a2c71904b6
SHA256 (ARM): 4326cf1f4176f35794a120a077b5dd87631e34424e338d13c4338e0475c58803
If you cannot use the OVPN app, you can use the official OpenVPN or WireGuard clients.
Securepoint OpenVPN 2.0.43
Security: OpenVPN update to version 2.6.12 and OpenSSL update to 3.0.15
Bugfix: Update of the deprecated OpenVPN option “—ns-cert-type” to “—remote-cert-tls”
Security Bugfix: Solved the issue of password remaining as cleartext in memory for some unknown amount of time (CWE 316 https://cwe.mitre.org/data/definitions/316.html)
Most cases are covered, but in some rare cases the password remains in memory for a short time, i.e. Windows / QT-Framework may store copies of the password in the memory. This is classified as a known issue.
Hint
Please read the important security changes in 2.0.33 release.
Important msi installer note!
If you do the install by using the msi installer it is all-important to specify the property CWINVERSION as msiexec argument which specify the windows version.
Two values are possible:
CWINVERSION=7
CWINVERSION=10
This property controls the installation of the tap driver. If no property is specified the tap driver for Windows 10 will be installed!
Example(en, Windows 7, executed in an administrative shell):
msiexec /qn /i openvpn-client-installer-2.0.43.msi TRANSFORMS=»:en-us.mst» CWINVERSION=7
For further examples please see the msi-installer-examples-2.0.43 file.
Securepoint OpenVPN 2.0.42
Security: Update to OpenSSL 3.0.13 and OpenVPN 2.6.10
Security: Update of TAP-driver to 9.27.0 (CVE-2024-1305)
Please Note: Windows 7 will no longer recive TAP-Driver updates as the support from microsoft and openvpn has ended
Hint
Please read the important security changes in 2.0.33 release.
Important msi installer note!
If you do the install by using the msi installer it is all-important to specify the property CWINVERSION as msiexec argument which specify the windows version.
Two values are possible:
CWINVERSION=7
CWINVERSION=10
This property controls the installation of the tap driver. If no property is specified the tap driver for Windows 10 will be installed!
Example(en, Windows 7, executed in an administrative shell):
msiexec /qn /i openvpn-client-installer-2.0.42.msi TRANSFORMS=»:en-us.mst» CWINVERSION=7
For further examples please see the msi-installer-examples-2.0.42 file.
Securepoint OpenVPN 2.0.41
Security: Update to OpenSSL 3.2.0 and OpenVPN 2.6.8
Bugfix: Reinstalling the client would delete all connections
Hint
Please read the important security changes in 2.0.33 release.
Important msi installer note!
If you do the install by using the msi installer it is all-important to specify the property CWINVERSION as msiexec argument which specify the windows version.
Two values are possible:
CWINVERSION=7
CWINVERSION=10
This property controls the installation of the tap driver. If no property is specified the tap driver for Windows 10 will be installed!
Example(en, Windows 7, executed in an administrative shell):
msiexec /qn /i openvpn-client-installer-2.0.41.msi TRANSFORMS=»:en-us.mst» CWINVERSION=7
For further examples please see the msi-installer-examples-2.0.41 file.
Securepoint OpenVPN 2.0.40
Security Bugfix: Bug fixed that could lead to extended privileges (local privilege escalation) when installing or repairing the ssl vpn client
Bugfix: The option «use interact» was not saved correctly
Hint
Please read the important security changes in 2.0.33 release.
Important msi installer note!
If you do the install by using the msi installer it is all-important to specify the property CWINVERSION as msiexec argument which specify the windows version.
Two values are possible:
CWINVERSION=7
CWINVERSION=10
This property controls the installation of the tap driver. If no property is specified the tap driver for Windows 10 will be installed!
Example(en, Windows 7, executed in an administrative shell):
msiexec /qn /i openvpn-client-installer-2.0.40.msi TRANSFORMS=»:en-us.mst» CWINVERSION=7
For further examples please see the msi-installer-examples-2.0.40 file.
Securepoint OpenVPN 2.0.39
Feature: Inline-Certificates are now supported in the Client
Bugfix: Usage of script-security for values 0 and 1 will not throw an error
Bugfix: If the start parameter «-noSave» is appended to the filename, (re-)enabling «Start on windows startup» will now add it to the startup-arguments
Security: OpenVPN 2.5.8 with OpenSSL 1.1.1t
Hint
Please read the important security changes in 2.0.33 release.
Important msi installer note!
If you do the install by using the msi installer it is all-important to specify the property CWINVERSION as msiexec argument which specify the windows version.
Two values are possible:
CWINVERSION=7
CWINVERSION=10
This property controls the installation of the tap driver. If no property is specified the tap driver for Windows 10 will be installed!
Example(en, Windows 7, executed in an administrative shell):
msiexec /qn /i openvpn-client-installer-2.0.39.msi TRANSFORMS=»:en-us.mst» CWINVERSION=7
For further examples please see the msi-installer-examples-2.0.39 file.
Securepoint OpenVPN 2.0.38
Feature: On startup the client will now check for a newer version and offer a direct download link
Feature: The msi-installer will now install windows 10 drivers by default
Hint
Please read the important security changes in 2.0.33 release.
Important msi installer note!
If you do the install by using the msi installer it is all-important to specify the property CWINVERSION as msiexec argument which specify the windows version.
Two values are possible:
CWINVERSION=7
CWINVERSION=10
This property controls the installation of the tap driver. If no property is specified the tap driver for Windows 10 will be installed!
Example(en, Windows 7, executed in an administrative shell):
msiexec /qn /i openvpn-client-installer-2.0.38.msi TRANSFORMS=»:en-us.mst» CWINVERSION=7
For further examples please see the msi-installer-examples-2.0.38 file.
Securepoint OpenVPN 2.0.36
Feature: The default target of the msi-file is now Windows 10 instead of Windows 7.
Maintenance: New code signing certificate
Hint
Please read the important security changes in 2.0.33 release.
Important msi installer note!
If you do the install by using the msi installer it is all-important to specify the property CWINVERSION as msiexec argument which specify the windows version.
Two values are possible:
CWINVERSION=7
CWINVERSION=10
This property controls the installation of the tap driver. If no property is specified the tap driver for Windows 10 will be installed!
Example(en, Windows 10):
msiexec /qn /i openvpn-client-installer-2.0.36.msi TRANSFORMS=»:en-us.mst» CWINVERSION=10
For further examples please see the msi-installer-examples-2.0.36 file.
Securepoint OpenVPN 2.0.37
Security: OpenSSL update (CVE-2022-0778)
Security: OpenVPN update (CVE-2022-0547)
Bugfix: Fixing import of utm roadwarrior configurations
Bugfix: Fixing import of ovpn-files with special characters
Bugfix: Fixing import of ovpn-files with tls-crypt keyword
Hint
Please read the important security changes in 2.0.33 release.
Important msi installer note!
If you do the install by using the msi installer it is all-important to specify the property CWINVERSION as msiexec argument which specify the windows version.
Two values are possible:
CWINVERSION=7
CWINVERSION=10
This property controls the installation of the tap driver. If no property is specified the tap driver for Windows 10 will be installed!
Example(en, Windows 10):
msiexec /qn /i openvpn-client-installer-2.0.37.msi TRANSFORMS=»:en-us.mst» CWINVERSION=10
For further examples please see the msi-installer-examples-2.0.37 file.
Securepoint OpenVPN 2.0.35
Security: OpenSSL config autoloading on Windows is disabled (CVE-2021-3606).
Security: OpenVPN 2.5.3 with custon security patch(no script-security > 1).
Hint
Please read the important security changes in 2.0.33 release.
Important msi installer note!
If you do the install by using the msi installer it is all-important to specify the property CWINVERSION as msiexec argument which specify the windows version.
Two values are possible:
CWINVERSION=7
CWINVERSION=10
This property controls the installation of the tap driver. If no property is specified the tap driver for Windows 7 will be installed!
Example(en, Windows 10):
msiexec /qn /i openvpn-client-installer-2.0.35.msi TRANSFORMS=»:en-us.mst» CWINVERSION=10
For further examples please see the msi-installer-examples-2.0.35 file.
Securepoint OpenVPN 2.0.34
Maintenance: Add new TAP driver for Windows 10.
Hint
Please read the important security changes in 2.0.33 release.
Important msi installer note!
If you do the install by using the msi installer it is all-important to specify the property CWINVERSION as msiexec argument which specify the windows version.
Two values are possible:
CWINVERSION=7
CWINVERSION=10
This property controls the installation of the tap driver. If no property is specified the tap driver for Windows 7 will be installed!
Example(en, Windows 10):
msiexec /qn /i openvpn-client-installer-2.0.34.msi TRANSFORMS=»:en-us.mst» CWINVERSION=10
For further examples please see the msi-installer-examples-2.0.34 file.
In this tutorial, we will demonstrate how to install the OpenVPN client on Windows and we will also show you how to configure the OpenVPN client.
We will use a lab scenario to allow the reader to learn and replicate what is presented in this tutorial. In addition, we explain during the tutorial what should be changed for a real production scenario.
Table Of Contents
- Installing the OpenVPN client
- Downloading the client OVPN file (Optional)
- Editing the OVPN file
- Adding an Alternate DNS
- Running the OpenVPN Client
- Testing the OpenVPN Client
- See more:
We’re assuming you already have an OpenVPN server installed. If not, we have an Install OpenVPN Server tutorial:
Installing the OpenVPN client
Initially we go to the OpenVPN page and we are going to download the openvpn client installer. For that we will type the link below.
After downloading the OpenVPN client installer, let’s run the file we just downloaded. To do this, let’s double-click with the mouse.
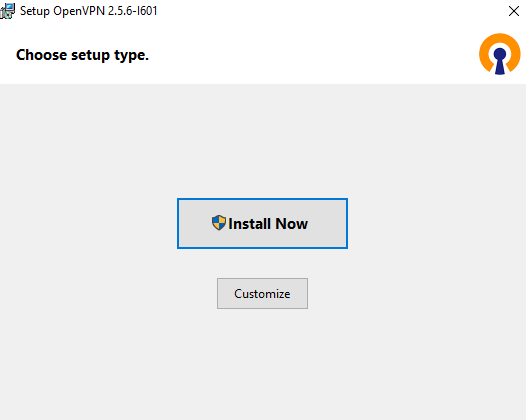
Then the screen below will appear. Let’s click on “Install Now”.
After that, let’s give the OpenVPN installer permission to access the disk.
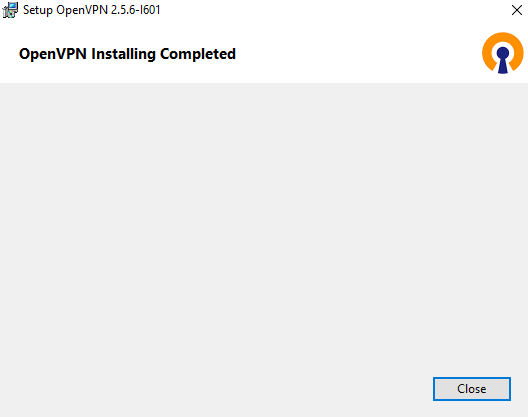
After the installation we can see the message below. So, let’s click on “Close”.
Downloading the client OVPN file (Optional)
Now let’s get the client configuration file. There are several ways to do this. In this tutorial, we are going to get the client file using SFTP. However, you can send it by email, flash drive…
To download via SFTP, let’s connect to the server. For this, we need to know the IP of the OpenVPN server. In our case the OpenVPN server has the IP 192.168.11.2. However, check your OpenVPN server IP.
Also, if you are already using OpenVPN in a production environment, the OpenVPN server IP will likely be a public IP.
To access the OpenVPN server with SFTP, click on the start menu and click on run and then type cmd.
You now have a terminal. In this terminal, type the command below:
sftp [email protected] The command consists of the application that we are going to use, in this case it is “sftp”. Next we have the OpenVPN server user, in this case our user is “networks”.
After that we have to inform the address of the OpenVPN server. In our example, this address is “@192.168.11.2”.
After that, you will enter the password of the user of the machine that has the OpenVPN server.
Now, let’s go to the directory where our user’s “OVPN” file is stored. In our case our client user Alice’s files are stored. For this we will use the command “cd /home/redes/vpn_clients/alice/”.
Remember to use the directory where you stored your Openvpn client files.
cd /home/redes/vpn_clients/alice/ 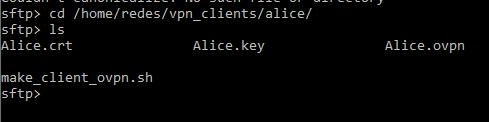
Now let’s use the “get” command to download the “Alice.ovpn” file.
get Alice.ovpn The figure below shows the Alice.ovpn file being copied to the Windows machine.

Editing the OVPN file
Now, let’s edit the client’s ovpn file. In this case, let’s change the server IP and uncomment the lines below.
After the change, the lines will look like this:
user nobody group nobody Now let’s change the OpenVPN server IP. For this, we need to check the IP of our OpenVPN server. In our case, we are accessing within an internal network and the OpenVPN server IP is “192.168.11.2”.
However, you will likely have a public IP from your OpenVPN server or the public IP from your edge router that port forwards to your OpenVPN server.
remote 192.168.11.2 Adding an Alternate DNS
If you have not specified a DNS server for your VPN interface. You can insert in the client file the option “dhcp-option DNS”. This command line allows the client to use the DNS specified in the OpenVPN client configuration. In our case, we are using a google DNS “8.8.8.8”. You can choose the DNS that best suits your purposes.
dhcp-option DNS 8.8.8.8 Running the OpenVPN Client
Now let’s run the OpenVPN application.
Once started, go to the lower right corner and right-click on the link with the symbol in the figure below.
By clicking with the right mouse button, we will see the “Import” option. So, let’s click on “Import” and let’s choose the location where we save the client’s OVPN file.
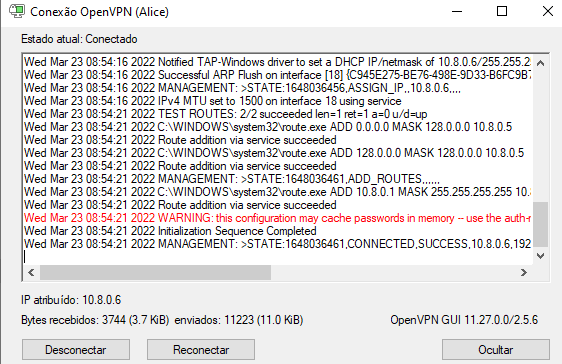
After importing the OpenVPN client file, we can right-click the OpenVPN icon and click “Connect”. Then OpenVPN will start creating the tunnel.
Testing the OpenVPN Client
To test the OpenVPn client on Windows, you can browse the Internet or use the windows tracert command. This command, tracert, is the same as the linux traceroute command.
So the tracert command will allow you to check the hops to the host you are searching for.
In our case, the first hop is the OpenVPN connection and then it goes to the default Gateway of the OpenVPN server. In this way, we have proof that the customer is using the VPN satisfactorily.
tracert www.google.com 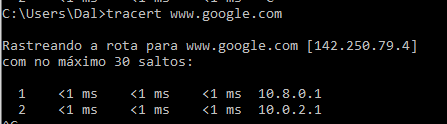
See more:
- Install Open VPN on Linux
- Install OpenVPN Client on Windows
- Update OpenVPN Client on Linux
- Install and Configure OpenVPN Server on PfSense
- OpenVPN and PfSense Site to Site
- Access Internet through site to site VPN

Juliana Mascarenhas
Data Scientist and Master in Computer Modeling by LNCC.
Computer Engineer
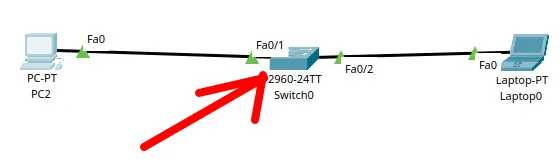
How to Create a Network with a Switch in Packet Tracer – Step-by-Step Guide for Beginners
In this practical tutorial, I will show you how to create a simple switch network…
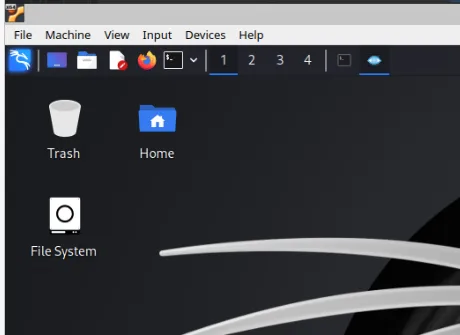
Why use Kali Linux inside VirtualBox?
In this article, we will see the main reasons for considering the use of Kali…
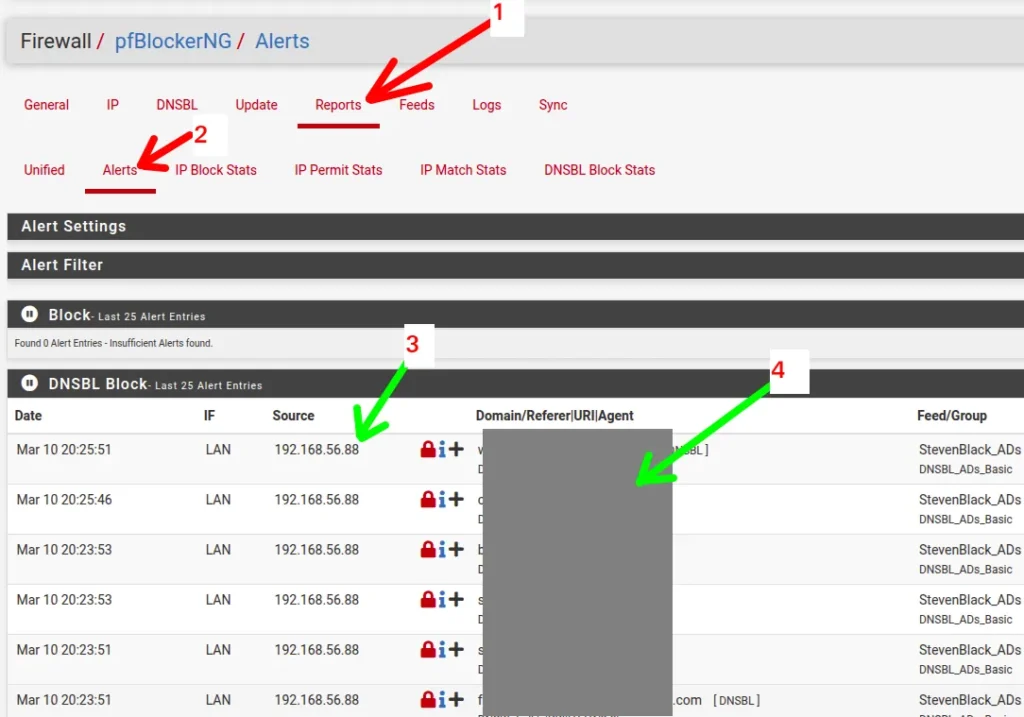
How to install pfBlocker on pfSense: step by step guide
Today we will learn how to install pfBLocker NG in PFSense. pfBLocker is an excellent…
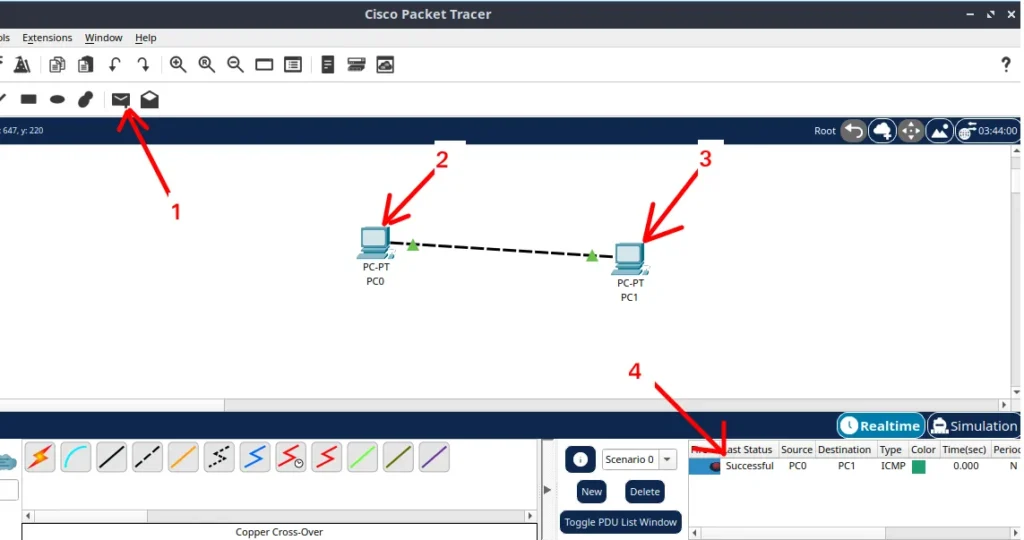
Packet Tracer for Dummies: Setting Up Your First Network with 2 PCs (Quick Start Guide)
Are you ready to take the first step into the fascinating world of computer networks?…
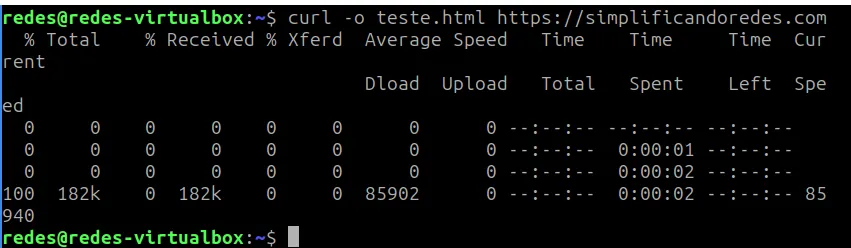
Learn how to use the curl command: tutorial with practical examples
Today we are going to learn about the curl command in Linux! This command is…

How to Install Kali Linux on VirtualBox: Step-by-Step Guide for Beginners
Welcome to the ultimate guide for beginners who want to learn how to install Kali…
Обновлено:
Опубликовано:
Тематические термины: OpenVPN, VPN, Windows, Linux, CentOS, Ubuntu
В данной инструкции подробно описан процесс настройки клиента OpenVPN на примере операционных систем Windows и Linux. Также, с ее помощью можно настроить скиента на Android.
Установка
Настройка
Пример конфигурационного файла
Ключи
Сертификаты
Запуск
Несколько конфигураций
Сертификаты внутри ovpn файла
Отзыв сертификата
Читайте также
Установка
Windows
Заходим на официальную страницу загрузки openvpn и скачиваем клиента для нужной Windows:

Запускаем скачанный файл и устанавливаем программу, нажимая «Далее».
Linux CentOS
Устанавливаем репозиторий EPEL:
yum install epel-release
Устанавливаем openvpn:
yum install openvpn
Linux Ubuntu
apt update
apt install openvpn
Android
Установка выполняется из Google Play. Набираем в поиске OpenVPN Connect — нажимаем установить и принимаем условия.
Настройка
После установки программы конфигурационный файл не создается автоматически и его нужно создать вручную.
В системах Windows создаем файл config.ovpn в папке %programfiles%\OpenVPN\config.
* имя файла может быть любым, расширение должно быть .ovpn.
Для создания конфигурационного файла в Linux выполняем команду:
vi /etc/openvpn/client.conf
* чтобы служба openvpn автоматически выполняла соединение, необходимо, чтобы конфигурационный файл назывался client.conf.
Пример конфигурационного файла
client
dev tun
proto udp
remote 192.168.0.15 443
resolv-retry infinite
nobind
persist-key
persist-tun
ca ca.crt
cert client.crt
key client.key
dh dh2048.pem
tls-client
tls-auth ta.key 1
float
keepalive 10 120
comp-lzo
verb 0
Параметры конфигурационного файла
| Параметр | Значения | Описание |
|---|---|---|
| client | Строка говорит о том, что конфигурационный файл описывает клиентское подключение (программа сама устанавливает соединение, а не ждет, как сервер). | |
| dev | tap или tun | Выбор виртуального сетевого драйвера. TUN — сетевой уровень модели OSI, оперирует IP-пакетами. TAP — эмулирует Ethernet устройство и работает на канальном уровне модели OSI, оперируя кадрами Ethernet. Настраивая OpenVPN клиента, в большинстве случаев, необходимо выбирать tun. TAP необходимо использовать для работы определенных сервисов, например DHCP. |
| dev-node | любая строка | Параметр используется в системах Windows в случаях, если имеется несколько сетевых интерфейсов. Значение этого параметра должно содержать название сетевого подключения, через который должен работать OpenVPN. |
| proto | udp или tcp | Указывает, какой протокол использовать для передачи данных. В большинстве случаев, лучше использовать UDP, так как данный протокол создает меньше нагрузки на сеть. |
| remote | VPN-сервер и порт | Задает сервер, к которому должен подключаться клиент, а также сетевой порт (по умолчанию 1194), на котором OpenVPN принимает запросы. Можно указать несколько строк. |
| remote-random | Если указано несколько строк remote, данный параметр говорит, что необходимо подключаться к удаленным серверам в случайном порядке. | |
| resolv-retry | количество секунд или infinite | Используется в тех случаях, когда в качестве сервера указано доменное имя. Параметр задает время в секундах для повторного переподключения, если не удалось узнать имя сервера. infinite — держать связь с сервером постоянно. |
| nobind | Клиент использует динамический порт для подключения. | |
| user | учетная запись | Задает определенного пользователя для работы клиента (только для UNIX-систем). |
| group | группа | Задает определенную группу для работы клиента (только для UNIX-систем). |
| persist-key | Не перечитывает ключи при перезагрузке сервиса OpenVPN. | |
| persist-tun | Не перечитывает параметры туннеля при перезагрузке сервиса OpenVPN. | |
| http-proxy | сервер прокси и порт | Использовать прокси-сервер для подключения. |
| http-proxy-retry | Переподключаться к прокси-серверу, если связь была разорвана. | |
| http-proxy-timeout | количество секунд | Время, через которое выполнять попытки переподключения к прокси-серверу. |
| mute-replay-warnings | Параметр стоит задавать при использовании беспроводного соединения. Он отключит дублирование предупреждений пакетов. | |
| ca | пут к сертификату | Корневой сертификат удостоверяющего центра. Генерируем на сервере. |
| cert | пут к сертификату | Открытый ключ клиента. Генерируем на сервере. |
| key | пут к сертификату | Закрытый ключ клиента. Генерируем на сервере. |
| dh | пут к сертификату | Ключ с алгоритмом Diffie-Hellman (Диффи-Хеллмана). |
| remote-cert-tls | сервер | Исключает возможность mitm атаки, включая верификацию сертификата сервера. |
| tls-client | Указание на то, что это клиент TLS. | |
| tls-auth | ta.key 1 | Дополнительный уровень аутентификации посредством ключа TLS. |
| float | Удаленный хост может менять IP-адрес в процессе соединения, при этом последнее не будет разорвано. | |
| keepalive | секунд1 секунд2 | Пинговать каждые секунд1 сервер и если в течение секунд2 не будут получены ответные пакеты, перезапустить подключение. |
| cipher | алгоритм | Указывает алгоритм шифрования. Примеры: AES-256-CBC, AES-128-CBC, BF-CBC, DES-EDE3-CBC. |
| comp-lzo | Использовать сжатие. | |
| verb | число от 0 до 9 | Уровень детализации лога. 0 отключает отладочную информацию. |
| mute | число | Указывает сколько лог-сообщений может отображаться для каждой категории события. |
| auth-user-pass | ничего или путь к файлу | Говорит клиенту, что необходима аутентификация. Если не указан путь к файлу, клиент выкинет окно для авторизации, иначе прочитает данные из файла. |
| ipchange | команда или путь к скрипту | Выполняет команду при смене IP. |
| connect-retry | секунд | Переподключиться к серверу через указанное количество секунд, если соединение было разорвано. |
| connect-retry-max | число | Сколько раз повторять соединение, если оно было разорвано. |
| shaper | байт | Задает максимальную скорость передачи данных для исходящего трафика. |
| tun-mtu | число | Задает MTU. |
| status | путь к файлу | Путь к фалу хранения статуса. |
| log | путь к файлу | Путь к лог-файлу. |
| askpass | путь к файлу | Путь к файлу с паролем для приватного ключа (private key password). |
Наиболее полный и актуальный список параметров для OpenVPN можно получить командой openvpn —help (в Linux и Windows).
Сертификаты
Клиентские сертификаты генерируются на стороне сервера. Процедура следующая.
Для Linux:
cd /etc/openvpn/easy-rsa
. ./vars
./build-key client
Для Windows:
cd %ProgramFiles%\OpenVPN\easy-rsa
vars.bat
build-key.bat client
* в выше приведенных примерах был сгенерирован клиентский сертификат client.
Сгенерированные ключи появятся в каталоге keys. Их необходимо скопировать на клиентский компьютер вместе с сертификатами сервера и разместить по каталогам, указанным в конфигурационном файле. В нашем примере они должны быть скопированы в ту же папку, в которой находится сам файл конфигурации.
В итоге мы получаем, примерно, следующее.
Для Windows:

Для Linux:
ls /etc/openvpn/client/
ca.crt client.crt client.key client.conf dh2048.pem ta.key
Запуск
Для проверки можно запустить клиента вручную. Но для повседневного использования стоит настроить автоматический запуск.
Вручную
На Windows:
Запускаем OpenVPN GUI от имени администратора — в правом нижнем углу появится иконка программы:
Кликаем по ней правой кнопкой мыши и выбираем Подключиться:
На Linux:
Переходим в каталог с конфигурационным файлом:
cd /etc/openvpn
Вводим команду:
openvpn —config /etc/openvpn/client.conf
или:
systemctl start openvpn@client
* также служба может называться openvpn.
Автоматически
На Windows:
Выполняем 2 действия.
1. Наш конфигурационный файл с сертификатами переносим из каталога config в каталог config-auto:
* в старых версиях клиента каталога config-auto нет — тогда оставляем файлы в config.
2. Открываем службы и находим OpenVPNService. Переводим его в режим автозапуска:
На Linux:
Разрешаем автозапуск службы:
systemctl enable openvpn@client
или для старых версий.
CentOS / Red Hat / Fedora:
chkconfig openvpn on
Ubuntu / Debian:
update-rc.d openvpn defaults
Несколько конфигурационных файлов
Позволит держать несколько конфигураций для подключения к различным VPN-серверам. Между последними можно переключаться из клиентской программы.
Для Windows:
В каталоге config создаем для каждого сервера свою папку и помещаем в нее рабочие файлы (файл конфигурации, сертификаты и так далее). В каждой папке называем конфигурационные файлы ovpn своими именами (даже если файлы будут находиться в разных папках, но с одинаковыми именами, клиент OpenVPN будет воспринимать их как один конфиг).
Пример каталога config:
Пример файлов в одном из каталогов:

Теперь при подключении клиентом к можно выбрать конкретный VPN-сервер:

Для Linux:
Также как для Windows, создаем для каждого сервера свой каталог, куда скопируем рабочие файлы:
mkdir /etc/openvpn/server1
А в каталоге /etc/openvpn создаем для каждого подключения свой конфиг:
vi /etc/openvpn/client1.conf
* в конфигурационном файле все пути до файлов должны вести в соответствующий каталог (в нашем примере, /etc/openvpn/server1).
Запускаем OpenVPN:
openvpn —config /etc/openvpn/server1/client.conf
Для автоматического запуска мы уже ранее применяли команду:
systemctl enable openvpn@client
… где @client — указатель на использование конфигурационного файла client внутри папки openvpn (/etc/openvpn). Таким образом, если мы создали 2 файла client1.conf и client2.conf, команды для разрешения автозапуска бelen такие:
systemctl enable openvpn@client1
systemctl enable openvpn@client2
Сертификаты внутри конфигурационного файла
Ключи сертификатов можно хранить не в отдельных файлах, а внутри конфигурационного файла ovpn.
<ca>
——BEGIN CERTIFICATE——
…
——END CERTIFICATE——
</ca>
<tls-auth>
——BEGIN OpenVPN Static key V1——
…
——END OpenVPN Static key V1——
</tls-auth>
<cert>
——BEGIN CERTIFICATE——
…
——END CERTIFICATE——
</cert>
<key>
——BEGIN PRIVATE KEY——
…
——END PRIVATE KEY——
</key>
<dh>
——BEGIN DH PARAMETERS——
…
——END DH PARAMETERS——
</dh>
* key-direction 1 — необходим для tls-auth, в противном случае, работать не будет; ca — ключ центра сертификации (ca.crt); tls-auth — ta.key; cert — открытый сертификат клиента (clients.crt); key — закрытый сертификат клиента (clients.key); dh — сертификат, созданный на базе протокола Диффи Хеллмана.
Отзыв сертификата
Для Linux:
cd /etc/openvpn/easy-rsa
. ./vars
./revoke-full client
Для Windows:
cd %ProgramFiles%\OpenVPN\easy-rsa
vars.bat
revoke-full.bat client
* с помощью данных манипуляций мы отзываем сертификат client.
Читайте также
Настройка OpenVPN сервера с включением аутентификации через LDAP (Active Directory)
Настройка доступа к локальной сети клиентам OpenVPN в CentOS 7