
Revoking a certificate means to invalidate a previously signed certificate so that it can no longer be used for authentication purposes.
Typical reasons for wanting to revoke a certificate include:
- The private key associated with the certificate is compromised or stolen.
- The user of an encrypted private key forgets the password on the key.
- You want to terminate a VPN user’s access.
Example
As an example, we will revoke the client2 certificate, which we generated above in the «key generation» section of the HOW TO
First open up a shell or command prompt window and cd to the easy-rsa directory as you did in the «key generation» section above. On Linux/BSD/Unix:
. ./vars
./revoke-full client2
On Windows:
vars
revoke-full client2
You should see output similar to this:
Using configuration from /root/openvpn/20/openvpn/tmp/easy-rsa/openssl.cnf
DEBUG[load_index]: unique_subject = "yes"
Revoking Certificate 04.
Data Base Updated
Using configuration from /root/openvpn/20/openvpn/tmp/easy-rsa/openssl.cnf
DEBUG[load_index]: unique_subject = "yes"
client2.crt: /C=KG/ST=NA/O=OpenVPN-TEST/CN=client2/emailAddress=me@myhost.mydomain
error 23 at 0 depth lookup:certificate revoked
Note the «error 23» in the last line. That is what you want to see, as it indicates that a certificate verification of the revoked certificate failed.
The revoke-full script will generate a CRL (certificate revocation list) file called crl.pem in the keyssubdirectory. The file should be copied to a directory where the OpenVPN server can access it, then CRL verification should be enabled in the server configuration:
crl-verify crl.pem
Now all connecting clients will have their client certificates verified against the CRL, and any positive match will result in the connection being dropped.
CRL Notes
When the crl-verify option is used in OpenVPN, the CRL file will be re-read any time a new client connects or an existing client renegotiates the SSL/TLS connection (by default once per hour). This means that you can update the CRL file while the OpenVPN server daemon is running, and have the new CRL take effect immediately for newly connecting clients. If the client whose certificate you are revoking is already connected, you can restart the server via a signal (SIGUSR1 or SIGHUP) and flush all clients, or you can telnet to the management interface and explicitly kill the specific client instance object on the server without disturbing other clients.
While the crl-verify directive can be used on both the OpenVPN server and clients, it is generally unnecessary to distribute a CRL file to clients unless a server certificate has been revoked. Clients don’t need to know about other client certificates which have been revoked because clients shouldn’t be accepting direct connections from other clients in the first place.
The CRL file is not secret, and should be made world-readable so that the OpenVPN daemon can read it after root privileges have been dropped.
If you are using the chroot directive, make sure to put a copy of the CRL file in the chroot directory, since unlike most other files which OpenVPN reads, the CRL file will be read after the chroot call is executed, not before.
A common reason why certificates need to be revoked is that the user encrypts their private key with a password, then forgets the password. By revoking the original certificate, it is possible to generate a new certificate/key pair with the user’s original common name.
Система клиентского доступа в OpenVPN построена вокруг инфраструктуры открытых ключей (PKI) и основным средством идентификации пользователя является сертификат. Располагая действительным сертификатом клиент может подключиться к любому серверу, использующему сертификаты вашего центра сертификации (CA). Если доступ пользователя необходимо прекратить, то выданный ему сертификат следует отозвать. В данной статье мы рассмотрим процесс отзыва сертификатов для различных версий Easy-RSA на платформах Windows и Linux, а также настройку OpenVPN севера для проверки сертификатов на отзыв.
Онлайн-курс по устройству компьютерных сетей
На углубленном курсе «Архитектура современных компьютерных сетей» вы с нуля научитесь работать с Wireshark и «под микроскопом» изучите работу сетевых протоколов. На протяжении курса надо будет выполнить более пятидесяти лабораторных работ в Wireshark.
Easy-RSA 2 Linux
Вторая версия Easy-RSA наиболее часто используется совместно с OpenVPN, так как входит в состав большинства актуальных на данный момент дистритбутивов. В нашем случае будет рассматриваться Ubuntu 18.04, но серьезных отличий с иными Linux системами нет, так как Easy-RSA это просто набор скриптов, облегачающий работу с OpenSSL.
Обычно корневая директория PKI находится в каталоге настроек OpenVPN — /etc/openvpn/easy-rsa, здесь и далее примем такое расположение как умолчание. Прежде чем выполнять отзыв, Easy-RSA потребуется немного настроить, откройте файл @openssl.conf и приведите к следующему виду строку:
RANDFILE = /etc/openvpn/easy-rsa/keys/.rndНиже найдите опцию, которая задает срок действия списка отозванных сертификатов, по умолчанию это 30 дней, после чего его нужно будет перевыпустить, имеет смысл установить более длительный срок:
default_crl_days= 30Сохраните изменения, после чего создайте указанный файл:
touch /etc/openvpn/easy-rsa/keys/.rndТеперь можно приступать к отзыву, для этих целей используется скрипт revoke-full. Перейдем в директорию Easy-RSA:
cd /etc/openvpn/easy-rsaЗагрузим переменные:
source ./varsИ выполним отзыв, для этого нам нужно знать CN (Commom Name) сертификата, в нашем случае это ivanov:
./revoke-full ivanov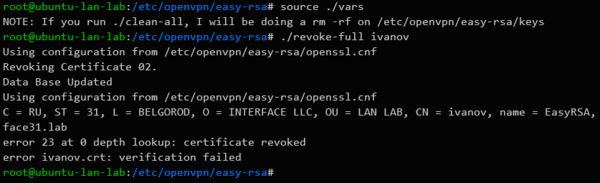
Сообщение:
error 23 at 0 depth lookup: certificate revokedне является ошибкой! Оно сообщает о том, что проверка сертификата не увенчалась успехом по причине его отзыва.
После выполнения данной команды впервые в каталоге /etc/openvpn/easy-rsa/keys появится файл crl.pem — список отозванных сертификатов. Данный файл будет обновляться после каждого успешного отзыва.
Easy-RSA 2 Windows
В Windows никаких дополнительных настроек производить не нужно, однако также рекомендуется увеличить срок действия CRL. Каталог Easy-RSA обычно располагается внутри каталога установки OpenVPN, по умолчанию это C:\Program Files\OpenVPN\easy-rsa. Для измненения срока действия откройте файл openssl-1.0.0.cnf и измените опцию, указав нужное количество дней:
default_crl_days= 30Затем перейдем в каталог Easy-RSA (так как он является системным, то командная строка должна быть запущена от имени Администратора):
cd "C:\Program Files\OpenVPN\easy-rsa"Загрузим переменные:
varsОтзовем сертификат:
revoke-full ivanov
Результатом выполнения команды также будет создание или обновление файла списка отозванных сертификатов — crl.pem.
Easy-RSA 3 Linux
Новая версия Easy-RSA пока не имеет широкого распространения и присутствует в ограниченном количестве новых дистрибутивов, в частности в Debian 10. Приемы работы с ней значительно отличаются от Easy-RSA 2 и мы посвящали этому отдельную статью, в которой рассматривали в том числе и отзыв сертификатов.
В Easy-RSA 3 для отзыва сертификатов и создания/обновления списка отозванных сертификатов предназначены разные команды, поэтому вы можете сформировать CRL заранее и подключить его к конфигурации OpenVPN не дожидаясь отзыва.
Будем также считать, что директория Easy-RSA расположена в /etc/openvpn/easy-rsa, сразу перейдем в нее:
cd /etc/openvpn/easy-rsaОткроем файл vars, найдем и раскомментируем в нем следующую опцию, которая задает срок действия CRL, по умолчанию установлено 180 дней, укажите нужное вам значение:
set_var EASYRSA_CRL_DAYS 180Затем сформируем список отозванных сертификатов:
./easyrsa gen-crlИтогом выполнения данной команды будет появление файла crl.pem в директории pki.
Для отзыва сертификата выполните (предварительно перейдя в директорию Easy-RSA):
./easyrsa revoke ivanovВ данном случае вам потребуется явно подтвердить отзыв, введя yes на запрос утилиты.
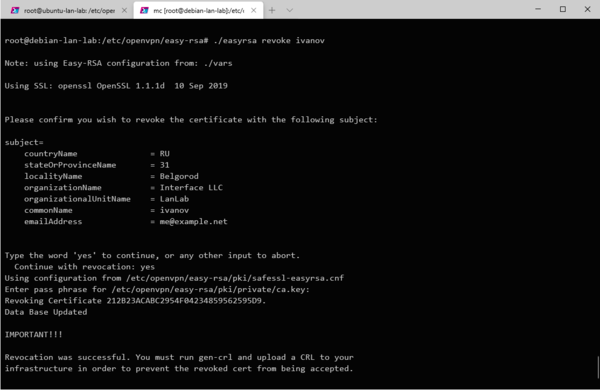
После отзыва сертификата вам потребуется обновить список CRL, для этого еще раз выполните:
./easyrsa gen-crlЕще раз напомним, что для отзыва сертификатов мы должны указать их CN, поэтому при их создании задавайте им осмысленные имена, чтобы потом не пришлось угадывать, как называется сертификат Иванова: client123, client231 или client321. Также помните о том, что отзыв сертификата — действие необратимое, даже если вы повторно выпустите сертификат с этим же именем (CN), это будет совсем другой сертификат, который придется заново выдать пользователю.
Настройка OpenVPN для работы со списком отозванных сертификатов (CRL)
После того, как вы создали или обновили CRL (файл crl.pem) его следует скопировать в директорию с ключами OpenVPN сервера, это действие следует повторять после каждого отзыва сертификата (и обновления файла crl.pem).
Затем откроем конфигурацию сервера OpenVPN и добавим туда директиву, отвечающую за проверку отозванных сертификатов. В Linux:
crl-verify keys/crl.pemВ данном случае подразумевается, что ключи и CRL находятся в директории /etc/openvpn/keys.
В Windows:
crl-verify "C:\\Program Files\\OpenVPN\\keys\\crl.pem" Здесь мы также подразумеваем расположение каталогов по умолчанию, если это не так, то пути следует отредактировать.
При обновлении списка отозванных сертификатов достаточно просто скопировать с заменой файл crl.pem, если серверов несколько, то это нужно сделать на каждом из них.
После чего обязательно перезапустите службу OpenVPN сервера. Это нужно сделать потому, что OpenVPN перечитывает CRL один раз в час и в течении этого времени клиенты с отозванными сертификатами смогут продолжать подключаться и работать. В Linuх для этого выполните:
service openvpn restartВ Windows воспользуйтесь штатной оснасткой Службы.
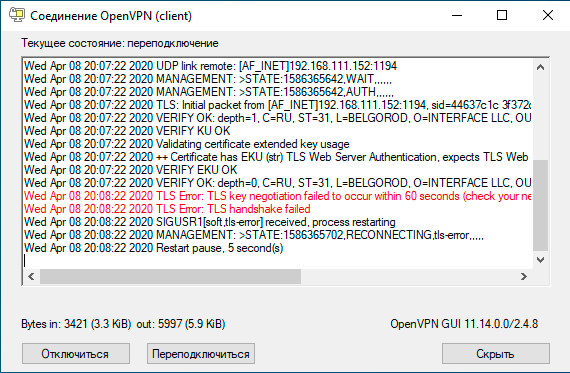
Для клиента с отозванным сертификатом процесс подключения будет «зависать» на этапе согласования ключей и через 60 секунд выдавать в лог сообщение:
TLS Error: TLS key negotiation failed to occur within 60 seconds (check your network connectivity)
TLS Error: TLS handshake failed
При этом клиент будет продолжать попытки подключения в соответствии со значениями опции keepalive. Если используется GUI, то клиент будет «вечно» висеть в желтом цвете.
Чтобы ограничить число переподключений используйте в конфигурации клиента опцию:
connect-retry-max 25Которая задает максимальное количество переподключений, в данном случае 25, однако вы должны указать ее заранее, передать на клиента с отозванным сертификатом вы ее не сможете. Мы рекомендуем всегда использовать эту опцию, когда вы настраиваете OpenVPN клиент на узлах, которые вы не контролируете, например, на домашних ПК или ноутбуках сотрудников.
Онлайн-курс по устройству компьютерных сетей
На углубленном курсе «Архитектура современных компьютерных сетей» вы с нуля научитесь работать с Wireshark и «под микроскопом» изучите работу сетевых протоколов. На протяжении курса надо будет выполнить более пятидесяти лабораторных работ в Wireshark.
OpenVPN используется для обеспечения шифрованного подключения дистанционных пользователей к удаленной сети. Штатной операцией является добавление новых пользователей и удаление старых. Осуществляется эта операция путем выдачи новых сертификатов для конкретного пользователя или отзыва старых сертификатов. Ниже рассмотрим оба этих механизма.
Создание сертификатов
- Заходим в директорию с OpenVPN
cd /etc/openvpn/keys-15500/easy-rsa/2.0
- Вводим команды:
. . /vars
. /build-key-pksc12 testovich
На появляющиеся запросы нажимаем Enter, соглашаемся, нажимая «Y».

Рисунок 1 – Результат создания нового сертификата
- Получаем результат: сертификат создан.
Отзыв сертификатов
- Заходим в директорию с OpenVPN
cd /etc/openvpn/keys-15500/easy-rsa/2.0
- Вводим команды:
. . /vars
./revoke-full testovich

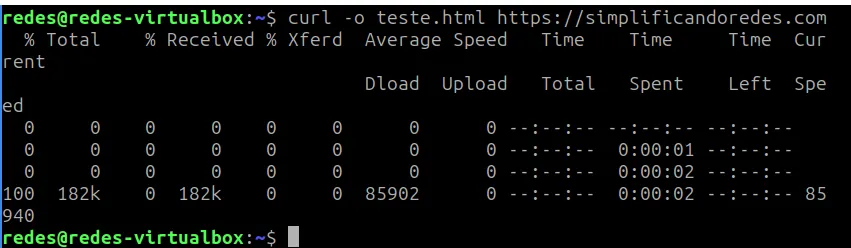
Рисунок 2 – Результат исполнения команды отзыва сертификата
- Ищем id процесса, вводом команду:
Htop
- Завершаем соответствующий процесс командой:
kill 23138
23138 = ID нужного нам процесса (PID)
Вы можете обратиться за помощью к нашим ИТ-специалистам, используйте любой удобный способ связи. Мы также готовы предложить комплексное ИТ-обслуживание.
This tutorial demonstrates in a practical way how to revoke a user’s certificate on the OpenVPN server.
It is very common, when we are dealing with corporate VPNs, for employees to leave the company and therefore should no longer have access to the VPN. Furthermore, a user may have forgotten their password or even have their private key exposed.
Therefore, it becomes a basic need in a company’s day-to-day life to know how to revoke a certificate correctly and precisely.
In this tutorial, we are using an OpenVPN server that is installed on a Linux machine. Additionally, as a proof of concept, we will use an OpenVPN client with an Alice user.
Also, we are using the same scenario that we used in the article:
Install Open VPN on Linux
Table Of Contents
- Revoking certificate in OpenVPN
- Generating the CRL (certificate revocation list)
- Copying the CRL (certificate revocation list) file
- Editing the OpenVPN configuration file
- Restarting the OpenVPN server
- Testing revoked OpenVPN certificate
- My opinion on VPNs and automation
- See more:
Revoking certificate in OpenVPN
The first step to revoke a certificate is to enter the directory containing the easyrsa file. In our previous installation of OpenVPN Server, the easyrsa file is in the easy-rsa directory. Therefore, to access it we will use the command below.
cd ~/easy-rsa/ 
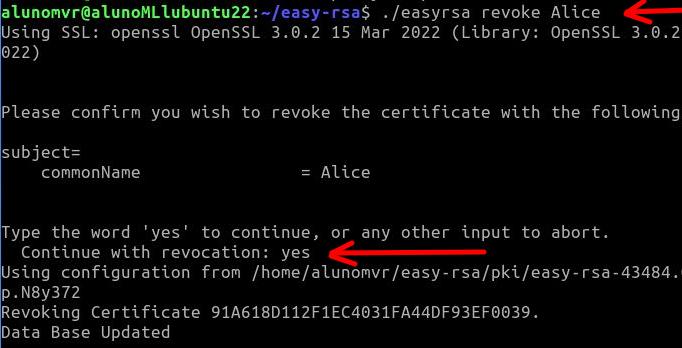
After that, we will use the easyrsa revoke command to revoke the Alice user certificate. To do this we will use the command below.
./easyrsa revoke Alice The system will ask if you want to continue and we will type yes and then press ENTER.
Generating the CRL (certificate revocation list)
Now let’s generate a CRL (certificate revocation list) for the revocation of Alice’s certificate to take effect. When using the command “./easyrsa gen-crl“ A certificate revocation list file called “crl.pem”.
./easyrsa gen-crl 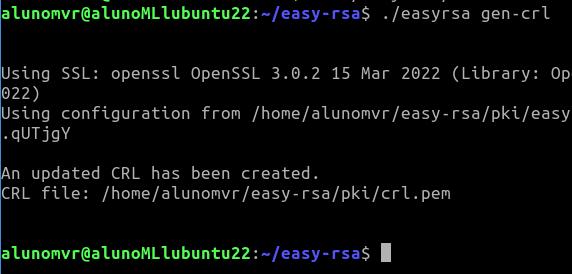
We can see that the file “crl.pem” was created inside the directory “~/easy-rsa/pki/”. If we want to check, we can use the command below to enter the directory and then use the command “ls”to list the contents of the directory.
So, we will see that we now have the certificate revocation list file called “crl.pem”.
cd ~/easy-rsa/pki/ ls 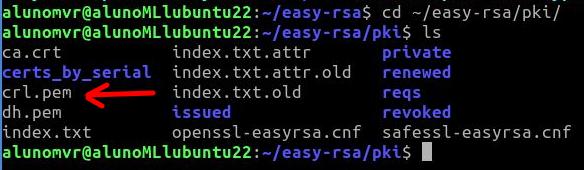
Copying the CRL (certificate revocation list) file
Now let’s copy the CRL ( certificate revocation list) file “crl.pem” to the openvpn configuration directory. To do this, we will use the command below.
sudo cp crl.pem /etc/openvpn/server/ Editing the OpenVPN configuration file
Now, let’s edit the OpenVPN server configuration file to identify the CRL (certificate revocation list) file. To do this, we will use the command below to edit the file “/etc/openvpn/server/server.conf” using the nano text editor.
sudo nano /etc/openvpn/server/server.conf At the end of the “server.conf” file, we will insert a line that indicates the CRL (certificate revocation list) check. Therefore, we must copy the instruction below and paste it at the end of the “server.conf” configuration file.
crl-verify crl.pem 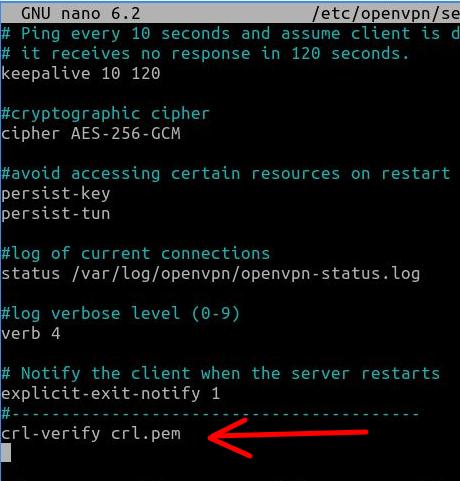
Restarting the OpenVPN server
Now let’s restart the OpenVPN server for the changes to take effect.
To do this, we will use the command below.
sudo systemctl restart [email protected] Testing revoked OpenVPN certificate
Now let’s test whether the user can still use the revoked OpenVPN certificate. To do this, let’s go to the client machine and try to connect to the VPN with the user Alice.
In our case, as we are using a Linux machine as a client, we will use the command below to connect the user to the VPN.
sudo openvpn --config Alice.ovpn 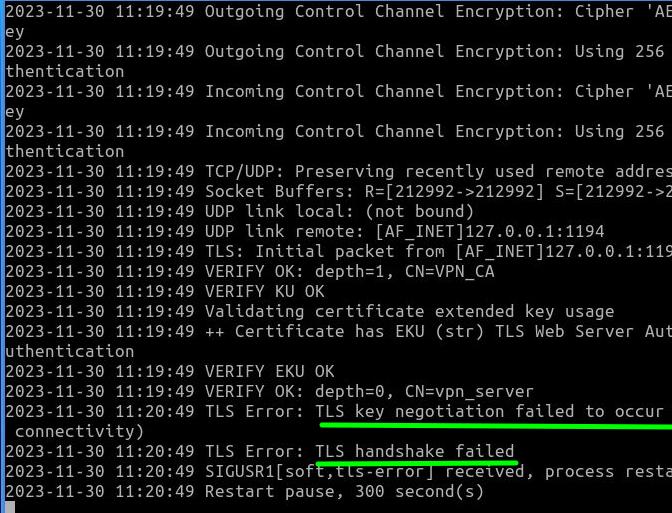
We can see that the user Alice was unable to connect to the VPN and, in addition, errors appeared such as “TLS key negotiation failed to occur” and also “TLS handshake failed”. Consequently, we can see that after revoking user Alice’s certificate, this user is no longer able to enter the VPN.
See more:
- Install Open VPN on Linux
- Install OpenVPN Client on Windows
- Update OpenVPN Client on Linux
- Install and Configure OpenVPN Server on PfSense
- OpenVPN and PfSense Site to Site
- Access Internet through site to site VPN
My opinion on VPNs and automation
I really like automating the certificate revocation process. This is because on a daily basis we must always try to simplify the lives of those responsible for adding new users to the VPN and removing them.
I once remember being at a computer company that produced software for devices built into TVs. On a Friday afternoon, we were informed that there would be a merger of the company with another company that until now was a competitor.
Our team was in charge of migrating the user base so that on Monday the impacts on work were reduced. In this case, we had a challenge: how to update the access of users from the original company and also add users from the company that was merging with ours.
Initially, we tried to revoke certificates and create users in OpenVPN manually. However, we quickly realized that this process could take longer than we were allotted. It was then that a colleague came up with the idea of creating a shell script to revoke all the VPN certificates that needed to be updated and within the same script create new certificates for the large list of employees that had been handed over to us.
So, we decided to follow our colleague’s idea and spent some time creating the script and validating it. And to our surprise, the script was ready faster than expected and we were able to add users to the VPN and revoke certificates quickly, reducing the likelihood of human error. This way, work that was supposed to be delivered in 3 days was done in just one Saturday morning.
This was just one episode of my life working with information technology, I hope it helps.

Juliana Mascarenhas
Data Scientist and Master in Computer Modeling by LNCC.
Computer Engineer
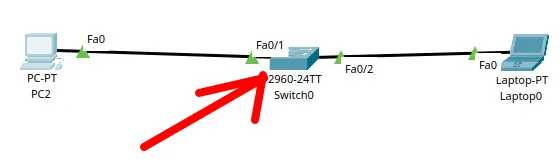
How to Create a Network with a Switch in Packet Tracer – Step-by-Step Guide for Beginners
In this practical tutorial, I will show you how to create a simple switch network…
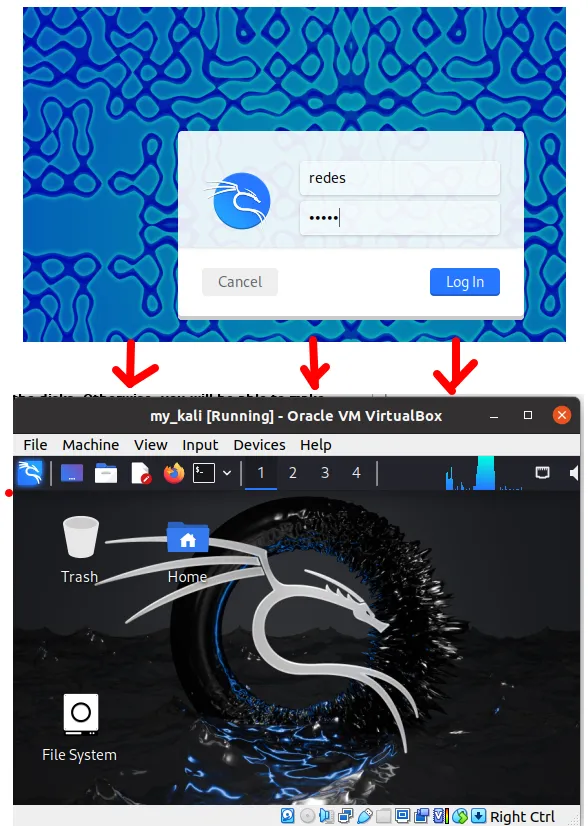
Why use Kali Linux inside VirtualBox?
In this article, we will see the main reasons for considering the use of Kali…
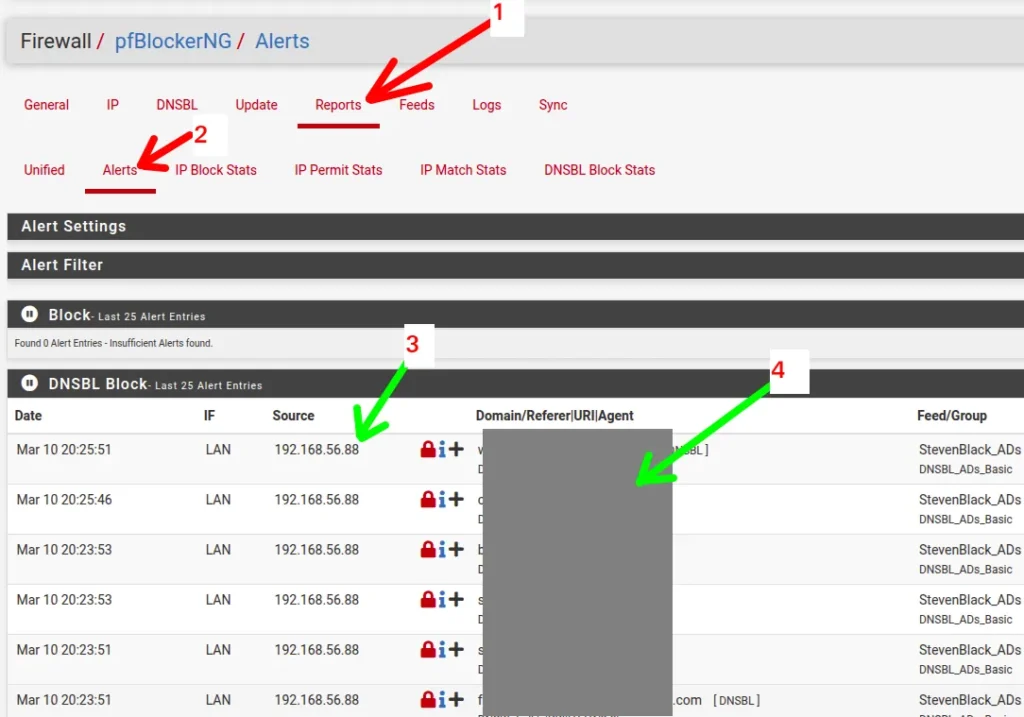
How to install pfBlocker on pfSense: step by step guide
Today we will learn how to install pfBLocker NG in PFSense. pfBLocker is an excellent…
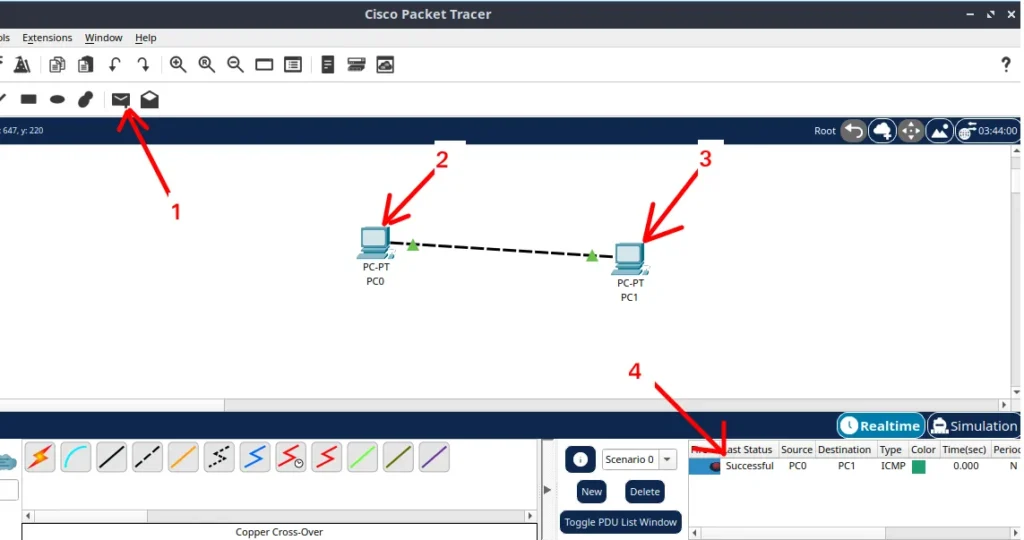
Packet Tracer for Dummies: Setting Up Your First Network with 2 PCs (Quick Start Guide)
Are you ready to take the first step into the fascinating world of computer networks?…
Learn how to use the curl command: tutorial with practical examples
Today we are going to learn about the curl command in Linux! This command is…
How to Install Kali Linux on VirtualBox: Step-by-Step Guide for Beginners
Welcome to the ultimate guide for beginners who want to learn how to install Kali…
See more:
https://community.openvpn.net/openvpn
Авторская статья
В предыдущих статьях на тему OpenVPN я рассказывал как настроить openVPN сервер и клиентов для него с использованием личных сертификатов пользователей. Остался не раскрытым вопрос, что делать в случае если требуется отказать какому-либо клиенту в доступе по его сертификату. Причины могут разными — закрытый ключ, связанный с сертификатом скомпрометирован или украден, пользователь забыл пароль на ключ, либо просто хотите прекратить доступ данного человека в вашу сеть. Решением этой задачи является создание списка отзыва сертификатов (Certificate Revocation List — CRL), в котором перечисляются отозванные вами клиентские сертификаты и руководствуясь которым сервер будет отклонять запросы.
В качестве примера, отзовём сертификат пользователя client2. Пример будет для Linux/BSD/Unix.
cd /usr/local/etc/openvpn
. ./vars
./revoke-full client2
В результате видим примерно следующее:
Using configuration from /usr/local/etc/openvpn/openssl.cnf
DEBUG[load_index]: unique_subject = "yes"
Revoking Certificate 04.
Data Base Updated
или
Using configuration from /usr/local/etc/openvpn/openssl.cnf
DEBUG[load_index]: unique_subject = "yes"
client2.crt: /C=RU/ST=NN/O=TEST/CN=client2/emailAddress=me@myhost.ru
error 23 at 0 depth lookup:certificate revoked
Обратите внимание на «Ошибку 23» в последней строке, указывающую на неудавшуюся попытку проверки отозванного сертификата. Скрипт revoke-full как раз и создает CRL (certificate revocation list) — crl.pem. Этот файл (не является секретным) должен быть скопирован в каталог, видимый OpenVPN сервером, а путь к нему прописан в конфиге server.conf.
crl-verify /usr/local/etc/openvpn/crl.pem
Теперь при подключении, все клиентские сертификаты будут проверяться на наличие в CRL, и если таковое будет найдено, в соединении будет отказано. При использовании crl-verify в OpenVPN, CRL-файл перечитывается по умолчанию каждый час. Таким образом, если в момент добавления сертификата в исключения, клиент уже установил связь, то он будет продолжать работу. Чтобы изменения применились наверняка перезапустите демон OpenVPN сервера.
При отзыве сертификата бывает ещё ошибка такого вида:
error on line 282 of config file '....openvpn/easy-rsa/openssl.cnf'
Решается комментированием следующих строчек в openssl.cnf:
#[ pkcs11_section ]
#engine_id = pkcs11
#dynamic_path = /usr/lib/engines/engine_pkcs11.so
#MODULE_PATH = $ENV::PKCS11_MODULE_PATH
#PIN = $ENV::PKCS11_PIN
#init = 0
Напоследок замечу, что возможно сгенерировать новую пару сертификат/ключ с тем же именем, как у отозванного ранее сертификата. Например в случае, когда пользователь забыл свой пароль на предыдущий сертификат, и его отозвали по этой причине.