Встроенный брандмауэр Windows в целях безопасности по умолчанию блокирует входящий ICMP трафик как в десктопных Windows 10/11, так и в Windows Server. Это означает, что вы не сможете удаленно проверить доступность компьютера с помощью стандартной команды
ping
, т.к. она будет отвечать о превышении интервала ожидания запроса (
Request timed out
) для ICMP Echo-Reply. Если вы хотите сделать возможной проверку доступности хостов Windows по протоколу ICMP из системы мониторинга или вручную из командной строки, можно разрешить ответы на ICMP эхо-запросы.
Чтобы разрешить отправку ответов на запросы по протоколу ICMP, нужно включить предустановленные правила в брандмауэре Windows.
- Откройте оснастку управления Windows Defender Firewall with Advanced Security, выполнив команду
wf.msc - Перейдите в раздел Inbound Rules
- Найдите правило Core Network Diagnostics – ICMP Echo Request (ICMPv4-In) и включите его.
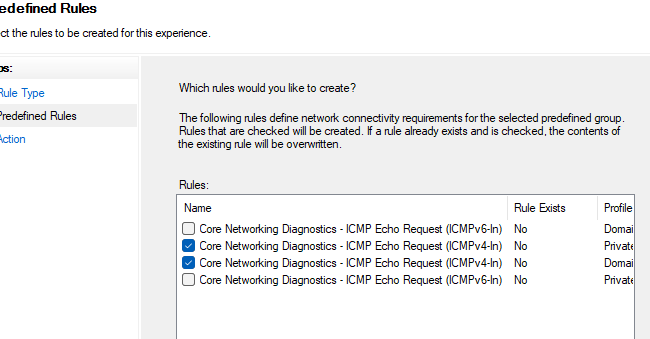
- В моем случае есть два правила с этим именем. Одно для частного и общедоступного сетевого профиля Windows, и второе для доменного. Я включил их оба. Можно также включить правило, разрешающее ICMP ответы для IPv6 протокола (если используется).
Есть также другое правило File and Printer Sharing (Echo Request – ICMPv4-In), которое также разрешает компьютеру отвечать на эхо-запросы
ping
.
Попробуйте пропиговать ваш компьютер и убедитесь, что теперь он отвечает на ICMP запросы.
Можно включить правила Windows Firewall, разрешающие ответы на эхо-запросы ICMP с помощью такой команды PowerShell:
Set-NetFirewallRule -Name CoreNet-Diag-ICMP4-EchoRequest-In -enabled True
Если нужно ограничить список IP подсетей или хостов, которым разрешено отправлять ответы на ICMP запросы, выполните команду:
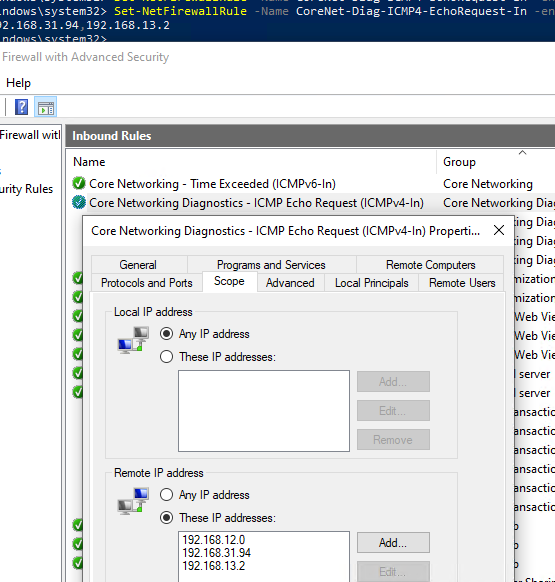
Set-NetFirewallRule -Name CoreNet-Diag-ICMP4-EchoRequest-In -enabled True -RemoteAddress 192.168.12.0,192.168.31.94
Откройте свойства правила в Windows Firewall и проверьте, что теперь правило разрешающие ICMP ответы будет работать только для указанных IP/подсетей.
Если в файрволе отсутствует (удалено) правило для входящих ICMP запросов, можно создать его из командной строки:
netsh advfirewall firewall add rule name="Allow_ICMPv4_Echo" protocol=icmpv4:8,any dir=in action=allow
Другой пример PowerShell команды, которое создаст правило файервола, разрешающего ping для всех хостов в локальной сети:
New-NetFirewallRule -DisplayName "Allow_ICMPv4_Echo" -Direction Inbound -Protocol ICMPv4 -IcmpType 8 -RemoteAddress localsubnet -Action Allow
Если нужно заблокировать ответы на ICMP эхо-запрос независимо от того, какие правила включены, создайте запрещающее правило, которое будет иметь более высокий приоритет:
New-NetFirewallRule -DisplayName "Block_ICMPv4_Echo" -Direction Inbound -Protocol ICMPv4 -IcmpType 8 -RemoteAddress localsubnet -Action Block
Чтобы разрешить ответы на ICMP ping на всех компьютерах в сети, можно включить правило Windows Firewall с помощью доменной групповой политики .
- Откройте редактор доменных GPO (
gpmc.msc
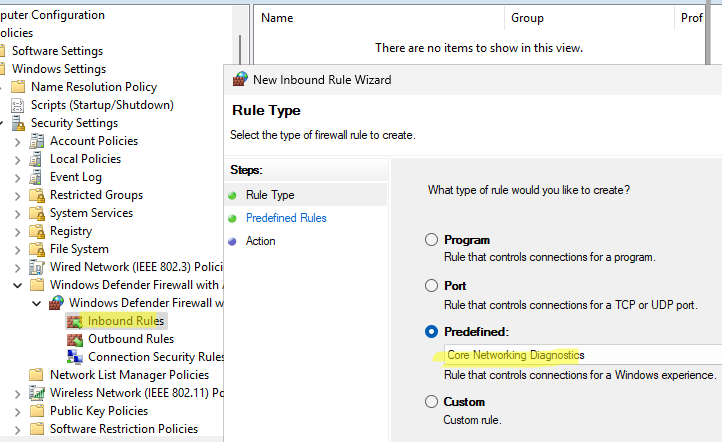
), создайте или отредактируйте имеющуюся GPO и назначьте ее на целевую OU или корень домена. - Перейдите в раздел Computer Configuration -> Windows Settings -> Security Settings -> Windows Firewall with Advanced Security -> Inbound rules
- Создайте новое правило, выберите Predefined rule типа Core Networking Diagnostics
- Укажите какие правила ICMP Echo request нужно включить.
- На следующем шаге вы берите Allow the connection.

По умолчанию в операционной системе Windows 8, 8.1 и 10 ответ на ping-запросы (входящие эхо-сообщения ICMP) отключен. Это сделано с целью повышения безопасности на уровне сети.
Активировать возможность ответа на эхо-запрос можно указанным ниже способом:
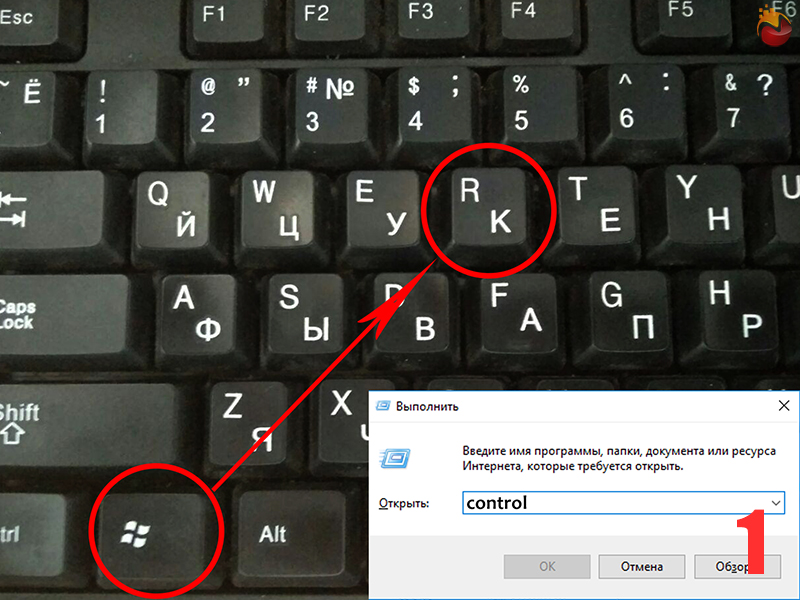
1) Во первых, откройте панель управления. Наиболее быстро это можно сделать нажав на клавиатуре сочетание клавиш «Win»+R, а далее в строке «открыть» напишите «control», рисунок 1.
2) В панели управления находите «Брандмауэр Windows», или как он называется в Windows 10 — «Брандмауэр Защитника Windows», и запускаете опцию «Дополнительные параметры», рисунок 2.

3) В окошке дополнительных параметров Вам нужно найти следующее правило — «Наблюдение за виртуальной машиной (эхо-запрос ICMPv4)» и включить его, рисунок 3.
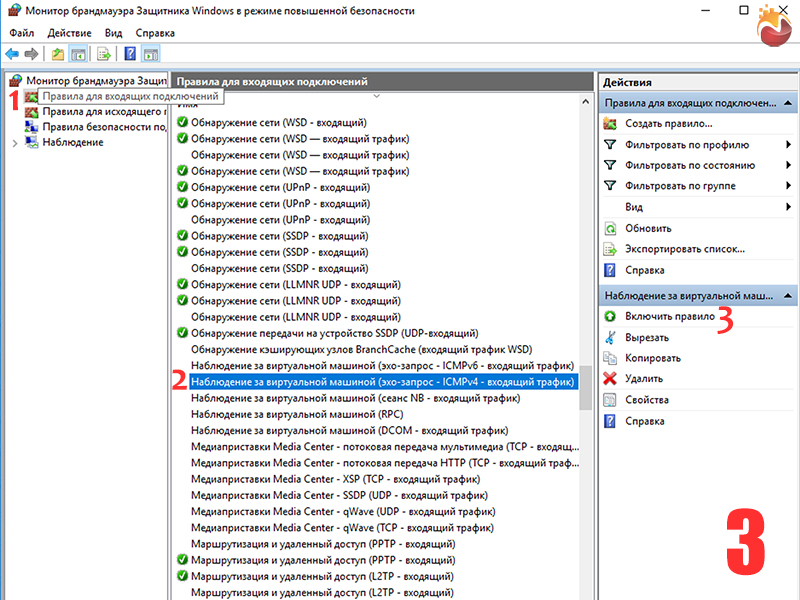
Сразу после включения правила, компьютер станет отвечать на ping-запросы в пределах локальной сети.
Recent Windows Operating systems do not reply to ping requests by default. The firewall policy was set to refuse ICMP Echo Requests by default. That means you will be getting ‘Request Timed Out’ from a Windows 10 or Windows 11 PC even though it is connected and set up properly on the network. This same basic network security rule was applied on earlier Operating Systems such as Windows 8.1 and 7 too. This guide shows how to enable ping reply and make your Windows 11/10 desktop or laptop computer respond to ICMP (ping) requests from other network devices.
If the Windows 11/10 computer is in a domain network, then the global domain policy that is related to ICMP echo requests will be applied automatically by your system administrator. In this example, we consider workgroup setup where the domain setup is not available; for example, a small office or your simple home network.
Also, this guide shows how to enable incoming FTP traffic in the Windows 11/10 firewall if you are planning to make your Windows PC an FTP server by using Microsoft IIS or other FTP server programs like FileZilla FTP server.
There is a pre-built firewall rule in Windows 11/10 to enable or disable ICMP echo requests. By default it was disabled. We can enable the rule to allow ping requests in Windows OS which can reply back to other network devices in the local or external network.
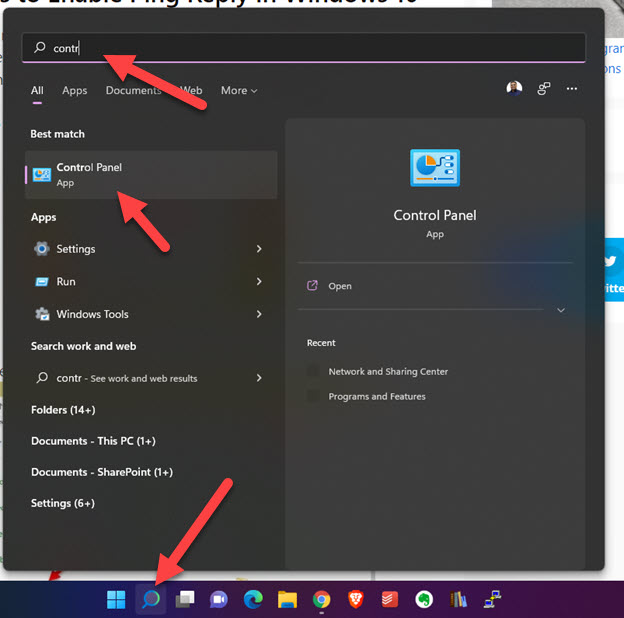
To open the rule, go to the control panel by right-clicking on the start button and selecting Control Panel.
In another way, you can search for ‘control’ in Windows 11 search bar.
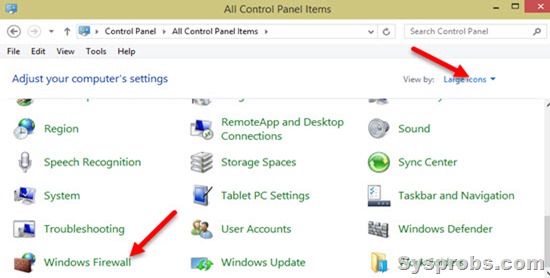
Make sure to change the view to the ‘Large Icon’ in the control panel to access Windows Firewall (or Windows Defender Firewall in Windows 11) settings quickly and easily.
Click on Advanced Settings to get the ICMP rule (incoming and outbound connections) option.
Since we are going to allow incoming ping requests, we need to open the Inbound Rules area and look for the File and Printer Sharing Echo Request –ICMPv4 rule as shown below.
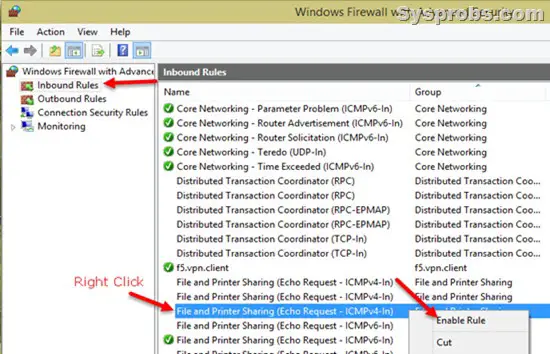
Once you enabled the Echo Request for ICMPv4 which is for IP v4, then your Windows 10 or Windows 11 computer will respond to ping requests.
You will see ‘Private’, ‘Public’ and ‘Domain’ network profiles in the advanced Firewall security settings while enabling or creating rules. Windows OS have each rule for every network profile. You have to enable the only profile which is related to your current connection.
For example, if you are at home or office local network, then the connection mostly will be in ‘Private’ or ‘Domain’ network profile. Therefore enable the Echo Request rule for these profiles only.
If you connect the same laptop to any public Internet network (like a coffee shop or airport Wi-Fi), Windows 11 will treat it as the public network profile. In this case, your computer will not respond to ping requests which come from the Internet to your computer, because the Echo Request rule is not enabled for the ‘Public’ network profile. Hence, it is essential to not enable unwanted firewall rules for public network profile.
Allow Ping Requests in Windows 11 by Command Prompt
You can also allow the Ping (ICMP Echo requests) by using the command prompt. It will modify the firewall rules. Using the command prompt will be handier to do the task quicker than the GUI. Also, it will be useful to execute these commands remotely when you are connected through a command prompt or on the Windows server core versions.
To enable ping requests for IPV4, execute the following command as administrator. Make sure to open the command prompt (CMD) as run as administrator.
netsh advfirewall firewall add rule name="ICMP Allow incoming V4 echo request" protocol=icmpv4:8,any dir=in action=allowDisable Ping Reply in Windows 10/11:
Visit the same control panel settings and disable the rule (for private or domain network profile). Now the Windows computer will not respond to ping requests from the connected network devices.
Here is the command to disable the ping in the command prompt.
netsh advfirewall firewall add rule name="ICMP Allow incoming V4 echo request" protocol=icmpv4:8,any dir=in action=blockEnable Incoming FTP Traffic in Windows 11/10/8.1 Firewall
Once you set up an FTP server on a Windows computer, then you must enable inbound FTP traffic in the firewall settings. You can follow the same methods below in Windows 11, even though screenshots are taken on Windows 10.
1) Open the control panel and Windows Firewall.

2) Click on ‘Allow an App or feature through Windows Firewall’. It may have a different option in Windows 8.1 or older versions, but you will find a similar option.
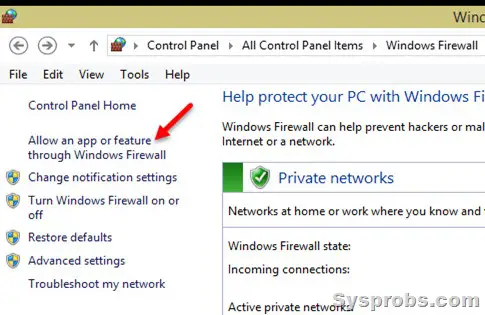
Assuming that you already installed IIS and enabled the FTP server, the firewall settings will automatically detect the FTP server application and list it out in the field.
Click on ‘Change Settings’ and choose ‘FTP Server’. Select the network profile currently the computer is connected, press OK to complete the steps.
3) Another Method: Manually Create The Policy and Allow
If you could not succeed with the above method or are not able to see the FTP server app in the programs list of firewall settings, you can manually create an inbound rule and allow particular FTP ports (20 and 21).
4) In the Control panel Firewall settings, click on Advanced settings.
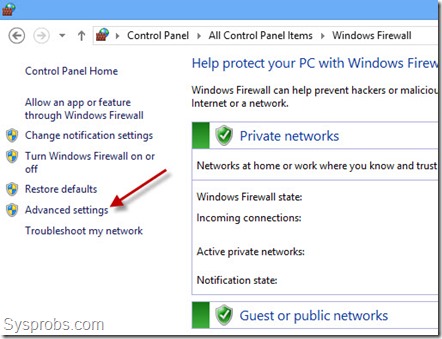
5) We need to create a new inbound rule to allow FTP traffic. This can be done by allowing particular port numbers in incoming traffic. If you do not have any third party personal firewall programs, this step will ensure that incoming FTP traffic is enabled on the computer even though the Windows firewall is on.
To create a new inbound rule in Windows 10/11 computer, click on Inbound Rules and ‘New Rule’.

6) Select ‘Port’ as the rule type on the next screen.
7) You can leave ‘TCP’ selected and in ports number enter 20 and 21 (20,21). FTP (File Transfer Protocol) uses port numbers 20 and 21 for data transfer and command control, click here to view more information.
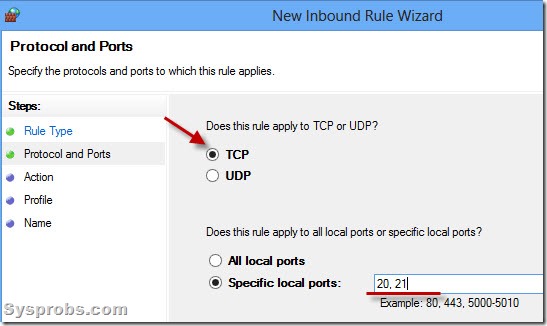

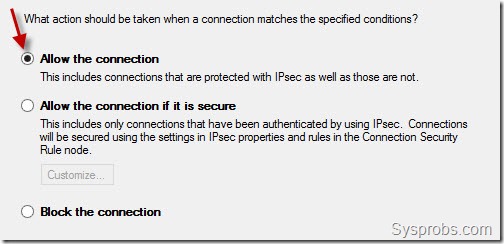
9) Depending on the network connection you are connected to, select the connection type where the particular rule should be applied. You can select all three (Domain, Private and Public) if you are not sure which one to select.
10) Provide a name for the rule, for example, ‘FTP’. This rule name will show under incoming rules in firewall advanced settings. We can easily modify or disable it later by this name.
If you want to block incoming FTP traffic later, you can simply right-click on it and disable the rule.
Also, you can enable the FTP inbound traffic in Windows 10/11 firewall by command prompt with simple commands which are explained at the Microsoft site here.
With the steps outlined in this guide, you will be able to enable ping reply and FTP packets on your Windows 11/10 computer without completely disabling the Firewall.
ICMP, также известный как PING, обычно используется системными администраторами для проверки работоспособности компьютеров (и других сетевых устройств).
Брандмауэр в Windows 10 по умолчанию блокирует ответы ICMP. Чтобы разрешить ICMP в Windows, нам нужно создать два правила брандмауэра. Один для IPv4 и один для IPV6.
Мы можем добиться этого с помощью графического интерфейса или командной строки.
Использование PowerShell для разрешения проверки связи
Самый простой способ — запустить следующие две команды в окне PowerShell:
netsh advfirewall firewall add rule name="Allow ICMPv4" protocol=icmpv4:8,any dir=in action=allow
netsh advfirewall firewall add rule name="Allow ICMPv6" protocol=icmpv6:8,any dir=in action=allow
Чтобы открыть окно PowerShell, щелкните правой кнопкой мыши кнопку «Пуск» и выберите в меню Windows PowerShell (Admin).
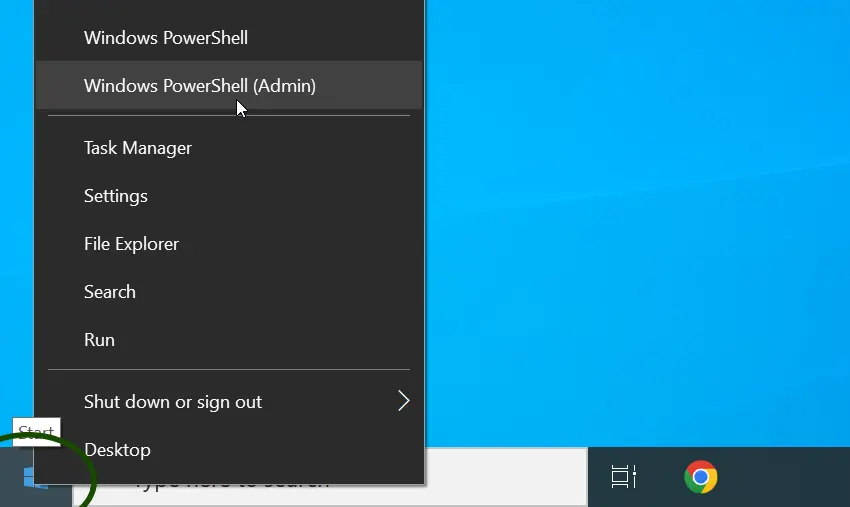
Когда откроется командное окно, запустите две команды, которые мы указали выше.

Ваш ПК/сервер с Windows теперь будет отвечать на запросы ping. Если вы хотите снова заблокировать ping, удалите эти два правила брандмауэра, используя следующие две команды:
netsh advfirewall firewall delete rule name="Allow ICMPv4"
netsh advfirewall firewall delete rule name="Allow ICMPv6"
Использование брандмауэра Защитника Windows
Если вам не нравится командная строка, используйте графический интерфейс, чтобы разрешить эхо-запросы через брандмауэр Windows.
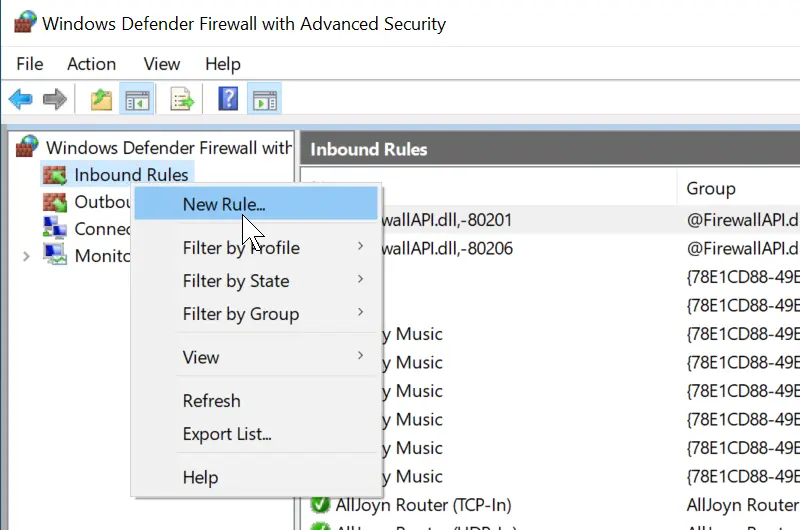
Нажмите кнопку «Пуск» и введите брандмауэр. В результатах поиска выберите Брандмауэр Защитника окон в режиме повышенной безопасности. В приложении брандмауэра щелкните правой кнопкой мыши «Правила для входящих подключений» и выберите «Новое правило» в контекстном меню.
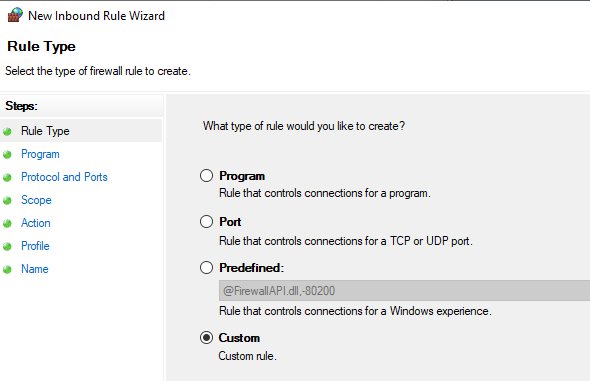
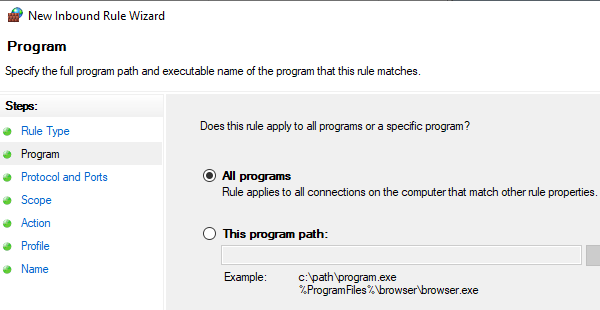
На первом экране выберите Пользовательский тип правила, нажмите Далее, а затем выберите Все программы. Нажмите «Далее» еще раз.
В раскрывающемся меню «Тип протокола» выберите ICMPv4 и нажмите «Далее».
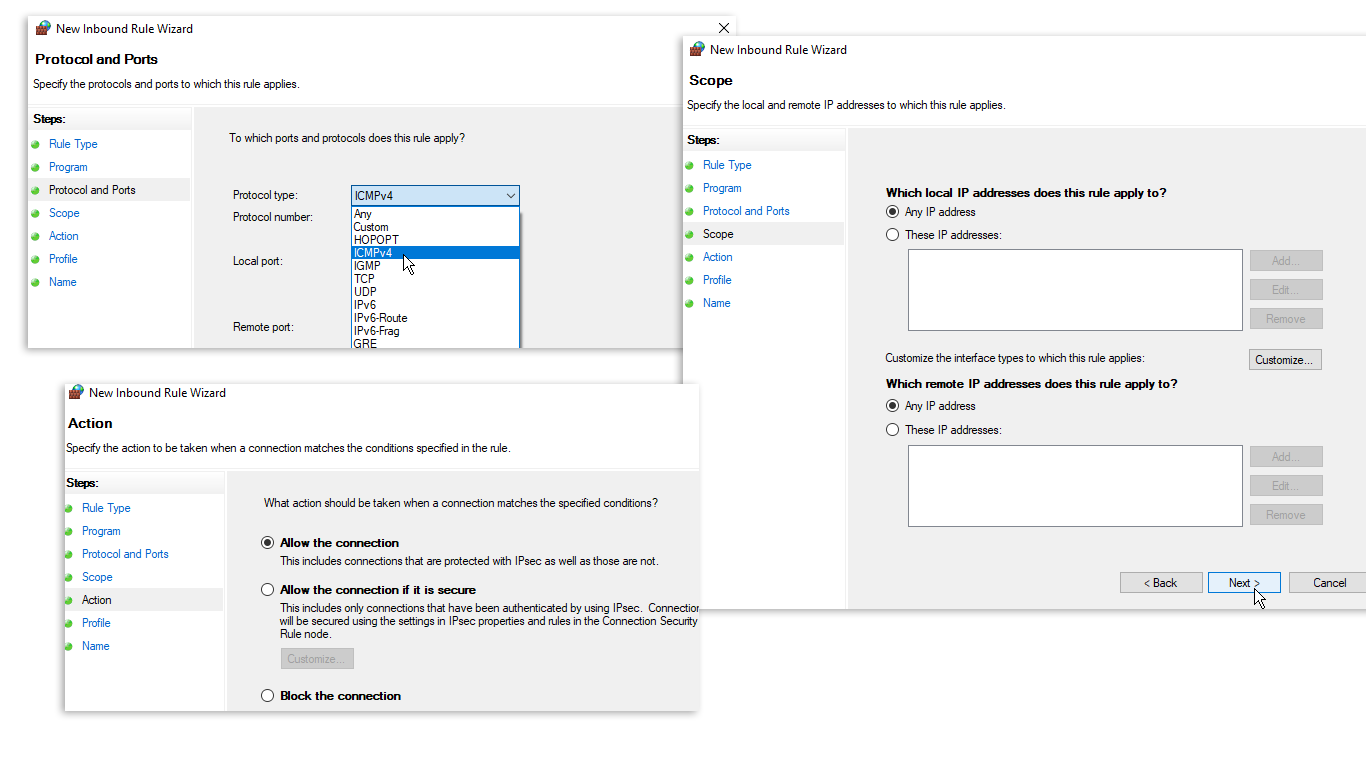
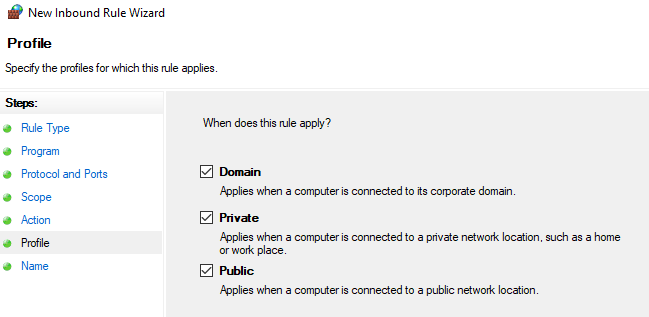
На экране «Область» выберите «Любые IP-адреса», нажмите «Далее» и выберите «Разрешить подключение». На экране «Профиль» оставьте все три профиля брандмауэра отмеченными.
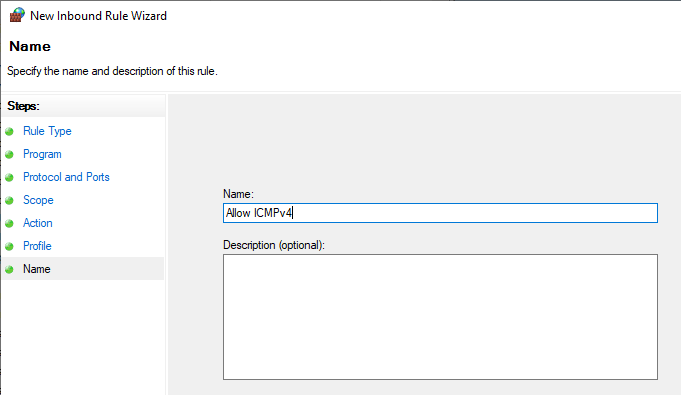
Наконец, дайте имя правилу брандмауэра и нажмите «Готово», чтобы завершить работу мастера.
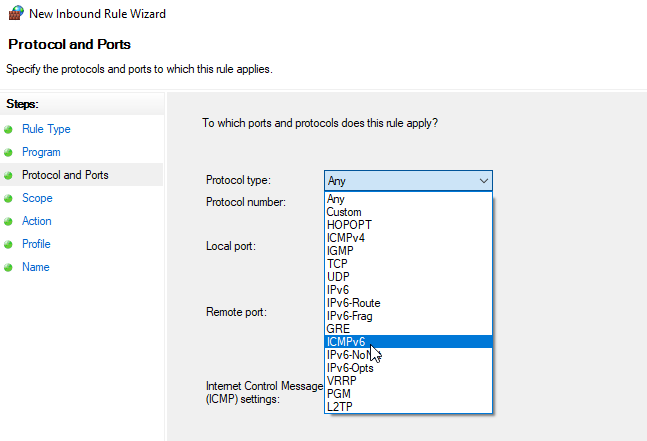
Это правило разрешает трафик ICMPv4 через брандмауэр. Чтобы разрешить трафик ICMPv6, повторите ту же процедуру, но на экране «Протокол и порты» выберите ICMPv6.
И это все. Вы можете использовать описанные выше методы, чтобы разрешить проверку связи в любой операционной системе Windows, включая Windows 10, 11 и Server.
Просмотров: 15 804


