
Это сообщение об ошибке указывает на то, что загрузочный сектор поврежден или отсутствует.
Решение
Воспользуйтесь приведенными ниже способами, чтобы устранить ошибки запуска Windows.
Примечание. Чтобы выполнить приведенные ниже действия, требуется установочный диск Windows 8.1, Windows 8, Windows 7 или Windows Vista. Если его нет, обратитесь к изготовителю компьютера или в службу поддержки Майкрософт с просьбой предоставить установочный диск. Если у вас нет установочного диска, но при этом на компьютере предустановлено средство восстановления при загрузке, воспользуйтесь способом 4.
Способ 1. Запуск средства восстановления при загрузке в среде восстановления Windows (WinRE)
Чтобы выполнить восстановление при загрузке в среде восстановления Windows (WinRE), сделайте следующее:
-
Вставьте установочный диск Windows в дисковод и запустите компьютер.
-
После появления сообщения Press any key to boot from CD or DVD (Нажмите любую клавишу для загрузки с компакт-диска или DVD-диска), выполните требуемое.
Если компьютер не обнаружит носитель автоматически-
При перезагрузке найдите на экране инструкции, в которых объясняется, как прервать загрузку в обычном режиме и войти в программу настройки BIOS. Чтобы начать настройку BIOS, для большинства компьютеров можно нажать клавиши F2, F10, ESC или DEL.
-
В окне программы настройки BIOS Setup Utility найдите вкладку Boot Order (Порядок загрузки), Boot Options (Параметры загрузки) или Boot (Загрузка). Следуя инструкциям на экране, воспользуйтесь клавишами со стрелками, чтобы открыть вкладку Boot Order (Порядок загрузки), а затем нажмите клавишу ВВОД.
-
В списке загрузки найдите обозначение компакт-диска, DVD-диска или USB-устройства флэш-памяти (CD, DVD или USB flash drive соответственно). Возможно, носитель определен как Removable Device (Съемное устройство). Следуя инструкциям на экране, воспользуйтесь клавишами со стрелками, чтобы поднять обозначение диска в списке загрузки и сделать его первым. Нажмите клавишу ВВОД. Теперь последовательность загрузки с компакт-диска, DVD-диска или USB-устройства флэш-памяти изменена.
-
Нажмите клавишу F10, чтобы сохранить изменения и выйти из программы настройки BIOS Setup Utility. Выберите команду Yes (Да) в окне подтверждения. Компьютер будет перезагружен.
-
-
Выберите язык, время и денежные единицы, а также способ ввода и клавиатуру, затем нажмите кнопку Далее.
-
Выберите пункт Восстановить компьютер.
-
При появлении диалогового окна Параметры восстановления системы выберите диск с установочными файлами Windows и нажмите кнопку Далее.
-
В окне Параметры восстановления системы выберите пункт Восстановление системы.
-
Укажите операционную систему, которую требуется восстановить, и нажмите кнопку Далее.
-
В диалоговом окне Параметры восстановления системы выберите пункт Восстановление при загрузке.
Способ 2. Перестроение данных конфигурации загрузки в среде восстановления Windows (WinRE)
Для перестроения данных конфигурации загрузки в среде восстановления Windows (WinRE) выполните следующие действия
-
Вставьте установочный диск Windows в дисковод и запустите компьютер.
-
После появления сообщения Press any key to boot from CD or DVD (Нажмите любую клавишу для загрузки с компакт-диска или DVD-диска), выполните требуемое.
Если компьютер не обнаружит носитель автоматически-
При перезагрузке найдите на экране инструкции, в которых объясняется, как прервать загрузку в обычном режиме и войти в программу настройки BIOS. Чтобы начать настройку BIOS, для большинства компьютеров можно нажать клавиши F2, F10, ESC или DEL.
-
В окне программы настройки BIOS Setup Utility найдите вкладку Boot Order (Порядок загрузки), Boot Options (Параметры загрузки) или Boot (Загрузка). Следуя инструкциям на экране, воспользуйтесь клавишами со стрелками, чтобы открыть вкладку Boot Order (Порядок загрузки), а затем нажмите клавишу ВВОД.
-
В списке загрузки найдите обозначение компакт-диска, DVD-диска или USB-устройства флэш-памяти (CD, DVD или USB flash drive соответственно). Возможно, носитель определен как Removable Device (Съемное устройство). Следуя инструкциям на экране, воспользуйтесь клавишами со стрелками, чтобы поднять обозначение диска в списке загрузки и сделать его первым. Нажмите клавишу ВВОД. Теперь последовательность загрузки с компакт-диска, DVD-диска или USB-устройства флэш-памяти изменена.
-
Нажмите клавишу F10, чтобы сохранить изменения и выйти из программы настройки BIOS Setup Utility. Выберите команду Yes (Да) в окне подтверждения. Компьютер будет перезагружен. Пусть компьютер загрузится в обычном режиме. Проверка займет несколько минут. За это время удалится вредоносная программа, которой, возможно, заражен компьютер.
-
-
Выберите язык, время и денежную единицу, способ ввода данных (с клавиатуры или другой), а затем нажмите кнопку Далее.
-
Выберите пункт Восстановить компьютер.
-
Укажите операционную систему, которую требуется восстановить, и нажмите кнопку Далее.
-
В диалоговом окне Параметры восстановления системы выберите пункт Командная строка.
-
Введите Bootrec /RebuildBcd и нажмите клавишу ВВОД.
Подробнее о том, как использовать Bootrec.exe, см. в статье Как использовать средство Bootrec.exe в среде восстановления Windows для устранения неполадок при запуске Windows.
Способ 3. Запуск восстановления системы в среде восстановления Windows (WinRE)
Важно! Для этого способа на компьютере должно быть включено восстановление системы.
Чтобы выполнить восстановление системы в среде восстановления Windows (WinRE), сделайте следующее:
-
Вставьте установочный диск Windows в дисковод и запустите компьютер.
-
После появления сообщения Press any key to boot from CD or DVD (Нажмите любую клавишу для загрузки с компакт-диска или DVD-диска), выполните требуемое.
Если компьютер не обнаружит носитель автоматически-
При перезагрузке найдите на экране инструкции, в которых объясняется, как прервать загрузку в обычном режиме и войти в программу настройки BIOS. Чтобы начать настройку BIOS, для большинства компьютеров можно нажать клавиши F2, F10, ESC или DEL.
-
В окне программы настройки BIOS Setup Utility найдите вкладку Boot Order (Порядок загрузки), Boot Options (Параметры загрузки) или Boot (Загрузка). Следуя инструкциям на экране, воспользуйтесь клавишами со стрелками, чтобы открыть вкладку Boot Order (Порядок загрузки), а затем нажмите клавишу ВВОД.
-
В списке загрузки найдите обозначение компакт-диска, DVD-диска или USB-устройства флэш-памяти (CD, DVD или USB flash drive соответственно). Возможно, носитель определен как Removable Device (Съемное устройство). Следуя инструкциям на экране, воспользуйтесь клавишами со стрелками, чтобы поднять обозначение диска в списке загрузки и сделать его первым. Нажмите клавишу ВВОД. Теперь последовательность загрузки с компакт-диска, DVD-диска или USB-устройства флэш-памяти изменена.
-
Нажмите клавишу F10, чтобы сохранить изменения и выйти из программы настройки BIOS Setup Utility. Выберите Да в окне подтверждения.
-
-
Выберите язык, время и валюту, а также способ ввода и клавиатуру, затем нажмите кнопку Далее.
-
Выберите пункт Восстановить компьютер.
-
При появлении диалогового окна Параметры восстановления системы выберите диск с установочными файлами Windows и нажмите кнопку Далее.
-
В диалоговом окне Параметры восстановления системы выберите пункт Восстановление системы.
-
Следуйте указаниям мастера восстановления системы и выберите подходящую точку восстановления.
-
Нажмите кнопку Готово, чтобы восстановить систему.
Дополнительные сведения о восстановлении системы см. в разделе Восстановление системы: часто задаваемые вопросы.
Способ 4. Использование средства восстановления при загрузке, если оно уже установлено на компьютере
Важно! Этот способ работает, только если на компьютере заранее установлено средство восстановления при загрузке.
Если у вас нет установочного диска Windows, но при этом на компьютере заранее установлено средство восстановления при загрузке, выполните следующие действия, чтобы восстановить загрузочные файлы.
-
Извлеките из компьютера все дискеты, компакт-диски и DVD-диски, а затем перезагрузите компьютер, нажав кнопку питания.
-
Если на компьютере установлена только одна операционная система, при перезагрузке компьютера нажмите и удерживайте клавишу F8. Клавишу F8 необходимо нажать до появления эмблемы Windows. В случае появления эмблемы Windows необходимо повторить перезагрузку после вывода приглашения войти в систему Windows.
-
Если на компьютере установлено несколько операционных систем, с помощью клавиш со стрелками выберите операционную систему, которую необходимо восстановить, а затем нажмите и удерживайте клавишу F8.
-
-
На экране Дополнительные варианты загрузки выберите с помощью клавиш со стрелками пункт Устранение неполадок компьютера и нажмите клавишу ВВОД. (Если пункт Восстановление системы отсутствует, то средства восстановления не установлены на компьютере или отключены администратором сети.)
-
Выберите раскладку клавиатуры и нажмите кнопку Далее.
-
Выберите имя пользователя, введите пароль и нажмите кнопку OK.
-
В меню Параметры восстановления системы выберите пункт Восстановление при загрузке. Средство восстановления при загрузке может предлагать вам выбор вариантов устранения проблемы и перезагружать компьютер в процессе восстановления.
The other day, I wrote about setting up a sleek dual-boot system. Everything was humming along just fine. That is, until the first reboot. Eager to select my operating system of choice, I rebooted, entered the BIOS, and… nothing. The Windows Boot Manager was nowhere in sight. A myriad of questions followed, including the simplest yet most perplexing: Why?
The Windows Boot Manager might not appear in BIOS due to several reasons, such as an outdated BIOS version, drive connection issues, corrupted Boot Configuration Data, or an incorrect boot mode. But, here’s the silver lining; each of these challenges has a corresponding solution.
Let’s unpack each of these causes, explore their intricacies, and more importantly, their fixes. Ready to navigate the booting Issue? Let’s set sail.

Why does the Windows Boot Manager isn’t Appear in BIOS?
- BIOS Version Mismatch: Some older BIOS versions might not be compatible with newer Windows installations or boot configurations, leading to the Boot Manager not being listed.
- Drive Connection Issues: If the hard drive or SSD with your Windows installation isn’t properly connected, the Boot Manager might not appear in BIOS.
- Corrupted Boot Configuration Data (BCD): The BCD can become corrupted due to software conflicts, power outages, or disk write errors, causing the Boot Manager to vanish from the BIOS.
- Incorrect Boot Mode: There are two primary boot modes – UEFI and Legacy. An inconsistency between your system and drive setup can make the Boot Manager disappear.
Resurrecting the Boot Manager in BIOS
Navigating the often cryptic BIOS settings can feel like traversing a digital maze. But with the right guide, bringing the Boot Manager back from its slumber is doable. Let’s explore a set of detailed methods to address this challenge:
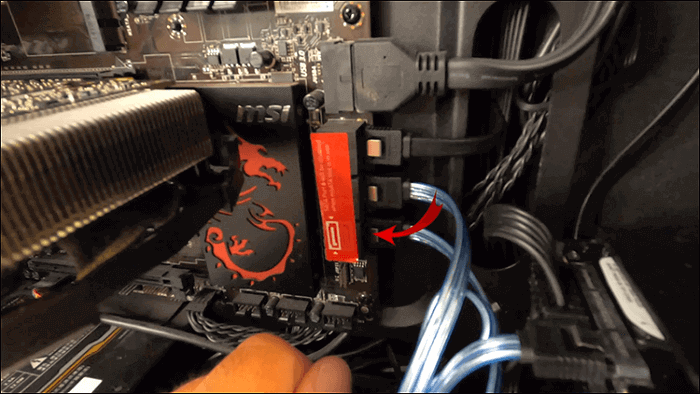
Solution 1: Check Your Hardware Connections
Step 1: Power down your system and unplug it from the wall.
Step 2: Open the system case (Check your PC’s manual if unsure about how to do this).
Step 3: Inspect the cables connected to your hard drive or SSD. Make sure they are securely plugged into both the drive and the motherboard.
Step 4: If a cable seems worn out or damaged, consider replacing it.
Step 5: After checking and adjusting, close the system case, plug the system back in, and power it up. Then check BIOS again for the Boot Manager.
Solution 2: Update BIOS
Step 1: Start by checking your current BIOS version. This is typically displayed on the BIOS splash screen or within the BIOS settings.
Step 2: Go to your motherboard manufacturer’s website and navigate to the support or downloads section.
Step 3: Enter your motherboard model to find the latest BIOS update.
Step 4: Download the update and follow the manufacturer’s instructions closely. Some systems allow updating directly within Windows, while others might require creating a bootable USB drive.
Step 5: After the update, reboot and access the BIOS to see if the Boot Manager is visible.
Solution 3: Repair Boot Configuration Data (BCD)
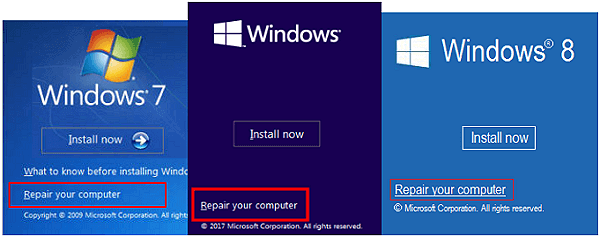
Step 1: Insert your Windows installation disk or USB and restart your PC.
Step 2: Boot from the disk or USB, and on the Windows Setup screen, click ‘Next’.

Step 3: Click on ‘Repair your computer’.
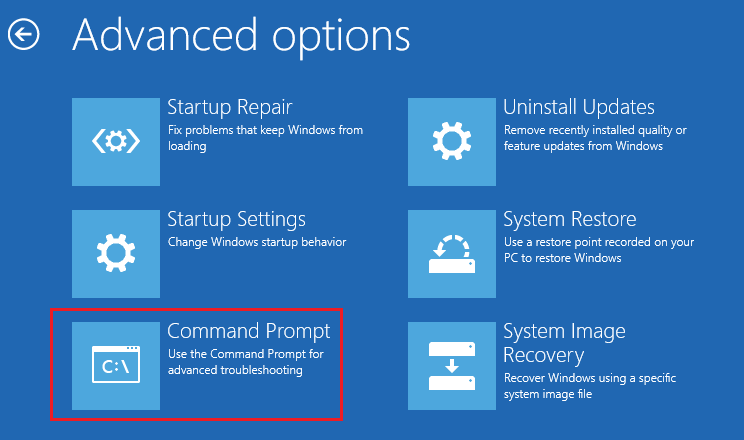
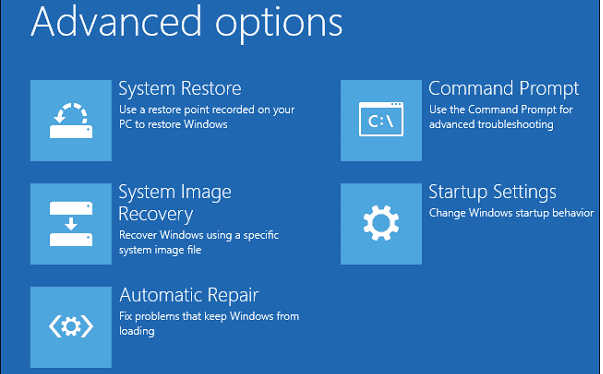
Step 4: Choose ‘Troubleshoot’ and then ‘Advanced options’.

Step 5: Select ‘Command Prompt’.

Step 6: Type the following commands in sequence:
- bootrec /fixmbr
- bootrec /fixboot
- bootrec /scanos
- bootrec /rebuildbcd
Step 7: After executing the commands, restart your system and check the BIOS.
Solution 4: Switch Boot Modes
Step 1: Access your BIOS/UEFI settings during the boot-up process. This usually involves pressing a specific key (like F2, F10, or Del) repeatedly.
Step 2: Navigate to the ‘Boot’ tab or similar.
Step 3: Locate the boot mode setting, which should offer options like ‘UEFI’ and ‘Legacy’.
Step 4: Change the mode. If you’re in UEFI, switch to Legacy and vice-versa.

Step 5: Save and exit the BIOS settings.
Step 6: As your system reboots, check if the Boot Manager has reappeared in BIOS.
Conclusion: Navigating the Booting Labyrinth
Encountering unexpected issues, like the vanishing act of the Windows Boot Manager in BIOS, can be both baffling and frustrating. However, armed with the right knowledge and a touch of patience, these technological quirks become solvable puzzles.
FAQs – Booting Up the Answers:
Is It Safe To Update My Bios?
While updating BIOS is generally safe, it’s crucial to follow the manufacturer’s instructions. A failed or interrupted update can cause system instability.
How Do I Switch Between Uefi And Legacy Modes?
This option is available in the BIOS or UEFI settings, usually under the “Boot” tab. Ensure to save changes when exiting.
If I Repair The Bcd, Will I Lose Any Data?
Repairing BCD shouldn’t result in data loss. However, always backup important files before making significant system changes.
Table Of Contents
- Why does the Windows Boot Manager isn’t Appear in BIOS?
- Resurrecting the Boot Manager in BIOS
- Conclusion: Navigating the Booting Labyrinth
- FAQs — Booting Up the Answers:
A tech wordsmith with an unquenchable thirst for knowledge. Has a knack for breaking down complex topics into digestible insights ensures that our readers are always in the know.
-
Home
-
News
- [Solved] Windows Boot Manager Not Showing in BIOS
By Vega | Follow |
Last Updated
Lots of users encounter the Windows Boot Manager not showing in BIOS error. Are you also troubled by the error? In this post, MiniTool Partition Wizard provides a full guide for this error.
Sometimes, some users encounter a confusing problem: Windows Boot Manager not showing in BIOS. It will prevent the computer from booting properly.
Why is Windows Boot Manager not showing in BIOS? It may be caused by various reasons like outdated BIOS, bad boot configuration, corrupted boot configuration data, corrupted hard drives, corrupted hard drive sectors, and failed hardware connections.
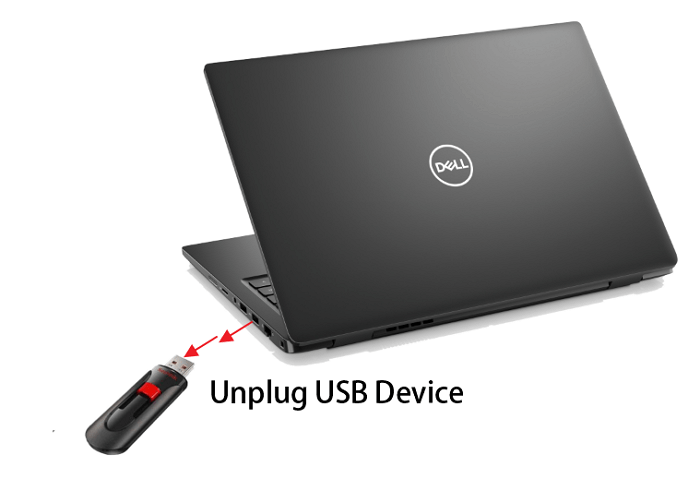
Well, how to fix the Windows Boot Manager missing from BIOS issue? Please keep reading. Before performing the complex solutions below, you should first try removing all external devices and restarting all power and data cables.
Solution 1. Change the Boot Order in BIOS
Different computers may have different BIOS settings, but they usually share similar boot options. To modify the boot sequence, access the BIOS menu by pressing the F2 or Delete key during boot. Once in the BIOS, navigate to Boot or Boot Sequence settings. Then modify the boot order to set the correct drive as the first boot device.
Save them and proceed to restart the computer. Then check if you can see the Boot Manager.
Solution 2. Create a New Boot Sector
The no Windows Boot Manager in BIOS error may occur if there is corruption or boot corruption in the partition, especially the Windows partition. Such problems can be attributed to a variety of factors, including an aging hard drive, virus infection, or malware attack. In this case, we recommend using the following method to create a new boot sector:
Step 1: Turn off your PC and then turn it on. Once the Windows logo appears on your screen, press and hold the Power button to turn off your PC again. Repeat this step until you enter the Recovery window.
Step 2: Once you get into the Windows Recovery Environment (Windows RE), select Advanced options.
Step 3: After that, go to Troubleshoot > Advanced options > Command Prompt.
Step 4: Once you enter the Command Prompt, type bootrec /fixboot and press Enter.
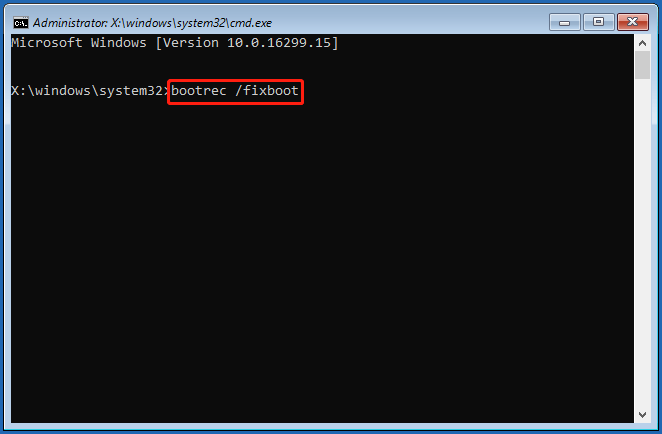
After executing the command, you will see the message “The operation completed successfully.” Now, restart your computer using the Ctrl + Alt + Del keys and select the restart option.
Solution 3. Rebuild BCD
If your boot configuration data (BCD) is corrupted or misconfigured, you must rebuild it to eliminate the “Windows Boot Manager not showing in BIOS” error.
Step 1: Enter the Command Prompt in Windows RE following solution 2.
Step 2: Type bootrec/rebuildbcd and press Enter.
Step 3: Type attrib c:\boot\bcd -h -r -s and press Enter. It will remove read-only and hidden files from Windows BCD. Now type another command ren c:\boot\bcd bcd.old to rename the stored BCD.
Step 4: Now type bootrec /rebuildbcd again and press Enter. This time it will ask to add the boot to the list. Type Y and press Enter. Wait a few seconds until the “Operation Successful” message appears on the screen.
Solution 4. Check the Hard Disk for Bad Sectors
As mentioned above, corruption in the specific hard disk sectors can also impact the boot process. So, you should check the hard disk for bad sectors. To do that, you can take advantage of a powerful disk manager – MiniTool Partition Wizard. It can help you check bad sectors.
MiniTool Partition Wizard DemoClick to Download100%Clean & Safe
Step 1: Boot the PC from the created bootable USB flash drive.
Step 2: In the main interface of MiniTool Partition Wizard, select the target disk and click on Surface Test from the left panel.
Step 3: Click on the Start Now button. After that, this tool will scan the whole drive immediately and show you the test result.
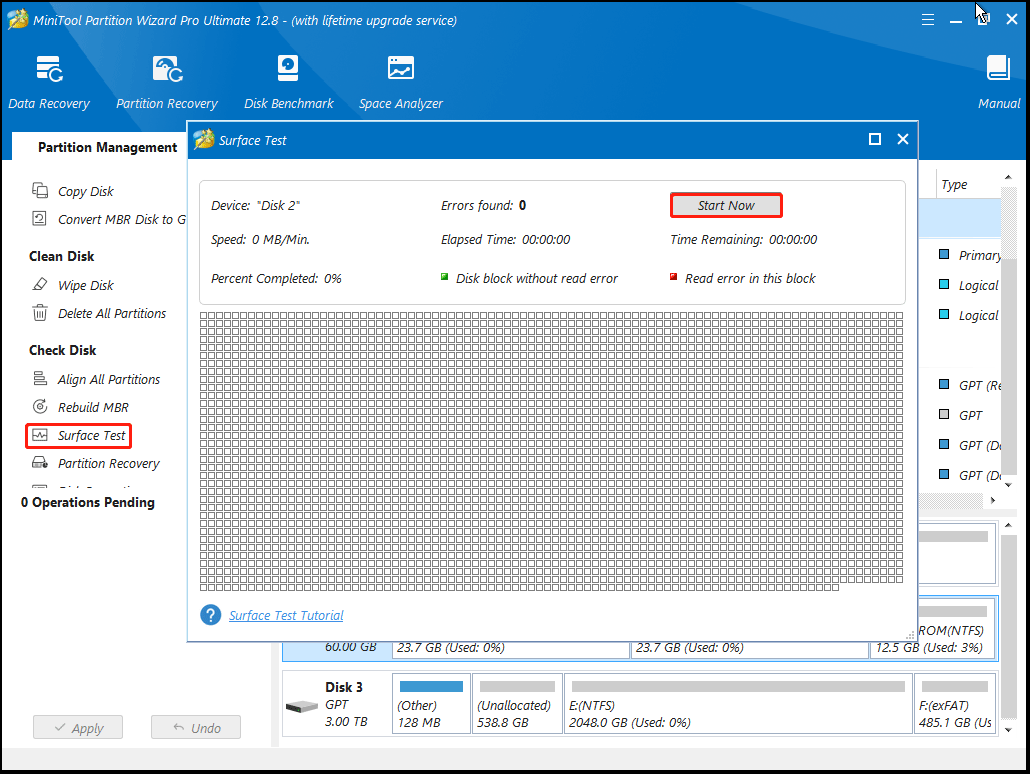
Step 4: When the hard drive error test process is completed, the bad sectors on the hard drive will be marked with red color. In this case, you can either use this bad sector repair guide or consider replacing it with a new one.
The startup manager is usually not visible because it is usually closed by default. However, you can easily enable it using the Command Prompt command. Just type bcdedit /set {bootmgr} display bootmenu yes in it and press Enter.
Windows Boot Manager not showing up in BIOS can be a frustrating problem. You can refer to the solutions above to solve it. If you have any other solutions, you can share them with us in the following comment zone.
About The Author
Position: Columnist
Vega joined MiniTool as an editor after graduation. She enjoys helping people with computer problems, including disk management, data recovery, and more. She is constantly expanding her knowledge in related fields. And she will continue to bring more easy-to-understand professional articles to help people solve various problems on the PC. In her daily life, Vega enjoys hanging out with friends, shopping online and listening to music. She is someone who knows how to enjoy life.
Доброго времени суток. Решил поставить fedora linux рядом с windows, освободил место на диске, всё как положено установил. Линукс работает, а в винду обратно загрузиться не могу. Том с windows жив-здоров, но при запуске компа нет окна выбора OC. В биосе есть единственный вариант загрузки — название моего ssd, вариант windows boot manager пропал. При загрузке grub и нажатии клавиши shift выдаёт три варианта- и все fedora linux. Как это дело исправить и загрузиться обратно в windows?
-
Вопрос задан
-
1247 просмотров
Пригласить эксперта
Запусти в Терминале os-prober…
Отработает, потом выполни:
sudo grub-mkconfig -o /boot/grub/grub.cfg
за внедрение в менюшку груба остальных осей, в том числе и винды, отвечает os-prober
установи и обнови менюшку груба.
это если без уефей всяких 
Загрузка Uefi или Legacy ?
Проверьте в /etc/default/grub не стоит ли GRUB_DISABLE_OS_PROBER=false .
Покажите список разделов диска. Диск 1 или несколько ?
Решено полной очисткой диска и переустановкой windows.
Войдите, чтобы написать ответ
-
Показать ещё
Загружается…
Минуточку внимания
Updated on Apr 28, 2025
| 🎯Goal: | Guide Windows beginners to fix ‘BOOTMGR Is Missing‘ error easily |
| 💻Supported OSes: | Windows 11/10/8/7, and Windows Server systems |
| 🧰Fixes for BOOTMGR Is Missing: |
|
| ⏱️Duration: | 10-20 minutes |
Some users may have the experience of getting a black screen, saying BOOTMGR is missing, or seeing a similar error message displayed on the screen while trying to boot their Windows 10/8/7 PCs:
- «BOOTMGR is Missing. Press Ctrl+Alt+Del to restart»
- «BOOTMGR is missing Press any key to restart.»
- «BOOTMGR image is corrupt. The system cannot boot.»
- «Couldn’t find BOOTMGR»
Stay here if you are experiencing a similar BOOTMGR Is Missing error as the example shown above, and continue reading on this page from EaseUS. You’ll get a satisfying solution to bring back the BOOTMGR file and make your computer bootable again:
Windows 7 fix for bootmgr is missing?? (I activated my disk by accident, and now it won’t boot up help!). from Reddit
This guide will talk about how to fix the «Bootmgr is missing» error on Windows 10 or Windows 7. Let’s get started. Also, don’t forget to share this amazing page to help more of your friends to get rid of this issue online:
How to Fix BOOTMGR Is Missing Windows 7/8/10
BOOTMGR (Windows Boot Manager) is a read-only hidden file that is located in the root directory of a partition marked Active, which is usually a system-reserved partition without a drive letter. BOOTMGR loads volume boot code automatically and starts your operating system from the hard drive.
We’ve provided below 10 fixes that you can use to fix the Windows 7/8/10 BOOTMGR is missing problem. Go through in order, step by step, and check which one will work for you.
Fix 1. Restart Your Desktop or Laptop
It’s not a deceptive trick; sometimes, rebooting PC can help you repair BOOTMGR. Pressing the power button on your PC to shut it down and reboot it again.
And if it doesn’t work, try the next way.
Fix 2. Reset All Internal Data and Power Cables
BOOTMGR missing error may be due to unplugged, loose, faulty power, or controller cables. Here is how to do so:
- Press the power button on your computer to shut it down.
- Remove and reconnect all SATA cables and power cables between the PC and hard drives.
- Reboot the PC again.
Fix 3. Remove External Storage Devices
To rule out the possibility that the ‘BOOTMGR is Missing’ error appears because your PC is trying to boot from a non-bootable device, make sure you have removed all the removable media, such as a USB flash drive, a floppy disk or other unbootable disks.
If the above physical fixes worked, do remember to share these tips and help your friends who are experiencing a similar issue online immediately:
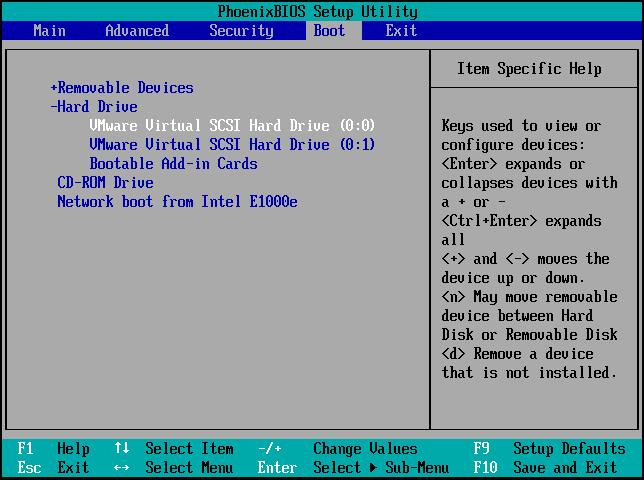
Fix 4. Change the Boot Order in BIOS
Does the Windows 10 BOOTMGR missing issue still happen? Check the boot sequence in BIOS and make sure the correct hard drive or other bootable device is listed as the first to boot your computer.
Step 1. Restart your Windows 10 or Windows 7 computer. When the computer starts to boot up, press the DEL or F2 key to enter BIOS Setup.
Step 2. Then, under the «Boot» tab, check if the hard drive is set as the BIOS’s first boot device. If not, change the boot drive. Finally, restart the PC.
Fix 5. Recreate BCD from Windows Recovery Environment (WinRE)
A corrupted or incorrectly configured BCD could cause BOOTMGR is missing error. bootrec.exe is a tool built in the Windows Recovery Environment (Windows RE) that you can use to troubleshoot and repair boot configuration data and master boot records. To rebuild BCD from Windows Recovery Environment (WinRE), follow these steps:
Step 1. Insert the Windows installation disk into your PC and, restart it from the disk, click «Repair your computer».
Step 2. Click «Troubleshoot» > «Advanced options» > «Command Prompt» and type: C: and hit Enter.
Step 3. In Command prompt, type the following commands in order and hit Enter:
- bootrec /fixmbr
- bootrec /fixboot
- bootrec /rebuildbcd
- Chkdsk /f
Step 4. After completing each command successfully, type exit and restart your computer. It should be able to boot up and run properly again.
Fix 6. Repair Corrupted MBR and BCD with Bootable USB
If the MBR is corrupted, the computer won’t boot up and shows BOOTMGR is missing error message, and you’ll need to rebuild the MBR on your PC with the help of reliable partition manager software — EaseUS Partition Master.
You can repair the corrupted MBR or BCD file with a bootable USB and fix BOOTMGR is missing on Windows 10/8/7 without an installation disc.
#1. Rebuild/Fix MBR
Step 1. Create a WinPE bootable disk
- Launch EaseUS Partition Master, and click «Bootable Media» on the toolbar. Select «Create bootable media».
- Click «Next» to finish the process.

Step 2. Boot EaseUS Partition Master Bootable USB
- Connect the bootable USB or CD/DVD to your PC.
- Press F2 or Del when you restart the computer to enter the BIOS screen. Set and boot your computer from «Removable Devices» or «CD-ROM Drive». And then EaseUS Partition Master will run automatically.
Step 3. Rebuild MBR
- Click «Toolkit» and choose «Rebuild MBR».

- Select the disk and the type of MBR. Then, click «Rebuild».

- After that, you can see «MBR has been successfully rebuilt on Disk X».

#2. Rebuild BCD
Step 1. Start EaseUS Partition Master after connecting the external drive/USB to your computer, go to «Bootable Media,» and click «Create bootable media.»
Step 2. Select an available USB Drive or CD/DVD and click «Create.» You can also burn the Windows ISO file to the storage media.

Step 3. Connect the created bootable drive to the new computer and reboot the computer by pressing and holding F2/Del to enter the BIOS. Then, set the WinPE bootable drive as the boot disk and press F10 to exit.
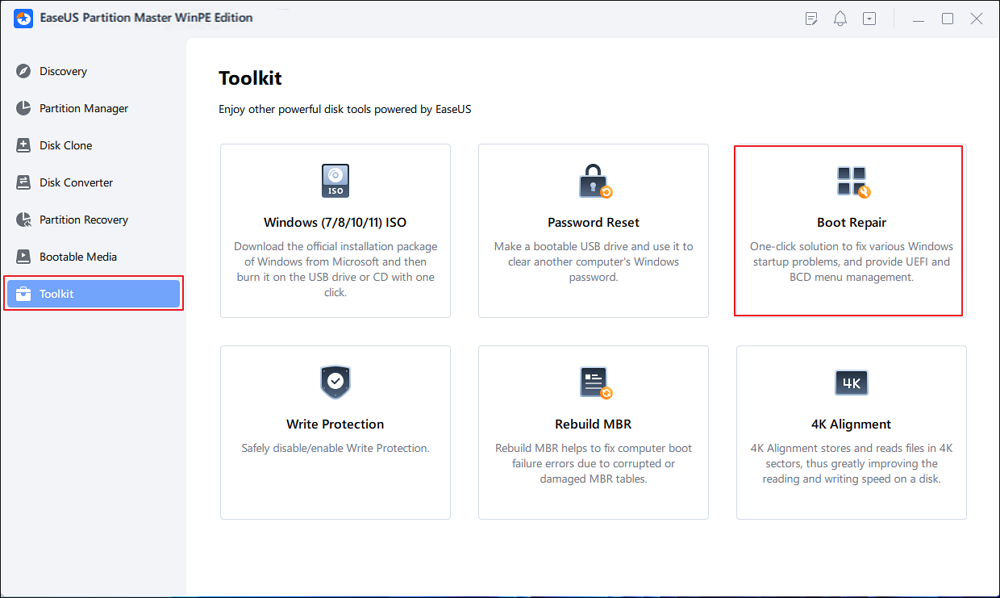
Step 4. Boot the computer again and enter the WinPE interface. Then, open EaseUS Partition Master and click «Boot Repair» under the «Toolkit» option.
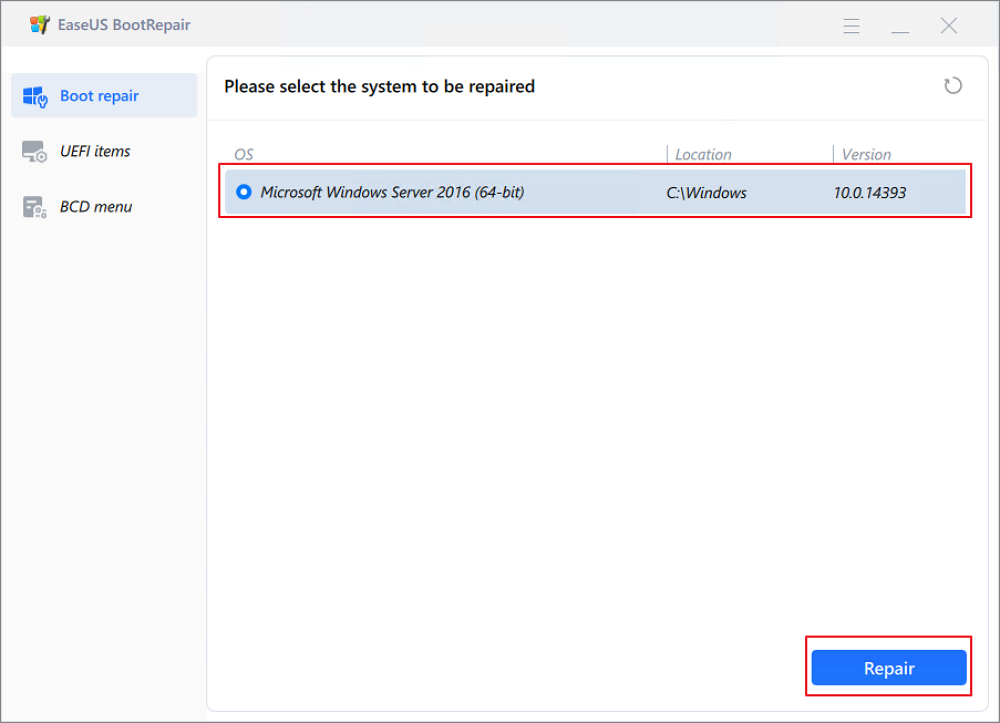
Step 5: Select the system you want to repair and click «Repair.»
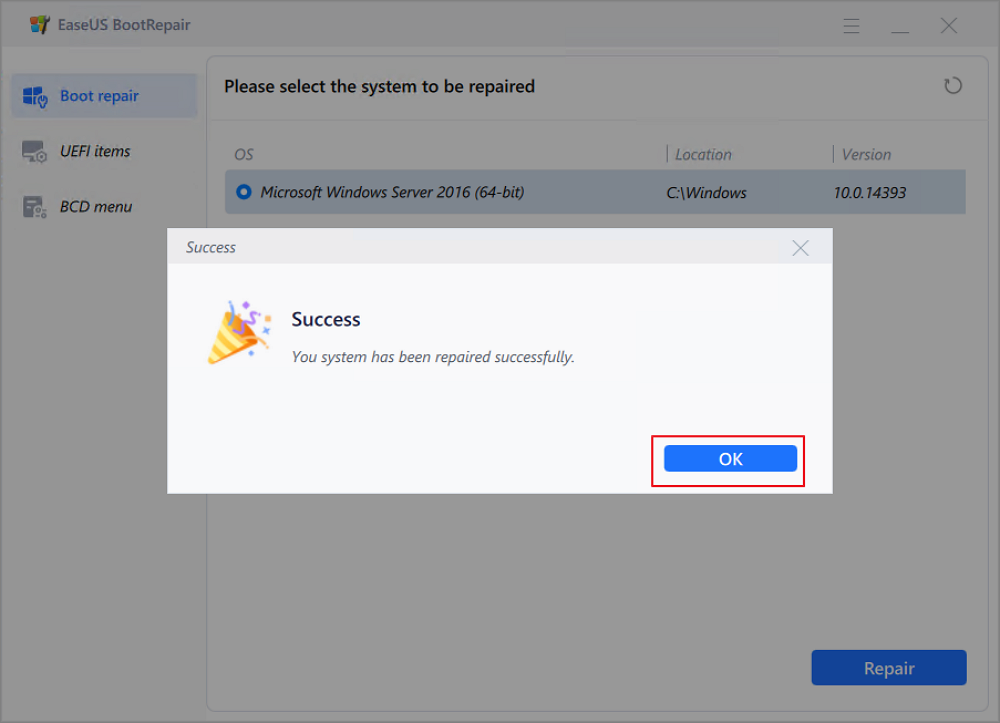
Step 6. Wait a moment, and you will receive an alert that the system has been successfully repaired. Click «OK» to complete the boot repair process.
Aside from rebuilding MBR and BCD, EaseUS Partition Master also enables you to manage and optimize disk performance with the following features:
- Transfer free disk space from one drive to another directly.
- Resize/move, merge, clone partition, and check file system error.
- Clone disk, convert to MBR/GPT, convert to dynamic/basic, and even wipe data.
- Migrate OS to SSD to speed up Windows without reinstalling.
Share this tutorial to help your friends get rid of the BOOTMGR Is Missing error from their computers with success:
Fix 7. Run Startup Repair from Windows Recovery Environment (WinRE)
The procedures for running Startup Repair on Windows 7 and Windows 10 are a bit different, so please refer to the respective guide according to your system:
#1. Run Startup Repair on Windows 7:
Step 1. Insert the Windows installation disc, and then start the computer. If there is no installation CD, how to fix BOOTMGR is missing in Windows 7 without CD? You can create a bootable USB from ISO and then boot the PC from the USB drive to enter the Windows Recovery Environment.
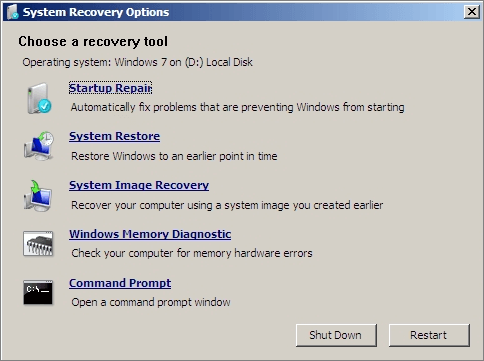
Step 2. Select «Startup Repair» under the System Recovery Options window to continue.
#2. Run Startup Repair on Windows 10
Step 1. Insert the Windows 10 bootable installation disc, and then start the computer.
Step 2. Press a key when the message Press any key to boot from CD or DVD appears.
Step 3. Select a language, a time and currency, a keyboard or input method, and then click «Next». Select «Repair your computer».
Step 4. Click «Troubleshoot» on the Choose an option screen. Then, on the Troubleshoot screen, click the «Advanced» option.
Step 5. On the Advanced options screen, click «Automatic Repair or Startup Repair».
Restart your computer and check whether you have successfully fixed BOOTMGR is missing in Windows 10. If not, continue.
Fix 8. Perform a System Restore if You Have a Backup Image
If System Restore is enabled on your computer, you can try to run System Restore from Windows Recovery Environment (WinRE) to fix Windows 7 or Windows 10 BOOTMGR is missing problem.
Step 1. Repeat the steps above to find the Startup Repair options by using the Windows installation disc. This time, select «System Restore».
Step 2. Follow the System Restore Wizard instructions and select the appropriate restore point.
Step 3. Select Finish to restore the system.
These are all the possible methods that might help you fix BOOTMGR is missing error caused by various reasons. We hope that these solutions are helpful. Otherwise, I am afraid you may need to consider doing a clean Windows Installation or replacing the PC hard drive.
Fix 9. Perform a Clean Installation of Windows
Performing a clean installation of Windows will completely remove Windows from your PC and install it again from scratch. This way can certainly resolve the BOOTMGR is missing issue on the Windows operating system.
A clean installation will erase all of your data, so you must back up your important files in advance, or you will lose them all. If you can’t access your data to back them up, use professional data recovery software — EaseUS Data Recovery Wizard to recover data from a computer that won’t boot. Follow this guide to clean install Windows on your computer:
Tips for Clean Install Windows 10 without Losing Data
Fix 10. Replace the Hard Drive
If the clean installation fails neither, you’re most likely facing a hardware issue with your hard drive. Then, recover your data from the corrupted hard drive and replace the hard drive.
For a step-by-step guide, follow this link: How to Replace Hard Drive in Dell Laptop.
Then, you will not encounter the BOOTMGR missing error in Windows.
When BOOTMGR is missing or corrupted, Windows can’t boot and shows you the ‘BOOTMGR is Missing’ error. If you’re on Windows 11, refer to this page to find fixes:
4 Solutions To Fix Bootmgr Is Missing Windows 11
Don’t fret, and take it easy! This guide will walk you through several effective solutions to fix the bootmgr missing Windows 11 issue. Read more >>
If you encounter any difficulties following these instructions, our dedicated support team is available to provide personalized guidance.
EaseUS experts are available to provide you with 1-on-1 manual services (24*7) and help fix Windows boot error, BSOD or computer boot loop issues. Our experts will offer you FREE evaluation services and efficiently diagnose and resolve system boot failure, Windows stop codes and OS lagging issues using their decades of experiences.
- 1. Fix BSOD — blue/black screen of death error due to Windows update or other reasons.
- 2. Get rid of Windows boot error such as no bootable device found, or BCD file corruption.
- 3. Serve to fix 0X000_error codes on Windows system or OS boot loop issues.
What Are the Causes of BOOTMGR Missing in Windows
When you start your computer, the PST (stands for Power On Self Test) processes begin to run by BIOS before booting your Windows copy. The BOOTMGR is missing error occurs after the Power On Self Test (POST) is complete and Windows starts to load.
The BOOTMGR error can be caused by many things, including:
- The BOOTMGR files are corrupted and misconfigured.
- Windows boot sector is damaged or missing.
- The PC is set to boot from a non-bootable device.
- Errors, corruptions, or bad sectors appear on the hard drive.
- Other reasons include outdated BIOS, loose or damaged hard disk interface cables, hard drives, and operating system upgrade issues.
Don’t forget to share this practical page to help your friends repair their PC with BOOTMGR missing issue successfully:
Conclusion
On this page, we collected 10 practical fixes for Windows users to apply to fix «BOOTMGR is Missing» issue on Windows computers. As for Windows beginners, please try the first 5 methods. EaseUS Partition Master, with its Boot Repair features and the other four manual fixes, could get rid of most of the blue screen issues with BOOTMGR missing issue.
Both old and new computer owners can take these tips to make their computer boot up and work normally again. Also, if you have some computing skills, the latter 5 tips, from Method 6 to Method 10, are also helpful in repairing computers with missing BOOTMGR file issue successfully.