
Если какая-то игра сообщает, что для работы её функций требуется DirectPlay, не торопитесь искать, где скачать эти компоненты в Интернете — подход к установке этого недостающего компонента совсем иной.
В этой простой инструкции для начинающих о том, как установить DirectPlay для Windows 10 или Windows 11 и почему их не требуется скачивать.
Установка DirectPlay в новых системах
Компоненты Microsoft DirectPlay могут требоваться для старых игр, но в новых ОС, таких как Windows 10 или Windows 11 по умолчанию отключены, хотя присутствуют и готовы к включению — то есть скачивать DirectPlay не требуется. Чтобы установить DirectPlay, выполните следующие простые шаги:
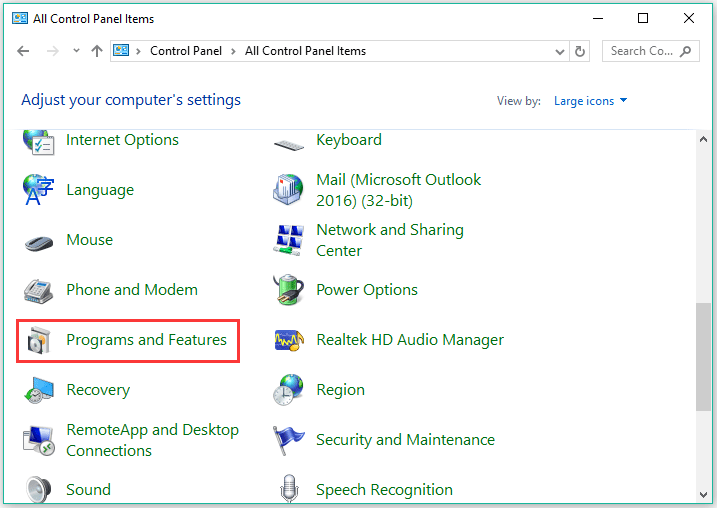
- Откройте панель управления и перейдите в раздел «Программы и компоненты» (чтобы он отображался, справа вверху в поле «Просмотр» установите «Значки»). Для открытия панели управления можно использовать поиск в панели задач Windows 10 и 11. Второй способ быстро открыть «Программы и компоненты» — нажать клавиши Win+R, ввести appwiz.cpl и нажать Enter.
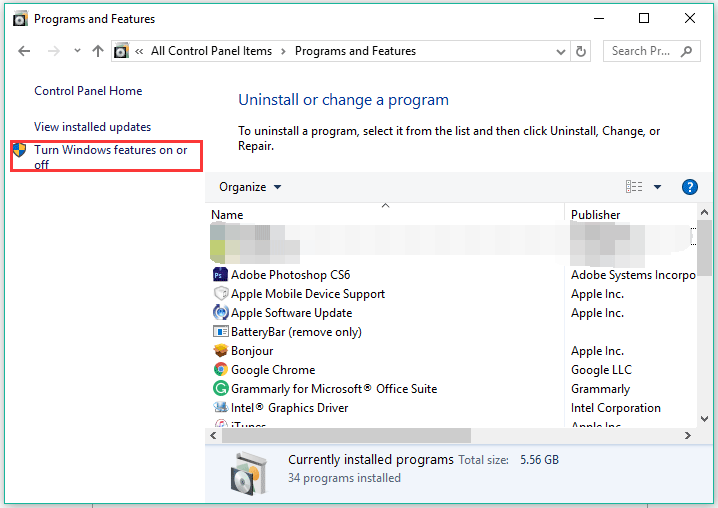
- В окне со списком программ, слева нажмите по пункту «Включение или отключение компонентов Windows».

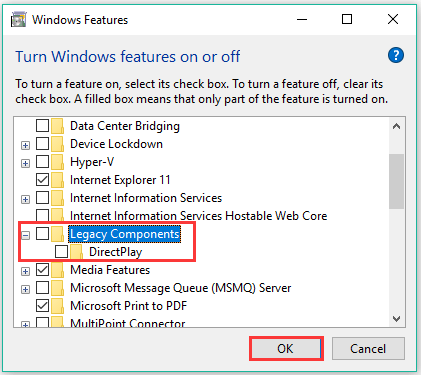
- В списке доступных компонентов найдите раздел «Компоненты прежних версий» (Legacy Components), а затем отметьте «DirectPlay» и нажмите «Ок».


В результате DirectPlay будет установлен на вашем компьютере или ноутбуке: обычно перезагрузка не требуется, но, если игра продолжает сообщать об отсутствии необходимых компонентов, попробуйте выполнить перезагрузку.
Дополнительный способ быстрой установки DirectPlay:
- Запустите командную строку от имени администратора
- Введите команду
dism /online /Enable-Feature /FeatureName:DirectPlay /All
и нажмите Enter


Видео инструкция
В завершение еще один момент: если игре требуется DirectPlay, не исключено что после включения компонентов она потребует и каких-то файлов от старых версий DirectX. Если этого произойдёт, скачайте веб-установщик DirectX с официального сайта Майкрософт https://www.microsoft.com/ru-ru/download/details.aspx?id=35 и он установит всё недостающее.
-
Home
-
Partition Manager
- What Is DirectPlay? How to Get It on Windows 10?
By Vicky |
Last Updated
If you are a game lover, you may have heard about DirectPlay Windows 10. This post will give a detailed explanation of DirectPlay, including what it is, its security, and how to enable it on Windows 10. By the way, you can try MiniTool Partition Wizard if you are seeking a professional partition manager for your Windows 10 PC.
DirectPlay Windows 10
How to play games that predate 2008 on your Windows 10 computer? Try DirectPlay.
What is DirectPlay? DirectPlay is a core API library that was a component of earlier DirectX versions. However, Microsoft abandoned DirectPlay in favor of Games for Windows Live.
Although DirectPlay is a deprecated feature in Windows 10, you can find it on your Windows 10 computer and enable it for running old games. As to how to enable DirectPlay on Windows 10, please move to the next part.
Enable DirectPlay Windows 10
This part will show you how to enable DirectPlay on Windows 10.
Before trying enabling DirectPlay on Windows 10, please make sure you have an administrator account. If you do not have one, please create it right now.
Now, let’s see how to enable DirectPlay on Windows 10.
Step 1: Press Windows + R at the same time to call out the Run dialogue box.
Step 2: Input control in the Run dialogue box and hit the Enter key.
Step 3: On the Control Panel window, switch the view mode to Large icons.

Step 3: Find the Programs and Features option and click it.
Step 4: Look at the left side of the new window, click the Turn Windows features on or off link.
Step 5: If you are required to enter the local account details, input them to open the above link.
Step 6: On the new window, locate the Legacy Componenfavts feature and expand it. Check the DirectPlay feature to enable it and then click the OK button to save the change.
Step 7: Reboot your Windows 10 computer.
Now you can play your favorite old games on your Windows 10 computer.
How to Troubleshoot Directplay Issues?
Some users reported that they ran into some issues related to DirectPlay such as “An app on your PC needs the following Windows feature: DirectPlay”. If these issues happen in your case, the following solutions I gleaned from the website could be helpful.
Solution 1: Disable antivirus
Antivirus may prevent you from launching an old game and enabling DirectPlay. So, when you run into issues related to DirectPlay, you can try disabling your antivirus. To disable antivirus, you can refer to the tutorial.
Solution 2: Try Compatibility mode
Steps to run an old game in compatibility mode:
Step 1: Right-click the game logo and select the Properties option.
Step 2: On the Properties window, switch to the Compatibility tab.
Step 3: Under the Compatibility tab, do the following changes one by one.
- Check the box next to the Run this program in Compatibility mode setting.
- In the following box, select the system that was the latest platform when the game launched.
- Check the box next to the Run this program as an administrator setting.
Solution 3: Try the Program Compatibility Troubleshooter
Step 1: Type Run programs made for earlier versions of Windows in the Windows search bar (can’t type). Select the result.
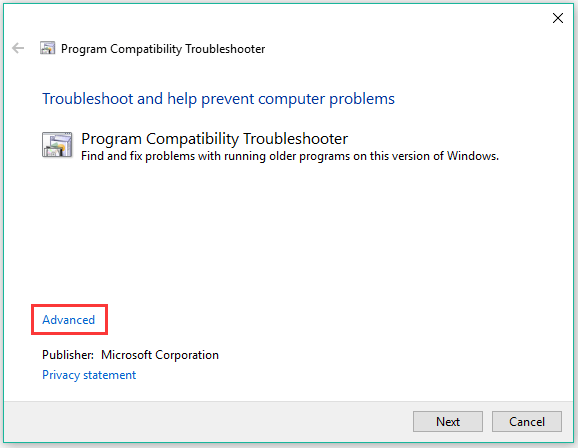
Step 2: On the program Compatibility Troubleshooter window, click the Advanced link.
Step 3: Click the Run as administrator link and you will see a window with administrative permissions. Then, click the Next button on this window.
Step 4: Select the game you are having issues and then click the Next button. If the game is not on the list, please select Not listed which is at the top of the list.
Step 5: Follow the on-screen instructions to finish the fix.
About The Author
Position: Columnist
Vicky is a website editor who has been writing tech articles since she was graduated from university. Most of her articles talk about Windows PC and hard disk issues. Some of her articles also touch on YouTube usage and issues.
During her spare time, she likes to spend time reading, watching videos, and sitting on her Yoga mat to relax.
Table of contents
- How to enable DirectPlay in Windows 10
- Initiate Windows Features
- Find DirectPlay from Legacy Components
- Enable DirectPlay
- Restart Your Computer
- How to install DirectPlay on Windows 11
- How to download DirectPlay
- How to fix my DirectPlay
- Temporarily Disable Your Anti-Virus Software Application
- Use Task Manager to Shut Down Anti-Virus Processes
- Re-Enable DirectPlay from Windows Features
- Use Command Prompt to Install DirectPlay with the No-Restart Option
- Use DirectPlay with Compatibility Mode
Windows has come a long way as a useful computer operating system (OS). Some of the best features of this OS have been further developed over the years. Others have long lost their usefulness and have been replaced by more efficient features. However, there are a few Windows features like DirectPlay that can still serve a purpose.
DirectPlay used to be one of the most important features on Windows, especially for gamers. The feature served as a multigame functionality and allowed more than one user to play the same game at the same time. In other words, with DirectPlay, two or more Windows users could play games together or against one another.
As DirectPlay is part of the Microsoft DirectX, it also boosts gameplay on Windows. As such, experienced Windows gamers will be able to tell when DirectPlay was enabled on a computer and when it was not. However, DirectPlay is no longer a default feature on Windows 10 or 11. This means that you need to enable it yourself before you can use it.
This article is all about showing you how to enable DirectPlay in Windows 10 and even how to install DirectPlay on Windows 11. The article also gives pointers on how to solve DirectPlay issues using different methods, and download it to use or keep for future references.
How to enable DirectPlay in Windows 10
Enabling DirectPlay in Windows 10 is not difficult. As long as you pay attention to the following steps, you should be able to get DirectPlay running on your Windows machine in 2 minutes or less. These steps can be simplified as follows:
- Initiate the Windows Features from Control Panel
- Locate DirectPlay from the Legacy Components option
- Enable DirectPlay by ticking the checkbox next to it
- Click OK and restart your computer to save and activate your changes.
If these steps are simple enough for you, then all is well and good. However, since we are not all computer wizards, here are a few more specifics on enabling DirectPlay in Windows 10 or 11.
Initiate Windows Features
Windows Features are very important components for the smooth running of the Windows OS. They work the same way as addons and extensions on web browser applications. More importantly, these features are original, meaning that they are not created by third-party developer companies but by Microsoft Corporation. Therefore, they are trustworthy.
If you want to get DirectPlay running on your Windows computer, you don’t have to rely on a third-party software distributor. Instead, you can simply enable it from Windows Features the same way you enable any other DirectX component.
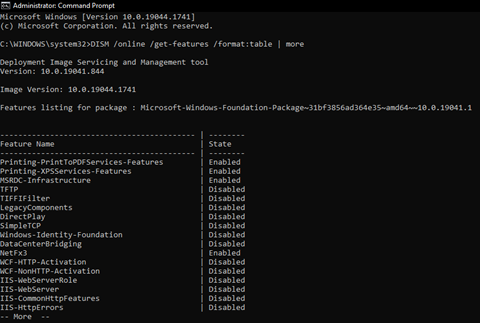
First, however, you may want to check to see if it is already enabled. You can do that by running Command Prompt as Administrator. Then type in the following code:
DISM /online /get-features /format:table | more
If you notice that DirectPlay is disabled, you can turn on Windows Features using any of the following methods:
- Click
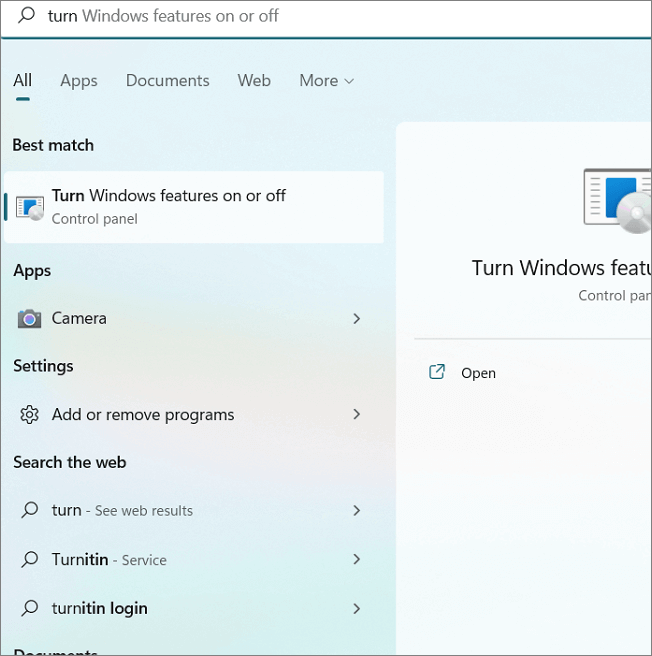
Windows key + Sto enter search mode, and typeTurn Windows features on or offinto the search bar. Select the best match categorized under Control Panel and tapENTER. - Click
Windows key + Rto start the Run prompt, and typeoptionalfeatures. Click OK to launch Windows Features this way. - Launch Command Prompt and click the Run as administrator. Then type the following and tap
ENTERon your keyboard afterward:
DISM /online /enable-feature /featurename:DirectPlay
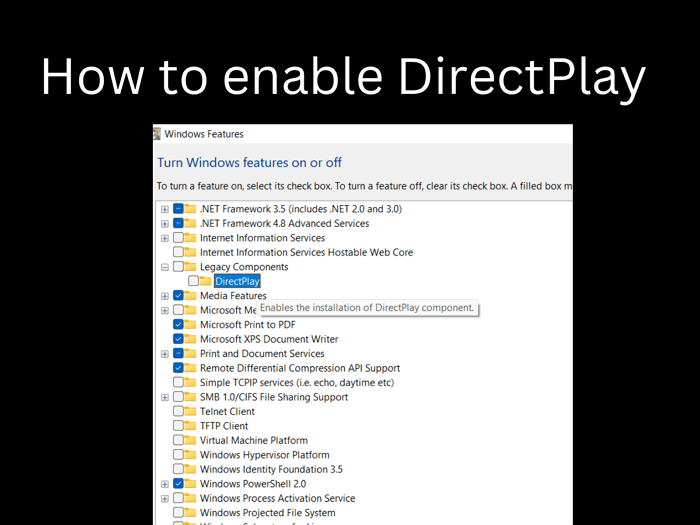
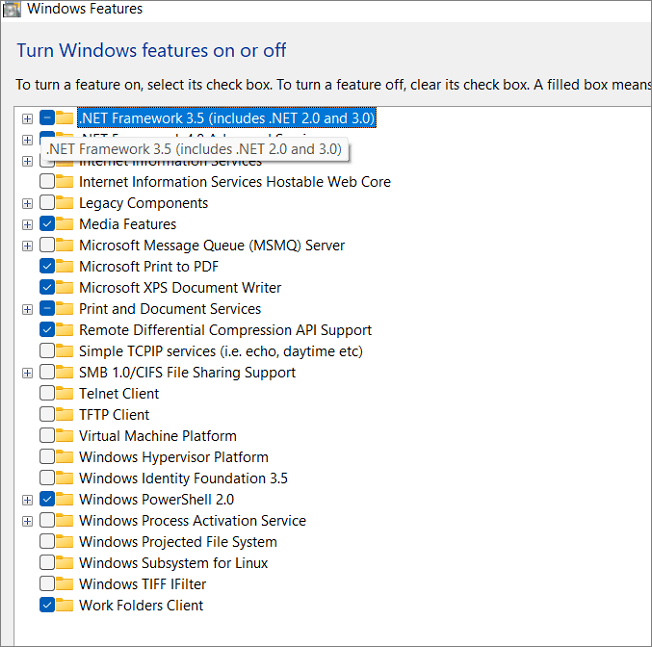
Find DirectPlay from Legacy Components
If you were unable to use the Windows command line to enable DirectPlay, it means that there is a requirement that your OS does not meet yet. There is nothing to worry about. You can use either of the other methods. Both of these methods will lead you to the same place—the Windows Features page where you can Turn Windows features on or off. Here, you will see all of the main Windows features that allow your OS to run smoothly.
Some of these features serve as the framework for others. For example, NETFramework is one of the main components that make it possible for certain software applications to run on your computer. So, just to be thorough, make sure that this feature is enabled.
DirectPlay should be the only feature under the Legacy Components folder on this Windows Features page. To locate it, simply click on the box next to the Legacy Components folder to expand it.
Enable DirectPlay
Once you have located DirectPlay in the Legacy Components folder, you can enable it by simply clicking on the empty box behind it.
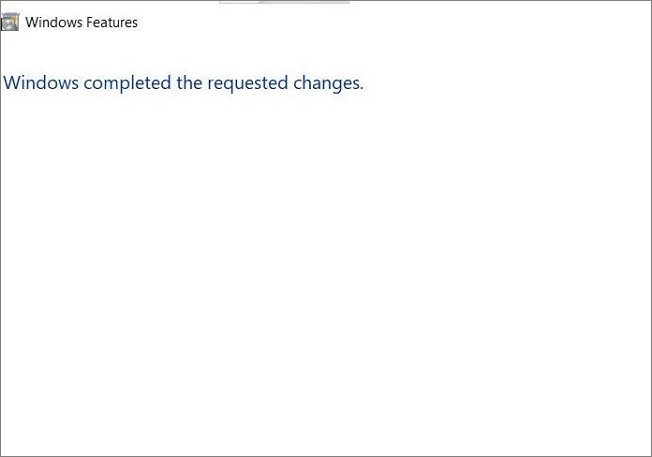
Also, make sure that your computer is connected to the internet so that it can download and install the feature immediately. You should see a prompt telling you that your computer is applying changes to Windows Features.

Restart Your Computer
Once the changes have been applied, close the Windows features page and restart your computer.
Once your OS and up and running, you can enter DISM /online /get-features /format:table | more in Command Prompt (as an administrator) to see if DirectPlay is now included in the list of enabled Windows features.
How to install DirectPlay on Windows 11
Installing DirectPlay on Windows 11 is not different from what we have shown above. Microsoft has made it possible for you to simply install the DirectX component as one of the many Windows features. The installation process does not have to be a separate process from the enabling process. As a result, you don’t have to download DirectPlay as a separate software application from a third-party distributor.
So, in essence, to install DirectPlay on Windows 11, you only need to follow the steps we outlined in the previous section. Use Command Prompt as an administrator to enable DirectPlay. This will work if DirectPlay is already installed in your Windows OS. If it isn’t, you can use the Windows Features option to achieve the same results as the Command Prompt option.
Whichever option you choose, make sure to restart your computer to implement the changes.
How to download DirectPlay
As earlier mentioned, you don’t have to download DirectPlay to have it enabled on your PC. The feature is part of the native Microsoft Corporate store. However, downloading it as a standalone computer program is difficult, if not impossible.
Of course, many third-party software distributors will be happy to offer you versions of DirectPlay. But the chances of these versions negatively affecting the operation of your PC are very high. So, it is better to ignore these downloadable DirectPlay variants and stick to the original DirectPlay version from Microsoft.
How to fix my DirectPlay
Even though DirectPlay is a native Microsoft application, there are times it becomes impossible to use. During such times, it would either seem as if the application has completely disappeared from your PC or it has been disabled. However, you will find that it is still included in the list of enabled Windows features. In such instances, you need to fix DirectPlay.
Fixing DirectPlay is not difficult. There are many ways to go about this. So, if you find error messages like Microsoft.directx.directplay.DLL Not Found, you can use any of the following methods to fix DirectPlay.
Temporarily Disable Your Anti-Virus Software Application
Many useful antivirus software applications can boost Windows protection against malware. Auslogics Anti-Malware, for example, is very effective in detecting and removing all kinds of malware from your PC.
Download Auslogics Anti-Malware
Detects malware, spyware and viruses, then safely removes them from your PC to help keep it as secure as possible. The program is made to complement your main antivirus.
Nevertheless, the operation of advanced anti-virus applications like Auslogics’ can prove to be a deterrent for the activation of DirectPlay and other outmoded Windows components. Therefore, you have to temporarily disable your anti-virus software to get DirectPlay running.
There are many ways to disable anti-virus applications on Windows. The most popular of these is using the disable switch from the anti-virus itself. To do this, you only need to
- Locate the anti-virus software on your taskbar or among the apps on your taskbar tray.
- Right-click on the anti-virus icon to bring up the options.
- Select the option that indicates a temporary deactivation.
It is important that you don’t restart your PC once you have deactivated the anti-virus. Most of these applications are programmed to start running whenever you boot up your computer. Therefore, restarting your PC immediately after deactivating the anti-virus will only delay you, and not fix the problem.
Once you have disabled your anti-virus application, try enabling DirectPlay from Windows Features or through Command Prompt once again.
Use Task Manager to Shut Down Anti-Virus Processes
If you notice that DirectPlay runs temporarily and is disabled once again, you might have to uninstall the antivirus you are currently using and replace it with another. But if you don’t want to uninstall the anti-virus, you can simply terminate the anti-virus processes whenever you need to use DirectPlay.
To terminate anti-virus processes so you can use antiquated Windows components like DirectPlay, you only need to:
- Use
Ctrl + Shift + Esckeys to start Task Manager. (You can also useWindows key + X + Tfor the same purpose.) - From the 7 tabs of the Task Manager window, select the Processes tab.
- From the Apps, Background processes, and Windows processes header options, select everything related to the anti-virus and use the End task option after you right-click on these processes. You have to do this one by one under each category.
- Close the Task Manager window and try to use DirectPlay again.
If you notice that your anti-virus starts running after you restart your Windows:
- Bring up Task Manager once more and navigate to the Startup tab this time. This tab shows all your installed programs that Windows automatically launches whenever the OS boots up.
- Select the anti-virus application and right-click it to bring up options.
- Select the Disable option to deactivate the launching of your anti-virus.
This should solve the problem of your anti-virus blocking DirectPlay once and for all. Whenever you need to use your anti-virus or if you no longer need to use DirectPlay, simply activate the anti-virus application processes from Task Manager. You should also enable the anti-virus from the Startup tab in Task Manager.
Re-Enable DirectPlay from Windows Features
Although the previous suggestions on how to fix DirectPlay problems are effective, they may be necessary. Maybe there was a problem during installation, so DirectPlay was not correctly enabled on your Windows PC. In that case, you only need to re-enable DirectPlay to get it working.
The best means of re-enabling DirectPlay to fix .dll not found issues is to use Windows Features. We outlined the steps for this in an earlier section, so you should be able to easily enable DirectPlay this way.
However, if you find that DirectPlay is enabled, first uncheck the box next to DirectPlay (that is, under Legacy Components in the Windows Features window) and restart your PC. Once your OS is up and running, go back to Windows Features and enable DirectPlay. This should fix the problem.
Use Command Prompt to Install DirectPlay with the No-Restart Option
If disabling and enabling DirectPlay using Windows Features does not work, you may have to fall back on Command Prompt to fix it. As earlier stated, make sure you start Command Prompt (or Windows PowerShell) as an administrator. Then copy and paste the following code:
C:/ dism /Online /enable-feature /FeatureName:”DirectPlay” /NoRestart
Once the process is complete, DirectPlay should have been enabled.
Use DirectPlay with Compatibility Mode
The last method to fix issues with DirectPlay on Windows 10 and 11 is compatibility mode. This method allows your OS to run a particular program under an older configuration state. All you need to do here is:
- Right-click on the desktop application of the game to select the Open file location option.
- Select the game file and right-click to bring up the options.
- Select Properties and click on the Compatibility tab.
- Check the Run this program in compatibility mode for option and select any of the older Windows OSes.
- Click Apply and close the window, and then restart the game to use DirectPlay.
Whether you want to install or fix DirectPlay, the Windows Features option and Command Prompt serve as reliable methods. As long as you use any of these methods well, you should be able to decide how DirectPlay runs on your Windows 10 and 11.
DirectPlay is one of the most important features for gamers on Windows software. It allows users to play multiplayer games online at the same time. People can join the multiplayer games using Directplay and connect with friends. You can install DirectPlay on the Windows computer easily. The method here is you do not need to manually download it from any store. The Operating System set up the app to suit the games on your computer. Throughout this article, we will learn various methods on how to install DirectPlay on Windows 10/11.
Windows is rapidly improving its technology to compete with the new market competitors. The OS has the best features, with more efficient features replacing the older ones to suit modern-day needs. One of such old features is DirectPlay, which is a special multimedia component. It is a part of Microsoft DirectX, which establishes network connections over the net to enable multiplayer games in the older versions.
In Windows 10/11, the feature is not active by default, but the DirectPlay files are still a part of the OS. So we do not need to download anything, just activate the feature to get it working on your PC.
In this article, we will explore ways how to install DirectPlay using various methods. Continue reading to learn about them in detail.
How to enable DirectPlay in Windows
Enabling DirectPlay is a simple steps process. You can do it in no time if you know the steps. There are multiple ways in which you can enable the DirectPlay app. We can install the app using the control panel, Deployment Image Servicing and Management (DISM), and Powershell. Let us see how to install DirectPlay using these methods.
Method1. Enable DirectPlay using Turn Windows features on or off
Learn the steps and follow them to get Directplay working on your system.
Step 1. Open the Turn Windows features On or Off using the control panel.
Step 2. Scroll down and find DirectPlay in the Legacy Components.

Step 3. Check both components by ticking the box.
Step 4. Click «OK» and restart the device to notice the changes.
The OS sets up the files and enables the app, now you can play the games that require DirectPlay.
Method2. Enable DirectPlay with DISM Command
Users can enable DirectPlay using the DISM command. Follow the steps to know how to activate the feature using DISM.
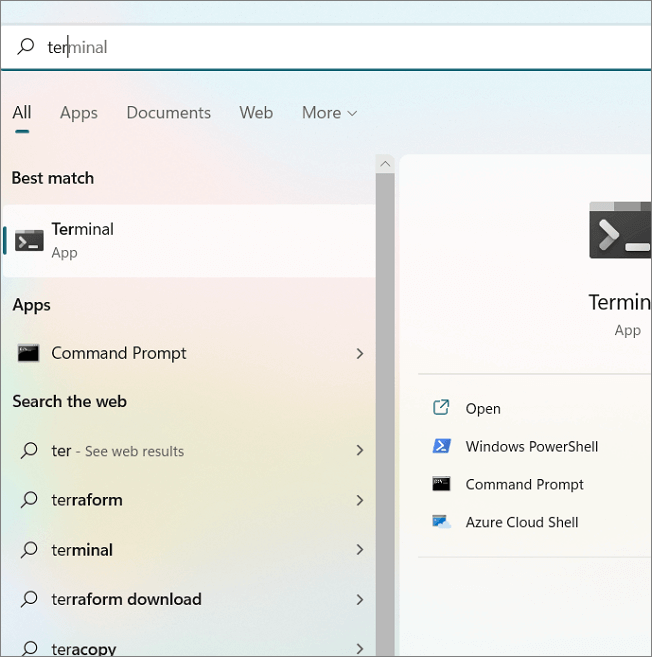
Step 1. Click on «Windows» on the taskbar, and Search for Terminal App. You can use the same steps to complete this process in the Command Prompt too.
Step 2. The app opens Powershell (default window), Copy and paste the following command in the window.
dism /online /Enable-Feature /FeatureName:DirectPlay /All

Step 3. Run the command and wait until the DISM setup the DirectPlay files for use.
Step 4. You will see the Restart Prompt after the process. Press Y to restart your device.
Method3. Enable the DirectPlay using Powershell
Step 1. Press the keys Windows + X simultaneously and Click the «Windows Terminal (Admin)» to open it.
Step 2. This action invokes the Powershell Window, now copy and paste the following command:
Enable-WindowsOptionalFeature –FeatureName «DirectPlay» -All -Online
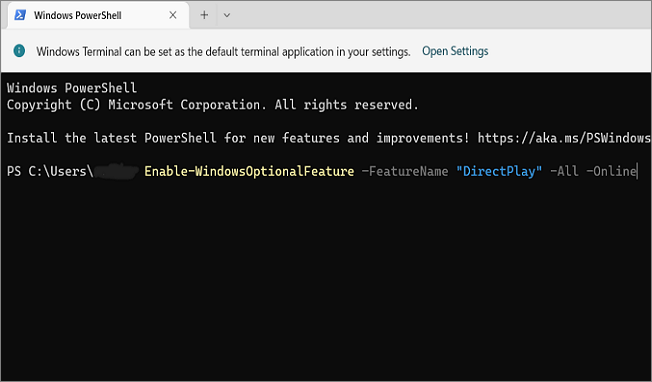
Step 3. Run the command and wait for the OS to complete the setup for installing Directplay.
Step 4. After completion, You can see the Restart Prompt on the screen. Press Y to restart your device.
These three are simple methods you can follow to install or activate DirectPlay. In some cases, along with DirectPlay, some games require the older version of DirectX. You can get this from the official website of Microsoft.
Even after enabling Directplay and downloading DirectX, if you are still unable to play the Legacy games, this means there is a software component that is not supporting the feature. In such instances, the problem is with some software that supports the frameworks. In Turn Windows features on or off section, You can see the NETFramework, one of the main components of the computer.
Enable the NETFramework as a precautionary measure to run the games smoothly without further interruptions.
Final Verdict
DirectPlay is already inbuilt into the OS, you just have to install DirectPlay. This action runs the multiplayer games without any interruptions. There are three simple methods on how to install DirectPlay, follow the steps mentioned to get the software running on your OS. You can face some issues regarding the supporting frameworks due to the unavailability of DirectX. Download it and enable other frameworks to get the DirectPlay for games.
If you have found this article useful, share it with your friends.
DirectPlay is an old API library that was used by DirectX to run games. It’s so old that modern games don’t need it any more which is why, you won’t find it on your Windows 10 PC. You might have the latest version of DirectX running but DirectPlay may not necessarily be enabled. Games simply don’t need it anymore however, if you’re trying to run an older game, you will need to enable DirectPlay on Windows 10 to get it going. Fortunately, it’s pretty easy to do.
DirectPlay will need DirectX installed if you’re trying to run a game so go ahead and install it. Once you’ve done that, you can proceed to enable DirectPlay.
Open the Control Panel and select Programs. Click the Turn Windows features on or off option. Alternatively, open File Explorer and enter the following in the location bar. Again, click Turn Windows features on or off.
Control Panel\Programs
In the window that opens, you will see a list of features that you can enable. This is where you can enable or disable Internet Explorer if you want. In this list of items, look for Legacy Components and expand it. Under it, you’ll find DirectPlay. Select it and click OK.
The component will take some to install and you will run into one or two prompts. Once it has been installed, you will have to reboot your system for the change to take effect.
Playing games
While DirectPlay may be an essential component needed to play older games, it likely isn’t the only thing you need. Older games that were built for older operating systems, architectures, and technology relied on multiple components to run. After you enable DirectPlay on Windows 10, check what else is required to run the game you want to play.
The older the game is, the more you will need to install additional components to make it compatible. You can try looking into emulators and they may take the pain out of running an older game however, there are few emulators that can run every single legacy game there is. The games themselves are too many to account for and legacy games might span a period of ten years which will make for different requirements depending on when it was released. It’s been a while since gaming improved and quite a lot of the popular games are now old, legacy ones which is why there’s no single emulator to run them all. In fact, you might be better of running an older version of Windows in a virtual machine and installing and playing the game on it if it’s very old.

Fatima Wahab
Fatima has been writing for AddictiveTips for six years. She began as a junior writer and has been working as the Editor in Chief since 2014.
Fatima gets an adrenaline rush from figuring out how technology works, and how to manipulate it. A well-designed app, something that solves a common everyday problem and looks