
Quick Answer
- So this was a quick guide on how you can show internet upload and download speed in the taskbar on your Windows 10 computer.
- However, there’s no such native option in Windows, and you’ll have to rely on third-party software to add a net speed monitor.
- In this article, let’s see how you can show internet speed in the taskbar on Windows 10.
Showing internet speed on Android devices is quite easy. In fact, most manufacturers bundle it as a built-in feature. However, there’s no such native option in Windows, and you’ll have to rely on third-party software to add a net speed monitor. In this article, let’s see how you can show internet speed in the taskbar on Windows 10.
Show Internet Speed on Windows 10 Taskbar
Here, we’ll be using third-party software called NetSpeedMonitor to show internet speed in the taskbar. The tool will help you monitor your real upload and download speeds on your Windows computer.
Now, while it works without any hitches on older versions of Windows, Windows 10 users may find it tricky to install and set up the software. Below we’ve mentioned a step-by-step guide through which you can show internet speed on the taskbar using NetSpeedMonitor.
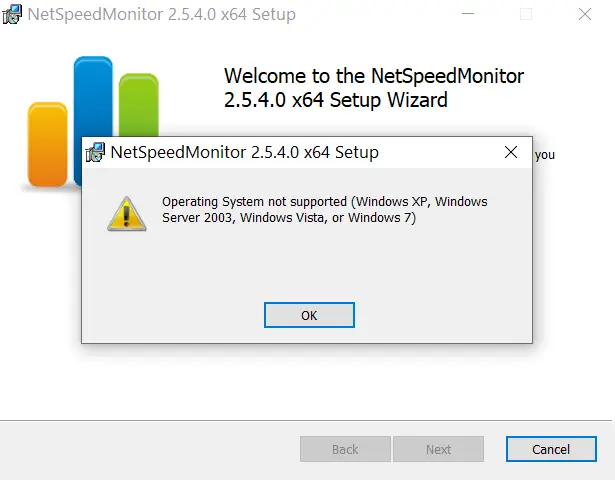
1] To start with, download NetSpeedMonitor from the link given below. The software is free to use and needs to be installed in compatibility mode on Windows 10.
NetSpeedMonitor 64-bit NetSpeedMonitor 32-bit
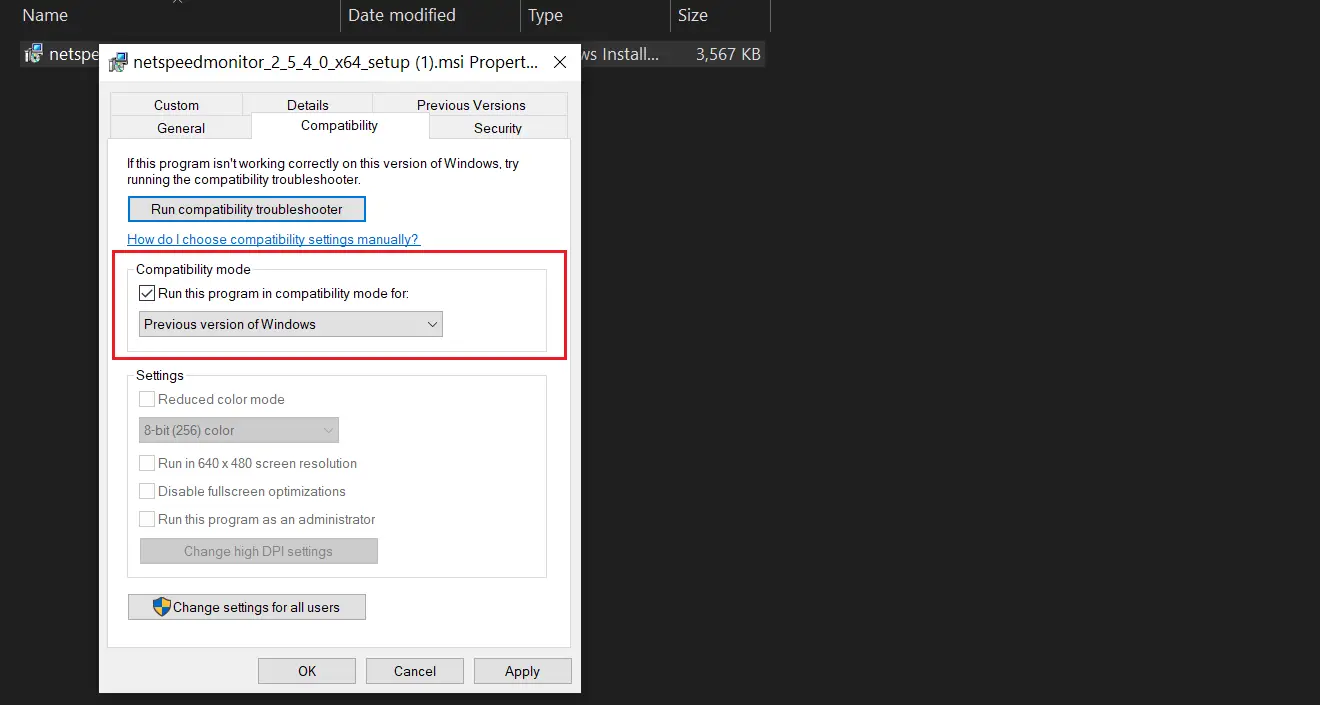
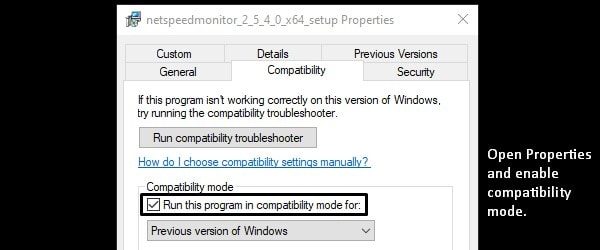
2] Once downloaded, click the setup and install it normally. If you’re on Windows 10, right-click the setup > Properties > Compatibility and tick the Compatibility mode for previous versions of Windows. Hit Apply to save changes.
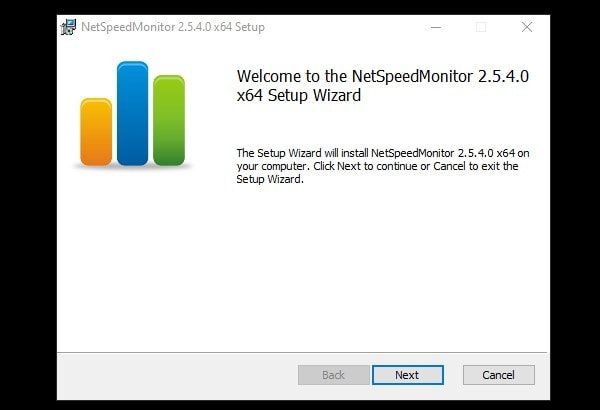
3] You can now double-click the setup file to install the software normally on Windows 10.
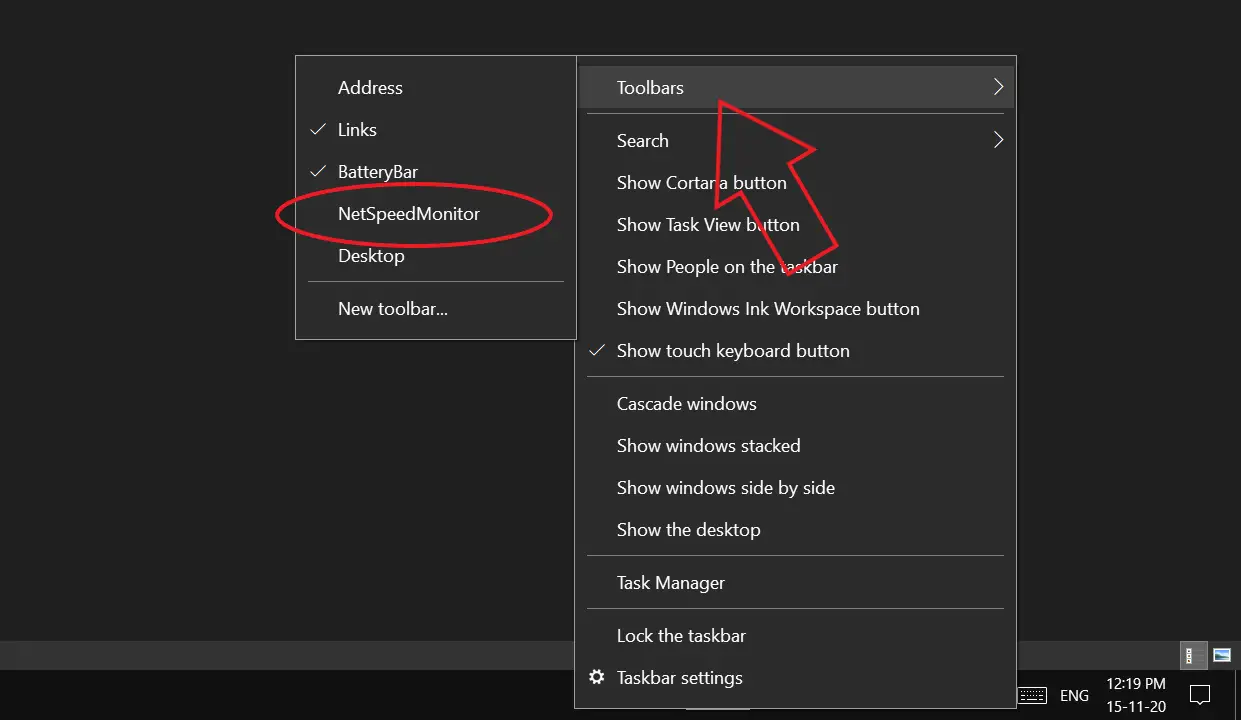
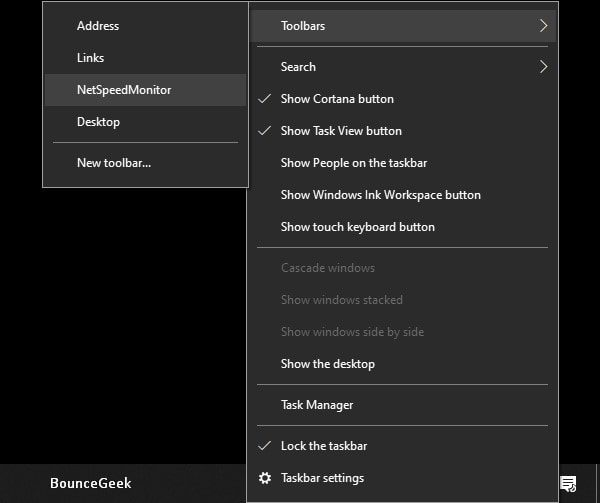
4] After you’ve installed the tool, right-click on the Windows toolbar, and select Toolbars from the available options.
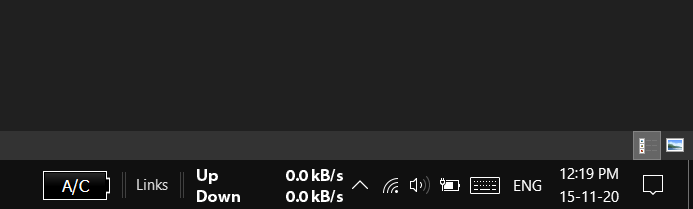
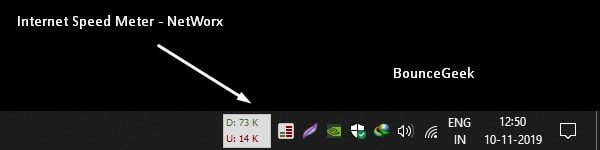
5] Click on NetSpeedMonitor to enable it. As you select it, your internet upload and download speed will automatically start showing in the taskbar at the bottom right.
NetSpeedMonitor Doesn’t Work?
As it was with my case, it’s likely that the NetSpeedMonitor will be stuck at zero and won’t display any speed, even if you’re connected to the internet. In that case, you can follow the easy fix below.
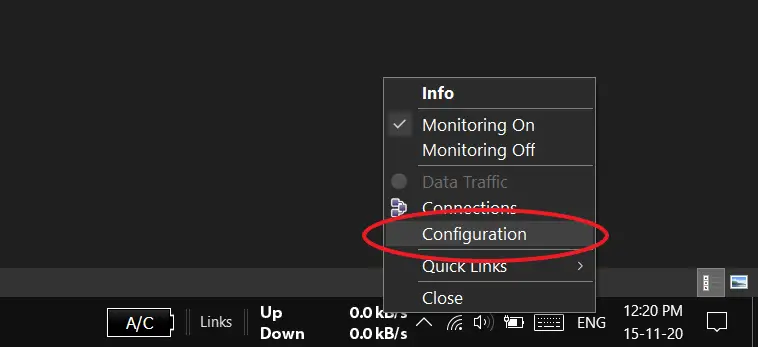
- Right-click on the NetSpeedMonitor meter at the toolbar.
- Select Configuration.

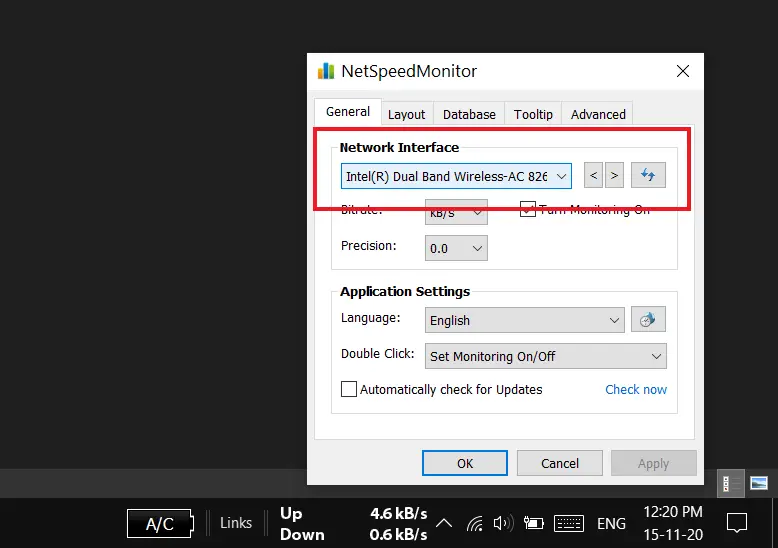
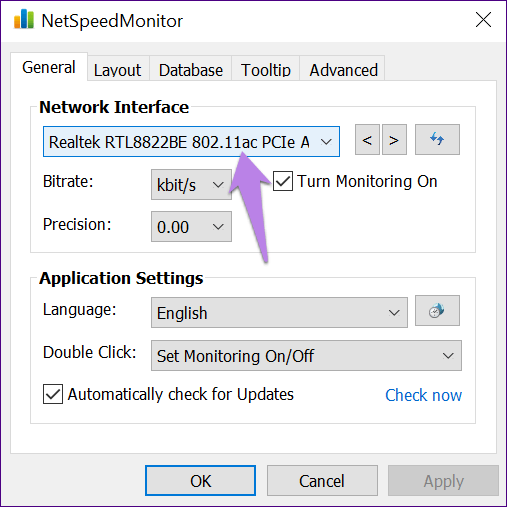
- Once the configuration window opens, click the network interface drop-down menu and select a different interface to see if the meter starts working.

- If it doesn’t, try selecting another interface. Also, make sure that monitoring is enabled.
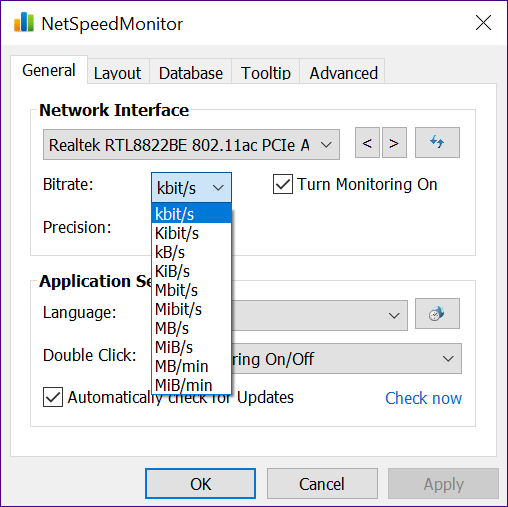
By default, NetSpeedMonitor shows speeds in kB/s (Kilobits per second). You can change it to KB/s or MB/s or the Bitrate of your choice through the given option. Also, you can turn on/ off the internet speed meter by double-clicking the same in the toolbar.
Wrapping Up
So this was a quick guide on how you can show internet upload and download speed in the taskbar on your Windows 10 computer. We’ve also mentioned a quick fix for NetSpeedMonitor not working issue. Do try it and let us know your experience in the comments below. Feel free to reach out in case of any related doubts or queries.
Also, read- How to Install macOS Dynamic Wallpapers on Windows 10
Was this article helpful?
YesNo
Recently, Microsoft released Windows 11 stable build for the general public. But still, Windows 11 doesn’t come with an Internet Speed Meter. Like, we get in the Android status bar. Yes, by going into Task Manager > Performance > Wi-Fi (Or Ethernet). You can check your current Internet speed. But, there isn’t any option to get a real-time internet speed meter in the Windows Taskbar. That means, there isn’t any way to check, how much your Computer is consuming the internet in real-time.
In this situation, third-party network speed indicator Software comes in handy. There are many free and paid tools available to show internet speed in the Taskbar. But, In this post, I will suggest to you some best tools. These tools will show you real-time internet upload and download speed on your Windows PC.
How Internet Speed Meter is helpful?
Network Speed Meter is very helpful if you don’t have a high-speed or stable Internet connection. In Windows, updates get downloaded automatically. And, if you have a slow connection, then, it can affect the work that you’re doing. Also, If your Internet speed fluctuates. Then, keeping an eye on real-time Internet speed is useful. Basically, it will help you to track connection problems.
Best Internet Speed Meter for Windows.
NetSpeedMonitor. (Free)
If you’re looking for free Internet Speed Monitor software. That can show you real-time download and upload speed. Then, this is the best tool, which you can use. There isn’t any specific site to download this software. You can download it from Softpedia for free. Though, this tool is designed to run only on Windows XP, Vista, and 7. So, it might not work directly in Windows 8 and 10, and Windows 11. You have to run the installer in compatibility mode.
1. Download NetSpeedMonitor from Softpedia. Right-Click on the installer > Click on Properties.
2. Click on the Compatibility tab > Mark the “Run this program in compatibility mode for” and click on OK.
3. Now, you can install it and you will not get any compatibility error.
4. After installing NetSpeedMonitor, Right-click on the taskbar. Go to Toolbars and click on “NetSpeedMonitor”.
Note: In Windows 11 you won’t find the Toolbars option. So, scroll down, and you will find a tool to enable Toolbars.
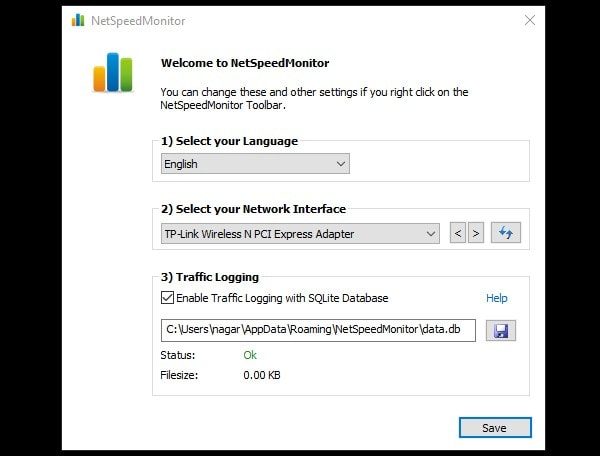
5. NetSpeedMonitor one-time setup window will now appear. Select the right network interface from it. And, click on save.
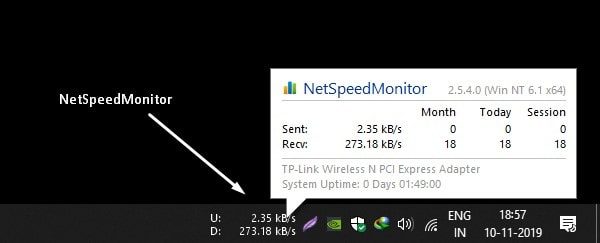
6. That’s it. You will now be able to see the speed meter by NetSpeedMonitor in Taskbar.
7. Right-Click on Net Speed Meter, and choose the “Configuration” option. You can select Bitrate and customize it.
NetWorx (Windows, macOS, and Linux.)
NetWorx is one of the most powerful tools to measure Internet Speed. It also helps to track suspicious activity on the network, like, hacker attacks and trojan horses. You can also use it as a bandwidth monitor if you have limited Internet. NetWorx also can identify the possible reasons or sources of network issues. The Software also can send you a visual and sound alert when the connection is down. Or, when some suspicious activity is occurring in Windows. With Networx, You can always see statistics of monthly and weekly bandwidth usage.
And, yes, you can enable Internet Speed Meter in Windows Taskbar or Toolbar. And, the speed meter will show you real-time upload and download speed. You can also customize the speed indicator graph. There are multiple graph types available to select. Like, histograms, numeric, polylines, and columns. You can also select the transfer rate unit between Bytes and Bits. But, I suggest you select Bytes/s.
Install Networx and Show Internet Speed Meter in Taskbar.
1. First, download the latest version of Networx and install it like normal Windows software. (During installation select recommended settings only.)
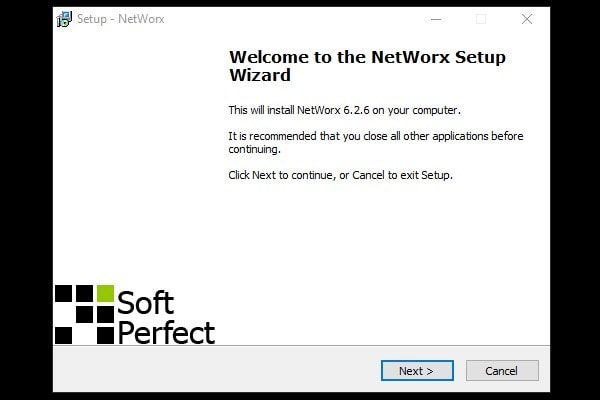
2. After installing it successfully, NetWorx welcome window will appear. Select Language and Click on Next.
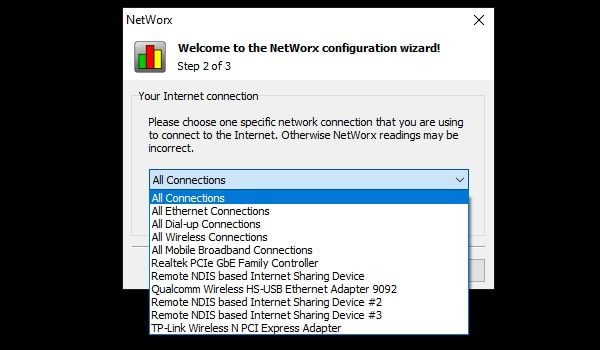
3. Now NetWorx will ask you to select your Internet Connection. You can either select a specific connection or can keep it on “All Connections”.
4. Click on Next, and then click on Finish.
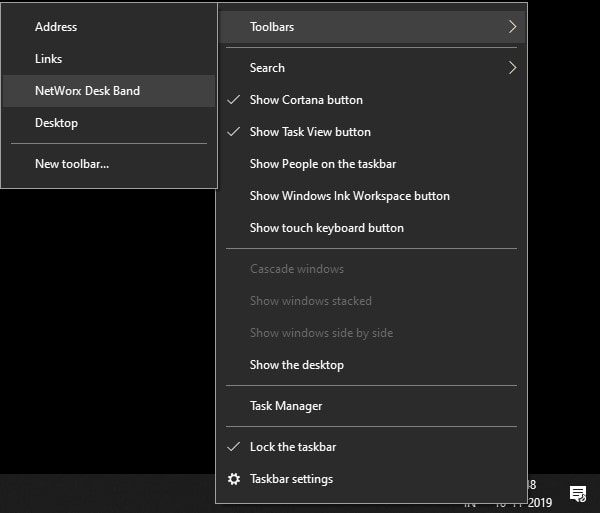
5. To show the Internet speed meter now in the toolbar. Right-Click anywhere in the taskbar. And then, take the mouse pointer over Toolbars. And, mark the “NetWorx Desk Band” option.
6. That’s it. You will be able to see real-time download/upload speed in Taskbar.
7. And, to customize graph settings, Right-Click on the Networx icon, and then click on Settings. (Don’t forget to select Bytes/s in the transfer unit rate. And, Apply the settings.)
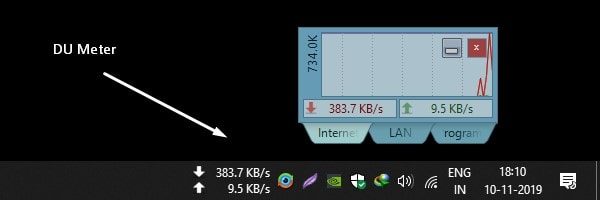
DU Meter.
After NetWorx, DU Meter is the best Internet Speed Meter for Windows 10 and Windows 11. DU Meter comes with 30 days of free trial. And, if you find it useful then you can buy its license. There are two license plans available to choose from. Single-user and business licenses and Family Pack. Currently, for Indian users, it is available for $9.95. DU meter also allows adding a speed meter in the taskbar. And, that’s all you wanted.
You can customize the color & sound of the DU Meter. So basically, you can do audible network monitoring. Also, you can customize the traffic monitor Graph. Apart from the taskbar or toolbar, you can enable a floating window of the DU Speed monitor. The data transfer rate unit option is also available. It also shows the highest Internet speed.
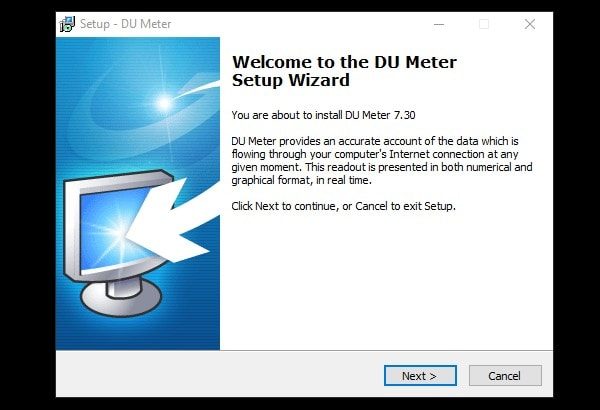
1. Download DU Meter and install it on your Windows PC.
2. To enable Network Speed Monitor in the taskbar. Right-Click on the toolbar. Take the mouse pointer on Toolbars > Click on “DU Meter” to enable.

3. That’s it, now you will be able to see upload and download speed in Taskbar.
4. To enable or disable the floating Internet speed Monitor, Right-Click on the DU Meter icon. And, click on the Show/Hide DU Meter option. And, by clicking on “User options”, you can access settings. Can customize DU Meter.
Get Back Windows 11 Quick Launch Toolbar.
Microsoft has removed Quick Launch Toolbar in its latest version of Windows 11. And, all the mentioned Network speed monitor work with the Toolbar option. So, if you want to get back the toolbar option, then you have to install Explorer Patcher from Github. It’s a free and open-source add-on for Windows 11, that enables Windows 10 toolbar in Windows 11.
1. Simply download ExplorerPatcher from GitHub. Click on the Assets section to get the setup file.
2. Run the setup. Windows Protected screen might appear, click on More Info > Run Anyway.
3. UAC window will appear, click on Yes.
4. The screen will go black for a minute. And, after that, when you right-click on the taskbar you will get the toolbar option.
Yes, if you like you can uninstall it from Control Panel.
Summing-up
So, these are some of the best speed-tracking software for Windows 10/11. Personally, I found “NetSpeedMonitor” best. Because it’s free and offers what exactly you want. DU Meter and Networx come with a trial period. But, offers many other features, that’s why you need to buy a subscription. Though, if you don’t want to spend to get some extra features. Then, NetSpeedMonitor is best for you.
Quick Tips
- NetSpeedMonitor is an app that allows you to display your internet speed in the taskbar on Windows.
- You can use the real-time speed monitor to check your download speeds and verify if your internet connection is functioning.
Download Internet Speed Meter for Windows for Real-Time Monitoring
To show internet speed in the taskbar on Windows, you will have to download a dedicated app known as NetSpeedMonitor.
The app was primarily designed to run on Windows Vista, XP, and 7. However, that doesn’t mean it won’t work on Windows 8 and above. However, you must run the installer in Compatibility mode. Don’t worry. We have mentioned the steps in detail. Follow along.
Step 1: Download NetSpeedMonitor.
Note: You will see two download options: x86 and x64. The first one is for 32-bit Windows systems and the second one is for 64-bit. Click on the desired option and save the file on your computer.

Step 2: Navigate to the folder where you downloaded the file.
If you are running Windows version below Windows 8, installation should start normally. Anything above it will throw an error that the operating system isn’t supported. Don’t worry. It’s time to tweak certain things.
Step 3: Right-click on the setup file and go to Properties.
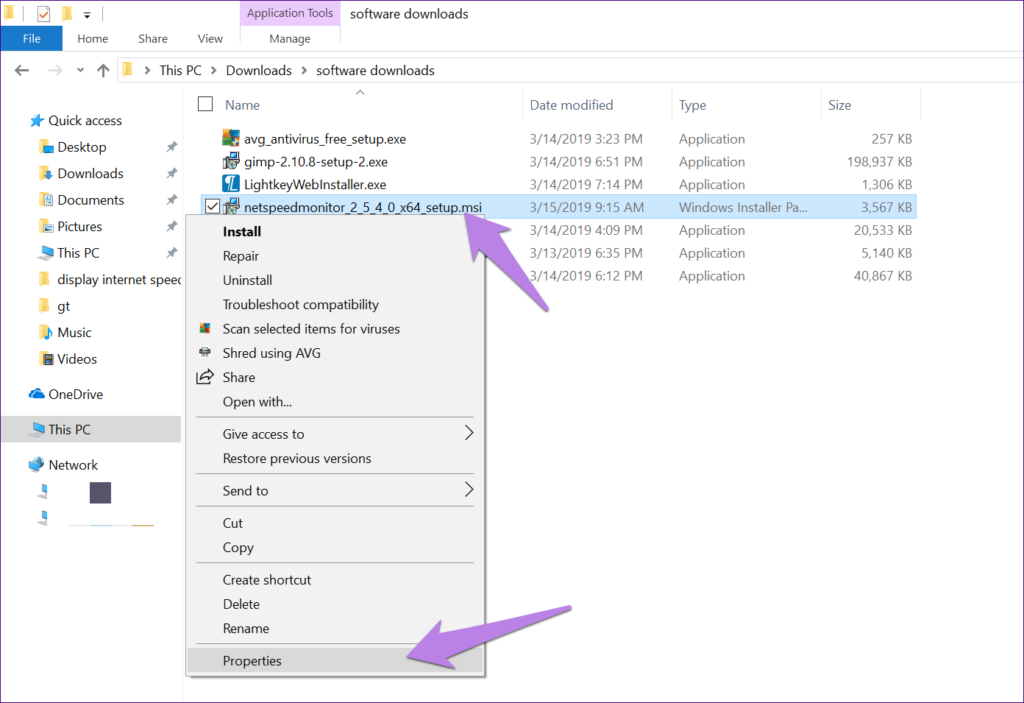
Step 3: Click on the Compatibility tab. Here, check the box next to Run this program in compatibility mode for:. The drop-down should show Previous version of Windows.
Step 4: Click on Apply followed by OK to save the changes.

Step 5: Now, double-click the setup file to begin the installation and follow the on-screen instructions during the installation process.
Once installed, you will have to enable the program.
Step 6: Right-click anywhere on your taskbar and hit the Toolbars option. Here select NetSpeedMonitor.

As soon as you enable it, you will see the upload and download speed on the taskbar.

Why Is NetSpeedMonitor Not Working
In case the visible download speeds are stuck at zero, here’s how to fix it.
Step 1: Right-click the network speed monitor in the taskbar and select Configuration.

Step 2: In the NetSpeedMonitor window, change the Network interface to a different one and click OK.
The meter should be working now. If it’s still not working, repeat the process with other interfaces to find the one that works.
Tips and Tricks for Network Speed Monitor on Windows
Here are some useful tips and tricks to make the best use of the internet speed monitoring tool on your Windows computer.
1. Change the Speed Unit
By default, the NetSpeedMonitor tool shows speed in kilobits/second (Kbit/s), which might look a bit weird for normal usage. To make it readable, we suggest changing it to kilobytes/second (KB/s), Megabits/second (Mbit/s), or any other metric that you like.
Fun Fact: The Internet and download speed are two different things.
To change the speed metric, right-click on the NetSpeedMonitor on the taskbar and select Configuration. Choose the speed unit from the drop-down menu next to Bitrate.
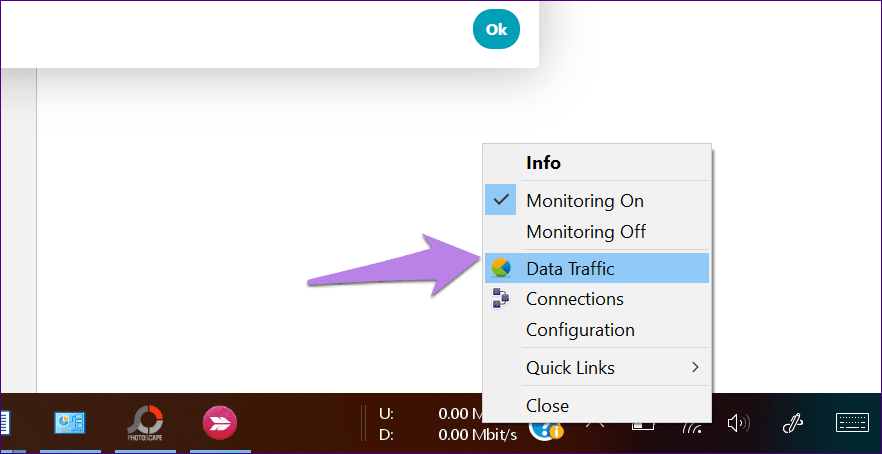
2. View Data Usage
The NetSpeedMonitor tool not only shows the current internet speed but you can also use it to track your data usage. For that, right-click the NetSpeedMonitor meter on the taskbar and hit Data Traffic.
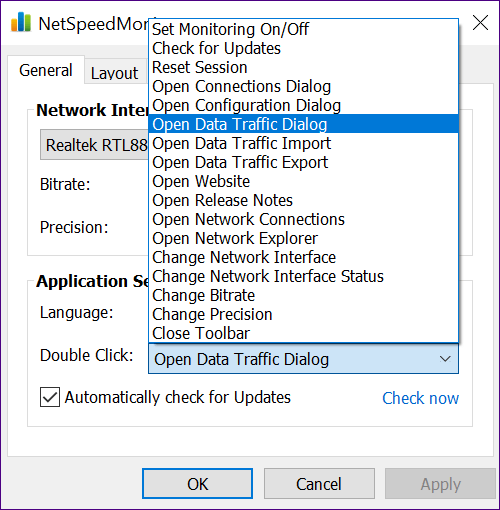
3. Change the Double Click Action
Double-clicking the NetSpeedMonitor tool on the taskbar is used to enable and disable the monitoring, by default. However, you can customize it and use it for an action of your choice. We have set it to open the data traffic window.
To change it, right-click the NetSpeedMonitor meter on the taskbar, go to Configuration, and choose the appropriate option for Double Click.
4. Customize Tool Font
If you like tinkering with fonts, the app lets you customize the font style and size. For that, right-click the NetSpeedMonitor meter on the taskbar > go to Configuration > Layout. Here, change the font.

Further, you can also customize the initials shown for upload and download speed in Layout.

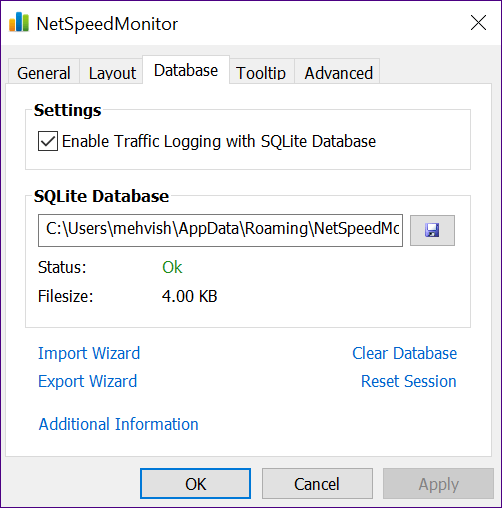
5. Export Database
Since the tool records everyday data usage, you can export its database too. This is handy if you wish to get an overview of your data usage or speed patterns. To do so, right-click the NetSpeedMonitor meter on the taskbar > go to Configuration > Database > Export Wizard.
FAQs for Displaying Internet Speed on Taskbar in Windows
1. Does the network speed monitor show accurate speeds?
Yes, the NetSpeedMonitor app displays your network speed in real time by connecting to the internet. Hence, it is reliable and accurate.
2. Can I check my computer’s internet speed using CMD?
Windows gives you the ability to check internet speeds using the command prompt. Launch a cmd window and enter “ping google.com”. You should be able to see the network speed listed.
Was this helpful?
Thanks for your feedback!
The article above may contain affiliate links which help support Guiding Tech. The content remains unbiased and authentic and will never affect our editorial integrity.
Sign in to your MUO account

Do you want to monitor how your internet speed fluctuates over time? Displaying upload and download speeds on the taskbar is an easy way to track your internet quality. Unfortunately, Windows does not offer a native way to display internet speed on the taskbar, but we can use third-party apps instead.
Below, we’ll show you how to display internet speed on your taskbar using TrafficMonitor, one of many tools available for this purpose.
How to Display Internet Speed on the Taskbar on Windows
To display internet speed on your taskbar on Windows, follow these steps:
- Go to MajorGeek’s official website to download TrafficMonitor.
- Extract the downloaded folder (check out different ways to extract ZIP files on Windows), and you’ll see an executable file for running the tool, so you don’t have to install the tool.
- Click the Yes button in the UAC window.
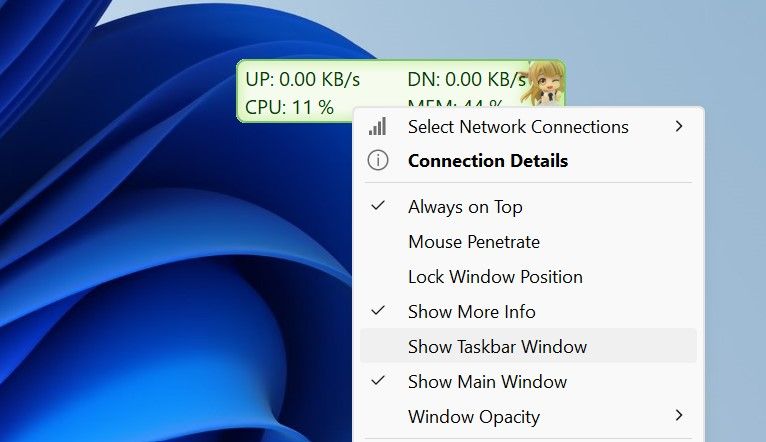
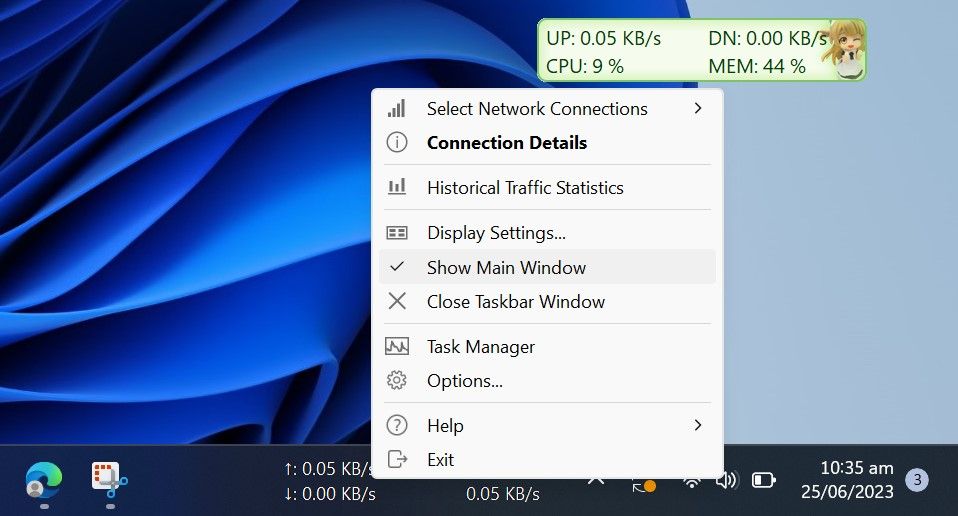
- Initially, the app’s main window will display your internet’s download and upload speed.
-
To display these numbers on your taskbar, right-click on the tool’s main window and select Show Taskbar Window.

-
Once the internet speed appears on the taskbar, right-click the main or taskbar window and uncheck Show Main Window. This will hide the main window of the tool.

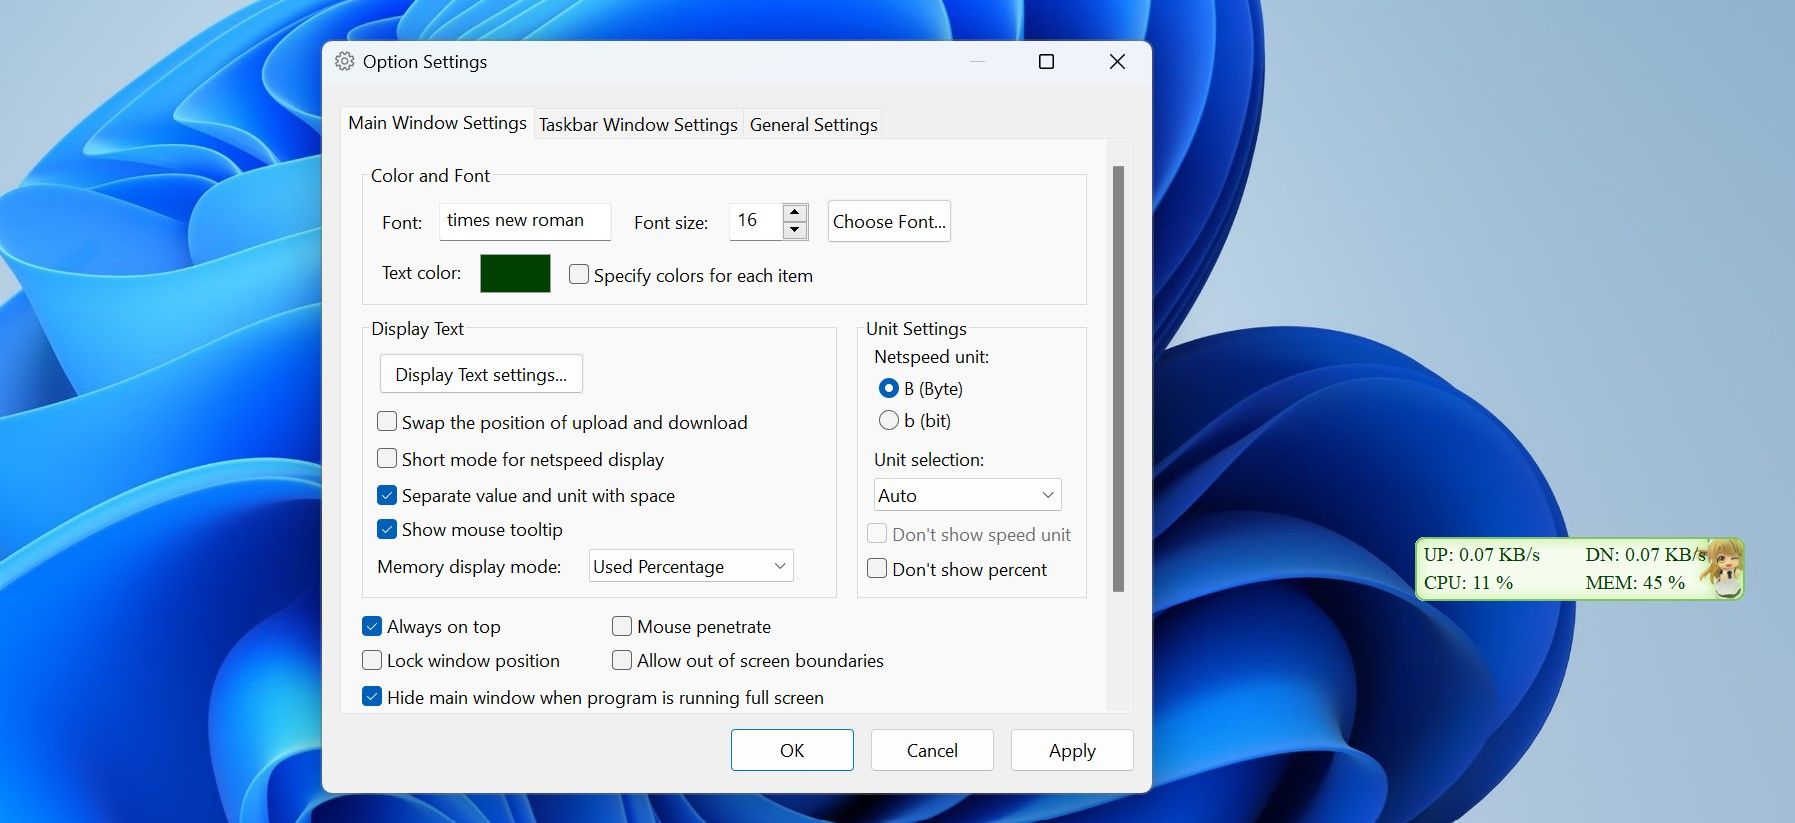
That’s how TrafficMonitor displays internet speed on the taskbar. The tool lets you choose the network connection you want to monitor and change the display’s font, font size, background color, and display unit, among other options. Depending on your preferences, you can change the display settings in the Option Settings window.
Keep Your Internet Speed in Check on Windows
The TrafficMonitor tool makes tracking and displaying the internet speed on the taskbar super easy. By now, you should have a better understanding of how to set up the tool and customize its display. With TrafficMonitor, you can quickly check whether your internet is stable or needs immediate attention.
На чтение 6 мин Просмотров 15.5к. Опубликовано
[UPD 09.12.2021 / ДОБАВИЛ ИНФОРМАЦИЮ ДЛЯ WINDOWS 11]
Всем доброго времени суток! Совсем недавно “по заявкам зрителей” я написал небольшое руководство о мониторинге системы в играх… однако далеко не все играют, а вот компьютер без привычных нам сайтов и социальных сетей уже невозможно себе представить. Поэтому это будет небольшим приложением к прошлой заметке и сегодня рассмотрим как настроить виджет скорости интернета для Windows 10 в трее (панели задач).
Вы можете подумать, что начало немного странное – суть посыла в потребности многих пользователей видеть перед собой информацию о скорости вашего интернет соединения в любой момент времени (как это удобно реализовано в стандартных настройках Android).
Во времена Windows 7 данный вопрос не был актуальным и особой потребности выводить “коннект” на видное место не имел практического смысла… все изменилось с приходом десятки. Спокойно себе работаешь и не понимаешь – чего это музыка заикаться стала? Открываешь диспетчер задач и видишь, что система обновляется и сожрала весь интернет канал (Windows 10 постоянно что-то подгружает и подкачивает в фоне, поэтому удобно расположить перед глазами компактный виджет с информацией о вашей скорости интернета)
Содержание
- Net Speed Monitor. Виджет скорости интернета для Windows 10
- Руководство по установке Net Speed Monitor
- Как отобразить скорость интернета в панели задач Windows 10
- Полезные советы по настройке индикации скорости интернета
- TrafficMonitor для Windows 11
- От автора
Net Speed Monitor. Виджет скорости интернета для Windows 10
Начиная с Windows 8 в диспетчере задач можно посмотреть текущую нагрузку на сетевой адаптер – это удобно и часто достаточно, но нас интересует отображение скорости интернет соединения перед глазами.

Протестировал несколько вариантов и остановился на Net Speed Monitor – приложение на русском, оно бесплатное и отлично работает на Windows 10 крайней версии (1909 на момент написания заметки). Однако утилитка давно не обновлялась и в процессе установки на свежую десятку есть некоторые нюансы.
Руководство по установке Net Speed Monitor
Утилита разрабатывалась под Windows 7, Windows Vista и для старушки Windows XP… и сразу вижу вопрос – чего ты там эту древность рекомендуешь?! На самом деле это один из лучших способов вывести скорость на панели рядом с часами (к тому же бесплатный).
Я всегда рекомендую загружать актуальные версии программ с официальных сайтов, однако на сайте разработчиков ничего интересного нет, программа сто лет не обновлялась, поэтому позволю себе (для вашего удобства) разместить файлы дистрибутива у себя на сервере.
https://www.itshneg.com/downloads/netspeedmonitor_2_5_4_0_x86_setup.msi
https://www.itshneg.com/downloads/netspeedmonitor_2_5_4_0_x64_setup.msi
Качаете установочный пакет необходимой разрядности (если сомневаетесь – загружайте x86) и при запуске сталкиваетесь с ошибкой…

Чуть выше я уже писал что Windows 10 еще был только в планах, когда разрабатывалась данная утилита. Следовательно нам необходимо поставить режим совместимости.
Кликните правой кнопкой мыши по загруженному файлу и в появившемся меню выберите пункт “Свойства”. Перейдите на вкладку “Совместимость” и в категории “Режим совместимости” выберите “Предыдущая версия Windows” (в какой версии Windows 10 успели убрать расширенные варианты совместимости со старыми редакциями?) и не забываем нажать кнопочку “Применить”

После применения параметров совместимости проблем с установкой программы не будет (во время установки инсталлятор не предлагал установить никакой сторонний софт, поэтому можете не беспокоиться что вместе с Net Speed Monitor) установиться в нагрузку что-то еще!
Как отобразить скорость интернета в панели задач Windows 10
Почему я решил написать данную заметку? Как видите есть некоторые нюансы с установкой… и после ее решения вы не найдете программу в списке установленных приложений! (на мой взгляд – это просто издевательство над неопытным пользователем).
Кликните правой кнопкой по панели задач Windows и в появившемся списке выберите “Панели” и активируйте пункт “NetSpeedMonitor”

Вы попадете на экран приветствия (окно первичной настройки программы) где необходимо выбрать язык (само собой Русский) и вашу сетевую карту, для которой необходимо отображать скорость загрузки (обычно поставляется нужная) и жмем “Сохранить”.

Теперь на панели задач будут отображаться исходящая скорость (U:) и скорость закачки (D:) – как видите все просто и наглядно!

С развитием высокоскоростного интернета не совсем логично отображать в kbit/s – далее рассмотрим как поставить привычные всем мегабиты (или даже мегабайты).
Полезные советы по настройке индикации скорости интернета
Чтобы поменять вариант отображения виджета – кликаем по нему правой кнопкой мыши и выбираем пункт “Конфигурация”.
В строке “Размерность” ставим Mbit/s и радуемся привычному отображению (если хотите как в торрентах мегабайты а не мегабиты, то выбираем MB/s) и не забываем применить настройки.

Я не спроста просил оставить настройки программы по умолчанию. Помимо отображения скорости у вас будет вестись статистика, где вы всегда можете посмотреть сколько трафика вы потратили в определенный день – это очень удобно для пользователей мобильного интернета на компьютере (а у нас в России я знаю таких очень много).
TrafficMonitor для Windows 11
После обновления до Windows 11 не обратил внимание, что виджет теперь не работает, да и в целом логика работы с панелью задач немного изменилась. В комментариях мне указали о невозможности использовать предложенную мной утилиту (да я и сам не нашел способ заставить ее работать на 11 винде). Предлагаю решение – TrafficMonitor. На мой взгляд – даже более функционально и отличный вариант для тех, кому необходим такой виджет с информацией о загрузке вашего интернет канала!
Скачать можно на GitHub (я рекомендую обычную zip версию – она не требует установки). Распакуйте в удобное для вас место и запускайте приложение. В стандартном виде это парящий виджет, который можно таскать куда угодно (а при наведении на него отобразится дополнительная информация).

Что на нужно? – Отображение информации в панели задач, поэтому кликаем правой кнопкой мыши по значку с программой и выбираем “Show Main Window” (к сожалению не умеет в русский язык). Тут же можно перейти в настройки или выбрать для отображения в панели необходимый сетевой интерфейс. В целом, все и так уже работает – стандартные настройки наверняка покроют потребность 99% пользователей.

Осталось только перейти в “General Settings” в “Options…” для автозапуска. Вам просто необходимо поставить галочку “Auto run when Windows starts” для автоматической загрузки виджета при включении компьютера.

Теперь у вас рабочий способ вывести виджет скорости сети для новейшей Windows 11! (Кстати, как она вам?!)
От автора
Жаль, конечно, что идея из Windows Vista так и не прижилась – панель с гаджетами была очень удобной и интересной… и виджет скорости интернета был очень полезен вместе с отображением загрузки процессора или оперативной памяти.
P.S. К сожалению скорость интернета зависит не только от вашего провайдера и на нее влияет много факторов. Устраивает ли вас ваш провайдер?! В последнее время все чаще слышу негатив в их сторону все зависимости от компании.