
В Windows доступно несколько команд, которые позволяют выключить или перезагрузить локальный или удаленный компьютер. В этой статье мы рассмотрим, как использовать команду shutdown и PowerShell командлеты Restart-Computer и Stop-Computer для выключения/перезагрузки Windows.
Содержание:
- Использование команды shutdown в Windows
- Перезагрузка удаленных компьютеров командой shutdown
- Перезагрузка и выключение Windows с помощью PowerShell
Использование команды shutdown в Windows
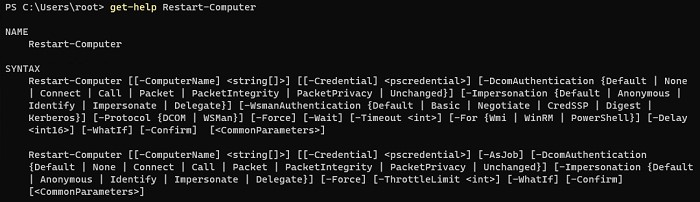
Утилита командной строки shutdown является встроенной командой Windows, которая позволяет перезагрузить, выключить компьютер, перевести его в спящий режим или завершить сеанс пользователя. В этой инструкции мы покажем основные примеры использования команды shutdown в Windows (все рассмотренные команды запускаются в окне Выполнить — Win+R ->, в командной строке cmd.exe или в консоли PowerShell).
Команда shutdown имеет следующий синтаксис:
shutdown [/i | /l | /s | /sg | /r | /g | /a | /p | /h | /e | /o] [/hybrid] [/soft] [/fw] [/f] [/m \\компьютер][/t xxx][/d [p|u]xx:yy [/c "комментарий"]]
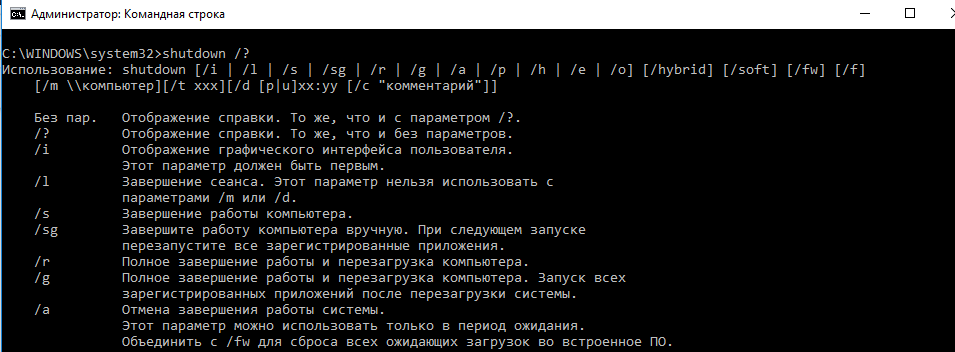
Как вы видите, у команды довольно много опций, а также есть возможность выключить/ перезагрузить удаленный компьютере.
Выключение Windows командой Shutdown
Для выключения ОС Windows и компьютера необходимо использовать команду shutdown с ключом /s.
shutdown /s
Перезагрузка Windows
Чтобы перезагрузить компьютер, необходимо добавить параметр /r. После выполнения этой команды Windows корректно перезагрузится.
shutdown /r
Завершение сеанса пользователя
Чтобы завершить текущую сессию пользователя (logout), нужно выполнить команду:
shutdown /l
Эта команда аналогично выполнению команды logoff.
Перевод компьютера в режим гибернации
Для перевода компьютер в режим гибернации (в этом режиме все содержимое памяти записывается в файл hyberfil.sys на диск и компьютер переходит в спящий режим с пониженным электропотреблением), выполните команду:
shutdown /h
Перезагрузка компьютера с сообщением пользователям
Вы можете предупредить всех пользователей Windows о предстоящем выключении / перезагрузки компьютера или сервера, отправив сообщение во все активные сессии (как правило эта возможность используется на терминальных RDS серверах, за которыми одновременно работают несколько пользователей, каждый в своей собственной RDP сессии).
shutdown /r /c “Этот сервер будет перезагружен через 60 секунд.”
Отложенное выключение / перезагрузка компьютера
Можно выключить или перезагрузить компьютер с определенной задержкой (по таймеру). С помощью опции /t можно указать интервал времени (в секундах), через который ПК/сервер будет перезагружен или выключен. Тем самым вы можете предоставить пользователям дополнительное время для того, чтобы успеть сохранить открытые файлы и корректно закрыть приложения. Эту опцию удобно использовать совместно с отправкой сообщения. В этом примере мы указываем, что Windows будет выключена через 10 минут (600 секунд) и информируем пользователей сообщением.
shutdown /s /t 600 /c "Сервер будет выключен через 10 минут. Сохраните свои документы!"
Пользователю будет выдано предупреждение о запланированном выключении: Ваш сеанс будет завершен.

Если задержка очень длительная, например, 100 минут (6000 секунд), то вместо предупреждающего окна появляется всплывающее сообщение в нижнем правом углу экрана: «Ваш сеанс будет завершен. Работа Windows будет завершена через 100 мин».
Отмена выключения / перезагрузки компьютера
После запуска команды выключения или перезагрузки Windows, по умолчанию утилита shutdown ожидает 60 секунд, не выполняя никаких действия. Администратор может отменить перезагрузку или выключение устройства, если в течении этого времени успеет выполнить команду:
shutdown /a
После отмены выключения появится всплывающее сообщение в нижнем правом углу экрана: «Выход из системы отменен. Запланировано завершение работы отменено».

Перезагрузить Windows немедленно
Чтобы выключить или перезагрузить компьютер немедленно, не ожидая стандартные 60 секунд, нужно указать значение 0 для параметра /t. Например, для немедленной перезагрузки компьютера:
shutdown /r /t 0
Очень важный ключ /f. Я использую его практически всегда при выключении или перезагрузки серверов Windows. Данный атрибут обеспечивает принудительное завершение всех запущенных программ и процессов, не ожидая подтверждения от пользователя (не будем же мы ждать подтверждения закрытия программ от всех пользователей на терминальном сервере, его можно просто не дождаться).
Следующая команда выполнит перезагрузку компьютера с автоматическим запуском всех зарегистрированных приложений после перезагрузки (имеются в виду приложения, зарегистрированные в системе с использованием функции API RegisterApplicationRestart).
shutdown /g
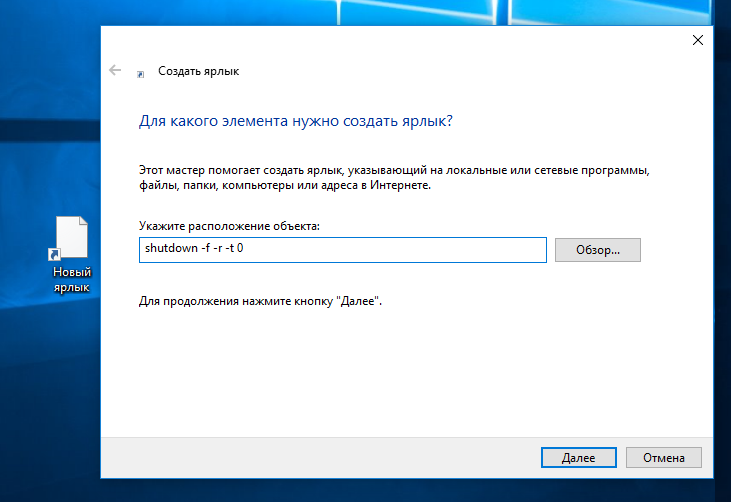
Ярлык для перезагрузки компьютера
Для удобства пользователей вы можете создать на рабочем столе ярлыки для выключения или перезагрузки компьютера с нужными настройками. Такой ярлык может быть полезен для выполнения перезагрузки из RDP сессии, когда отсутствуют кнопки перезагрузки/завершения работы компьютера в меню Пуск.
Перезагрузка Windows в определенное время
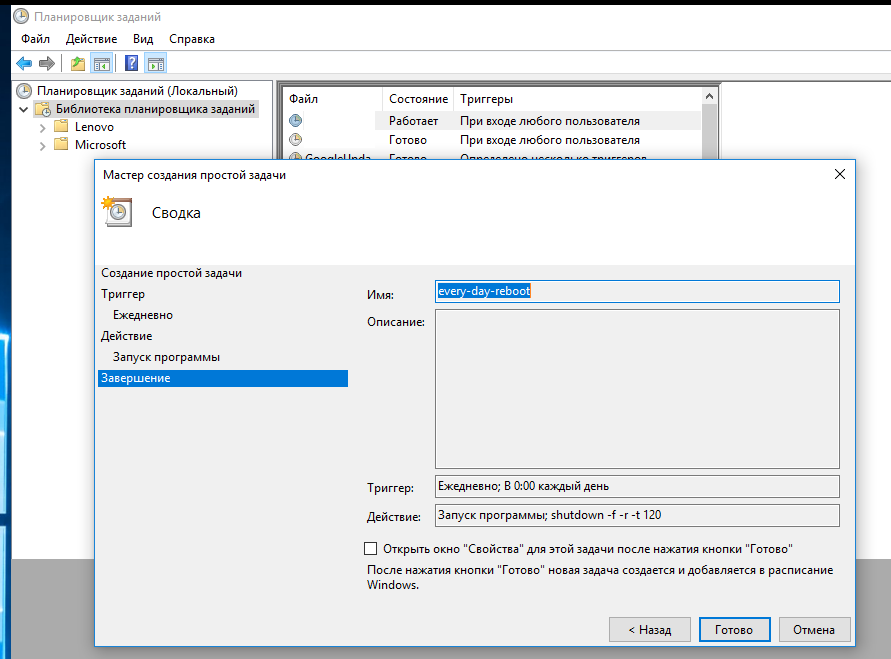
Чтобы всегда перезагружать/выключать компьютер или сервер в определенное время, вы можете добавить команду shutdown в планировщик заданий Windows taskschd.msc.
Например, следующее задание планировщика будет ежедневно перезагружать компьютер ночью в 0:00.
Либо вы можете создать новое задание планировщика из PowerShell:
$Trigger= New-ScheduledTaskTrigger -At 00:00am -Daily
$User= "NT AUTHORITY\SYSTEM"
 $Action= New-ScheduledTaskAction -Execute "shutdown.exe" -Argument "–f –r –t 120"
Register-ScheduledTask -TaskName "RebootEvertyNight_PS" -Trigger $Trigger -User $User -Action $Action -RunLevel Highest –Force
Перезагрузка удаленных компьютеров командой shutdown
Вы можете перезагрузить удаленный компьютер по сети, для этого у вас должен быть к нему сетевой доступ, а учетная запись, из-под которой запускается команда shutdown должна входить в группу локальных администраторов на удаленном компьютере (сервере):
shutdown /r /t 120 /m \\192.168.1.100

Если все указанные условия выполняются, но при выполнении команды shutdown появляется ошибка ”Отказано в доступе (5)”, на удаленном компьютере нужно разрешить удаленный доступ к административным ресурсам (C$, ADMIN$), изменив значение параметра LocalAccountTokenFilterPolicy на 1.
reg add "HKLM\SOFTWARE\Microsoft\Windows\CurrentVersion\Policies\System" /v "LocalAccountTokenFilterPolicy" /t REG_DWORD /d 1 /f
Если для подключения к удаленному компьютеру нужно указать учетные данные пользователя, можно использовать команду:
net use \\192.168.31.10 /u:corp\username
shutdown /s /t 60 /f /m \\192.168.31.10
Если вам необходимо удаленно перезагрузить множество компьютеров, их список можно сохранить в текстовый файл и запустить удаленную перезагрузку всех компьютеров с помощью такого PowerShell скрипта:
$sh_msg = "Ваш компьютер будет автоматически перезагружен через 10 минут. Сохраните свои файлы и закройте запущенные программы"
$sh_delay = 600 # секунд
$computers = gc C:\PS\PC-list.txt
foreach ($comp in $computers)
{
Invoke-Expression "SHUTDOWN.exe /m \\$comp /r /c '$sh_msg' /t $sh_delay"
}
Графический интерфейс команды shutdown
Для тех, кому не комфортно работать в командной строке, есть графический интерфейс для команды shutdown, чтобы его вызвать, наберите:
shutdown /i
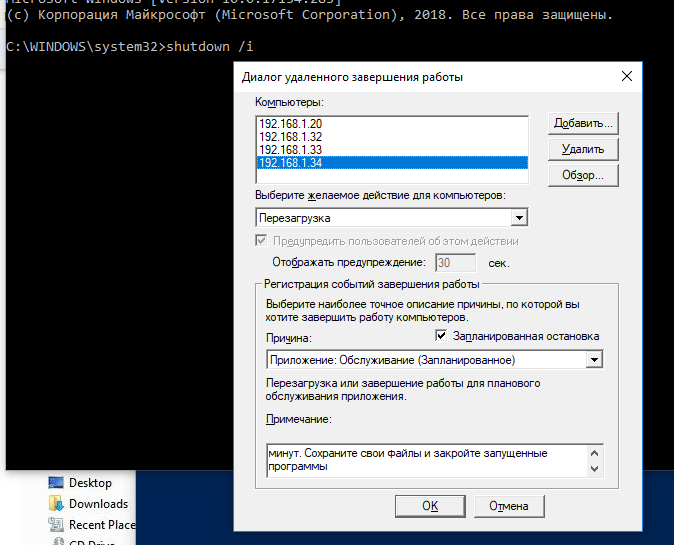
Как вы видите, в диалоге удаленного завершения работы вы можете добавить несколько компьютеров, которые нужно перезагрузить/выключить, указать текст уведомления и задать причину выключения для сохранения в журнале Windows.
Перезагрузка и выключение Windows с помощью PowerShell
В PowerShell есть две команды для выключения и перезагрузки компьютера: Restart-Computer и Stop-Computer. Обе команды позволяют выключить или перезагрузить локальный или удаленный компьютер по сети.
Для перезагрузки Windows выполните:
Restart-Computer -force
Чтобы выключить компьютер:
Stop-Computer
По умолчанию перезагрузка начнется через 5 секунд. Можно увеличить задержку перед перезагрузкой:
Restart-Computer –delay 15
У обоих командлетов есть параметр
–ComputerName
, который позволяет задать список удаленных компьютеров.
Например, чтобы удаленно выключить два сервера Windows:
Stop-Computer -ComputerName "Server01", "Server02"
Можно указать учетные данные администратора для подключения к удаленному хосту:
$Creds = Get-Credential
Restart-Computer -ComputerName $Names -Credential $Creds
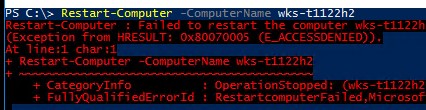
Для подключения к удаленным компьютерам используется WMI и DCOM (он должны быть включен и настроен). Если WMI не настроен, при запуске команды появится ошибка:
Restart-Computer : Failed to restart the computer wks-t1122h2 with the following error message:
Access is denied.
Exception from HRESULT: 0x80070005 (E_ACCESSDENIED).
Если на удаленном компьютере настроен WinRM (Windows Remote Management), вы можете использовать для подключения WSman вместо WMI:
Restart-Computer -ComputerName wks-t1122h2 -Protocol WSMan
Если на удаленном компьютер есть активные сессии пользователей, при запуске Restart-Computer появится ошибка:
Restart-Computer : Failed to restart the computer wks-t1122h2 with the following error message:
The system shutdown cannot be initiated because there are other users logged on to the computer.

Для принудительной перезагрузки нужно добавить параметр -Force:
Restart-Computer -ComputerName wks-t1122h2 –Force
С помощью параметра -For можно перезагрузить компьютер и дождаться, когда он будет доступен. Например, вы хотите убедиться, что удаленный компьютер успешно перезагрузится и на нем стартовала служба WinRM, позволяющая подключиться к нему через WS-Management:
Restart-Computer -ComputerName wks-t1122h2 -Wait -For WinRM
Restarting computer wks-t1122h2
Verifying that the computer has been restarted.

Можно дождаться запуска службы удаленного рабочего стола (RDP) или любой другой службы Windows:
Restart-Computer -ComputerName wks-t1122h2 -Wait -For TermService
Если нужно одновременно перезагрузить несколько хостов, можно использовать возможности параллельного запуска команд в версии PowerShell 7.x.
Например, вы можете получим список Windows Server в определенном контейнере (Organizational Unit) Active Directory с помощью командлета Get-ADComputer и перезагрузить их одновременно:
$Computers = (Get-ADComputer -Filter 'operatingsystem -like "*Windows server*" -and enabled -eq "true"' -SearchBase "OU=Servers,DC=winitpro,DC=loc").Name
$Computers | ForEach-Object -Parallel {    Restart-Computer -ComputerName $_ -Force} -ThrottleLimit 3
You can use the Task Scheduler to restart on schedule in both Windows 11 and Windows 10. Here’s how.
If you generally use your system all day, every day, and cannot restart it without disrupting the workflow, having the ability to schedule a restart is very useful. For example, maybe the system is functioning as a media server, connected to a medical device, 3D printer, or an industrial machine. Whatever your specific use case is, if you need it, you can restart your computer on schedule using the built-in Task Scheduler app.
One of the biggest advantages of restarting Windows regularly is that fix frees up RAM, may improve performance, solves a lot of system & software glitches, and more.
So, without further ado, let me show you how to schedule restart Windows using Task Scheduler in simple steps. Let’s get started.
Note: If you are looking to restart your system automatically to install Windows updates, make sure the Active Hours feature is enabled instead. No need to use the Task Scheduler.
- Open the Start menu.
- Search for “Task Scheduler” and click “Open“.
- Click the “Create task” option on the right panel.
- Type “Schedule Restart” in the “Name” field.
- Go to the “Triggers” tab and click “New“.
- Select “On a schedule” from the first drop-down menu.
- Select the “Daily” under “Settings”.
- Set the date and time.
- Type “1” in the “Recur every” field to run the task every day.
- Click “OK“.
- Go to the “Actions” tab and click “New“.
- Select “Start a program” from the first dropdown menu.
- Type “%SystemRoot%\system32\shutdown.exe” in the “Program/Script” field.
- Type “-r -f -t 10” in the arguments field.
- Click “OK“.
- (Optional) Go to the “Conditions” tab and select the “Start the task only if the computer is idle” checkbox. That way, the system will only restart if it is idle. i.e., not doing anything. Click “OK“.
- That’s it. From now on, Windows restarts on schedule.
Detailed Steps (With Screenshots)
First, open the Task Scheduler. To do that, open the Start menu by pressing the Windows key, search for “Task Scheduler” and click the “Open” option. Once it opens, click the “Create Task” option on the right sidebar.

The above action opens the task creation wizard. Here, type “Schedule Restart” in the “Name” field.

Go to the “Triggers” tab and click the “New” button at the bottom.

Select “On Schedule” from the “Begin the task” dropdown menu. Next, select the “Daily” option under “Settings”. After that, set the start date & time and the number of days you want the task to recur in the “Recur every” field. For example, to run the task every day, you can enter 1, to run the tasks on alternate days, you can enter 2, etc.
Click the “OK” button.
Note: You can also select other schedule options such as Weekly or Monthly depending on your use case.

Go to the “Actions” tab and click the “New” button at the bottom.

In the “New Action” window, configure the options as shown below:
- Action > Start a program.
- Program/script:
%SystemRoot%\system32\shutdown.exe - Add arguments:
-r -f -t 10
Click the “OK” button.

Go to the Conditions tab and select the “Start the task only if the computer is idle for:” checkbox, set the dropdown next to it to “10 minutes“, and click “OK“.

That’s it. You’ve created a scheduled task to restart Windows. You can find it in the middle of the Task Scheduler window.

From now on, Windows will reboot automatically on schedule as per the task configuration. Right before restarting, it will show a little message giving any active users a chance to save the work.

Good to know: How to display a popup message using a task scheduler.
Wrapping Up — Scheduling System Restart in Windows 11 & 10
As you can see, thanks to the Task Scheduler app, you can easily configure a custom scheduled task to restart Windows on schedule. If you ever want to disable the automatic scheduled restart, simply disable the scheduled task. To do that, open the Task Scheduler, find & right-click on the task, and select the “Disable” option.
Good to know: How to start programs on delay at startup using the task scheduler.
If you have any questions or need help, comment below. I’ll be happy to assist.
If you are a Windows user, you most likely have encountered your PC automatically restarting on you in the middle of working. Yes, updates for our computers are essential in keeping it running efficiently. When a restart happens without us knowing, though, it can be quite frustrating. Here’s how to set up a restart schedule for your Windows 10 computer.
With the current version of Windows, your PC automatically downloads updates and installs them when your PC detects that you are not using your computer for a period of time. This happens when your Windows Update has been set to “automatic” – it will work the same way as it has in the previous Windows by waiting until your PC is idle.
However, idle does not mean you allow your PC to be restarted. There may be instances when you just happen to leave your PC for a moment while working on a paper that is due hours from now. Next thing you know, your PC is automatically restarting! We do not want this to happen so Microsoft has given us the option to schedule a specific start time. With this, you now have a measure of control and it is time for you to be proactive with it! No more “Remind me later” pop-ups when you can customize your restarting schedules.
How to set up a restart schedule
- Click on the Start menu and open the Settings option.
- Select Update & Security > Windows Update. You will see two options wherein the first one is a schedule chosen by your computer. The other option is for you to select a specific restart time.
The first option shows a specific time your PC has chosen for you (e.g. 2:30 in the morning). If you want a specific time and date, click on Select a Restart Time and choose a Time and Day. For Time, tap on the box and hover over each part of the time (minutes, hours, and AM/PM) until you can choose your desired schedule. For the Day, you are given dates of the next few days for you to select which one you prefer most.
If you want updates to start immediately, you can choose the Restart Now option at the bottom of the page. Know that Windows schedules its own reboot first and you will have to override it through the Settings page to adjust it to your own schedule.
Go through those easy and simple steps and you no longer have to worry about your computer restarting whenever there is a need for you to leave it for a short period of time. It is also important for users to be notified when the system needs to reboot. You can control this option by following these steps:
- Click on Advanced Options at the bottom part of the Windows Update page.
- Go to the top of the screen and tap on Choose how updates are installed.
- Click the drop down and select the option to Notify to schedule restart.
This way, you will no longer find the need to keep checking the Settings menu if updates have already been installed. You will now receive prompts whenever updates require a restart of your PC. If you happen to be a Windows Insider, you can set your active hours for 18 hours with an option to choose when the OS should finish its updates. You can also set additional notifications before your system restarts to give you more time to save your work.
Once done, you can return to the previous screen by hitting the back button on the upper left. Now you can be notified ahead of time before your computer starts to install updates and restart its system.
How important are updates and scheduling restarts?
Wondering why Microsoft added this feature? With the new system, Microsoft has evolved to the notion of “Windows as a service.” This means that Windows is an on-going product with constant updates and patches. There will be new features every time which will depend on the needs of the users via the Windows Insider program.
It is a new way for Microsoft to develop and release software with a goal to continuously grow. Its aim is to adjust to what the world needs. Since updates have already become mandatory, Microsoft cares about how this could affect the users. Scheduling a restart can make it more convenient for them and could avoid interruptions during hours when they rely on the PC the most.
Microsoft has made it easier for users to work especially for individuals with different or shifting schedules. So if you are a person who works most at night, you can schedule your active hours during the day while you are away from your computer. Now you no longer have to worry about your PC installing updates in the middle of your working schedule!
Now that you know how to set up a restart schedule for your Windows 10 computer, check out our guide on how to reset your Windows 10 computer.
-
Home
-
News
- Here Are Four Easy Methods to Schedule Shutdown in Windows 10
By Vera | Follow |
Last Updated
Occasionally, you may want your computer to automatically shut down at a specified time point, for instance, if some downloading processes haven’t been completed but you have to leave the PC. In this post, MiniTool Solution will introduce four methods to schedule shutdown Windows 10.
It is still important to maintain your computer and you can try many methods to ensure the system’s health, especially the battery. For example, you can shut down your PC to save power when you are not using it.
But sometimes you may not remember to turn it off when you leave the PC to complete some tasks. Or you have to leave although some processes are not complete. Luckily, you can try many ways to set auto shutdown on your Windows computer to turn off the machine as expected.
Now, let’s go to see how to set computer to turn off at a certain time in Windows 10.
4 Ways to Set Auto Shutdown Windows 10
Schedule Shutdown Windows 10 CMD
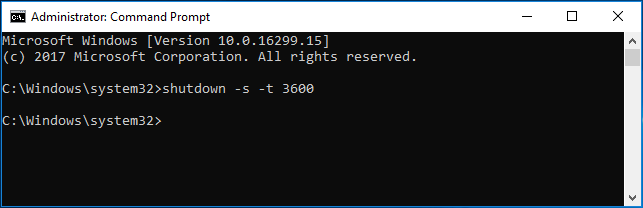
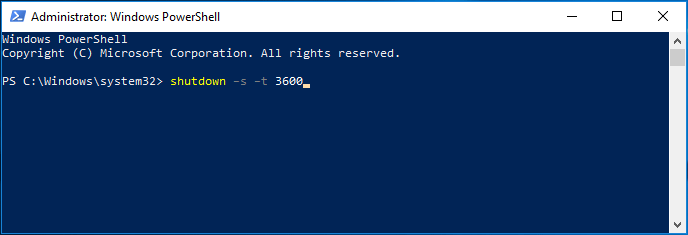
Step 1: Input cmd in the search box and right-click on Command Prompt to choose Run as administrator.
Step 2: Type shutdown –s –t number and press Enter. If you type 3600, this means your computer will automatically shut down after 60 minutes, namely 1 hour.
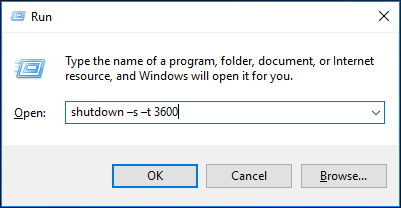
Set Auto Shutdown Windows 10 via Run
Step 1: Press two keys at the same time – Windows logo and R to open the Run dialog box.
Step 2: Input shutdown –s –t number, for example, shutdown –s –t 3600 and press Enter.
Set Windows 10 Scheduled Shutdown in Windows PowerShell
Step 1: Right-click on the Start button, choose Windows PowerShell (Admin) and click Yes to open this utility.
Step 2: Type shutdown –s –t number and press Enter.
Tip: If you set the automatic shutdown in Windows 10 using the above ways, you can cancel the operation by running shutdown –a in CMD, Run or Windows PowerShell.
Schedule Shutdown Windows 10 via Windows Task Manager
In Windows 10, there is a tool called Task Scheduler that allows you to schedule any task on your computer. With it, you can easily set Windows 10 scheduled shutdown.
Step 1: Type task scheduler in the search box and open this app.
Step 2: Choose Create Basic Task from the right Actions panel.
Step 3: Type the task name, for example, shutdown.
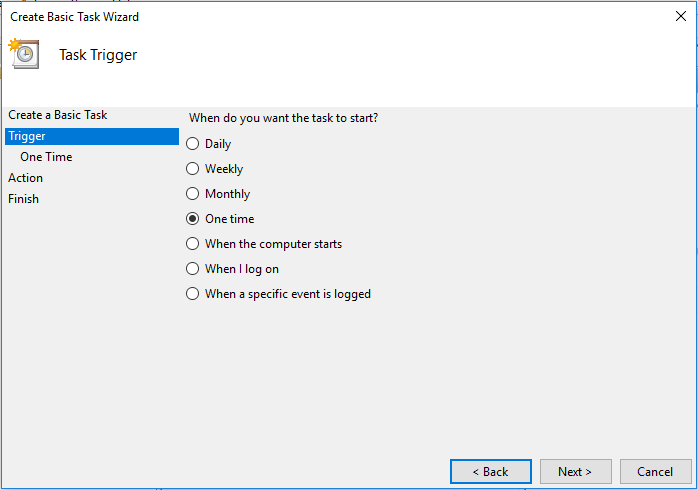
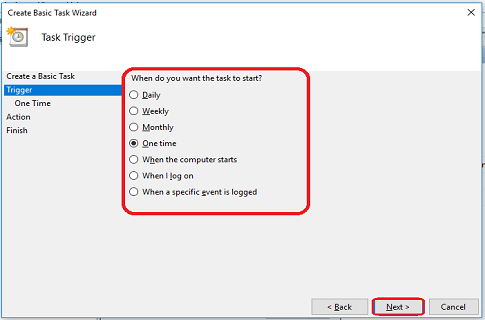
Step 4: Choose when you want the auto shutdown task to start. Here, we choose One time as an example.
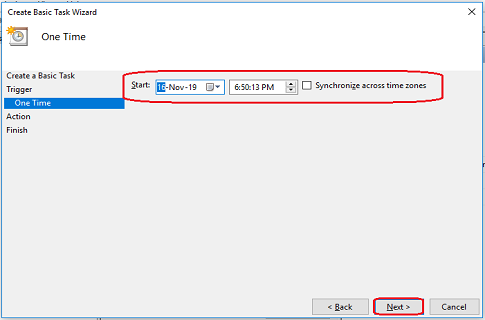
Step 5: Set the specific time when you want Windows 10 to automatically turn off.
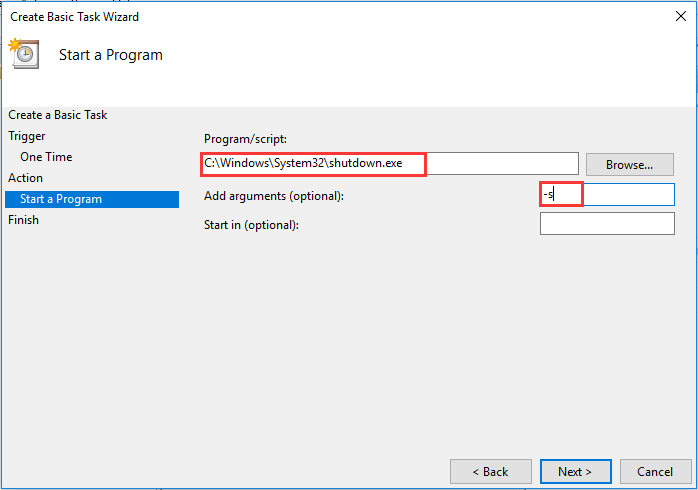
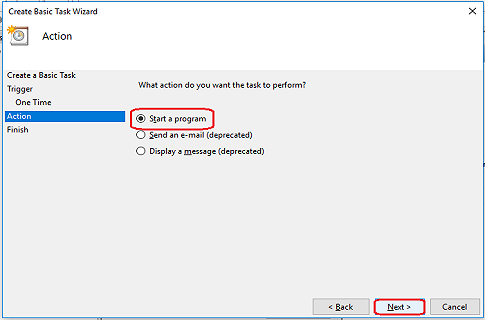
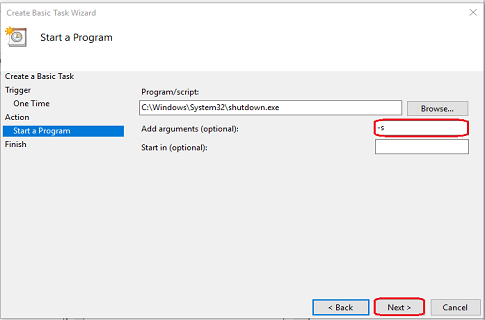
Step 6: Decide what action you want the task to perform, for example, start a program.
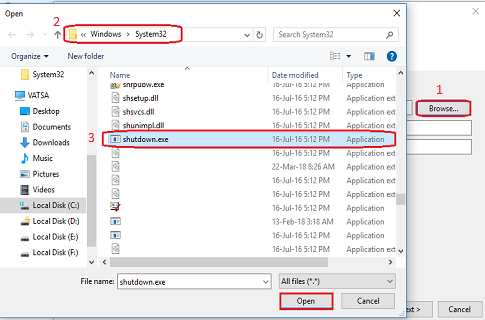
Step 7: Click Browse, go to C:\Windows\System32 and find the shutdown app file to open it.
Step 8: Click –s behind the Add arguments section and click Next.
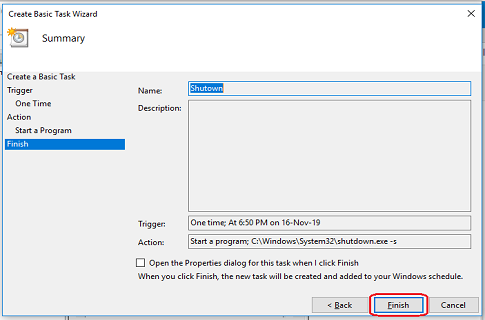
Step 9: Finally, click Finish. Then, Windows 10 will shut down by itself at the specified time point.
Tip: In addition to the above ways to set computer to turn off at a certain time, you can also choose a professional shutdown timer for Windows 10 – Windows Shutdown Assistant. This tool allows you to select various actions, including log off, restart, hibernate, run screen saver, shut down, etc. Just get it to have a try if you are interested in it.
Final Words
Now, all the effective methods to schedule shutdown in Windows 10 are here. Try one of them if you have a need. Hope this post is helpful for you.
About The Author
Position: Columnist
Vera is an editor of the MiniTool Team since 2016 who has more than 7 years’ writing experiences in the field of technical articles. Her articles mainly focus on disk & partition management, PC data recovery, video conversion, as well as PC backup & restore, helping users to solve some errors and issues when using their computers. In her spare times, she likes shopping, playing games and reading some articles.
Introduction
Automatic shutdown in Windows 10 is one of the features of the Windows operating system, which makes your computer safe and secure. Generally, we prefer our system to properly shutdown every time to lengthen the operating system’s life. But sometimes, when you work on your computer late at night, it is really hard to remember to shut down your computer; in those cases, you should use the automatic shutdown scheduler on your computer.
This tutorial will show you various ways to Schedule Automatic Shutdown in Windows 10.
1. Auto Shutdown via Run
Follow the instructions below to proceed.
Step 1. From the Start menu, open the Run dialog box, or you can Press the «Window + R» key to open the RUN window.
Step 2. Type «shutdown -s -t <number in seconds>» and press Enter Key.
For example. if you want to shut down your PC/laptop after 10 minutes, then type- shutdown -s -t 600.
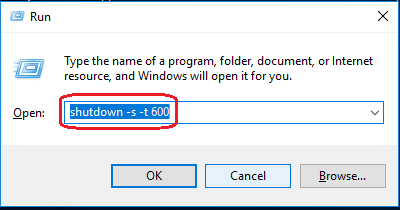
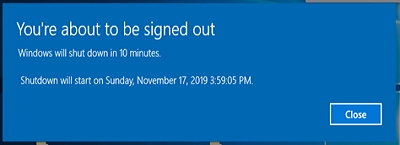
In this example, 600 represents the number of seconds, so in this example, your computer will turn off automatically after 10 minutes. You can experiment by taking the different values and setting the one you want.
After finishing this setting, the system will prompt you about the auto-shutdown time, as shown in the following screenshot.
2. Auto Shutdown via Command Prompt
Using the «Command Prompt», the user can schedule the automatic shutdown. Follow the instructions below to proceed.
Step 1. Open Command Prompt.
Step 2. Type «shutdown -s -t <number in seconds>» and press enter key.
For example. if you want to shut down your PC/laptop after 15 minutes, then type- shutdown -s -t 900
In this example, 900 represents the number of seconds, so in this example, your computer will turn off automatically after 15 minutes. You can also experiment by taking the different values and setting the one you want.
3. Auto Shutdown via Task Scheduler
Follow the instructions below to proceed.
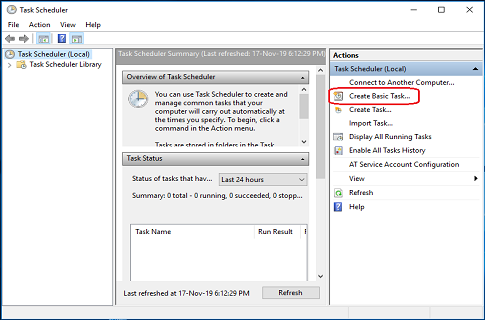
Step 1. Open Start, Search for Task Scheduler, and press enter to open Task Scheduler.
Step 2. Click on the «Create Basic Task» option.
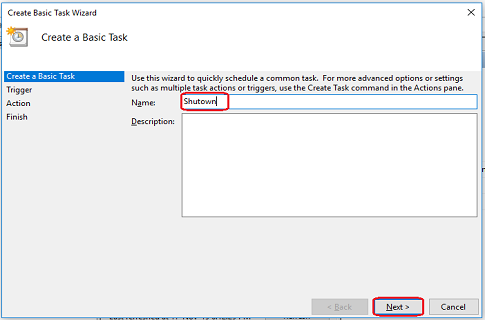
Step 3. Provide the Task Name, such as Shutdown, and click next.
Step 4. Choose when you would like your task to start and click next.
Step 5. Set the Start date and time of the task and click Next.
Step 6. Select the «Start a program» option from a various list of actions and then click on the «Next» button to proceed.
Step 7. Click on the Browse Button and choose «shutdown.exe» from C/Windows/System32.
Step 8. Enter «-s» as the argument and click on the «Next» button to proceed.
Step 9. Click the «Finish» button to complete the task.
Conclusion
By following any of the above methods, you can Schedule Automatic Shutdown in Windows 10.
If you want to Cancel the Auto Shutdown Command, then visit, How To Cancel Automatic Shutdown in Windows 10.
I hope you enjoyed this article. Follow C# Corner to learn more new and amazing things about Windows 10.
Thanks for reading this article.