
If you are using Android device, you may refer to the ways below to turn on USB debugging mode.
Way 1: Enable Manually
Due to different Android firmware versions, the ways to enable USB debugging mode on Android are also different. Please choose the appropriate ways.
i
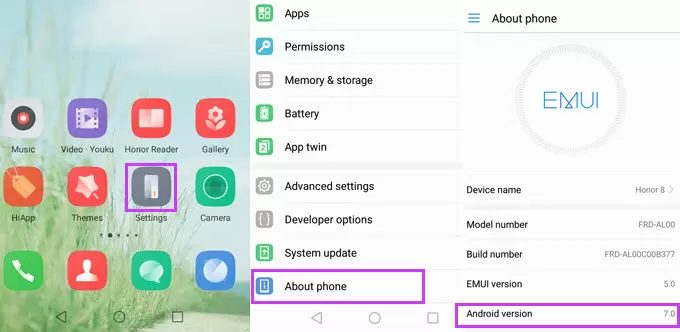
Check mobile operating system version
Go to Settings > About phone > Android version).
ii
Enable USB debugging according to different OS version
According to different Android versions, you need to choose different ways to turn on USB debugging mode.
A. Steps to activate USB debugging on Android 4.4 and above:
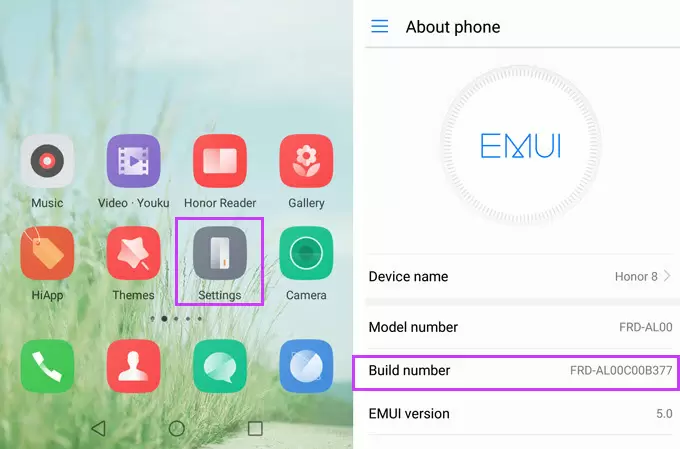
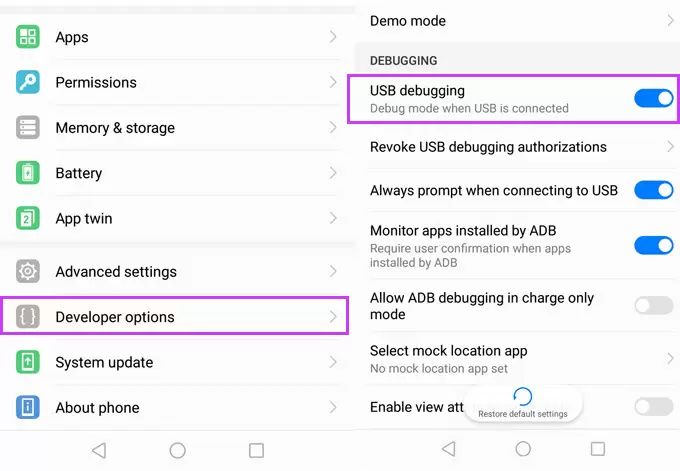
Go to Menu > Settings (This can be found in Apps or pop-up menu.) > About phone (About, About phone or About tablet) > Keep on tapping Build number for 4 to 8 times (Once done, you will see a message which congratulates you have become a developer.) > Go back to Settings page > Unlock Developer options > Check the box next to USB debugging
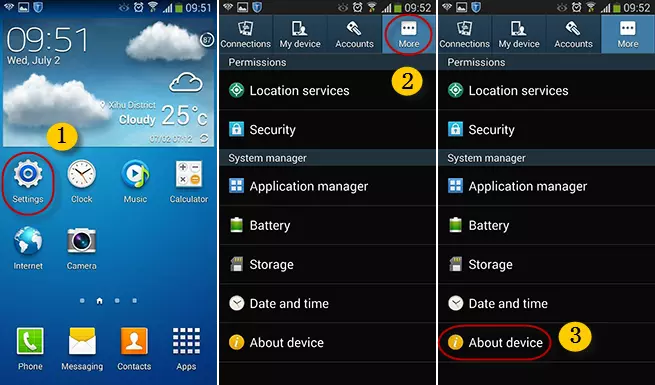
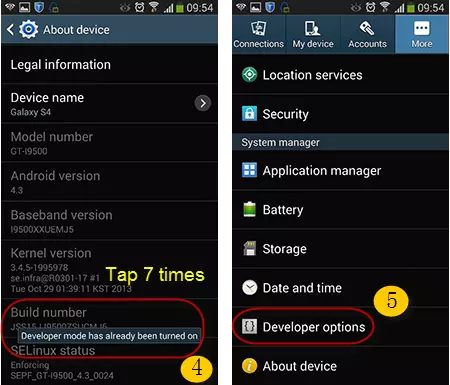
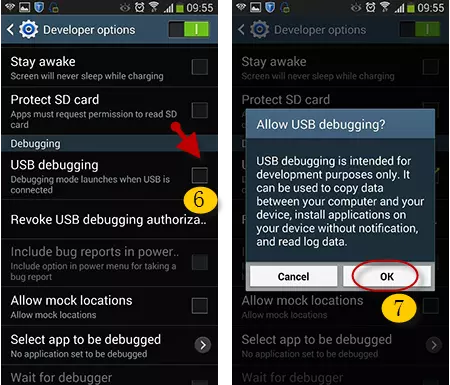
B. Steps to open USB debugging on Android 4.2-4.3:
Go to Settings > More > About device > Keep on tapping Build number for 7 times > Go back and tap Developer options > Check the box next to USB debugging > Select OK.
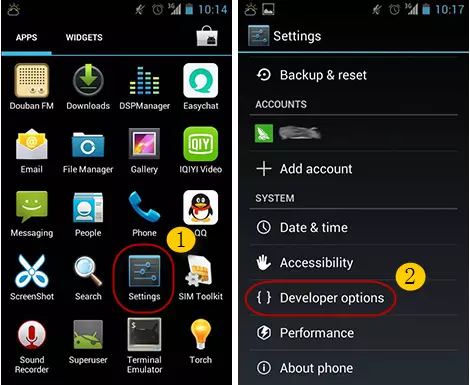
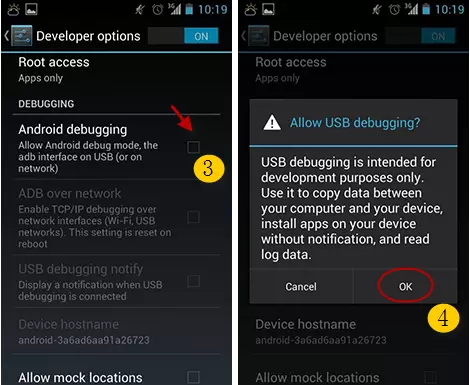
C. Steps to turn on USB debugging on Android 4.0-4.1:
Go to Settings > Unlock Developer options > Check the box next to Android debugging > Select OK
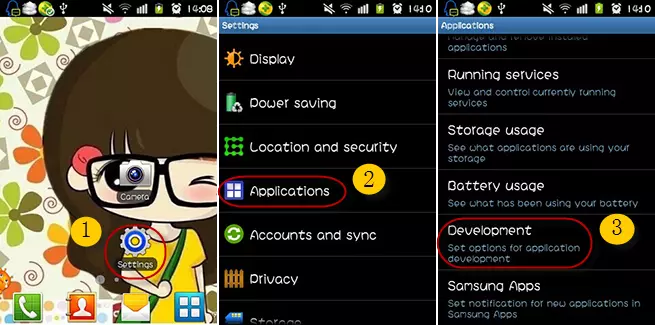
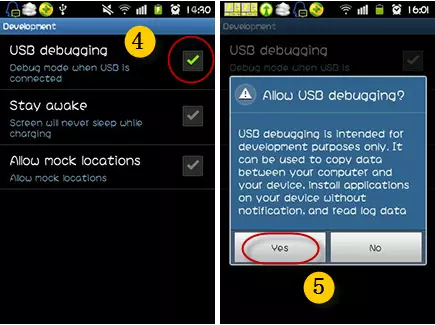
D. Steps to enable USB debugging on Android 1.6-3.2:
Go to Settings > Applications > Development > Check the box next to USB debugging > Select Yes
You can use phone to set USB debugging mode through learning the tutorials above. Besides, Apowersoft Phone Manager also allows you to enable USB debugging mode by using App. This way is super easy. If you want to know this way, please refer to the tutorial below.
2
Way 2: Enable with App
Please finish the 4 steps below to immediately turn on USB debugging by using App.
Step 1: Install Apowersoft Phone Manager on phone.
How to install Phone Manager APK on phone? Click here to learn more
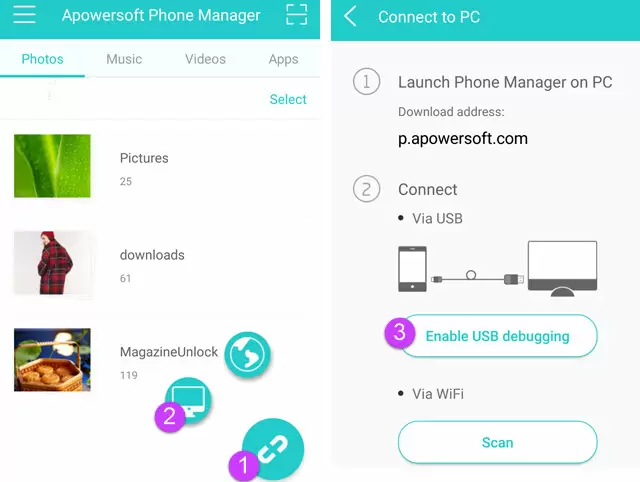
Step 2: Run Phone Manager APK file. Hit the menu icon on the upper left. Tap Settings button on screen.
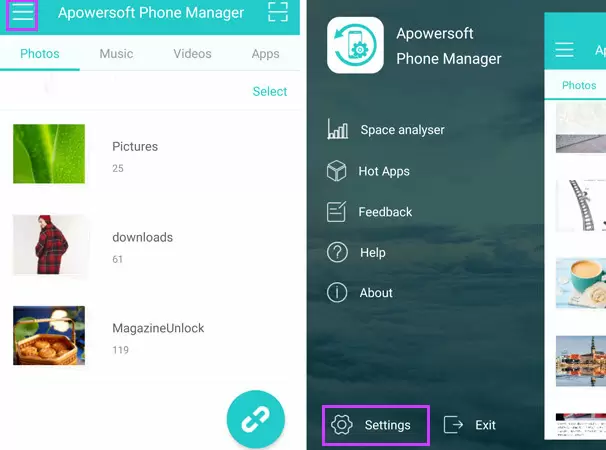
Step 3: Go to “USB debugging” and turn on “USB debugging” under the “Developer Options”.
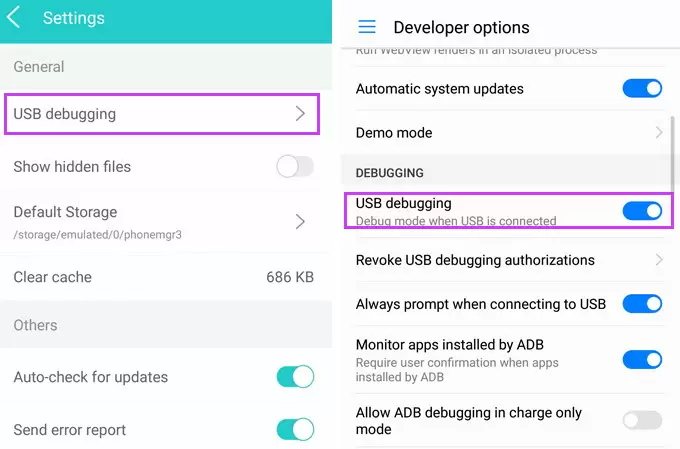
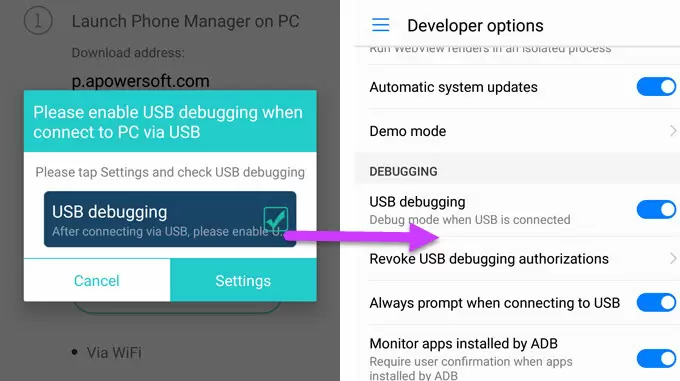
Also you can tap the connect button on the lower right on the main interface, and hit the computer icon > go to “Enable USB debugging” > “Settings” > turn on “USB debugging”.
3
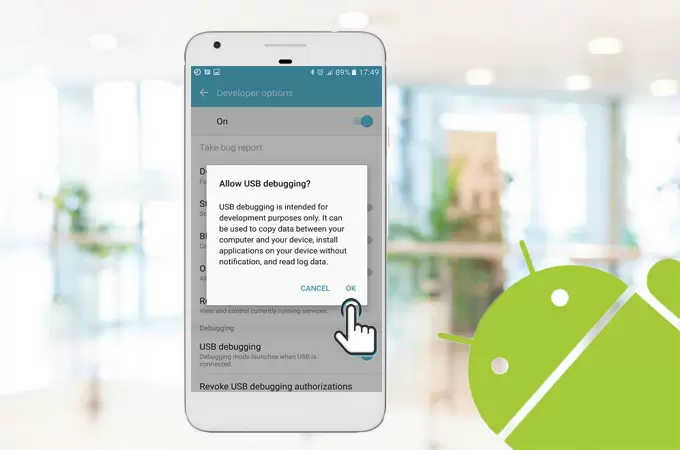
Allow USB debugging from computer
After enabling USB debugging on phone, when you connect phone to PC via USB, “Allow USB debugging?” prompt will pop up, please check Always allow from this computer and click OK to allow your computer to debug. So far, you have finished the whole process of opening USB debugging mode.
Note: After enabling USB debugging, please set USB connection mode to MTP (Media device) or PTP (Camera).
4
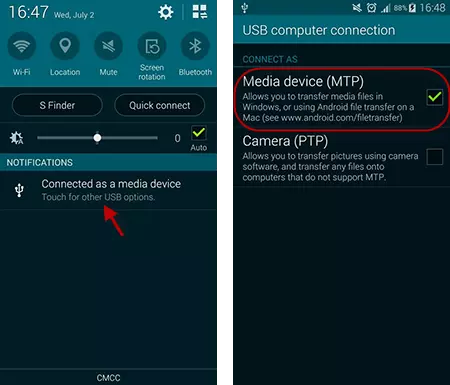
Set USB connection mode to MTP or PTP
Because some of the phones come with Charge Only or other special connection modes, in order to use Phone Manager on this type of phones successfully, please change the current USB connection mode to MTP or PTP.
Step 1: After you have enabled USB debugging mode on your phone, please use USB cable to connect phone to computer.
Step 2: In the drop-down notification menu, opt to USB computer connection option, and then check MTP or PTP mode.
Remarks:
Media Transfer Protocol is abbreviated as MTP, which is also casually referred to as Media device mode.
It allows using Android device to transfer various media files and connect to third-party programs on Windows and Mac.
The full name of PTP is Picture Transfer Protocol, which is known as camera mode. It can help us transfer, export photos and so on rapidly.
Posted by: on December 24, 2015 to ApowerManager . Last updated on January 22, 2019
Are you searching for how to enable USB Debugging on your locked Phone? As this is the most searched issue so, today we are going to list 4 remarkable and simple methods that will assist you in enabling USB debugging on your locked smartphone.
- I. Background Knowledge: What Is Android USB Debugging
- II. How to Enable USB Debugging on Locked Android Phone
- Frequently Asked Questions about USB Debugging
I. Background Knowledge: What Is Android USB Debugging
USB Debugging is a mode that you could not be able to skip if you are an Android user. The first and foremost function of this mode is to create communication between a computer with Android SDK (Software Development Kit) and an Android device. So, it will become enabled in your Android device right after connecting it directly to a PC by using a USB. This USB debugging mode is also called developer mode in a few versions of Android.
II. How to Enable USB Debugging on Locked Android Phone
Follow the below-mentioned steps to enable USB Debugging on locked Android Phone:
- First Open the Settings app. Then, Select System.
- Go to the bottom and select the option About Phone.
- Go to the bottom and tap 7 times on a built number.
- Get back to the initial screen to find Developer options near the bottom.
-
Scroll down and enable USB debugging.
Method # 1: Bypass Android Lock Screen Using 4uKey for Android (Effective)
Tenorshare 4uKey for Android is a great Android lock screen removal tool focusing on quickly bypassing the unknown passcode, including PIN, pattern, fingerprint, and password to enable you to reaccess your Android Phone without any security lock.
To begin with, first, download and then install Tenorshare Android Unlocker on your PC.
-
Launch the program, select feature «Remove Screen Lock» and connects your phone to the PC through a USB cable. The program will install the driver for your device automatically once you run it.
-
The software will notify you when your Android Phone gets connected. After that press «Start» button to remove the forgotten lock screen lock code.
-
After that, you should confirm that «Removing the lock screen password will eradicate all of your data on the Android device». If you are sure, go and press the «Yes» button. Tenorshare 4uKey for Android will begin to remove the lock screen automatically.
-
When you have the removal process, you will be asked to enter into the recovery mode. Shut down your Android device and click and hold on the «Volume up» + «Home» + «Power» button together.
-
Then, select the option by using the power key and Volume keys to confirm the reboot system. factory reset/ wipe data > confirm > wipe cache partition > confirm > ReoBoot system now > confirm.
-
In the end, 4uKey for Android will automatically remove the lock screen. After a few minutes, you will see the whole process gets completed.
The disadvantage of using this method is that it is not free of cost.
Method # 2: Enable USB Debugging by Using OTG Adapter and USB mouse (Difficult)
One of the best methods to enable USB debugging on Android, specifically when the device is locked by using a USB mouse and OTG Adapter. Both these works successfully and could help you in serious situations.
But before using it, you must also check if it supports your Android version that is running into your Phone or not. You could do this on any Android device such as Huawei, Samsung, LG, HTC, Asus, Sony, Lenovo, Xiaomi, etc. Do follow these steps to enable USB debugging on locked Android phone:
-
Connect your Android device with an OTG adapter and mouse.
- After that, click on mouse to unlock phone and after that turn on USB debugging option on Settings.
- Connect your broken Android phone to the computer, and it will recognize it as external memory.
-
Now, from the computer, open the folders of the Phone and copy the data such as photos, videos, music, contacts, etc. that you want.
A disadvantage of this method is that it is a bit difficult to use it.
Method # 3: Using ADB Command to Enable USB Debugging FRP (Risky)
ADB command is another powerful method to unlock an Android phone. When the command is executed, the data could easily be taken out from a locked Android device with USB debugging. Follow these steps:
- Install the ADB tool on your PC and then take out the zip file on the computer.
- Generally, it requires connecting the Phone by USB debugging but as USB debugging mode is turned off on your device or phone, so here you must boot the device in the ClockworkMod Recovery mode.
- When your device is in recovery mode, remember to launch ADB tool and after that connect the device to the PC with the help of a USB cable.
- Next, type the command prompt: adb devices
-
After that, type the below command for backing up the data you’re your locked phone. adb pull / data / media / clockworkmod / backup ~ / Desktop / Android-up
One of the disadvantages of using this method is that it is somehow risky. If you don’t have the proper knowledge about the ADB tool, command, and fast boot, then trying this process will become risky. Your Phone might break and will be complete damage to the device.
Method # 4: Via Recovery Mode (Wipe Data)
The fourth method that will assist you to enter USB debugging mode on locked phone or device is by getting into the recovery mode. Once you enter into the recovery mode, you will have to run a factory reset/ wipe data process to unlock a locked Android device.
Do follow these below-mentioned steps:
- Turn your Android device off.
-
Then click the «Power Button + Volume Up Button + Volume Down Button» to get entered into the recovery mode. However, the key might change from Phone to phone, but you must follow the key combination according to the model.
- Now, the Android bootloader menu gets open, then select the «Recovery Mode» and click the Power button to enter recovery mode.
- Once you successfully get entered into the recovery mode, choose the «factory reset or Wipe data» option via the Volume down key and click the Power button for selection.
- When you get done with the selection, your Android device will start the process.
- And finally, reboot your Android device when the process is over.
Once this process is finished, your Phone will turn on normally without a pin, pattern, password, or fingerprint lock.
There is one disadvantage of this method that all of your data on the phone will be wiped off completely.
Frequently Asked Questions about USB Debugging
Q1. How to Enable USB debugging on your Android Phone
For Android 4.2, do follow these steps:
- On your device, go to Settings and then go to About.
- Tap the Build number seven times to make Settings and then go to Developer options available.
- In the end, enable the USB Debugging option.
Q2. Is USB debugging harmful?
No, USB debugging is not harmful. If you are a developer, then you will need to leave USB debugging enabled always. Otherwise, you don’t need to keep it enabled at all times; you can enable it when you have any need of using it, then after that, you will dis-enable it once you are done with it. And this is the fastest way to handle it properly. It would be a bit inconvenient, but it is worth it.
No.1 Android Unlocker & Samsung FRP Tool
- Remove Android password, pattern, PIN, and fingerprint lockin one click
- Bypass FRP for Samsung, Xiaomi, Redmi, Vivo, OPPO, Huawei, etc. (Android 6-14)
- Compatible with 6000+ Android phones and tablets
- The unlocking success rate is up to 99%, in 3 minutes
FREE DOWNLOAD
FREE DOWNLOAD
- Home
- All Brands
- Lephone
- USB debugging
by Editorial Staff

If you are the owner of the Lephone W10 and you want to know; how to enable USB debugging on your Lephone W10. Here we will guide you how to enable USB debugging mode on your W10. using Developer Options, you can easily customize animations, background processes, USB cable settings, etc.
Quick Steps to enable USB debugging Mode in your Lephone W10
Step 01: First of all, go to Settings your Lephone W10
Step 02: Now, you will see Settings option >>>> select About phone then choose >>>> Software Information.
Step 03: Now, Scroll down your screen and find the Build Number your Lephone W10, now tap the Build number 7 to 10 times until you will see a pop-up message that says «Developer mode has been enabled».
Step 04: After 10 minutes, you will see a popup message «you are now a developer» on your Lephone W10
Step 05: Now, you will see the Developer options menu under Settings via Tap on the Back button.
Step 06: Then, You will click on Developer options. Slide the «Developer Options» button to «On».
Step 07: Then scroll down your phone screen and turn on «USB debugging». You will see the messages «Allow USB Debugging», click the «OK».
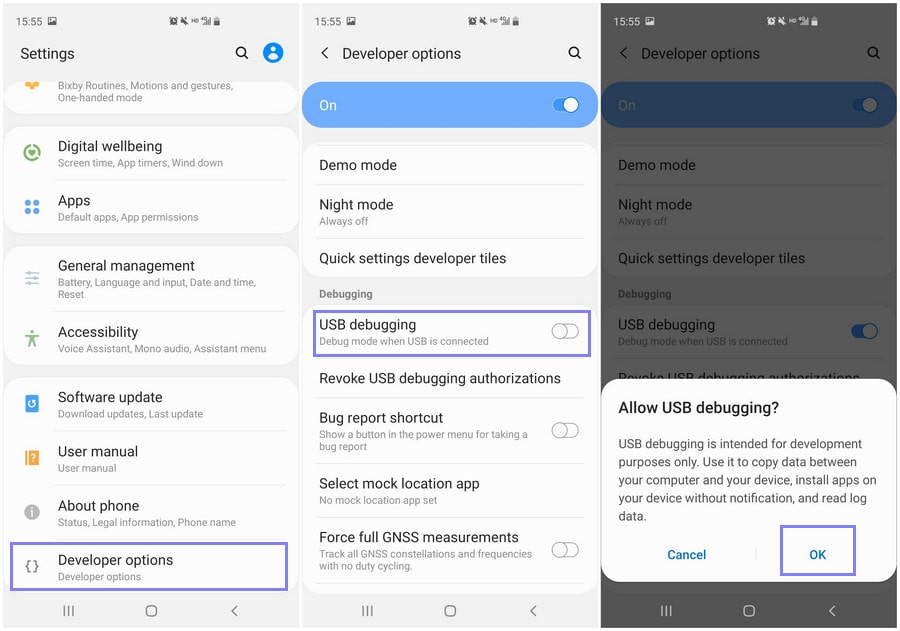
Now, you have successfully enabled USB debugging mode on Lephone W10.
Read Me Once We are not responsible for any damage to your Lephone W10 while doing anything with USB Debugging. You must create a backup of all files and save them in a safe location.
Мы знаем, что в Windows Phone 8.1 есть настройки USB. Но если вы внимательно исследовали настройки своего Windows Phone 8.1-устройства, то наверняка заметили, что на смартфоне этих настроек нет. А в эмуляторе есть. Тем не менее, найти настройки USB можно и на телефоне.

Как это сделать?
- Запустите поиск, введите «USB».
- Проведите влево на вкладку «Phone» — там отображаются результаты поиска по телефону.
- Вы увидите ссылку на настройки — USB.
- Откройте.
В этих настройках вам доступно две опции — запрашивать разрешение на передачу данных при подключении к пк и уведомления о медленном заряде устройства. Эти два пункта не являются критическими настройками, но кому-то могут показаться полезными.
Не совсем понятно почему Microsoft решили спрятать эти настройки. Возможно, это зависит от определенного производителя, а возможно, имеет отношение к тому, что в будущих билдах Windows Phone 8.1 появится поддержка OTG.

Microsoft To Do Uwp App Updated For Windows 10 And Windows 10 Mobile Debugging an app with visual studio on an windows phone lumia 950 xl with usb cable and breakpoints. Microsoft visual studio allows you to deploy and debug your universal windows platform (uwp) apps on a variety of windows 10 devices. visual studio will handle the process of building and registering the app on the target device.

Windows Usb Debug Tool Utvast If you plan to develop windows 10 mobile app, you need to use visual studio 2017 and make sure the target version of the app is below 14393. visual studio 2019 no longer supports deploying uwp apps on mobile phones. Review how to use visual studio to run, debug, profile, and test a universal windows platform (uwp) app remotely on another computer or device. This section shows you how to use microsoft visual studio to debug, test, and optimize your app. it also includes tools like the windows device portal (for device monitoring and configuration) and the windows app certification kit (to prepare your app for the microsoft store). Deploy windows 10 universal app on windows phone. windows 10 universal apps model lets you write applications that runs on any windows device, here are three steps to deploy the app to phone.
Skype Uwp For Windows 10 Mobile Available For Insiders This section shows you how to use microsoft visual studio to debug, test, and optimize your app. it also includes tools like the windows device portal (for device monitoring and configuration) and the windows app certification kit (to prepare your app for the microsoft store). Deploy windows 10 universal app on windows phone. windows 10 universal apps model lets you write applications that runs on any windows device, here are three steps to deploy the app to phone. I’m trying to create an uwp app for some old windows 10 mobile phones and deploy debug them via usb. i’m using visual studio 2017 and have set the target version to build 10586 ( to stay below 14393 ). If you are developing a uwp app on a windows 8.1 pc, you can remotely debug a uwp app running on another windows 10 device, provided that both the host and target computer are on the same lan. to do this, download and install the remote tools for visual studio on both machines. I need to communicate (via usb) between c c application on windows 10, and, an android device (device model:pax a910, android version: 7.0). msdn suggested two approaches on windows side. uwp app: it needs a manifest file that keeps on showing an unending chain of errors. Visual studio 2022 no longer supports deploying uwp applications on mobile phones. it is recommended to use visual studio 2017 to develop windows 10 mobile applications and ensure that the target version of the application is lower than 14393.