
Важно! Обновить операционную систему из «Командной строки» можно только в том случае, если в Windows 10 включена служба «Центра обновления Windows». Рекомендуется перед выполнением основной инструкции убедиться в этом. При необходимости воспользуйтесь руководством, опубликованным в тематической статье на нашем сайте.
Подробнее: Включение «Центра обновления» в Windows 10
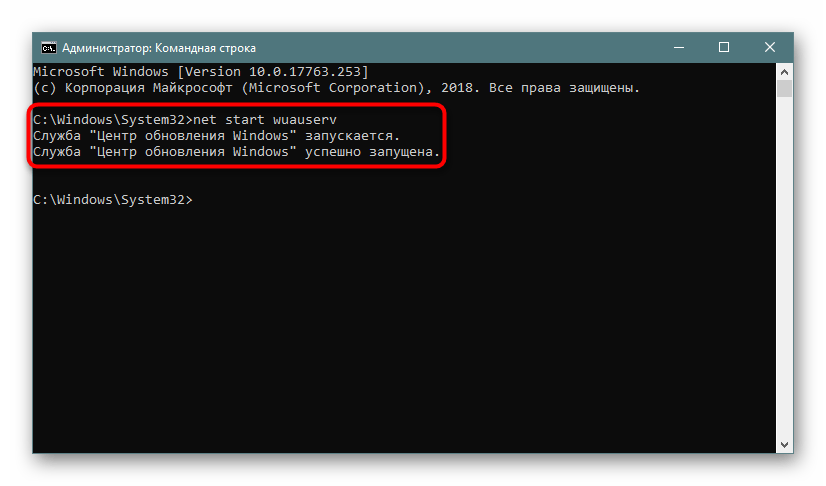
Чтобы обновить Windows 10 через окно консоли, его изначально необходимо открыть, только делать это следует от имени администратора. Одним из способов запуска «Командной строки» с повышенными привилегиями подразумевает использование поиска по системе. Установите курсор в соответствующее поле на панели задач, а затем введите запрос «Командная строка» (без кавычек). Как только в результатах отобразится искомая программа, наведите на нее курсор и в дополнительном меню справа выберите пункт «Запуск от имени администратора».
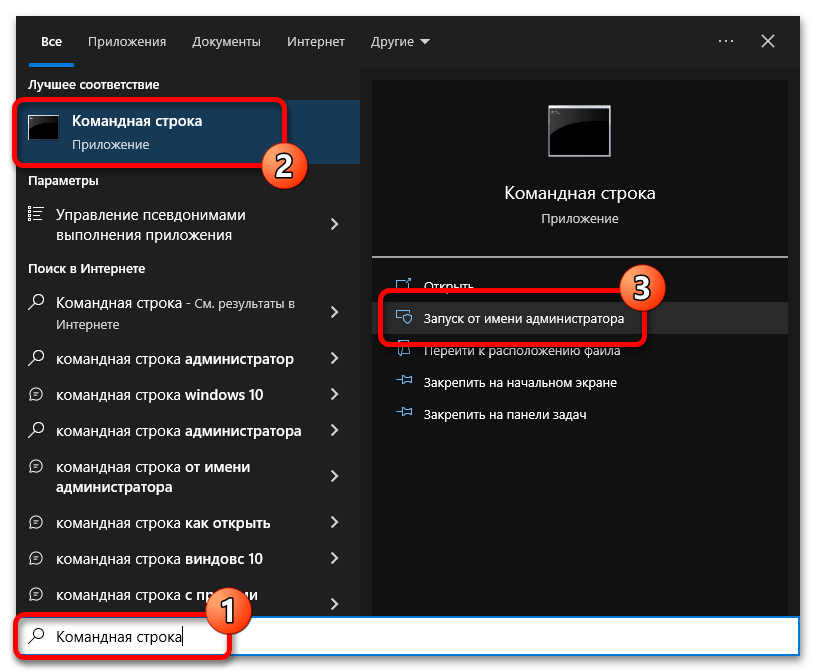
Читайте также: Как запустить «Командную строку» от имени администратора в Windows 10
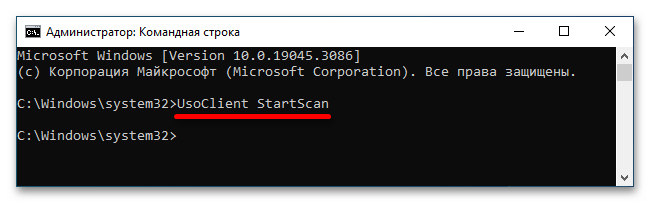
После появления на экране черного окна консоли, воспользуйтесь командой для сканирования наличия обновлений. Для этого введите приведенную ниже строку и нажмите Enter для ее выполнения.
UsoClient StartScan
При наличии обновлений инициализация их загрузки выполняется посредством другой команды, показанной ниже. Не забудьте нажать Enter после того, как введете ее.
UsoClient StartDownload

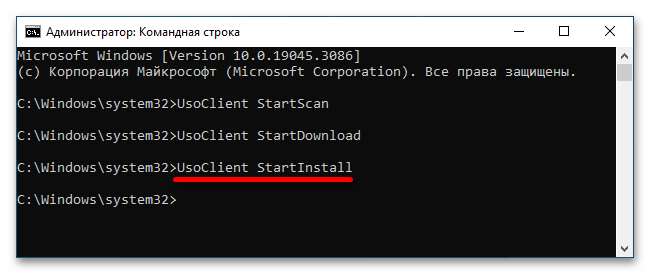
Если все апдейты скачаны на компьютер, можно произвести их инсталляцию. Делается это путем ввода команды, приведенной ниже.
UsoClient StartInstall
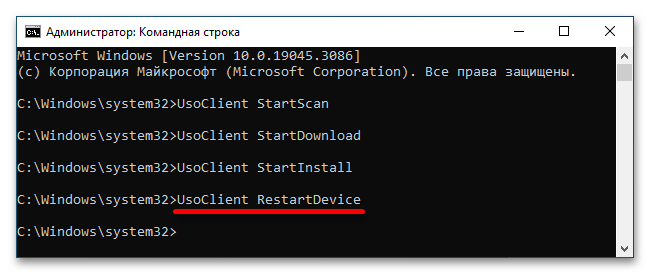
Вы также можете выполнить команду, чтобы после завершения установки обновлений компьютер автоматически перезагрузился. Это иногда требуется для применения внесенных изменений.
UsoClient RestartDevice
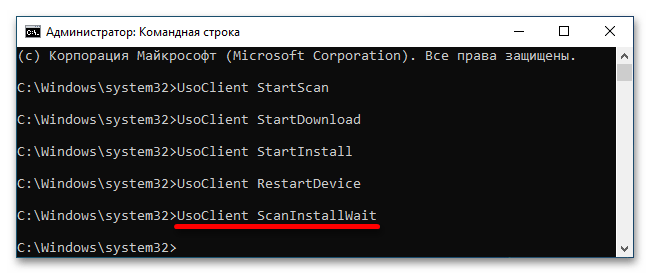
Обратите внимание! Все вышеперечисленные команды можно выполнять по отдельности, но при необходимости их последовательного ввода предпочтительнее воспользоваться всего одной командой, которая автоматически их поочередно выполняет. То есть если вписать строку ниже в консоль и нажать Enter, будет произведен поиск обновлений, их загрузка и автоматическая установка. А при необходимости компьютер после этого перезагрузится.
UsoClient ScanInstallWait
Несмотря на то, что операционная система Windows 10 позволяет для обновления использовать «Командную строку», предпочтительнее это делать стандартным способом — через «Центр обновления Windows». Таким образом вы сможете контролировать каждый этап процедуры через графический интерфейс, чего не позволяет консоль. На нашем сайте есть отдельная статья, в которой этот процесс подробно описан.
Подробнее: Установка обновлений Windows 10
Читайте также: Полезные команды для «Командной строки» в Windows 10
Наша группа в TelegramПолезные советы и помощь
The Windows Update allows users to keep Windows OS up to date with the latest security patches, new features, and bug fixes from Microsoft. You can access Windows Update from the Settings app on your PC. You can also run Windows Update from CMD.
Windows Update runs automatically in the background and installs new updates when they are available. However, you can also manually check for updates at any time. This will help you get the latest features and improvements faster.
By checking regularly for new Windows updates, you can ensure your PC is running smoothly and securely, ensuring you are safe from viruses, malware, and other threats.
In this guide, you will learn how to run Windows Update from Command Prompt and PowerShell using different commands.
Table of Contents
Force Windows Update from CMD
Check for updates on all Windows versions
If you want to run Windows Update from Command Prompt, you can use the wuauclt.exe utility. This utility allows you to check for updates, download updates, and install updates from the command line. The only limitation of running Windows Update through the CMD is that it won’t show any progress. Only results are shown when the process is complete. Here is how to run Windows Update from CMD:
-
Open Command Prompt with administrative privileges
-
Run wuauclt /detectnow to check for new updates and download them
wuauclt /detectnow -
Run wuauclt /updatenow to install updates
wuauclt /updatenow -
(Optional) Run wuauclt /reportnow to report back to WSUS server (if available)
wuauclt.exe /reportnow
You can also use multiple switches in the same command:
wuauclt /detectnow /updatenowIf you want to disregard the already detected updates and force Windows Update to check for updates again immediately, you may run the following command:
wuauclt /resetauthorization /detectnowSince the command prompt does not show any progress, a better approach would be to check and install updates simultaneously. Here’s the command for this:
wuauclt /detectnow /updatenowCheck for Windows updates in Windows 11, 10
The above-mentioned command will work in all versions of Windows, including Windows 7 and Windows Server 2008 R2. But if you are using Windows 11, Windows 10 or Windows Server 2016, you can use the “UsoClient” command, which has more options than “wuauclt.” You can run UsoClient with the following switches:
-
Start checking for new updates
UsoClient /StartScan -
Start downloading updates
UsoClient /StartDownload -
Start installing updates
UsoClient /StartInstall
Force Windows Update Check using Run Command Box
I found out that the easiest way to force a Windows update check is to use a command in the Run dialog box. There are other commands from CMD and PowerShell as well, but let’s start with the easiest way to do it.
-
Open the Run Command box (Windows key + R).
-
Run the following command:
control updateCheck Windows update from the Run Command box
This will trigger the Windows Update graphical user interface which will start checking for new updates. This method works on all versions of Windows including Windows 10 and Windows 11.
There is another command that will trigger the same effect but only works in Windows 10 and 11:
ms-settings:windowsupdateRun Windows Update from PowerShell
There is no official Windows Update module for PowerShell. However, you can use “PSWindowsUpdate.” PSWindowsUpdate is a third-party module that can be used to configure Windows updates in Windows.
This module is not installed in Windows by default but you can download it from the PowerShell gallery and install and run the module to check for new updates.
Here are the three steps to run Windows Update through PowerShell:
-
Run the following command to install PSWindowsUpdate:
Install-Module PSWindowsUpdate 3")
Install PSWindowsUpdate module -
Check for available updates by running this cmdlet:
Get-WindowsUpdate 4")
Check for available Windows updates -
Now install these updates using this cmdlet:
Install-WindowsUpdate 5")
Install available Windows updates
 3")
 4")
 5")
The above-mentioned commands will only install Windows updates. If you want to update other Microsoft products, you’ll also need to enable the Microsoft Update Service. It’s pretty easy to enable it using PowerShell:
Add-WUServiceManager -MicrosoftUpdateIf you want to automatically restart your computer after installing all the updates, you can run the following command instead:
Install-WindowsUpdate -MicrosoftUpdate -AcceptAll -AutoRebootIf you don’t want to install a separate module, you can run the following command to force start Windows Update using PowerShell:
Start-Process -FilePath 'ms-settings:windowsupdate'Deploy Updates on Remote Computers
The PSWindowsUpdate PowerShell module can also be used to deploy Windows updates on remote computers. There are two commands involved in this process:
-
Create a list of computers and pass the list as a variable string using the computer names:
$computer = "comp1, comp2, comp3"You can add more computers to the string separated by commas. Replace “compX” with the name of each computer.
-
Run the following command to start checking for Windows updates on remote computers:
Invoke-WUJob -ComputerName $computer -Script {ipmo PSWindowsUpdate; Install-WindowsUpdate -MicrosoftUpdate -AcceptAll -AutoReboot} -RunNow -Confirm:$false | Out-File "\server\share\logs\$computer-$(Get-Date -f yyyy-MM-dd)-MSUpdates.log" -Force
Install Specific Updates Only
If you already know the article KB no. of the specific update you want to install, you can run the following command to install that particular update(s) only:
Get-WindowsUpdate - KBArticleID "KB5002324", "KB5002325" -InstallReplace the KB number with the one you want to install.
Prevent Specific Windows Updates from Installing
You can prevent specific updates from installing on your computer by replacing the KB numbers in the following command in PowerShell:
Install-WindowsUpdate -NotKBArticle "KB5002324, KB5002325" -AcceptAllCheck for Windows Updates using Windows Settings
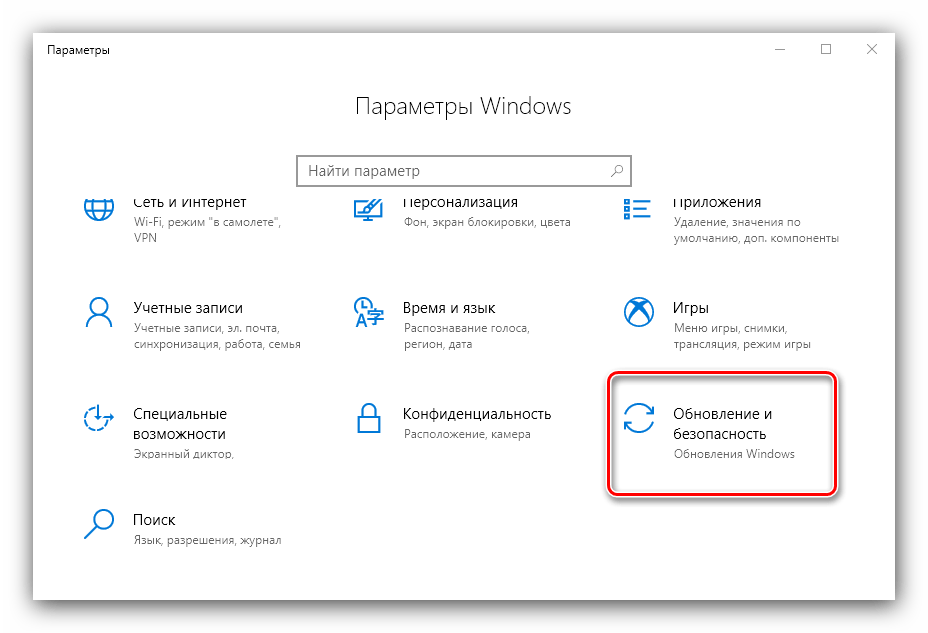
To check for new updates and configure your Windows Update settings, follow the steps below:
-
Navigate to:
-
In Windows 11:
Settings app >> Windows Update
-
In Windows 10:
Settings app >> Update & Security >> Windows Update
-
-
Click “Check for updates.”
 6")
Check for pending updates
 6")
Force Windows Update to Download Already Downloaded Updates
There will be times when the updates become corrupted or for other reasons, you just don’t want to install the downloaded updates. In that situation, you can easily delete the already-downloaded updates, which will force Windows Update to run again and check for and download the updates again.
The only caveat in this situation is that the update must not have been installed on your computer. If the update is already installed, Windows will detect it as installed and will not download it again. In that case, you will need to uninstall the update first and then force Windows Update to run again.
If you want to force Windows Update to re-download all the updates again, you can do this using the steps below.
-
Navigate to the following directory using File Explorer:
C:\Windows\SoftwareDistribution\Download
This folder contains all the Windows update files that Windows OS is currently downloading or recently downloaded and installed.
-
Select and delete all the files from the “Download” folder.
 7")
Delete all files in the “Download” folder -
Run Windows Update again using the above-mentioned methods.
This will force Windows Update to check for the same updates and download them again. The download and install process for new updates is completely automated. You don’t need to do anything during the download and installation process.
 7")
Manage Windows Updates using Wuinstall
Using WuInstall, IT Administrators can automate Windows updates. Wuinstall can be used to enforce Windows Updates inquiries, downloads, and installations at times when they deem them appropriate, enabling them to make the entire update process more controlled and user-friendly.
WuInstall is a strong and flexible system management tool that can be used in a WSUS-based or standalone environment. To download the latest updates using Wuinstall, you will need to download and install Wuinstall first. Follow the steps below:
-
Go to http://www.wuinstall.com/ and install the latest free version of Wuinstall on your computer.
-
Open an elevated Command Prompt.
-
Run the following cmdlet to search for the latest available Windows updates:
wuinstall /searchThis will not only look for new updates but will also list them in the command window.
-
To download the updates, run the following command:
wuinstall /downloadThis will download all the available updates from Microsoft servers.
-
To install the updates, run the following command:
wuinstall /install
There are a few more switches that you can use with the install command:
- /quiet – will install updates without showing anything.
- /disableprompt – Disable any input from Windows.
- /autoaccepteula – Auto-accept any agreement during the update installation.
- /rebootcycle – Install updates on the next computer reboot.
Fix Corrupted Windows Updates
Sometimes Windows Update files get corrupted and the user is not able to download the files again or install the corrupted update files. In that case, we need to run a DISM command to fix the corrupted Windows Update. Here are the steps:
-
Launch the Command Prompt.
-
Run the following cmdlet:
dism.exe /Online /Cleanup-image /Restorehealth
After successfully running this command, try force downloading the updates again, and the Windows Update should start working again.
Hopefully, this will be useful in situations where you want to automate certain Windows functions. What other purposes do you want to use command line options to run Windows Update?
Run Windows Update FAQs
What is Windows Update?
Windows Update is a free Microsoft service that provides bug
fixes, security patches, and performance enhancements for Microsoft Windows operating systems. By installing these updates, users can ensure they have the latest features and security available for their operating system.
Can I use the command line to run Windows Update?
Yes, you can use Windows’ command line to run Windows Update.
What is the benefit of running Windows Update from the command line?
Running Windows Update from the command line offers flexibility,
automation, and convenience. For example, by using the command line, you can schedule updates to occur at a specific time or be triggered by an event, and even control which updates are installed.
How can I run Windows Update from the command line in Windows 10?
Follow the steps below to force Windows update with the command line:
Type cmd in the search box, choose Run as administrator, and click Yes to continue.
Type wuauclt.exe /updatenow and hit Enter.
This command will force Windows Update to check for updates and start downloading.
What is the command to run Windows Update from PowerShell?
To run Windows Update via PowerShell, enter the following command:
Start-Process -FilePath ‘ms-settings:windowsupdate’
What is “usoclient.exe” and how does it relate to Windows Update?
“Usoclient.exe” is a built-in command line tool for Windows Update that can be used to scan for updates, start updates, and even uninstall updates. It provides an alternative to Windows Update’s graphical user interface. This tool can be especially useful for IT administrators who need to run Windows Update simultaneously on multiple machines. It can be run from the command line and provides options for updating in managed environments. It also allows for more detailed control over the update process, such as setting which updates to install or uninstall.
Can Windows Update be automated using the command line?
Yes, Windows Update can be automated using the command line. This can be done by creating scripts that automatically execute Windows Update commands.
It’s always recommended to regularly update Windows as the updates solve any existing bugs and bring about new features.
Usually, users use the graphical interface on the OS to search for and install updates. However, there are some cases where you may want to run this process from the Command-line (CLI) tools such as Command Prompt and Windows PowerShell.
For instance, you may need to manage updates, especially for other users on a Windows server. Or, you may be creating a script where you need such commands.
How to Run Windows Update from Command Line?
There are a few ways to run Windows Update from the command line on a Windows system, which are as follows:
Using Command Prompt
On Windows 10 and 11, Microsoft uses the Update Session Orchestrator Client UsoClient.exe tool for updating your system components.
Previously, it was possible for users to use this program from the Command Prompt to check and install updates. However, in the latest versions, you can only check for updates. Regardless, you can try using the steps below and check if they work out for you:
- Open Run by pressing Win + R.
- Type
cmdand press Ctrl + Shift + Enter to open the Elevated Command Prompt.
- Enter the following commands depending on the corresponding operations:
UsoClient StartScan– Start the scan for available updatesUsoClient StartDownload– Download but not install the updates or patches you scanned for.UsoClient StartInstall– Install all downloaded updates.UsoClient ScanInstallWait– Scans, downloads, and installs the updatesUsoClient RestartDevice– Restarts your computer to complete the update installationUsoClient ResumeUpdate– Resumes the installation of update after rebootUsoClient RefreshSettings– Refresh the update settings to the default


You can also check which UsoClient commands you can use on your system by using the following command on the Elevated Windows PowerShell:
- Open Run.
- Type
powershelland press Ctrl + Shift + Enter to open the Elevated Windows PowerShell. - Copy and paste the following command and press Enter:
Get-ScheduledTask -TaskPath '\Microsoft\Windows\UpdateOrchestrator\' | Select-Object @{Expression={$_.TaskName};Label="TaskName"}, @{Expression={$_.Actions.Execute + ' ' + $_.Actions.Arguments};Label="CommandLine"}

On older Windows versions, you could use the Windows Update Agent WUAUCLT.exe to update Windows.
First, you need to enable Automatic Updates with scheduled installation through the Group Policy. Otherwise using the Windows Update Agent from Command Prompt won’t work. To do so,
- Open Run and enter
gpedit.mscto open the Local Group Policy Editor. - Go to Computer Configuration > Administrative Templates > Windows Components > Windows Update.
- If it doesn’t contain policies but expands to further folders, go to Manage end user experience.

- Double-click on Configure Automatic Updates.
- Check Enabled and set Configuring automatic updating to 4 – Auto download and schedule the install.
- You can choose any schedule you want. Then, click Apply and OK.


Then, you can use the following commands on Prompt to update Windows using the Update Agent:
wuauclt /detectnow– Scans for available updateswuauclt /updatenow– Installs the available updateswuauclt /detectnow /updatenow– Combines both the processes above

Microsoft didn’t exactly create the WUAUCLT.exe and UsoClient.exe tools for end users. So you won’t get any additional information for whether the commands are actually running when you use them on the Command Prompt. The Prompt will show that these commands have finished running even when they are still operating in the background.
You have to estimate the time it may take and wait until then. So, instead of this method, we recommend using Windows PowerShell as you can get more detailed information during the process.
Using PowerShell
Windows PowerShell is a very powerful Windows CLI with which you can do everything that Command Prompt allows and many more. Naturally, you can use it to run windows updates. Here’s what you need to do:
- Press Win + R to open Run.
- Type
powershelland press Ctrl + Shift + Enter to open the Elevated PowerShell. If you use PowerShell 7, you can open it by enteringpwshinstead ofpowershell - Enter the command below to download and install the Windows Update Module, which you need to run the actual commands for updating Windows:
Install-Module PSWindowsUpdate
- On the prompts, type
Yand press Enter. - After installing it, enter the following update commands to perform the corresponding actions:
Get-WindowsUpdate– Scans for available updates and displays themInstall-WindowsUpdate– Downloads and installs all the available updatesGet-WindowsUpdate -AcceptAll -Install -AutoReboot– Downloads and installs all the available updates while automatically rebooting the PC after the installation if necessary.Get-WindowsUpdate -Install -KBArticleID 'KB5017859'– Install the KB5017859 update. You need to replace the update ID ‘KB5017859’ with the KB Article ID of the available updates from theGet-WindowsUpdatecommand.


Using Visual Basic Script
While the above command line methods can run Windows Update, they are not interactive and user-friendly. Microsoft’s platform contains some Visual Basic Script (VB script) to run an interactive update process from the CLI, especially as a sample for developers. However, you can also use this script for your purpose.
- Open Run and enter
notepadto launch this text editor.
- Then, open a web browser and go to the following Microsoft pages depending on whether you want to install a particular update or all updates at once:
- All Available Updates
- Specific Updates
- Copy the script from the page to the notepad you just opened.
- Press Ctrl + S to save the file.
- Set Save as type to All files and File name to
UpdateInstall.vbs. You can use any name, but remember to use the.vbsextension. - Save it on any location by navigating there and clicking on Save.

- Then, open the Elevated Command Prompt.
- Enter the following command while replacing the path:
cscript “<Path to the folder>\UpdateInstall.vbs”
- You can also right-click on the script on your file explorer and select Copy as path. Then, paste it after typing
cscriptand the space to avoid manually typing the full path. - Then, follow the on-screen instructions on the CLI.


As you know, one of the most highlighted features of Windows 10 is Windows Updates. It was offered to the customers as a service rather than a product with the release of Windows 10 under the scenario of Software as a Service which led to Windows Updates being set by default on Windows 10 and without an option for any users to disable it. Although not all users are happy with what Microsoft did, this is an ultimate step towards the greater good of all its customers since Windows Updates helps users in keeping their computers secured against all kinds of threats as well as provide them with the greatest and latest updates from Microsoft. So if you are one of those users who approved of the Windows Updates service, then read on as this post will guide you in running Windows Updates from Command Line either via Command Prompt or Windows PowerShell. For the complete set of instructions, refer to the options given below.
Option 1 – Run Windows Update via Command Prompt
Command Prompt in the Windows operating system exists for a very long time now compared to the comparatively new Windows PowerShell. That’s why it has similar capabilities to run Windows Updates. However, the highlighting point here is that you don’t have to download any module for Windows Updates. To get started running Windows Updates using Command Prompt, refer to the steps below.
- First, type “cmd” in the Cortana search box, and from the search results, right-click on Command Prompt and select the Run as Administrator option to open it with Administrator privileges.
- If a User Account or UAC prompt appears, just click on Yes to proceed.
- Next, type in the commands listed below, and don’t forget to tap Enter right after you type each one of them.
- UsoClient StartScan – use this command to start checking for updates.
- UsoClient StartDownload – use this command to start downloading updates.
- UsoClient StartInstall – use this command to start installing the downloaded updates.
- UsoClient RestartDevice – use this command to restart your computer after you install.
- UsoClient ScanInstallWait – use this command to check, download and install updates.
Note: Keep in mind that the commands in Command Prompt listed above are only meant for Windows 10. On the other hand, if you are using an older Windows version, you can try using the following commands instead:
- wuauclt /detectnow – use this command to start checking for updates.
- wuauclt /updatenow – use this command to start installing the updates detected.
- wuauclt /detectnow /updatenow – use this command to check, download and install updates.
Option 2 – Run Windows Updates via Windows PowerShell
If you run Windows Updates in the Windows PowerShell, it will require you to install the Windows Update module manually. Hence, you have to get the Windows Updates downloaded and install Windows Updates.
- Search for PowerShell in the Cortana search box and then run it with administrator privileges.
- Once you’ve opened the Windows PowerShell, type the following command and hit Enter.
- Install-Module PSWindowsUpdate – use this command to install the Windows Update module for Windows PowerShell.
- Get-WindowsUpdate – use this command to connect to the servers of Windows Update and download the updates if found.
- Install-WindowsUpdate – use this command to install the Windows Updates you’ve downloaded to your computer.
Do You Need Help with Your Device?
Our Team of Experts May Help
Troubleshoot.Tech Experts are There for You!
GET HELP
Troubleshoot.Tech experts work with all versions of Microsoft Windows including Windows 11, with Android, Mac, and more.
Share this article:
You might also like
If you are using the Camera app on your Windows 10 computer but encountered an error code 0xa00f429f with an error message that says, “Can’t start your camera”, read on as this post will guide you in fixing this problem. This kind of error in the Camera app could be due to a recent update gone wrong or it could also be due to a corrupted driver. If you are certain that the camera is connected and is properly installed, you can try to check for updated drivers.
The error code signifies that the drivers have to be updated. However, that isn’t always the case sometimes as the problem could also have something to do with corruption in the driver. The effective ways to troubleshoot this problem would be trying to reinstall or reset the Windows Camera app, or update, rollback or uninstall some device drivers as well as use the Registry Editor. Before you proceed with the instructions provided below, make sure that you have admin privileges and don’t forget to create a System Restore point.
Option 1 – Try to reset or reinstall the Windows Camera app
As pointed out earlier, you can also reset the Camera app to fix the error. To do so, follow the steps below.
- The first thing you have to do is go to the My Pictures folder under the C: drive of the File Explorer and then delete the Camera Roll folder.
- Once you’re done, right-click on an empty area on your screen and create a new folder and name it “Camera Roll”.
- Then from the Start menu open the Settings app and select System.
- From there, navigate to the Apps and features section.
- Now go to Camera and click on the Advanced Options and click the Reset button.
Option 2 – Try to reinstall the Camera app
If resetting the Camera app didn’t help, you might want to reinstall it by following these steps:
- Tap the Win + X keys and select the “Windows PowerShell (Admin)” option from the menu to open Windows PowerShell as admin.
- Next, type this command to uninstall the Camera app: Get-AppxPackage *camera* | Remove-AppxPackage
- Once done, exit the Windows PowerShell and restart your computer and then try to install the latest version of the Camera app from Microsoft Store.
Option 3 – Try to rollback, update or disable drivers
The next thing you can do to fix the error code 0xa00f429f in the Camera app is to roll back, or update, or disable device drivers. It is most likely that after you updated your Windows computer that your driver also needs a refresh. On the other hand, if you have just updated your device drivers then you need to roll back the drivers to their previous versions. Whichever applies to you, refer to the steps below.
- Open the Devices Manager from the Win X Menu.
- After opening the Device Manager, look for the device drivers which have a yellow exclamation mark.
- Then right-click on each one of them. If you haven’t updated this driver in a while, select the “Update Driver” option. On the other hand, if you’ve just updated this driver, then select the Uninstall Device option.
- Next, follow the screen option to update or uninstall it.
- Finally, restart your computer. It will just reinstall the device drivers automatically if you have chosen to uninstall them.
Note: You can install a dedicated driver on your computer in case you have it or you could also look for it directly from the website of the manufacturer.
Option 4 – Try to use the Registry Editor
- Tap the Win + R keys to open the Run dialog box and type “Regedit” in the field and then hit Enter to open the Registry Editor.
- Next, navigate to this registry key: ComputerHKEY_LOCAL_MACHINESOFTWAREWOW6432NodeMicrosoftWindows Media FoundationPlatform
- From there, right-click on any empty space on the right side part of the window and select New > DWORD (32-bit) Value.
- Then name it as “EnableFrameServerMode” and double click on it.
- Now set its value data to “0” and its base value as Hexadecimal and then click on OK.
- After that, restart your computer and see if it helped in fixing the problem or not.
Read More
Minecraft has taken the world by the storm, it was an indie project game and it went mainstream. Dream of every game developer I guess. The dream of every gamer on the other hand is to double click on the game and to play it and not to deal with various issues, especially if they are launch issues.
Luckily for all of you gamers, here at errortools we game as well and we are happy to bring you a solution on how to fix Minecraft won’t launch issue. So sit back, relax and keep on reading, and hopefully enough you will be gaming again in no time.
Follow the guide presented step by step, point by point how it is presented for the quickest way to get back in Minecraft. This guide also presumes that your hardware configurations meet at least the minimum system requirements for running Minecraft.
-
Disable antivirus and firewall
90% of the time this is the issue why Minecraft is not working, your antivirus or firewall has detected it as a false positive, and access to system internet, etc has been cut. Try disabling it and if everything is working fine add it to the antivirus or the firewall exception list.
-
Run Minecraft as admin
Minecraft will sometimes refuse to run if it does not has administrator privileges. To make sure this is the case locate the Minecraft executable, right-click on it and choose properties. Go to the compatibility tab and check Run as Administrator box.
-
End Minecraft process
It came to knowledge that even if Minecraft is not running it can have its processes active in the background.
Press CTRL + SHIFT + ESC to open task manager
Locate if Minecraft has a process running
If you find the Minecraft process right-click on it and choose End Task -
Run Minecraft in compatibility mode
If Minecraft still refuses to start try running it in compatibility mode in the previous Windows version
Locate Minecraft executable file in its install location
Right-click on it and choose properties
In the properties, windows go to the compatibility tab
Check run this program in compatibility mode for:
Select previous version of the operating system, try Windows 8 or Windows 7 -
Update graphic card driver
The best bet is to go to your GPU manufacturer’s website and download the latest version of the driver of your GPU.
-
Remove mods, plugins, texture packs
Mods, plugins, texture packs are all great but sometimes they can cause GPU overloads and other issues to see if this is the case try running Minecraft in Vannila mode without anything installed, just pure and clean Minecraft as it was just downloaded and installed.
-
Reinstall Minecraft
If everything else failed, reinstall Minecraft. There might be a chance that some DLL file was deleted or corrupted by mistake or that some crucial files are missing. Clean reinstallation will fix all of these issues.
Read More
As you know, the NVIDIA Control Panel is the central control panel for all devices that run the graphics drivers manufactured by NVIDIA. This control panel comes bundled with the drive package itself which is why there is no need for users to download it or update it separately. However, recently, some users reported that when they tried to make changes to the configuration in the NVIDIA Control Panel, they were unable to do so and encountered an error message instead saying, “Access denied. Failed to apply selected settings to your system”. If you also got the same error message, then you’ve come to the right place as this post will walk you through fixing this error in the NVIDIA Control Panel.
There are several suggestions given in this article to fix the error. You can try to run the file named “nvcplui.exe” as an administrator or restore the most recent version of the folder where the aforementioned file is located. You could also try to restart NVIDIA’s process or restart the NVIDIA Display driver service or update the NVIDIA drivers in your computer. For more details, refer to each one of the options given below.
Option 1 – Try running the nvcplui.exe file as an administrator
- Tap the Win + E keys to open File Explorer and navigate to this path: C:/Program Files/NVIDIA Corporation/Control Panel/Client
- After that, look for the exe file and right-click on it, and then select the Run as administrator option.
- Next, select Yes if a User Account Control or UAC prompt appears.
Option 2 – Try to restore the most recent version of the folder
The next thing you can do to fix the error is to restore the most recent version of the folder where the nvcplui.exe file is located. Keep in mind that this option is tricky so you have to be careful.
- Tap the Win + E keys to open File Explorer.
- Next, navigate to this path: C:/ProgramData/NVIDIA DRS
- From there, right-click on the DRS folder and select Properties.
- After that, go to the Previous Versions, System Protection, or System Restore tab in the Properties window.
- Now restore the most recent version of the contents inside that folder. This will revert the old working configuration of DRS.
Option 3: Restart the process of the NVIDIA Control Panel
- Tap the Ctrl + Shift + Esc keys to open the Task Manager.
- After opening the Task Manager, look for the process named NVIDIA Control Panel Application.
- Once you found it, expand it and right-click on the NVIDIA Control Panel sub-process, and click on End Task.
- Now try opening the NVIDIA Control Panel from the Start Menu and see if it now works fine or not.
Option 4: Restart the NVIDIA Display Driver Service
- Tap the Win + R keys to open the Run dialog box.
- Then type “services.msc” in the field and hit Enter to open the Windows Services Manager.
- After opening the Services window, you will see a list of services. From there, look for services named “NVIDIA Display Container LS” and double click on it to open its Properties.
- Now make sure that the service is Started. If it isn’t, you need to start it, otherwise, you need to Stop it and Start It again. You also have to make sure that the Startup Type is set to Automatic.
- Do the same for the NVIDIA LocalSystem Container service.
- Restart your computer and check if the problem’s fixed.
Option 5– Try updating the drivers from the official site of NVIDIA
If both the first and second given options didn’t work, you can also try updating the drivers from the official NVIDIA website. And in case you don’t know the type of Nvidia graphics card that your computer is on, follow the steps below:
- Tap the Win + R keys to open the Run dialog box.
- Next type in “dxdiag” in the field and click OK or hit Enter to open the DirectX Diagnostic Tool.
- From there, you can see what type of Nvidia graphics card that your system is on.
- Take note of your graphics card information and then look for the best drivers for your operating system. Once you’ve downloaded and installed the file, restart your PC.
Read More
If you are not able to access the Windows 10 Advanced troubleshooting options within Windows then you’ve come to the right place as this post will guide you on how you can repair or boot the Windows 10 installation without losing data using the bootable installation USB or DVD media. To repair or boot Windows 10 using the installation media, you have to download the Windows ISO, create a bootable USB or DVD drive, boot from the media and select “Repair your computer” and then select Startup Repair under Advanced troubleshooting. To get started, follow the given steps below carefully.
Step 1: Frist, download the Windows ISO.
Although this is not necessarily needed, it’s still better if you download the Windows ISO first so make sure that you download the same ISO version as installed on your computer.
Step 2: Next, create a bootable USB or DVD drive.
- Insert your USB drive into your PC.
- Tap the Win + R keys to open the Run dialog box and type in “cmd” and tap Enter to open the Command Prompt. Alternatively, you can also search for “cmd” in the Cortana search box to open Command Prompt.
- Once you’ve opened CMD, type in this command to open the DISPART utility – diskpart
- After that, you should see a new black and white window that would say, “DISKPART>”.
- Next, type in “list disk” in the command line and tap Enter to see the list of all the Storage devices as well as your hard disk connected to your PC. Here, you have to identify your disk’s number.
- Type in this command where “X” is the disk number you have identified and then tap Enter – disk X
- Type in this command and hit Enter to clear the table records and all the visible data on the drive – clean
- Now you have to recreate a new primary partition of the drive so you’ll have to type in this command and tap Enter right after – create part pri
- A new primary partition has been created so you have to select it by typing this command and tapping Enter – select part 1
- Now you have to format it to make it visible to normal users by typing – format fs=ntfs quick
Note: If your platform supports the Unified Extensible Firmware Interface or UEFI, replace the “NTFS” with “FAT32” in the command on Step 10.
- After that, type in this command and tap Enter after – active
- Finally, type this command and hit Enter to exit the utility – exit
- After you prepare the image for the operating system, save it to the root of your USB Storage device.
Step 3: After creating a bootable drive, boot from the media and select the “Repair your computer” option.
Once you boot from the USB drive, it will start the Windows 10 installation right away. So you must not keep on clicking Next as you will end up installing Windows. You need to look for the “Repair your computer” link on the first installation screen and click on it and then boot your computer into Advanced Recovery.
Step 4: Select Startup Repair under the Advanced options screen
- Once you’re at the Advanced Recovery screen, select Advanced Options and select Troubleshoot.
- After that, look for the Startup Repair and click on it and then follow the next on-screen instructions. This solution will help you fix issues that do not allow you to boot into your computer.
- On the next screen, you will see the admin account with its name. Click on it and verify using the account password associated with the email.
- After verification, it will start to diagnose your computer and automatically resolve any detected issues related to boot.
- After the issue is fixed, your computer should reboot normally and you should now be able to use it. Note that your personal files are still intact since the process didn’t delete or wipe them out.
Read More
If you are using a Windows 10 PC that has different processors clubbed together, chances are you might encounter an error saying, “MULTIPROCESSOR CONFIGURATION NOT SUPPORTED” during a Windows upgrade or software installation.
This error is actually caused by a bug check with a value of 0x0000003E. This error also indicates that the processors in your computer are asymmetric in relation to one another. So if you want to upgrade you need to have all the processors of the same type and level. But worry not for this guide will help you in fixing this error.
The MULTIPROCESSOR_CONFIGURATION_NOT_SUPPORTED error can occur in several cases such as during an installation of Windows 10, or when the driver is loaded, or when Windows Start or Shutdown and the chances of you getting a blue screen is very much high. To fix this error, refer to the options given below and make sure to follow them carefully.
Option 1 – Try to disable the Hyper-Threading in your BIOS
Hyper-Threading in the BIOS lets a processor (multi-threaded) run various tasks in a simultaneous manner. To disable this, here’s what you have to do:
- Restart your computer and boot into it right after. To do that, tap the F2 key.
- Once you’re in the BIOS, locate the Hyper-Threading option which should be located under the Performance section along with other options like Multi-core support, Rapid Start technology, and many more.
- Disable Hyper-Threading and then make sure to save the changes and exit BIOS.
Note: Although Hyper-Threading is only used when necessary, there are some OEMS that don’t have the option to disable it and if that’s the case, you need to try other options given below.
Option 2 – Try to disable the Virtualization in the BIOS
Virtualization in the BIOS allows users to run a single physical resource such as the server or storage device to appear that it is running as multiple logical resources. It is also properly termed as “HYPER-V”. To disable it, refer to these steps:
- Boot into the BIOS as you did earlier.
- Then look for the Security options.
- After that, from Security options, look for Virtualization Technology or VTX among the options given.
- Then turn it off and restart your computer.
Note: Although Windows 10 offers features such as the Device Security for Core Isolation and Memory Integrity, if you turn them off at the software level, it will not help at all. If you’re able to resolve the error, you can do some further research and see what software or hardware you can use to further help you.
Option 3 – Try checking if there are any BIOS updates available for your PC
Updating the BIOS may help you resolve the MULTIPROCESSOR CONFIGURATION NOT SUPPORTED error. You can just go to the OEM’s website as they offer utility software that can download BIOS firmware and update it without any problem. BIOS updates usually offer enhancements and fixes to some issues like this one.
Read More
Steam is one of if not the largest online store for the digital distribution of games on the PC platform. The game gets downloaded to your PC when you are planning to play it and its saves are synched in the Steam cloud. They get automatically downloaded when you install the game but you can also get your saves by directly downloading them from Valve’s website in your browser.
If Steam isn’t automatically downloading your old save games after you install a game, ensure Steam Cloud is enabled for that game within Steam.
Locate the game in your Steam library, right-click it, and then select Properties. Click the Updates tab and ensure the Enable Steam Cloud synchronization option is checked for the game. If this option isn’t checked, Steam won’t automatically download your cloud saves.
If you don’t see a Steam Cloud option for a game here, that game doesn’t support Steam Cloud. Not all games on Steam do, it’s up to each game developer.
Download the Files in Your Web Browser
Valve lets you download your Steam cloud save files via a web browser, too. You can download just your saved files without re-downloading the entire game.
To find your saved files, visit Valve’s View Steam Cloud page in your web browser and sign in with your Steam account. You’ll see a list of games using your Steam Cloud storage. Locate the game in the list and click Show Files to see all the files for a game. Each game has a page showing all the files it’s storing in Steam Cloud, as well as the date they were modified. To download a file, click Download. Download all the save files for your game, and you’ll have a copy of its save games. This feature is especially useful for multi-platform games that don’t automatically synchronize save files between platforms.
Read More
If your operating system cannot or is not able to load a required DLL file on your Windows startup and you encounter a message saying, “Failed to load DLL”, then you’ve come to the right place as this post will guide you in fixing this problem.
When you encounter this kind of issue, you will see either of the following error messages on your screen:
“The dynamic library dll failed to load.”
“Failed to load dll library.”
This kind of error can occur when your Windows operating system fails to locate the DLL library which the system needs to access during startup. It can also occur when the DLL file is not in a directory specified in the path or when the DLL file is corrupted or has gone missing. Moreover, you can also encounter this error if the DLL file is infected with some malware. Whatever the case is, here are some suggestions you have to check out to resolve the problem.
Option 1 – Try to reinstall the program
The first thing you can do is to reinstall the program that’s giving you this error. Once you’ve uninstalled the program, download its latest setup file from its official site and then install it again.
Option 2 – Try checking the startup programs
You might also want to check the startup programs on your computer, especially the Windows Registry startup paths, and then remove the startup entry to the concerned DLL file.
Option 3 – Try to re-register the problematic DLL file
You may have to re-register the ntdll.dll file using the regsvr32.exe before you can successfully install the program and fix the ntdll.dll file crash error. The Regsvr32 tool is a command-line utility that can be used to register and unregister OLE controls like DLL and ActiveX (OCX) control in the Windows operating system. Follow the steps below to use it.
- Open Command Prompt as admin from the WinX menu.
- Next, type the following commands in the elevated Command Prompt and hit Enter to execute the command. This will re-register the affected DLL file using the Windows operating system tool, regsvr32.exe.
- exe /[DLL file]
- exe [DLL file]
Note: Replace “[DLL file]” with the name of the DLL file that was pointed out in the error.
- After you execute the given commands, you should see a message saying, “DllRegisterServer in vbscript.dll succeeded” if the Regsvr32 tool was able to run successfully. After that, try to install the program again and see if it now works.
Option 4 – Try to replace the DLL file with a trusted source
- First, you need to get the new DLL file from another computer with preferably the same file version number.
- After that, you need to boot your PC into Safe Mode and navigate to the paths listed below and then replace the file using a USB drive or other external storage devices.
- x86: This PC > C:/Windows/System32
- x64: This PC > C:/Windows/SysWOW64
- Next, type “cmd” in the Cortana search box and right-click on Command Prompt, and select “Run as administrator” to open it with administrator privileges.
- Now type the “regsvr32 ntdll.dll” command and hit Enter.
- Restart your PC and check if the error is now fixed.
Option 5 – Try checking the details in the Event Viewer
Checking the details in the Event Viewer can also help you find out the root cause of the problem as the Event Viewer usually contains detailed information about the error.
Option 6 – Try running the DISM tool
You might want to repair potentially corrupted files in your system as having them could also trigger the “Failed to load DLL” error. To repair these corrupted system files, you can run the DISM commands:
- Tap the Win + X keys and click on the “Command Prompt (Admin)” option.
- After that, input each one of the commands listed below sequentially to execute them:
- Dism /Online /Cleanup-Image /CheckHealth
- Dism /Online /Cleanup-Image /ScanHealth
- Dism /Online /Cleanup-Image /RestoreHealth
- Once you’ve executed the commands given above, restart your computer and check if the “Failed to load DLL” error is now fixed.
Option 7 – Try scanning your computer using Windows Defender
The DLL file might also be infected with malware or virus and to eliminate it which could explain why you’re getting the “Failed to load DLL” error. Thus, you have to scan your computer using security programs like Windows Defender.
- Tap the Win + I keys to open Update & Security.
- Then click on the Windows Security option and open Windows Defender Security Center.
- Next, click on Virus & threat protection > Run a new advanced scan.
- Now make sure that Full Scan is selected from the menu and then click the Scan Now button to get started.
Read More

In Windows 11 by default inside the Start menu, there is recommended section that contains recently opened folders, documents, and files. If you do not wish this section and do not want recent items in your Start menu there is an easy way to turn it off.
- Press ⊞ WINDOWS + I to open settings
- Click on Personalization
- On the right side scroll down and click on Start
- Click on the switch beside Show recently opened items in Start, Jump lists, and File Explorer
- Close settings
Settings will be automatically applied and there will be no more recommended items inside your Start menu to create clutter, it will be nice and clean.
Read More
Speech Recognition is a technology used to control computers using voice commands. Through this feature, you can say commands that your computer will respond to, and aside from that, you can also dictate text to your computer which eliminates the need to type words in any word processing program or text editor. All in all, the Speech Recognition feature allows you to communicate with your computer and improves your computer’s ability to understand your own voice better as well as improve its diction accuracy. However, before you can improve its accuracy, you need to “train the feature” first. And if so far you are not satisfied with its performance, you actually have the option to disable it. So in this post, you will be guided on how you can disable the Speech Recognition feature in Windows 10 v1809.
To disable Speech Recognition on your computer, follow the steps below.
Step 1: Go to Settings > Ease of Access.
Step 2: From there, go to Speech.
Step 3: Now switch off the toggle button for Speech Recognition to disable this feature.
On the other hand, you can also disable the Online Speech Recognition feature if you really don’t want to have anything to do with it. You have two options to do that – you can either do it using Settings or using the Registry Editor.
Disable Online Speech Recognition feature via Settings:
- Click on the Start button and select Settings.
- Next, go to the Privacy section and click on the Speech option located at the right pane.
- Then switch the toggle button off to turn off the Online Speech Recognition feature.
Note: Speech services exist on your computer and even in the cloud since Microsoft collects essential information from these services in order to enhance user experience and if you want to stop this, you have to turn off the “Getting to know you” option under the “Inking and typing Personalization” section.
Disable Online Speech Recognition feature via Registry Editor:
Before you proceed, you need to create a System Restore Point first.
- Tap the Win + R keys to open the Run dialog box.
- Then type “Regedit” in the field and hit Enter to open the Registry Editor.
- Next, navigate to the following registry path:
HKEY_CURRENT_USERSoftwareMicrosoftSpeech_OneCoreSettingsOnlineSpeechPrivacy
- After that, check the default value of the “HasAccepted” key located in the right pane. As you can see its value is set to “1” which means that the Speech Recognition feature is enabled. And so to change it, you have to set “0” as its new value to permanently disable the feature.
- Just double click on the key and change the value from “1” to “0”. Keep in mind that even if you are using a 64-bit Windows 10 computer, you still have to create a 32-bit DWORD value.
- After that, restart your computer to apply the changes made.
Read More
Did you know you can use emoji in file names inside Windows 10?
It is no secret that emojis are basically everywhere and Microsoft has seen this and integrated them into Windows itself, so you can name files using emojis or combine them with text.
Placing emojis in file names or in the text is extremely easy, all you have to do is press ⊞ WINDOWS + . and the emoji dialog will open from where you can find which emoji you would like to use.
And that’s it, you just used emoji for the file naming.
!!!NOTE!!!
In theory, some applications may not like these emojis if they don’t support Unicode characters. However, modern applications are designed to work with a broad set of languages that should properly support emojis.
For example, the classic Windows Command Prompt can’t see emoji characters in file names properly, but both PowerShell and Microsoft’s new Windows Terminal can display them properly.
If you do run into a problem, you can always open File Explorer and rename the affected files and folders to remove the emoji characters. You can then use those files in applications that don’t properly support emoji file names.
Read More
Copyright © 2023, ErrorTools. All Rights Reserved
Trademark: Microsoft Windows logos are registered trademarks of Microsoft. Disclaimer: ErrorTools.com is not affiliated with Microsoft, nor claims direct affiliation.
The information on this page is provided for information purposes only.
Run Windows Update From Command Line (Windows 10/11). In this guide, we will introduce Windows update, its type then show you different method to run Windows update via command line.
What is Windows Update?

Windows Update is a free service from Microsoft that helps keep your computer up to date with the latest security and software updates. When you install new software, Windows Update automatically checks for and downloads any available updates. Also check manually for updates from the Windows Update Control Panel.
Here with Windows Update is a service that was first introduced with Windows Vista, and it has been included in every version of Windows since then. It provides users with the option to install various updates and new features on their systems.
The concept behind this service is simple: when you want an update, instead of searching online for files or downloading them yourself, you can simply click on the “Check for Updates” button on your system.
Types of Windows Updates
Well, with Windows updates are used to update drivers for hardware devices as well as patches and other security areas to prevent malware and malicious attacks. There are various types of Windows Updates:
Defender Based Updates
Windows Defender is an integrated security solution that protects you from known and unknown threats. Primarily designed to provide real time protection against viruses, spyware, and other potentially unwanted software, as well as to identify and block attempts at unauthorized access.
Rollup Updates
Rollups include all the security fixes Microsoft releases in one group of updates. This means that you won’t have to install multiple updates if one fails or doesn’t solve your issue. Rollup updates also include non security improvements like reliability improvements, minor feature enhancements, and other fixes that improve the overall performance of Windows 10 on your device.
Service Packs
Service Packs are cumulative updates that include all the latest fixes for a particular Windows release. These updates are released once or twice a year and are installed on any computer running the same Windows release.
The Service Pack is designed to address any security vulnerabilities and bugs that were found in the previous versions of Windows. In addition, it also includes any new features that Microsoft has added to the operating system since the last Service Pack release.
Critical Updates
Critical updates are important for software and hardware compatibility, security, and stability of the computer. These are mostly released to fix problems addressing some of the critical non security related bugs.
Why it is important to install Windows Update?
Simple, the Windows Update is important because it comes with security updates, which means that Microsoft can fix any problems with its software. This makes Windows more secure and keeps you safe from viruses, malware, and other threats.
If you have a virus on your computer and you don’t have the latest version of Windows Update installed then the virus will still be there after the update has been installed. Therefore, if you get a new version of Windows Update then all of your old viruses will be removed automatically.
In short, Windows Update helps protect your computer from specific types of malware by downloading definitions for known viruses, spyware, and other types of malicious software. Without Windows Update enabled, you won’t be able to install updates that contain these files.
Use the Update service to check for newly released patches, but also use it to install new patches and security updates.
What is more, with Windows Update is also useful if you want to install some features built into Windows 7 or 8 (such as BitLocker encryption or virtualization). These features are often installed through other methods (like entering an administrator password), so they won’t show up in the normal list of installed updates if you haven’t used them recently enough.
Overall, these updates are essential to keep Windows up to date with the latest security updates.
We shall do the main part of this article How To Run Windows Update From Command Line (Windows 10/11).
How To Run Windows Update From Command Line (Windows 10/11)

Firstly, install the WuInstall tool to run Windows update via command prompt. WuInstall is a powerful tool that allows you to download and install Windows updates via command prompt.
Download and install WuInstall tool from its official download page. After the installation, open the Windows command prompt in administrative mode.
First, search for the latest updates using the following command:
This command will prints a list of all updates.
To download all available updates to your system, run the following command:
To install all downloaded updates, run the following command:
If you want to install updates without showing anything on the screen, run the following command:
To accept any agreement during update installation, run the following command:
wuinstall /autoaccepteula
If you want to install all updates after the system restart, run the following command:
In some cases, Windows update files get corrupted and you can not download and install the corrupted update files. In this case, you can fix corrupted Windows update using the following command:
dism.exe /Online /Cleanup-image /Restorehealth
After running the above command, you will need to try downloading and installing the updates again.
How to Run Windows Update Via PowerShell (Windows 10/11)

PowerShell provides a simple and easiest way to run update via command line. First, you will need to install the “PowerShell Windows Update module” to run the update.
First, open your PowerShell and run the following command to install the “PowerShell update module”:
Install-Module PSWindowsUpdate
After installing the above module, you see the list of all commands available in the module using the following command:
Get-Command -module PSWindowsUpdate
You should see the following screen:

By default, the above module only install the Windows and driver updates. If want to install updates of other Microsoft product, run the following command:
Add-WUServiceManager -MicrosoftUpdate
Next, allow the execution of scripts on your machine by running the following command:
Set-ExecutionPolicy -ExecutionPolicy RemoteSigned
In this step, download and list all available updates using the following command:
You should see the list of all available updates in the following screen:

To install all Windows update, run the following command:
You should see the following screen:

To install all Windows and other product updates, run the following command:
Install-WindowsUpdate -MicrosoftUpdate
If you want to install a specific Windows Update from the available updates list, use the following command:
Get-WindowsUpdate -KBArticleID "KB-Number" -Install
If you want to install only Driver updates, run the following command:
Install-WindowsUpdate -NotCategory "Drivers","FeaturePacks" -AcceptAll
How to Uninstall Windows Updates via Command Line
First, get a list of all installed updates with the following command:
wmic qfe list brief /format:table
You should see the following screen:

Next, pick any KB number from the above list and run the following command to uninstall it:
wusa /uninstall /kb:Number
Thank you for reading How To Run Windows Update From Command Line (Windows 10/11). We will now conclude.
Run Windows Update From Command Line (Windows 10/11) Conclusion
Summing up, Windows Update has been a part of Windows since its release in 1985 as a way for Microsoft to update its operating system. The idea behind this service was that it would be easier for users to install updates from Microsoft or other vendors, as opposed to having to manually download them from their local computer or placing an order at a retail store.
While the original version of Windows Update was fairly simple, it has evolved over the years into a robust service that allows users to download any available update package directly from Microsoft’s website without having to manually search for it online or install it manually using software like Program Compatibility Wizard.
Lastly, Windows Update is a service that helps keep Windows, apps, and devices up to date with the latest security updates, stability improvements, and feature updates. You can use Windows Update to automatically download updates from Microsoft.
To check out more about Windows content, please navigate to our blog here.